LIGHTSAFE EDL1PT User manual

Lightsafe_EDL1PT_Instructions_Rev01
EDL1PT
Circular Flush 3 Hour Non Maintained LED Emergency Fitting
c/w utomatic Self-Test Function
Please read these instructions before installation and retain for the user/maintenance engineer for
future reference.
IMPORT NT NOTE:
The luminaire must be installed b a skilled electrician and to the most current electrical wiring and
building regulations
This product MUST be earthed and NOT be subject to an electrical insulation test (500/1000v)
which will not be covered b the warrant
The luminaire should not be modified, if modified this will invalidate an warranties and Firesafe will
not be liable for an damages caused
The person carr ing out the installation is to check and verif that the total load on the circuit,
including the rating of the cable, fuse and/or circuit breaker is not exceeded
It is the responsibilit of the installer to consider an fire risks and breach in an fire protection
barriers or partitions, and take the appropriate precautions
Emergenc lighting should be installed and maintained in accordance with BS5266 and BS EN50172
INST LL TION
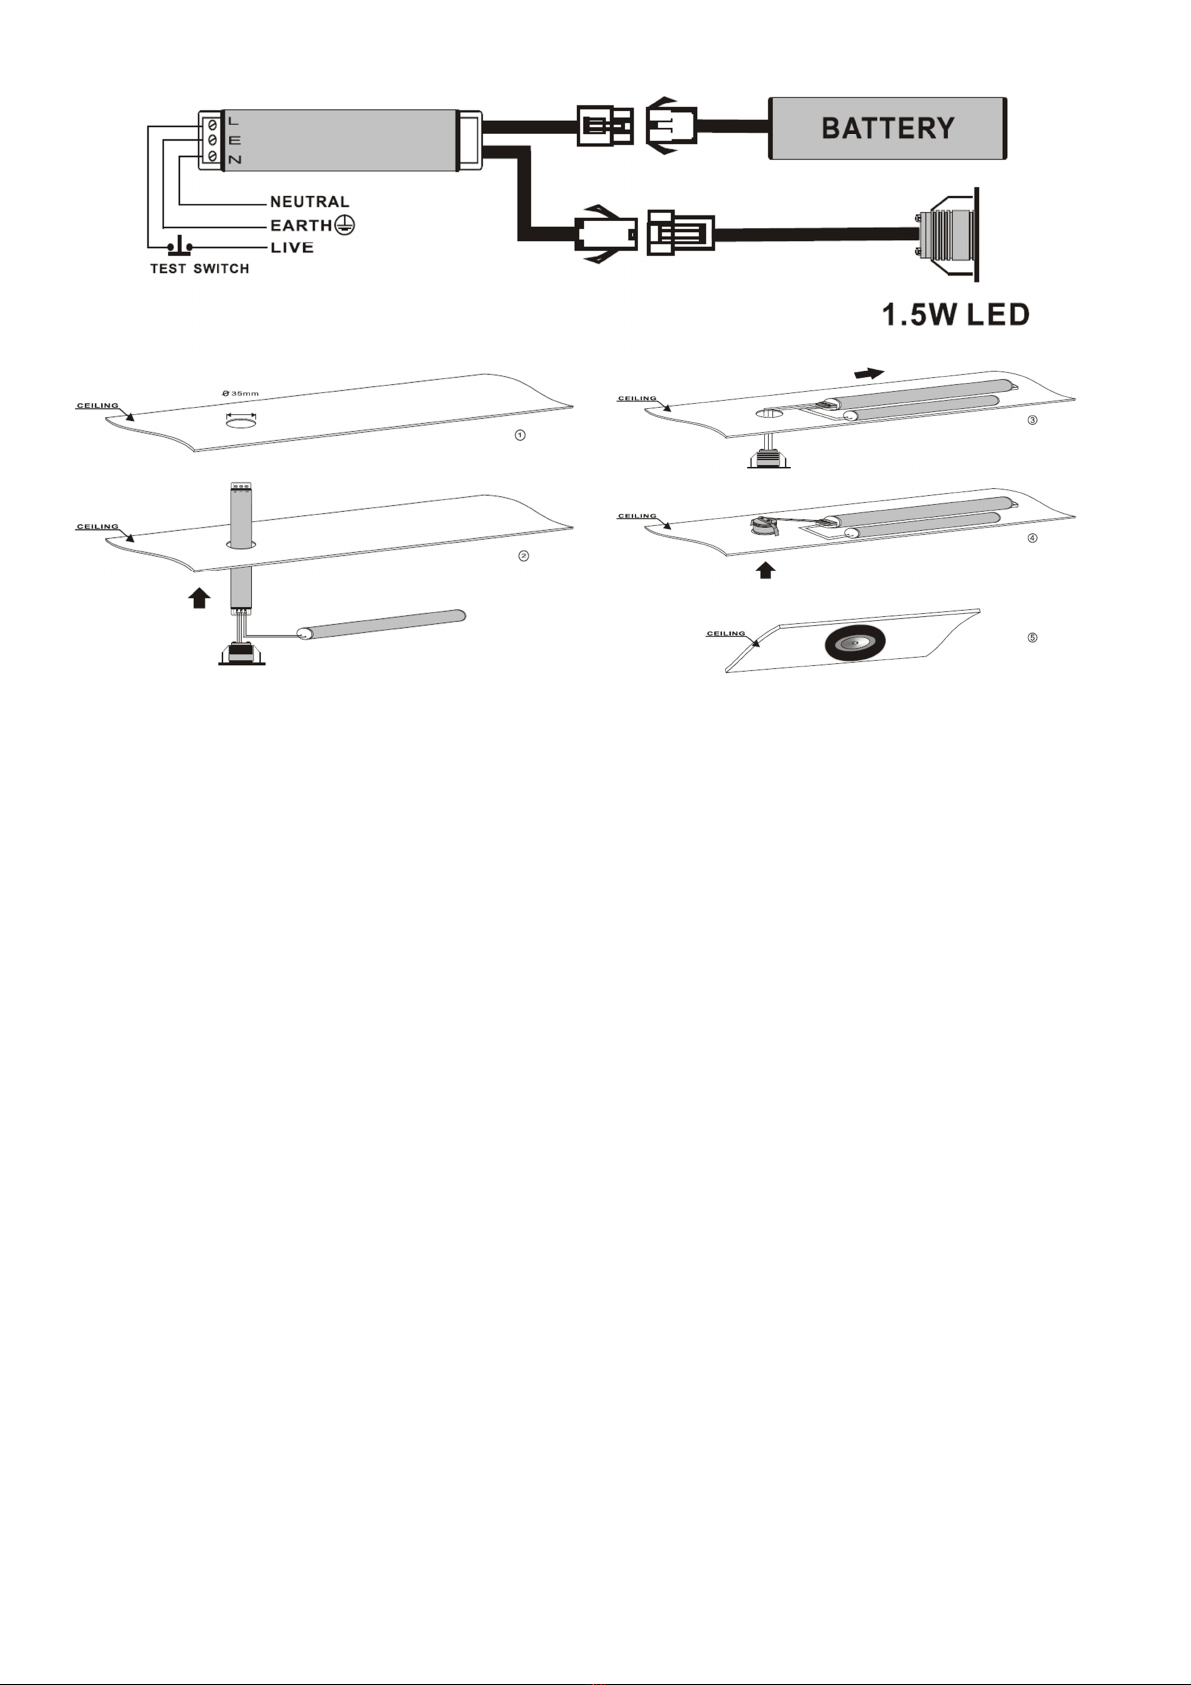
1. The fitting is supplied with two different colour front bezels, to change the LED lamp bezel this can
be unscrewed from the LED lamp unit.
2. Ensure the AC mains suppl is isolated
3. Ensure the correct size hole is made in the ceiling
4. A permanent 230v AC suppl is required to the live (L), Earth and neutral (N) terminals to the driver
pack
5. Connect the suppl cables to the appropriate terminals and ensure no loose strands, also ensure
the cable clamp on the driver adequatel secures and clamps the cable used
6. Ensure there is at least 100mm of free space around the luminaire and no insulation is placed on
top of the luminaire or its associated parts
7. Plug the batter and LED lamp lead to the driver pack ensuring no cables are trapped
8. Restore the mains suppl , the green charge LED should be illuminated
9. Allow 24 hour to charge the batteries and record the installation date in the log book
10. After a 24 hour charge period test the luminaire for a full 3 hour duration and record the date of
the commissioning on the batter pack and log book
11. Subsequent testing should be carried out in accordance with the British/European standards and
recorded in the log book

Lightsafe_EDL1PT_Instructions_Rev01
utomatic Self-Test Function
The luminaire has an integral automatic self-test function.
When the luminaire is connected to a 230v AC suppl the luminaire will perform an automatic test,
monthl and annuall . The first monthl test will be performed approximatel between 16
th
to 30
th
da and the annual test will be between 200
th
to 360
th
da from initial power on.
After the first annual test, the test routine will then be scheduled for ever 30 da s and ever 360 da
for the monthl and annual tests. The luminaire will retain the testing schedule for approximatel 7
da s without a 230v AC suppl (the internal batter still has to be connected).
Please note there is no manual test button on this unit.
utomatic Daily Test
The luminaire checks dail if the batter is connected and that AC mains suppl is present, if both are
present then the LED will be illuminated Green. If the batter is not connected or there is an issue
with the batter then the LED will change from Green to flash Red once ever three seconds. If there
is no 230v AC suppl present the LED will be lit at full brightness in emergenc mode.
Monthly / nnual Test
The luminaire performs an automatic 10 minutes duration self-test ever month and an annual test for
the full 3 hours duration. During the test the LED will be lit at full brightness (similar to emergenc
mode), if the test is satisfactoril then the LED will return to a constant Green state.
If the fitting does not complete the required emergenc duration then the LED will flash Red three
times ever three seconds.

Lightsafe_EDL1PT_Instructions_Rev01
LED Indicator Status
Green LED On: AC mains suppl and batter connected
LED On (full brightness): No AC suppl present, or in monthl or annual test mode
Red Flash Once ever 3 seconds: Issue with the batter during the dail test
Red Flash Twice ever 3 seconds: Fitting failed test - Issue with the light output during auto-test
Red Flash Three ever 3 seconds: Fitting failed test – the batter duration was not achieved during
auto-test
Failed Test / Reset: After a failed test and the fault has been rectified, the 230v AC
suppl to reset the fault and LED indicator status back to green.
Maintenance
Repairs should onl be carried out b suitabl qualified person
Regular cleaning of luminaire should be carried out at regular intervals not onl to ensure good optical
performance but also ensure that dirt does not accumulate to such an extent as to impair the
electrical or thermal safet of the fitting, this should be done with a soft damp cloth, do not use an
chemicals or abrasives
Servicing should onl be carried out after the fitting has been made electricall safe and the batter
disconnected
Light Source Maintenance: the light source of this luminaire is not replaceable; in case the light source
need to be replaced (e.g. at the end of its life), the whole luminaire shall be replaced
TESTING
Ensure the luminaires are tested in accordance with 5266-8 / BS EN 50172
Daily: Ensure the green charge LED is illuminated on each luminaire
Monthly: Simulate a mains power suppl failure, for a period of time sufficient to ensure that each
lamp is illuminated and then recorded in the log book
nnually: Similar test to a monthl but the full emergenc duration of the luminaire should be tested.
Defects: An defects should be noted and recorded in the log book and actioned b a competent
person as soon as possible
Environment:
Please DO NOT dispose of electrical items or packaging as unsorted waste, use the rec cling facilities
provided b our local authorities.

Lightsafe_EDL1PT_Instructions_Rev01
Technical Specification:
Voltage: 230v AC 50Hz
Lamp: 1.5W LED
Wattage: 1.5W
Colour Temp: 6500K
Lumen Output: 117lm
Class: 1
Batter : 3.6V 2Ah NiCad
Emergenc Duration: 3 Hours
Recharge Time: 24 hours
Temp Range: 0℃ - 40℃
Dimensions: PCB housing:φ31x230mm, Batter housing:φ31x149mm,
LED tra :φ45x33mm
Cut Out Diameter: φ35mm
Weight: 342g
IP: IP20
Warranty:
This product is covered b an extended warrant for 2 ears from date of purchase.
Batteries are regarded as a consumable item, and as such, are not covered b the Extended Warrant
periods and are onl covered b a 1 ear warrant .
The extended warrant is available following installation in the UK or Ireland b a competent person in
accordance with the current building and IEE wiring regulations.
For full terms and conditions in regards to our extended warrant please refer to the website.
Due to our polic of continuous improvement we reserve the right to change specification without
prior notice.
Errors and omissions excepted. These instructions have been carefull checked prior to publication.
However, no responsibilit can be accepted b Firesafe for an misinterpretation of these instructions.
LIGHTS FE
Distributed b : FIRESAFE
10 Sandersons Wa ,
Blackpool, FY4 4NB
Email: [email protected]
Web: www.firesafe.co.uk
Part No:
Date:
Date:
Signed Date Signed Date Signed Date Signed Date
1 Short
2 Short
3 Short
4 Short
5 Short
6 Short
7 Short
8 Short
9 Short
10 Short
11 Short
12 Full Duraiton
INST LL TION / TEST
RECORDS
Location:
Installed By
Comissioned By:
FOURTH YE R
MONTH TEST FIRST YE R SECOND YE R THIRD YE R
Table of contents
Other LIGHTSAFE Light Fixture manuals
Popular Light Fixture manuals by other brands

Rush
Rush MH 1 Profile user manual

Lena Lighting
Lena Lighting Crane Cob LED Installation instruction

Sylvania
Sylvania ValueLED 61877 Installation and setup instructions

Cooper Lighting
Cooper Lighting Metalux IA Series Specifications

RAB Lighting
RAB Lighting VX Series installation instructions

ColorKey
ColorKey PartyLight FX user manual

Larson Electronics
Larson Electronics RCL360-LED-40 quick start guide

Eiko
Eiko LLW Series installation instructions

EuroLite
EuroLite LED SLS-6 UV Floor user manual

Blueview
Blueview ANS2-10 manual

Hydrofarm
Hydrofarm Mini Sunburst SBMM100H instructions

Central Machinery
Central Machinery 34102 Assembly and operating instructions