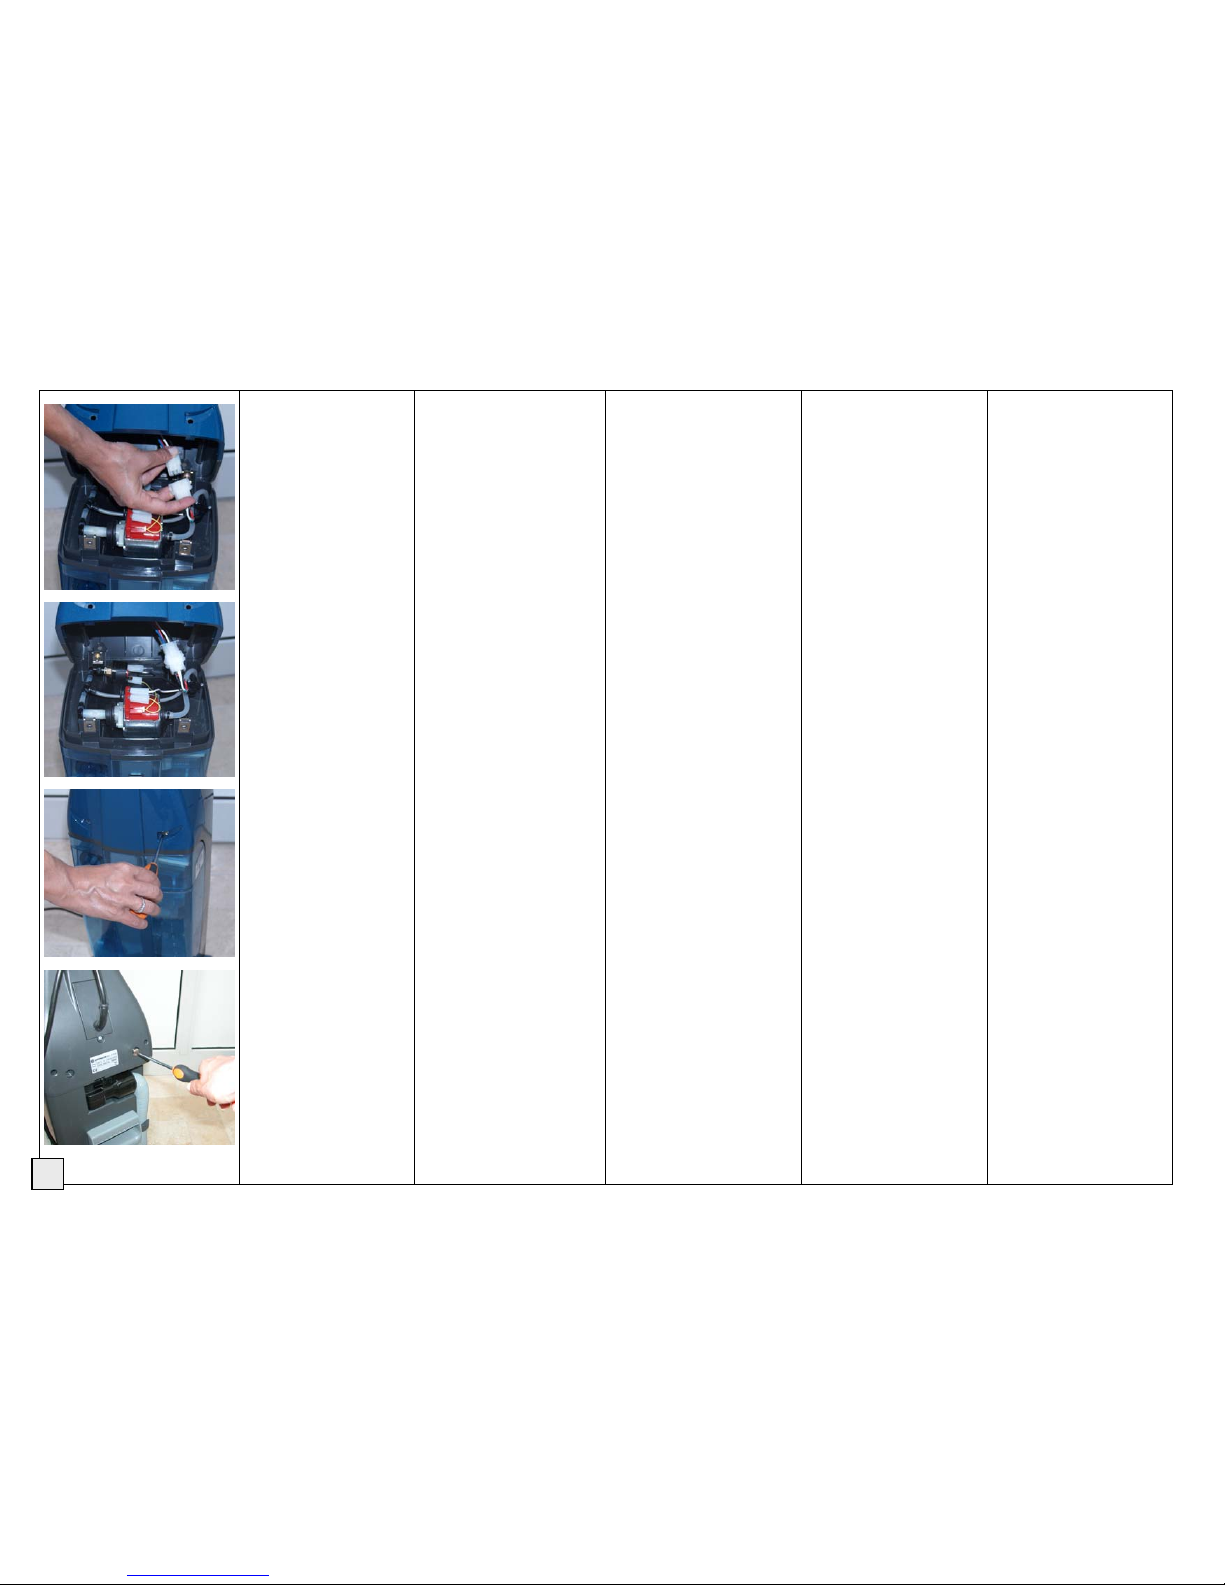
BRUSH HEIGHT
ADJUSTMENT
Your Lindhaus scrubber has
various safety devices to protect
the components from damages due
to overload. The electronic circuit
that activates the red light on the
base indicates that the motor is
overloaded because there is too
much pressure on the brush roll.
If the overload is excessive, the
circuit will switch off the brush
motor and the red light will stay
on.
CORRECT BRUSH PRESSURE
ADJUSTMENT
STEP 1: With the machine ON
and the handle in operating
position, slowly rotate the brush
adjustment knob to the Pos. MAX.
STEP 2: if during the scrobbing,
the red light will turn ON, slowly
turn the knob couterclockwise until
the red light will turn OFF.
NOTE: the adjustment is correct
with red light OFF or intermittent.
Only if the red light is constantly
ON, adjust the brush pressure as
STEP 2.
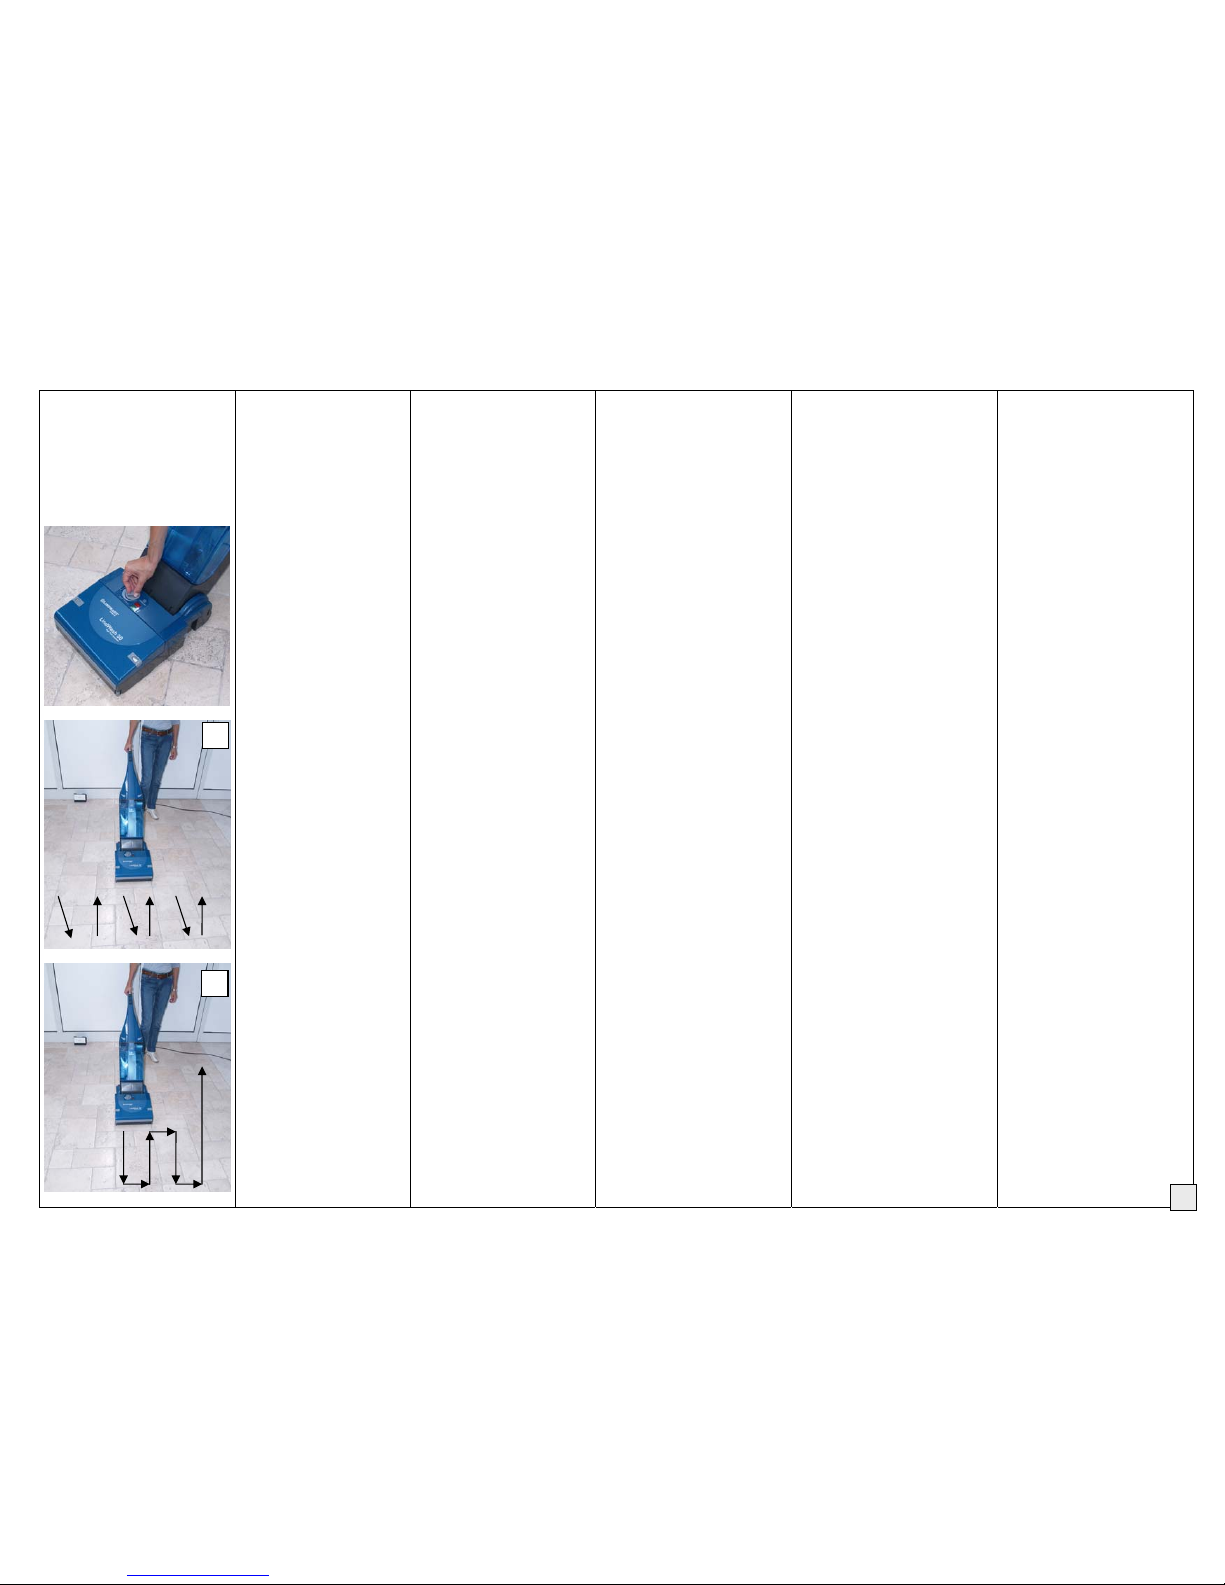
CORRECT USE OF THE
LINDHAUS SCRUBBER
After switching on all the 3
switches, the washing can start
following the direction of the
arrows (picture 1) without resting
on one place with the machine on.
This way the washing and the
drying will be perfect without
leaving wet areas.
In order to save detergent up to
50%, in case of washing of shiny,
delicate and not particularly dirty
floors it is possible to swith on the
pump when going forwards and
switching it off when going
backwards. In case of rough floors,
for outside or hygroscopic like
porous tiles etc. it is advisable to
leave the pump always on.
In case of big surfaces it is
advisable to wash following the
procedure in picture 2.
When the clean water is finished,
switch OFF the pump/electrovalve
to avoid overheating.
DISPOSITIVO PER REGOLARE
L’ALTEZZA
La vs. lava-asciuga pavimenti
Lindhaus ha diversi dispositivi di
sicurezza per proteggere i
componenti da danni dovuti a
sovraccarico. Il circuito elettronico
che mette in funzione la spia rossa
sulla base indica che il motore è in
sovraccarico perché
c’è troppa pressione sul rullo.
Se il sovraccarico è eccessivo il
circuito spegnerà il motore
elettrospazzola e la spia rossa rimarrà
accesa.
CORRETTA REGOLAZIONE
DELLA PRESSIONE RULLO
PASSO :1 con la macchina accesa e
con l’impugnatura in posizione di
lavoro, ruotate lentamente in senso
orario il regolatore fino a
raggiungere la Pos. MAX. per
ottenere la massima efficacia
pulente.
PASSO 2: se durante il lavaggio si
accende la spia rossa, ruotare il
regolatore lentamente in senso
antiorario fino a che la spia si
spegne.
NOTA: la regolazione è corretta con
spia rossa spenta o intermittente.
Solo in caso di spia rossa accesa
fissa, intervenire come da passo 2.
CORRETTO USO DELLA
LAVASCIUGA LINDHAUS
Dopo aver acceso i 3 interruttori,
senza mai sostare su un punto con la
macchina accesa, iniziare il lavaggio
seguendo la direzione delle frecce
(fig. 1) In questo modo il lavaggio e
l’asciugatura saranno perfetti senza
lasciare zone bagnate.
Per risparmiare detergente fino al
50%, nel caso del lavaggio di
pavimenti lucidi, delicati e non
particolarmente sporchi, è possibile
accendere la pompa andando avanti e
spegnerla tornando indietro.
Nel caso di pavimenti grezzi, da
esterni o igroscopici come cotto ecc.
è consigliabile lasciare la pompa
sempre accesa.
Nel caso di grandi superfici è
consigliabile lavarle seguendo
l’andamento indicato in (fig. 2)
Quando finisce l’acqua pulita,
spegnere subito l’interruttore Pompa
o Elettrovalvola per evitarene il
surriscaldamento.
SAUGBÜRSTEN
HÖHENVERSTELLUNG
Ihr Lindhaus Boden Schrubbautomat
hat verschiedene
Sicherheitsvorrichtungen um die
Bestandteile vor Überlastungsschäden
zu schützen. Die Elektronikschaltung,
welche die rote Kontrolllampe auf dem
Fuss betätigt, zeigt an, dass der Motor
überlastet ist, weil die Bürstenrolle
unter zu viel Druck steht.
Falls die Überlastung übermässig ist,
stellt die Elektronikschaltung den
Motor der Elektrobürste ab und die rote
Leuchte bleibt an.
KORREKTE REGELUNG DES
DRUCKS AUF DER
BÜRSTENROLLE
SCHRITT 1: Bei eingeschalteter
Maschine und mit Griff in normaler
Arbeitsstellung, den Regler langsam im
Uhrzeigersinn drehen, bis die Pos.
MAX erreicht ist.
SCHRITT 2: Falls während des
Waschens die rote Kontrollampe
aufleuchtet, den Regler im
Gegenuhrzeigersinn drehen, bis sich
die rote Kontrollampe ausschaltet.
ANMERKUNG: Wenn die rote
Kontrollampe ab und zu aufleuchtet
während die Maschine arbeitet, ist die
Regelung korrekt, wenn sie hingegen
immer anbleibt, regulieren wie Schr. 2.
KORREKTE ANWENDUNG DES
SCHRUBBAUTOMATS
Nachdem alle 3 Schalter eingeschaltet
sind, mit dem Waschen beginnen wie
mit den Pfeilen (Bild 1) gezeigt, ohne
mit der eingeschalteten Maschine an
einer Stelle stehenzubleiben. Auf diese
Weise wird das Waschen und Trocknen
perfekt ohne nasse Stellen zu
hinterlassen. Um bis zu 50%
Waschmittel zu sparen, kann beim
Waschen von glänzenden, heiklen und
nicht besonders schmutzigen Böden
beim vorwärts gehen die Pumpe
eingeschaltet werden und beim
rückwärts gehen ausgeschaltet werden.
Im Falle von groben Böden, für aussen
oder hygroskopisch wie Backstein etc.
ist es empfehlenswert die Pumpe
immer eingeschaltet zu lassen. Bei
grossen Oberflächen ist es
empfehlenswert zu waschen wie in
Bild 2 gezeigt.
Sobald das Reinwasser aufgebraucht
ist, sofort die Pumpe/Elektroventil
ausschalten um Überhitzung zu
vermeiden.
CONTROLE ELECTRONIQUE DE
SURCHARGE
Votre autolaveuse pour sols Lindhaus
LW possède plusieurs dispositifs de
sécurité pour protéger les composants
contre tout danger de surcharge. Le
circuit électronique avec le voyant rouge,
indique que le moteur est en surcharge,
car il y a trop de pression sur le rouleau.
Si la surcharge est excessive, le circuit
arrêtera le moteur de la brosse
électronique et le voyant rouge restera
allumé.
CORRECT REGLAGE DE LA
PRESSION DU ROULEAU
PAS 1: avec la machine allumée et avec
la poignée en position de travail, tourner
doucement le régulateur en sens horaire
jusqu’à atteindre la Pos.MAX pour
obtenir le maximum d’efficacité
nettoyante.
PAS 2: si pendant le lavage le voyant
rouge s’allume, tourner doucement le
régulateur en sens anti-horaire, jusqu’à ce
que le voyant s’éteigne.
REMARQUE: le réglage est correct
avec le voyant rouge éteint ou
intermittent. Seul en cas où il reste allumé
fixe, il faut intervenir comme dans le
pas 2.
CORRECT USAGE DE
L’AUTOLAVEUSE LINDHAUS
Quand le rouleau et en marche, ne jamais
garder la machine arrèté s urun seul point.
La vitesse élevée de la rotation du
rouleau pourrait abbimer les sols délicats.
Après avoir allumer les 3 interrupteurs,
sans jamais s’arréter sur un seul point
avec la machine allumée, commencer le
lavage en suivant la direction des flèches
(fif. !). De cette façon le lavage et le
séchage seront parfaits sans laisser de
zones mouillées
Pour épargner du détergeant jusqu’à 50%,
en cas de lavage de sols non
particulièrement sales, il est possible
d’allumer la pompe en allant en avant et
de l’éteindre en allant en arrière.
En cas de sols mat, d’extérieur ou
igroscopique come cuit etc, il est
conseillé de laisser la pompe toujours
allumée. En cas de grandes surfaces il est
conseillé de les laver en suivant les
instructions indiquées dans la (fig.2)
Quand l’eau propre finit, éteindre tout de
suite l’interrupteur Pompe ou
électrovalve afin d’éviter tout
surchauffage.
РЕГУЛИРОВКА ВЫСОТЫ
ЩЕТКИ
Ввашем моющем пылесосе Lindhaus
есть различные предохранительные
устройства для защиты деталей от
повреждений из-за перегрузки.
Электронная схема, которая
включает красный индикатор на
щетке, указывает, что мотор
работает сперегрузкой, поскольку
вал щетки находится под слишком
большим давлением.
ПРАВИЛЬНАЯ РЕГУЛИРОВКА
ДАВЛЕНИЯ НА ЩЕТКУ
ШАГ 1: Включите машину и
установите ручку врабочее
положение. Медленно поверните
ручку регулировки щетки по
часовой стрелке, пока не загорится
красный индикатор.
Позиция: МАКСИМАЛЬНО
ШАГ 2: Поверните ручку
регулировки щетки против часовой
стрелки, пока красный индикатор не
выключится.
ШАГ 3: Если красный индикатор
включается ивыключается во время
работы, щетка отрегулирована
правильно. Если же красный
индикатор никогда не выключается,
поверните ручку регулировки щетки,
как указано вШАГ 2.
ПРАВИЛЬНОЕ
ИСПОЛЬЗОВАНИЕ МОЮЩЕГО
ПЫЛЕСОСА LINDHAUS
После включения всех трех
выключателей Вы можете начать
мыть, следуя направлению стрелок
на рисунке (рис.1) без остановки при
включенной машине.
Таким образом, уВас будет
идеально вымытый ивысушеный
пол без влажных участков.
Чтобы сэкономить моющее средство
вплоть до 50%, во время мытья
полированных, деликатных ине
очень грязных поверхностей можно
включить насос при движении
вперед ивыключить его при
движении назад. При уборке грубых
поверхностей, наружных или
гигроскопических, например
пористая плитка, мы рекоммендуем
оставлять насос всегда включенным.
При уборке больших площадей, вам
следует мыть полы, как показано на
рис.2
Когда закончилась чистая вода,
ВЫКЛЮЧИТЕ насос/электроклапан,
чтобы избежать перегрева.
1
2
9