manuals.online logo
Brands
  1. Home
  2. •
  3. Brands
  4. •
  5. Lionel
  6. •
  7. Toy
  8. •
  9. Lionel C-420 User manual

Lionel C-420 User manual

Other Lionel Toy manuals

Lionel GG1 User manual

Lionel

Lionel GG1 User manual

Lionel The Polar Express User manual

Lionel

Lionel The Polar Express User manual

Lionel Dash-9 User manual

Lionel

Lionel Dash-9 User manual

Lionel Gingerbread Junction Docksider User manual

Lionel

Lionel Gingerbread Junction Docksider User manual

Lionel 21" Passenger Cars User manual

Lionel

Lionel 21" Passenger Cars User manual

Lionel New York Central Flyer User manual

Lionel

Lionel New York Central Flyer User manual

Lionel C&NW WINDY CITY GP-38 User manual

Lionel

Lionel C&NW WINDY CITY GP-38 User manual

Lionel Single Signal Bridge User manual

Lionel

Lionel Single Signal Bridge User manual

Lionel Rocket Launcher User manual

Lionel

Lionel Rocket Launcher User manual

Lionel Rectifier electric locomotive User manual

Lionel

Lionel Rectifier electric locomotive User manual

Lionel Track Cleaner User manual

Lionel

Lionel Track Cleaner User manual

Lionel Auto Crossing Gateand Signal User manual

Lionel

Lionel Auto Crossing Gateand Signal User manual

Lionel Amusement Park Swing Ride User manual

Lionel

Lionel Amusement Park Swing Ride User manual

Lionel 73-0211-250 BNSF GP38 User manual

Lionel

Lionel 73-0211-250 BNSF GP38 User manual

Lionel 4-8-4 GS-4 Northern User manual

Lionel

Lionel 4-8-4 GS-4 Northern User manual

Lionel 1563W Wabash Freight Set User manual

Lionel

Lionel 1563W Wabash Freight Set User manual

Lionel 726 Berkshire 2-8-4 steam locomotive User manual

Lionel

Lionel 726 Berkshire 2-8-4 steam locomotive User manual

Lionel Strasburg Passenger User manual

Lionel

Lionel Strasburg Passenger User manual

Lionel VISION ATSF 3000 2-10-10-2 User manual

Lionel

Lionel VISION ATSF 3000 2-10-10-2 User manual

Lionel Caboose User manual

Lionel

Lionel Caboose User manual

Lionel 73-0020-250 User manual

Lionel

Lionel 73-0020-250 User manual

Lionel VisionLine 3GS21B User manual

Lionel

Lionel VisionLine 3GS21B User manual

Lionel NW2 User manual

Lionel

Lionel NW2 User manual

Lionel K-LINE EP-5 User manual

Lionel

Lionel K-LINE EP-5 User manual

Popular Toy manuals by other brands

FUTABA GY470 instruction manual

FUTABA

FUTABA GY470 instruction manual

LEGO 41116 manual

LEGO

LEGO 41116 manual

Fisher-Price ColorMe Flowerz Bouquet Maker P9692 instruction sheet

Fisher-Price

Fisher-Price ColorMe Flowerz Bouquet Maker P9692 instruction sheet

Little Tikes LITTLE HANDIWORKER 0920 Assembly instructions

Little Tikes

Little Tikes LITTLE HANDIWORKER 0920 Assembly instructions

Eduard EF-2000 Two-seater exterior Assembly instructions

Eduard

Eduard EF-2000 Two-seater exterior Assembly instructions

USA Trains EXTENDED VISION CABOOSE instructions

USA Trains

USA Trains EXTENDED VISION CABOOSE instructions

Modellbau Laffont Z1601 Assembly instructions

Modellbau Laffont

Modellbau Laffont Z1601 Assembly instructions

NOCH 12905 instruction manual

NOCH

NOCH 12905 instruction manual

Eduard Ki-61-Id quick start guide

Eduard

Eduard Ki-61-Id quick start guide

Viessmann Vollmer 45616 Mounting instruction

Viessmann

Viessmann Vollmer 45616 Mounting instruction

Vollmer 42004 Mounting instruction

Vollmer

Vollmer 42004 Mounting instruction

Phoenix Model CLASSIC-EP instruction manual

Phoenix Model

Phoenix Model CLASSIC-EP instruction manual

H-KING Sopwith Camel British WW1 Fighter instruction manual

H-KING

H-KING Sopwith Camel British WW1 Fighter instruction manual

MODSTER Predator 4x4 Crawler user manual

MODSTER

MODSTER Predator 4x4 Crawler user manual

DHK Hobby 8136 User instruction manual

DHK Hobby

DHK Hobby 8136 User instruction manual

THUNDER TIGER Raptor 50 V2 kit manual

THUNDER TIGER

THUNDER TIGER Raptor 50 V2 kit manual

Timberkits Skateboarder instructions

Timberkits

Timberkits Skateboarder instructions

Hangar 9 Funtana 125 Assembly manual

Hangar 9

Hangar 9 Funtana 125 Assembly manual

manuals.online logo
manuals.online logoBrands
  • About & Mission
  • Contact us
  • Privacy Policy
  • Terms and Conditions

Copyright 2025 Manuals.Online. All Rights Reserved.

Lionel C-420
Diesel Locomotive
Owner’s Manual
Instructions Included to Upgrade
your C-420 with These available Kits,
Railsounds: part No. 6- 22964
Command Control: part No. 6-22960
Electrocouplers: part No. 6-14018
71-8590-250
Rev. 3.1
5/00
LIONEL
I
N
S
T
R
U
C
T
I
O
N
S
H
E
E
T
2
Table of contents
Transformer operations
Running your C-420 with a Lionel transformer 3
Using your C-420’s magnetic coupler 3
Experiencing the range of your C-420’s Signalsounds 4
Your C-420’s 104E reverse units operation 4
Installing the Lionel no. 610-5906-001 sound activation button 6
Maintaining and servicing your C-420
Lubricating your C-420 7
Adding fluid to your Locomotive’s smoke generator 8
Replacing your C-420’s L.E.D. 9
Upgrades to your C-420
Available Railsounds & Command Control Upgrade 10
Railsounds upgrade 11
Your C-420’s Railsounds™system—the basics 12
Notes on Railsounds™12
Experiencing the range of your C-420’s Railsounds™system 13
CommandControl upgrade 14
Coil Coupler upgrade 15
TrainMaster®Command operations
The Command™control environment 17
Running your C-420 in the TrainMaster®Command environment 18
CAB-1 commands for your C-420 18
CAB-1 numeric keypad commands for your C-420 19
Tuning your C-420’s performance 20
Assigning your C-420 a new ID# 21
Reprogramming R2LC circuit boards to restore or change features 22
Notes 23
Lionel Service 24
• Two powerful flywheel equipped can
motors
• Lionel electronic reversing unit
• SignalSounds horn and bell
• Tire-Traction
• Die-cast magnetic couplers
• Illuminated headlights/rear light/
interior light/ditch light
• Upgrade Ready
• Diesel smoke generator
You purchased a tough, durable loco-
motive—the C-420 diesel locomotive
built by Lionel. From the crisp detail and
expert decoration on the outside to the brute
power under the hood, the Lionel C-420 is
ready for duty on your model railroad.
Experience the superiority of today’s Lionel.
Your C-420 is also upgradable to include the
latest Command Control and Railsounds
features
Congratulations!
3
Your Lionel C-420 is
equipped with a front
and rear operating
magnetic knuckle coupler.
Lionel magnetic couplers
react to the magnetic field
generated by a Lionel
remote-control track sec-
tion (available separately).
Place your locomotive’s
coupler trigger disc over the central coil of a
remote-control track section and press
UNCOUPLE on the controller. The magnetic
field pulls the disc downward, and the
knuckle opens.
One operating tech-
nique favored by Lionel
railroaders is the “mov-
ing uncouple.” Press the
UNCOUPLE button as the
C-420 passes over a
remote-control section.
The magnetic field will
open the coupler; the
consist remains behind as the locomotive
moves on. But be careful—the speed of a
newly uncoupled and moving locomotive can
increase dramatically.
Position your C-420’s trigger disc over
the remote-control section, then press
“uncouple.” The coupler opens.
3
3Move ‘em out!
• Get your C-420 moving. Press the DIR button on your CAB-1 remote or
Lionel transformer. This sequences the Lionel 104 E reverse unit to the next oper-
ating state. The 104 E unit alternates between three states: forward, neutral, and
reverse.
• Adjust track voltage until your C-420 moves at your desired speed. To
increase speed, increase track voltage. To decrease speed, reduce voltage. To stop
the locomotive, cut track power.
• See table on page 5 for information on locking your C-420 in a
single operating state
Place your C-420 locomotives on Lionel or Lionel-
compatible O gauge track.
2
2Power up your C-420s with your transformer.
• Your C-420 is designed to operate on 10-16 volts alternating cur-
rent. Virtually all Lionel and Lionel-compatible alternating-current transform-
ers are suitable.
• Do not power your C-420 with direct current (DC). Damage to sensitive
electronic components may occur.
• When you first power up your track, your C-420’s headlights will illu-
minate. At this point, the locomotive is in neutral. This occurs when placing the
C-420 on your railroad for the first time. When your train is first powered up, the
default state will be neutral and the default direction is forward. This means
whenever you power up your engine the engine will remain in neutral, and
when the power is removed and again applied, the train will move forward. This
condition holds true if the engine is being powered up for the first time or if the
engine has been powered down longer than five seconds.
Note!
1
1
Running your Lionel C-420s with a Lionel transformer
Using your C420 Diesel’s magnetic coupler
Transformer operations
4
With SignalSounds, you experience the
sounds of real railroading like never
before. Simply put, it delivers realistic, and
authentic sounds to your model railroad. To
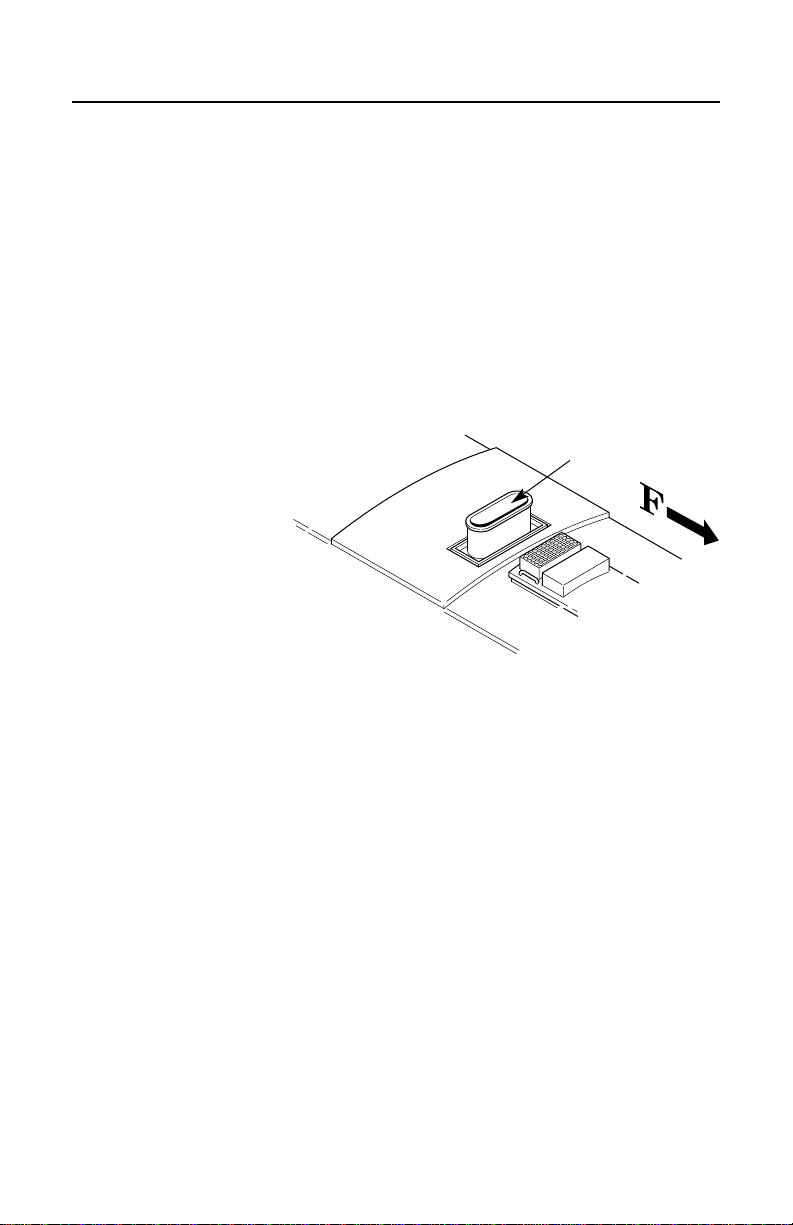
adjust the volume of signalsounds see page
7 for location of adjustment knob.
• Diesel Horn. Press horn to produce an
authentic diesel horn blast.
• Mechanical bell. Press BELL on your
CAB-1 or transformer to begin the effect;
again to discontinue.
Experiencing the range of your C-420’s SignalSounds system
Your C-420’s 104 E Reverse unit
The New E-Series Reversing Unit controls
the direction of the engine. When the revers-
ing unit senses an interruption in track
power, it will cycle into the next direction in
the sequence. The sequence is neutral, for-
ward, neutral, reverse.... Track power inter-
ruptions are created using the direction
control on your transformer or Cab-1, or by
turning the throttle to zero.
When power is first applied (or after a 5
second power interruption), the engine will
power up in neutral, always before forward.
A single press of the direction button will set
your engine in forward motion. This will
help eliminate unexpected start ups, derail-
ments, and crashes. Listed in the table on
the next page is the direction sequence pat-
tern that your 104 E unit will follow under
the given conditions.
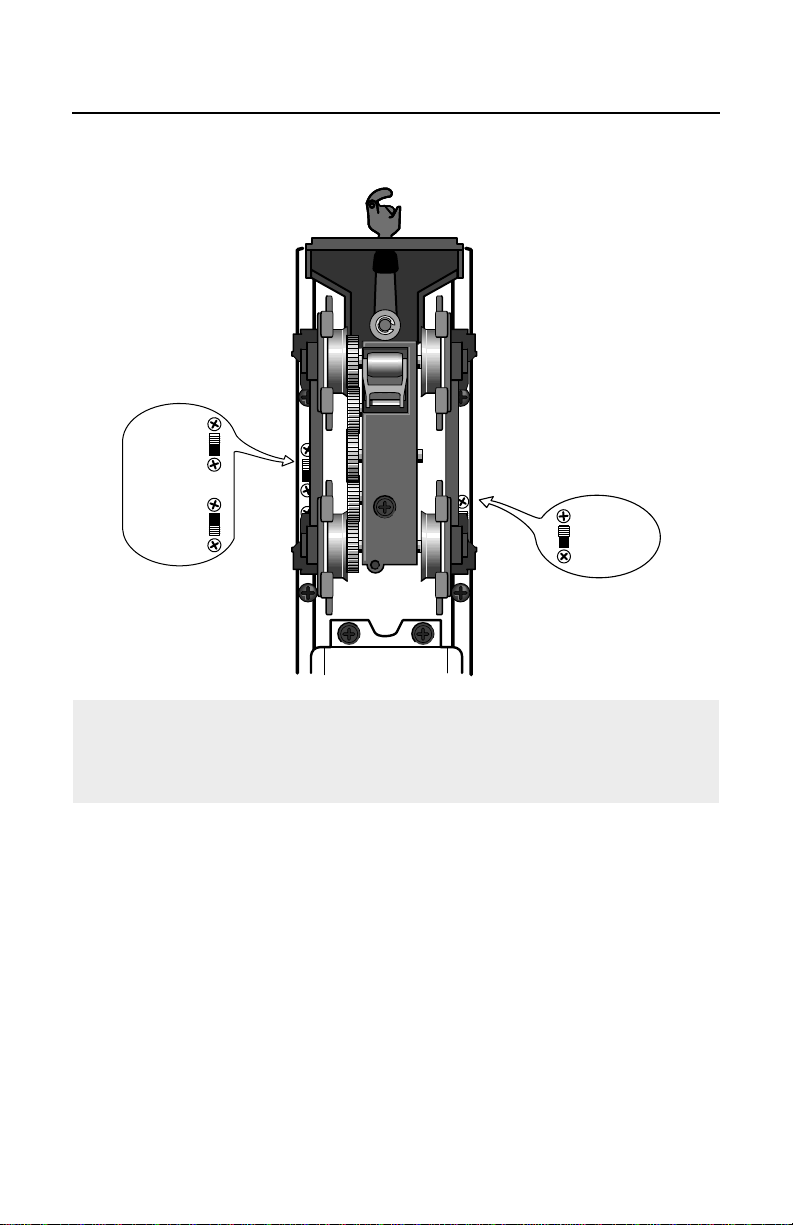
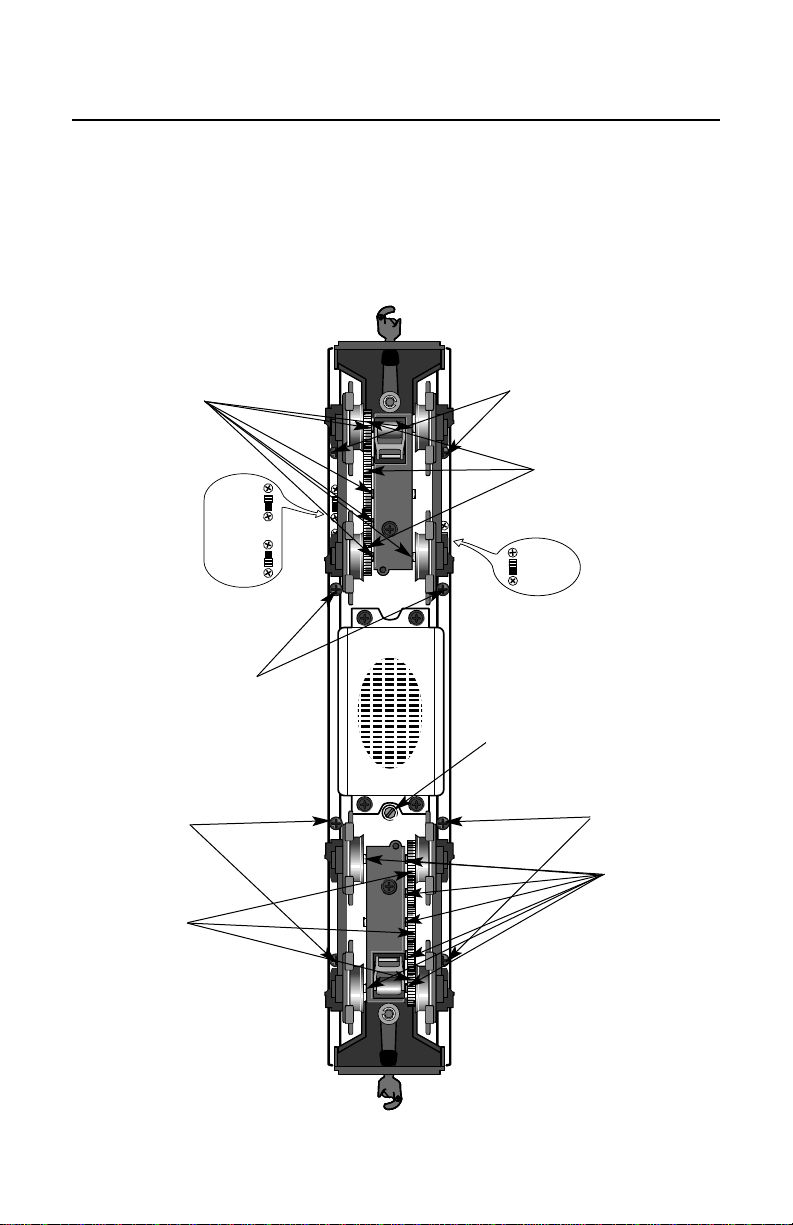
As always, a lockout switch is included to
deactivate the 104 E’s sequencing function.
(for switch location see illustration on the
next page) A new feature is that now you
will have a neutral available even when the
reversing unit is “off”. In addition, you no
longer have to slow the engine by hand to
turn off the reversing unit while the train is
moving. Simply stop the engine, and throw
the switch. The 104 E unit will be locked
into its last moving direction, plus neu-
tral. Even simpler, just put the switch in the
“PGM” position and keep power off for 5
seconds. When you start, you will be locked
in neutral/forward. If you want to lock your
engine in reverse for any length of time, it is
recommended that you reverse the power
connections (blue and yellow) on the top of
the motors. Otherwise, your “reverse” lock
will become a “forward” lock after any 5
second power off.
NOTE: Due to limitations of the electronic
components, it is hard to predict how each
engine will function when power is inter-
rupted between 2.5 seconds and 5 seconds.
Engines will function either as in case #1 or
case #2. This solely depends on the toler-
ances of the installed electronics and is not
affected or caused by your power supply.
Transformer operations
5
Summary Table of Engine Directions
Condition Direction Change Cycle
Case #1: First power up or without power longer than 5 sec.
E unit off (switch in PGM position) N, F, N, F, etc.
E unit on (switch in RUN position) N, F, N, R, etc.
Case #2: Engine without power for less than 2.5 seconds
E unit off (switch in PGM position) N, Last-Dir, N, Last-Dir, etc.
E unit on (switch in RUN position) N, F, N, R, etc.
NOTE: With your 104 E reversing unit, positioning the switch in the PGM position locks
your engine into its last moving direction plus neutral. Positioning the switch in the RUN
position resumes normal sequencing operation.
Your C-420’s 104 E Reverse unit
SND
NO SND
RUN
PGM
SMK
NO SMK
6
Transformer operations
Installing the Lionel no. 610-5906-001 sound activation button
To operate the bell and horn sounds when
operating your C-420 with conventional
transformers, you’ll need to install the Lionel
no. 610-5906-001 sound activation button
(available separately). Connect the button(s)
as shown below.
ForAC transformers lacking a horn/whistle button (two no. 5906s required)
Lionel no. 610-5906-001
sound activation button for
activating the bell
Lionel no.
610-5906-001
sound activation
button
(for horn)
Lionel no. 610-5906-001
sound activation button (for bell)
Black wire
Red wire
Red wire attach to ground terminal
attach to power terminal
to your transformer
The no. 610-5906-001 sound activation button (available separately) works with
any Lionel AC transformer except no. 6-4690 Type MW. Transformers made by
other manufacturers may not be compatible with Railsounds.
Note!
attach to ground terminal
attach to power terminal
Red wire
to your transformer
Customer’s wire
Black wire
Note! All track power must feed through
“Sound Activation Button”
Do not bypass button
For AC transformers with a horn/whistle button
Help your Lionel C-420s lead a long and
productive life on your railroad by
maintaining it properly.
We recommend you purchase a Lionel
Lubrication and Maintenance Kit (no. 6-
62927), available from your Lionel dealer.
Two basic rules to keep in mind: never over-
lubricate (a small amount will do), and
avoid getting grease or oil on the C-420’s
wheels or your track. You’ll know your C-
420 requires lubrication when visual inspec-
tion reveals dryness on the parts indicated in
the illustration. Remove accumulated dirt
and dust before lubricating, and always
lubricate any locomotive emerging from
prolonged storage.
7
Lubricating your C-420s
Maintaining and servicing your C-420s
Body Mount
Screws
SND
NO SND
RUN
PGM
SMK
NO SMK
Body Mount Screws
Oil Bearings
(sparingly)
Grease Gears
(sparingly)
Oil
Bearings
(sparingly)
Grease
Gears
(sparingly)
Volume Control
Set Screw
Body Mount
Screws
Body Mount
Screws
8
Adding fluid to your Locomotive’s smoke generator
Your Locomotive is equipped with a
smoke generator that produces safe,
clean white smoke during operation.
The smoke generator requires the periodic
addition of Lionel smoke fluid in order to func-
tion. Pierce the tube end with a pin, then add
35-40 drops of fluid into the Locomotive’s
stack. See diagram for location of smoke gen-
erator duct. Smoke production will commence
momentarily, faster if you run your Locomotive
at speed. When smoke production wanes, add
more fluid (four to eight drops).
If you prefer to have a smoke free loco-
motive, there is a switch located on the bot-
tom of the engine under the cab marked
SMK/NO SMK (see page 7 for location).
Move the switch to NO SMK
and your locomotive will stop
smoking.
If you have installed the Command
Control upgrade you can use the feature
below to increase smoke production. Press
AUX1 and 9 (press for a maximum of 10 sec-
onds) to boost smoke generator. When the
smoke unit is on Always keep a small
amount of smoke fluid in the Locomotive’s
smoke generator; the generator’s element can
become damaged if operated without fluid.
Smoke production is greater at higher volt-
ages and when the Locomotive is pulling a
heavy load or long consist.
Add fluid here
9
Note! If you have upgraded your powered locomotive to Command Control, make sure
the headlight was not turned off by pressing AUX2 before replacing L.E.D.
Replacing your C-420’s L.E.D.
Your C-420 is illuminated by two L.E.D.
Circuit Boards. During the course of
normal operation, they may require replace-
ment.
Begin by removing the C-420’s shell; see
page 7 for screw location. After removing the
eight screws, carefully lift the shell. away
from the frame.
The rear L.E.D. assembly can be replaced
with Lionel Part No. 610-8587-019. The
front L.E.D. assembly can be replaced with
Lionel Part No. 610-8587-020.
We recommend that you have the L.E.D.
replacement done at a Lionel Service
Station. See Lionel Service section on page
24 for more information. Reinstall the shell.
10
Available Railsounds and Command Control Upgrades
To experience the most from your C-420
several upgrade options are available,
including Railsounds, Command Control,
and Electrocouplers. With these you can
enjoy the full spectrum of digitally recorded
real diesel sounds and the ability to control
your locomotive from anywhere. As with all
upgrades you may choose to have this done
at an authorized Lionel Service Center for a
fee, or you can choose “do it yourself”.
Just follow these instructions we have
included and you’ll be ready to experience
the fun that is today’s Lionel
Be sure these are plugged in correctly, or RailSounds will not function. Damage
may occur if the engine is operated with these circuits in the wrong locations!
Note!
Railsounds
Power Board
Chip
Railsounds
Board
Signal Sounds Board
Heat Sink
Large Coil
Rear of Engine
Front of Engine