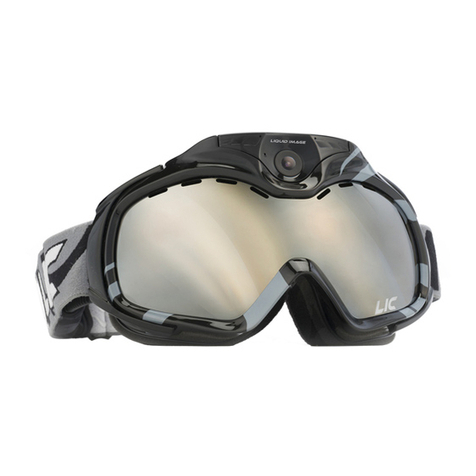
Liquid Image Apex PLUS User manual


Products mentioned above or throughout the manual may be trademarks or registered trademarks of their respective
companies.
ATTENTION
This manual explains how to safely operate the Camera Goggle.
Please read these instructions carefully before using the camera.
Keep this manual in a safe place for later reference
Disclaimer
While every effort has been made to ensure that the information contained in the
guide is accurate and complete, no liability can be accepted for any errors or
omissions. Liquid Image Co reserves the right to change the specifications of the
hardware and software described herein at any time without prior notice.
Liquid Image Co declines all responsibility for damages due to improper use of
this product, failure to adhere to the instructions given in this manual, or
modifications to the CAMERA GOGGLE.
Cautions concerning data storage: Stored data may be lost or corrupted. It is
recommended that any important data be copied onto a separate media (such as
a hard disk, DVD-R or CD-R disk). Liquid Image Co makes no warranties and shall
not be held responsible for damages resulting from corrupted or lost data due to a
malfunction of the camera, the software, the memory cards, personal computer,
peripheral devices, or for any losses that result from images that could not be
recorded, are erased, destroyed, or damaged in any way due to a problem or a
mistake while utilizing the camera or any of its accessories.
The Camera Goggle is a sophisticated electronic device and should
be supervised by an adult at all times. This product should not be
used by children under 13 years. This product is not a toy. The inserting
of memory cards, USB cable, and battery must be performed by an
adult 18 years or older who has read and understands this manual. An
adult must always check all water resistant compartments prior to each use.
ENGLISH
ENG-2
1.0 GET TO KNOW YOUR CAMERA GOGGLE
1.1 Features
Video Clips, Still Images, Micro SD/SDHC Card support
Driver free for Windows XP/Vista/7 and Mac 9.x or above
1.2 Specifications -
1.2 System Requirements
Subject to change without notice
Sensor 1/2.5” 5.0MP CMOS Sensor
Image Resolution 12.0 Megapixels (4000x3000)
Lens F/3.2 f=2.75mm (135 Degree FOV)
Focus range .4m to infinity
Internal Memory 256MB NAND Flash Memory for CPU only
External Memory Card Micro SD/SDHC Card supports up to 32GB
Must be Class 6 and above
Video Mode 30FPS@HD 1080P
60FPS@HD 720P (1280x720) with Audio
(1920X1080) with Audio
File Format Picture: JPEG, Video: H.264 MOV with Audio
Status Display LCD Display
PC Interface USB
Power 3.7V Lithium Rechargeable Battery 1150mAh
Auto Of
WiFi - Wireless
f System time 180 seconds
Apps for Android and iOS systems
Operating System
CPU Intel® Core™ 2 Duo CPU E6300 processor
(or above), AMD Athlon 64 X2 3800+ (or above)
RAM 1GB RAM (2GB recommended for editing HD videos)
300 MB available hard disk space
Memory
Graphics Card 256 MB Graphics Card or above is recommendeded
TV Output PAL and NTSC
Quantity of pixels is only an approximate number Approximate frames per second
*
* **
**
***
***
No Software required to download files
Windows® XP (SP2 or higher) ,Vista™,
Windows® 7 or Mac 9.x
ENG-1
ENG-1
TM
4.0 Recording Pictures and Video
4.1 720P Video Mode ENG-10
4.2 1080P Video Mode ENG-10
4.3 Still Image Photo Mode ENG-11
4.4 Continuous Photo Mode ENG-11
4.5 Power Off ENG-11
5.0 Transferring Still Images and Video to a Computer
5.1 Opening Memory Compartment ENG-12
5.2 Connecting and Transferring Files ENG-12
ENG-14
ENG-15
5.3 Disconnecting and Closing Memory Compartment ENG-13
7.0 Video and Image File Size ENG-15
6.0 Viewing Videos and Still Images on TV
6.1 Setting Correct NTSC/PAL Mode for your TV
6.2 Video and Still Image Playback on a TV
ENG-18
ENG-18
11.0 Replacing Lenses
10.1 Removing the Lens
10.2 Inserting the Lens
10.0 Care and Maintenance ENG-17
8.0 WiFi Capabilites and Use with other WiFi Devices ENG-16
9.0 Firmware and Product Updates ENG-17
12.0 Camera Warnings and Precautions ENG-18
13.0 Battery Warning and Precautions ENG-20
14.0 Commonly Asked Questions and Troubleshooting ENG-20
CONTENTS
1.0 Get to know your CAMERA GOGGLE
1.1 Features ENG- 2
1.2 Specifications ENG- 2
1.3 System requirements ENG- 2
2.0 Functional Parts
2.1 Included Parts and Accessories ENG- 3
2.2 Part Names - Front View ENG- 4
2.3 Part Names - Back View ENG- 4
2.4 Part Names - Ports and LCD Screen
2.5 Part Names - Battery Compartment
ENG- 5
ENG- 6
2.6 Replace Goggle Strap ENG- 6
2.7 Replace Face Foam and Rotate Lens ENG- 7
3.0 Camera Goggle Setup
3.1 Recharging or Replacing the Li-ion Battery ENG- 8
3.2 Inserting Micro SD/SDHC Memory Card ENG- 8
3.3 Setting the Date and Time Mode ENG- 9

ENG-3
TM
2.0 Functional Parts
2.1 Included Parts and Accessories
Please check the contents now (before use) to confirm that it is complete.
Contact your Liquid Image Co dealer if anything is missing.
USER MANUAL
CAMERA GOGGLE
USB CABLE
WARRANTY
MICRO FIBER STORAGE BAG
RECHARGEABLE LI-ION BATTERY 3.7V 1150mAh
EXTRA SNOW LENS
EXTRA STRAP
NOTE: The CAMERA GOGGLE will be referred to as the
"CAMERA GOGGLE" throughout this instruction manual.
WARNING: NEVER OPEN THE CAMERA BODY THAT IS FACTORY
SEALED WITH SCREWS. THIS WILL VOID ANY WARRANTY. NEVER USE
A SCREW DRIVER TO OPEN ANY PORTION OF THE CAMERA GOGGLE.
TM
“If the product is exposed to a strong electrostatic charge, its memory
contents may be damaged or the keys may stop working. In such case,
reinstall battery to clear the memory and restore normal key operation.”
REPLACEMENT FACE FOAM
HEX ALLEN WRENCH
ENG-3
2.2 Part Names - Front View
2.3 Part Names - Back View
CAMERA
LENS
POWER/MODE
BUTTON
SHUTTER/SELECT
BUTTON
BATTERY
COMPARTMENT
GOGGLE LENS
2.2 Part Names - Front View
MICROPHONE
WITH WIND GUARD
ENG-4
MODE LIGHT
INDICATOR
(blue - video 720P@60fps)
(green - video 1080P@30fps)
(red - photo)
(purple - continuous photo)
(also used for recharging)
2.4 Part Names - Ports and LCD Screen
ENG-5
POWER/MODE
BUTTON
SHUTTER/SELECT
BUTTON
HDMI
Port
Secondary LOCK
2.5 Part Names - Battery Compartment
2.6 Replace Goggle Strap
1150
ENG-6
WiFi - when flashing, the WiFi is in standby mode
When Solid, WiFi is turned on and ready
WiFi

3.0 CAMERA GOGGLE SETUP
CAUTION: An adult 18 years or older should perform this function. Always
make sure the CAMERA GOGGLE is completely dry before performing these
steps. Set up should always take place in a clean dry space with a controlled
environment. These steps should be performed indoors to avoid exposure to
the elements.
3.1 Recharging or Replacing Li-Ion Battery
NOTE:
Only use a Liquid Image Rechargeable 3.7V 1150mAh Lithium Battery with the
CAMERA GOGGLE.
The LCD indicator shows battery life. When no remaining bars are
displayed, the battery is low and the LCD screen will show the word “LO” and will
make a beeping sound. Recharge or replace battery to continue using. Files on the
Micro SD/SDHC card will not be lost if battery power runs out or during replacement
of the battery.
To insert or replace battery:
1. Unlock and Slide Battery Compartment door forward and then down to open.
2. Insert the Battery as shown on page ENG-6. Notches on the battery will only
allow you to put the battery in one direction.
3. Close the BATTERY COMPARTMENT door carefully.
3.2 Inserting Micro SD or SDHC Memory Card - Mandatory
NOTE: A Micro SD/SDHC Memory Card may or may not be included with your
CAMERA GOGGLE. It is recommended that you utilize a commercially sold Micro
SD/SDHC Card to add memory storage to yourCAMERA GOGGLE. It is best to utilize
a high performance Micro SD/SDHC card as this will improve the performance of
Estimated Battery life for a new 1150 mAh Rechargeable Lithium Battery
Still image mode: up to 5000 pictures
Video clip recording mode: up to 120 minutes
To Recharge Battery:
1) Open MEMORY COMPARTMENT door.
2) Plug USB CABLE into both the USB Port on the CAMERA GOGGLE and the Computer.
The battery will start charging and the RED LED will start blinking. When the charge is
complete, the RED LED will stop blinking and will switch to a solid GREEN LED light.
V
ENG-8
your CAMERA GOGGLE.This CAMERA GOGGLE
CAMERA GOGGLE
works with both a Micro SD card or a
Micro SDHC card up to 32 GB (Class 6+). Carefully read the instructions and warnings
that come with the card. If your card is not FAT16 formatted, it will be reformatted once
placed into the Micro SD/SDHC card slot on your and the Power is
turned on. Please note that any data on the card will be lost. Make sure to back up
any data on the Micro SD/SDHC Card prior to inserting into the CAMERAGOGGLE.
NOTE: The CAMERA GOGGLE does not have
internal memory to store the images and videos
taken by the . ou must
insert a Micro SD/SDHC card prior to taking images
and videos. 4GB+Micro SDHC Class 6+ is
recommended for peak performance.
3.3 Setting the Date and Time Mode
This feature allows you to set the Date and Time to the photo or video file.
1. Press and hold the SHUTTER/SELECT button down. Press and hold POWER/MODE
button for 2 seconds to turn on camera.
2. Continue holding the SHUTTER/SELECT button down and press the
POWER/MODE button 3 times continuously and then release the
SHUTTER/SELECT button. The LCD screen will access the Time Setting mode.
You will be able to change Year (YY), Month (MM), Day (DD), Hour (hh), and
Minute (mm). The first window will be YY for Year. Press the SHUTTER/SELECT
button and the numbers will appear (eg.“12”, means year 2012). The first number “1”
in the year will start blinking.
3. Press the POWER/MODE button to change the blinking character from 0-9. Press
the SHUTTER/SELECT button to select the number and move onto the next number
“0”. The setting process is from the left to right and will go through the different
settings from Year, Month, Day, Hour, and minute. Once the number is confirmed by
pressing the SHUTTER/SELECT button, the next digit will start blinking. Once
you see the letters again such as MM for Month, press the SHUTTER/SELECT
button to move to the numbers representing the month. Continue the process until
you return to YY.
4. To get out of the Date and Time Setting Mode, press and hold the
SHUTTER/SELECT button for 2 seconds. The GOGGLE will return to the
Video mode (BLUE LED).
5. In case the battery needs to be replaced or the battery runs out, the date setting
data will be maintained for 5 hours.
r r
r
CAMERA GOGGLE. Y
r T
“ ”
r
.
ENG-9
Approximate File Storage
Micro SDHC Card 32GB
Images: 20,000
Video: 354 minutes
ENG-10
Note: the BLUE MODE LIGHT INDICATOR is blinking. The light will continue to
blink until the camera stops recording.
3. To stop recording, press the SHUTTER/SELECT button again.
Note: the GREEN MODE LIGHT INDICATOR is blinking. The light will continue to
blink until the camera stops recording.
3. To stop recording, press the SHUTTER/SELECT button again.
cycles through the modes in the following order: 720P Video@60 fps,
1080P Video@30fps, Still Photo, and Continuous Photo. To advance to the next
mode, press the POWER/MODE button one time. The camera will remain on and
ready to use for 180 seconds, after which the GOGGLE will turn off
automatically. Press and hold the POWER/MODE for more than 3 second to turn
off camera.
4.1 720P @ 60 FPS Video Mode - BLUE LIGHT
1. Press and hold POWER/MODE button for 2 seconds to turn on camera.
The camera will power up in 720P @ 60 frames per second Video mode.
Note: the BLUE MODE LIGHT INDICATOR is on and the GOGGLE is now
in the VIDEO READY mode and set to take Videos. The LCD screen displays the
720P video icon.
2. Press the SHUTTER/SELECT button once. Recording begins.
4.2 1080P @ 30 FPS Video Mode - GREEN LIGHT
1. Press and hold POWER/MODE button for 2 seconds to turn on camera.
2. Press the POWER/MODE button again for less than a second to change to
the 1080P @ 30 frames per second Video Mode.
Note: the GREEN MODE LIGHT INDICATOR is on and the GOGGLE is now
in the 1080P READY mode and set to take videos.
The LCD screen displays the 1080P Video icon.
4.0 RECORDING PICTURES AND VIDEO
NOTE: The GOGGLE has 4 modes and pressing the POWER/MODE button
3. Press the SHUTTER/SELECT button once. Recording begins.
2.7 Replace Face Foam and Rotate Camera Lens
ENG-7
Unlock Camera Lens
by loosening the Hex
screw with Allen
wrench provided.
Rotate lens up to
30 degrees.
To lock the lens in
place at a specified
angle, tighten the
Hex Screw.
Pull off replacement
face foam by pulling
on the plastic part
attached to the
Foam. To reattach,
align the pins on
the plastic part of the
replacement face foam
with the holes in the
goggle frame.
The Camera Lens
can be rotated up
to 30 degrees.
30 o
This manual suits for next models
1
Other Liquid Image Accessories manuals
Popular Accessories manuals by other brands

eufy Security
eufy Security T8213 quick start guide
Intermatic
Intermatic HB61R supplementary guide
Badger Meter
Badger Meter SDI Series user manual
Philips
Philips GoGear HDD1420 Specifications

IFM
IFM Efector 200 O5PG operating instructions
PCB Piezotronics
PCB Piezotronics 357C10 Installation and operating manual
HB Products
HB Products HBX Installation and configuration guide
SENSINOVA
SENSINOVA PR15 manual
Maytag
Maytag MAL2000AXW - Neptune Washer/Dryer Platform Repair parts list
Smartwares
Smartwares Byron 7900 instructions

Radial Engineering
Radial Engineering EDU-DI Build instructions
Biamp
Biamp Vocia ANC-1 Operation manual
