LISHITOYS ButterflY L6069 User manual

8+
L6069 DRONE
This products is not a toy, it is a precise device which requires accurate
assembly and debugging to avoid accident. It should be operated in proper
way, it is the user’s responsibility to make sure that it will not do harm to
personal security and property.
(1) Not suitable for children under 14 and without model operating experience
(2) Please choose a legal area to play this drone
(3) We will not be responsible for any damage caused by improper operation
(4) For any technical support and after-sale service, please contact your local
distributor
•Do not charge the battery when putting it inside the drone, it might cause fire
and damage.
•Please keep the drone with 50% power if you do not play it for a long time, to
extend the battery life.
•Please use the original charger.
•Do not charge the battery on the carpet to avoid fire.
•Please recharge the Li-po battery if it is stored more than 3 months.
distributor
The drone is a high-risk product, please keep it away from the crowd while
playing.It might cause the accident of drone damaged or personal injury by
improper assembly, poor control or unfamiliar operation, please be cautious.
(1) Keep away from the crowd, high building, high-voltage line,and avoid to play
it in stormy and thunderstorm weather to ensure safety
(2) Keep away from humid conditions to avoid malfunction
(3) Keep away from the blades to avoid danger and damage

-1-
Transmitter
USB charging cableRC drone
Battery
Manual
CAUTIONS:
2.Warning:
1. Cautions:
This product is using Li-po battery, which will lead to explosion if it is
improperly operated.
This products is not a toy, it is a precise device which requires accurate
assembly and debugging to avoid accident. It should be operated in proper
way, it is the user’s responsibility to make sure that it will not do harm to
personal security and property.
(1) Not suitable for children under 14 and without model operating experience
(2) Please choose a legal area to play this drone
(3) We will not be responsible for any damage caused by improper operation
(4) For any technical support and after-sale service, please contact your local
distributor
•Do not charge the battery when putting it inside the drone, it might cause fire
and damage.
•Please keep the drone with 50% power if you do not play it for a long time, to
extend the battery life.
•Please use the original charger.
•Do not charge the battery on the carpet to avoid fire.
•Please recharge the Li-po battery if it is stored more than 3 months.
distributor
The drone is a high-risk product, please keep it away from the crowd while
playing.It might cause the accident of drone damaged or personal injury by
improper assembly, poor control or unfamiliar operation, please be cautious.
(1) Keep away from the crowd, high building, high-voltage line,and avoid to play
it in stormy and thunderstorm weather to ensure safety
(2) Keep away from humid conditions to avoid malfunction
(3) Keep away from the blades to avoid danger and damage
ACCESSORIES:

Take out the aircraft battery, then connect the USB charging cable
charging head to the battery charging socket, and connect the USB
terminal to the power supply for charging.
-
+
-
+
-
+
power supply Power socket
Remove the battery Install battery
Charging batteries
Pay attention to the following when charging:
- Do not leave the charged battery in a hot place, such as an open
flame or electric heater, otherwise it may be damaged or explode.
- Do not immerse the battery in water. The battery should be stored in
a dry place.
- Do not disassemble the battery.
- Do not leave when charging.
PRODUCT SPECIFICATION:
REMOTE BATTERY SETTING:
Product Size:
Remote Battery:
Remote control distance:
80mmX80mmX30mm
Product Battery:
Flight duration:
3x 1.5v AAA (not included)
30 m
Li-Polymer 3.7V 300 mAh
5-6 minutes
BATTERY INSTALLATION AND CHARGING INSTRUCTION:
Place batteries according(+/-)
DRONE BATTERY CHARGING
REMOTE INSTRUCTION:
± 25.400
① Switch (long press for
two seconds off)
② Left stick
③ Right Stick(Press “Di”
under the putter to start
the headless mode).
④360°Stunt
⑤Forward/Backward
fine adjuster
⑥Leftward/Rightward
fine adjuster
⑦Phone attaching clamp
-2-

2. Reset operation.
2. Start and stop operation
PREPARATORY FLIGHT
-3-
QR code of
“
Butterfly_UFO
”
software for
Apple ISO syetem
QR code of
“Butterfly_UFO ”
software for Google
play syetem
QR code of
“Butterfly_UFO ”
software for
android syetem
SMARTPHONE HOLDER SETTING
APP DOWNLOAD:
Download the real-time aerial-photographic software
“Butterfly_UFO ”, which enables the aircraft to make FPV
real-time transmission during the course of flying.
①Downloading the installation software
Please download and install Butterfly_UFO software from your Android
phone.Apple IOS system in the APP STORE inside to download and
install Butterfly_UFO software or scan QR code to download and install
Butterfly_UFO software
Remove the battery cover on
the back of the remote
control and replace it with
the battery cover with the
phone holder
1.Match the 2.4G frequency
Turn on the drone, put the drone on the flat,
at that time the drone signal will keep flicker,
then turn on the remote control, push the left
stick forward and backward.)
When the frequency is successful, the left
and right joysticks are pulled back at the
same time and kept for a minimum of three
seconds or more. The first time the aircraft's
"flying" indicator light flashes and then turns
on constantly, indicating that the reset is
successful.
1. After the frequency is successful, push the left
joystick up once, the aircraft starts, release the
throttle and push the aircraft to take off.
2. The left joystick is pulled down and the aircraft
descends.

Front Reart
1. Throttle(the left stick)
Push the left stick
forward
The drone
flies up
The drone
flies down
Push the left
stick backward
2. Forward/Backward (the right stick,the side with camera is the
ahead side)
Push the right
stick forward
The drone flies
forward
The drone flies
backward
Push the right
stick backward
3. Left/Right side fly
Push the right
stick to the left
The drone left
side fly
Push the right
stick to the right
The drone
right side fly
4. Left/Right turn(the side with camera is the ahead side)
Push the left
stick to the left
The drone
turns left
Push the left
stick to the right
The drone
turns right
5. Fine adjustment(the side with camera is the ahead side)
Forward/Backward fine-adjustment
Inclined to the
back side
Inclined to the
ahead side
FLYING CONTROL
After take off,when you feel
the drone body inclined to the
back side,press the forward
micro adjustment button.
After take off,when you feel
the drone body inclined to the
ahead side,press the
backward micro adjustment
button.
-4-

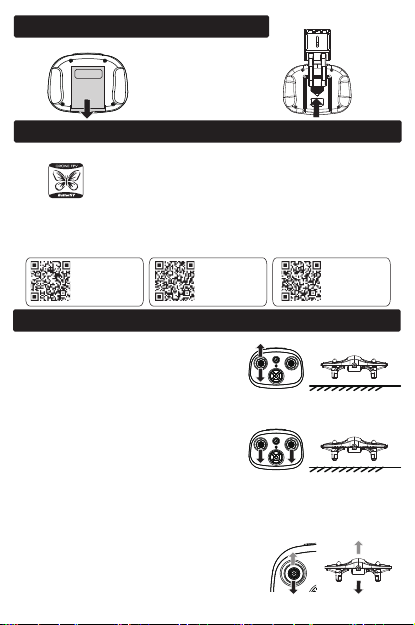
Left/Right fine-adjustment
Inclined to
the left side
Inclined to
the right side
After take off,when you feel
the drone body inclined to the
right side,press the left micro
adjustment button.
After take off,when you feel
the drone body inclined to
the left side, press the right
micro adjustment button.
360°STUNT FLIP FUNCTION:
When you are familiar with the basic actions, you can
proceed to explore even more exciting stunt actions. Fly the
drone to a height of above 3 m above the ground, press the
button (Stunt Flip Button) on the remote control and then
push the right joystick to the farthest position of
Front/Back/Left/Right, the drone will now execute the
Front/Back/ Left/ Right stunt flip function.
SPEED CHANGE
Press the left joystick down to adjust the speed of
forward, backward, left and right side and steering;
the speed is divided into three gears, the default is
one gear, press “di” two sounds for the second gear,
then press “di, di, The three-tone is the third gear,
and when you press the “di”, it returns to the first
gear.
FIXED HEIGHT FUNCTION
This product is fixed by the barometer. Due to various environmental
factors and other factors, it is normal for the aircraft to automatically
change when it starts flying or at low voltage!
HEADLESS MODE:
X
X
1.Flying direction setting:Put the drone right in
front of you,point the remote towards the back of
the drone,then press one key take off.
2. Press the right joystick of the remote control
to make a "Bi" sound, and the aircraft lights
quickly to enter the headless mode. Press the
remote button again to make a "flute" and exit
the headless mode.
When the headless mode is on,the drone will base on pilot's position as
reference for any signal received from the right stick on the remote.(The right
stick push forward,the drone will fly away,push backward,the drone will fly
back,the direction that the drone itself is facing will not affect.)
-5-
Table of contents
Other LISHITOYS Drone manuals