Lite-on Tech NA120 User manual

NA120
Intel® 845-G Motherboard
USER’S MANUAL
Intel® Pentium®4 Processor Motherboard
Rev. 1.0

NA120 Motherboard
Revision History
Revision Date Description
1.0 Initial release of NA120 motherboard user’s manual
Item Checklist
1 NA120 Motherboard
1 Floppy Cable
1 ATA Cable 66/100
1 Motherboard Driver CD
NA120 User’s Manual
Quick Installation Guide
Intel® Pentium® 4 are registered trademark of Intel Corporation.
Copyright © 2001, Lite-On Tech./ System BU

NA120 Motherboard
Safety Instructions
Please follow some precautions when operating your computer.
1. Always unplug the power cord when inserting any add-on card or module inside the system.
2. Use a grounded wrist strap before handling computer components. If one is not available, touch both of your
hands to a safely grounded object or to a metal object.
3. Place components on a level grounded antistatic pad or on the packaging that came with the components
whenever the components are separated from the system.
4. Keep equipment away from moisture and humidity.
5. Keep this User’s Manual for future reference.

NA120 Motherboard
Table of Contents
Chapter 1. Introduction …………………………………………………………………… 1
Motherboard Specification …………………………………………………………………………. 1
NA120 Motherboard Layout …………………………………………………………………….…. 3
Chapter 2. Hardware Installation Process ………………………………………..4
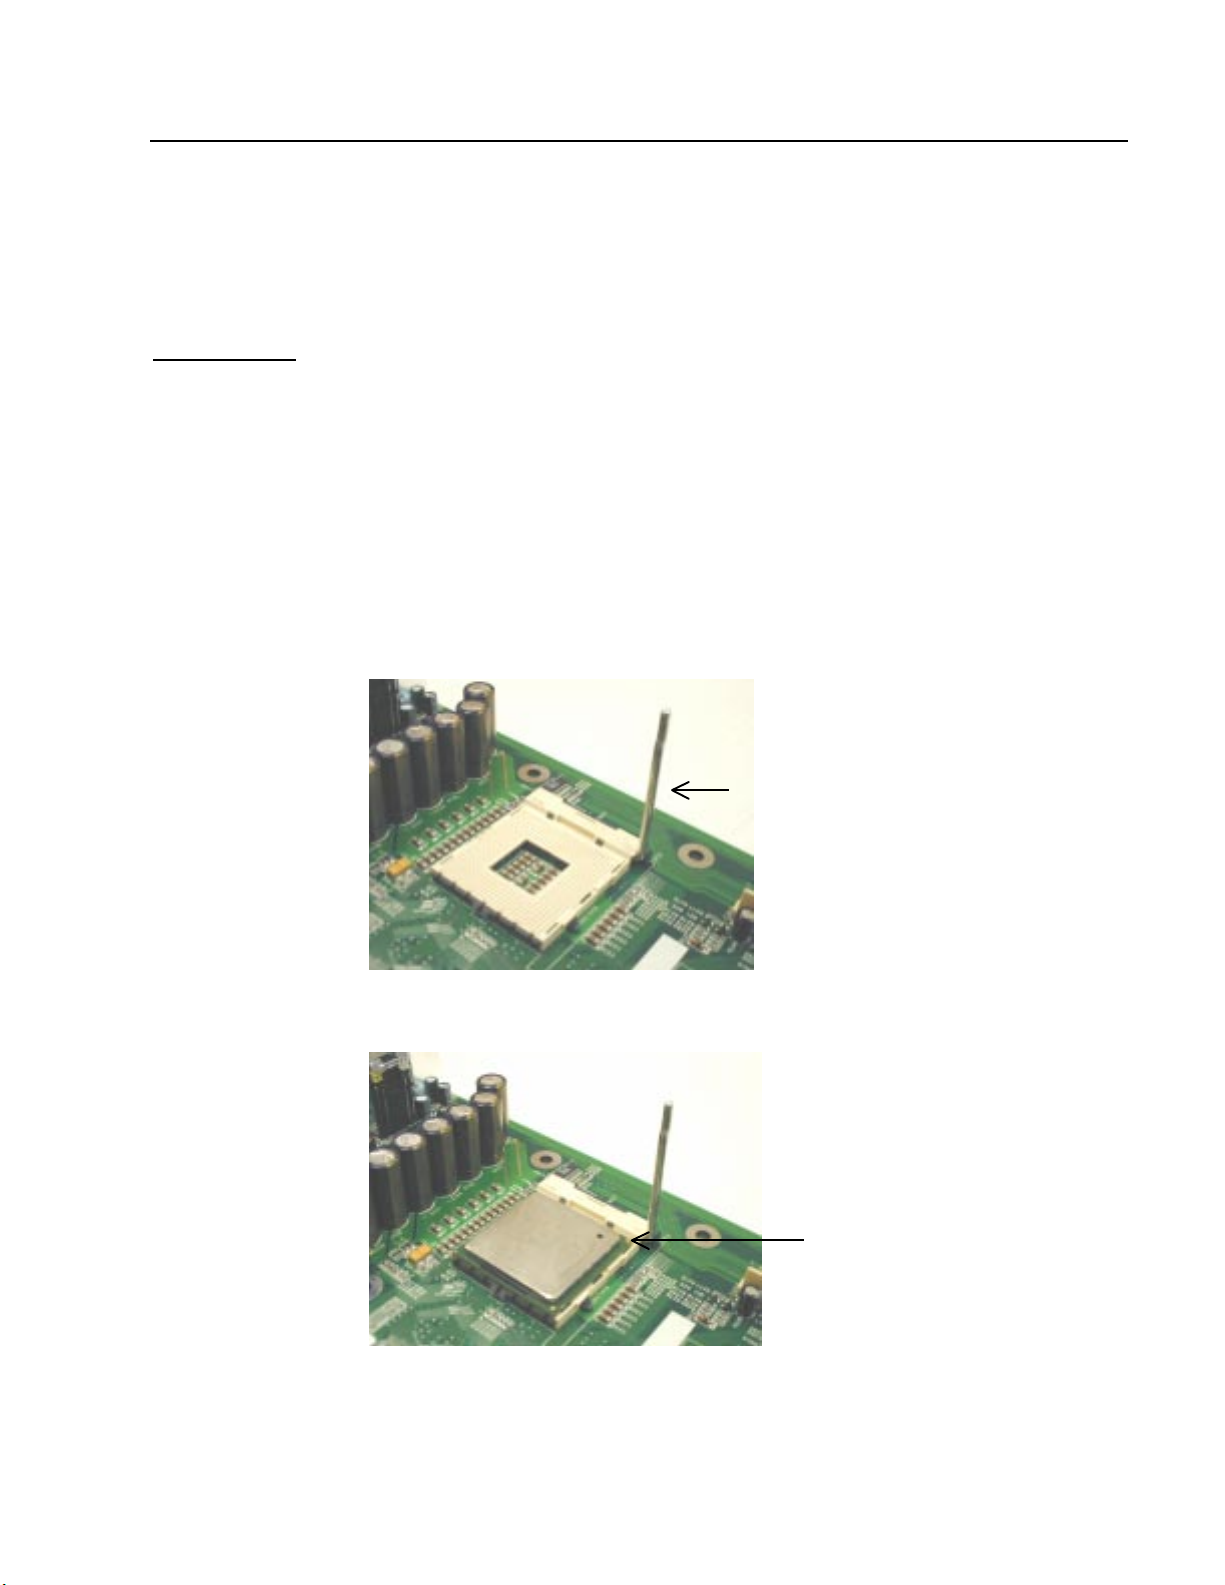
Installing Central Process Unit (CPU) ……………………………………………………………..4
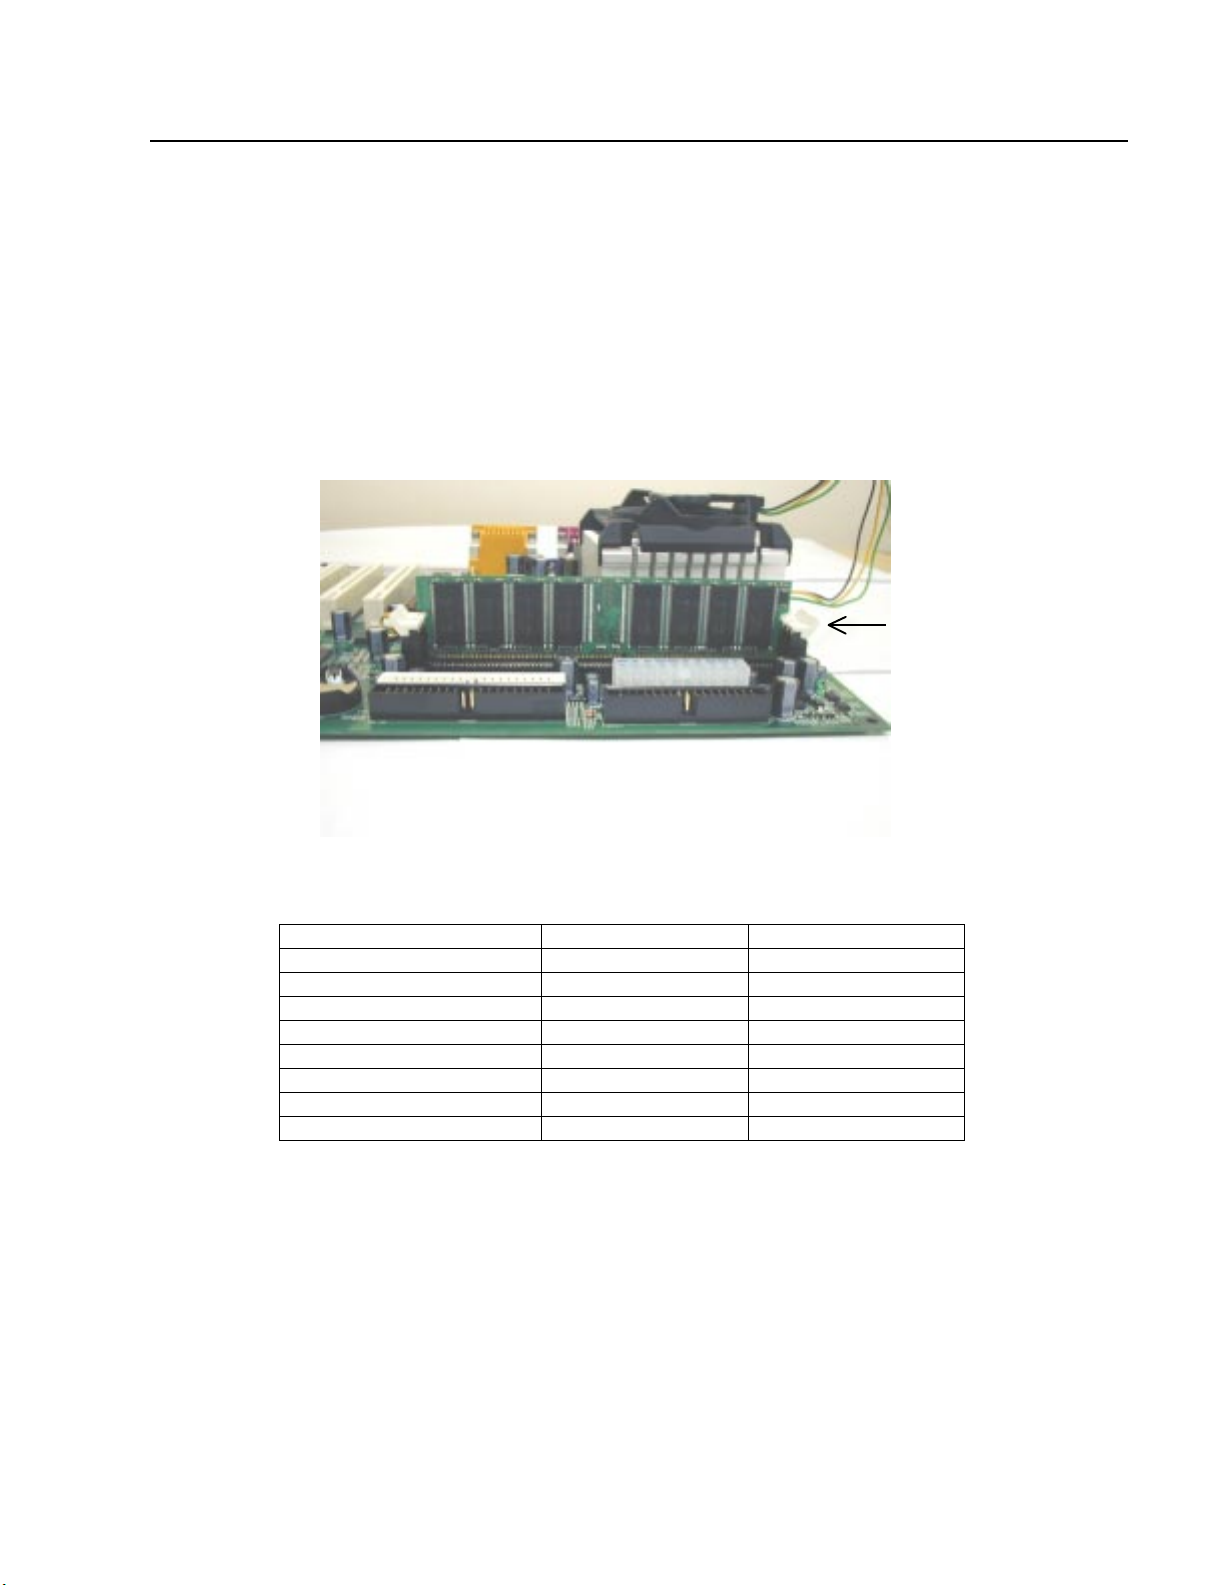
Installing Memory Modules ………………………………………………………………………… 6
Connecting IDE and Floppy Disk Cables and Drives ……………………………………………7
Installing Expansion Cards ……………………………………………………………………….. . 9
Connect Power Supply Cable ……………………………………………………………………. 10
I/O Back Panel Introduction ………………………………………………………………………. 11
Jumpers Introduction ……………………………………………………………………………… 13
Chapter 3. AMI® BIOS Setup ………………………………………………………….. 19
Entering Setup ……………………………………………………………………………………... 19
The Main Menu ……………………………………………………………………………………. 19
Standard CMOS Setup …………………………………………………………………………… 20
Advanced CMOS Setup ……….…………………………………………………………………. 21
Advanced Chipset Setup …………………………………………………………………………. 22
Power Management Setup ……………………………………………………………………….. 23
PCI/Plug and Play Setup …………………………………………………………………………. 24
Peripheral Setup …………………………………………………………………………………… 25
Hardware Monitor Setup ………………………………………………………………………….. 26
Auto-Detect Hard Disks …………………………………………………………………………… 27
Change User Password …………………………………………………………………………... 28
Change Supervisor Password ……………………………………………………………………. 29
Auto Configuration with Optimal Settings ……………………………………………………….. 30
Auto Configuration with Fail Safe Settings ……………………………………………………… 31
Save Settings and Exit ……………………………………………………………………………. 32
Exit Without Saving ………………………………………………………………………………... 33

NA120 Motherboard
1
Chapter 1 Introduction
Motherboard Specifications
Form Factor:
• ATX Form Factor 12” x 8.9” (30.5cm x 22.6cm)
Processor:
• Supports IntelPentium4 Willamette and Northwood Processor
• Processor socket mPGA478B
• 400 MHz system bus, capable to enhance processor system bus to 533 MHz with Northwood
processor
Super I/O:
• Winbond W83627HF
System Memory:
• Two DIMM socket support
• Supports PC200 and PC266 DDR SDRAM
Clock Generator:
• ICS950220 setting for jumpless
Audio:
• 3D audio compliant with AC’97 rev. 2.2
• Realtek ALC202A
Video:
• External 1.5V 2X/4X AGP Slot
• Integrate High Performance 2D/3D Acceleration
IDE Ports:
• Two IDE ports to support four devices
• Supports all PIO modes
• Support Ultra DMA 33/66/100

NA120 Motherboard
2
Expansion Slots:
• One AGP slot
• One CNR slot shared with one PCI slot (optional)
• Six PCI Slots
BIOS:
• 4Mbit flash EEPROM
• AMI® BIOS, PnP, ACPI, SMBIOS 2.3, Boot Block DMI
• WfM v.2.0, DMI v2.0, WOL, SMBus support
Additional Features:
• Keyboard/Mouse/USB wake up
• Support S1, S3, S4 and S5 ACPI status
• Hardware Monitor Capability (LPC47M192)
• Optional On Board LAN (Realtek RTL8100B, Support 10/100 Mbps Ethernet)
Expansion Slots:
• Single AGP 2.0 slot (AGP 4X, 1.5 signaling)
• Six PCI 2.2 slots
• 1 CNR slot shared with one PCI slot (option)
Rear Side I/O Ports:
• PS2 Keyboard and Mouse
• Two USB 2.0 ports
• RJ45 LAN connector (option)
• Single Serial Port
• Single Parallel Port
• Single VGA connector
• Dual Channel Game Port
• Three Audio Jacks (Line-Out, Line-In, Mic-In)
On Board I/O Interface:
• Single ATX and +12V Power Connector
• Single Floppy Connector
• Front Panel Connector (Switch, LED, IRDA)
• Header for front side Line-Out and Mic-In (option)
• Three Fan Headers for CPU, chassis and system
• Two ATAPI headers (CD In, AUX In)
• Header to support two front side USB ports

NA120 Motherboard
3
NA120 Motherboard Layout
A CPU Socket H Front SideUSB
B CPU Fan Socket I COM Port
C Memory Sockets J Expansion Slots
D Power Supply Connectors K Audio Connector
E Floppy Connector L Jumper Connector
F IDE Connectors M Back Panel Connectors
G Front Panel Connector
Front Panel Connector Pin Definition
Pin Signal Name I/O Description
1 HDD LED+ O Pull up 330ohm to VCC
2 Suspend LED- O SUS LED
3 HDD LED- O IDEACTP-
4 Suspend LED+ O Pull up 330ohm to VCC
5 H/W reset- - GND
6 Power Button+ I Pull up 1Kohm to VCC
7 H/W reset+ I HWRST SW
8 Power Button- - PWRBTIN
9 VCC - VCC
10 EXT, SMI+ I Pull up 8.2ohm to 3.3V
11 IRRX I IRRX
12 EXT, SMI- - GND
13 GND - GND
14 KEY - KEY
15 IRTX O IPTX
16 Power LED+ O VCC
17 CIRRX - CIRRX
18 NC - not connected
19 NC - not connected
20 Power LED- - GND
A
B
C
D
E
F
G
J
H
D
K
M
L
I

NA120 Motherboard
4
Chapter 2 Hardware Installation Process
Installing the Central Process Unit (CPU)
CPU Installation
1. Unlock the CPU socket by pulling the lever up to a 90-degree angle.
2. Position the CPU above the socket such that the marked corner (pin1) matches the corner near the
base of the lever.
3. Place the CPU into the socket. If the CPU is unable to insert properly, check its orientation and
attempt to re-install.
Warning! Do not force the CPU into the socket. Doing so will prompt bending of the pins and create
damage to the CPU.
4. Close the socket by lowering the lever and locking the lever in place.
Step 1
90 degree angle
Step 2
Pin1

NA120 Motherboard
5
Installing the Central Process Unit (CPU)
cont.
CPU Heat Sink Installation
1. Read the related CPU heat sink user’s manual for more detailed installation procedures.
2. Connect CPU fan power cable into the CPU fan connector on the motherboard.
CPU Fan Connector

NA120 Motherboard
6
Installing Memory Modules
1. Push the white retaining clips on each of the memory socket outwards.
2. Match the notches on the contact edge of the memory module to the ridges in the memory socket.
3. Insert the memory module vertically into place. When properly inserted, the white retaining clips will
move inward to lock in the module.
4. Repeat installation process when adding additional modules.
Total Memory Sizes With Unbuffered DDR DIMM
Devices used on DIMM 1 DIMM x64 2 DIMMs x64
64 Mbit (2Mx8x4 banks) 128 MBytes 256 MBytes
64 Mbit (1Mx16x4 banks) 64 MBytes 128 MBytes
128 Mbit (4Mx8x4 banks) 256 MBytes 512 MBytes
128 Mbit (2Mx16x4 banks) 128 MBytes 256 MBytes
256 Mbit (8Mx8x4 banks) 512 MBytes 1 GByte
256 Mbit (4Mx16x4 banks) 256 MBytes 512 MBytes
512 Mbit (16Mx8x4 banks) 1 GByte 2 GBytes
512 Mbit (8Mx16x4 banks) 512 MBytes 1 GByte
Retaining Clip

NA120 Motherboard
7
Connecting IDE and Floppy Disk Cables
1. Connecting the floppy disk ribbon cable into the motherboard. The side of the cable with the red
stripe needs to be inserted into the Pin1 side of the floppy disk connector.
2. Connecting the IDE ribbon cable into the motherboard. The side of the cable with the red stripe
should be inserted into Pin1 side of the IDE connector.
IDE Connectors
Red Stripe
to Pin1
Floppy Connector
Red Stripe
to Pin1

NA120 Motherboard
8
Connect Floppy and IDE Drives
NOTE: If installing two IDE devices on the same ribbon cable, one device is to be set as “master” and the
second as “slave”. Please refer to IDE device manuals for master and slave settings.
1. Mount the desired drives into the case.
2. Connect the floppy disk ribbon cable and power cable into the device.
3. Connect the IDE ribbon cable and power cable into the device.
Power Cable
Floppy Disk Drive
Floppy Disk Ribbon Cable
Hard Disk Drive
Power Cable
IDE Ribbon Cable

NA120 Motherboard
9
Installing Expansion Cards
1. Read the related expansion card’s installation instructions before inserting the expansion card into the
motherboard.
2. Remove the slot covers from the chassis case where the expansion cards will be placed.
3. Press the expansion card firmly into the expansion slot of the motherboard.
4. Secure the card with the screw provided.
5. Repeat same procedure when adding additional expansion cards.

NA120 Motherboard
10
Connect the Power Supply Cables
NOTE: The ATX power connector is keyed for proper insertion.
1. Place the plastic clip of the power connector over the plastic tab on the motherboard power connector.
The plastic clip should lock into the plastic tab.
Power Supply Connector

NA120 Motherboard
11
I/O Back Panel Introduction
(1) PS/2 Keyboard and PS/2 Mouse Connector
This connector supports standard PS/2 keyboard and PS/2 mouse.
(2) USB and LAN Connector
Before connecting device(s) into the USB connections, determine if devices have a standard
interface.
Make sure your computer Operating System (OS) supports the USB controller. If not, contact your
OS or device(s) vendors for more information.
On Board LAN function (optional)
1
3
4
PS/2 Mouse Connector (6 pin Female)
PS/2 Keyboard Connector (6 pin Female)
5
2
USB 1
USB 2
LAN (Optional)

NA120 Motherboard
12
I/O Back Panel Introduction
cont…
(3) Parallel Port and Serial Ports (COM1/VGA)
This connector supports a COM port, VGA port, and Parallel port.
Devices (i.e. printer) can be connected into the Parallel port.
Devices (i.e. mouse and modem etc. can be connected into the Serial ports).
(4) Game Port
This connector supports joystick, MIDI keyboard and other related audio devices.
(5) Audio Connectors
Once onboard audio driver has been installed, the speakers may be connected into the Line out jack,
audio devices such as CD-ROM etc., and a microphone into the MIC in jack.
Parallel Port (25 pin Female)
COM 1 VGA
Serial Ports (9 pin Male)
Line out Line In MIC in

NA120 Motherboard
13
Jumper Introduction
Jumper Settings
The following graphic shows the meaning of the jumper with cover and without cover.
FWH Lock
This jumper allows you to set FWH lock.
Reference: JP5
Connector Type: 1 x 3
JP5 Description Jumper Placement
1-2
BIOS Setting (Default) Put the jumper cover on pin1 and pin2.
2-3
FWH Lock Put the jumper cover on pin2 and pin3.
OPEN
Unlock Remove jumper from JP5.
BIOS Configuration
This jumper allows you to set CPU speed.
Reference: JP2
Connector Type: 1 x 4
JP2 Description Jumper Placement
1-2, 3-4
100 Mhz Put the jumper cover on pin1 and pin2.
Put the jumper cover on pin3 and pin4.
2-3
Auto (Default) Put the jumper cover on pin2 and pin3.
OPEN
133 Mhz Remove jumper from JP2.
PIN 1 PIN 1

NA120 Motherboard
14
Jumper Introduction
cont….
Clear CMOS (Optional)
This jumper allows you to clear the content of the CMOS.
Reference: JP4
Connector Type: 1 x 3
JP4 Description Jumper Placement
1-2
Normal (Default) Put the jumper cover on pin1 and pin2.
2-3
Clear content of CMOS Put the jumper cover on pin2 and pin3.
Onboard LAN
This jumper allows you to set Onboard LAN feature.
Reference: JP1
Connector Type: 1 x 3
JP1 Description Jumper Placement
1-2
Enable Put the jumper cover on pin1 and pin2.
2-3
BIOS Setting (Default) Put the jumper cover on pin2 and pin3.
OPEN
Disable Remove jumper from JP1.

NA120 Motherboard
15
Jumper Introduction
cont….
Connectors and Headers
Front Side USB
CN16
Front Side USB Connector Pin Definition
Pin Signal Name Description
1 Power Power
2 Power Power
3 USB p2- USB p2-
4 USB p3- USB p3-
5 USB p2+ USB p2+
6 USB p2+ USB p2+
7 GND GND
8 GND GND
9 KEY KEY
10 NC NC
USB1-
V1+V2+
USB2-
USB2+ USB1+
GND2 GND1
NC USBOC

NA120 Motherboard
16
Jumper Introduction
cont….
FAN1: System FAN
FAN2: CPU FAN
FAN3: Chassis FAN
Front Side Audio header (CN9)
Pin Description
1 Micro Phone out
2 GND
3 Micro Phone Vref
4 Audio VDD
5 AC97’ right out
6 Ph Jack right out
7 NC
8 Key
9 AC97’ left out
10 Ph Jack left out
Pin Description
1 GND
2 Fan Ctrl (+12V)
3 Fan Sensor
Pin Description
1 GND
2 Fan Ctrl (+12V)
3 Fan Sensor
Pin Description
1 GND
2 Fan Ctrl (+12V)
3 Unused
2
1
Table of contents
Other Lite-on Tech Motherboard manuals

Lite-on Tech
Lite-on Tech TR101 User manual

Lite-on Tech
Lite-on Tech NA115 User manual

Lite-on Tech
Lite-on Tech NA380 User manual

Lite-on Tech
Lite-on Tech NR120 User manual

Lite-on Tech
Lite-on Tech TR100 User manual

Lite-on Tech
Lite-on Tech Scenic Edition X101 User manual

Lite-on Tech
Lite-on Tech NA280 User manual