Livoo DOD174 User manual

User manual
WWW.LIVOO.FR
Reference : DOD174
Version : 1.4
Language : English
Espresso coffee ma er

User manual
1
You have purchased a product LIVOO brand and we than you. We ta e great care in design, ergonomics
and ease of use of our products. We hope that this product will give you complete satisfaction.
General Instructions
PLEASE, TAKE TIME TO READ WELL THE INSTRUCTIONS FOR USE
PARTICULARLY BEFORE THE FIRST USE.
A misuse of the appliance can damage it or hurt the user. Assure
that you use the appliance for the use for which it is designed; we
refuse any responsibilities as for the damages by an incorrect use
or a bad manipulation.
1. Before use chec that the voltage of your wall outlet
correspond to the rated voltage manner.
2. If the supply cord is damaged, it must be replaced by the
manufacturer, its service agent or similarly qualified
persons in order to avoid a hazard (*).
3. This appliance can be used by children aged from 8 years
and above if they have been given supervision or
instruction concerning use of the appliance in a safe way
and if they understand the hazards involved. Cleaning and
user maintenance shall not be made by children unless they
are older than 8 and supervised.
4. Keep the appliance and its cord out of reach of children
aged less than 8 years.
5. Appliances can be used by persons with reduced physical,
sensory or mental capabilities or lac of experience and
nowledge if they have been given supervision or
instruction concerning use of the appliance in a safe way
and if they understand the hazards involved.

User manual
2
6. Children shall not play with the appliance.
7. Do not let cord hang over edge of table or counter or touch
hot surface.
8. Do not touch hot surface. Use handles or nobs only.
9. Close supervision is necessary when your appliance is being
used near children or infirm persons.
10. Do not place an appliance on or near a hot gas or on a
heated oven.
11. Do not use outdoors (Household use only).
12. The appliance is not intended to be operated by means of
external timer or separate remote control system.
13. It is absolutely necessary to eep this appliance clean at all
times as it comes into direct contact with food.
14. Regarding the instruction for cleaning surfaces in contact
with food than s to refer to the below paragraph
“cleaning” in manual.
15. Appliance must not be immersed.
16. There is potential injury from misuse
17. The heating element surface is subject to residual heat
after use.
18. WARNING: The filling aperture must not be opened during
use.
19. This appliance is intended to be used in household and
similar applications such as:
•staff itchen areas in shops, offices and other
wor ing environments
•farm houses
•by clients in hotels, motels and other

User manual
3
residential type environments
•bed and brea fast type environments
(*)
Competent qualified electrician: after sales department of the producer or importer or any person
who is qualified, approved and competent to perform this ind of repairs in order to avoid all danger.
In any case you should return the appliance to this electrician
This instruction manual is available too on our website www.livoo.fr
SPECIFICATION
Voltage:
220-240V~ 50-60Hz
Power:
1350W
Brewing period must be followed by rest period of 1 min
Surfaces are liable to get hot during
use.

User manual
4
DESCRIPTION
1. Water tan lid
2. Water tan
3. Steam nob
4. Pressure gauge
5. On/off switch
6. Steam tube
7. Cup holder tray
8. Drip tray
9. Coffee filter
10. Filter holder
11. Filter holder handle
12. Measuring spoon
13. Coffee filter for ESE pods
14. On switch
15. Coffee switch
16. Steam switch
17. Red led light
18. Steam led indicator
USE OF THE APPLIANCE
Before first use:
Ta e out from the pac ing, clean all the removable parts.
Warning: The machine might emit some noises during the cleaning and water dispensing process, it is
something normal.
Clean the appliance’s internal conduits before the first use:
1. Place it on a stable and flat surface.
2. Install the drip tray and place the cup holder tray on it.
3. Fill the water tan between the MIN and MAX mar .
4. Place a mug or cup on the holder tray. Ma e sure the steam switch and steam nob are set to the off
position.

User manual
5
5. Assemble the filter holder with the filter inside, but do not add any coffee. Ma e sure it is properly
loc ed into place.
6. Place the cup under the coffee outlet nozzles.
7. Plug in appliance.
8. Set the On/off switch to the on position and turn it on. The power light indicator will start blin ing red
and the machine will start heating. Once it has finished heating, the red light will turn steady.
9. Slide the coffee switch upwards, the machine will start dispensing hot water. Slide it downwards to stop
water from coming out. It will not stop automatically.
10. Once water has stopped being dispensed, remove the water tan , rinse it and clean the cup used. The
coffee machine is now ready to use.
Note: if you want to carry out a more thorough cleaning cycle of the inside parts of the appliance, use a
1:4 solution of vinegar and water, or use descaling product.
USE
illing the filter with coffee
1. Insert the filter in the filter holder.
2. Fill the filter with ground coffee.
3. Ma e sure the coffee introduced does not exceed the filter’s edge.
4. Use the measuring spoon and coffee press to press coffee down, add coffee if necessary and press it
down again.
5. Remove excess coffee from the filter’s edge to ensure easy assembly of the filter holder in the unit
and to ensure good operation.
Note: pressing coffee down is a very important part of brewing coffee.
Installing the filter holder
1. Rotate the filter holder to the left to remove it.
2. Choose the desired filter: coffee filter (9) or biggest coffee filter (13)
The (13) coffee filter will require a greater amount of coffee.
3. Follow the above steps to fill the filter with coffee.
Note: Use freshly ground coffee to obtain best results.
4. Assemble the filter holder bac in the appliance by rotating it to the right until it fits into the
loc position.

User manual
6
Warning: The appliance will switch to standby mode after 2 minutes of inactivity. If it enters standby
mode, it is recommended to turn the On/off switch to the off position.
Brewing coffee
Note: Use only potable, fresh, cold water for brewing coffee.
5. Fill the filter with coffee (coffee (9) or coffee filter for ESE pods (13).
6. Install the filter holder.
7. Turn the device on by setting the On/off switch on. The red indicator light will start blin ing and
the machine will start heating up.
8. Once it has finished heating, the red light will turn steady.
9. Slide the coffee switch downwards, the machine will start brewing coffee. Once you have
enough coffee, take the switch to the off position.
Brewing coffee with milk
Once your coffee has been brewed, start preparing mil :
1. Slide the steam switch downwards, the blue light indicator will start blin ing.
2. Once the appliance has heated up, the blue light indicator will stop blin ing.
3. Fill in a cup or mug with mil . It is recommended to use whole mil at room temperature for better
results.
Note:
•Do not use warm milk with the steam function.
•It is recommended to use a milk mug or container with a diameter not smaller than 70 ± 5 mm.
Remember that the milk doubles its volume. or this reason, make sure the milk mug/container
height is sufficient.
4. Introduced the steam tube in the mug or container at a depth of 1-2 cm. When frothing mil , move the
mug or container up and down. Slowly rotate the steam nob anticloc wise for steam to be emitted.

User manual
7
Warning: Do not rotate the steam knob quickly, otherwise steam will be accumulated and will cause milk
to be ejected, causing burns.
The steam tube might emit some water droplets before producing steam.
5. Once the required mil froth is ready, rotate the steam nob cloc wise and set the steam switch to the
off position.
Hot water
1. Turn the appliance on by setting the On/off switch on. The red indicator light will start blin ing and the
machine will start heating up.
2. Once it has finished heating, the red light will turn steady.
3. Slide the coffee switch downwards, the machine will start dispensing hot water. Once you have
obtained enough hot water, take the switch to the off position.
4. Allow the machine to preheat and repeat these steps to dispense hot water as many times as
necessary.
Cooling process
After steam is emitted or coffee is brewed, the appliance’s temperature is li ely to increase so much, which
means that all of its components will become very hot as it has been operating at high pressure. Both of
the light indicators will start blin ing quic ly, indicating the appliance’s temperature has to be decreased.
•Rotate the steam nob anticloc wise and slide the coffee switch to the on position. Water will be
dispensed through the steam tube.
•When the red light indicator stops blin ing, turn off the coffee switch and set the steam nob to the
off position. Temperature will start decreasing.
•The machine will now be ready to brew more coffee.
CLEANING AND STORAGE
Turn off, unplug appliance from the power supply and allow it to cool down completely before cleaning.
Do not use abrasive cleaners or scouring pads as they could cause damage to the product’s surface.
1. Use a soft, dampened cloth to clean the outer part of the appliance regularly.
2. Do not use metal, sharp or rough cleaning accessories, as they may damage the product.

User manual
8
3. Do not immerse the main body in water or other liquids.
4. Wash the water tan , drip tray, measuring spoon, filter holder, filter and cup-holder tray under
running water after each use.
5. After using the steam function, the tube must be cleaned with a cloth immediately after. Allow
steam to be released to avoid possible bloc ages inside the tube.
6. If the steam tube is clogged, use a needle to unbloc the conduct.
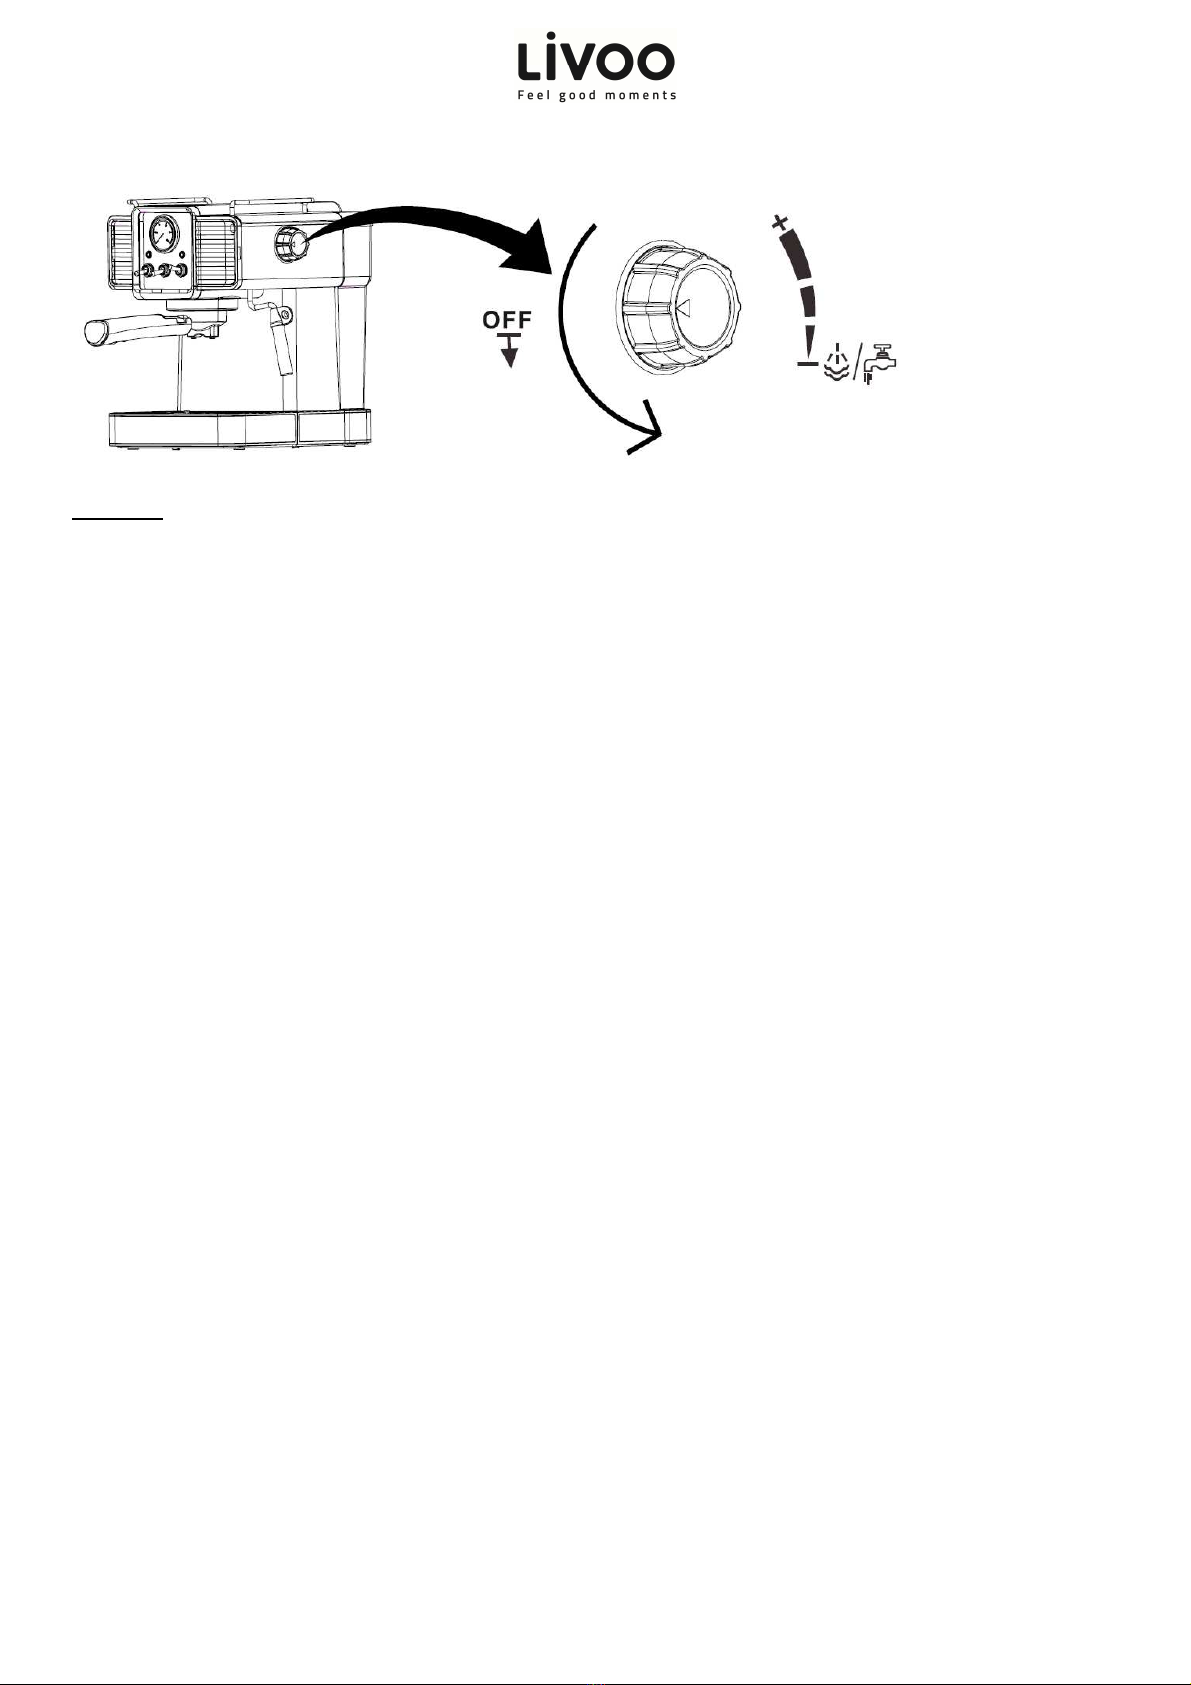
7. Turn the filter holder left to detach it and empty all coffee residues inside it. Then, use water and a
cloth to clean it, do not wash it in the dishwasher.
8. Dry thoroughly all components before storing the appliance or using it again.
Cleaning the filter holder
1. Remove the filter holder.
2. Lift the filter loc and hold the filter tight with it.
3. Tap the filter gently against the bin to remove coffee grounds.
4. Lower the filter loc bac .
5. Remove the filter from the filter holder
6. Wash the filter holder and the filter as described in the section above.
Cleaning the water tank
1. Remove the water tan from the machine.
2. Thoroughly wash the tan and its lid under running water with a mild detergent. Then, rinse it with
water.
3. Leave until completely dry.
TROUBLE SHOOTING
Problem Cause Solution
Water lea s from the bottom of
coffee ma er.
There is much water in the drip
tray.
The coffee ma er is malfunction.
Please clean the drip tray.
Please contact with the
authorized service facility for
repairing.
Water lea s out of outer side of
filter.
There is some coffee powder on
filter edge.
Get rid of them.
Acid (vinegar) taste exists in
Espresso coffee.
No clean correctly after cleaning
mineral deposits.
Clean coffee ma er per the
content in “before the first use”
for several times.
The coffee ma er cannot wor
any more
The power outlet is not plugged
well.
Plug the power cord into a wall
outlet correctly, if the appliance
still does not wor , please
contact with the authorized

User manual
9
service facility for repairing.
The steam cannot froth.
The steam ready indicator is not
illuminated.
The container is too big or the
shape is not fit.
You have used s immed mil
Only after the steam ready
indicator is illuminated, the
steam can be used to froth
Use high and narrow cup.
Use whole mil .
Correct Disposal of this product
(Waste Electrical & Electronic Equipment)
(Applicable in the European Union and other European countries with separate collection systems)
The European Directive 2012/19/EU
on Waste Facilities Electrical and Electronic (WEEE)
This marking shown on the product or its literature, indicates that it should not be disposed with other household
wastes at the end of its working life.
To prevent possible harm to the environment or human health from uncontrolled waste disposal, please separate this from other types
of wastes and recycle it responsibly to promote the sustainable reuse of material resources.
Household users should contact either the retailer where they purchased this product or their local authority office, for details of
where and how they can ta e this item for environmentally safe recycling
.
•Photo no contractual
•Worried about the quality of his products the manufacturer reserves the right to ma e modifications without advance
notice
LIVOO
BP 61071
67452 Mundolsheim-FRANCE
Table of contents
Other Livoo Coffee Maker manuals