Livoo DOM456 User manual
Instruction manual
WWW.LIVOO.FR
Reference : DOM456
Version : 1.4
Language : Englis
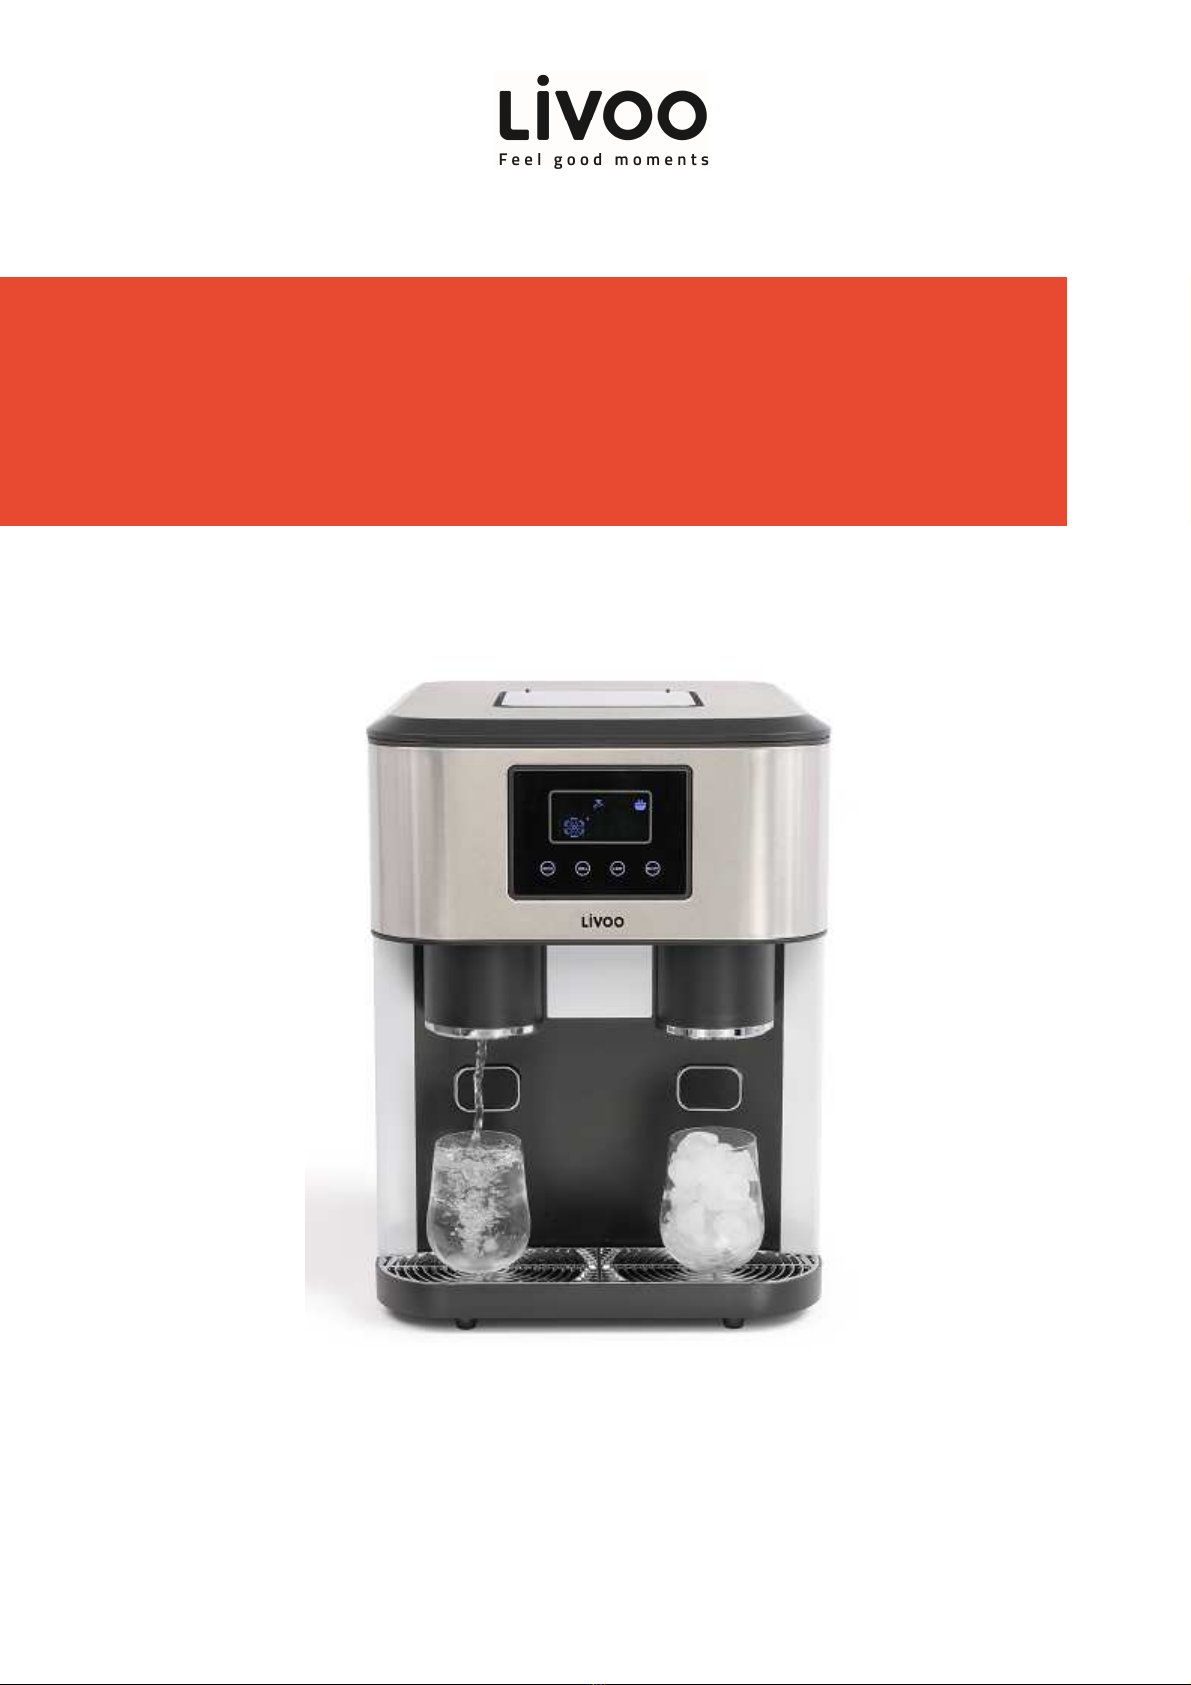
Ice maker

Instruction manual
1
You ave purc ased a product LIVOO brand and we t ank you. We take great care in design, ergonomics
and ease of use of our products. We ope t at t is product will give you complete satisfaction.
T is instruction manual is available too on our website www.livoo.fr
SAFETY ADVICES
PLEASE READ THESE INSTRUCTIONS CAREFULLY BEFORE USING
THE APPLIANCE AND SAVE IT FOR ANY FURTHER NEED.
1.
Read all instructions before using.
2.
Unplug t e mac ine before fitting, removing, or cleaning
parts.
3.
Ensure t e voltage is compliant wit t e voltage range
stated on t e rating label, and ensure t e eart ing of t e
socket is in good condition.
4.
C ildren s ould not use t is mac ine unsupervised. Do not
let t e cord ang down w ere a c ild could grab it.
5.
T is appliance can be used by c ildren aged from 8 years
and above and persons wit reduced p ysical, sensory or
mental capabilities or lack of experience and knowledge if
t ey ave been given supervision or instruction concerning
use of t e appliance in a safe way and understand t e
azards involved.
6.
Cleaning and user maintenance s all not be made by
c ildren wit out supervision.
7.
C ildren s all not play wit t e appliance
8.
Do not use it outdoors. Keep it away from sources of eat,

Instruction manual
2
direct sunlig t, umidity (never dip it into any liquid) and
s arp edges.
9.
Do not use t e appliance wit wet ands. If t e appliance is
umid or wet, unplug it immediately.
10.
Keep t e appliance and its cord out of reac of c ildren less
t an 8 years.
11.
If t e supply cord is damaged, it must be replaced by t e
manufacturer, its service agent or similarly qualified
persons in order to avoid a azard(*)
12.
To protect against t e risk of fire, electric s ock, or personal
injury, do not place t e cord, plug, or unit in water or ot er
liquids.
13.
T e appliance must be placed on a flat and stable surface.
14.
Never leave t e mac ine on unattended.
15.
Always make sure everyt ing is t oroug ly clean before
making ice cube.
16.
Never clean wit scouring powders or ard implements.
17.
T e appliance is not intended to be operated by means of
external timer or separate remote control system.
18.
Do not upend t is product or incline it over a 45° angle.
19.
Do not use t e accessories w ic are not recommended by
manufacturer.
20.
Do not switc on t e power button frequently (ensure
5min. interval at least) to avoid t e damage of compressor.
21.
Metal s eet or ot er electric objects are not allowed to be
inserted into t e appliance to avoid fire and s ort circuit.
22.
Warning: Do not store explosive substances suc as aerosol

Instruction manual
3
cans wit a flammable propellant in t is appliance.
23.
C ildren aged from 3 to 8 years are allowed to load and
unload refrigerating appliances.
24.
WARNING: w en positioning t e appliance, ensure t e
supply cord is not trapped or damaged.
25.
WARNING: do not locate multiple portable socket outlets or
portable power supplies at t e rear of t e appliance.
26.
T is appliance is intended to be used in ouse old and
similar applications suc as:
•staff kitc en areas in s ops, offices and ot er
working environments
•farm ouses
•by clients in otels, motels and ot er
residential type environments
•bed and breakfast type environments
(*)
Competent qualified electrician: after sales department of t e producer or importer or any person w o
is qualified, approved and competent to perform t is kind of repairs in order to avoid all danger. In any
case you s ould return t e appliance to t is electrician.
SPECIAL MEASURES
Warning; Risk of fire / flammable materials
- Keep t e appliance 8cm from ot er objects to ensure t e
good eat releasing.

Instruction manual
4
- WARNING – Keep ventilation openings, in t e appliance
enclosure or in t e built-in structure, clear of obstruction.
- WARNING - Do not use mec anical devices or ot er means to
accelerate t e defrosting process, ot er t an t ose
recommended by t e manufacturer.
- WARNING - Do not damage t e refrigerant circuit.
- WARNING - Do not use electrical appliances inside t e food
storage compartments of t e appliance, unless t ey are of t e
type recommended by t e manufacturer
- WARNING - fill wit potable water only.
- Pure water is not allowed to be used on t is unit, spring water
is recommended.
- Only use drinking water wit out additives! Additives remain
in t e water circuit and contaminate t e appliance.
- Opening t e door for long periods can cause a significant
increase of t e temperature in t e compartments of t e
appliance.
- Clean regularly surfaces t at can come in contact wit food
and accessible drainage systems.
- Clean water tanks if t ey ave not been used for 48 ; flus
t e water system connected to a water supply if water as not
been drawn for 5 days.
- If t e refrigerating appliance is left empty for long periods,
switc off, defrost, clean, dry, and leave t e door open to
prevent mould developing wit in t e appliance.

Instruction manual
5
PREPARATION BEFORE USE.
Remove all packing material and carefully c eck your ice maker to ensure it is in good condition and t at
t ere is no damage to t e ice maker or power cord and plug.
IMPORTANT: Please observe a waiting period of 6 ours before initial operation and after moving t e
appliance for t e coolant to settle; ot erwise t e compressor can be damaged.
SPECIFICATIONS
Compressor Hig efficiency CFC free R600a/29g
Water Reservoir Capacity: 2.1 Liters
Voltage: 220-240V~ 50Hz 1.32A
DESCRIPTION
1
2
3
4
5
6
11
10
7
8
9
11
13
12
14
15

Instruction manual
6
1. Window
6. Water Collecting Tray
2. LCD screen 7. Ice outlet
3. Control panel 8.Water tank door
4. Crus ice and water outlet 9. ice button
5. Water button 10.Water inlet
11. Measuring cup 12. ice scoop
13. Filling water pipe 14. adaptor
15. Anti-drain plug
USE
Before First use of your Ice Maker
1. During transportation, t e incline angle s ould not be over 45°. Do not turn t e ice maker upside down.
As t is may damage t e compressor.
2. Remove all packing material and carefully c eck your ice maker to ensure it is in good condition and t at
t ere is no damage to t e ice maker or power cord and plug.
3. T e Ice maker s ould be placed orizontally on a level surface. To ensure proper ventilation for your
Ice maker allow 150 mm of space at t e top, t e back and on eac side. Do not install t e Ice maker
near an oven, radiator, or any ot er eat source.
4. Before using t e Ice maker for t e first time, please wait 2 ours after positioning it, and keep t e
front lid open for at least 6 ours
5. Pure water is not allowed to be used on t is unit, spring water is recommended.
6. Please always keep t e viewing window close during ice making.
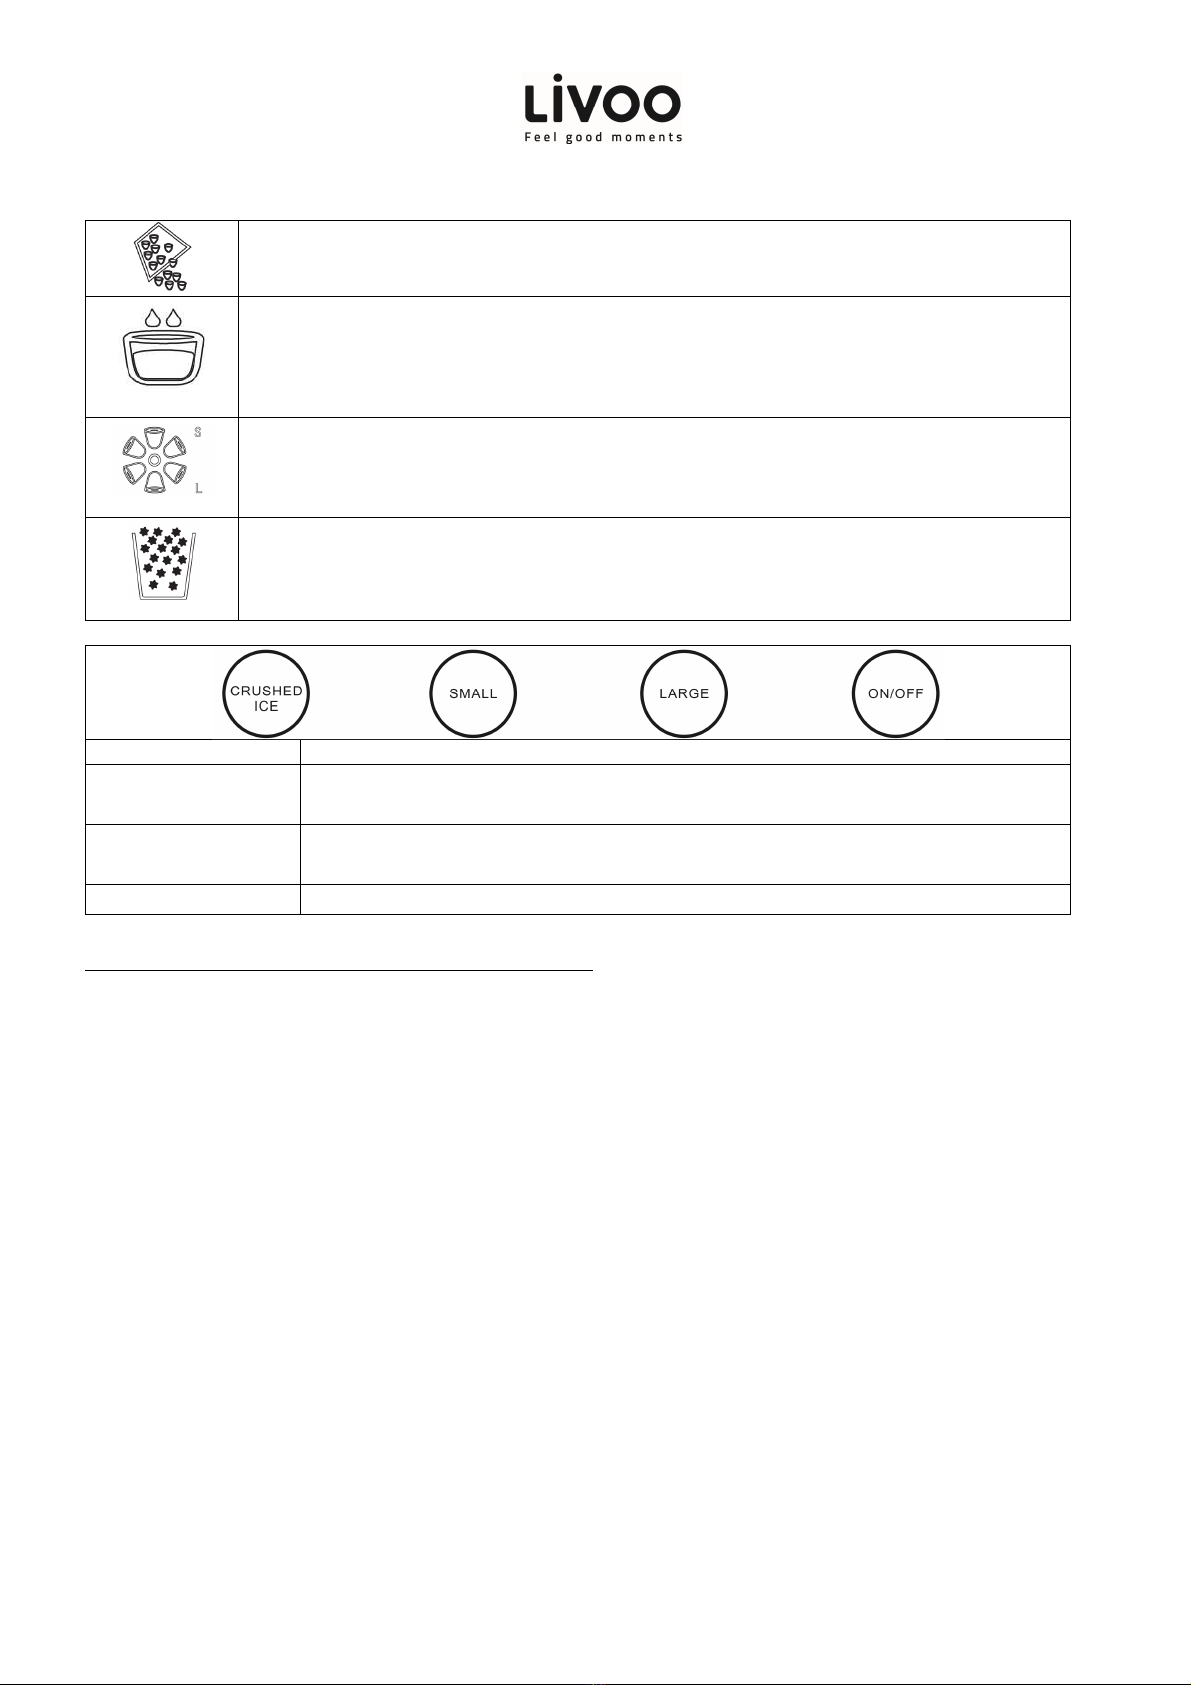
Control Panel Operation
Display
Explanation
The unit has problem, need to take off the plug, and restart it.
If it appears again, then ask for service
Ice is full
Water is not enough in water reservoir, need to add water
Instruction manual
7
Unit is on ice dropping process
Alert to fill water
Ice on making, if S at right top hand of it, then means small size ice on making
if L at right bottom hand, then means large size ice on making
Crushed ice in process
Button
Operation
CRUSHED ICE Press it, get to get t e crus ed ice.
Press it again, t e unit will stop crus ed ice in 5seconds
SMALL or LARGE Press button SMALL to turn on/off t e small size ice making function
Press button LARGE to turn on/off t e large size ice making function
ON/OFF Press it to turn on or off t e power
Operating Instructions : crushed ice and ice making
1. Open t e lid and fill t e water reservoir wit water.
Note: Make sure the water level in the water reservoir is not over the Ice collecting tray.
2. Connect to t e power.
3. Press ON/OFF button to turn unit on. T e ice maker begins to work. Water will be pumped into t e
water tray from t e water reservoir automatically.
Note: For the first three cycles, the ice may be small and irregular in size.
If no water is pumped to the water tray over two cycles but the water in reservoir is enough,
then please open the drain cap, and let several drops water runs out. Then press ON/OFF button
again to restart the unit
4. Select t e button SMALL,LARGE to start t e ice making function you may need
Note: when temperature lower than 15degrees,S SMALL is recommended, when temperature
over 30degrees,L LARGE ice is recommended.
5. Ice making cycle begins, ice will be frozen.
Note: the ice making time depends on the ambient temperature

Instruction manual
8
6. Once ice making cycle is finis ed, t e water tray will tilt forward; t e remaining water flows back to
t e water reservoir and t e ice cubes will drop from t e fingers.
7.
In about 15-35 seconds, t e water tray will tilt backward, ice in produced in previous cycle will be
pus ed to ice reservoir directly, unit back to
work from step 4 to step 6 again.
8. Please put your cup below t e ice cube dispenser s oot directly t en pus t e ice cube dispenser
button to get ice, t e indicator will be on.
If t e ice is stored in t e unit for long time, t e ice may freeze and stick toget er, t en no ice will be
dispensed even t e ice is full, if so, please kindly use scoop included in t e unit to break t e ice first,
t en pus t e punc er button.
9. Press t e , unit start to dispense crus ed ice, press it again, t e unit will stop crus ed ice in
5 seconds.
Note: Please don’t put the finger into the crusher at any time, or your finger might be hurt
10. Press ON/OFF button to turn off power of unit
11. Pus t e button at left side of t e unit, old water will come out
Note: if you need to get cold water, at least the ice making function should be turn on.
Please make sure your cup is below t e cold water outlet, or water will be splas ed everyw ere.
12. If you need to take off t e pipe, replace it or insert t e anti-drain plug, please do as follows:
Firstly take off t e blue ring named as A, t en press t e w ite ring (lock) at t e outer side, take out
t e pipe
Dispenser function
To dispense fres water, use a glass and press t e trigger until amount of water is satisfying.
WARNING
If t e icemaker is reused after a long time, t e water pump may not pump sufficient water due to an air
block, t e deficient water indicator turns on in t is case. To correct t is press t e START button again, t en
t e icemaker will work normally.
To ensure t e cleanliness of t e ice cubes, water in t e water reservoir s ould be replaced every
24 ours.
Always use fres water before starting ice production eit er at initial installation or after a long s ut-off
period.
DANGER

Instruction manual
9
It is normal for t e compressor and condenser surface to reac temperatures between 70°C and
90°C during operation and surrounding areas may be very ot.
CLEANING AND MAINTENANCE
•Clean t e ice collecting tray, water box, ice s ovel. W en cleaning, unplug t e unit and remove t e
ice cubes. Use a diluted solution of water and vinegar to clean t e inside and t e outside surface of
t e Ice maker. Do not spray Ice maker wit c emicals or diluted agents suc as acids, gasoline or
oil. Rinse t oroug ly before starting.
•If t e compressor stops for any reason suc as water s ortage, too muc Ice, power off, etc... Do
not start t e system rig t away, wait 3 minutes, and t en re-start t e Ice maker.
•Always use fres water before starting ice production eit er at initial installation or after a long
s ut-off period.
Troubleshooting
•Please note, if a power failure occurs due to disconnection of t e power cord, or t e off power
button as been pus ed off during an ice making cycle, small ice c ips may formed and lodge in t e
automatic s ovel causing it to jam. If t is occurs, t e ice c ips may be removed by disconnecting t e
power cord and gently pus ing t e s ovel to t e rear of t e cabinet and removing t e ice c ips,
t en restarting.
Problem
Possible Cause Suggested Solutions
T e compressor works
abnormally wit a Buzzing
noise
T e voltage is lower t an
recommended
T e compressor is urt
during transportation
Stop t e Ice maker and do not restart
until t e voltage is normal.
Stop rig t away and keep it on a flat
surface for 24 ,t en restart
ADD WATER indicator lig ts
up
1.T ere is not enoug
water
2.T e pump is blocked or
broken
1. Fill water to t e MAX line, t en
press t e start button to restart.
2. Clean t e water pump after take it
out or replace it.
Indicator lig ts on display
are not on
Blown fuse/ No power Replace fuse / Turn power on
T e Ice made is too large
and wit pieces sticking
toget er.
1. Wrong ice size is
selected
2. Ice from previous batc
left in t e ice tray
1. Select small size if temperature is
cool
2. Stop t e unit rig t away, restart t e
unit till t e ice in water tray melt
down
Table of contents
Other Livoo Ice Maker manuals


