LOADMASTER ELITE Series User manual

ELITE SERIES
OPERATORS MANUAL
LOADMASTER
100 WEST ELEVENTH AVENUE
PO BOX 186
NORWAY, MICHIGAN 49870
PHONE 906- 63-9226
TOLL FREE 800-433-2768
FAX 906- 63-9800
E-MAIL: [email protected]
12-1-2001
REV 06-01-2004

TABLE OF CONTENTS ELITE
Section 01 SAFETY PRECAUTIONS
Sec01-pg03 thru sec01-pg08
Section 02 OPERATOR’S MANUAL
Sec02-pg09 thru sec02-pg30
{Include/study all of the SECTION 01:
SAFETY PRECAUTIONS}
Warning…Although many ELITE’s are setup on chassis’ that do NOT require the operator to possess a
“CDL”…this does NOT imply that
this
manuals numerous SAFTEY PRECAUTIONS are less valuable or less
important to understand and follow than any other REAR LOADER.
All of the same rear-loader
hazards
exist in the Elite rear-loader, even if it happens to be smaller and lighter
than some other rear-loader.
Read, understand, and follow all of the information in this manual (including but not limited to all the Safe
Operation, Safe Maintenance, and Safe Repair information) before approaching an ELITE.
Be sure all operator’s, maintenance people, repairers, washers, lubers, etc. are trained for ELITE
operation
so
that each person can SAFELY perform their assigned tasks.
Sec01-pg01 (contents page)

Section 01
SAFETY PRECAUTIONS
IMPORTANT SAFETY INFORMATION
READ AND UNDERSTAND THIS ENTIRE MANUAL
BEFORE OPERATING, REPAIRING, OR ADJUSTING THE
EXCEL REAR-LOAD REFUSE PACKER. PEOPLE WHOM
USE OR MAINTAIN THIS EQUIPMENT MUST BE
THOROUGHLY TRAINED AND FAMILIAR WITH THE
MACHINE. IF INCORRECTLY USED OR MAINTAINED,
THIS EQUIPMENT CAN CAUSE SEVERE INJURY OR
DEATH.
Keep this manual where the people who maintain or
operate the ELITE can have ready access to it.
Additional copies are available by contacting
LOADMASTER or a LOADMASTER dealer.
Some service operations may require special tools or
blocking devices (such as the raised tailgate). If you
require information on these items, contact
LOADMASTER.
THE SAFETY PRECAUTIONS ARE FOR YOUR OWN
PROTECTION!
DO NOT OPERATE OR MAINTAIN OR REPAIR THE ELITE
UNTIL YOU HAVE READ THIS ENTIRE MANUAL AND
UNDERSTAND ITS CONTENTS CLEARLY. PLEASE CALL
LOADMASTER (906-563-9226) IF YOU REQUIRE
ASSISTANCE!
If the operator of this machine or the servicer of this machine
has trouble reading, then he/she must be assigned a
mentor/trainer who will read and explain to such individual the
entire contents of this manual as well as the safety precautions
and the danger, warning, caution, and notice decals and
placards affixed to the ELITE. SUCH INDIVIDUAL CAN NOT BE
ALLOWED TO OPERATE OR MAINTAIN THE ELITE UNTIL
HE/SHE COMPLETELY UNDERSTANDS ALL OF THESE
MATERIALS. FAILURE TO DO THIS CAN RESULT IN SERIOUS
INJURY OR DEATH!
SAFETY AND SAFE METHODS MUST BE ADHERED TO AT
ALL TIMES. OSHA LOCKOUT PROCEDURES MUST BE
FOLLOWED WHEN MAINTAINING THE LEGACY3. If you
are not familiar with OSHA lockout procedures, contact
the LOADMASTER or OSHA office.
This DANGER symbolism precedes information
pertaining to specific immediate hazards, which
if
disregarded
, WILL result in severe personal injury or
death of the user or others.
This WARNING symbolism precedes information
pertaining to hazards or unsafe practices which COULD
result in severe personal injury or death.
This CAUTION symbolism precedes information
pertaining to potential hazards or unsafe practices,
which if disregarded, may result in a lesser personal
injury or damage to the equipment.
This notice symbol will precede information which is vital
to the proper operation or maintenance of the
equipment.
Sec01-pg02

FOLLOW ALL LOCKOUT/TAGOUT PROCEDURES AS DEFINED IN THIS
MANUAL, AS WELL AS WELL AS DEFINED BY YOUR SPECIFIC SHOP
(EMPLOYER) AND OSHA! FAILURE TO HEED THIS WARNING OF
DANGER MAY RESULT IN SERIOUS PERSONAL INJURY OR DEATH.
BEFORE ENTERING THE BODY, ALWAYS SHUTDOWN THE
DIESEL, PLACE THE IGNITION KEYS IN YOUR POCKET AND
ATTACH A SIGN TO THE STEERING WHEEL THAT SAYS “DO
NOT START ENGINE”! PERFORM YOUR SHOP’S DETAILED
LOCKOUT/TAGOUT PROCEDURE. THE EJECTOR BLADE
COULD MOVE UNEXPECTEDLY CAUSING SERIOUS INJURY OR
DEATH.
IF ENTERING THE FORWARD (CAB) SIDE OF EJECTOR, FIRST
EXTEND THE EJECTOR BLADE ALL THE WAY REARWARD
(TOWARDS TAILGATE) AND “PARK” IT THERE. THEN DO YOUR
COMPLETE LOCKOUT/TAGOUT PROCEDURE.
STAY CLEAR OF MOVING HOPPER BLADES AND THE HOPPER
LOADING SILL WHEN BLADES ARE MOVING! IF YOU OR A WORK
PARTNER IS CAUGHT IN THE BLADE ACTION, SERIOUS INJURY OR
DEATH WILL RESULT.
BEFORE ENTERING THE LOADING HOPPER, ALWAYS
SHUTDOWN THE DIESEL, PLACE THE IGNTION KEYS IN YOUR
POCKET AND ATTACH A SIGN TO THE STEERING WHEEL THAT
SAYS “DO NOT START ENGINE”! DO YOUR SHOP’S DETAILED
LOCKOUT/TAGOUT PROCEDURE.
THE BLADES COULD UNEXPECTEDLY AND SUDDENLY BEGIN
MOVING WHICH WILL CAUSE SERIOUS INJURY OR DEATH.
WHEN REPAIRING THE TAILGATE’S RUBBER SEAL, ALWAYS
PROVIDE
THREE DISTINCT MEANS
OF SUPPORT FOR THE
PARTIALLY RAISED TAILGATE! TAILGATE COULD SUDDENLY
FALL CAUSING SERIOUS INJURY OR DEATH IF TAILGATE IS
NOT SUPPORTED IN THREE SEPARATE WAYS.
SEE THE REPAIR TOPIC CALLED “INSTALLING A FRESH
TAILGATE SEAL” IN THE REPAIR SECTION OF THIS MANUAL
FOR A DETAILED EXPLANATION OF BLOCKING AND
PROPPING OF TAILGATE BEFORE BEGINNING SEAL
REPLACEMENT.
NEVER WORK BENEATH A RAISED TAILGATE THAT HAS A
HYDRAULIC CYLINDER REMOVED!
NEVER WORK BENEATH A RAISED TAILGATE THAT HAS A
TAILGATE LIFT CYLINDER’S HOSE, FITTING, OR VALVE
COMPONENT REMOVED!
TAILGATE MAY SUDDENLY FALL CAUSING SERIOUS INJURY
OR DEATH
EVEN IF
THE TAILGATE IS MECHANICALLY
PROPPED AND BLOCKED UP. THE TAILGATE LIFT CYLINDERS
SYSTEM
MUST BE
PROVIDING
ONE OF THE THREE
MEANS OF
SUPPORT BEFORE
WORKING BENEATH
A RAISED TAILGATE.
THE TAILGATE’S HYDRAULIC LIFT SYSTEM MUST BE IN GOOD
WORKING CONDITION (AND TWO ADDITIONAL MECHANICAL
BLOCKING AND PROPPING MEANS SECURELY INSTALLED)
BEFORE WORKING BENEATH A RAISED TAILGATE.
ALWAYS FULLY LOWER THE TAILGATE BEFORE REMOVING A
TAILGATE LIFT CYLINDER OR ANY OF IT’S PLUMBING COMPONENTS
(VALVES, TUBES, FITTINGS, and HOSES)! DO NOT RELY
ONLY
ON
MECHANICAL BLOCKING AND PROPPING TO SUPPORT A PARTIALLY
RAISED TAILGATE! TAILGATE MAY SUDDENLY FALL CAUSING
SERIOUS INJURY OR DEATH.
THE ELITE’S TAILGATE LIFT SYSTEM IS FULLY SERVICABLE WITH
TAILGATE
FULLY LOWERED
.
NEVER STAND UNDERNEATH OR WALK BENEATH A MOVING
TAILGATE! THE TAILGATE MAY BE LOWERED UPON YOU OR MAY
SUDDENLY FALL CAUSING SERIOUS INJURY OR DEATH.
A COMPONENT FAILURE (SUCH AS HOSE END “BLOW-OFF”) COULD
CAUSE TAILGATE TO SUDDENLY FALL.
NEVER STAND UNDERNEATH OR WALK BENEATH A RAISED
(OR PARTIALLY RAISED) TAILGATE WHEN SUPPORTED
ONLY
BY ITS HYDRAULIC SYSTEM!
TAILGATE MAY SUDDENLY AND UNEXPECTEDLY FALL
DOWNWARD CAUSING SERIOUS INJURY OR DEATH.
SHOULD A HYDRAULIC COMPONENT FAIL, SUCH AS A HOSE-
END “BLOW-OFF”, THE TAILGATE WILL SUDDENLY FALL.
Sec01-pg03

KEEP THE BODY SIDE ACCESS DOOR CLOSED WHEN EJECTOR
BLADE IS IN MOTION! THE EJECTOR BLADE MOVES PAST
THE DOOR OPENING AND COULD CAUSE INJURY.
YOU MUST NOT OPERATE THE ELITE UNLESS:
YOU ARE QUALIFIED BY TRAINING AND EXPERIENCE IN THE
SAFE OPERATION OF THIS MACHINE.
TRAINING INCLUDES COMPLETE KNOWLEDGE OF YOUR EMPLOYER’S
WORK RULES, ALL GOVERMENTAL REGULATIONS, AND
MANUFACTURER’S OPERATOR’S MANUAL RELATIVE TO THIS
MACHINE’S SAFE USE.
AN UNTRAINED OPERATOR SUBJECTS HIMSELF/ HERSELF
AND OTHERS TO SERIOUS INJURY OR DEATH.
YOU MUST NOT SERVICE, MAINTAIN, OR REPAIR THE ELITE UNLESS:
YOU ARE QUALIFIED BY TRAINING AND EXPERIENCE IN THE
SAFE
OPERATION
OF THIS MACHINE.
TRAINING INCLUDES COMPLETE KNOWLEDGE OF YOUR
EMPLOYER’S WORK RULES, ALL GOVERMENTAL
REGULATIONS, AND MANUFACTURER’S OPERATOR’S MANUAL
RELATIVE TO THIS MACHINE’S SAFE USE.
A SERVICE TECHNICIAN WHO IS UNTRAINED IN THE SAFE
OPERATION
OF THE ELITE SUBJECTS HIMSELF/HERSELF AND
OTHERS TO SERIOUS INJURY OR DEATH.
YOU MUST NOT SERVICE, MAINTAIN, OR REPAIR THE ELITE
UNLESS YOU ARE THOROUGHLY KNOWLEDGEABLE OF YOUR
SHOP’S (YOUR EMPLOYER’S) DETAILED LOCKOUT/TAGOUT
POLICIES AND PROCEDURES.
LOADMASTER HAS INCLUDED THE OUTLINE OF A SKELETON,
BARE BONES LOCKOUT/TAGOUT PROCEDURE IN THIS
MANUAL. IT IS THE RESPONSIBILITY OF THE OWNERS,
SUPERVISORS, MAINTAINERS, AND OPERATORS OF THE
LEGACY3 TO FULLY DEVELOP A “DETAILED”
LOCKOUT/TAGOUT PROCEDURE/POLICY THAT SUITS YOUR
SHOP’S SPECIFIC CIRCUMSTANCES.
THE RIDING STEP SHALL NOT BE USED WHEN:
SPEEDS EXCEED 10 MPH
DISTANCE OF TRAVEL IS MORE THAN 2 TENTHS OF A
MILE
VEHICLE IS MOVING BACKWARDS (IN REVERSE)
TO PREVENT POSSIBLE INJURY, DEATH, OR PROPERTY
DAMAGE, DO NOT USE THIS VEHICLE TO “TOW” OTHER
EQUIPMENT. IT IS NOT INTENDED, DESIGNED OR EQUIPPED
FOR TOWING.
DO NOT ENTER UNDER OR CRAWL UNDER THE CHASSIS
UNLESS THE DIESEL IS SHUTDOWN, THE IGNITION KEYS ARE
IN YOUR POCKET, AND A SIGN HAS BEEN PLACED ON THE
STEERING WHEEL THAT SAYS “DO NOT START ENGINE”! DO
YOUR SHOP’S DETAILED LOCKOUT/TAGOUT PROCEDURE
INCLUDING WHEEL CHOCKING!
THE VEHICLE WILL RUN YOU OVER CAUSING SERIOUS
INJURY OR DEATH. YOU MAY BECOME ENTANGLED IN THE
EXPOSED VEHICLE DRIVETRAIN OR THE ROTATING PUMP-
PROPELLOR SHAFTING CAUSING SERIOUS INJURY OR
DEATH.
DO NOT OVERLOAD THE PACKER AND CHASSIS. DO NOT
EXCEED THE CHASSIS MANUFACTURER’S POSTED GROSS
VEHICLE WEIGHT RATINGS (OVERALL AND “PER AXLE”).
GROSS VEHICLE WEIGHTS MUST ALSO MEET APPLICABLE
FEDERAL, STATE, AND LOCAL WEIGHT LAWS. FAILURE TO
COMPLY COULD CAUSE POOR HANDLING AND OUT OF
COMPLIANCE BRAKING AND CAUSE SERIOUS INJURY OR
DEATH.
Sec01-pg 04
THE IN-CAB MASTER ROCKER SWITCH LABELED “THRTL”
(THROTTLE) MUST BE IN THE “OFF” POSITION WHEN THE
TRUCK IS BEING DRIVEN ABOVE 10MPH!
SHOULD THE THROTTLE ENGAGE DURING TRAVEL, LOSS OF
VEHICLE CONTROL COULD OCCUR RESULTING IN SERIOUS
INJURY OR DEATH.
ALWAYS BE CERTAIN THE THROTTLE ADVANCE CAN
NOT
AUTOMATICALLY ADVANCE THE DIESEL RPM UNLESS THE
VEHICLE TRANSMISSION IS IN
NEUTRAL
!
AUTOMATIC ADVANCEMENT OF THROTTLE WHILE VEHICLE IS
IN A DRIVE OR REVERSE GEAR COULD RESULT IN LOSS OF
VEHICLE CONTROL AND CAUSE SERIOUS INJURY OR DEATH.
SHOULD THIS MALFUNCTION EVER OCCUR, PARK THE
VEHICLE IMMEDIATELY AND REPAIR
NEUTRAL
INTERLOCK
OF THE THROTTLE ADVANCE SYSTEM.
NEVER OPERATE, MAINTAIN, OR REPAIR THE VEHICLE OR
THE ELITE WHILE UNDER THE INFLUENCE OF ALCOHOL OR
DRUGS! WORKERS UNDER THE INFLUENCE PRESENT A
HAZARD TO THEMSELVES AND OTHERS AND CAN CAUSE
SERIOUS INJURY OR DEATH.
DO NOT OPERATE, MAINTAIN, OR REPAIR THE VEHICLE OR
THE ELITE UNLESS YOU ARE ALERT, CLEAR-HEADED AND
WELL RESTED. IF YOU ARE FEELING TIRED, DO OTHER WORK
CHORES THAT DO
NOT
REQUIRE YOU TO BE NEAR A
HYDRAULICALY-POWERED MACHINE.
DO NOT WEAR WATCHES, RINGS, AND JEWELRY WHILE
WORKING WITH MECHANICAL OR ELECTRICAL EQUIPMENT.
DO NOT WEAR LOOSE CLOTHING THAT COULD ENTAGLE YOU
INTO MOVING OR ROTATING COMPONENTS. THESE TYPES
OF THINGS WILL BE HAZARDOUS AND COULD CAUSE
SERIOUS INJURY OR DEATH IF WORN NEAR MOVING
MECHANICAL OR HYDRAULIC MACHINE PARTS.
DO WEAR PERSONAL PROTECTION ITEMS SUCH AS HARD
HATS, SAFETY GLASSES (EYE PROTECTION), HEAVY GLOVING,
AND SAFETY SHOES WHEN OPERATING OR MAINTAINING
THE ELITE OR CHASSIS. OPERATORS SHOULD WEAR VESTING
THAT HAS A BRIGHT COLORATION (ORANGE) AND
REFLECTIVE CHARACTERISTICS FOR DAY/NIGHT VISIBILITY.
FOLLOW ALL OF YOUR EMPLOYER’S REQUIREMENTS FOR
PERSONAL PROTECTIVE ITEMS.
BEFORE OPERATING THE PACKER, BE CERTAIN TO CLEAR THE
AREA OF ALL PEOPLE. ALWAYS BE ATTENTIVE WHEN
OPERATING THE CONTROLS. WATCHDOG THE AREA FOR
ACTIVITY. SCAN YOUR MIRRORS REGULARLY. NEVER BACK-
UP THE VEHICLE UNLESS YOU ARE COMPLETELY CERTAIN IT
IS SAFE TO DO SO. USE A HELPER/OBSERVER OR GET OUT
YOURSELF, IF NECESSARY, TO ASSURE YOU CAN SAFELY
BACK-UP. THOROUGHLY UNDERSTAND THE CONTROLS
BEFORE OPERATING THE PACKER. FAILURE TO DO SO COULD
RESULT IN SERIOUS INJURY OR DEATH TO YOURSELF OR
OTHERS.
ALWAYS KEEP THE IN-CAB “GATE AJAR” PILOT LIGHT IN
GOOD WORKING CONDITION. ALWAYS BE SURE THE BACK-
UP ALARM SOUNDS WHENEVER THE TAILGATE IS RAISED-UP
A FOOT OR SO. REPLACE LAMP BULB OR REPAIR ELECTRICAL
WIRE SYSTEM IMMEDIATELY. FAILURE TO DO SO COULD
LEAD TO SERIOUS SITUATIONS.
BEFORE RAISING THE TAILGATE, BE SURE THERE EXISTS
ADEQUATE CLEARANCE BETWEEN TAILGATE AND ANY
BUILDING STRUCTURE OR ELECTRICAL POWER LINES (OR
ANY OTHER OBSTACLES). ALLOWING THE TAILGATE TO
STRIKE OBJECTS OR POWER LINES COULD CAUSE SERIOUS
INJURY OR DEATH.
sec01-pg 05

ALWAYS DRIVE CAREFULLY AND DEFENSIVELY! ALWAYS BE
AWARE THE CHASSIS/PACKER IS A
HEAVY
VEHICLE AND NOT
A PASSENGER CAR. THE CHASSIS/PACKER WILL REQUIRE
SLOWER CORNERING SPEEDS AND LONGER STOPPING
DISTANCES. THE CHASSIS/PACKER WILL HAVE A HIGHER
CENTER OF GRAVITY WHICH PRESENTS A “ROLL-OVER”
HAZARD IF DRIVING HABITS ARE NOT ADJUSTED. BE AWARE
THE CHASSIS/PACKER’S HANDLING AND BRAKING
CHARACTERSITICS WILL
CHANGE
AS YOU BUILD A PAYLOAD.
FAILURE TO ACCOUNT FOR THESE FACTORS COULD LEAD TO
ROLL-OVER OR LOSS OF CONTROL RESULTING IN SERIOUS
INJURY OR DEATH.
SOME CONTAINER HANDLING “OPTIONS”, SUCH AS THE
ROOF-MOUNTED CABLE REEVER (AKA....THE “2-10”), AND
THE SPOOLING DRUM WINCH, WILL HAVE CABLES WITH A
“HOOK’ AT THE END OF THE CABLE. THERE WILL EXSIST A
BENT PEG FOR HOOK “STOREAGE”.
WHEN THAT OPTION’s HOOK IS “NOT” ACTIVELY BEING
USED, ALWAYS “STORE” THE CABLE’S HOOK ONLY AT THE
PROVIDED “BENT PEG” HOOK STORE. DO NOT STORE THE
HOOK ANYWHERE ELSE!!
NEVER, (NEVER) “STORE” THE CABLE’S HOOK BY
ATTACHING THE HOOK TO THE GATESIDE “HAND HOLDS”
(AKA ...GATESIDE “GRAB HANDLES”). THE HAND-HOLDS
ARE “ONLY” FOR THE ‘HANDS” OF THE RIDERS & OPERATORS.
WRONGLY “HOOKING’THE CABLE’s HOOK TO THE HAND-HOLD
WILL RESULT IN SERIOUS INJURY (CABLE PINCHING/
CUTTING INJURIES), IF THE CABLE’S HOOK IS “WRONGLY”
STORED AT THE GATESIDE “HANDHOLDS/ GRAB HANDLES”.
ALWAYS “STORE” ANY CABLE’s “HOOK” AT THE PROVIDED
BENT PEG STYLE OF HOOK STOREAGE ONLY.
ALWAYS EXERCISE YOUR HIGHEST SPECIAL CARE WHEN
“BACKING-UP” THE CHASSIS/PACKER!
THE CHASSIS/PACKER IS TYPICAL OF ALL REAR LOADERS IN
THAT IT HAS A “BLIND-SPOT” WHICH THE VEHICLE’S
MIRRORS CAN
NOT
PUT INTO THEIR “FIELD OF VISION”.
FAILURE TO ALWAYS USE THE MOST EXTREME CARE IN
BACKING-UP THE CHASSIS/PACKER WILL RESULT IN
SERIOUS INJURY OR DEATH TO BYSTANDER OR WORK
PARTNER.
ALWAYS FOLLOW YOUR EMPLOYER’S “SAFEST WAY TO BACK-
UP” PROCEDURES/POLILCIES. THESE SHOULD INCLUDE:
PLANNING YOUR COLLECTION ROUTES TO MINIMIZE
THE NEED FOR BACK-UPS
USING A HELPER/OBSERVER TO GUIDE THE PERSON
BEHIND THE STEERING WHEEL WHEN BACKING-UP
HELPER/OBSERVER MUST ALWAYS BE OFF TO THE SIDE
OF THE CHASSIS/PACKER AND WITHIN THE MIRRORS’
FIELD OF VISION
NEVER EXCEEDING ¼ MPH WHEN IN REVERSE
ALWAYS KEEPING THE BACK-UP-ALARM IN TOP
WORKING CONDITON…(KEEP IN MIND THAT
JUST
HAVING
A FUNCTIONAL BACK-UP-ALARM IS
NOT
ENOUGH TO ASSURE SAFEST “BACKING-UP”).
ANYTHING ELSE YOU AND YOUR EMPLOYER DEEM
HELPFUL TO BACKING-UP WITH EXTREME SAFETY
HYDRAULIC SYSTEMS ARE HOT! DO NOT TOUCH ANY
HYDRAULIC COMPONENTS OR YOU MAY BURN YOURSELF.
ALLOW THE HYDRAULICS SYSTEM TO COOL DOWN TO 100
DEGREES FAIRENHEIGHT (OR LESS) BEFORE DOING ANY
HYDRAULIC MAINTENANCE OR REPAIR ACTIVITIES.
WHEN REPLACING A HYDRAULIC “PLUMBING” COMPONENT
SUCH AS A HOSE, TUBE, OR A FITTING, BE CERTAIN YOU USE
ONLY AN EQUIVALENT PRESSURE RATING (OR HIGHER)
REPLACEMENT PART! FAILURE TO HEED THIS WARNING
COULD RESULT IN SUDDEN FAILURE (BURSTS OR FORCEFUL
LEAKS) OF THE INFERIOR REPLACEMENT AND COULD CAUSE
SERIOUS INJURY OR DEATH.
HIGH PRESSURE OIL STREAMS CAN CAUSE SERIOUS BURNS
OR CAN PENETRATE TISSUE. FIRE CAN OCCUR IF THE
ESCAPING OIL HITS A HOT SURFACE (SUCH AS VEHICLE
EXHAUST SYSTEM). MACHINE COMPONENTS COULD
SUDDENLY FALL OR OTHERWISE MOVE UNCONTROLLABLY.
THE CORRECT LENGTH OF HOSE MUST ALSO BE USED. CALL
LOADMASTER IF IN ANY DOUBT ABOUT CORRECT
REPLACEMENT PARTS FOR YOUR ELITE.
GETTING YOUR REPLACEMENT HYDRAULIC PLUMBING
COMPONENTS FROM LOADMASTER WILL ASSURE CORRECT
SPECIFICATIONS. IF YOU MUST PROCURE IT IN YOUR
LOCALITY, USE ONLY NAME BRAND PARTS AND USE A
REPUTABLE HYDRAULIC HOSE/FITTING ASSEMBLY HOUSE.
DO NOT ALLOW THE “MIXING” OF DIFFERENT BRANDS AS
THEY WILL NOT CORRECTLY MATE.
Sec01-pg06
THE HYDRAULICS SYSTEM MAY HAVE “TRAPPED” HIGH-
PRESSURES EVEN WHEN DIESEL IS OFF. ALWAYS RELIEVE
THESE TRAPPED PRESSURES BY RATTLING THE CONTROL
LEVERS ABOUT THEIR CENTERED-NEUTRAL POSITIONS
(WITH THE DIESEL SHUTDOWN) BEFORE LOOSENING ANY
SYSTEM CONNECTIONS.
SOME MACHINE COMPONENTS COULD HAVE GRAVITY
PULLING ON THEM AS THEY ARE HYDRAULICALLY HELD IN
PLACE. ALWAYS STOP AND THINK FIRST IF A BLADE OR
OTHER MACHINE COMPONENT NEEDS TO BE REPOSITIONED
TO ITS “DEAD END” (OR OTHER POSITION) SO IT WILL NOT
MOVE BY GRAVITY
WHEN A HYDRAULIC CONNECTION IS
LOOSENED FOR REPAIR.
THE HYDRAULIC CYLINDERS COULD BE HOLDING A
PARTICULAR COMPONENT (SUCH AS A “BLADE”) IN A
PARTICULAR POSITION WHEN THE DIESEL IS OFF. AN
EXAMPLE OF THIS IS WOULD BE THE SLIDER BLADE HELD
UPWARD IN ITS “HOME” POSITION BY THE OIL “LOCKED”
INSIDE ITS CYLINDERS WITH DIESEL OFF. IF A HYDRAULIC
HOSE OR FITTING IS THEN WORKED-ON, GRAVITY
WILL
MOVE
THE COMPONENT TO A NEW POSTION IN A
UNCONTROLABLE FASHION. FAILURE TO ACCOUNT FOR THIS
FACT COULD RESULT IN SERIOUS INJURY OR DEATH.
OFTEN YOU CAN PURPOSEFULLY MOVE THE COMPONENT TO A
POSITON WHERE GRAVITY CAN NOT MOVE IT
BEFORE
WORKING ON THE HYDRAULICS.
SOMETIMES YOU WILL NEED TO SECURE THE COMPONENT IN
PLACE BY WELDING TEMPORARY STEEL “BLOCKING” OR
“STOPS” ONTO THE PACKER.
CALL LOADMASTER IF YOU HAVE ANY DOUBTS ABOUT THE
CORRECT AND SAFEST METHODS OF DOING THIS.
HYDRAULIC HOSES AND TUBING MUST BE INSPECTED ON A
DAILY BASIS FOR LEAKS, CUTS, ABRASIONS, DAMAGE,
RUBBING (NO CLEARANCE IN ROUTING), BEFORE THE TRUCK
IS PUT IN SERVICE. IF YOUR INSPECTION DISCOVERS SUCH
ADVERSE CONDITIONS, THE SITUATION MUST BE
CORRECTED BEFORE TRUCK CAN BE PLACED IN SERVICE.
LOADMASTER RECOMMENDS YOU REPLACE
ALL
OF YOUR
RUBBER HOSES AND THE CLAMPING AT LEAST EVERY THREE
YEARS.
FAILURE TO CLOSELY INSPECT AND MAINTAIN YOUR ELITE
AND CHASSIS COULD LEAD TO SERIOUS INJURY.
NEVER OPERATE THE HYDRAULIC SYSTEM IF ANY LEAK IS
PRESENT. SERIOUS INJURY MAY RESULT.
ALL OF THE ELITE’S PRESSURE GUAGE READINGS ARE TO BE
TAKEN AT THE GAUGE STEM LOCATED AT THE INLET COVER
OF THE BODY-MOUNTED VALVE! USE A GLYCERIN FILLED
GUAGE ON THE END OF A 24” HOSE (1/4” DIAMETER WITH
3000 PSI WORKING PRESSURE RATING) THAT ALLOWS YOU
TO BE FULLY OUTSIDE THE BODY WITH BOTH FEET ON
GROUND AND THEN TAKE THE GAUGE READING. DIESEL
MUST BE SHUTDOWN AND KEYS IN YOUR POCKET BEFORE
ENTERING THE BODY THROUGH THE ACCESS DOOR TO
COUPLE THE GAUGE COUPLER.
NEVER ATTEMPT TO READ A GLYCERIN-FILLED GAUGE WHICH IS
ATTACHED TO THE INLET COVER OF THE
TAILGATE
-MOUNTED
VALVE. ALWAYS COUPLE YOUR GLYCERIN FILLED GAUGE TO THE
BODY-MOUNTED VALVE’S GUAGE STEM. ALL LOADMASTER PRESSURE
SPECS ARE CHECKED/ADJUSTED AT THE BODY-MOUNTED VALVE’S
GAUGE STEM.
Sec01-pg07
Section 02
OPERATORS MANUAL
This operator’s manual describes how a person will
do the useful tasks needed to collect garbage using
the LOADMASTER packer. The user/operator will
often “command” the LOADMASTER packer by
moving a knobbed control lever, or flipping a rocker
switch, or depressing a button switch. This manual
describes these operator-input
actions and the
resulting
output
reactions of the machine.
Throughout this OPERATORS MANUAL there will be
safety precautions. Section 01 SAFETY
PRECAUTIONS must be read and re-read until you
thoroughly understand them and can follow them.
Some (but not all) of the SAFETY PRECAUTIONS
will be repeated throughout this booklet where
they apply. Call LOADMASTER if you have any
doubt about the safe ways to operate your
LOADMASTER packer. The LOADMASTER packer
will have been mounted on a chassis…refer to the
operators manual for the chassis for
its
safe
operation instructions.
ATTENTION OPERATORS, USERS, MAINTAINERS,
REPAIRERS OF THE LOADMASTER PACKER!!!
READ AND UNDERSTAND SECTION 01 SAFETY
PRECAUTIONS AND SECTION 02 OPERATORS
MANUAL BEFORE OPERATING THE LOADMASTER
REFUSE PACKER. PEOPLE WHOM USE OR
MAINTAIN THIS EQUIPMENT MUST BE
THOROUGHLY TRAINED AND FAMILIAR WITH THE
MACHINE. IF INCORRECTLY USED OR
MAINTAINED, THIS EQUIPMENT CAN CAUSE
SERIOUS INJURY OR DEATH.
This DANGER symbolism precedes information
pertaining to specific immediate hazards, which
if
disregarded
, WILL result in severe personal injury or
death of the user or others.
This WARNING symbolism precedes information
pertaining to hazards or unsafe practices which COULD
result in severe personal injury or death.
This CAUTION symbolism precedes information
pertaining to potential hazards or unsafe practices,
which if disregarded, may result in a lesser personal
injury or damage to the equipment.
This notice symbol will precede information which is vital
to the proper operation or maintenance of the
equipment.
Sec02-pg08
Operation of the LOADMASTER packer can be
divided into separate areas of activity. This
operator’s manual covers:
STARTUP
of the machine. This includes the pre-
startup checklist.
TRAVELING
to the area where you will pickup the
garbage.
ON-THE-ROUTE
garbage collection.
YOU MUST NOT OPERATE THE LOADMASTER PACKER UNLESS:
YOU ARE QUALIFIED BY TRAINING AND EXPERIENCE IN THE
SAFE OPERATION OF THIS MACHINE.
TRAINING INCLUDES COMPLETE KNOWLEDGE OF YOUR EMPLOYER’S
WORK RULES, ALL GOVERMENTAL REGULATIONS, AND
MANUFACTURER’S OPERATOR’S MANUAL RELATIVE TO THIS
MACHINE’S SAFE USE.
AN UNTRAINED OPERATOR SUBJECTS HIMSELF/ HERSELF
AND OTHERS TO SERIOUS INJURY OR DEATH.
TRAVELING
to the landfill or transfer station.
UNLOADING
your collected payload at the landfill
or transfer station.
Parking and
SHUTTING-DOWN
the machine.
Some LOADMASTER’S will have
OPTIONS,
such as
a 2-10 reever or a kickbar.
DO
NOT
WEAR WATCHES, RINGS, AND JEWELRY WHILE
WORKING WITH MECHANICAL OR ELECTRICAL EQUIPMENT.
DO NOT WEAR LOOSE CLOTHING THAT COULD ENTAGLE YOU
INTO MOVING OR ROTATING COMPONENTS. THESE TYPES
OF THINGS WILL BE HAZARDOUS AND COULD CAUSE
SERIOUS INJURY OR DEATH IF WORN NEAR MOVING
MECHANICAL OR HYDRAULIC MACHINE PARTS.
DO WEAR PERSONAL PROTECTION ITEMS SUCH AS HARD
HATS, SAFETY GLASSES (EYE PROTECTION), HEAVY GLOVING,
AND SAFETY SHOES WHEN OPERATING OR MAINTAINING
THE EXCEL OR CHASSIS. OPERATORS SHOULD WEAR
VESTING THAT HAS A BRIGHT COLORATION (ORANGE) AND
REFLECTIVE CHARACTERISTICS FOR DAY/NIGHT VISIBILITY.
FOLLOW ALL OF YOUR EMPLOYER’S REQUIREMENTS FOR
PERSONAL PROTECTIVE ITEMS.
Sec02-pg09

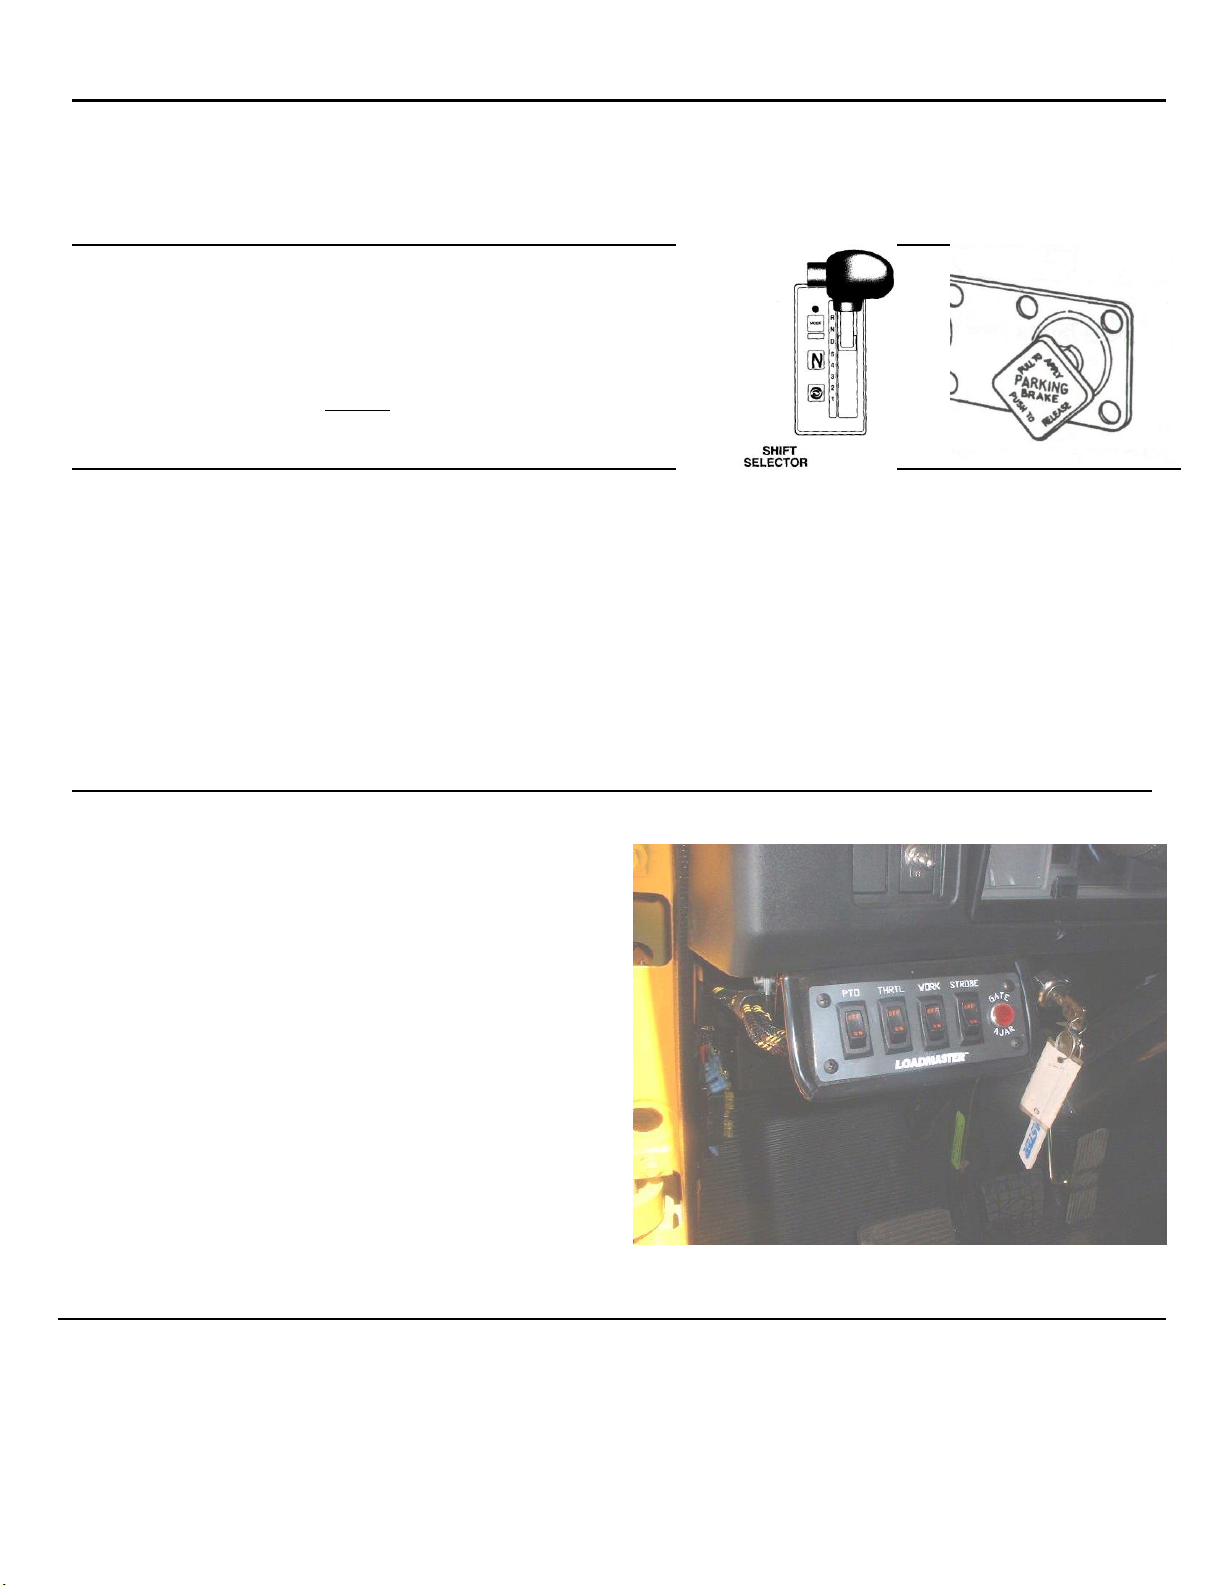
OVERVIEW OF THE CONTROLS
ROCKER SWITCH PANEL
This panel is located inside the cab and just to the
left of the steering wheel.
This ROCKER SWITCH PANEL groups together four
switches and one pilot light. They are:
PTO on/off switch
THRTL on/off switch
WORK light switch (optional)
STROBE light switch (optional)
GATE AJAR warning light
“BODY-MOUNTED VALVE” KNOBBED HANDLEVERS
These are located at the body’s left front corner,
just behind back of cab.
The lower knobbed handlever controls the tailgate
lift. The upper handlever controls the ejector blade.
These handlevers are spring-centered to their
neutral positions. The handlever must be “held” to
a shifted position by the operator.
“TALIGATE-MOUNTED VALVE” HANDLEVERS
These are located on the rearward, right-side of
tailgate shell.
The lower, yellow colored handlever controls the
sweep
blade. The sweep blade is the compaction
blade that “rotates” at the blades pivot.
The orange colored handlever controls the
slide
blade. The slide blade is the compaction blade that
slides in the “track” channel.
Any knobbed handlevers for
optional
attachments
will also be located near the above blade controls,
but they will
not
be colored yellow or orange. The
“2-10 reever” and the “kickbar” are examples of
optional equipment.
Sec02-pg10
SWEEP BLADE IS
YELLOW
SLIDE BLADE
IS ORANGE
TAILGATE LIFT
CONTROL
EJECTION BLADE
CONTROL
GATE
AJAR
LIGHT

OVERVIEW OF THE CONTROLS
DRIVER SIGNAL SWITCHES
There are two switches that will sound the in-cab
buzzer. They are located one on each side of the
tailgate’s shell at the very rear.
These switches are “momentary” type, which
means the operator must depress and “hold”
depressed to sound the in-cab buzzer.
THROTTLE ADVANCE SWITCHES
There are two of these switches. One is located on
the right rear of the tailgate shell. One is located at
the body’s front left corner (near body-mounted
valve). Depressing and holding these “momentary”
switches will advance the diesel’s RPM (so long as
the in-cab master switch labeled THRTL is also at
it’s ON position).
TAILGATE LATCH TURNBUCKLE
If your packer is not equipped with automatic
tailgate latches, it then will have manually operated
tailgate latches on each side. Also known as
tailgate clamps, tailgate locks, tailgate latches,
tailgate buckles, or turnbuckles. Most ELITE’s
models have the automatic-operated latches (std).
Sec02-pg11
DRIVER SIGNAL
SWITCH
THROTTLE
ADVANCE
SWITCH

STARTUP
The first step is to do a “walk-around” inspection of the
LOADMASTER packer and the truck chassis before
“cranking” the diesel.
Assure that the machine is in good, safe working
condition.
All signals and lights needed for safe street
operation are undamaged and functional
The mirrors are undamaged, clean, and
adjusted to best field of vision
Tires are inflated and have adequate treading
Cab windshield and side windows are cleaned
Assure that there is no hydraulic leakage
Check the fuel level, engine oil level, coolant
level
Check for a fully charged and accessible fire
extinguisher
Check the hydraulic fluid level
Assure that all hoses and tubes show no signs
of damage or rubbing-out spots
Assure the suction line valve is fully open
The backup alarm sounds when transmission is
shifted to reverse
The backup alarm sounds when tailgate is
raised upward about ¼ of fully raised.
The tailgate cylinder pins are retained in proper
position
The machine is clean of debris, dirt, and oils
The steps and grab handles are in good
condition
Check that the body mounts to the chassis are
in good condition
The control levers and knobs are in good
condition
Assure the body access door is securely latched
Be sure the hopper is clear of people
Be sure the general area is clear of any other
people (a passerby or a service person,
perhaps) before starting the diesel
Be certain no person is in front ,underneath,
on top of, or behind the machine
Any other “walk-around” checks your employer
has assigned
Check that the tailgate is fully down and fully
latched
The tailgate hinge pins are retained in proper
position
Assure all placards and decals are readable
Check that any work lights are in good
condition.
Check that any strobe or beacon lights work
If the LOADMASTER packer or the chassis has a
problem that needs correcting, see your supervisor
so that a trained service person will attend to the
problem.
Sec02-pg12

STARTUP
After completing the “walk-around” pre-startup
inspection, enter the vehicle’s cab.
Check that the LOADMASTER rocker switches are
all in their OFF position. A rocker switch that is ON
will show its reddish color band and a rocker switch
that is OFF will
not show
its color band.
The group of rocker switches includes 4 rocker
switches and one pilot light.
The switch labeled THRTL is the throttle master
switch. When this switch is at OFF, the throttle can
never advance because all electrical power is cutoff
at this branch circuit’s origin.
The switch labeled PTO controls whether the PTO
is engaged (hydraulic pump rotating) or
disengaged (pump uncoupled). See your specific
chassis/transmission manual for the correct
procedure for engaging/disengaging the PTO.
The switch labeled WORK turns the optional
hopper work lighting on or off.
The switch labeled STROBE will turn the optional
beacon or strobe lights on or off.
The red color warning light is labeled GATE AJAR.
This light will illuminate whenever the tailgate is
raised about a foot or so above fully closed.
Do not move truck at speeds above ¼ MPH
whenever the tailgate is raised up (fully or partially)
and “gate ajar” light is illuminated! Move only after
assuring overhead clearance is adequate and then
still move at less than ¼ MPH.
Confirm that the transmission is in Neutral and
that the park/emergency brake is applied On.
Now turn the ignition switch to ON and start-up the
diesel. Follow the instructions in the chassis
operator’s manual for starting the diesel. (Refer to
your specific chassis’ operators manual for ALL of
its operational information.)
Warm up the diesel for a few minutes and prepare
yourself to begin to travel. BUCKLE UP!
Sec02-pg13
TRAVELING
You have done your walk-around inspection, the diesel
is running, and you and your work partners are seated
and buckled up.
Ride
only in the cab
during travel to and from the
area where you will collect garbage house-to-
house.
THE RIDING STEP SHALL NOT BE USED WHEN:
SPEEDS EXCEED 10 MPH
DISTANCE OF TRAVEL IS MORE THAN 2 TENTHS OF A
MILE
VEHICLE IS MOVING BACKWARDS (IN REVERSE)
When driving on the street in the chassis/packer,
always be aware that you are driving a
heavy
truck
. The way a heavy truck handles and brakes
is different from your personal passenger car or
light truck (pickup truck). The packer requires more
distance to stop in a “panic” situation. Always allow
extra spacing in traffic. The packer is not as agile
or responsive as a typical passenger car. You will
not always be able to maneuver your way out of
difficult situations. This means you must drive extra
defensively when traveling in the chassis/packer.
Always be alert and anticipate possible traffic
hazards. Account for the size and weight of your
chassis/packer.
The center of gravity of the chassis/packer is much
higher than a passenger car. This fact must be
accounted for to avoid rolling over. Turn through
corners at slower speeds and account for the larger
turn radius the chassis/packer will require.
Also, be aware that the full chassis/packer will
behave (brake and handle) somewhat differently
from the empty chassis/packer.
ALWAYS DRIVE CAREFULLY AND DEFENSIVELY! ALWAYS BE
AWARE THE CHASSIS/PACKER IS A
HEAVY
VEHICLE AND NOT
A PASSENGER CAR. THE CHASSIS/PACKER WILL REQUIRE
SLOWER CORNERING SPEEDS AND LONGER STOPPING
DISTANCES. THE CHASSIS/PACKER WILL HAVE A HIGHER
CENTER OF GRAVITY WHICH PRESENTS A “ROLL-OVER”
HAZARD IF DRIVING HABITS ARE NOT ADJUSTED. BE AWARE
THE CHASSIS/PACKER’S HANDLING AND BRAKING
CHARACTERSITICS WILL
CHANGE
AS YOU BUILD A PAYLOAD.
FAILURE TO ACCOUNT FOR THESE FACTORS COULD LEAD TO
ROLL-OVER OR LOSS OF CONTROL RESULTING IN SERIOUS
INJURY OR DEATH.
You must know the height of your chassis/packer
before going under any overpasses. Be sure to
allow sufficient clearance to avoid slamming into
anything overhead.
As mentioned in the “walk-around” pre-travel
inspections, be sure the tailgate is fully down and
fully latched closed. Do this by visually checking it
to be fully down in addition to monitoring the “gate
ajar” warning light periodically during road travel.
Pull over immediately should you notice the “gate
ajar” light has illuminated during travel. When you
unload (tailgate raised up), confirm that the “gate
ajar” light does indeed illuminate (proper and
normal). If not, have the “gate ajar” warning light
system repaired immediately. (Note that the “gate
ajar” light will illuminate when vehicle transmission
shifts to reverse, even with gate fully down…this is
how it is wired.)
ALWAYS KEEP THE IN-CAB “GATE AJAR” PILOT LIGHT IN
GOOD WORKING CONDITION. ALWAYS BE SURE THE BACK-
UP ALARM SOUNDS WHENEVER THE TAILGATE IS RAISED-UP
A FOOT OR SO. REPLACE LAMP BULB OR REPAIR ELECTRICAL
WIRE SYSTEM IMMEDIATELY. FAILURE TO DO SO COULD
LEAD TO SERIOUS SITUATIONS.
Never allow any person to ride in the hopper
or to ride sitting on the loading sill at any
time.
When traveling to or from your on-the–route
collection geographic area, always have the rocker
switch labeled THRTL in the OFF position (no red
color band showing). This rocker switch is a
master
kill switch which precludes any malfunction or
unintentional throttle advancing during travel
whenever it is at the OFF position.
THE IN-CAB MASTER ROCKER SWITCH LABELED “THRTL”
(THROTTLE) MUST BE IN THE “OFF” POSITION WHEN THE
TRUCK IS BEING DRIVEN ABOVE 10MPH!
SHOULD THE THROTTLE ENGAGE DURING TRAVEL, LOSS OF
VEHICLE CONTROL COULD OCCUR RESULTING IN SERIOUS
INJURY OR DEATH.
Sec02-pg14

TRAVELING
Disengage the PTO when traveling above 10 MPH.
The rocker switch labeled PTO must be rockered to
OFF position. Read the instructions for PTO
engagement/disengagement that came with your
transmission or chassis for the specific sequence of
steps.
Do not use the LOADMASTER packer/chassis as a
towing vehicle.
TO PREVENT POSSIBLE INJURY, DEATH, OR PROPERTY
DAMAGE, DO NOT USE THIS VEHICLE TO “TOW” OTHER
EQUIPMENT. IT IS NOT INTENDED, DESIGNED OR EQUIPPED
FOR TOWING.
Every chassis is tagged (often in the cab door jamb
area) by the chassis manufacturer for its maximum
allowable weight capacities. Do not exceed the
allowable tagged weight ratings.
DO NOT OVERLOAD THE PACKER AND CHASSIS. DO NOT
EXCEED THE CHASSIS MANUFACTURER’S POSTED GROSS
VEHICLE WEIGHT RATINGS (OVERALL AND “PER-AXLE”).
GROSS VEHICLE WEIGHTS MUST ALSO MEET APPLICABLE
FEDERAL, STATE, AND LOCAL LAWS. FAILURE TO COMPLY
COULD CAUSE POOR HANDLING AND OUT OF COMPLIANCE
BRAKING AND CAUSE SERIOUS INJURY OR DEATH.
NEVER OPERATE THE VEHICLE WHILE UNDER THE INFLUENCE
OF ALCOHOL OR DRUGS! WORKERS UNDER THE INFLUENCE
PRESENT A HAZARD TO THEMSELVES AND OTHERS AND CAN
CAUSE SERIOUS INJURY OR DEATH.
DO NOT OPERATE THE VEHICLE UNLESS YOU ARE ALERT,
CLEAR-HEADED AND WELL RESTED.
Plan your travel to minimize the need for “backing-
up” (reverse gear) the chassis/packer. When you
must backup, always use your highest special care
to avoid running-over people. You must keep the
back-up-alarm in good working condition and then
be aware that
this alone does not
assure safe
backing-up.
Always exercise your highest special care when
“backing up” the chassis/packer.
THE CHASSIS/PACKER IS TYPICAL OF ALL REAR LOADERS IN
THAT IT HAS A “BLIND-SPOT” WHICH THE VEHICLE’S
MIRRORS CAN
NOT
PUT INTO THEIR “FIELD OF VISION”.
FAILURE TO ALWAYS USE THE MOST EXTREME CARE IN BACKING-UP
THE CHASSIS/PACKER WILL RESULT IN SERIOUS INJURY OR DEATH
TO BYSTANDER OR WORK PARTNER.
ALWAYS FOLLOW YOUR EMPLOYER’S “SAFEST WAY TO BACK-UP”
PROCEDURES/POLICIES. THESE SHOULD INCLUDE:
PLANNING YOUR COLLECTION ROUTES TO MINIMIZE THE NEED
FOR BACK-UPS
USING A HELPER/OBSERVER TO GUIDE THE PERSON BEHIND
THE STEERING WHEEL WHEN BACKING-UP
HELPER/OBSERVER MUST ALWAYS BE OFF TO THE SIDE OF THE
CHASSIS/PACKER AND WITHIN THE MIRRORS’ FIELD OF VISION
NEVER EXCEEDING ¼ MPH WHEN IN REVERSE
ALWAYS KEEPING THE BACK-UP-ALARM IN TOP WORKING
CONDITON…(KEEP IN MIND THAT
JUST
HAVING
A FUNCTIONAL
BACK-UP-ALARM IS
NOT
ENOUGH TO ASSURE SAFEST
“BACKING-UP”).
DO “ANYTHING ELSE”YOU AND YOUR EMPLOYER DEEM
HELPFUL TO BACKING-UP WITH EXTREME SAFETY
Sec02-pg15
ON-THE-ROUTE GARBAGE COLLECTION
You have traveled to the area that will begin the
actual collection of the route’s garbage. The packer
has pulled along side the very first garbage can or
bag to be picked-up.
Shift the vehicle transmission to PARK (or
Neutral if “park” does not exist on your ELITE chassis).
Set the PARK/EMERGENCY brake to applied
ON.
These two steps must always be done by the
vehicle’s driver before he/she leaves the cab!
Position the switch labeled THRTL to ON. The
rocker switches red color band will be visible when
the switch is at ON position.
This will allow the diesel’s throttle to advance
automatically
when the compaction blades are
cycling automatically.
This will also allow
manual
throttle advancement by
depressing and holding the button switches labeled
“throttle advance”.
Position the switch labeled PTO to ON. The
rocker switches red color band will be visible when
the switch is at the ON position.
This engages the PTO and the hydraulic pump will
begin to rotate (pump) and the hydraulic system is
now active. You will typically hear a change in the
overall sound.
You must follow the
specific engagement
instructions
given in the operation manuals for your
particular chassis/transmission/PTO-type. There are
several possible combinations that will require
somewhat different procedures for proper
engagement. If you hear nasty gear clashing
sounds, immediately revert the rocker switch to
OFF position and re-study the correct PTO
engagement procedure.
Turn on your beacon or strobe lights (and the
hopper area work lights, if needed) by
positioning the rocker switches so that the red
band is exposed.
Sec02-pg16

ON-THE-ROUTE GARBAGE COLLECTION
The compaction blades will be at their “home”
position as shown here. The hydraulic circuit has
been made active and ready to do “house-to-
house” collection. Begin tossing bagged garbage
into the hopper or dumping garbage cans into the
hopper. Fill the hopper until it is to “sill” level.
When the hopper is about full, you will need to do
a “semi” automatic blade cycle. Each blade cycle
will clear the hopper of garbage.
The blade cycle is called “semi” automatic because
it is done in two parts. The first part will begin by
pulling both
of the blades control knobs outward
(momentarily) and then releasing them.
First the sweep blade will automatically rotate open
(blade tip moves upward). When the sweep blade
is fully opened, then the slide blade will
automatically travel downward (towards hopper).
When the slide blade is fully downward and the
sweep blade’s tip is fully rotated upward, the
blades will be in their “interrupted” position as
shown here.
At this point, both blades stop moving and nothing
more will “automatically” happen. The blades will
“wait” for your next command. Before doing the
next step, be completely certain that you and
everyone else have their arms and hands well clear
of the loading sill.
The second part of the semi-automatic blades cycle
requires the sweep blade to sweep across the
sill…this is a hazardous “pinch-point” that you must
always be careful of and aware of.
This purposeful “interruption” of the blades
cycle allows the person operating the blade
controls to visually check that the hopper sill
area is clear of all people’s fingers, hands and
arms
before
beginning the second part of the
blades cycle. The person “at the controls” has
the responsibility to make sure
himself/herself is fully clear of the “pinch-
point” and that all others are fully clear as
well.
Sec02-pg17
HOPPER SILL
HOPPER
SWEEP
BLADE
SLIDE
BLADE
HOPPER
BLADES AT
INTERRUPTED
POSITION
PINCH-POINT
AT THE SILL
HOPPER’S BLADES
SHOWN AT ”HOME”
POSITION
PULL OUTWARD
BOTH SLIDE AND
SWEEP KNOBS
SIMULTANEOUSLY

ON-THE-ROUTE GARBAGE COLLECTION
After assuring that no people (or “parts of people”)
are anywhere near the hopper sill (including the
person “at the controls”),
push both
of the blade
control lever’s knobs inward (and release) to begin
the second part of the semi-automatic blade cycle.
First the sweep blade will rotate to capture the
garbage in the hopper (blade tip will move
downward). Notice the blade “tip” swept by the
hopper sill, thereby creating the pinch-point
hazard. At the very moment the sweep blade stops
rotating, the slide blade then begins sliding
upward. These actions compact the garbage into
the “body”. These actions also have cleared the
hopper. The blades are now back at their original
“home” position.
This completes one “semi-automatic” compaction
cycle.
During on-the-route, house-to-house collection you
will be doing many of these complete blade cycles.
The ejector blade will slowly and automatically drift
forward (towards the cab) as you build up a
“payload” in the LOADMASTER’S body.
Always do one
complete
blade cycle so that the
blades are always in their “home” position
whenever you are loading garbage into the hopper.
The riding steps can be used on-the-route
whenever the speeds stay below 10MPH, moving
from house-to-house, and the vehicle is not going
in reverse. Be certain the vehicle is
completely
stopped
before getting on or getting off the step.
Get a firm grip on the grab handles with both
hands and spread your feet apart to be stable.
Signal the vehicle driver (when you are stable and
secure) by sounding the in-cab buzzer by
depressing a button switch. The driver is to wait
two seconds after the buzzer stops buzzing, and
then begin to move the vehicle to the next house’s
garbage.
Do not use the LOADMASTER packer and the
chassis to tow a trailer.
STAY CLEAR OF MOVING HOPPER BLADES AND THE HOPPER
LOADING SILL WHEN BLADES ARE MOVING! IF YOU OR A
WORK PARTNER IS CAUGHT IN THE BLADE ACTION, SERIOUS
INJURY OR DEATH WILL RESULT.
THE RIDING STEP SHALL NOT BE USED WHEN:
SPEEDS EXCEED 10 MPH
DISTANCE OF TRAVEL IS MORE THAN 2 TENTHS OF A
MILE
VEHICLE IS MOVING BACKWARDS (IN REVERSE)
TO PREVENT POSSIBLE INJURY, DEATH, OR PROPERTY
DAMAGE, DO NOT USE THIS VEHICLE TO “TOW” OTHER
EQUIPMENT. IT IS NOT INTENDED, DESIGNED OR EQUIPPED
FOR TOWING.
Sec02-pg18
EJECTOR
BLADE
“THE BODY”
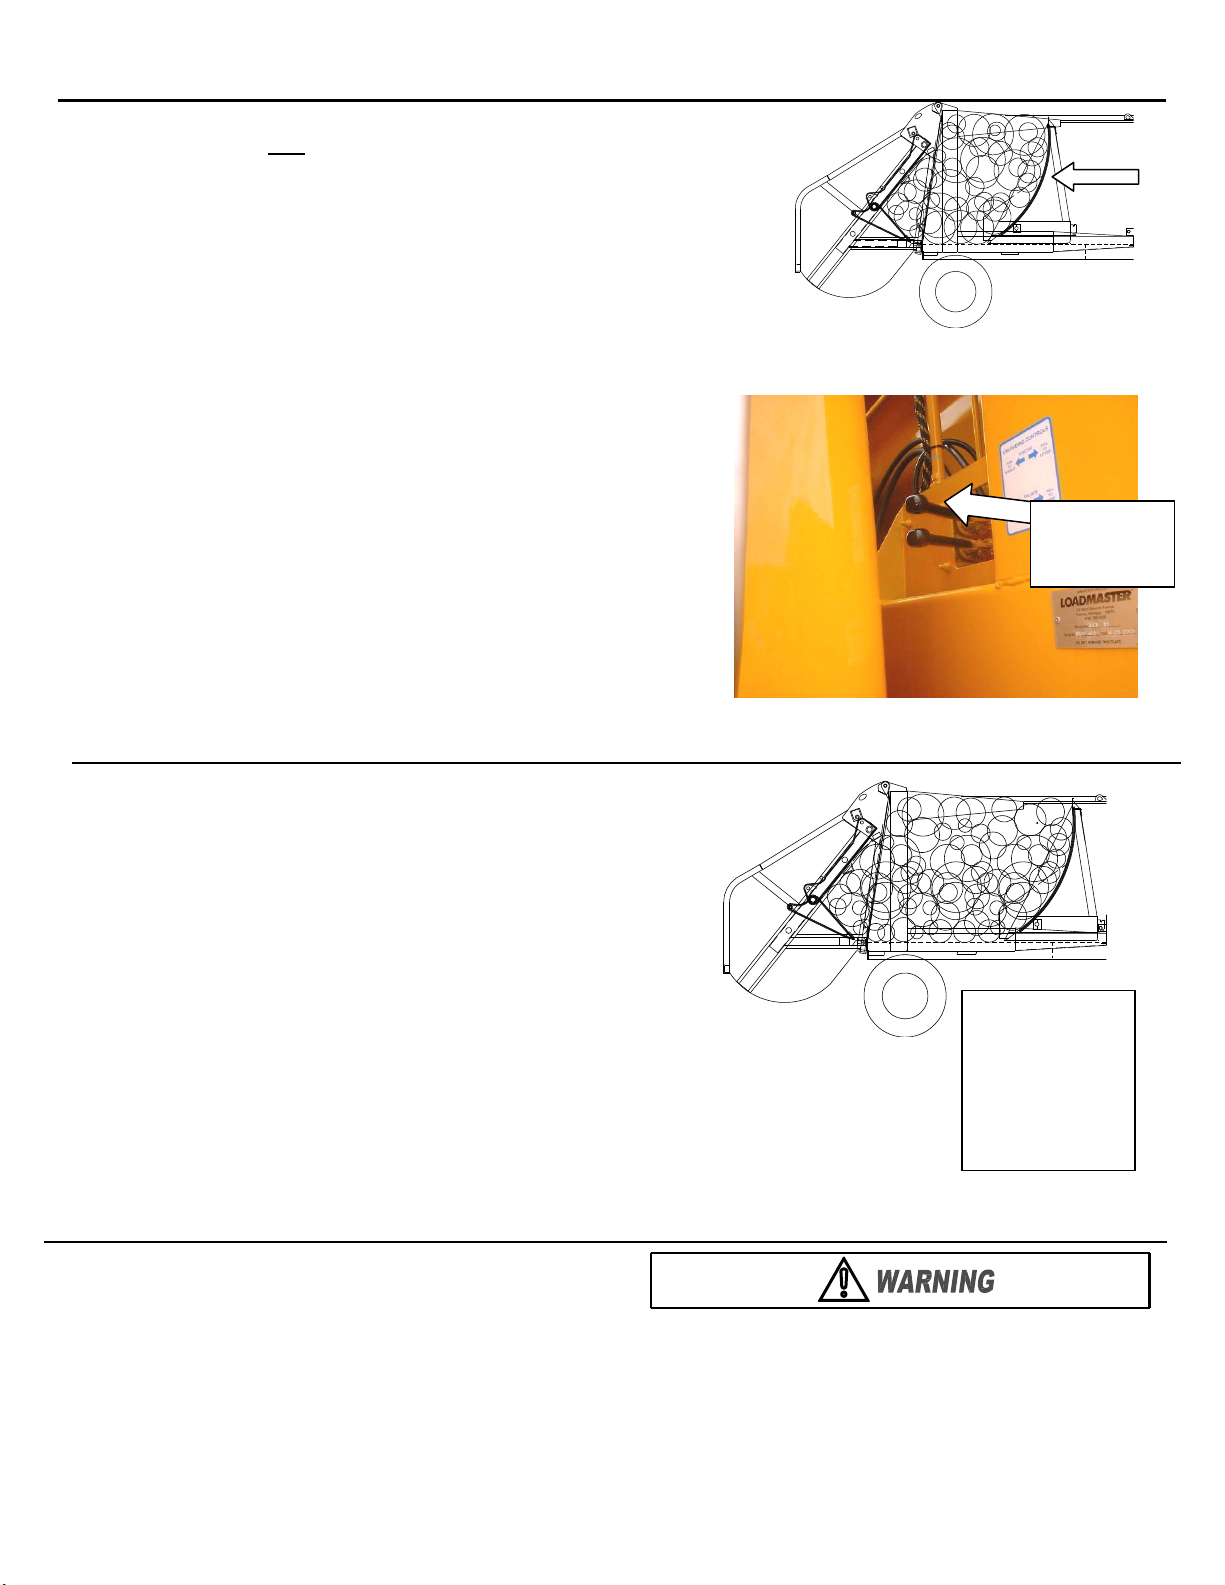
ON-THE-ROUTE GARBAGE COLLECTION
LOADMASTER does not recommend that you “back
pack” while on-the-route and collecting the
garbage.
Backpacking simply means pushing the ejector
blade rearward
against your payload
with the
throttle
manually advanced
(using the button
switch located near the body-mounted valve). The
compaction blades will be at their “home” position
during this “back packing”.
The LOADMASTER ELITE is designed to densify
properly to the advertised, rated payload
without
performing a single “backpacking” operation.
The valve known as the “synkpak” valve will allow
the ejector blade to
automatically
drift forward in a
controlled fashion. The operator will never need to
operate the hand-lever labeled “ejector” while
collecting garbage on the route.
When the body is “full” the ejector blade will have
drifted all the way forward (towards cab) and the
ejector’s telescopic cylinder will be seen to be
totally collapsed (retracted).
Continue
loading the
hopper until the sweep and slider blades are seen
to be not fully moving to their normal, full “home”
position. Then begin to use the slide and sweep
levers to “manually over-ride” the blade’s automatic
function. This will make extra force available to
help push the blades to their “home” positions as
the payload densification continues. Soon…even
“manually-overriding” will not get the blades “fully”
to their home positions and the loading hopper will
“shrink” quite a bit. The LOADMASTER is now truly
“full” and you must unload.
Travel to the unloading site. Follow the same
information given in the earlier section called
TRAVELING.
Remember to position the rocker
switches of OFF to disengage PTO and disable the
throttle advance.
DO NOT OVERLOAD THE PACKER AND CHASSIS. DO NOT
EXCEED THE MANUFACTURER’S POSTED GROSS VEHICLE
WEIGHT RATINGS (OVERALL AND “PER AXLE”). GROSS
VEHICLE WEIGHTS MUST ALSO MEET APPLICABLE FEDERAL,
STATE, AND LOCAL LAWS. FAILURE TO COMPLY COULD CAUSE
POOR HANDLING AND OUT OF COMPLIANCE BRAKING AND
CAUSE SERIOUS INJURY OR DEATH.
Sec02-19
EJECTOR BLADE
HAS DRIFTED
FULLY
FORWARD, but
continue to load
and pack several
hopper’s full…if
you choose to
EJECTOR
CONTROL
LEVER
Table of contents
Other LOADMASTER Truck manuals


