Loewe Individual Mediacenter DR+ User manual

233–33591.021
Individual Mediacenter
Individual Mediacenter DR+
Operating Instructions

Preparation
TV operation remote control
Mediacenter remote control
Switch device on/off
Insert disk Insert disk in the slot-in disk drive on
the right side
Eject disk Operating panel on the device
Operating modes
Main Menu
Menu selection OK
Settings Menu
Play
DVD/CD player - DVD/CD player - Select title
Music - Music - Category - Select media
Play
Pause
Stop
Forward (press several times)
Backward (press several times)
Next/Previous Chapter P+/-
Volume V+/-
Sound on / Mute
Detailed information/DVD title menu
Close/ go back in menu
Menu Now Playing
Radio
FM radio - Radio - FM radio -
Stations by Name - select radio station
Internet radio - Radio - Internet radio -
Category - Select radio station
DVB radio - Radio - DVB radio -
Select station
Screen off/on
Audio CD Import
CD Import - DVD/CD player - Import -
CD import
Brief Instructions for Individual Mediacenter / DR+
Please unfold this page.
- 2

3 -
Assist Remote Control – Mediacenter Operation
Short: Switch on/off in standby mode ...............(Page 17)
Long: Mediacenter Reduced Power Down
Short: Switching on Mediacenter last music selection
Long: last radio station
Shift to operate BluTechVision Interactive
Sound functions................................................(Page 16)
Enter numbers or letters
¾
"Main menu"....................................................(Page 18)
Info Menu
Close/go back in menu .....................................(Page 18)
Select title up/down
Select Setup menu............................................(Page 18)
¾
Settings menu...................................................(Page 18)
Play
Fast forward
Short: Select title/chapter up.............................(Page 33)
Long: Search forwards ......................................(Page 33)
Stop
¾without function
Sound on / Mute
LED display for current operating mode
Switch over to operate TV
Switch over to operate DVD recorder/Auro
¾
Setting TV Aspect Ratio
¾
¾
Options menu
Volume
Confirm/call
¾
(Page 37)...........................................Now Playing menu;
(Page 37).....................................Screen Off/On Rewind
(Page 33) short:........................ Select title/chapter down
(Page 33) long:....................................Search backwards
¾
Pause

Contents
Brief Instructions for Individual Mediacenter / DR+ ........ 2
Assist Remote Control – Mediacenter Operation ............. 3
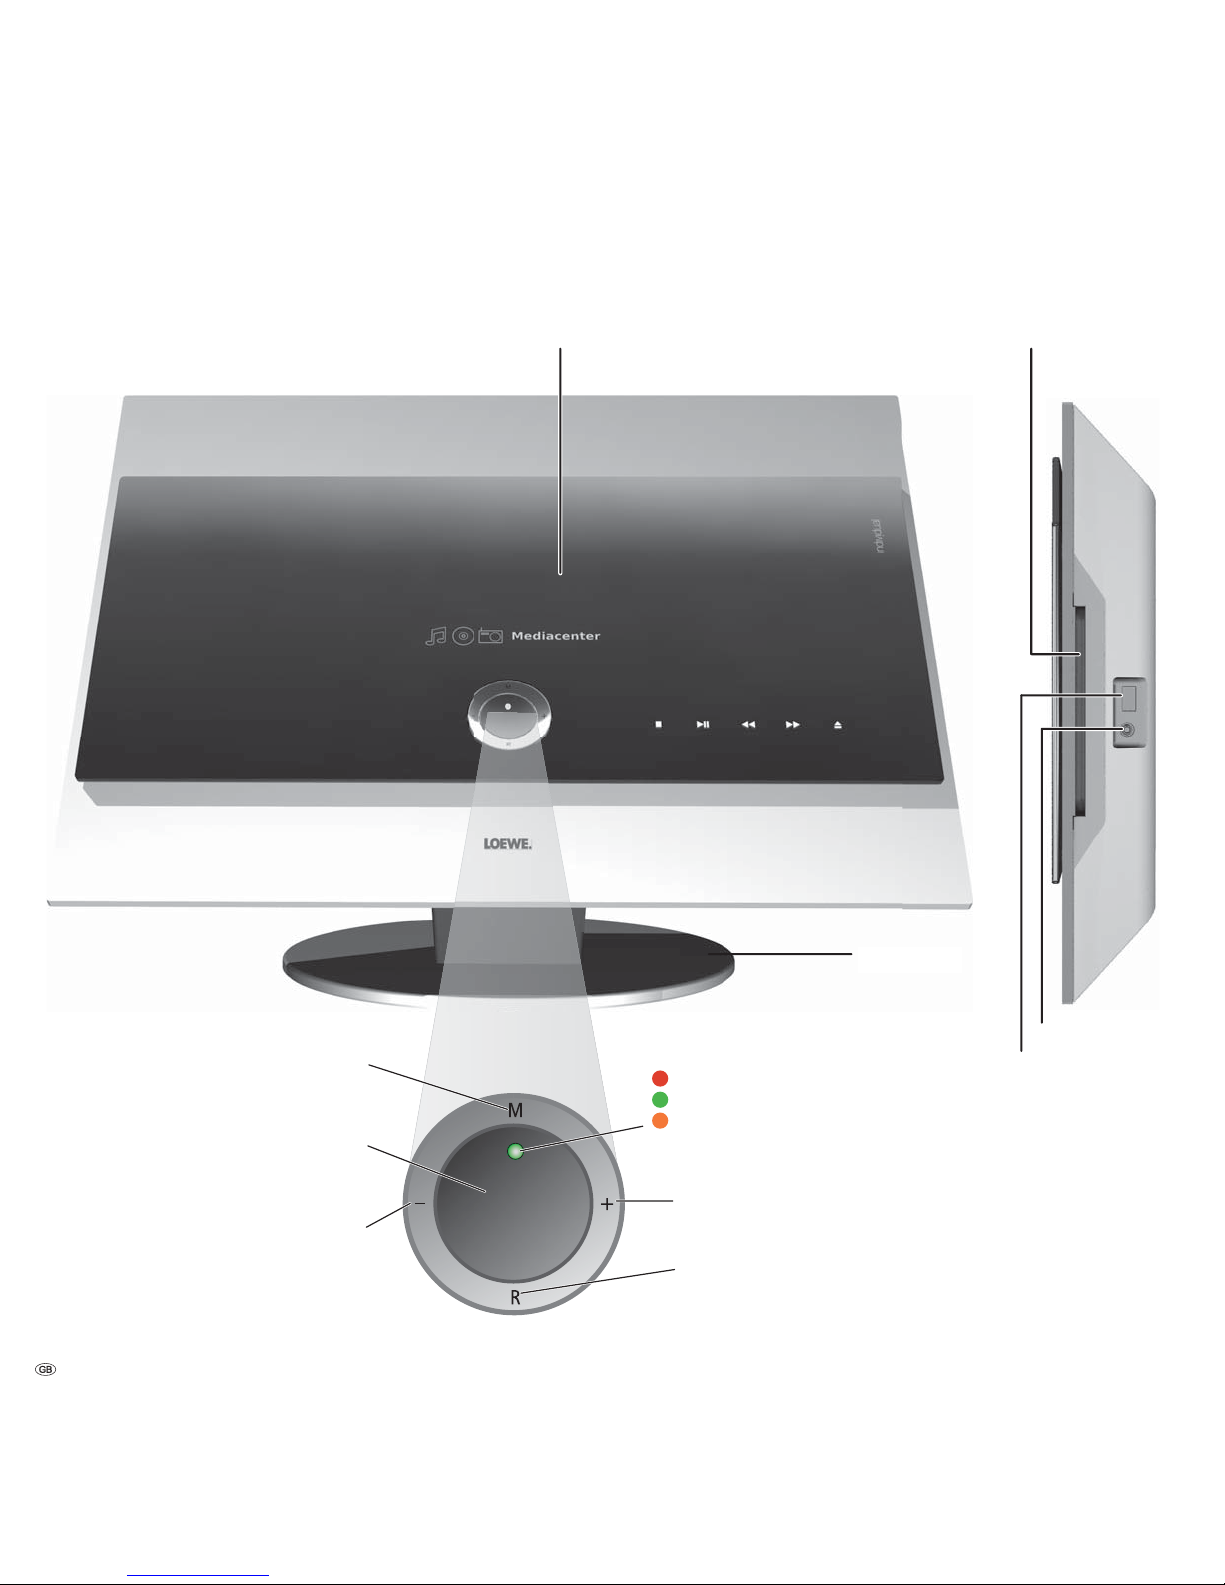
Front / Side view..............................................................6
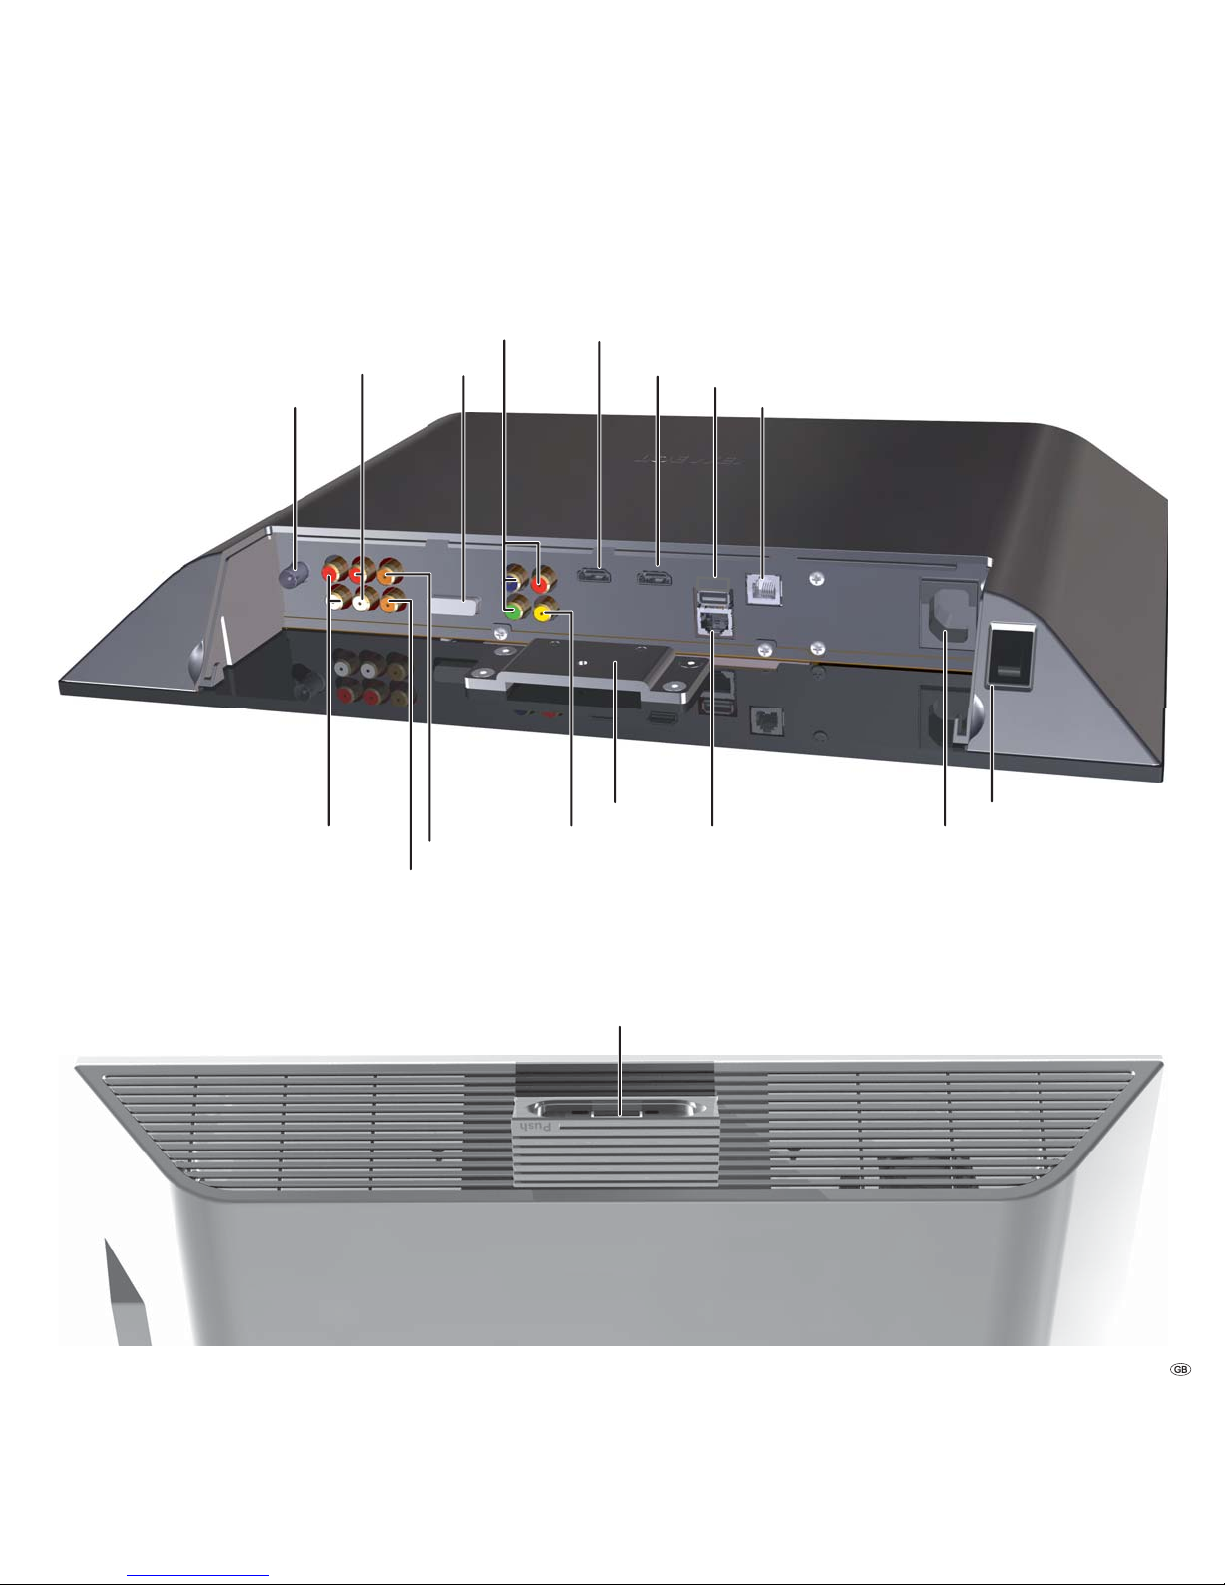
Back................................................................................. 7
Welcome .......................................................................... 8
Scope of delivery...........................................................................................8
Operating requirements ................................................................................8
Setup............................................................................................................8
For your Safety..............................................................................................9
Performance .................................................................. 10
Setting up ...................................................................... 11
Suggested setup solution: 5.1 Audio System...............................................11
Suggested setup solution: Stereo Audio System...........................................11
Suggested setup solution: Multiroom System ..............................................12
Connecting..................................................................... 13
Mediacenter in the integrated TV system.....................................................13
Mediacenter with Loewe Sound Projector and Loewe Flat TV Set ................14
Mediacenter as a Standalone Solution ........................................................15
Start-up.......................................................................... 16
Using the remote control for the first time...................................................16
Setting up the Assist Remote Control ..........................................................16
Operating Loewe Equipment.......................................................................16
Connecting to the Mains Supply..................................................................17
Switching On/Off.........................................................................................17
Digital Link HD (HDMI CEC).........................................................................17
Product Registration ...................................................................................17
Main Menu.................................................................................................18
Navigation in the Menu ..............................................................................18
Settings Menu.............................................................................................18
Menu Language..........................................................................................18
Network......................................................................................................19
Wired network ............................................................................................19
Wireless network ........................................................................................21
Mediacenter Network Name .......................................................................22
Network Share............................................................................................22
Reduced Power Down.................................................................................23
Standby Timer.............................................................................................23
Screen Saver ...............................................................................................23
Automatic Return to Play ............................................................................23
Time Zone...................................................................................................23
Privacy Policy ..............................................................................................23
Movie Audio ...............................................................................................24
Sound mode ...............................................................................................24
Dolby Pro Logic II Mode..............................................................................24
Sound Adjustment ......................................................................................24
Loudness.....................................................................................................25
Max Volume................................................................................................25
Switch On Volume.......................................................................................25
Night mode.................................................................................................25
Sound Components.....................................................................................26
TV Resolution..............................................................................................28
TV Type .......................................................................................................28
DVD Playback Frequency.............................................................................28
HDMI Settings.............................................................................................29
Set Video Defaults.......................................................................................29
Parental Controls ........................................................................................29
Movie Ratings.............................................................................................29
Start-up ......................................................................................................30
System Information.....................................................................................30
Storage information....................................................................................30
My Content.................................................................................................30
Delete Music...............................................................................................30
Start-up ......................................................................................................31
Restart System ............................................................................................31
Update Software.........................................................................................31
Play CD and DVD............................................................32
Preconditions..............................................................................................32
Play CD .......................................................................... 33
Read Disc ...................................................................................................33
CD Play.......................................................................................................33
Show Songs................................................................................................33
Edit Music Info............................................................................................34
CD Settings.................................................................................................34
Play DVD........................................................................ 35
Read Disc ...................................................................................................35
DVD Play.....................................................................................................35
DVD history.................................................................................................36
Edit Movie ..................................................................................................36
Music Menu ................................................................... 37
Now Playing ...............................................................................................37
Playlists.......................................................................................................37
Artists.........................................................................................................38
Music Menu................................................................................................39
Albums .......................................................................................................39
Track...........................................................................................................39
Music Menu................................................................................................40
Covers.........................................................................................................40
Genres ........................................................................................................40
Music Options.............................................................................................41
Search.........................................................................................................41
- 4

Contents
Play from iPod ............................................................... 42
Connecting iPod..........................................................................................42
Menu iPod ..................................................................................................42
Now Playing (iPod)......................................................................................42
Playlists (iPod).............................................................................................42
iPod Music..................................................................................................43
iPod options................................................................................................43
Radio Operation............................................................. 44
Setting FM Radio ........................................................................................44
Stations by Names/Frequency......................................................................45
Now Playing - FM Radio .............................................................................45
Internet Radio.............................................................................................46
Listening to Internet Radio..........................................................................46
Now Playing - Internet radio.......................................................................46
Internet Radio Favourites............................................................................47
DVB radio ...................................................................................................48
Listening to DVB Radio ...............................................................................48
Sources .......................................................................... 49
Wired Audio Sources...................................................................................49
External memories ......................................................................................49
USB Operation ............................................................................................49
Importing Music ............................................................ 50
Audio-CD Import.........................................................................................50
Copying Music to Harddisk .........................................................................50
Music Server .................................................................. 51
Setting up Music Server ..............................................................................51
Multiroom Operation ..................................................................................51
Party Mode .................................................................................................52
Copying Covers to Harddisk ........................................................................52
Troubleshooting............................................................. 53
Index of key words........................................................ 54
Glossary ......................................................................... 56
Technical specifications ................................................. 57
Company and editorial details.....................................................................57
Environment .................................................................. 58
Environmental Protection............................................................................58
Legal notices.................................................................. 58
EC Declaration of Conformity ........................................ 60
Service 61
5 -

Front / Side view
Button +:
Volume up
On/Off button:
Switching on from standby mode
Switching off in the standby mode
Button – :
Volume down
LED indicator:
= Standby (readiness)
= Operate
= Mediacenter in active Standby
(server functionality is guaranteed)
Button R:
Radio on
From standby mode switch on the radio
in menu: downwards
Button M:
Select source
source in menu: upwards/downwards
- 6
Device display
Table base
CD/DVD Drive
Headphones socket
USB socket

Back
7 -
Mains switch
Socket for network cableLAN network RJ-45
AUDIO OUT L/R
iPod Dock
Bracket
DIGITAL IN
VIDEO OUT
Composite
Video
DIGITAL OUT
ANT FM
HDMI IN
HDMI OUT
AUDIO LINK
RS-232
USB
AUDIO IN L/R
COMPONENT OUT

Thank you
for choosing a Loewe product. We are happy to welcome you as our customer.
At Loewe we combine the highest standards of technology, design and user friendli-
ness. This is equally true of TV, DVD, video, audio and accessories. Neither technol-
ogy nor design is an end in itself, but both are intended to provide our customers
with the best possible audio and visual experience. Our design is not influenced
by short-term, fashionable trends. You have, after all, purchased a high-quality
piece of equipment which you do not want to tire of tomorrow or the day after.
Scope of delivery
• Individual Mediacenter / DR+
• Assist Remote Control with 2 batteries
• Wall mount
• Antenna cable
• Network cable
• HDMI cable
• Mains cable
• Audio cable D-SUB/Cinch
• Self-adhesive spacer
• These operating instructions
• Assembly instructions
Operating requirements
To make optimum use of Loewe Mediacenter, the following prerequisites must
be satisfied:
• Connection to a wired(Ethernet, Powerline) or wireless (WiFi) home network,
router with Internet access.
• Loewe TV set with HDMI input (from chassis L271x onwards) and current
TV/DVB software.
Optional Expansions
• Loewe Multiroom Receiver.
• Loewe remote control of type Loewe Assist Media.
• Loewe TV set with HDMI input (from Mainframe L271x)
• Loewe Audio System
• Floor Stand Individual Mediacenter, Art.No. 68281B00
• Table Stand Individual Mediacenter, Art.No. 68280B00
Setup
• Please refer to the indications in the enclosed assembly instructions.
• Do not set up the unit near strong heat sources or in direct sunlight.
• When setting up in a cupboard or enclosed shelving: Leave at least 2.5 cm
of free space around the unit to allow air to circulate freely and to prevent
heat accumulation. Do not cover the fan and opening on the back.
• This device complies with the protection class 1. The power plug must be
inserted in a socket with an earth wire connection.
• Incorrect voltages can damage the unit. The unit may only be connected
to an electricity supply with the voltage and frequency stated on the rating
plate and using the enclosed mains cable.
• During thunderstorms, disconnect the mains plug. A voltage surge caused
by lightning conducted through the mains could damage the unit.
• If the unit is not to be used for an extended period, the plug should also be
disconnected from the mains.
• The mains plug must be easy to reach to ensure that the unit can be discon-
nected from the mains at any time.
• Position the mains cable in such a way that it can not be damaged. The
mains cable may not be bent or laid across sharp edges, walked on or
exposed to any chemicals; the latter applies to the whole unit. A mains
cable with damaged insulation can cause electric shocks and represents a
fire hazard.
• When you want to unplug from the mains, pull on the plug housing rather
than on the cable. The cables in the mains plug could otherwise be dam-
aged and could cause a short-circuit when being plugged in again.
• Malfunctions can occur if there are other devices operating in the same
frequency range (2.4 GHz) (see page 19).
Please also read and follow the safety advice on the following pages.
Welcome
- 8

For your Safety
For your safety, and to avoid unnecessary damage to your unit, please read
and follow the safety advice below.
Please keep the safety information in a safe place.
Use for the intended purpose and ambient conditions
This unit is intended exclusively for wireless transmission and play of audio signals.
It is designed for living or office rooms and may not be used in rooms with a high
level of humidity (e.g. bathroom, sauna) or a high dust concentration
(e.g. workshops).
The terms of the warranty only cover the intended use of the unit.
If the unit is used outdoors, make sure that it is protected from moisture (rain,
drips, spray or dew).
High concentrations of moisture and dust lead to creepage current in the unit
which can make it dangerous if a live wire is touched or it may cause a fire.
If you have moved the unit out of the cold into a warm environment, leave it
switched off for about an hour to avoid the formation of condensation.
Always switch off your system (Individual Mediacenter, TV and any other com-
ponents which may be connected) before connecting or disconnecting other de-
vices or speakers.
Protect your device from:
• Water, dampness, dripping or sprayed water, steam.
• Knocks and mechanical stress
• Magnetic and electric fields
• Cold, heat, direct sunlight and high temperature fluctuations
• Dust
• Covers that inhibit ventilation
• Interference with the internal workings of the unit
Do not place any burning candles or anything filled with a liquid (such as vases)
on the unit.
The ventilation slits on the back of the unit must not be covered with magazines
or rugs. Pay attention for example to curtains etc.
This device is network-enabled. Please follow the instructions regarding the con-
necting options on pages 13-15 and 18.
Volume
Loud music can cause hearing damage. Avoid extreme volumes especially over
extended periods of time and when using headphones.
IMPORTANT: TO AVOID RISK OF ELECTRIC SHOCK, DO NOT RE-
MOVE THE COVER (AND THE BACK OF THE UNIT). THERE ARE NO
PARTS INSIDE THE UNIT THAT CAN BE REPAIRED BY THE USER.
REPAIRS SHOULD ONLY BE CARRIED OUT BY A LOEWE DEALER.
Use only Original accessories and spare parts from Loewe.
Supervision
Do not allow children to use the unit/TV set unsupervised. Do not allow children
to play in the immediate vicinity of the unit/TV set. Do not operate the Media-
center unattended. If the unit is not to be used for an extended period, the plug
should also be disconnected from the mains or switched off.
Cleaning
Only clean your unit with a slightly damp, soft, clean cloth (without any aggressive
or scouring cleaning agents).
About these operating instructions
The information in this manual relates to the Loewe product Individual Media-
center. or Individual Mediacenter DR+. Texts referring to the DR+ version are
marked with the symbol:
Unless stated otherwise, the instructions refer to the operating elements on the
Assist remote control.
Paragraphs beginning with the ➠symbol indicate important hints, tips or condi-
tions for perfect operation.
Terms which you will find in the menu or printed on the unit are printed in bold
type.
In the functional descriptions, the necessary operating elements are arranged to
the left of the text containing the handling instructions.
The diagrams in these operating instructions are only by way of example. The
actual display may be different depending on the services available in your system.
Please do read the enclosed document to understand this device and its capabili-
ties. The individual chapters are based on each other and therefore complement
each other. Always follow the instructions for setting up, operation and security.
The keyword index/ glossary at the end of the manual explains certain terms used
in the user interface of the device and its operating manual.
9 -

Performance
The Loewe Individual Mediacenter / DR+ provides you a convenient access
to your media collection. It plays CDs and DVDs and receives radio signals via
antenna, cable, satellite or Internet. You can also use digital music files from your
home network, USB stick and MP3 player as iPod or iPhone.
Connection options
2x USB 2.0
LAN RJ45 10/100/1000 Mbps
WiFi 802.11 b/g
HDMI In
HDMI Out
Video Composite Out
Video Component Out
Audio In
Audio Digital In
Audio Out
Audio Digital Out
Headphones 3.5 mm Stereo
FM antenna 75 Ohm
Loewe audio link
RS-232 RJ12 (for external home network systems)
CD/DVD Player
Slot-in disk drive
DVD Upscaling (720p/1080p)
Display of title, genre, album name, covers (if available)
Operation via touch-sensitive sensor buttons on the device
as well as remote control
Streaming of audio content
Ripping of audio CDs
Media management
DVD / CD identification through Internet databases
Storage of metadata of last 500 CDs
Storage of metadata of last 100 DVDs
Display of covers and title information on the TV screen
Display of ID3v1 and ID3v2 metadata
Recursive search in CD-R/RW discs for files and directories
Simple administration via TV screen menu
Creation and administration of playlists
Import of metadata from Internet
Import of audio CDs and storage on integrated harddisk
Import/export of audio files and album graphics via PC and saving on the inte-
grated hard disc
Music Play
Play Audio CD, CD-R and CD-RW disc
Play MP3/VBR, WMA, FLAC, AAC audio files
Play playlists
Repeating Titles, Tracks or Directories
Shuffle
Streaming Server Connectivity+
UPnP-AV Audio Server
Audio streaming to up to 6 media receivers via LAN/WiFi
2 harddisks of 160 GB each with data security in RAID 1 system (mirror image)
Party mode
Play an audio stream to several Loewe media receivers
FM Radio
FM radio with RDS display via cable or terrestrial means
Streaming of FM radio into home network
DVB Radio
DVB radio in compatible Loewe TV devices
Streaming of DVB radio into home network
Internet Radio
Supporting thousand radio stations via Internet radio
Support internet radio favourites list - can also be edited via the Loewe Portal
iPod Support
iPod Docking Station for iPod or iPhone (Airplane Mode)
Convenient control through Loewe Assist remote control
Battery charging
Use with other Loewe system components
Connection of Loewe Flat-TV sets via HDMI/CEC (from Mainframe L271x)
Connection of Loewe Audio Components via Audio Link
- 10

Setting up
Suggested setup solution: 5.1 Audio System
11 -
Surround
Speakers
right
Front Speakers
right
Subwoofer
Individual Sound
Highline
Individual
Mediacenter / DR+
Loewe Flat TV set
Loewe Flat TV set
Internet
Router
Surround
Speakers
left Front
Speakers
left
Suggested setup solution: Stereo Audio System
Front
Speakers
right
Individual
Mediacenter / DR+
Front
Speakers
left
Subwoofer
Individual Sound
Highline
Centre

Setting up
Suggested setup solution: Multiroom System
Example: Secondary room
Example: Living room
- 12
Individual Sound
Multiroom Receiver
Speakers
right
Speakers
left
Subwoofer
Individual Sound
Highline
Individual
Mediacenter / DR+
Loewe Flat TV set
Subwoofer
Individual Sound
Highline
Internet
Router
Front
Speakers
right
Front
Speakers
left
Center

Connecting
Mediacenter in the integrated TV system
Use the supplied RJ-45 network cable to connect the Mediacenter to a network
connection (e.g. switch or DSL router) with a link to the Internet.
Use the supplied HDMI cable to connect the HDMI OUT socket of the Mediacenter
to the HDMI IN socket on your TV set.
If your TV set does not have an HDMI IN socket, use three video-capable cinch
cables to connect the three COMPONENT OUT sockets of the Mediacenter to the
COMPONENT IN sockets on your TV set.
Otherwise, using a cinch cable you can connect the VIDEO OUT socket on the
Mediacenter with the VIDEO IN socket on your TV set. But through this connection,
termed as Composite Video, you only receive a restricted picture quality. As far
as possible, you should use the earlier mentioned connection types.
Using the supplied cinch cable (digital audio cable: socket in orange colour) con-
nect the AUDIO DIGITAL IN socket of the Mediacenter with the cinch coupling
of the D-SUB/Cinch audio cable. (Loewe Art.No. 70529.001).
Connect the AUDIO LINK socket of the TV set to the D-SUB coupling of the audio
cable D-SUB/Cinch. You can connect a Loewe subwoofer available as an accessory
at the other end of the D-SUB coupling.
In the menu Sound components (page 26), set the option Sound via on the TV.
With the antenna cable, connect the ANT FM socket to an antenna socket. Plug
the mains cable into a 220-240V 50/60 Hz wall socket.
AudioLink
Line In
Speaker
Out
Power Mode
Left
Center
Right
Left Right Left Right
230V~50/60Hz
Left
Phase
Equalizer
Crossover
Frequency
Bass
Intensity
180°
-3dB
+6dB
50Hz
250Hz
min
max
0°
Subw Right
Rear
Front
OFF ON Auto Manu.
Front Rear
13 -
Loewe Flat TV set (from L271x)
Loewe Individual Mediacenter / DR+
Loewe Subwoofer Individual Sound Highline
Digital audio cable
FM Antenna
Audio link cable
Network
Cable
Mains cable
HDMI cable
Audio cable D-SUB/Cinch

Connecting up
Mediacenter with Loewe Sound Projector
and Loewe Flat TV Set
Use the supplied RJ-45 network cable to connect the Mediacenter to a network
connection (e.g. switch or DSL router) with a link to the Internet.
Use the supplied HDMI cable to connect the HDMI OUT socket of the Mediacenter
to the HDMI IN socket on your TV set.
Connect, using the supplied audio cable D-SUB/Cinch, the D-SUB plug with the
socket AUDIO-LINK on the Loewe TV set.
Using the supplied cinch cable (digital audio cable: socket in orange colour) con-
nect the AUDIO DIGITAL IN socket of the Mediacenter with the cinch coupling
of the D-SUB/Cinch audio cable. (Loewe Art.No. 70529.001).
Connect the AUDIO LINK socket of the TV set to the D-SUB coupling of the audio
cable D-SUB/Cinch. You can connect a Loewe subwoofer available as an accessory
at the other end of the D-SUB coupling.
Use a cinch cable (digital audio cable: connector is orange in colour) to connect
the AUDIO DIGITAL OUT socket of the TV set to the TV-COAXIAL socket of the
Sound Projector.
In the menu Sound components (page 26), set the option System amplifier
on the TV.
With the antenna cable, connect the ANT FM socket to an antenna socket. Plug
the mains cable into a 220-240V 50/60 Hz wall socket.
Connect the sound projector to the TV set and subwoofer as shown.
- 14
Mains cable
Loewe at TV set (above L27x1)
Loewe Individual Mediacenter / DR+
Digital audio cable
FM Antenna
Network
Cable
HDMI cable Digital audio cable
RS-232C
Audio cable D-SUB/Cinch
Loewe Sound Projector
Connection to the Subwoofer

Connecting up
Mediacenter as a Standalone Solution
Use the supplied RJ-45 network cable to connect the Mediacenter to a network
connection (e.g. switch or DSL router) with a link to the Internet.
➠In order to be able to carry out settings (see from Page 18 onwards) it is
necessary to connect the Mediacenter with a TV set (Page 13) in order to be
able to operate the relevant menus. This is also recommended for operation
of the Mediacenters.
Using the Audio Link Cable connect the AUDIO-LINK socket of the mediacenter
to the AUDIO-LINK socket of the Loewe subwoofer.
In the menu Sound components (page 26) set the option System amplifier on
the Mediacenter.
With the antenna cable, connect the ANT FM socket to an antenna socket.
Plug the mains cable into a 220-240V 50/60 Hz wall socket.
AudioLink
Line In
Speaker
Out
Power Mode
Left
Center
Right
Left Right Left Right
230V~50/60Hz
Left
Phase
Equalizer
Crossover
Frequency
Bass
Intensity
180°
-3dB
+6dB
50Hz
250Hz
min
max
0°
Subw Right
Rear
Front
OFF ON Auto Manu.
Front Rear
15 -
Mains cable FM Antenna
Network
Cable
Audio link cable
Loewe Subwoofer Individual Sound Highline
HDMI cable
to TV set
Loewe Individual Mediacenter / DR+

Start-up
Using the remote control for the first time
To insert or change the batteries, press on the arrow. While doing so, simply slide
the battery compartment lid down and remove it. Insert alkali manganese bat-
teries LR 03 (AAA) and ensure the correct position of + and –. Slide the cover on
again from the bottom.
Setting up the Assist Remote Control
Other Devices
You can operate various Loewe devices using the Assist Remote Control. The device
buttons REC - BD - AUDIO can be set up for this.
Press the required device buttons and the Stop button
simultaneously for 5 sec. until the corresponding LED display
flashes twice.
Then select the two-digit device code from the table:
Unit Code Restore defaults
Loewe ViewVision 8106 H 10
Loewe ViewVision, Centros 21x2 12
Loewe ViewVision DR+ DVB-T 13 REC
Loewe Auro 2216 PS/8116 DT 14
Loewe BlutechVision 15
Loewe Sound Projector 1 17
Loewe TV Radio digital 19
Loewe Mediacenter 20 AUDIO
Loewe BlutechVision Interactive 21 BD
HDMI CEC Mode ¾¾ 22
Loewe AudioVision 24
Loewe Sound Projector SL 25
Restore defaults 99
The corresponding LED Display flashes twice.
Sound functions
It is possible to set the devices with which the buttons with the sound functions
(V+/-, Mute and sound mode) should work. Depending upon which device con-
figuration you use (page 13- page 15), set the device keys and sound functions
of the Assist remote control. If you use the integrated network configuration as
described on page 13, the Loewe TV set will process the sound and the sound
functions of the Assist remote control do not have to be changed. With a configu-
ration as described on page 14 and page 15, it is necessary to change the sound
functions on the Assist remote control as described below.
Press the device button TV and at the same time the button
with the single digit function code from the list for 5 sec. until
the LED Display flashes twice.
Function Code Figure
Loewe AudioVision 3
Loewe Mediacenter 4 Page 15
Loewe TV ¾5 Page 13 / Page 14
Loewe Sound Projector 6
¾Restore defaults
¾¾ From mainframe L271x, Software V9.16
Operating Loewe Equipment
Using the remote control for a Loewe TV set
Press TV button; the LED Display above it
lights up for approx. 5 seconds
Using the remote control for a Loewe recorder
Press the REC button; the LED Display above
it lights up for approx. 5 seconds
Using the remote control for BluTechVision Interactive
Press the BD button; the LED Display above
it lights up for approx. 5 seconds
Using the remote control for Mediacenter
Press the AUDIO button; the LED Display above
it lights up for approx. 5 seconds
Every time a button is pressed, the LED display lights up for the selected operating
mode for checking purposes (TV – REC – BD – AUDIO).
Please refer to the respective operating conditions on how to operate the indi-
vidual devices.
- 16

Start-up
Connecting to the Mains Supply
Make the required cable connections as described in section “Connecting“
(page 13). First insert the smaller three-pin plug of the network cable into the
socket for the network cable (page 7) at the rear of the player, then insert the
large network plug into a 220-240V/50-60 Hz network socket.
Switching On/Off
➠Please switch your Mediacenter after the first boot process
(it can take a few minutes) IN FUTURE ONLY switch on and
off by pressing briefly of the on/off button on the remote
control. Your Mediacenter remains ready for use more
quickly in this way.
Switch on the Mediacenter with the Mains switch
(page 7).
Adjust the remote control for Mediacenter operation by
briefly pressing the AUDIO button.
Your Mediacenter switches on. If you have connected a Loewe
TV set (from L271x) via HDMI, then this will switch on as well.
Otherwise, switch your TV set on and set the respective AV
programme slot.
To switch off the device, press the On/Off switch on your
Mediacenter (page 6) or Assist (page 3) remote control.
➠To prevent loss of data, do not switch off until all write
operations (e.g. reading from USB memory or iPod, CD import)
on the harddisks have ended.
While the Mediacenter starts up, the red LED indicator flashes
(page 6).
The moment the Mediacenter becomes operational, the green
LED indicator begins to glows constantly.
➠If available, a software update for the Mediacenter is auto-
matically started after Product registration (on this page)
and setting up of Internet access (from page 19) after con-
firmation (page 31).
➠Switch your Mediacenter off if you are to be away for an
extended period, first with the On/Off Button and then with
the mains switch or pull out the mains plug. This will save
energy and protect the environment.
Digital Link HD (HDMI CEC)
With the Digital Link HD, the Loewe TV sets (above chassis L271x) pass on the
remote control signals over the HDMI link from the Loewe TV set to the compat-
ible attachments, such as e.g. Mediacenter. Digital Link HD is useful if you want
a concealed setup for the Mediacenter and the device is completely controlled
via Loewe TV set.
First of all, adjust the HDMI CEC function for the Assist
remote control as described on page 16 to Code 22 on the
required device button (e.g. AUDIO).
Then carry out the allocation of the Digital Link HD function to
the HDMI interface of the TV set used by pressing the button
set above (e.g. AUDIO) for 5 sec.
A selection menu will appear.
OK
END
OK
Select HDMI device for key
Mediacenter
No device
Adopt
Hint
Here you select the device which you want to switch over your remote
control to with the key. After confirming the selection with OK all
remote control commands are passed on to the selected device via the TV set
in future when you press this key.
AUDIO
AUDIO
Select the desired device (e.g. Mediacenter).
Confirm OK.
Now, the signals from the Assist remote control of the Loewe
TV set are transmitted to the Mediacenter if the relevant
device button (e.g. BD) is pressed beforehand.
➠It is possible that your Loewe TV set may need a software
update. Please contact your specialist retailer.
Product Registration
The Mediacenter must be registered once during startup to be able to use all
integrated services.
In accordance with § 33 of the German Federal Data Protection Act (BDSG) we
would like to highlight that the device number and the respective software ver-
sion are processed and saved using electronic data processing equipment. The
data guarantee that we are always able to provide you with the best service in
the event of any repairs. All information is treated as confidential and not passed
on to the third parties.
17 -

Start-up
Main Menu
The menu of the Mediacenter is displayed on the screen of the connected TV
set. From here, you can execute different functions of the Mediacenter and also
make the necessary settings.
BD BLU-RAY PALYER
DVD/CD Player
iPod
Music
Radio
Sources
Settings
Mediacenter
Navigation in the Menu
In these operating instructions, the arrow buttons on the Remote Control Assist
are shown as follows:
In the text, the arrows correspond to: ““.
The OK button on the remote control is shown as OK in the text.
Call up Main Menu.
Select required option.
Move Back in the menu.
Confirm OK.
Push the button BD to operate a BluTechVision
Interactive player connected to the Loewe TV set..
Settings Menu
Set the Mediacenter to meet your individual requirements and configuration.
Select Settings option.
Confirm OK.
Calling up menu settings directly from other menus.
BD BLU-RAY PLAYER
DVD/CD Player
iPod
Music
Radio
Sources
Settings
Mediacenter
➠If necessary, set the TV resolution as described on page 28 to have a better
TV screen display.
Menu Language
Select a language for menus and dialogues displayed by the player.
Call up Main Menu.
Select Settings option.
Confirm OK.
Select Language option. Confirm OK.
Select On Screen User Interface option. Confirm OK.
Select required language. Confirm OK.
ASSIST
END
Deutsch
English
Español
Français
Italiano
Nederlands
Please select a language for the on screen user interface...
Back Home
Call up Main Menu.
- 18

Start-up
Network
Different settings must be made depending upon whether the Mediacenter has a
Depending on whether you use a wired (Ethernet, Powerline) or wireless (WiFi)
connection with your home network several settings will have to be made.
➠Loewe recommends use of a wired network (Ethernet, Powerline) to ensure
a high stability and quality of the data link. Use a wireless connection only
if there is no option. As a matter of principle, wireless connections can get
disturbed due to external influences (e.g. microwave devices) and mostly
provide a lower data transmission rate.
Wired network
Here you make the settings for the selected network.
Call up Main Menu.
Select Settings option.
Confirm OK.
Select option Network.
Confirm OK.
Select Connect Using option.
Press
ASSIST
END
Connect Using Ethernet
Ethernet
Network Name
Connect to Network Share 1
Connect to Network Share 2
Settings - Network
Back Home
OK several times to set the Ethernet option.
IP Address Type DHCP
If a DHCP server is present in your home network (e.g. a DSL router), use this set-
ting since all network parameters are set automatically.
➠Call up menu as under “Wireless network“.
Select Set Ethernet option.
Confirm OK.
Select IP address type option.
Press several times to set the DHCP option.
Select Test settings option.
Confirm OK.
ASSIST
END
IP-Address Type DHCP
Test Settings
Current Ethernet Settings :
IP Address: 192.168.0.10
Gateway: 192.168.0.1
Subnet Mask: 255.255.255.0
DNS 1, 2: 192.168.0.1, 192.168.1.1
Settings - Network - Ethernet
Back Home
Now, an automatic test run starts, during which all settings
relevant for the flawless operation of the Mediacenter are
tested. A report is outputted on the screen during the
execution of the text.
ASSIST
END
Please wait...Test starting
Checking hardware configuration
MAC adress : 00:40:63:F9:95:73
Checking ethernet link...OK
Requesting dynamic interface configuration...OK
Determine subnet mask, DNS, route and IP addresses
Subnet mask : 255.255.0.0
DNS1 address : 192.168.0.1
DNS2 address : 192.168.1.1
Router address : 192.168.0.1
IP address : 192.168.0.10
Checking IP address...OK
Checking Router address...OK
Checking DNS addresses...OK
DNS lookup of w.openglobe.net...OK
DNS lookup of eCDDB.cddb.com...OK
Connecting to w.openglobe.net:80...OK
Determine external IP address
External IP address : 91.00.24.116
Checking time service...OK, Time is 08:04:26 (GMT)
Connecting to w.openglobe.net:443...OK
Connecting to w.openglobe.net:1755...OK
Connecting to w.openglobe.net:8000...OK
Connecting to eCDDB.cddb.com:8080...OK
Test completed
Test Settings
Back Home
The network setting is successfully complete when all tests are
over and indicate an OK status.
Call up Main Menu.
19 -

Start-up
IP Address Type Manual
The network parameters be fixed manually (e.g. when there is no DHCP server in
your home network).
➠Call up menu as under “Wireless network“.
Select Set Ethernet option.
Confirm OK.
Select IP address type option.
Press several times to set the Manual option.
Select option IP Address Settings.
Confirm OK.
ASSIST
IP-Address Type Manual
IP Address Settings
Test Settings
Current Ethernet Settings :
IP Address: 192.168.0.10
Gateway: 192.168.0.1
Subnet Mask: 255.255.255.0
DNS 1,2: 192.168.0.1, 192.168.1.1
Settings - Network - Ethernet
Back
END Home
Select desired option, e.g. IP Address.
ASSIST
192.168.0.10
192.168.0.1
255.255.255.0
192.168.0.1
192.168.1.1
IP Address
Gateway
Subnet
DNS1
DNS2
Apply Settings
Settings - Network - Ethernet - Manuell
Back
END Home
Confirm OK.
ASSIST
T
S
T
END
192.168.000.001
Enter an Ethernet IP Address
Back Home
Select digit.
Select position.
Confirm OK.
When all network parameters are set correctly:
Move Back in the menu.
Select Test settings option.
Confirm OK.
Now, an automatic test run starts, during which all settings
relevant for the flawless operation of the Mediacenter are
tested. A report is outputted on the screen during the
execution of the text.
ASSIST
END
Please wait...Test starting
Checking hardware configuration
MAC adress : 00:40:63:F9:95:73
Checking ethernet link...OK
Requesting dynamic interface configuration...OK
Determine subnet mask, DNS, route and IP addresses
Subnet mask : 255.255.0.0
DNS1 address : 192.168.0.1
DNS2 address : 192.168.1.1
Router address : 192.168.0.1
IP address : 192.168.0.10
Checking IP address...OK
Checking Router address...OK
Checking DNS addresses...OK
DNS lookup of w.openglobe.net...OK
DNS lookup of eCDDB.cddb.com...OK
Connecting to w.openglobe.net:80...OK
Determine external IP address
External IP address : 91.00.24.116
Checking time service...OK, Time is 08:04:26 (GMT)
Connecting to w.openglobe.net:443...OK
Connecting to w.openglobe.net:1755...OK
Connecting to w.openglobe.net:8000...OK
Connecting to eCDDB.cddb.com:8080...OK
Test completed
Test Settings
Back Home
The network setting is successfully complete when all tests are
over and indicate an OK status.
Scroll up/down the report.
Call up Main Menu.
- 20
This manual suits for next models
1
Table of contents
Other Loewe Media Player manuals