Dyne Telecom DN6128 User manual

1
Digital Audio Player
USER MAUNAL
DN6128 / DN6256 / DN6512
Dyne Telecom Co., Ltd.

2
CONTENTS
P
PR
RE
EP
PA
AR
RA
AT
TI
IO
ON
N
P
PA
AR
RT
TS
S.
..
..
..
..
..
..
..
..
..
..
..
..
..
..
..
..
..
..
..
..
..
..
..
..
..
..
..
..
..
..
..
..
..
..
..
..
..
..
..
..
..
..
..
..
..
..
..
..
..
..
..
..
..
..
..
..
..
..
..
..
..
..
..
..
..
..
..
..
..
..
..
..
..
..
..
..
..
..
..
..
..
..
..
..
..
.3
3
P
Pr
ro
od
du
uc
ct
t
F
Fe
ea
at
tu
ur
re
es
s.
..
..
..
..
..
..
..
..
..
..
..
..
..
..
..
..
..
..
..
..
..
..
..
..
..
..
..
..
..
..
..
..
..
..
..
..
..
..
..
..
..
..
..
..
..
..
..
..
..
..
..
..
..
..
..
..
..
..
..
..
..
..
..
..
..
..
..
..
..
..
..
..
..
..
..
..
..
..
..
..
..
..
..
..
..
..
..
..
..
..
..
..
..
..
..
..
..
..
..
..
..
..
..
..
..
..
..
..
.4
4
A
Ac
cc
ce
es
ss
so
or
ri
ie
es
s.
..
..
..
..
..
..
..
..
..
..
..
..
..
..
..
..
..
..
..
..
..
..
..
..
..
..
..
..
..
..
..
..
..
..
..
..
..
..
..
..
..
..
..
..
..
..
..
..
..
..
..
..
..
..
..
..
..
..
..
..
..
..
..
..
..
..
..
..
..
..
..
..
..
..
..
..
..
..
..
..
..
..
..
..
..
..
..
..
..
..
..
..
..
..
..
..
..
..
..
..
..
..
..
..
..
..
..
..
..
..
..
..
..
..
..
..
..
..
.5
5
M
MP
P3
3/
/W
WM
MA
A
D
De
ef
fi
in
ni
it
ti
io
on
n.
..
..
..
..
..
..
..
..
..
..
..
..
..
..
..
..
..
..
..
..
..
..
..
..
..
..
..
..
..
..
..
..
..
..
..
..
..
..
..
..
..
..
..
..
..
..
..
..
..
..
..
..
..
..
..
..
..
..
..
..
..
..
..
..
..
..
..
..
..
..
..
..
..
..
..
..
..
..
..
..
..
..
..
..
..
..
..
..
..
..
..
..
..
..
..
..
..
..
..
.5
5
L
La
ay
yo
ou
ut
t
a
an
nd
d
F
Fu
un
nc
ct
ti
io
on
n
K
Ke
ey
ys
s.
..
..
..
..
..
..
..
..
..
..
..
..
..
..
..
..
..
..
..
..
..
..
..
..
..
..
..
..
..
..
..
..
..
..
..
..
..
..
..
..
..
..
..
..
..
..
..
..
..
..
..
..
..
..
..
..
..
..
..
..
..
..
..
..
..
..
..
..
..
..
..
..
..
..
..
..
..
..
..
..
..
..
..
..
..
..
..
..
..
..
..
..
.6
6
F
Fu
un
nc
ct
ti
io
on
n
d
de
es
sc
cr
ri
ip
pt
ti
io
on
n.
..
..
..
..
..
..
..
..
..
..
..
..
..
..
..
..
..
..
..
..
..
..
..
..
..
..
..
..
..
..
..
..
..
..
..
..
..
..
..
..
..
..
..
..
..
..
..
..
..
..
..
..
..
..
..
..
..
..
..
..
..
..
..
..
..
..
..
..
..
..
..
..
..
..
..
..
..
..
..
..
..
..
..
..
..
..
..
..
..
..
..
..
.6
6
M
Mo
od
de
e
s
se
et
t.
..
..
..
..
..
..
..
..
..
..
..
..
..
..
..
..
..
..
..
..
..
..
..
..
..
..
..
..
..
..
..
..
..
..
..
..
..
..
..
..
..
..
..
..
..
..
..
..
..
..
..
..
..
..
..
..
..
..
..
..
..
..
..
..
..
..
..
..
..
..
..
..
..
..
..
..
..
..
..
..
..
..
..
..
..
..
..
..
..
..
..
..
..
..
..
..
..
..
..
..
..
..
..
..
..
..
..
..
..
..
..
..
..
..
..
..
..
..
..
..
..
..
..
..
..
..
..
..
..
..
..
..
..
..
.6
6
M
Mu
us
si
ic
c
M
Mo
od
de
e.
..
..
..
..
..
..
..
..
..
..
..
..
..
..
..
..
..
..
..
..
..
..
..
..
..
..
..
..
..
..
..
..
..
..
..
..
..
..
..
..
..
..
..
..
..
..
..
..
..
..
..
..
..
..
..
..
..
..
..
..
..
..
..
..
..
..
..
..
..
..
..
..
..
..
..
..
..
..
..
..
..
..
..
..
..
..
..
..
..
..
..
..
..
..
..
..
..
..
..
..
..
..
..
..
..
..
..
..
..
..
..
..
..
..
..
..
.7
7
B
Bu
ut
tt
to
on
n
d
de
es
sc
cr
ri
ip
pt
ti
io
on
n.
..
..
..
..
..
..
..
..
..
..
..
..
..
..
..
..
..
..
..
..
..
..
..
..
..
..
..
..
..
..
..
..
..
..
..
..
..
..
..
..
..
..
..
..
..
..
..
..
..
..
..
..
..
..
..
..
..
..
..
..
..
..
..
..
..
..
..
..
..
..
..
..
..
..
..
..
..
..
..
..
..
..
..
..
..
..
..
..
..
..
..
..
..
..
..
..
..
..
..
..
..
..
..
..
..
..
..
..
..
..
..
..
..
..
..
..
..
.7
7
P
Pl
la
ay
yb
ba
ac
ck
k
/
/
S
St
to
op
p.
..
..
..
..
..
..
..
..
..
..
..
..
..
..
..
..
..
..
..
..
..
..
..
..
..
..
..
..
..
..
..
..
..
..
..
..
..
..
..
..
..
..
..
..
..
..
..
..
..
..
..
..
..
..
..
..
..
..
..
..
..
..
..
..
..
..
..
..
..
..
..
..
..
..
..
..
..
..
..
..
..
..
..
..
..
..
..
..
..
..
..
..
..
..
..
..
..
..
..
..
..
..
..
..
..
..
..
..
..
..
..
..
..
..
..
..
..
..
..
..
..
..
..
.7
7
P
Pa
au
us
se
e
M
Mo
od
de
e.
..
..
..
..
..
..
..
..
..
..
..
..
..
..
..
..
..
..
..
..
..
..
..
..
..
..
..
..
..
..
..
..
..
..
..
..
..
..
..
..
..
..
..
..
..
..
..
..
..
..
..
..
..
..
..
..
..
..
..
..
..
..
..
..
..
..
..
..
..
..
..
..
..
..
..
..
..
..
..
..
..
..
..
..
..
..
..
..
..
..
..
..
..
..
..
..
..
..
..
..
..
..
..
..
..
..
..
..
..
..
..
..
..
..
..
..
..
..
..
..
..
..
..
..
..
..
..
..
.8
8
L
Li
is
st
te
en
ni
in
ng
g
t
th
he
e
p
pr
re
ev
vi
io
ou
us
s
/
/
n
ne
ex
xt
t
s
so
on
ng
g.
..
..
..
..
..
..
..
..
..
..
..
..
..
..
..
..
..
..
..
..
..
..
..
..
..
..
..
..
..
..
..
..
..
..
..
..
..
..
..
..
..
..
..
..
..
..
..
..
..
..
..
..
..
..
..
..
..
..
..
..
..
..
..
..
..
..
..
..
..
..
..
..
..
..
..
..
..
..
..
..
..
..
..
..
..
..
..
..
..
..
..
..
.8
8
H
Hi
ig
gh
h
S
Sp
pe
ee
ed
d
S
Se
ea
ar
rc
ch
h.
..
..
..
..
..
..
..
..
..
..
..
..
..
..
..
..
..
..
..
..
..
..
..
..
..
..
..
..
..
..
..
..
..
..
..
..
..
..
..
..
..
..
..
..
..
..
..
..
..
..
..
..
..
..
..
..
..
..
..
..
..
..
..
..
..
..
..
..
..
..
..
..
..
..
..
..
..
..
..
..
..
..
..
..
..
..
..
..
..
..
..
..
..
..
..
..
..
..
..
..
..
..
..
..
..
..
..
..
..
..
..
..
..
..
..
..
..
.9
9
S
Se
ec
ct
ti
io
on
n
r
re
ep
pe
ea
at
t.
..
..
..
..
..
..
..
..
..
..
..
..
..
..
..
..
..
..
..
..
..
..
..
..
..
..
..
..
..
..
..
..
..
..
..
..
..
..
..
..
..
..
..
..
..
..
..
..
..
..
..
..
..
..
..
..
..
..
..
..
..
..
..
..
..
..
..
..
..
..
..
..
..
..
..
..
..
..
..
..
..
..
..
..
..
..
..
..
..
..
..
..
..
..
..
..
..
..
..
..
..
..
..
..
..
..
..
..
..
..
..
..
..
..
..
..
..
..
..
..
..
..
..
..
..
.9
9
M
Me
en
nu
u
S
Se
et
tt
ti
in
ng
g.
..
..
..
..
..
..
..
..
..
..
..
..
..
..
..
..
..
..
..
..
..
..
..
..
..
..
..
..
..
..
..
..
..
..
..
..
..
..
..
..
..
..
..
..
..
..
..
..
..
..
..
..
..
..
..
..
..
..
..
..
..
..
..
..
..
..
..
..
..
..
..
..
..
..
..
..
..
..
..
..
..
..
..
..
..
..
..
..
..
..
..
..
..
..
..
..
..
..
..
..
..
..
..
..
..
..
..
..
..
..
..
..
..
..
..
..
..
..
..
..
..
..
..
..
..
..
.9
9
R
Ra
ad
di
io
o
M
Mo
od
de
e.
..
..
..
..
..
..
..
..
..
..
..
..
..
..
..
..
..
..
..
..
..
..
..
..
..
..
..
..
..
..
..
..
..
..
..
..
..
..
..
..
..
..
..
..
..
..
..
..
..
..
..
..
..
..
..
..
..
..
..
..
..
..
..
..
..
..
..
..
..
..
..
..
..
..
..
..
..
..
..
..
..
..
..
..
..
..
..
..
..
..
..
..
..
..
..
..
..
..
..
..
..
..
..
..
..
..
..
..
..
..
..
..
..
..
.1
12
2
B
Bu
ut
tt
to
on
n
d
de
es
sc
cr
ri
ip
pt
ti
io
on
n.
..
..
..
..
..
..
..
..
..
..
..
..
..
..
..
..
..
..
..
..
..
..
..
..
..
..
..
..
..
..
..
..
..
..
..
..
..
..
..
..
..
..
..
..
..
..
..
..
..
..
..
..
..
..
..
..
..
..
..
..
..
..
..
..
..
..
..
..
..
..
..
..
..
..
..
..
..
..
..
..
..
..
..
..
..
..
..
..
..
..
..
..
..
..
..
..
..
..
..
..
..
..
..
..
..
..
..
..
..
..
..
..
..
..
..
.1
12
2
P
Pr
re
es
se
et
t
M
Mo
od
de
e.
..
..
..
..
..
..
..
..
..
..
..
..
..
..
..
..
..
..
..
..
..
..
..
..
..
..
..
..
..
..
..
..
..
..
..
..
..
..
..
..
..
..
..
..
..
..
..
..
..
..
..
..
..
..
..
..
..
..
..
..
..
..
..
..
..
..
..
..
..
..
..
..
..
..
..
..
..
..
..
..
..
..
..
..
..
..
..
..
..
..
..
..
..
..
..
..
..
..
..
..
..
..
..
..
..
..
..
..
..
..
..
..
..
..
..
..
..
..
..
..
..
..
..
..
..
..
.1
13
3
P
Pr
re
es
se
et
t
F
Fu
un
nc
ct
ti
io
on
n.
..
..
..
..
..
..
..
..
..
..
..
..
..
..
..
..
..
..
..
..
..
..
..
..
..
..
..
..
..
..
..
..
..
..
..
..
..
..
..
..
..
..
..
..
..
..
..
..
..
..
..
..
..
..
..
..
..
..
..
..
..
..
..
..
..
..
..
..
..
..
..
..
..
..
..
..
..
..
..
..
..
..
..
..
..
..
..
..
..
..
..
..
..
..
..
..
..
..
..
..
..
..
..
..
..
..
..
..
..
..
..
..
..
..
..
..
..
..
..
..
.1
14
4
M
Me
en
nu
u
s
se
et
tt
ti
in
ng
g.
..
..
..
..
..
..
..
..
..
..
..
..
..
..
..
..
..
..
..
..
..
..
..
..
..
..
..
..
..
..
..
..
..
..
..
..
..
..
..
..
..
..
..
..
..
..
..
..
..
..
..
..
..
..
..
..
..
..
..
..
..
..
..
..
..
..
..
..
..
..
..
..
..
..
..
..
..
..
..
..
..
..
..
..
..
..
..
..
..
..
..
..
..
..
..
..
..
..
..
..
..
..
..
..
..
..
..
..
..
..
..
..
..
..
..
..
..
..
..
..
..
..
..
..
..
.1
14
4
A
Ad
dd
di
it
ti
io
on
na
al
l
f
fu
un
nc
ct
ti
io
on
n.
..
..
..
..
..
..
..
..
..
..
..
..
..
..
..
..
..
..
..
..
..
..
..
..
..
..
..
..
..
..
..
..
..
..
..
..
..
..
..
..
..
..
..
..
..
..
..
..
..
..
..
..
..
..
..
..
..
..
..
..
..
..
..
..
..
..
..
..
..
..
..
..
..
..
..
..
..
..
..
..
..
..
..
..
..
..
..
..
..
..
..
..
..
..
..
..
..
..
..
..
..
..
.1
16
6
R
Re
ec
co
or
rd
di
in
ng
g
f
fu
un
nc
ct
tI
Io
on
n.
..
..
..
..
..
..
..
..
..
..
..
..
..
..
..
..
..
..
..
..
..
..
..
..
..
..
..
..
..
..
..
..
..
..
..
..
..
..
..
..
..
..
..
..
..
..
..
..
..
..
..
..
..
..
..
..
..
..
..
..
..
..
..
..
..
..
..
..
..
..
..
..
..
..
..
..
..
..
..
..
..
..
..
..
..
..
..
..
..
..
..
..
..
..
..
..
..
..
..
..
..
..
.1
16
6
N
Na
av
vi
ig
ga
at
ti
io
on
n
f
fu
un
nc
ct
ti
io
on
n.
..
..
..
..
..
..
..
..
..
..
..
..
..
..
..
..
..
..
..
..
..
..
..
..
..
..
..
..
..
..
..
..
..
..
..
..
..
..
..
..
..
..
..
..
..
..
..
..
..
..
..
..
..
..
..
..
..
..
..
..
..
..
..
..
..
..
..
..
..
..
..
..
..
..
..
..
..
..
..
..
..
..
..
..
..
..
..
..
..
..
..
..
..
..
..
..
..
..
..
..
..
..
..
..
..
..
..
..
..
..
..
..
..
.1
17
7
U
Us
sa
ag
ge
e
a
af
ft
te
er
r
c
co
on
nn
ne
ec
ct
ti
io
on
n
w
wi
it
th
h
P
PC
C.
..
..
..
..
..
..
..
..
..
..
..
..
..
..
..
..
..
..
..
..
..
..
..
..
..
..
..
..
..
..
..
..
..
..
..
..
..
..
..
..
..
..
..
..
..
..
..
..
..
..
..
..
..
..
..
..
..
..
..
..
..
..
..
..
..
..
..
..
..
..
..
.1
17
7
F
FI
IL
LE
E
U
UP
PL
LO
OA
AD
D
/
/
D
DO
OW
WN
NL
LO
OA
AD
D.
..
..
..
..
..
..
..
..
..
..
..
..
..
..
..
..
..
..
..
..
..
..
..
..
..
..
..
..
..
..
..
..
..
..
..
..
..
..
..
..
..
..
..
..
..
..
..
..
..
..
..
..
..
..
..
..
..
..
..
..
..
..
..
..
..
..
..
..
..
..
..
..
..
..
..
..
..
..
..
..
.1
18
8
M
Ma
as
ss
s
S
St
to
or
ra
ag
ge
e
D
Dr
ri
iv
ve
er
r
I
In
ns
st
ta
al
ll
la
at
ti
io
on
n
f
fo
or
r
W
Wi
in
nd
do
ow
ws
s
9
98
8.
..
..
..
..
..
..
..
..
..
..
..
..
..
..
..
..
..
..
..
..
..
..
..
..
..
..
..
..
..
..
..
..
..
..
..
..
..
..
..
..
..
..
..
..
..
..
..
..
..
..
..
..
..
..
..
..
..
..
..
..
..
..
..
..
.1
18
8
F
FO
ON
NT
T
D
DO
OW
WN
NL
LO
OA
AD
D
(
(L
LA
AN
NG
GU
UA
AG
GE
E
S
SU
UP
PP
PO
OR
RT
T)
).
..
..
..
..
..
..
..
..
..
..
..
..
..
..
..
..
..
..
..
..
..
..
..
..
..
..
..
..
..
..
..
..
..
..
..
..
..
..
..
..
..
..
..
..
..
..
..
..
..
..
..
..
..
.1
18
8
D
DR
RI
IV
VE
E
I
IN
NS
ST
TA
AL
LL
LA
AT
TI
IO
ON
N.
..
..
..
..
..
..
..
..
..
..
..
..
..
..
..
..
..
..
..
..
..
..
..
..
..
..
..
..
..
..
..
..
..
..
..
..
..
..
..
..
..
..
..
..
..
..
..
..
..
..
..
..
..
..
..
..
..
..
..
..
..
..
..
..
..
..
..
..
..
..
..
..
..
..
..
..
..
..
..
..
..
..
..
..
..
..
..
..
..
..
..
..
..
..
..
..
..
..
..
..
..
..
..
.1
18
8
F
FO
ON
NT
T
D
DO
OW
WN
NL
LO
OA
AD
D.
..
..
..
..
..
..
..
..
..
..
..
..
..
..
..
..
..
..
..
..
..
..
..
..
..
..
..
..
..
..
..
..
..
..
..
..
..
..
..
..
..
..
..
..
..
..
..
..
..
..
..
..
..
..
..
..
..
..
..
..
..
..
..
..
..
..
..
..
..
..
..
..
..
..
..
..
..
..
..
..
..
..
..
..
..
..
..
..
..
..
..
..
..
..
..
..
..
..
..
..
..
..
..
..
..
..
..
..
..
..
..
.1
18
8
L
LI
IS
ST
TE
EN
NI
IN
NG
G
O
OF
F
R
RE
EC
CO
OR
RD
D
F
FI
IL
LE
E.
..
..
..
..
..
..
..
..
..
..
..
..
..
..
..
..
..
..
..
..
..
..
..
..
..
..
..
..
..
..
..
..
..
..
..
..
..
..
..
..
..
..
..
..
..
..
..
..
..
..
..
..
..
..
..
..
..
..
..
..
..
..
..
..
..
..
..
..
..
..
..
..
..
..
..
..
..
..
.2
20
0
E
Ex
xp
pr
re
es
ss
s
M
Me
ed
di
ia
a
P
Pl
la
ay
ye
er
r
I
In
ns
st
ta
al
ll
la
at
ti
io
on
n.
..
..
..
..
..
..
..
..
..
..
..
..
..
..
..
..
..
..
..
..
..
..
..
..
..
..
..
..
..
..
..
..
..
..
..
..
..
..
..
..
..
..
..
..
..
..
..
..
..
..
..
..
..
..
..
..
..
..
..
..
..
..
..
..
..
..
..
..
..
..
..
..
..
..
..
..
..
..
..
..
..
..
..
..
..
..
..
..
..
.2
20
0
P
PL
LA
AY
YB
BA
AC
CK
K
O
OF
F
R
RE
EC
CO
OR
RE
ED
D
F
FI
IL
LE
E.
..
..
..
..
..
..
..
..
..
..
..
..
..
..
..
..
..
..
..
..
..
..
..
..
..
..
..
..
..
..
..
..
..
..
..
..
..
..
..
..
..
..
..
..
..
..
..
..
..
..
..
..
..
..
..
..
..
..
..
..
..
..
..
..
..
..
..
..
..
..
..
..
..
..
..
..
..
..
..
..
..
..
..
..
..
..
..
..
.2
22
2
F
FA
AQ
Q.
..
..
..
..
..
..
..
..
..
..
..
..
..
..
..
..
..
..
..
..
..
..
..
..
..
..
..
..
..
..
..
..
..
..
..
..
..
..
..
..
..
..
..
..
..
..
..
..
..
..
..
..
..
..
..
..
..
..
..
..
..
..
..
..
..
..
..
..
..
..
..
..
..
..
..
..
..
..
..
..
..
..
..
..
..
..
..
..
..
..
..
..
..
..
..
..
..
..
..
..
..
..
..
..
..
..
..
..
..
..
..
..
..
..
..
..
..
.2
24
4

3
Precaution
Any problem happened without reading this precaution is not Dyne telecom’s
responsibilty
● Do use this unit based on the manual.
● Do not impact the unit by strong stock or shaking. Or it may cause a serious
problems on unit.
● Do not use or place the unit in hot or humid conditions. Be careful that the unit
does not get wet. As this may cause critical damage that could be impossible to
repair. If the player gets wet then please wipe the unit with a dry towel and contact
the service center..
● Do not clean the unit with inflammable solvents like alcohol, benzene and thinner,
etc. Please use dried towel or soft rag
● Do not disassemble & assemble the unit yourself.
● Check the polarity before you use the battery.
● When you are not going to use the unit for a long time, remove the batteries to
prevent damage from battery leakage and corrosion.
● Please plug in / unplug the earphone or cable by grasping the plug connector.
This ay cause a break in the wire.
● Do not make a shock or a shake while the USB is connected to the PC.
● Case of any data loss saved in the unit by user mistake or unit breakdown,
dynetelecom does not have any responsibility to compensate for your data loss.
● Do not carry the battery with other metallic items, as it can cause a fire because of
the sort of battery that is used in the player.
● Watch out the scratching from the Papers or Wrap paper.
● Please take care while opening the battery cover.
● Using the earphone for long time will cause some problem on your health. So, do
control the use time.
● Listening to music at full volume for large amounts of time could cause damage to
your hearing.
● Do not use the earphone while you are driving because it is so dangerous.
● Do not hear the earphone with full volume when you walk by the crosswalk.
The Warning of Copyright
1. This company reserves all the copyrights of the contents of this publication
P
PR
RE
EP
PA
AR
RA
AT
TI
IO
ON
N
P
PA
AR
RT
TS
S

4
and Digital Audio Player software. So, we notice that you cannot reproduce,
copy or translate any part of this publication into any language in any form
without the prior written consent of the copyright holders.
2. Also, you cannot use the MP3 files, TCV, TVF files produced by Digital Audio
Player for the purpose of commercial purpose. They can be used for personal
purpose only.
3. It could be illegal to use or duplicate the recordings beyond a private purpose.
P
Pr
ro
od
du
uc
ct
t
F
Fe
ea
at
tu
ur
re
es
s
● Multi-format support: MP3, WMA Format
● Connected to the external Audio device, real-time recording function is available
by MP3 File
● MP3 File or WMA Music file playback function
● Various playback speed control function
● Voice record function via internal microphone
( Recording time: About 182Hr, 512MB / (6Kbps/8KHz Sampling) basis)
● FM Radio hearing or recording function
● Memory : Built-in 128MB, 256MB, 512MB
● Back Light display function
● ID3 tag function
● File title display function by various languages (Korean, English, Japanese,
Chinese etc)
● Super-ultra size with innovative design
● 6 kinds of different EQ support : NORMAL(FLAT), POP, CLASSIC, JAZZ, ROCK, n
AUTO
● Auto Equalize function by ID3 Tag information
● Repeat function for language study: Intro ( 10 sec playback function on each
file), section repeat, A file or All of file repeat function, Random
playback.
● Use convineance by Resume function
● Firmware upgrades available via the USB
● Can also be used as a portable storage device
● File search is available, while doing a playback, by Navigation function

5
A
Ac
cc
ce
es
ss
so
or
ri
ie
es
s
Earphone, USB cable, Audio cable, Installation CD, Battery (AAA type) 1 pcs, Necklace,
User Manual.
* Optional Accessories: Carrying case, Arm-band, Holster
M
MP
P3
3/
/W
WM
MA
A
D
De
ef
fi
in
ni
it
ti
io
on
n
● MP3
MP3 or Moving Pictures Expert Group Audio Layer 3, to call it by its proper
name, is a digital audio format that is encoded on a personal computer or
dedicatd recorder from an audio source such as CD. The encoded files are
compressed into far smaller sizes, around 1/12, while retaining near-original
sound quality, making it easy to download songs from the internet or store
music collections on your computer’s hard drive.
● WMA
A popular alternative to MP3, Microsoft’s WMA(Windows Media Audio) format can
compress files into even smaller sizes while retaining audio quality. A general
compression rate of 1/24 in relation to CD-DA(Compact Disc Digital Audio)files.

6
L
La
ay
yo
ou
ut
t
a
an
nd
d
F
Fu
un
nc
ct
ti
io
on
n
K
Ke
ey
ys
s
M
Mo
od
de
e
s
se
et
t
This unit is devided to two modes like MUSIC MODE and RADIO MODE.
Select Music Mode to be playback files. Select Radio Mode to listen Raido
program.
M
Mo
od
de
e
s
se
et
t
1. Music mode -> Radio mode
F
Fu
un
nc
ct
ti
io
on
n
d
de
es
sc
cr
ri
ip
pt
ti
io
on
n
LINE IN EARPHONE JACK
INTERNAL MIC
VOLUME CONTROL BUTTON
HOLD BUTTON
REW BUTTON
STOP BUTTON
MENU/MODE
FF BUTTON
RECORDING BUTTON
PALY BUTTON

7
Do press button long, moved to Radio Mode.
2. Radio Mode -> Music Mode
Do press button long, moved to Music Mode.
M
Mu
us
si
ic
c
M
Mo
od
de
e
B
Bu
ut
tt
to
on
n
d
de
es
sc
cr
ri
ip
pt
ti
io
on
n
Button Description
Stop Stage Press
shortly
Music Playback or pause stage
Playback Stage Press long Navigation stage
Power-off Stage Press long Power on
Stop stage Press long Power off
Playback stage Can be stopped playback function
Menu stage
Press long Do change to the Radio mode
Press shortly Will be moved to the Menu mode
Menu stage Selection function is available
Stop stage Available to select the previous or next file
Press long High speed search is available
, Playback stage
Press
shortly
Moveable to the previous or next song
Press long Recording will be started Stop stage
Press
shortly
File will be deleted
Playback stage Will be performed the section repeat function
Recording stage Recording will be stopped temporaily
Will be controlled the volume
Will be locked the button or unlocked
P
Pl
la
ay
yb
ba
ac
ck
k
/
/
S
St
to
op
p
Description LCD display

8
1. Choose the file you want to listen by
, button.
2. Press button shortly to play.
3. Press button shortly to stop while
playing.
Navigation function: While playing, if you press button long, will go to
the navigation mode. And then, can select the file by , button.
On the Mode of choosing the file, if you press button shortly, selected file
will be on a playback mode.
P
Pa
au
us
se
e
M
Mo
od
de
e
Description LCD Display
1. While playing, do press button
shortly to go Pause mode.
L
Li
is
st
te
en
ni
in
ng
g
t
th
he
e
p
pr
re
ev
vi
io
ou
us
s
/
/
n
ne
ex
xt
t
s
so
on
ng
g
1. While playing, do press button shortly
After the playback of 10 sec, previous song will be on a playback mode.
2. While doing a playback mode, if you press button shortly, next song will be on
a playback mode.

9
H
Hi
ig
gh
h
S
Sp
pe
ee
ed
d
S
Se
ea
ar
rc
ch
h
While doing a playback mode, if you do press button long, will be moved to
the position of previous song rapidly, and do press button long, will be
moved to the next song rapidly.
S
Se
ec
ct
ti
io
on
n
r
re
ep
pe
ea
at
t
Section repeat function is the listening of certain section file repetely
Description LCD Display
1. While playing, if you press button
shortly, “ A→“ will be displayed on LCD and
then Starting point of section repeat will be
2. Press button shortly again, then “A
→B“ on LCD will show and work the section
repeat..
3. Press button shortly again. Then,
section repeat is released
File deletion
On a stop stage of Music mode, press button shortly. the selected
file will be deleted.
M
Me
en
nu
u
S
Se
et
tt
ti
in
ng
g
Do press button shortly, and go to the Menu set Mode.
* While setting the Menu, do press button shortly, you can exit from the Menu

10
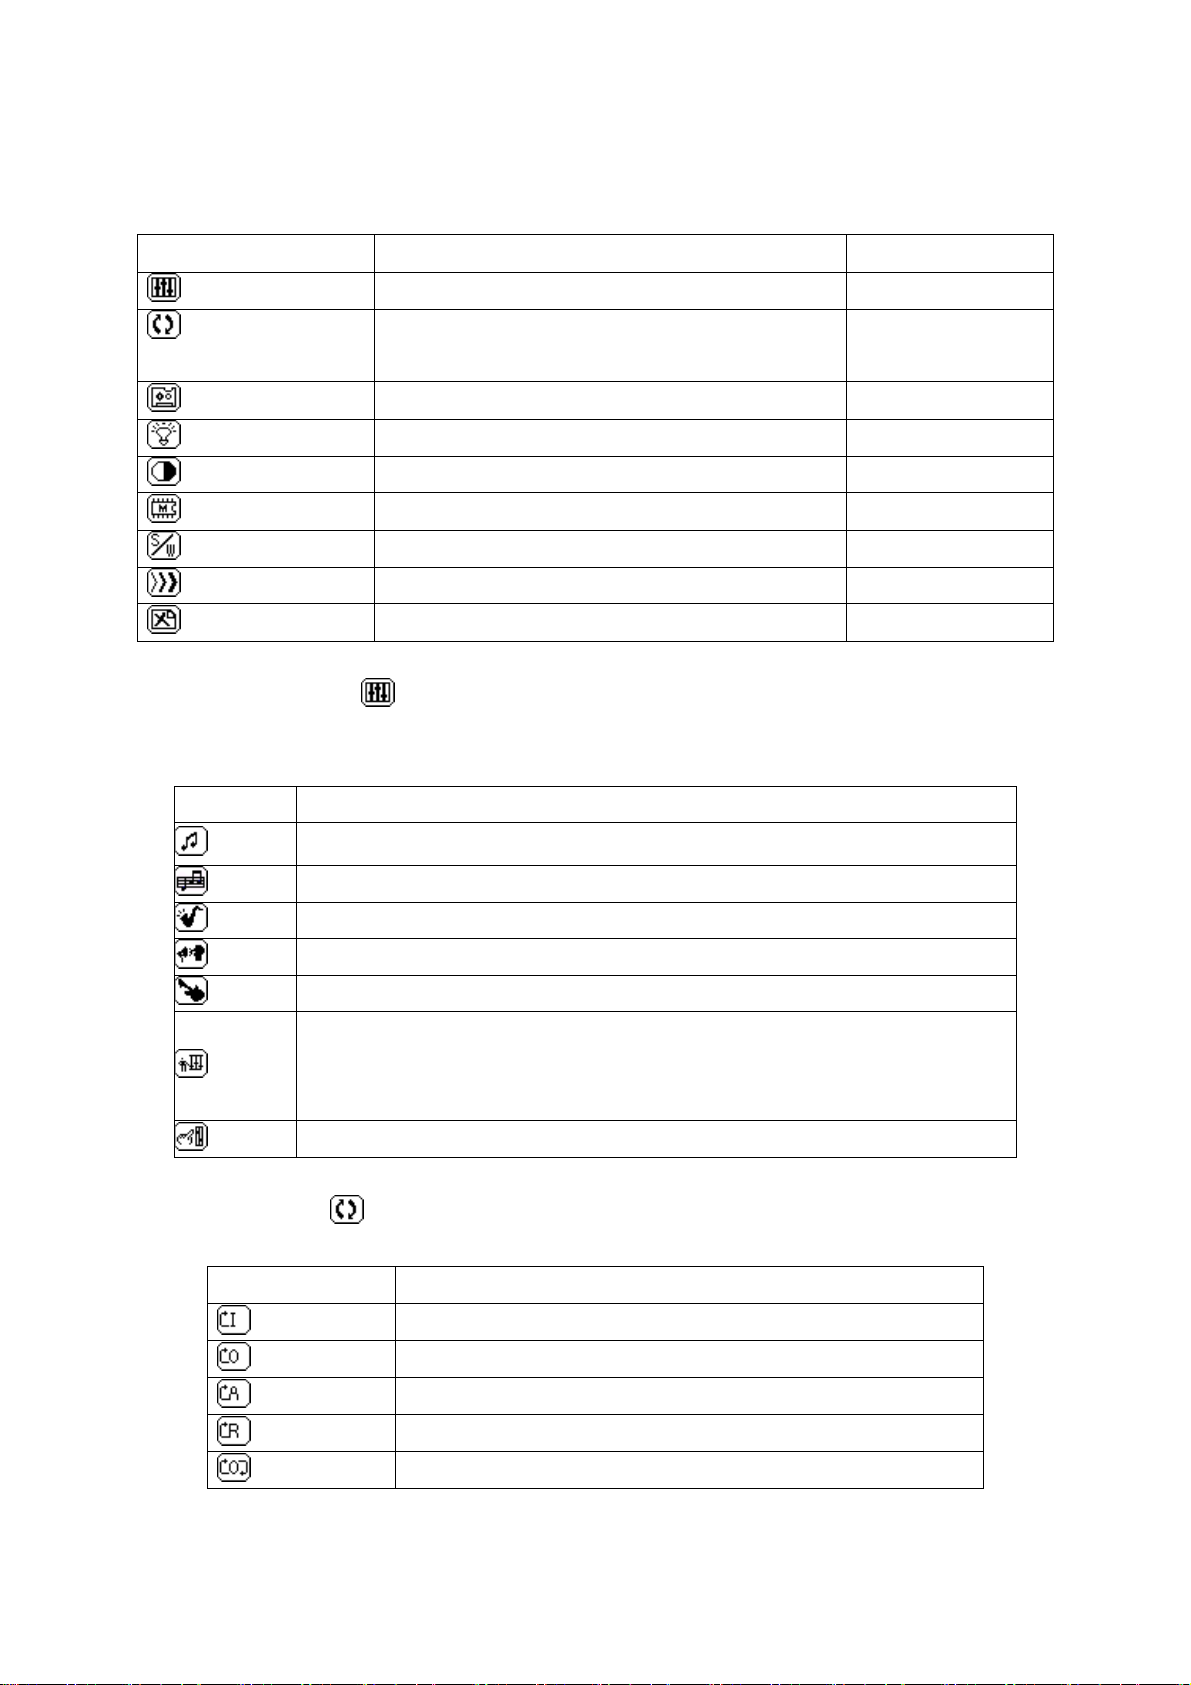
Mode. The contents of Menu is as follows.
Menu Description Initialize
Equalizer Normal, Classic, Jazz, Rock, Pop, Auto, User Normal
Repeat Intro, Normal One, Normal All, Normal Random,
Repeat One, Repeat All, Repeat Random
Repeat All
Record type High Quality, Middle Quality, Low Quality High Quality
LCD Backlight Off, 3 Sec, 5 Sec, 10 Sec 3 Sec
LCD Contrast From 0 to 20 10
Memory Size Total Mem, Remain Mem
Version / Upgrade S/W Version, S/W Upgrade
Play Speed 130,120,110,100,90,80 100
Delete Delete all in fold, Low Format Delete all in fold
1. Equalizer
Various Equalizer effectiveness can give more active feeling according to
ongoing music.
Mode Description
Normal Playback on Normal(Flat) mode
Classic Playback on Classic mode
Jazz Playback on Jazz mode
Pop Playback on Pop mode
Rock Playback on Rock mode
Auto
* Changing the EQ mode automatically through reading Tag information
on MP3 file.
* Without EQ information on the file itself, it runs with Normal mode.
User User can set the Bass, Middle & Treble value by user’s will
2. Repeat
The Player provides 7 different repeat modes.
Mode Description
Intro Playback all the file’s front part for 10 seconds
Normal One Stop after playback one file only
Normal All Stop after playback all the files in Memory
Normal Random Random Playback from first to last files in Memory
Repeat One Repeat playback one file

11
Repeat All Repeat playback all the files in Memory.
Repeat Random Repeat playback from first to last files in Memory
3. Record Type
This player provides 3 different record type.
Mode Description
High Quality Record with 128Kbps
Middle Quality Record with 64Kbps
Low Quality Record with 6Kbps
**Lower bit rate is able to povide longer recording time but low sound quality.
4. LCD Backlight
Do select the Backlight running time.
Mode Description
Off Always off the Backlight
3 Sec Automatically turn off after running for 3seconds
5 Sec Automatically turn off after running for 5seconds
10 Sec Automatically turn off after running for 10seconds
5. LCD Contrast
To use the Player at night or in poor light.
You can select 21 different luminosity of LCD.
6. Memory Size
The function of display “Whole memory capacity of this unit & available memory
capacity of this unit“
Total memory capacity of this unit and available memory capacity are shown on LCD.
7. Software vesion & upgrade
Mode Description
S/W Version Displaying of software Version number
S/W Upgrade To use software upgrade and download the pont
8. PLAY SPEED
To control playback speed
Mode Description

12
Speed 130% Playback of 130 % speed rate
Speed 120% Playback of 120 % speed rate
Speed 110% Playback of 110 % speed rate
Speed 100% Playback of normal speed
Speed 90% Playback of 90% speed rate
Speed 80% Playback of 80% speed rate
* Note : Low quality recording is only being played with Normal Play speed
9. Delete
To delete the file or memory format
Mode Description
Delete all in fold Delete all file in the folder
Low Format Delete all of memory content and new start.
* Low Format will be take several minutes by MB. Do take care of not turning
off the power on Firmware running.
R
Ra
ad
di
io
o
M
Mo
od
de
e
B
Bu
ut
tt
to
on
n
d
de
es
sc
cr
ri
ip
pt
ti
io
on
n
Button Description
Press shortly Will be selected the Preset Mode
Press long Performed the Auto Memory Tuning
Power-off
stage
Press
long
Will be turned on the Power
Press long Will be turned off the Power
Press shortly Will be moved to the Menu Mode
Press long Will be moved to the Music Mode
Preset Mode Will be moved to the previous / next Preset
Mode
Press
shortly
Will be controlled the Frequency manually
,
Normal
stage
Press long Will be searched the broadcasting reception
automatically
Press shortly Preset value will be saved by chosen
Frequency currently.
Press long Will be recorded on running air
Will be controlled the volume

13
Will be locked or unlocked
P
Pr
re
es
se
et
t
M
Mo
od
de
e
Navigate to one of the FM stations saved in the memory through use of automatic
or manual operation.
There are two ways to select the Preset Value like automatic way and manual way
as follows
1. Manual setting
Description LCD Display
1. Press or button shortly.
Then choose the broadcasting station.
2. Press button shortly and give
the preset number wanted.
3. Do press button shortly, currently
selected broadcasting station will be saved.
2. Automatic setting
Description LCD Display
Press button long, preset value will be set
automatically.
Note : Earphone has an antena function,
hence, please do not remove the antena from the unit.

14
P
Pr
re
es
se
et
t
F
Fu
un
nc
ct
ti
io
on
n
Description LCD Display
1. Press button shortly, preset No will
be displayed with the letter of Preset
2. Press , button shortly, and then,
moved to the previous or next Preset value
M
Me
en
nu
u
s
se
et
tt
ti
in
ng
g
Do press button shortly, you can do set the MENU.
* While doing a set of MENU, If you press button shortly, will be exited from the
MENU. Description of Menu is as follows.
Menu Description Initialize
Radio Mode Stereo, Mono Stereo
Radio Band Korea/China/USA, Europe, Japan Korea/China/USA
Record Type High Quality, Middle Quality, Low Quality High Quality
LCD Backlight Off, 3 Sec, 5 Sec, 10 Sec 3 Sec
LCD Contrast From 0 to 20 5
Memory Size Total Mem, Remain Mem
Version / Upgrade S/W Version, S/W Upgrade
1. Radio Mode
Will be set on Radio Mode
Mode Description
Stereo Will be listened as a Stereo base.
Mono Will be listened as a Mono type.
2. Radio Band
Set the area frequency range and frequency increase unit.

15
Mode Description
Frequency range 87.5 ~ 108 MHz
Korea/China/USA
Frequency
increase unit
0.1 MHz
Frequency range 87 ~ 108 MHz
Europe
Frequency
increase unit
0.05 MHz
Frequency range 76 ~ 90 MHz
Japan
Frequency
increase unit
0.1 MHz
3. Record Type
Will be selected the recording quality
Mode Description
High Quality Record with 128Kbps
Middle Quality Record with 64Kbps
Low Quality Record with 6Kbps
4. LCD Backlight
Will be selected the running time of Screen Backlight
Mode Description
Off Always off the Backlight
3 Sec Automatically turn off after turn on for 3seconds
5 Sec Automatically turn off after turn on for 5seconds
10 Sec Automatically turn off after turn on for10seconds
5. LCD Contrast
To control the LCD luminosity.
LCD luminosity is from 0 to 20 and 21 steps are available.
6. Memory Size
Display the whole memory capacity of unit and available memory capacity
7. Software vesion or upgrade
Mode Description
S/W Version Display software version information
S/W Upgrade Use of upgrading software and downlading font

16
A
Ad
dd
di
it
ti
io
on
na
al
l
f
fu
un
nc
ct
ti
io
on
n
R
Re
ec
co
or
rd
di
in
ng
g
f
fu
un
nc
ct
tI
Io
on
n
Available to record anytime whether it is Music Mode or Radio Mode
1. Recording on Music Mode
Description LCD Display
1. On a stop mode, do press button
long, Recording will be started.
2. Case of finishing the recording, do press
button shortly.
3-1. Case of recording from LINE IN, it
will be saved to the Audio Folder.
3-2. Case of recording through the internal
microphone, it will be saved to the Voice
folder.
* Case of recording from External sound unit’s Line out to Player’s line in, it
will be recorded directly without any noise.
2. Recording on Radio Mode
Available to record currently receiving frequency.
Description LCD Display
1. Do press button long, recording will
be started.

17
2. To finish the recording, do press
button shortly.
3. Case of recording from LINE IN, it will be
saved in RADIO Folder.
N
Na
av
vi
ig
ga
at
ti
io
on
n
f
fu
un
nc
ct
ti
io
on
n
While playback function, do press button long, and then, will be moved to
the navigation mode, you can select the file by pressing , button. On the
mode of selecting the file, do press button shortly, you can go into the Playback
Mode.
No need to get installation of any software but directly use this device in Window ME,
2000, XP. However, being requested to install „ MASS Storage Driver“ in Window 98.
Insert provided CD into CD-ROM to make it autorun with „ Installation program“. If
not, kindly select and click „ INSTALL. EXE“ by manual.
U
Us
sa
ag
ge
e
a
af
ft
te
er
r
c
co
on
nn
ne
ec
ct
ti
io
on
n
w
wi
it
th
h
P
PC
C

18
F
FI
IL
LE
E
U
UP
PL
LO
OA
AD
D
/
/
D
DO
OW
WN
NL
LO
OA
AD
D
Connected to PC , It is automatically recognized with removable disc.
M
Ma
as
ss
s
S
St
to
or
ra
ag
ge
e
D
Dr
ri
iv
ve
er
r
I
In
ns
st
ta
al
ll
la
at
ti
io
on
n
f
fo
or
r
W
Wi
in
nd
do
ow
ws
s
9
98
8
Select the Mass Storage Drive for Windows 98 on the menu of INSTALLATION
PROGRAM, it will be automatically installed.
F
FO
ON
NT
T
D
DO
OW
WN
NL
LO
OA
AD
D
(
(L
LA
AN
NG
GU
UA
AG
GE
E
S
SU
UP
PP
PO
OR
RT
T)
)
To perform the player as a same language as PC, need to download the FONT. It
is basically downloaded, when you purchase, to use directlly, however, case of
using another language, you should font download in the related language
Windows.
Before downloading the FONT, needing to set the DRIVER using the Download
Program.
D
DR
RI
IV
VE
E
I
IN
NS
ST
TA
AL
LL
LA
AT
TI
IO
ON
N
Driver, which is used to download the Font, is used to get program upgrade.
Select the part of “Driver for Upgrade and Font Download“ in installation
program Menu, it will be installed automatically.
F
FO
ON
NT
T
D
DO
OW
WN
NL
LO
OA
AD
D
DESCRIPTION LCD DISPLAY

19
1. Do press button shortly, will go
into the Menu mode.
2. Do use , button to choose the
function of mode.
3. Do press button shortly, you can
see the picture of right side.
4. By using , button, do select
mode.
5. If you press button shortly, you
can see the picture of right side on LCD.
6. While connecting of PC, the picture of
right side will be displayed on LCD.
* Before connecting to PC, Drive installation
should be set up.
7. Do perform the Font Download Utility in installation program.
8. After checking the message of CONNECTED on the screen’s below side, do
press Start button to download.

20
L
LI
IS
ST
TE
EN
NI
IN
NG
G
O
OF
F
R
RE
EC
CO
OR
RD
D
F
FI
IL
LE
E
After uploading the files(TCV,TVF) recorded on Player, being requested to get
“Express Media Player“ to playback at PC.
E
Ex
xp
pr
re
es
ss
s
M
Me
ed
di
ia
a
P
Pl
la
ay
ye
er
r
I
In
ns
st
ta
al
ll
la
at
ti
io
on
n
1) Before installation, all of the programs should be shot down..
2) Select “Express Media Player“ from Installation Program Menu, installation
will be started.
3) Press <OK> button when the pop window shows.
4) Do prepare to make an installation.
5) Do press <Next> button.
This manual suits for next models
2
Table of contents