Logik LID60W20 Service manual

1
DISHWASHER
For your continued safety and to reduce the risk of injury or electric shock,
please follow all the safety precautions listed below.
• Read all instructions carefully before using the dishwasher and keep
them for future reference.
• Retain the manual. If you pass the dishwasher onto a third party, make
sure to include this manual.
• Keep ventilation openings in the dishwasher enclosure clear of
obstructions. The ventilation openings at the base of the dishwasher
must not be obstructed by carpet.
• Choose a location for your dishwasher away from heat sources such as
radiators or res.
• Children should be supervised to ensure that they do not play with the
dishwasher.
• Keep mains cable out of reach from children.
• This appliance can be used by children aged from 8 years and above
and persons with reduced physical, sensory or mental capabilities or
lack of experience and knowledge if they have been given supervision
or instruction concerning use of the appliance in a safe way and
understand the hazards involved. Children shall not play with the
appliance. Cleaning and user maintenance shall not be made by
children without supervision.
• Keep children away from detergents and rinse aids. These may cause
chemical burns in the mouth, throat and eyes or asphyxiation.
• Keep children away from the dishwasher when the door is open.
• Switch o and disconnect from the mains supply before tting or
removing tools/attachments, after use and before cleaning.
• Keep your ngers away from moving parts and tted attachments.
• Never use a damaged machine.
• If the mains cable is damaged, it must be replaced by the manufacturer,
its service agent or a qualied technician in order to avoid a hazard.
• Keep the mains cable and plug away from water.
• Never exceed the maximum capacities.
• 2 people are required to lift this dishwasher.
• Only use the dishwasher for its intended domestic use.
• This appliance is intended for indoor household use and similar
applications such as:
–farm houses and by clients in hotels, motels and other residential
SAFETY WARNING
IB safety_Dishwasher_UK_Final200612.indd 1IB safety_Dishwasher_UK_Final200612.indd 1 10/6/2020 3:03 PM10/6/2020 3:03 PM

2
type environments;
–bed and breakfast type environments;
–catering and similar non-retail applications.
WARNING
IT IS HAZARDOUS FOR ANYONE OTHER THAN AUTHORISED
SERVICE PERSONNEL TO CARRY OUT SERVICING OF REPAIRS WHICH
INVOLVE THE REMOVAL OF COVERS.
TO AVOID THE RISK OF AN ELECTRICAL SHOCK DO NOT ATTEMPT
REPAIRS YOURSELF.
• Do not sit or stand on the door or dish rack.
• Do not move your dishwasher by holding the door or its edges. Hold
the dishwasher around its sides or base when moving it.
• Do not touch the heating element during or immediately after use.
• Do not operate your dishwasher unless all enclosure panels are properly
in place. Open the door very carefully when there is a programme
running, as there is a risk of hot water spraying out of the appliance.
• Do not place any heavy objects on the open door. The appliance could
tip.
• When loading items to be washed:
–Locate sharp items so that they will not damage the door seal;
–Warning: Knives and other utensils with sharp points must be loaded
in the basket with the points downwards or placed horizontally.
• Do not allow plastic items to come into contact with heating element.
• Check that the detergent receptacle is empty after completion of the
wash cycle.
• Do not wash plastic items unless they are marked dishwasher safe or
equivalent.
• Use only detergent and rinse aids designed for an automatic
dishwasher.
• Other means for disconnection from the supply must be incorporated
in the xed wiring with at least 3mm contact separation in all poles.
• The door should not be left in the open position since this could
present a tripping hazard.
• For energy saving, always remember to switch the dishwasher o
when you have nished using it. The dishwasher should not be left
unattended when in use.
• Remove the door to the washing compartment when removing an old
dishwasher from service or discarding it.
• During installation, the power supply cord must not be excessively or
IB safety_Dishwasher_UK_Final200612.indd 2IB safety_Dishwasher_UK_Final200612.indd 2 10/6/2020 3:03 PM10/6/2020 3:03 PM

3
• Improper connection of the equipment-earthing conductor
could result in a risk of electric shock.
• The wires in the cord are coloured as follows:
–Green and Yellow = Earth,
–Blue = Neutral,
–Brown = Live.
• Check with a qualied electrician or service representative if
you are in doubt whether the appliance is properly earthed or
the plug does not t correctly.
• Never modify the plug provided with the appliance.
dangerously bent or attened.
• Do not tamper with controls.
• The appliance is to be connected to the water mains using new hose
sets.
• Never place heavy or wet items directly on top of the appliance.
• Do not dismantle, repair or modify the machine. This may invalidate
your guarantee and could lead to malfunction and cause re or injury.
• Manual pre-rinsing of items leads to increased water and energy
consumption and is not recommended.
• Washing in a household dishwasher usually consumes less energy and
water than hand dishwashing provided the household dishwasher is
used according to the manufacturer’s instructions.
Earthing Instructions
WARNING: THIS APPLIANCE MUST BE EARTHED.
• This appliance is equipped with a mains cable having an equipment-
earthing conductor and an earthing plug.
• The plug must be plugged into an appropriate outlet that is installed
and earthed in accordance with local standards and requirements.
IB safety_Dishwasher_UK_Final200612.indd 3IB safety_Dishwasher_UK_Final200612.indd 3 10/6/2020 3:03 PM10/6/2020 3:03 PM

DSG Retail Ltd. (co. no. 504877)
1 Portal Way, London, W3 6RS, UK
EU Representative
DSG Retail Ireland Ltd (259460)
3rd Floor Oce Suite,
Omni Park SC, Santry, Dublin 9, Republic of Ireland
IB safety-Dishwasher-UK-200612V1
The symbol on the product or its packaging indicates that this
product must not be disposed of with your other household
waste. Instead, it is your responsibility to dispose of your waste
equipment by handing it over to a designated collection point for
the recycling of waste electrical and electronic equipment. The
separate collection and recycling of your waste equipment at the
time of disposal will help conserve natural resources and ensure
that it is recycled in a manner that protects human health and
the environment.
For more information about where you can drop o your waste
for recycling, please contact your local authority, or where you
purchased your product.
Visit Partmaster.co.uk today for the easiest way to buy
electrical spares and accessories. With over 1 million
spares and accessories available we can deliver direct
to your door the very next day. Visit www.partmaster.co.uk or call 0344 800 3456
(UK customers only) Calls charged at National Rate.
IB safety_Dishwasher_UK_Final200612.indd 4IB safety_Dishwasher_UK_Final200612.indd 4 10/6/2020 3:03 PM10/6/2020 3:03 PM

60cm Integrated
Dishwasher
Installation / Instruction Manual
LID60W20
LID60W20_IB_RC_Final210603.indd 1LID60W20_IB_RC_Final210603.indd 1 3/6/2021 5:42 PM3/6/2021 5:42 PM

Contents
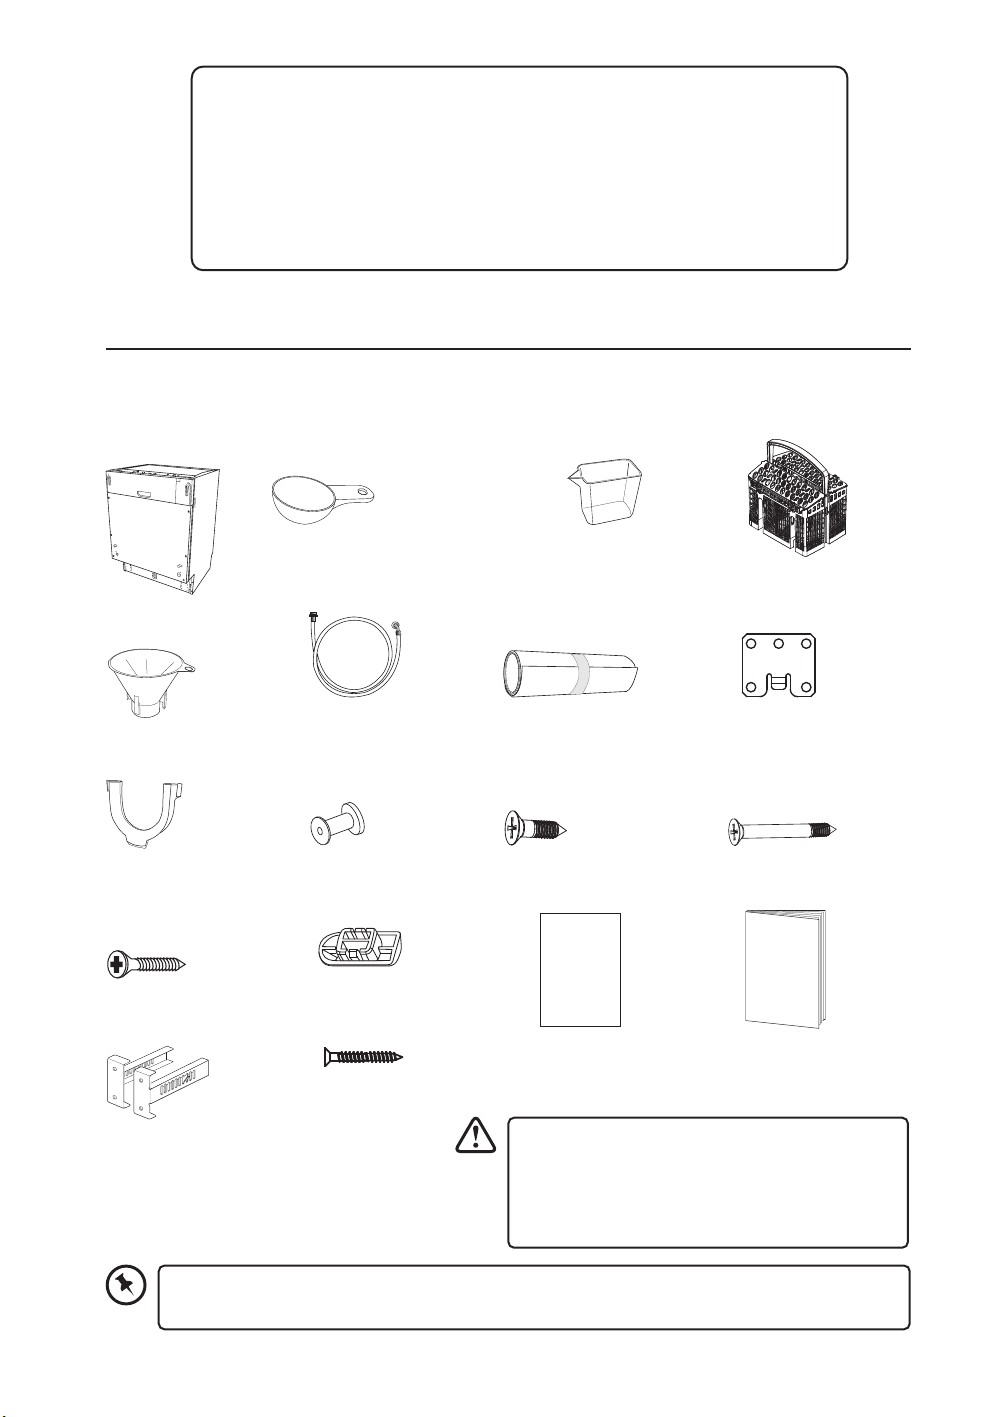
Unpacking............................................................................................................................................4
Installation ...........................................................................................................................................5
Location ...............................................................................................................................................................................5
Product Overview..............................................................................................................................11
Front View ........................................................................................................................................................................ 11
Rear View .......................................................................................................................................................................... 11
Internal View.................................................................................................................................................................... 12
Control Panel................................................................................................................................................................... 13
Before Operating...............................................................................................................................14
To Open the Door.......................................................................................................................................................... 14
To Close the Door .......................................................................................................................................................... 14
Items Not Suitable for Use in the Dishwasher..................................................................................................... 14
Adding Detergent Powder or Detergent Tablet..............................................................................15
Adding Rinse Aid ...............................................................................................................................16
Adjusting the Rinse Aid Reservoir ........................................................................................................................... 17
Adding Salt.........................................................................................................................................18
Adjusting Salt Consumption..................................................................................................................................... 19
Loading the Dishwasher ...................................................................................................................21
Before Loading the Dishwasher............................................................................................................................... 21
Upper Basket................................................................................................................................................................... 22
– Adjusting the Upper Basket............................................................................................................................. 22
Lower Basket ................................................................................................................................................................... 23
– Hinged Spikes .......................................................................................................................................................23
Loading the Upper and Lower Basket for 13 Place Settings (according to EN 50242)......................... 23
Loading the Upper and Lower Basket for 13 Place Settings (according to EN 60436)......................... 24
Cutlery Rack and Basket (according to EN 50242 and EN 60436)................................................................ 25
Operation ...........................................................................................................................................26
Starting a Wash Cycle................................................................................................................................................... 26
Changing a Programme.............................................................................................................................................. 26
At the End of a Programme ....................................................................................................................................... 26
Delay Start........................................................................................................................................................................ 27
Half Load........................................................................................................................................................................... 27
Switching O the Unit ................................................................................................................................................. 27
Unloading the Dishwasher ...............................................................................................................27
Wash Cycle Table (according to EN 50242) ......................................................................................28
Wash Cycle Table (according to EN 60436) ......................................................................................29
Cleaning After Use.............................................................................................................................30
External Care ................................................................................................................................................................... 30
– The Door and the Door Seal.............................................................................................................................30
– The Control Panel.................................................................................................................................................30
LID60W20_IB_RC_Final210603.indd 2LID60W20_IB_RC_Final210603.indd 2 3/6/2021 5:42 PM3/6/2021 5:42 PM

Internal Care.................................................................................................................................................................... 30
– Filtering System....................................................................................................................................................30
– Spray Arms .............................................................................................................................................................31
Frost Precaution ................................................................................................................................31
Moving the Dishwasher ....................................................................................................................31
Maintenance After a Prolonged Period of Non-Operation ............................................................32
Hints and Tips ....................................................................................................................................32
Technical Problems....................................................................................................................................................... 32
General Problems .......................................................................................................................................................... 33
Disposal of the Dishwasher ..............................................................................................................34
Disposal of Packing Material ............................................................................................................34
Specications.....................................................................................................................................35
LID60W20_IB_RC_Final210603.indd 3LID60W20_IB_RC_Final210603.indd 3 3/6/2021 5:42 PM3/6/2021 5:42 PM

4
Unpacking
Remove all items from the packaging. Retain the packaging. If you dispose of it please do so
according to local regulations.
The following items are included:
Thank you for purchasing your new product.
We recommend that you spend some time reading this instruction
manual in order that you fully understand all the operational features it
oers.
Read all the safety instructions carefully before use and keep this
instruction manual for future reference.
This product has been wet tested to ensure
correct operation. As a result some water may
remain inside the unit. This is normal and
safe. Remove any water droplets from the
exterior if necessary.
If items are missing, or damaged please contact Partmaster (UK only).
Tel: 0344 800 3456 for assistance.
Main Unit
U-shape Hose
Holder
Salt Funnel
Detergent Measuring Spoon
1 full spoon = 20g (approx.)
Instruction Manual
Door Template
Cutlery Basket
ST3.5x45 Screw x 4
Toe Panel Mounting
Bracket x 2
Hole Cover x 4
Lower Hook X 2
ST3.5x25 Screw x 2
Hop Hook X 2
Water Supply
Hose
ST4x14 Screw x 12
Measuring Cup
60ml (approx.)
Condensation Strip
Installation
Door
Template
Instruction
Manual
ST4x30 Screw x 4
LID60W20_IB_RC_Final210603.indd 4LID60W20_IB_RC_Final210603.indd 4 3/6/2021 5:42 PM3/6/2021 5:42 PM

INSTALLATION
5
1. Please ensure the dishwasher is installed
by a qualied technician. Refer to the tools
required.
Location
When selecting a position for your dishwasher you should make sure the installation surface
is at and rm, and the room is well ventilated. Avoid locating your dishwasher near a heat
source, eg. cooker, boiler or radiator. Extreme cold ambient temperatures may also cause
the appliance not to perform properly. This dishwasher is not designed for use in a garage or
outdoors.
Do not cover the dishwasher. When installing, ensure that free space is left at the sides.
2. Ensure there is clearance each side of the
unit to allow slight sideways movement for
servicing when required. Good levelling
is essential for correct closure and sealing
of the door. When the unit is correctly
levelled, the door should not catch the inner
liner on either side of the cabinet. Adjust
the levelling feet to obtain the optimum
levelling of the unit.
The gure outlines the minimum
dimensions required to accommodate the
dishwasher within tted kitchen furniture
units.
820
600
580
598
550
815
units in mm
All parts removed must be saved to do the reinstallation in the future. Ensure the
dishwasher is unplugged and empty. We recommend that 2 people handle the
dishwasher during installation.
The supplied door template also
contains installation steps which will
assist installation.
LID60W20_IB_RC_Final210603.indd 5LID60W20_IB_RC_Final210603.indd 5 3/6/2021 5:42 PM3/6/2021 5:42 PM

INSTALLATION
6
4. The condensation strip must be tted
to the underside of the worktop above
your dishwasher to protect it against any
moisture. Its purpose is to protect your
worktop’s underside from steam rising from
the dishwasher.
• Ensure the surface is clean prior to
sticking the condensation strip to the
underside of the worktop.
• Remove the backing paper from the
condensation strip.
• Stick the condensation strip to the
underside of the worktop.
3. Do not connect the unit to the mains socket
before installation. Ensure you are not
installing the unit right in front of the mains
socket. This is to avoid potential damage to
the back of the unit.
Leave some space
Stick the Condensation Strip
under the worktop, where you
want to install the dishwasher.
Failure to attach the
condensation strip could
result in damage to the
underside of your worktop!
5. Position the dishwasher next to a water tap
and a drain. Ensure the water inlet and drain
hoses are not kinked or squashed. The unit
must not stand on the mains cable. Adjust
the levelling feet to obtain the optimum
levelling of the unit.
LID60W20_IB_RC_Final210603.indd 6LID60W20_IB_RC_Final210603.indd 6 3/6/2021 5:42 PM3/6/2021 5:42 PM

INSTALLATION
7
6. Tape the supplied Door Template to the
dishwasher door. Ensure the aesthetic
door weight is a minimum of 3kg and a
maximum of 7kg. Make sure the top of the
template is at the top of the door. Drill the
required holes following the depth and
diameter shown on the Door Template.
<7kg
7. Install the Aesthetic Panel onto the
dishwasher door. After the aesthetic
panel is installed, the tension of the
dishwasher door spring can be adjusted
by rotating the adjusting bolt. If the
tension is right, the door will remain
horizontal in the fully open position.
Hop hook
ST4*14
Countersunk
head screw
Lower hook
8. Remove the screws on both sides of the
dishwasher door and replace with ST3.5x45
screws. Ensure to tighten the screws and to
secure the Aesthetic Panel.
9. Adjust the bolt to loosen or tighten the
tension of the dishwasher door. Adjust
the levelling feet to obtain the optimum
levelling of the unit.
LID60W20_IB_RC_Final210603.indd 7LID60W20_IB_RC_Final210603.indd 7 3/6/2021 5:42 PM3/6/2021 5:42 PM

INSTALLATION
8
10. To secure the dishwasher under the table
top, tighten the screws as shown.
Synthetic / Ceramic Worktop
ST4x30
Hole
Cover
11. Cut out a 598 mm wide plinth for toe
panel. Tape the supplied toe panel
mounting brackets to the toe panel as
shown. Drill the required holes.
598
560.4
36
56.2 100
12. Determine the correct position for the
toe panel mounting bracket, remove
the bracket and bend the metal tab. This
ensures that the toe panel won’t slide in
further than you need.
13. Attach the toe panel mounting brackets to
the toe panel. Align the screw holes, then
use 4 screws of ST4x14 to secure the toe
panel.
LID60W20_IB_RC_Final210603.indd 8LID60W20_IB_RC_Final210603.indd 8 3/6/2021 5:42 PM3/6/2021 5:42 PM

INSTALLATION
9
water mains
Y-Adaptor
(not included)
safety water supply hose
Connect
to another
appliance if
required.
You may use a Y-adaptor (not
included) for an additional water
feed for another appliance, for
example a washing machine. This
is only applicable for cold water
mains. A Y-adaptor is available
from most DIY stores.
Before connecting to the waste
pipe, make sure to check the
waste pipe and remove any
stopper or blockage inside,
otherwise the unit may not be
able to expel the waste water
properly.
14. Insert the toe panel to the dishwasher.
15. Make sure your plumbing is suitable for use
with the dishwasher. If in doubt contact
a qualied plumber. This unit MUST BE
connected to COLD WATER MAINS using
the new water inlet hose. OLD HOSE SETS
MUST NOT BE RE-USED. The water pressure
from the water mains needs to be at a
minimum of 0.04 MPa and a maximum of
1.00MPa.
16. Connect the water supply hose. You can
connect the water supply hose to the
mains water, or depending on the type of
tap you have you can purchase an adaptor
to connect the hose directly onto your tap.
17. Connect the drain hose. The drain hose can
be placed into your sink, or connected to
the waste pipe.
LID60W20_IB_RC_Final210603.indd 9LID60W20_IB_RC_Final210603.indd 9 3/6/2021 5:42 PM3/6/2021 5:42 PM

INSTALLATION
10
U-shaped drain hose
holder water drain hose
• The waste pipe must only be
connected to the foul drains and
not the surface water drainage
system.
• Make sure you do not raise the
drain hose above 10cm from
the outlet on the dishwasher.
Your dishwasher will not drain
properly if you raise the hose by
more than 10cm.
• Do not forcefully bend the drain
hose.
• You may use the u-shaped drain
hose holder to secure your drain
hose and to avoid bending it.
• Please close the hydrant after use.
18. After connecting the hoses, check all connections for leaks.
LID60W20_IB_RC_Final210603.indd 10LID60W20_IB_RC_Final210603.indd 10 3/6/2021 5:42 PM3/6/2021 5:42 PM

11
Product Overview
Front View
Rear View
1. Control Panel
2. Door Handle
2
3
1
5
4
3. Mains Cable
(Connect To Electrical Mains Outlet)
4. Drain Hose
5. Water Inlet
(Connect To Supply Hose)
LID60W20_IB_RC_Final210603.indd 11LID60W20_IB_RC_Final210603.indd 11 3/6/2021 5:42 PM3/6/2021 5:42 PM

12
Internal View
6. Cutlery Rack
7. Spray Arm
(one under the upper
and one under the
lower basket)
8. Upper Basket
9. Salt Reservoir
10. Detergent Dispenser
11. Rinse Aid Reservoir
12. Filtering System
13. Lower Basket
14. Cutlery Basket
15. Cup Rack
6
10
8
9
7
11
12
13
14
712
9
15
LID60W20_IB_RC_Final210603.indd 12LID60W20_IB_RC_Final210603.indd 12 3/6/2021 5:42 PM3/6/2021 5:42 PM

13
Control Panel
1. ON/OFF button
To turn on/o the power supply.
2. Programme button
To select a wash programme.
3. Delay button
To delay the wash starting time: 3 hours, 6 hours or 9 hours.
4. Half load button
To choose half load washing of 6 place setting or less. Half load washing function only
applies to intensive, universal, ECO, Glass and 90 min programme.
5. Programme indicators
6. Half load indicator
7. Add salt indicator
8. Add rinse aid indicator
9. ON/OFF indicator
10. Delay indicators
6h
3h
9h
EC O
1
5
6
234
7
8
9
10
LID60W20_IB_RC_Final210603.indd 13LID60W20_IB_RC_Final210603.indd 13 3/6/2021 5:42 PM3/6/2021 5:42 PM

14
Before Operating
To Open the Door
• Pull the door handle.
• If the door is opened during operation, rst open the door slightly to avoid water spillage.
• Wooden cutlery and crockery or items with wooden parts may discolour and fade. The glue
used in these items is not dishwasher-proof and wooden handles may come loose after being
washed in a dishwasher.
• Craft items, antiques, valuable vases and decorative glassware are also not suitable for
dishwashers.
• Plastic items (e.g. tupperware) which are not heat resistant may melt or loose shape due to
the high temperature in the dishwasher.
• Copper, brass, tin and aluminium items may discolour or become matt.
• Clouding may occur on glasses and delicate glassware after frequent washing. Do not wash
delicate glassware or glassware containing lead crystal, in a dishwasher. Wash delicate
glassware by hand instead.
• Silver and aluminium parts have a tendency to discolour during washing. Residues like egg
white, egg yolk and mustard often cause discolouring and staining on silver. Therefore, please
clean the residues from silver immediately after use.
To Close the Door
• After loading the dishes, push the baskets fully into the dishwasher.
• Lift the door upwards and push until it clicks into position.
• Do not slam the dishwasher door.
Items Not Suitable for Use in the Dishwasher
When purchasing new crockery and cutlery, please make sure they are dishwasher-proof. Some
items are not suitable for dishwashers.
The following items are not suitable
Towels and
sponges
Small plastic
items
(Milk bottle
nipple)
Plastic items
that are not
dishwasher safe
Cast iron
pans
Scratched non-stick cookware
Copper pots and pans
Crystal
glasses
Silverware
Valuable
vases
Cracked / chipped china
If the door is opened during operation, all functions are automatically interrupted.
LID60W20_IB_RC_Final210603.indd 14LID60W20_IB_RC_Final210603.indd 14 3/6/2021 5:42 PM3/6/2021 5:42 PM

15
2. Fill the detergent dispenser with detergent powder or detergent
tablet. The marking indicates the lling level.
3. To close the detergent dispenser, slide the dispenser lid to the
centre and press down to close.
Adding Detergent Powder or Detergent Tablet
Only use detergents specically designed for use in dishwashers. To be more environmentally
friendly, please use no more than the correct amount of detergent. Fill the detergent
dispenser with detergent powder or tablet. See the detergent manufacturers instructions for
the correct amount to use. If using tablets read the manufacturers recommendations on the
tablet packaging in order to determine where the tablet should be placed (e.g. cutlery basket,
detergent compartment etc).
Please follow the steps below to ll the detergent dispenser.
1. To open the detergent dispenser, slide the dispenser latch to the
right.
Irritant
Bleach and
Countertop
detergent
• Keep detergents and bleaches out of the reach of
children.
• Irritating to eyes.
• Avoid contact with eyes. In case of contact with
eyes, rinse immediately with plenty of water and
seek medical advice.
• If swallowed, seek medical advice immediately.
All programmes with pre-wash need an additional
detergent dosage. Just place them on the
dispenser or put them inside the dishwasher.
If using tablets please check the detergent
manufacturers instructions. Please refer to the
wash cycle table. This detergent will take eect
during the pre-wash phase.
LID60W20_IB_RC_Final210603.indd 15LID60W20_IB_RC_Final210603.indd 15 3/6/2021 5:42 PM3/6/2021 5:42 PM

16
Adding Rinse Aid
Rinse aid helps to ensure water does not cling and leave marks on crockery during the drying
phase and helps crockery dry faster after it has been washed. Only pour rinse aid that is for
domestic dishwashers into the reservoir. This model is designed to use liquid rinse aids only.
Please follow the steps below to pour the rinse aid into the storage reservoir, and the amount will
dispense automatically.
1. Lift the rinse aid reservoir cap.
2. Pour the rinse aid and press down the cap
to close.
3. Be careful not to overll the reservoir.
Wipe up any spills.
• If the water hardness in your area is soft, you may not need rinse aid as it may cause
white lm to develop on your dishes.
• If you decide to use a detergent tablet, you do not need to add rinse aid into the
rinse aid reservoir.
• Rinse aid rell warning indicator will show on the control panel when the reservoir is
running out of rinse aid and requires relling.
LID60W20_IB_RC_Final210603.indd 16LID60W20_IB_RC_Final210603.indd 16 3/6/2021 5:42 PM3/6/2021 5:42 PM
Table of contents
Other Logik Dishwasher manuals

Logik
Logik LID45W16N Service manual

Logik
Logik LDWTT13E Service manual

Logik
Logik LDW45W12N Service manual

Logik
Logik LDW60W15N Service manual

Logik
Logik LID45W13N Service manual

Logik
Logik LID60W16N Service manual

Logik
Logik LDW60W11N Operating manual

Logik
Logik LDW45W15N Service manual

Logik
Logik LDW60W12N Service manual

Logik
Logik LS474W User manual

Logik
Logik ldw60s11 User manual

Logik
Logik LDWTT15E Parts list manual

Logik
Logik LDW60W20N User manual

Logik
Logik LF674WN User manual

Logik
Logik LDW2PB19N Service manual

Logik
Logik LDW45S10 User manual

Logik
Logik LDW45S10 User manual

Logik
Logik LDW45S11 Service manual

Logik
Logik LDW45S12 Service manual

Logik
Logik LID45W20 Service manual