manuals.online logo
Brands
  1. Home
  2. •
  3. Brands
  4. •
  5. LoJack
  6. •
  7. Automobile Accessories
  8. •
  9. LoJack ATS100 User manual

LoJack ATS100 User manual

Toll Free Support Phone: 1-877-563-0032
Email: customer_support@spireon.com
GPS DEVICE
INSTALLATION GUIDE
LOJACK ATS100
Please contact customer service at: Spireon.com/lojack
Phone: 1-877-563-0032 Email: customer_support@spireon.com ©2021 Spireon, Inc. All rights reserved.
Installation Guide (Standard)
LoJack ATS100 LTE
GPS Device
Installation Options:
1. The standard installation simply hard-wires to the vehicle. ATS100 supports both 2-wire and OBD passthrough
install methods.
Standard Installation Instructions:
1. Using a digital voltmeter, locate a constant 12V source (meter
should read 12V with the vehicle’s ignition in the o position) and
a solid chassis ground location.
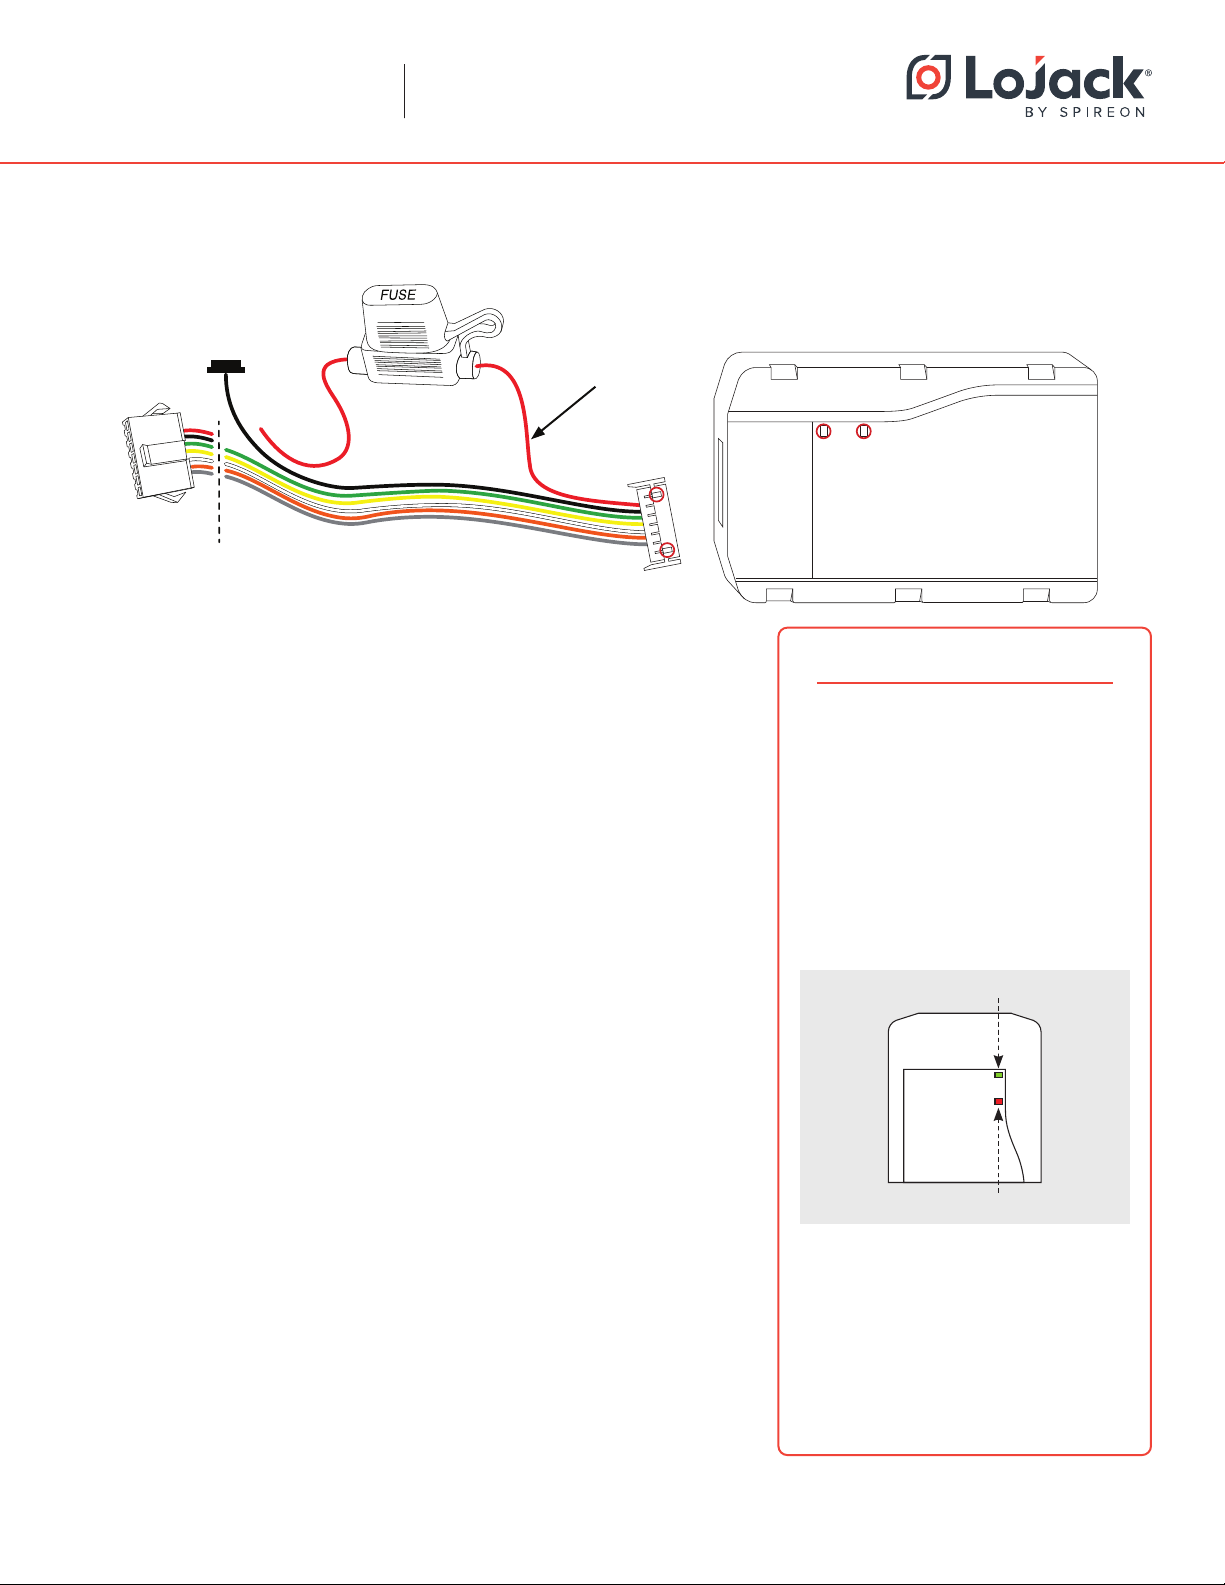
2. For installations without the OBDii pass through cable, cut o the
quick disconnect on the device harness and connect the red wire
to your constant 12V source and the black wire to ground.
3. Find a mounting location for the ATS100 LTE that is clear of
metallic obstructions from above that could cause interference
with GPS signal reception. Be sure that the ATS100 LTE is
mounted in a manner that positions the printed ‘This Side Down’
indicator toward the floor of the vehicle. IMPORTANT: Take special
care to secure the device to a solid surface using zip ties. In order
for the accelerometer to work properly, the device must be firmly
attached to the vehicle.
4. The ATS100 will only wake up with movement. The device will
need to be awoken with movement before validation of the install.
It will go back to sleep mode after 10 minutes if no additional
motion is detected.
5. On initial power up, the LED indicators should show a flashing
green LED and a flashing red LED while scanning for cellular and
GPS signals, respectively. When the green and red LEDs stop
flashing and remain solid, adequate cellular and signals have
been acquired.
Ground
Constant 12V
Cut here for Standard Installation
(Do not cut when using preinstall or OBDII Harness)
LED Indicators
Important:
It may take five to seven seconds to see
any LED activity and up to 10 minutes to
get an initial GPS lock.
Caution:
If, after 15 minutes, you are still unable
to get GPS and / or cellular signals,
reposition and try again.
LED Troubleshooting
Slow Flash = From powerup,
system initialization
Fast Flash = GPS Lost / Cellular Data
Connection Lost
Solid = Signal Acquired
Red LED Blips once every 30s =
Device in monitoring or standby
mode
Green LED fast flash = Cellular data
connection is lost temporarily
Green = Cellular Signal
Red = GPS Signal
Installation Guide (Standard)
LoJack ATS100 LTE
GPS Device
Please contact customer service at: Spireon.com/lojack
Phone: 1-877-563-0032 Email: customer_support@spireon.com ©2021 Spireon, Inc. All rights reserved.
Optional OBDii Pass-through Cable Installation Instructions:
1. Unclip or unscrew the vehicle’s stock OBDii plug from its mounting location.
2. Plug the OBDii pass-through cable into the stock OBDii port and clip or screw the opposite end into the
stock plug’s original mounting location using the supplied bracket where necessary.
3. To install the Edge, mount the device as instructed in Step 3 of the standard installation before plugging the
quick disconnect on the device harness into the one on the passthrough cable.
OBDII Pass-through Cable
(where applicable)
ATS100 Harness

Popular Automobile Accessories manuals by other brands

Mahindra ROXOR2 installation instructions

Mahindra

Mahindra ROXOR2 installation instructions

Holley HOOKER 2253HKR instruction sheet

Holley

Holley HOOKER 2253HKR instruction sheet

Reese Explore 9516000 Instruction guide

Reese Explore

Reese Explore 9516000 Instruction guide

travall TDG 1364 FITTING INSTRUCTION

travall

travall TDG 1364 FITTING INSTRUCTION

AMP Research Power Step 77121-01A installation guide

AMP Research

AMP Research Power Step 77121-01A installation guide

GTW MACH 01-176 installation instructions

GTW MACH

GTW MACH 01-176 installation instructions

Sears Craftsman 486.24536 owner's manual

Sears

Sears Craftsman 486.24536 owner's manual

iDataLink maestro Rr install guide

iDataLink

iDataLink maestro Rr install guide

Pyle PLCPBT25 brochure

Pyle

Pyle PLCPBT25 brochure

EUFAB 11595 operating instructions

EUFAB

EUFAB 11595 operating instructions

Audiovox UniStreamONE installation guide

Audiovox

Audiovox UniStreamONE installation guide

Bazzaz ZFi installation instructions

Bazzaz

Bazzaz ZFi installation instructions

Cruz N+ Series Assembly instructions

Cruz

Cruz N+ Series Assembly instructions

Whispbar K368W Fitting instructions

Whispbar

Whispbar K368W Fitting instructions

GMC Magne Charge WM7200 installation manual

GMC

GMC Magne Charge WM7200 installation manual

Kuda 293260 Installation instruction

Kuda

Kuda 293260 Installation instruction

Bestop 51117 installation instructions

Bestop

Bestop 51117 installation instructions

Kolpin Outdoors 35-3010 Assembly & owners manual

Kolpin Outdoors

Kolpin Outdoors 35-3010 Assembly & owners manual

manuals.online logo
manuals.online logoBrands
  • About & Mission
  • Contact us
  • Privacy Policy
  • Terms and Conditions

Copyright 2025 Manuals.Online. All Rights Reserved.