Lomax STANCE User manual

Thank you for purchasing a LOMAXTM STANCETM Hard Cover. Agri-Cover, Inc. proudly
manufactured this cover using superior quality materials and workmanship. With proper
care, your cover will provide years of service and enjoyment.
NOTICE TO INSTALLER: Even if familiar with cover, read instructions prior to
installation as improvements may be made without notice. Always handle cover
and components with care. If you have questions or problems, have serial number
ready and call customer service. When done, these instructions must be given to the
consumer.
NOTICE TO CONSUMER: Before using cover, read operating, maintenance and safety
sections. Save these instructions for future reference.
FOR YOUR RECORDS
DATE PURCHASED:
WHERE PURCHASED:
SERIAL NUMBER:
(Located on decal under rear panel)
INSTALLATION INSTRUCTIONS
Questions? 844-566-2987
agricover.com

2
PREPARATION
Ensure air and surface temperatures are above 60° F. Unpack cover components and
clean truck box if dirty. For additional installation assistance, go to lomaxcovers.com
for install video.
COMPONENTS
• (8) Clamps
• (2) Anchors
• (2) Driver side rails
• (2) Passenger side rails
• Pre-folded cover assembly
TOOLS NEEDED
• 1/2” Wrench
• Ft-lbs torque wrench with 1/2” socket
• Marking tool
• Protective eyewear
• 7/16” Wrench
• Spring clamp (optional)
NOTE: With an under the rail drop-in bed liner, installation is possible with minimal
trimming/cutting of bed liner at front corner of box and back by tailgate to allow side
rail to install properly. Considerable trimming/cutting is required with an over the rail
drop-in bed liner.
NOTE: For additional protection against the elements, locate and seal miscellaneous
factory holes, crevices, stake pockets, etc. that may be in box (sealant not included).
NOTE: Tonneau cover and side rail appearance may vary. Typically a vehicle with a 6’
or longer box is provided with two multi-piece side rails.
!CAUTION: Over torquing hardware may damage components.
PARTS DIAGRAM
Clamps
Driver side rails
Safety strap
hole toward
front of box
Rear
Latches on
rear panel
Cover assembly
Passenger
side rails
Front (closest to cab)
Storage brackets on
header panel Pivot link in clip
(underneath)
Anchors
Pre-installed
assembly
bracket

2 3
1: INSTALLING SIDE RAILS
NOTE: Some installs require special instructions. If required, follow special instructions
for side rail attachment along with these standard instructions.
A. Locate two side rail sections with matching proles displayed in image below.
B. On side rail section without pre-installed bracket, remove 1/4” x 3/4” carriage bolt and
1/4” nylock hex nut from rail end.
C. Slide end of short rail (front) with mounting hole onto assembly bracket pre-installed
on longer rail (rear).
Front side rail
(short)
Rear side rail
(long)
Pre-installed assembly
bracket
Remove pre-installed
bolt and nut
D. Attach short side rail (front) to assembly bracket with previously removed 1/4” x 3/4”
carriage bolt and 1/4” nylock hex nut. Align side rails then tighten with 7/16” wrench.
NOTE: Side rails should have little to no gap at assembly bracket.
1/4” Nylock
hex nut
Front side rail
(short)
Rear side rail
(long)
1/4” x 3/4”
Carriage bolt

4
1: INSTALLING SIDE RAILS (Continued)
E. Position side rail with weather strip
against inside lip of box, safety strap hole
toward front of box and side rail guide set
on top of box. Push side rail forward until it
touches front of box.
Side rail guide provides proper side
rail placement
Side rail touching
front of box
Safety strap
hole
F. At front, hold side rail with assistance of
another person or a spring clamp.
G. Install rst clamp as close to front of
box as possible with clamp orientation that
provides best grip, turn nut nger tight, then
use 1/2" wrench to tighten.
IMPORTANT: To keep side rail secured
on truck, ensure clamp teeth engage
grooves on side rail.
Position 1st
clamp as close
to front of box
as possible
NOTE:Images below illustrate clamping options. Option A depicts standard clamping
orientation lower on the side rail. Option B depicts alternate clamping orientation with
half of clamp assembly rotated 180° to provide better grip at top of side rail.
H. Verify side rail is level. If side rail is not level, perform one of the following:
If side rail tilts up: loosen and lower clamp, engage teeth and then retighten clamp.
If side rail tilts down: loosen and raise clamp, engage teeth and then retighten clamp.
This surface of
side rail should
be level
Adjust clamps
up or down until
they hold side
rail level when
tightened
Side rail guide set
on top of box
OPTION A OPTION B
This surface of
side rail should
be level
Adjust clamps
up or down until
they hold side
rail level when
tightened
Side rail guide set
on top of box

4 5
1: INSTALLING SIDE RAILS (Continued)
I. With side rail guide set on top of box, install second clamp at side rail splice (where
two side rail sections meet). Repeat clamping procedure.
NOTE: The second clamp covers the side rail splice and engages grooves on both rail
sections. If clamp cannot be installed on side rail splice, install second clamp as close as
possible to side rail splice favoring rail section closest to cab.
J. Install third clamp 2/3rds from front of box. Repeat clamping procedure.
K. At rear of box with side rail guide set on top of box, place rear clamp as close to
tailgate as possible. Repeat clamping procedure.
IMPORTANT: Ensure clamp teeth engage grooves on side rail.
Install 4th clamp as close to
tailgate as possible (and on 2
layers of metal when present)
Install 2nd clamp at side rail splice
Install 3rd clamp 2/3rds from front of box
Install 1st clamp as close to front as possible
(and onto 2 layers of metal when present)
NOTE: For trucks with electric tailgates, typically side rail must be installed slightly
higher to eliminate interference.
L. Repeat Step 1 to install side rail on opposite side.
M. Torque all clamps to 20 ft-lbs or value specied in special instructions (if supplied).

6
2. INSTALLING COVER
A. At front of box, carefully place header
panel on side rails.
B. Hold cover’s rear edge 1” above side rails
and slide forward, then lower into retainment
brackets.
Latch
Retainment
bracket
C. With cover in horizontal position, center
on side rails, then slide front tabs fully under
side rails and torque to 20 ft-lbs.
D. Close cover to ensure tailgate closes
properly.
IMPORTANT: Always ensure hooks and
latches fully engage side rails.
NOTE:Refer to TROUBLESHOOTING
section if adjustments are needed. Front tab
E. Fold cover open to horizontal position and
hook bungee to storage bracket on each side.
Bungee hooked to
storage bracket
F. Release nal latch and carefully tilt cover
into storage bracket grooves for vertical
position, then secure safety straps to side rails.
IMPORTANT: Always ensure safety straps
are attached to cover and side rails.
Safety strap
carabiner attached
to side rail
Groove in
storage bracket
Side rail

6 7
2. INSTALLING COVER (Continued)
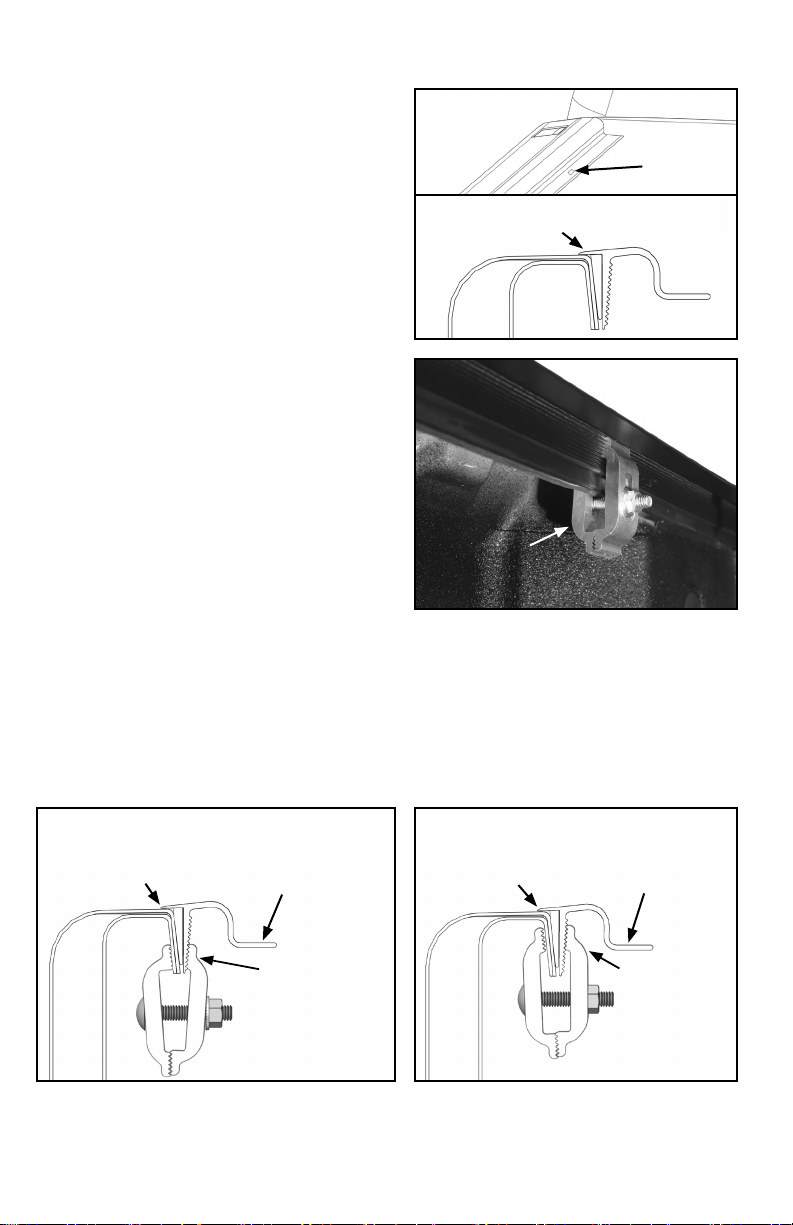
G. Swing pivot links out from clips and
attach anchors.
Pivot link attached
to anchor
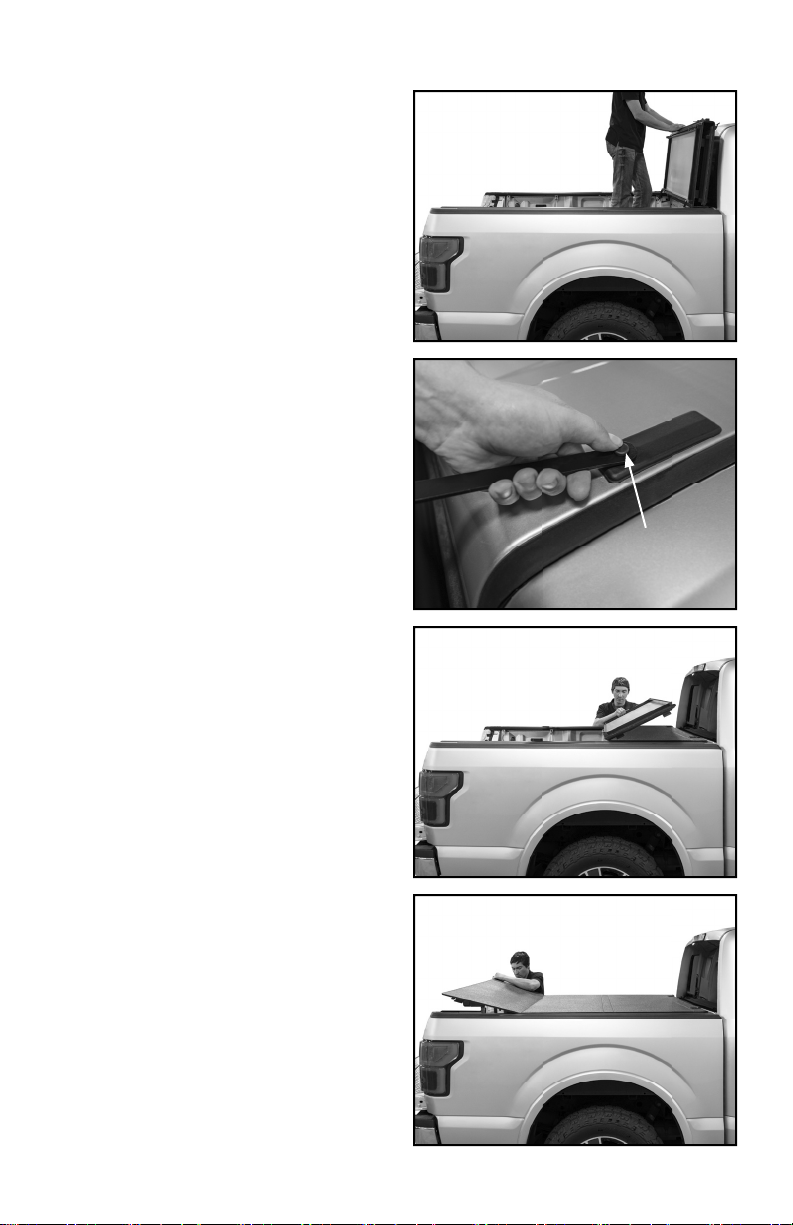
H. With anchor’s post toward cover, test
placement on top of cab in fl at area between
ribs, then mark location. Repeat for opposite
side.
IMPORTA NT: Ensure 1 to 1-1/2” space
between cover and closest point on cab.
NOTE: Improper placement of anchors will
require ordering replacements. Flat area on
top of cab
Ensure 1 to
1-1/2” space
Anchor’s post
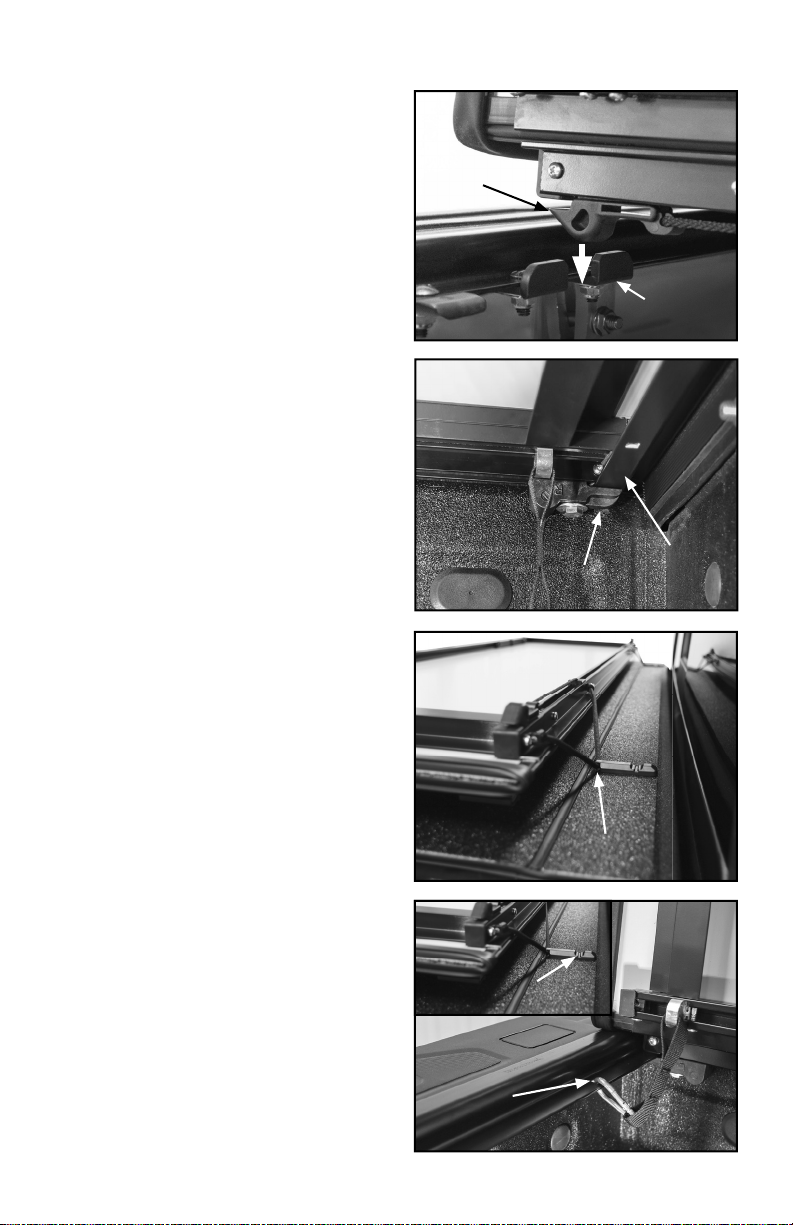
I. Release pivot link from anchor and secure in
clip on each side.
!CAUTION: Air and surface temperatures
must be above 60° F for proper adhesion.
J. Clean marked locations with alcohol pad.
K. Shake primer and squeeze at black dot to
start liquid fl ow, then prime marked locations.
Clean
marked
locations
!CAUTION: Strong magnetic pull may
cause improper placement.
L. Peel adhesive liner from anchors and
adhere to marked locations. Apply pressure
for 10 seconds, then close cover.
NOTE: After installation, cover should remain
in closed position for at least 48 hours.
During this time period, anchors bond to cab
and cover typically conforms to truck box.
Anchor

8
TROUBLESHOOTING
PROBLEM SOLUTION
Top of tailgate hits cover when attempting
to close
• Verify side rail guide is set on top of box.
• Side rails are not level or set too low at
rear of cover, raise rails at rear of box
until cover no longer interferes with
tailgate operation (see Step 1).
Gap between cover and truck box or
tailgate
• Verify side rail guide is set on top of box.
• Side rails are not level or set too high
(see Step 1).
Seal on edge of cover is not sealing tight
with top of side rail and truck box
• Verify side rail guide is set on top of box.
• Check side rails for height and level
(see Step 1).
Latch doesn’t engage • Check side rails for height and level
(see Step 1).
• Inspect latches for jammed or broken
parts.
Cover is not parallel with side rails • With cover installed on box, loosen
hardware on both retainment brackets
with 7/16” wrench (DO NOT REMOVE
HARDWARE). Unfold cover to closed
position and square up with box.
Carefully fold cover back to open
position and retighten retainment
brackets’ hardware.

8 9
OPENING FOLDING COVER
IMPORTANT: To avoid damage or
misalignment of hinge points, open cover
in a smooth, fl uid manner.
IMPORTANT: Remove debris or snow
from hinges before opening cover.
HORIZONTAL POSITION
A. Open tailgate, pull release latch.
B. Fold panels toward the cab, pulling
additional release latch as you go.
C. Hook bungee to storage bracket on both
sides.
VERTICAL POSITION
D. From horizontal position with bungees
secured, release nal latch and carefully tilt
cover into storage bracket grooves.
E. Secure pivot link to anchor on each side.

10
CLOSING FOLDING COVER
IMPORTANT: To avoid damage or
misalignment of hinge points, close cover
in a smooth, fl uid manner.
IMPORTANT: Remove debris or snow
from hinges before closing cover.
A. Open tailgate. If in vertical position,
release pivot link and secure in clip on each
side, then lower to horizontal position.
TIP: For easier removal of pivot link, push
down on anchor’s post with thumb.
Anchor’s post
B. Unhook bungees from storage brackets
and unfold panels toward tailgate.
C. Always ensure hooks and latches fully
engage side rails. Close tailgate.

10 11
SAFETY INFORMATION
• Always ensure hooks and latches fully engage side rails.
• Ensure safety straps are attached to side rails when cover is installed.
• Ensure anchors are clear, free of interference.
• Do not tow vehicle backward with cover on your truck.
• Do not cover cargo that is higher than the cover.
• Do not place object(s) on or against the cover or its framework at any time.
• Always secure cargo to ensure it does not damage cover or framework.
• Remove debris, snow or ice from cover and hinges before opening or closing cover.
• Do not use the cover’s framework to tie down cargo.
• Never stand, sit or ride on the cover or allow others to do so.
• Cover does not eliminate moisture and dust from entering the truck box. Special
wrappings or packaging of the cargo may be necessary.
• Due to poor ventilation, if you allow a pet/animal in the box, leave cover open. Do not
allow people or animals to occupy box with the cover closed.
• Avoid excessive speeds and high winds when cover is in vertical position.
• Do not clean cover with a pressure washer.
• Keep cover completely closed or in approved horizontal or vertical position. Do not
drive with only the rear panel open.
• Before entering low clearance areas, check height restrictions to ensure safe entry.
• Keep cover closed when going through automatic car washes.
• Keep hands and ngers away from all pinch points.
• Never use latch cord to lift or fold cover.
• Use caution when operating cover in windy conditions.

12
INSPECTION AND MAINTENANCE
The operator can perform most of inspection and maintenance. It may be necessary to
review the installation and operating instructions.
• Periodically check and retighten safety strap hardware. If safety straps are damaged,
replace with new hardware.
• Periodically check and retighten clamps as needed.
• Periodically check latch cords to ensure latches fully engage side rails.
• Periodically inspect cover assembly and the condition of all parts. Check for loose
bolts and parts, tighten if needed. Test the operation to ensure parts are functioning
properly and cover is in top operational condition.
• If latches have been damaged, replace with new ones.
• Periodically ensure anchors are clear, free of interference. If anchors have been
damaged, replace with new ones.
NOTE:Inspection and maintenance should also be performed anytime a malfunction
is observed or suspected. If you need assistance inspecting or servicing your cover, or
if you want to order a replacement part, call the customer service number on the back
page. Always use original equipment replacement parts for your cover.

12 13
ALWAYS PROPERLY SECURE COVER
!WARNING: Failure to execute these steps may result in severe damage and will
void your warranty.
1. Tabs engaged under side rails and properly torqued.
2. Safety straps attached to side rails.
3. Bungees hooked on storage brackets.
HORIZONTAL POSITION ONLY:
4H. Latches engaged in retainment bracket.
VERTICAL POSITION ONLY:
4v. Folded edge fully set in storage bracket grooves.
5v. Pivot links secured to anchors without interference.
1
2
3
4V
4H
5V

14
TIPS FOR A LONGER LASTING COVER
• Keep cover closed when not in use.
• Avoid storing cover in its horizontal or vertical position for long periods of time.
• Ensure cover is properly latched while traveling and before entering automatic
drive-through car washes.
• When cleaning, use mild liquid soap and water. Periodically treat cover and hinges with
our COVER CARE®Cleaner and UV protectant. Never clean with petroleum or citrus
based products. Petroleum based products may dry out and damage cover seal.

14

TM
052920 2000312_
MANUFACTURER’S LIMITED WARRANTY
Agri-Cover, Inc. extends the following three (3) year Limited Warranty for the LOMAXTM
STANCETM Hard Cover:
Agri-Cover, Inc. warrants a period of three (3) years from the date of manufacture that its
LOMAXTM STANCETM Hard Cover is free from defects in workmanship under normal use
for the truck model it was intended for. This Limited Warranty does not cover any damage
due to accident, abuse, misuse, alteration, neglect, improper installation, or ordinary wear
and tear.
Agri-Cover, Inc.’s sole obligation under this Limited Warranty is limited to the repair or
replacement at its option, of defective parts only. No labor or service allowance is given
or implied. IN NO EVENT SHALL AGRI-COVER, INC. BE LIABLE FOR INCIDENTAL,
CONSEQUENTIAL, OR SPECIAL DAMAGES. AGRI-COVER, INC. EXPRESSLY
DISCLAIMS ANY AND ALL IMPLIED WARRANTIES OF MERCHANTABILITY, AND
THERE ARE NO WARRANTIES WHICH EXTEND BEYOND THE LIMITED WARRANTY
DESCRIPTION CONTAINED HEREIN.
For warranty, have serial number ready and ll out the warranty claim form at
agricover.com/warrantyclaim or call Customer Service Department at 844-566-2987 to
determine if only a replacement part is needed or if the cover needs to be returned for
inspection and repair. Goods to be returned must have a pre-authorized RA # (Return
Authorization Number) - obtained by calling the number above. Mark the number on the
package and ship it freight prepaid to address below. Agri-Cover, Inc. will pay freight to
return goods to sender.
This Limited Warranty gives you specic legal rights and you may have other rights, which
vary, from state to state.
For replacement parts shop at lomaxparts.com or call Customer Service at
844-566-2987.
Hours: 8:00 am - 5:00 pm CST Monday through Friday, except Holidays
Agri-Cover, Inc.
Customer Service Dept
3000 Hwy 281 SE
Jamestown, ND 58401
Phone: 844-566-2987
© 2020 AGRI-COVER, INC. ALL RIGHTS RESERVED.
Product subject to change without notice. Patents: agricover.com/patents.
Table of contents
Other Lomax Automobile Accessories manuals
Popular Automobile Accessories manuals by other brands

BTCPower
BTCPower EVSE 200 KW Installation and user manual

ZROADZ
ZROADZ Z845401 installation guide

Trail Ridge Technologies
Trail Ridge Technologies QuickVu user manual

Bosch
Bosch 1 987 432 300 installation instructions

Perrycraft
Perrycraft Easy Go 01 Fitting instructions

Brink
Brink 4399 Fitting instructions