manuals.online logo
Brands
  1. Home
  2. •
  3. Brands
  4. •
  5. LOOKING GLASS FACTORY
  6. •
  7. TV Mount
  8. •
  9. LOOKING GLASS FACTORY 8K Stand User manual

LOOKING GLASS FACTORY 8K Stand User manual

Looking Glass 8K
Stand Assembly
SAFETY
WARNING! Severe personal injury and property damage can result from
improper installation and assembly.
Read the following carefully before proceeding.
• If you do not understand the instructions or have any concerns or questions,
please contact Looking Glass Factory.
•
DO NOT install or assemble if the product or hardware is damaged or missing.
If you require replacement parts please contact Looking Glass Factory.
•
This product is ONLY intended for a Looking Glass 8K display - 51.8 lb /23.5kg
• DO NOT use this product for anything other than the original design.
• Using this product with anything heavier than a Looking Glass 8K display
may result in instability causing possible injury.
• DO NOT allow children to climb on or push the stand.
• This product contains moving parts, please use with caution.
• ALWAYS
use two (2) people when installing the Looking Glass 8K display onto
the stand.
• ALWAYS
use two (2) people when adjusting the height of the stand.
• ALWAYS
u
se two (2) people when moving the stand.
• Looking Glass Factory disclaims any liability for the modifications, improper
installation, or installation other than the Looking Glass 8K display.
Hardware and tools provided
• M8x26mm socket head cap screw (SHCS) (4)
• M6x12 low profile socket head cap screw (4 +1 spare)
• M5x12mm pan head screw (2)
• M8x70mm shoulder bolt (4)
• M8 lock nut (4)
• Split washer (4)
• M6 washers (4 +1 spare)
• M4 hex key
• M6 hex key
Tools required
• Phillips screwdriver
• 1/2” / 13mm open head wrench
Instructions
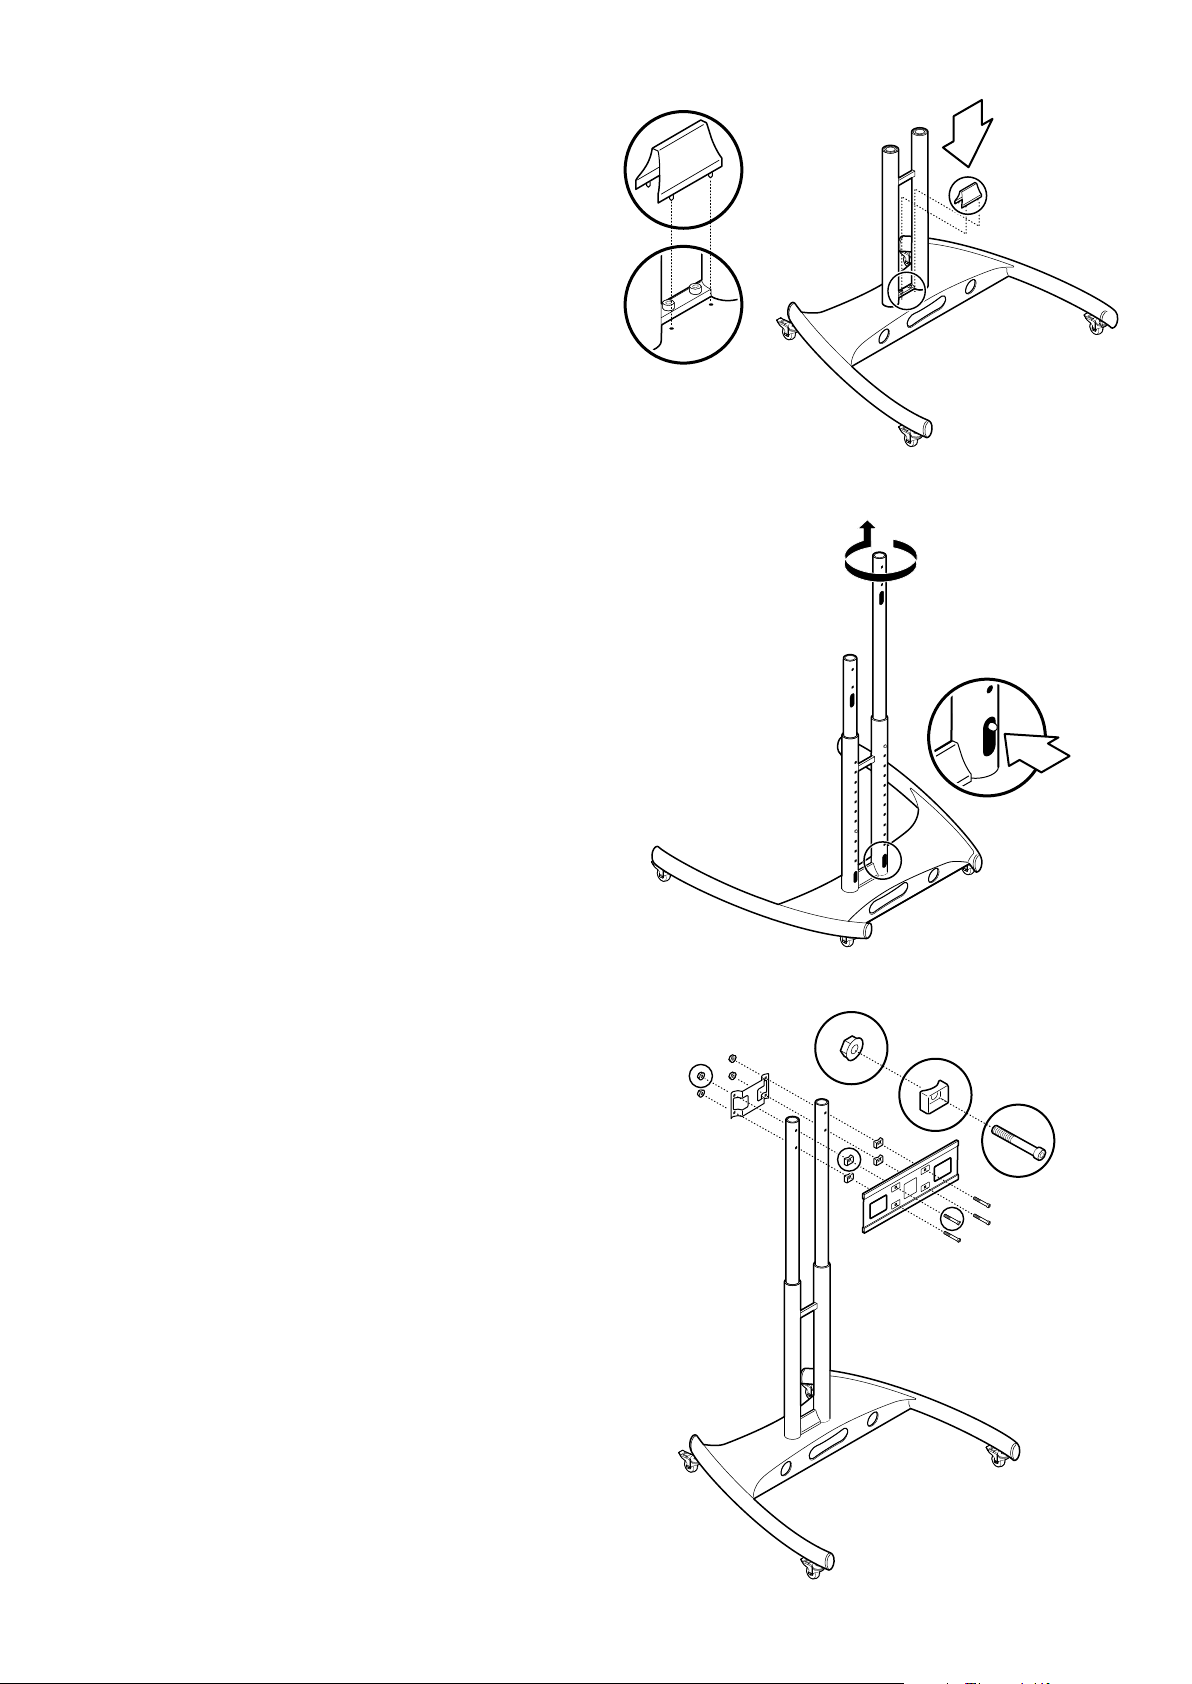
1. Release the column from the base
• By hand, pull the double column out of its shipping
position in the base.
2. Install the casters
• Turn the base over bottom side up.
• Lock the casters.
• By hand install the four (4) casters with four (4) split
washers, by threading each into receptacles on the
base.
3. Install the double column
• Turn the base over and place with casters on the
ground.
• By hand insert the double column into the base.
Note: The vertical set of holes on the column should
face the back (narrow end) of the base.
Note: The small cross piece at the bottom of the
column must sit flush onto the base.
• Using the M6 hex key and the four (4) M8x26mm
SHCS screws, secure the column to the base plate.
X4
X4
X4
4. Install the screw cover
• By hand, insert the screw cover at the bottom of the
column.
5. Set the column height
Note: The top locking hole puts the LG8K center line
at 59” / 150cm appx above the floor. Every hole
below reduces the centerline height by 2” / 5cm.
• By hand, press the spring-loaded pin at the bottom of
the column and twist the upper portion of the column.
Note: Twisting the column avoids the pin snapping
into locking holes above as you are raising it.
• Raise to the desired height.
• Twist the upper portion of the column to engage the
spring-loaded pin into the locking hole.
• Repeat for the other column.
6. Install the display bracket
• Place the four (4) M8x70mm shoulder bolts through
the bracket.
• Place the four (4) articulated seats onto the bolts.
• Place the four (4 bolts through the columns.
• Place the articulated back panel onto the bolts.
• Using a 1/2”/13mm open head wrench, M6 hex key,
and the four (4) M8 lock nuts, secure the bracket in
place.
X4
X4
X4
7. Install the hanger brackets onto the back of the Looking
Glass 8K display
• Place the provided foam sheet on a work surface.
• Place the display face down on the foam.
WARNING! The display is heavy 51.8 lb / 23.5kg and
requires two (2) people to lift.
• Place the hanger bracket onto the back of the display.
Note: Use the correct orientation of the display and
hanger bracket as shown - bracket hook oriented
towards the top of the display.
• Using a M4 hex key and the two (2) M6x12 SHCS screw
/ M6x17 washer sets, secure the bracket to the display.
• Repeat for other bracket.
8. Attach the Looking Glass 8K display to the display bracket
on the column.
• Using two (2) people lift the display and hang it on the
display bracket.
WARNING! The display is heavy 55.1 lb /25.0kg and
requires two (2) people to lift.
• Using a phillips screwdriver, the two (2) bracket clips,
and the two (2) M5x12 pan head screws, secure the
display to the display bracket.
X4
X2
X2X2
X2
X2
51.8 lb /23.5kg
55.1 lb /25.0kg
This equipment is manufactured by Looking
Glass Factory Inc. (US).
Designed in Brooklyn
and Hong Kong - Made in China. Looking Glass®is a registered trademark of Looking Glass
Factory Inc.
Looking Glass Factory (US)
190 West St, Brooklyn NY, 11222 USA
www.lookingglassfactory.com 8K Stand Assembly / Rev. A / 04-20
Secondary Display
Computer
Optional Computer w/ Secondary Display
USB-C Cable
USB A 3.0 Cable
Power
Cable
Power Cable
Display Cable 1
Display Cable 2
Looking Glass 8K Display
All Cables Provided
Looking Glass 8K Display
All Cables Provided
USB A 3.0 Cable
USB A 3.0 Port
Power Cable
Display Port 1
Display Port 2
Display Cable 1
Display Cable 2
Your Computer
For best performance, ensure that your PC has the
following minimum recommended requirements:
• i7 CPU
• 16GB ram
• RTX 2080 Ti GPU
• 256 GB SSD
Ensure that the Display Ports are connected to the
external graphics card and not the ports on the
motherboard itself as it will lead to slower rendering
speeds.
9. Thread the four (4) Looking Glass 8K display cables
through the double column
• Thread down the left column - as seen from the rear:
• Power cable
• DP1 display cable
• Thread down the right column - as seen from the rear:
• DP2 display cable
• USB A 3.0 cable
10. Connect the cables to the computer
• Connect the cables from the Looking Glass 8K
display to either:
• Your computer
• Optional Looking Glass 8K computer with
secondary display.

Popular TV Mount manuals by other brands

ERARD EXO400TW3 manual

ERARD

ERARD EXO400TW3 manual

NCR 7761-K321 Kit instructions

NCR

NCR 7761-K321 Kit instructions

Trelock VECTOR LS 600 I-GO quick start guide

Trelock

Trelock VECTOR LS 600 I-GO quick start guide

SANUS VuePoint F35b instruction manual

SANUS VuePoint

SANUS VuePoint F35b instruction manual

BMS FPM-F installation guide

BMS

BMS FPM-F installation guide

peerless-AV LCT620AQ-G manual

peerless-AV

peerless-AV LCT620AQ-G manual

PEERLESS PARAMOUNT PFT640  and assembly Installation and assembly manual

PEERLESS

PEERLESS PARAMOUNT PFT640 and assembly Installation and assembly manual

ricoo S4764 quick start guide

ricoo

ricoo S4764 quick start guide

Platinum PT-UBAS21 Quick setup guide

Platinum

Platinum PT-UBAS21 Quick setup guide

Wilko WL14 Assembly instructions

Wilko

Wilko WL14 Assembly instructions

Sony SU-WL700 instructions

Sony

Sony SU-WL700 instructions

Alphason ADUNIFIT-BKT installation instructions

Alphason

Alphason ADUNIFIT-BKT installation instructions

Gladiator Joe GJ0A0090 quick start guide

Gladiator Joe

Gladiator Joe GJ0A0090 quick start guide

Firgelli UTVL-200 Series manual

Firgelli

Firgelli UTVL-200 Series manual

Pyle PSWLE57 installation guide

Pyle

Pyle PSWLE57 installation guide

USX-MOUNT XTM009 instruction manual

USX-MOUNT

USX-MOUNT XTM009 instruction manual

ricoo S2644 installation instructions

ricoo

ricoo S2644 installation instructions

Sony SU-PW1 Product View

Sony

Sony SU-PW1 Product View

manuals.online logo
manuals.online logoBrands
  • About & Mission
  • Contact us
  • Privacy Policy
  • Terms and Conditions

Copyright 2025 Manuals.Online. All Rights Reserved.