Loop4Live Loop4Live User manual

V1.0 © 2020 Loop4Live Group, Inc. All rights reserved.
Manual

Loop4Live Manual
Page 2
Table of contents
1. Introduction________________________________________________________________________6
2. Keep in mind _______________________________________________________________________6
3. Configuration ______________________________________________________________________6
4. Hardware set-up ____________________________________________________________________6
5. Product overview: Ableton Live ________________________________________________________7
6. Ableton Live Configuration ____________________________________________________________9
6A. Remote scripts installation _______________________________________________________________9
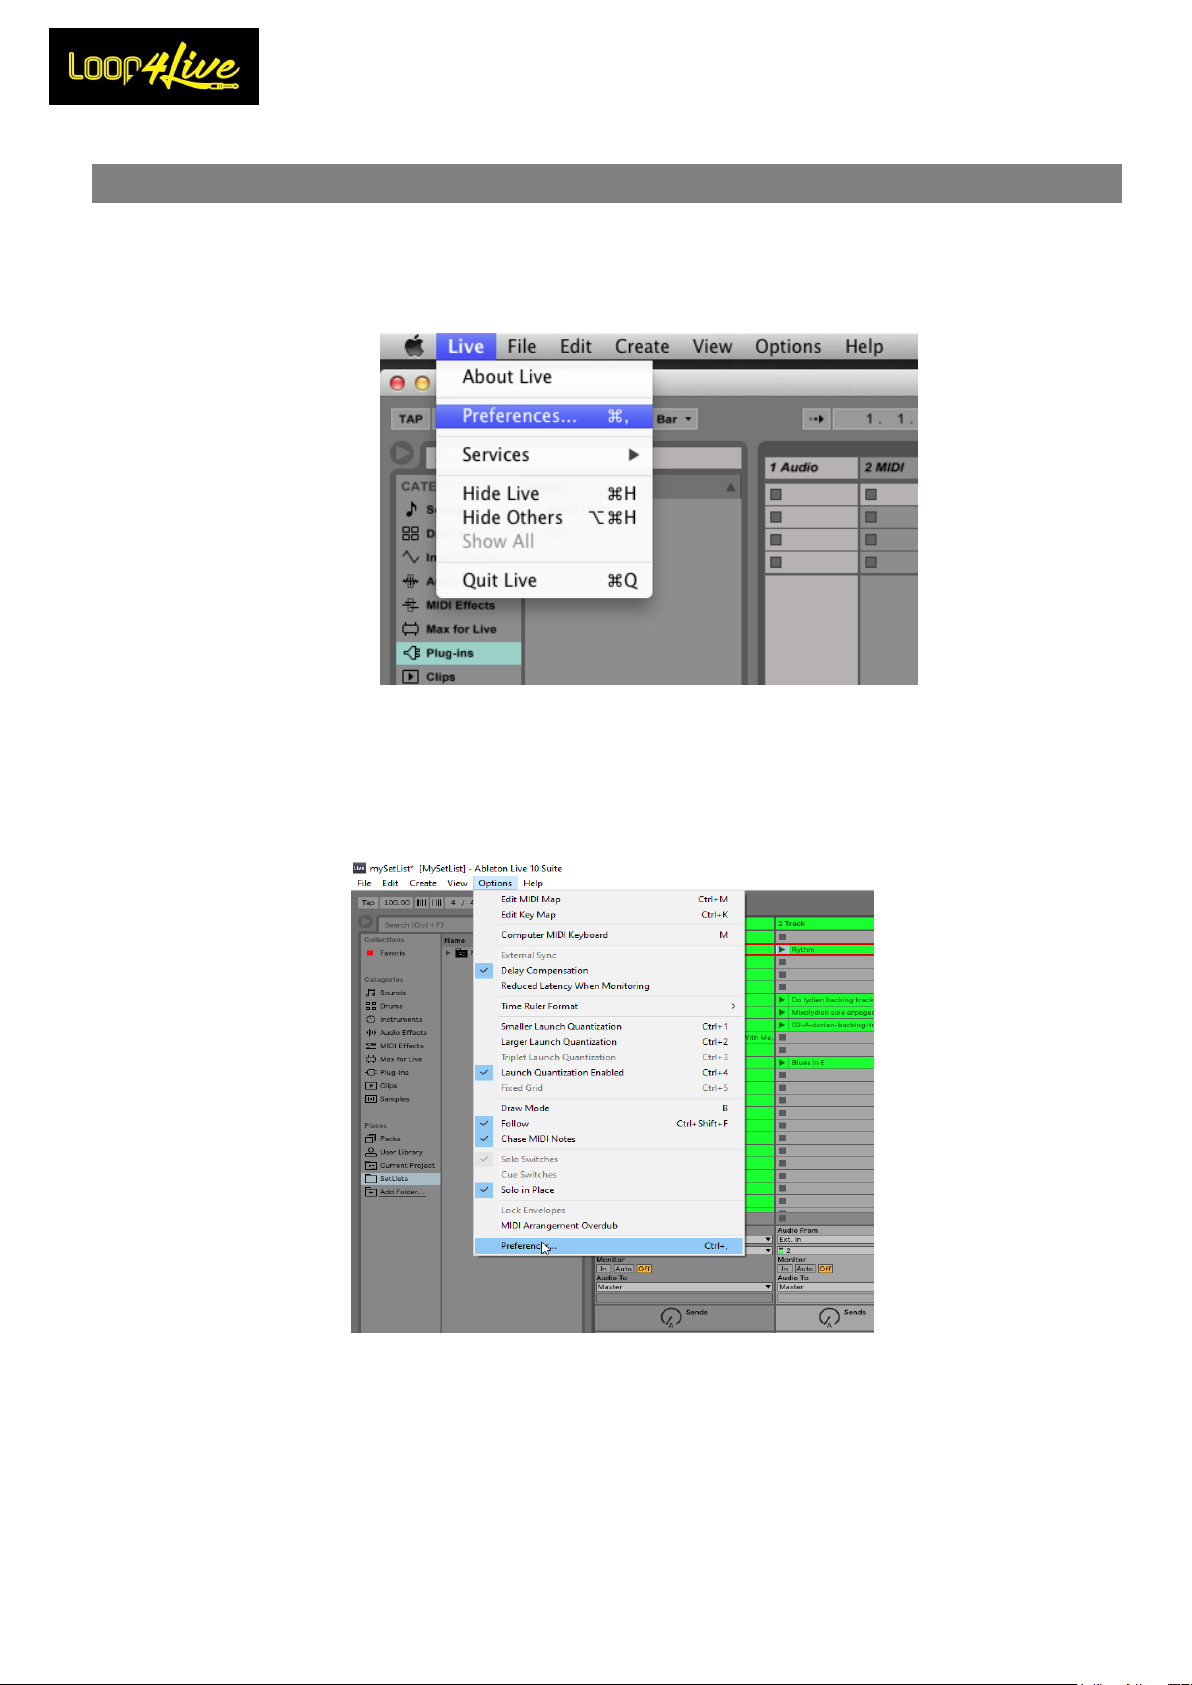
6B. Configure Ableton Live® ________________________________________________________________10
6C. Configure Audio Interface_______________________________________________________________13
7. Loop4Live presentation______________________________________________________________14
1. Buttons A-B-C-D –Start/ Stop/ Record clip____________________________________________________________ 15
2. Button up/down_________________________________________________________________________________ 15
3. Button left/right_________________________________________________________________________________ 16
4. Button Full Start Stop/Record ______________________________________________________________________ 16
5. Mute / Delete___________________________________________________________________________________ 17
6. Rotary encoder : Clips gain / Master volume and menus ________________________________________________ 17
6.1. Tempo menu _______________________________________________________________________________ 18
6.2. Scene menu and calibration ___________________________________________________________________ 19
6.3. Tap tempo _________________________________________________________________________________ 20
7. Screen_________________________________________________________________________________________ 20
7.1. Screen : Current scene _______________________________________________________________________ 20
7.2. Screen : Master volume position _______________________________________________________________ 20
7.3. Screen : Measure position ____________________________________________________________________ 21
7.4. Screen : Tracks properties ____________________________________________________________________ 21
7.5. Screen : Mute indicator ______________________________________________________________________ 22
7.6. Screen : Recording length_____________________________________________________________________ 22
7.7. Screen : Scene tempo ________________________________________________________________________ 22
7.8. Screen : Midi channel ________________________________________________________________________ 22
8. Ableton Live main concepts __________________________________________________________23
8A. Bar and beats explanation ______________________________________________________________23
8B. Warping _____________________________________________________________________________23
8C. Think to save your work when closing Ableton Live® _________________________________________23
8D. Ableton Live interface__________________________________________________________________24
1. Clip Matrix and current selection ___________________________________________________________________ 24
2. Tempo section __________________________________________________________________________________ 25
3. Selected scene BPM______________________________________________________________________________ 25
4. Selected clip properties ___________________________________________________________________________ 26
5. Track volume ___________________________________________________________________________________ 26
6. Track properties_________________________________________________________________________________ 27
7. Transport section ________________________________________________________________________________ 27
8. Browser _______________________________________________________________________________________ 28
9. Clip wave ______________________________________________________________________________________ 28
8E. Insert new tracks and new scenes ________________________________________________________29
1. Insert new track _________________________________________________________________________________ 29
2. Insert new scene ________________________________________________________________________________ 30
8F. Follow action : automatically chain clips ___________________________________________________30

Loop4Live Manual
Page 3
8G. Loop4Live default configuration in Ableton Live _____________________________________________32
9. Practical aspects ___________________________________________________________________34
9A. Tips_________________________________________________________________________________34
9B. Organization of your clip matrix to have the best experience with Loop4Live _____________________34
9C. Launch a recording ____________________________________________________________________35
9D. Recording with several Loop4Live ________________________________________________________35
9E. Send Metronome click on a dedicated output for your drummer._______________________________35
9F. Recording with count in ________________________________________________________________37
9G. Adding a drum loop using MT Power Drum Kit® _____________________________________________37
9H. Adding an expression pedal _____________________________________________________________41
9I. Adding a backing track into playlist and make it loops or not __________________________________42
9A. Insert Midi Clips_______________________________________________________________________46
9B. Troubleshoots ________________________________________________________________________46
1. Records are not launched _________________________________________________________________________ 46

Loop4Live Manual
Page 4

Loop4Live Manual
Page 5
• Read these instructions.
• Keep these instructions.
• Heed all warnings.
• Follow all instructions.
• Do not use this apparatus near water.
• Clean only with dry cloth.
• Do not block any ventilation openings. Install in accordance with the manufacturer’s instructions.
• Do not install near any heat sources such as radiators, heat registers, stoves, or other apparatus (including amplifi-
ers) that produce heat.
• This apparatus shall be connected to a MAINS socket outlet with a protective earthing connection.
• Do not defeat the safety purpose of the polarized or grounding-type plug. A polarized plug has two blades with one
wider than the other. A grounding type plug has two blades and a third grounding prong. The wide blade or the third
prong are provided for your safety. If the provided plug does not fit into your outlet, consult an electrician for replace-
ment of the obsolete outlet.
• Protect the power cord from being walked on or pinched particularly at plugs, convenience receptacles, and the point
where they exit from the apparatus.
• Only use attachments/accessories specified by the manufacturer.
• Use only with the cart, stand, tripod, bracket, or table specified by the manufacturer, or sold with the apparatus.
When a cart is used, use caution when moving the cart/apparatus combination to avoid injury from tip-over.
• Unplug this apparatus during lightning storms or when unused for long periods of time.
• Refer all servicing to qualified service personnel. Servicing is required when the apparatus has been damaged in any
way, such as power-supply cord or plug is dam-aged, liquid has been spilled or objects have fallen into the apparatus,
the apparatus has been exposed to rain or moisture, does not operate normally, or has been dropped.
• The apparatus shall not be exposed to dripping or splashing and that no objects filled with liquids, such as vases,
shall be placed on the apparatus.
• WARNING: To reduce the risk of fire or electric shock do not expose this apparatus to rain or moisture.
• The appliance coupler is used as the disconnect device, the disconnect device shall remain readily operable.
• Connect only to USB type 1.1, 2.0 or 3.0.
• Prolonged listening at high volume levels may cause irreparable hearing loss and/or damage. Always be sure to
practice “safe listening.”
• Service is required when the apparatus has been damaged in any way, such as:
• power-supply cord or plug is damaged.
• liquid has been spilled or objects have fallen into the apparatus.
• the unit has been exposed to rain or moisture.
• the unit is dropped or the enclosure is damaged.
• the unit does not operate normally or changes in performance in a significant way.

Loop4Live Manual
Page 6
1. Introduction
Thanks a lot ! We hope you will find all you need in this manual. If not, we will be happy to
answer any question on support@loop4live.com.
Loop4Live need a few configurations on Ableton Live® to make it works. But don't worry, it is really
simple and well explained in this manual.
2. Keep in mind
-You will need a computer and Ableton Live® 10 ! Loop4Live has not been tested on Live® 9.
-You will need an audio interface to be able to record samples.
-If playing with a band, drummer has to play with a headphone to be in rhythm with
computer samples.
3. Configuration
Several behaviors of Ableton Live are editable via a configuration file. If unwanted behaviors
are encountered (like arming all tracks at startup for example), refer to 8G.LOOP4LIVE DEFAULT
CONFIGURATION IN ABLETON LIVE to see if some parameters can be modified. If you have a wish that is not
supported, feel free to contact us at support@loop4live.com .
4. Hardware set-up
Connect your Loop4Live to an available USB port on your Mac or PC using the supplied USB ca-
ble.
If you want to record, plug your setting to the audio input of your computer. Ableton Live® audio
setup is explained below.

Loop4Live Manual
Page 7
5. Product overview: Ableton Live
Ableton Live® offers 2 views : Session view and Arranger view. Loop4Live only use session
view. To change view, use button as below (default view is Session View):
Session View is a grid that consists of clips, tracks (columns) and scenes (rows).
Clips are samples like mp3, midi notes or audio record.
Tracks represent virtual instruments or audio tracks. You can assign different audio input and audio
output for a track. With Loop4Live, we will (in a first time) only use the same audio input for all
tracks.
Scenes are rows of clips and represent a song or a part of a song (verse, chorus, solo, …).
Loop4Live offers capabilities to:
-start/stop/record clips without access to the computer.
-navigate into this grid in order to select clips you want to handle with Loop4Live buttons
left/right and up/down.

Loop4Live Manual
Page 8
Information displayed on Loop4Live screen is the one present in the red frame on Ableton Live®
(current selected clips and scene). Red frame move using Loop4Live navigation buttons.
The 4 bottom left switches control the 4 selected clips (in red frame). In the example above,
Loop4Live is controlling the first scene (first row). The bottom left switch is controlling clip “Drum
1”, the second bottom left switch is controlling clip “Rhythmic 1”, the third bottom left switch is con-
trolling clip “Rhythmic 2” and the fourth bottom left switch is controlling clip “Solo”.
Information of the 4 selected clips is displayed on Loop4Live screen + selected scene. Scene and
tracks number are also displayed as tempo and recording loop length (see later in this manual for this
feature). Ring leds around the 4 bottom left switches indicate state of the 4 selected clips (blue full
: not playing, blue full + red blinking : playing, red full : recording, Off : no clip).

Loop4Live Manual
Page 9
6. Ableton Live Configuration
6A. Remote scripts installation
Ableton Live® needs a few simple configurations to work with Loop4Live.
You need to download Loop4Live scripts from https://www.loop4live.com/downloads. Unzip the archive,
you will obtain a folder named “Loop4Live”. Drag it into the Remote scripts folder which is stored in
Live® Preferences folder (which depends of your Operating System Windows/Mac) :
On Mac :
The Remote Script folder is located inside the Ableton Live application bundle. To access it,
locate the Live application in Finder, right click on it and select "Show Package Contents" in
the appearing context menu. Then navigate to: /Contents/App-Resources/MIDI Remote
Scripts/
On Windows Vista, Windows 7, Windows 8+, Windows 10 :
<Drive:>\ProgramData\Ableton\Live x.x.x\Resources\MIDI Remote Scripts\
On Windows XP
<Drive:>\Documents and Settings\All Users\Application Data\Ableton\Live
x.x\Resources\MIDI Remote Scripts
Note: These folders are hidden by default. Here's how to access hidden folders.
Change Live x.x.x in the path to your Live’s version.
Change <Drive:> with your real drive (typically C:\)
Relaunch Ableton Live® and remote scripts named ‘”Loop4Live” will be available in “Link MIDI”
preferences section (see below).

Loop4Live Manual
Page 10
6B. Configure Ableton Live®
On Mac :
Go to “Live” menu and choose “Preferences” :
On Windows :
Go to “Options” menu and choose “Preferences” :

Loop4Live Manual
Page 11
It will open this window :
Select “Link MIDI” tab (as show above). In “Link MIDI” section, select Loop4Live as your
“Control Surface”. Select both Input and Ouput as Loop4Live. In “MIDI Ports” section, toggle
Loop4Live Track and Remote properties to “On” (as shown above).
Last major settings are “Default Launch Mode” and “Default Launch Quantization” in “Record
Warp Launch” section of properties :
Set respectively “Default Launch Mode” and “Default Launch Quantization” properties to
“Toggle” and “Global” (as shown above). “Default Launch Mode” change behavior of the footswitch

Loop4Live Manual
Page 12
actions, “Default Launch Quantization” change audio synchronization (don't change it if you don't
know what it does).
If you would like to record audio, go in next section to configure your input interface. Else you can go
on.
That's it. You can now plug your Loop4Live footswitch (or unplug and plug it if it was already done)
and enjoy :)
If you don't know Ableton Live®, you can learn main concepts in this manual and much deeper on
https://help.ableton.com/hc/en-us.

Loop4Live Manual
Page 13
6C. Configure Audio Interface
Go to “Options” menu and choose “Preferences”, tab “Audio” :
Select your audio interface. If you are not using a dedicated audio interface on Windows®, we
strongly recommend installing Asio4All drivers (available on http://www.asio4all.org/). It will reduce
latency (time elapsed between your play and its output on speakers). In other case, you could have
trouble if using an integrated audio interface (delay and bad noises).
You could then select your input and your output (speakers).
Note: When Asio4All is used (when Ableton Live®is opened), other applications (like an internet
browser like chrome or firefox) won’t be able to read music. It’s good to be known.
Tips: If you want to record a guitar and a bass (for example) at the same time, you could select 2
different inputs. Or you could also use the first voice of one track for the guitar and the other one
for the bass. You could also use 2 Loop4Live
.

Loop4Live Manual
Page 14
7. Loop4Live presentation
No drivers are needed but you will have to configure Ableton Live®.
Loop4Live foot controller and Ableton Live®are fully synchronized in bidirectional ways. Doing
an action on one side are transmitted to the other side (example : launching a clip from live will turn
on the corresponding light on Loop4Live, changing clip name on Live®will refresh Loop4Live display,
etc…).
Loop4Live is as follows :

Loop4Live Manual
Page 15
All these features are explained below :
1. Buttons A-B-C-D –Start/ Stop/ Record clip
The 4 bottom left switches control clips contained in selection on Ableton Live®. This
selection on Live® contains 4 clips : it is the surrounded red rectangle that you can see above.
Switches ring leds on Loop4Live point status of corresponding clip on Live® :
full Blue : clip stopped.
full Blue and blinked red (seems pink) : clip is playing.
full Red : clip is recording (launching record is done with the switch n°4 : scene/record
mode).
Off : no clip in the corresponding slot (this slot is free for recording, we will see that
later).
Pushing a switch will start or stop corresponding clip :
-If clip is stopped, pushing switch will start it.
-Conversely, if clip is playing, clicking will stop it.
-If corresponding slot is empty, pushing switch will launch record in this slot (if the
corresponding track is armed).
2. Button up/down
These 2 switches allow making Live selection goes up and down. In other words, they allow
changing current scene (ie. current row, scenes are the lines of the Live clips matrix).
Holding down these switches during more than 1 second will change Loop4Live mode (see
section 4 for main explanations on scene/record mode).
Navigating across scenes will change Live selection and will refresh Loop4Live display with
current scene and track names.

Loop4Live Manual
Page 16
During navigation across scenes, Loop4Live will display previous and next scene during 2
seconds to have a more global view :
Loop4Live displays the 2 previous and next scenes, the current scene and the playing scene (in
blue if any).
3. Button left/right
These 2 switches allow making Live selection go left and right. In other words, they allow
changing selected tracks (and clips but still in the same scene). Tracks are the columns of the
Live clips matrix.
Navigating across tracks will change Live selection and will refresh Loop4Live display with
current clips name and properties.
4. Button Full Start Stop/Record
Loop4Live provides 2 modes : scene mode and record mode. Mode is toggled by holding
“navigate up”or “navigate down”button during 1 second (see section 1.).
-Scene mode : the ring led turns green. In this state, the switch allows to :
oStart all clip of selected scene if no one are playing
oStop all clip if at least one clip is playing.
-Record mode : the ring led turn red. In this state, the switch allows to :
oLaunch record in next available slot in armed tracks (Ableton Live® Intro have a limited
number of track). Live® will attempt to find the first empty clip slot in the current
selection and then on the right. Live® won’t search before the selected clips.
oStop recording if a clip was recording (but if you are playing with a finite recording loop
length, record will stop automatically - see section 6).

Loop4Live Manual
Page 17
During record launch, if there is no empty clip slot available or armed tracks in selected scene,
an error message will be displayed on Loop4Live : “CAN NOT RECORD : No Track Available”.
Recording length is parameterized in tempo menu (see section 6.).
5. Mute / Delete
This switch allows to mute/unmute all tracks. If at least one track is muted, a click will
unmute all tracks. If no tracks are muted, a click will mute all tracks.
Holding down this switch during more than 1 second will delete the last clip recorded.
6. Rotary encoder : Clips gain / Master volume and menus
Loop4Live provides 5 rotary encoders to control clips volumes (ie. gain) and master
volume.
The 4 rotary encoders on the left control the 4 selected clips gain. The last rotary
encoder on the right controls master volume (change all tracks volume).
In addition, 3 of the rotary switches control access to additional functionalities when
pressing them as explained below.

Loop4Live Manual
Page 18
6.1. Tempo menu
Pushing “clip 1 gain” switch button above open the tempo menu :
In tempo menu, you can parameterized tempo attributes :
oRecording length : This is the length of the clip when you record it.
You can choose between 1 beat to infinite. An infinite length will record without
automatic stop and will not be warp (nor looping). At the opposite, a finite length will be
stopped automatically when length is reached : clip created will be warped and looping.
Note : the default recording length could be parameterized in the Loop4Live config file into Ableton Live (see
section” 8G. Loop4Live default configuration in Ableton Live”. Warp aspect is explained in Ableton Live main concept
later in this manual).
oSignature : change signature of the song.
oMetronome : enable or disable metronome play.
oTempo : change song tempo.
Note : To modify an attribute :
Scroll the selection by turning the “clip 1 gain” rotary encoder.
Push the “clip 1 gain” rotary encoder to select an item (a triangle appears next selected item).
Change value by turning the “clip 1 gain” rotary encoder.
Validate by pushing the “clip 1 gain” rotary encoder. (Note : you can only cancel an action by setting the
same value as the previous one)
Close menu by clicking the “Close” element.

Loop4Live Manual
Page 19
6.2. Scene menu and calibration
Pushing “clip 2 gain” switch button (above) open the scene menu :
In scene menu, you can create a new scene or duplicate the current selected scene.
In the Exp Pedal subpart, you can calibrate your expression pedal :
oPut your expression pedal to bottom position and push “Calibrate down” button.
oPut your expression pedal to top position and push “Calibrate up” button.
Note : To modify an attribute :
Scroll the selection by turning the “clip 2 gain” rotary encoder.
Push the “clip 2 gain” rotary encoder to launch the corresponding action.
Close menu by clicking the “Close” element.

Loop4Live Manual
Page 20
6.3. Tap tempo
This button allows changing tempo by pushing it several times at the good rhythm.
7. Screen
Loop4Live screen displays information about selected scene, tracks and clips. It indicates
your position in the clip matrix.
Screen is as follows :
7.1. Screen : Current scene
It is the current selected scene on Ableton Live®. Adding BPM (beat per minute) in a scene
name will automatically adjust tempo during clip launch. Current scene is preceded by its number in
the grid.
7.2. Screen : Master volume position
Display current master volume value. This value could be modified with the corresponding ro-
tary encoder (see section 6).
Table of contents