Lotek SRX1200 Series User manual

USER MANUAL
REVISION 02
26 JAN 2023
#MVHF018
SRX1200 Host User Guide

1
TABLE OF CONTENTS
1. INTRODUCTION...............................................................................................................................................3
2. INSTALLATION..................................................................................................................................................4
2.1. SRX1200 HOST PROGRAM INSTALLATION ..........................................................................4
2.2. USB COMMUNICATION PORT SETUP ..................................................................................... 5
2.2.1. TROUBLESHOOTING.................................................................................................................. 6
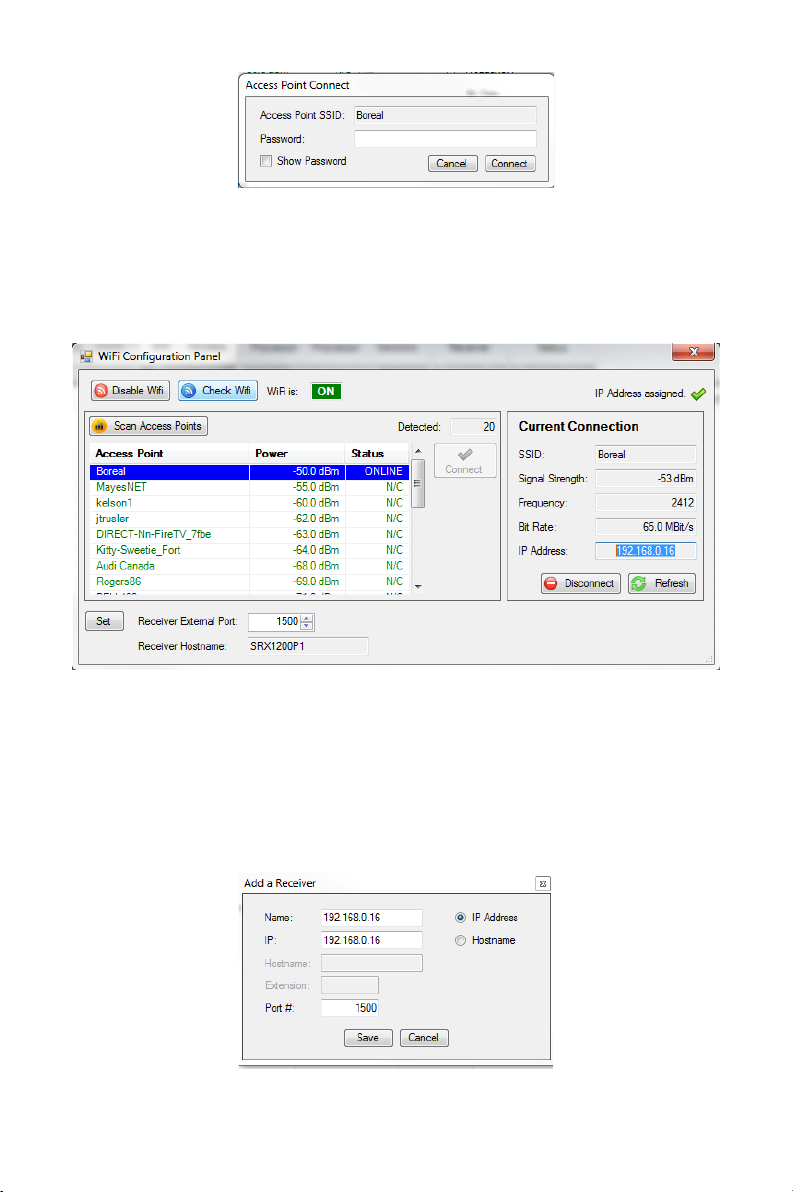
2.3. WIFI COMMUNICATION SET UP (D2, MD2)...........................................................................7
3. GETTING STARTED.......................................................................................................................................12
3.1. HOST MAIN MENU SETUP..............................................................................................................12
3.2. LOGGING ON...........................................................................................................................................13
3.3. KEYPAD SIMULATOR.........................................................................................................................15
3.4. RECEIVER CLOCK ................................................................................................................................16
3.5. PROJECT EDITOR.................................................................................................................................16
3.5.1. NAVIGATING THE PROJECT EDITOR..............................................................................18
3.5.2. SCAN SETTINGS............................................................................................................................19
3.5.3. CHANNELS......................................................................................................................................23
3.5.4. ANTENNAS......................................................................................................................................26
3.5.5. FILTER SETTINGS .........................................................................................................................31
3.5.6. SENSOR SETTINGS ....................................................................................................................33
4. RECEIVER MODES OF OPERATION ................................................................................................34
4.1. IDLE...............................................................................................................................................................34
4.2. MANUAL MODE (M, MD) ................................................................................................................34
4.3. MONITOR MODE .................................................................................................................................35
4.3.1. MONITOR MODE- M2...............................................................................................................35
4.3.2. MONITOR MODE- MD..............................................................................................................36
4.3.3. PAUSE ................................................................................................................................................36
4.4. CODELOG (MD & D MODELS)......................................................................................................36
4.4.1. LIVE VIEW ON................................................................................................................................37
4.4.2. PAUSE ................................................................................................................................................37
5. DATA DOWNLOAD .....................................................................................................................................38
5.1. DOWNLOAD CODELOG DATA (MD, D MODELS) ...........................................................38
5.1.1. DOWNLOAD QUICK RECORD DATA (M2, MD MODELS)................................. 40

2
5.2. VIEW DATA..............................................................................................................................................42
5.3. EXPORT DATA.......................................................................................................................................43
APPENDIX.................................................................................................................................................................44
CONTACT INFORMATION.............................................................................................................................. 46
CUSTOMER SUPPORT ................................................................................................................................ 46

3
1. Introduction
This document provides installation and operating instructions for the SRX1200
Host Software (hereafter referred to as ‘Host’). It is designed to allow you to
program your receiver to monitor and/or data log VHF transmitters, as well as
download data based upon the features of your SRX1200 Model. It is highly
recommended that you also review the SRX1200 User Guide for operation
instructions.
NOTE: The SRX1200 Host Application is only compatible with Windows-based
operating systems.

4
2. Installation
2.1. SRX1200 Host Program Installation
Installation of the Host is a quick procedure. The latest SRX1200 Host software
will be provided to you on a USB Memory Stick with the Lotek logo. You can also
contact Lotek Customer Support if you do not receive the USB stick, or have
misplaced the USB stick.
Double-click on the latest SRX1200 Host Install app to initiate the installation
process. Most of the windows and prompts that are issued during the
installation are self directing.
The Host is not a large application and there are no options for installing
medium or compact components. You are asked to read and acknowledge the
Lotek end-user license agreement.
You may wish to alter the installation directory and also the target position of
the short cut that will be placed in the Windows program start menu. The mostl
likely choices have been offered as defaults:
Program location: C:\Program Files (x86) \Lotek Wireless Inc\SRX1200 Host\
Program Folder: Lotek Wireless Inc \ SRX1200 Host
Once the options have been adjusted OR defaults have been accepted, the
program files are copied to the target directory. You will be informed once the
process is complete.
At this point, you should find that the requested program directory has been
created. Under the program directory, sub directories have also been created.
Those are, Data, Projects and System. If this is a first-time installation, Data and
Projects should be empty.

5
2.2. USB Communication Port Setup
Host installation will also copy the required USB drivers on to the PC to enable
connection between the receiver and the Host Software on your PC.
1. Once the Host has been installed successfully, connect the provided
USB cable to the back of the receiver (M-models, faceplate for D-
models) and connect the other end to a USB port on your PC. Once it is
securely connected, turn on the receiver via the knob.
2. The PC will acknowledge the USB as a new hardware device being
connected to the system. You can now open the Host software on your
PC.
NOTE: If your computer does not recognize the receiver via the USB
port, detach the USB cable from the USB port on the computer, and try
another USB port on your computer.
3. Click on the USB Open Button under the Main Menu > Connect section,
If your receiver connects successfully, the button will switch to “USB
Close”.
→
4. If your Host does not recognize the receiver, click on the Host Setup
button under the Main Menu > Configure section. This will open up the
Application Settings Panel. Under the COM Port tab, select the
device/serial COM Port that corresponds to your receiver. Once
selected, click Save. Repeat Step 3.

6
2.2.1. Troubleshooting
1. You can click on the Refresh List button to update the list of available
COM Ports.
2. You can click on the Try button after selecting a serial port, if you are
unsure which serial port corresponds to your receiver.

7
2.3. WIFI communication set up (D2, MD2)
NOTE: In order to set up a remote WIFI connection, both the receiver and the
computer must be using the same WIFI access point.
To set up your WIFI communication settings, the receiver must be connected via
USB to the computer, powered up and logged on to the Host. The WIFI antenna
must be attached to your SRX 1200 D2 or MD2 receiver.
Step 1.
Select the Maintenance tab indicated by the black arrow below:
Step 2.
Select local WIFI in the Wireless Setup section of the maintenance tab:

8
Step 3.
In the WIFI Configuration Panel click on Enable WIFI (1) then select Scan Access
Points (2):
Step 4.
A list of all local WIFI access points that your receiver can utilize will appear as
below. Select your local WIFI network and then click on the “Connect” button. It
will then ask for your SSID password. Enter the password and click “Connect”.

9
Step 5.
Click on the set button and copy the IP address highlighted in the Current
Connection section. Then, click on the “x” to exit the WIFI Configuration Panel.
Step 6.
Click the Main Menu tab then “Host Setup” icon. The Applications Settings Panel
should appear. In the IP Addresses tab click on “Add” the “Add a Receiver” panel
will appear. Here, paste the IP address you just copied into the Name and IP as
shown below. Then click on the “Save” button.

10
Step 7.
Make sure you also have the same Port # from the WIFI Configuration Panel.
Step 8.
Your receiver’s connection will appear in the IP Addresses window to make it
active. Double click the IP address line.

11
Step 9.
Upon your double click, you will now see “>>>” on the left side of the line appear.
If they DO NOT appear please repeat step 8.
Step 10.
Click on Save and you are ready to connect using WIFI Remote. Log Off from the
USB then select “USB Close”. At this point, please test your WIFI connection to
ensure connection by selecting and clicking on “IP/Port Open” (shown below).
Log ON and you should have complete access to all your SRX 1200 functions.

12
3. Getting Started
The Host program’s primary functions vary depending on your receiver model.
FOR THE M1 MODEL –You can use the SRX Host Keypad LCD feature to
program your receiver in place of using the manual keypad on the physical
receiver.
M2, MD1, MD2, D1 and D2 –You can setup the project configuration of the
receiver and to download data from the receiver. The Host also supports real
time detection display and can support remote control via WIFI of the D2 and
MD2 models.
The following section provides an overview of the main menu functions and
associated toolbar buttons. Detailed descriptions are deferred to subsequent
sections where necessary.
3.1. Host Main Menu Setup
Following the successful connection between the SRX1200 receiver and the
SRX1200 Host on your PC, launching Host presents the setup menu window
below. The Main Menu tab allows you to program and access receiver
configurations, as well as GPS and remote download connection.
The ‘Receiver Maintenance’ tab provides access to ‘background’ operations such
as WIFI connections, installed codesets and battery status.
Positioning your mouse arrow over an icon prompts a brief description of the
actions that can be accessed under that icon.

13
3.2. Logging On
Click on the “Log On” button. A box will appear asking for a password.
The default factory password is “123456”
Once you are Logged On, the button will change to “Log Off” and the Receiver
Access boxes will be populated.
If you are “logged on” the physical receiver, you will see the message box (
shown below).
By clicking on the “Yes” button you can override the receiver “Log On” and be
logged on via the host. This will allow you full access to change the functions and
settings of the receiver.
Indicates connected COM port, your Receiver Model and Device Name

14
If you wish to change this password to restrict access to your data, you must be
logged on to your receiver.
To accomplish this, go to the Maintenance Menu Tab, and click the Change
Password icon. You will now be able to enter a new password and save it to your
receiver.
It is highly recommended to note this password down as you will not be able to
access the receiver or make changes without using the new password to log on.
NOTE: If you would like to avoid entering your password every time you Log On
to the Host, navigate to the Access Tab of the Host Setup icon. Check the box
where it says “Yes! I do not want to enter a password”, this will save your default
password to expedite the log on process. This will only work if the factory default
is not changed.

15
This feature should ONLY be used if your receiver is always in a secure setting
such as manually tracking or in a secured area if datalogging.
3.3. Keypad Simulator
If you are connecting the Host to a Manual SRX1200 receiver (M1, M2, MD1,
MD2), you can use the Keypad Simulator instead of pressing the physical keys
on the receiver. In order to make changes to the receiver, log onto the receiver
via the virtual keypad (mimicking the physical keypad), and not through the Host
Log on Option (i.e. do not log in using the above mentioned steps in section 2.2).

16
3.4. Receiver Clock
The Receiver Clock icon will open the SRX1200 Real Time Clock Settings Panel.
This is the time used by the receiver. The receiver will log all data in GMT
(Greenwich Mean Time). GMT is not altered by Daylight Savings Time.
Changes to the RTC Clock can only be made when the Receiver is in IDLE mode
and you must be logged on. You can then set a GMT correction based on your
local time.
3.5. Project Editor
The Project Editor will allow you to design, edit, send and retrieve project
configurations while the receiver is in IDLE or CODELOG mode. A Project
Configuration is the setup of parameters such as the frequency, the scan time
and the antenna settings.
The Project Editor allows you to create or edit configurations with or without a
receiver connected to the Host. Once the parameters are entered, the Project
Configuration can be saved as a project file and then uploaded to the receiver
once it is connected. This allows a project file (with identical parameters) to be
uploaded to multiple receivers after configuring the project only once.

17
NOTE: when creating a Project Configuration without a receiver connected, all
parameter options will be available to you; however, these parameters or
settings may not be supported by your receiver model. If you create a Product
Configuration offline, save it to a file and then attempt to load that configuration
onto a receiver that does not support one or more of the options specified in
the file, the Host will detect this conflict and let you know.
Setting up the Project Configuration is a key component to optimizing the
performance of your receiver. Some factors to consider:
•The type of tag being used (Beeper (pulsed), ID-only, Sensor,
Even/Odd, ID+100)
•The number of tags in the study
•The number of distinct frequencies and antennas to be monitored
•Geographic footprint of the study area and deployment schedule
•System reception range
•Environmental factors specific to your area
•Target species behaviour

18
3.5.1. Navigating the Project Editor
The Project Editor supports entry for up to eight distinct configurations within a
single Project File, individually referenced on the top right corner of the Project
Editor window. By default, the first configuration will be the Active Configuration,
unless you set it up otherwise
You can toggle through the different configurations using the red arrow buttons,
and once the correct configuration is selected, you can use the Set Active
button. The receiver must be connected for this step.
It is not necessary to enter more than one configuration; this feature allows
greater flexibility for you to pre-set multiple configurations and switch quickly
between them in the field. You can setup various parameters based on the
capabilities of the given receiver model. By clicking on the labelled tabs, you can
navigate between the Scan settings, Channels, Antennas, Filter Settings and the
Sensor Settings for a given project configuration.
Once you have made changes to the Configuration, it is necessary to Save them
as a project file. Please note, saving the project file will NOT send them to your
receiver. It will simply save a copy of the project file on your PC; you are advised
always to save a copy of your project file for later reference.
You can also Load or open pre-saved project files. This is especially useful if the
same project configuration is to be used on multiple receivers.

19
When you need to send a project file to a receiver, ensure the receiver is
connected, logged on via the Host and in Idle Mode prior to opening the Project
Editor. You can then click the “Send #1” button to send the first project
configuration to the receiver.
If you have setup multiple configurations within the same project file, you can
click the “Send All” button. The Read SRX button is used to retrieve the project
configuration file currently saved on the receiver.
You can set up the GMT (Greenwich Mean Time) correction based on your own
geographic location. All data will be collected in GMT by the receiver, but by
adjusting the correction, you can view the data in your local time on the Host.
You can asses the changes to your configuration, and verify whether the
configuration has been sent to the receiver via the Status bar. It will show the
serial number of the connected receiver, and whether the configuration has
“Not Changed”, “Changed”, been “Sent” or is “Not Connected”.
3.5.2. Scan Settings
Scan Timing
The Scan Time is the length of time spent by the receiver monitoring for a given
frequency on one antenna. This time needs to be at least 0.5 seconds more
than the longest burst interval on your VHF tags. The value can be as long as
600 seconds (10 minutes).
Other manuals for SRX1200 Series
2
Table of contents
Other Lotek Receiver manuals
Popular Receiver manuals by other brands

Harman Kardon
Harman Kardon AVR 245 quick start guide

Nuvo
Nuvo NV-T2DF supplementary guide

Sony
Sony STR-DN1040 Guide reference guide

Hammarlund
Hammarlund HQ-140-X Technical description and operating instructions

Hochiki
Hochiki YBN-UA installation instructions

Goodmans
Goodmans GFSAT102DHS quick start guide