Lucci LEDlux 229150 User manual

Installation Instructions
1 | P a g e v 1 . 0 (07 / 2 0 2 0 )
ULTRA LED PORTABLE RECHARGEABLE LIGHT
SKU# 229150
Rated Voltage 3.7V DC, 10W
Thank you for purchasing this quality Lucci product. To ensure correct function and safety, please read and follow all
instructions carefully before assembly, installation and use of this product. Please keep instructions for future reference.
Warranty
•This luminaire is covered by a 3-year warranty valid for in-store replacement or refund only.
•The warranty period starts from the date of purchase. Please retain the proof of purchase.
•The warranty is for the luminaire only and does not include the rechargeable battery.
•Warranty will be void if there is any damage due to improper usage or modification to the luminaire.
•Failure to comply with the instructions in this manual may increase the risk of damage or injury and will void the
warranty.
Installation Requirements
•Select a suitable location for installation:
−Ensure it is on a flat and stable surface.
−Do not place flammable material near or over the luminaire.
−This luminaire is protected against water penetration to IP54 standards, which is splashing water from any
direction.
NOTE: The clear plastic door covering the USB ports and the power display screen and button, must
be closed and locked into position to maintain the IP54 rating.
•The luminaire must not be used if the protective shield or shade has been cracked or damaged. Replace the
protective shield or shade before using the luminaire.
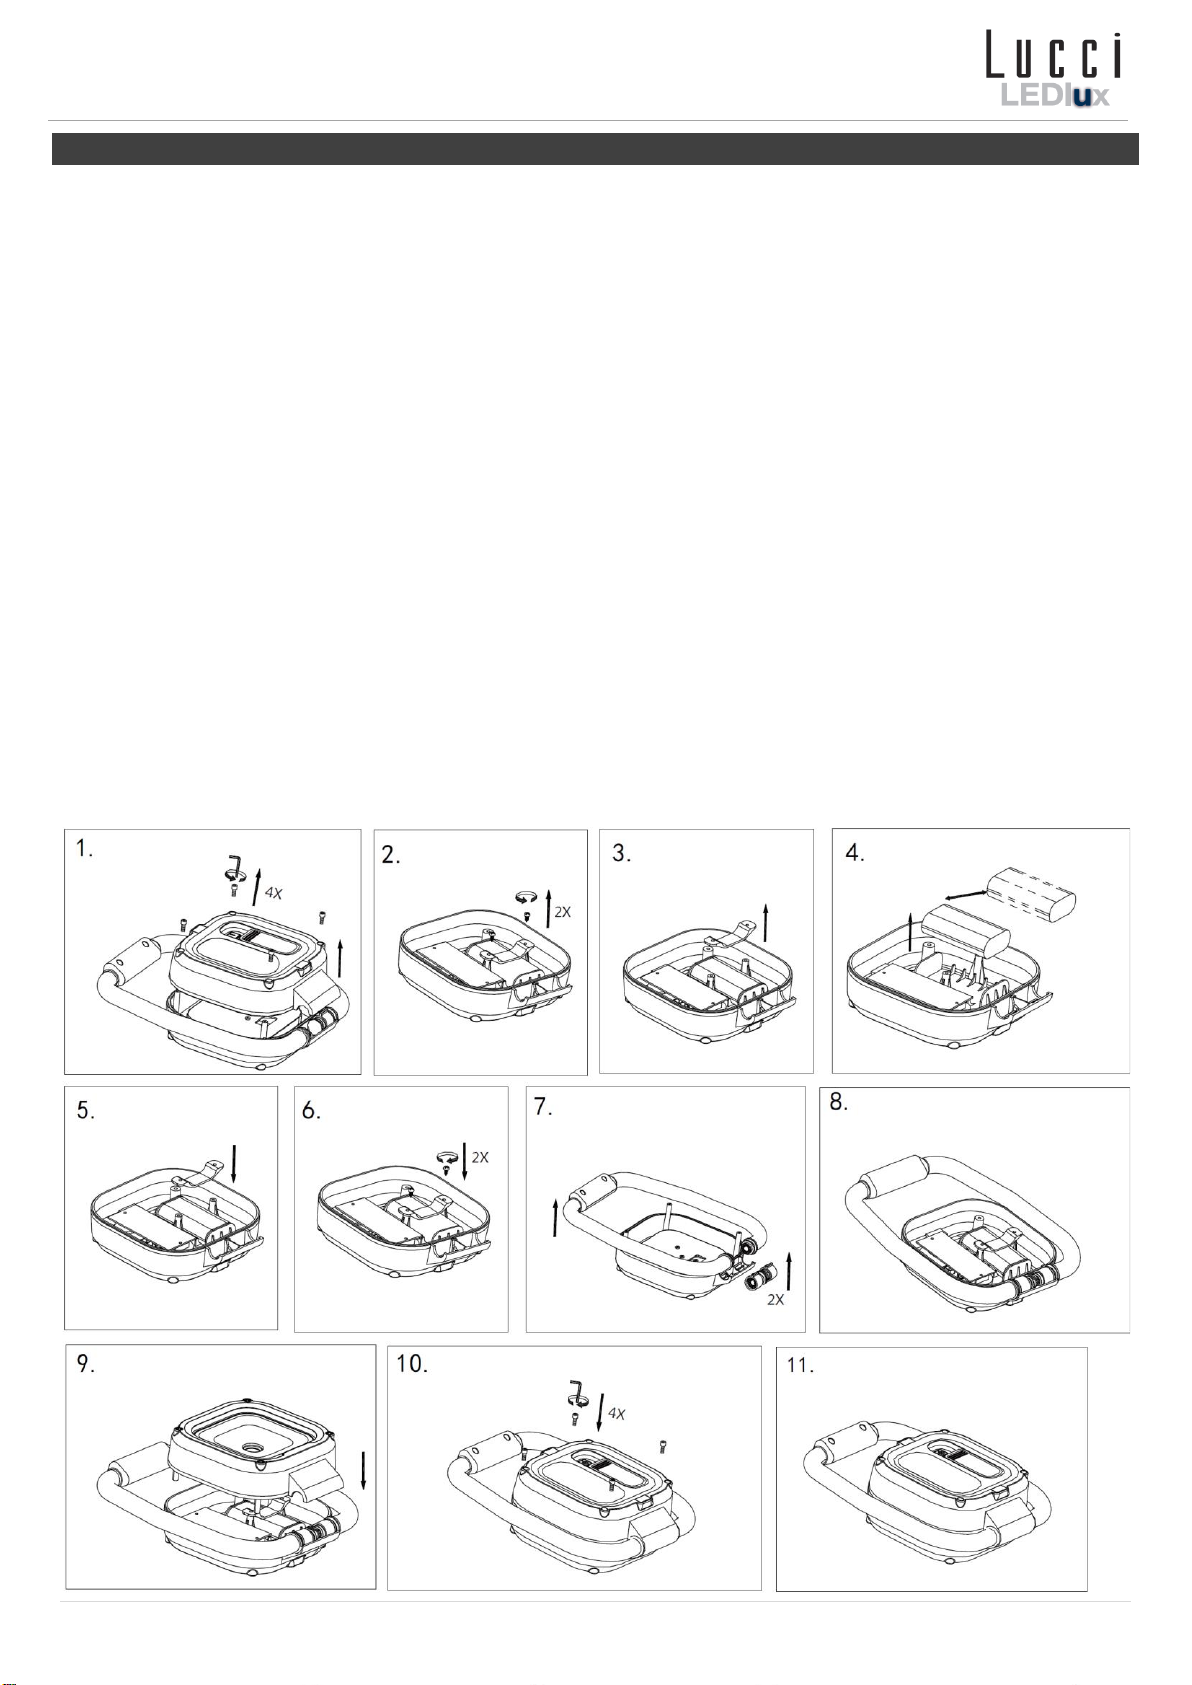
•Lay out all the components on a smooth surface and make sure no components are missing before assembling.
If parts are missing, return the complete product to the place of purchase for inspection or replacement.
•Check whether the luminaire has been damaged during transport. Do not operate/install any product which appears
damaged in any way. Return the complete product to the place of purchase for inspection, repair or replacement.
Operation Directions
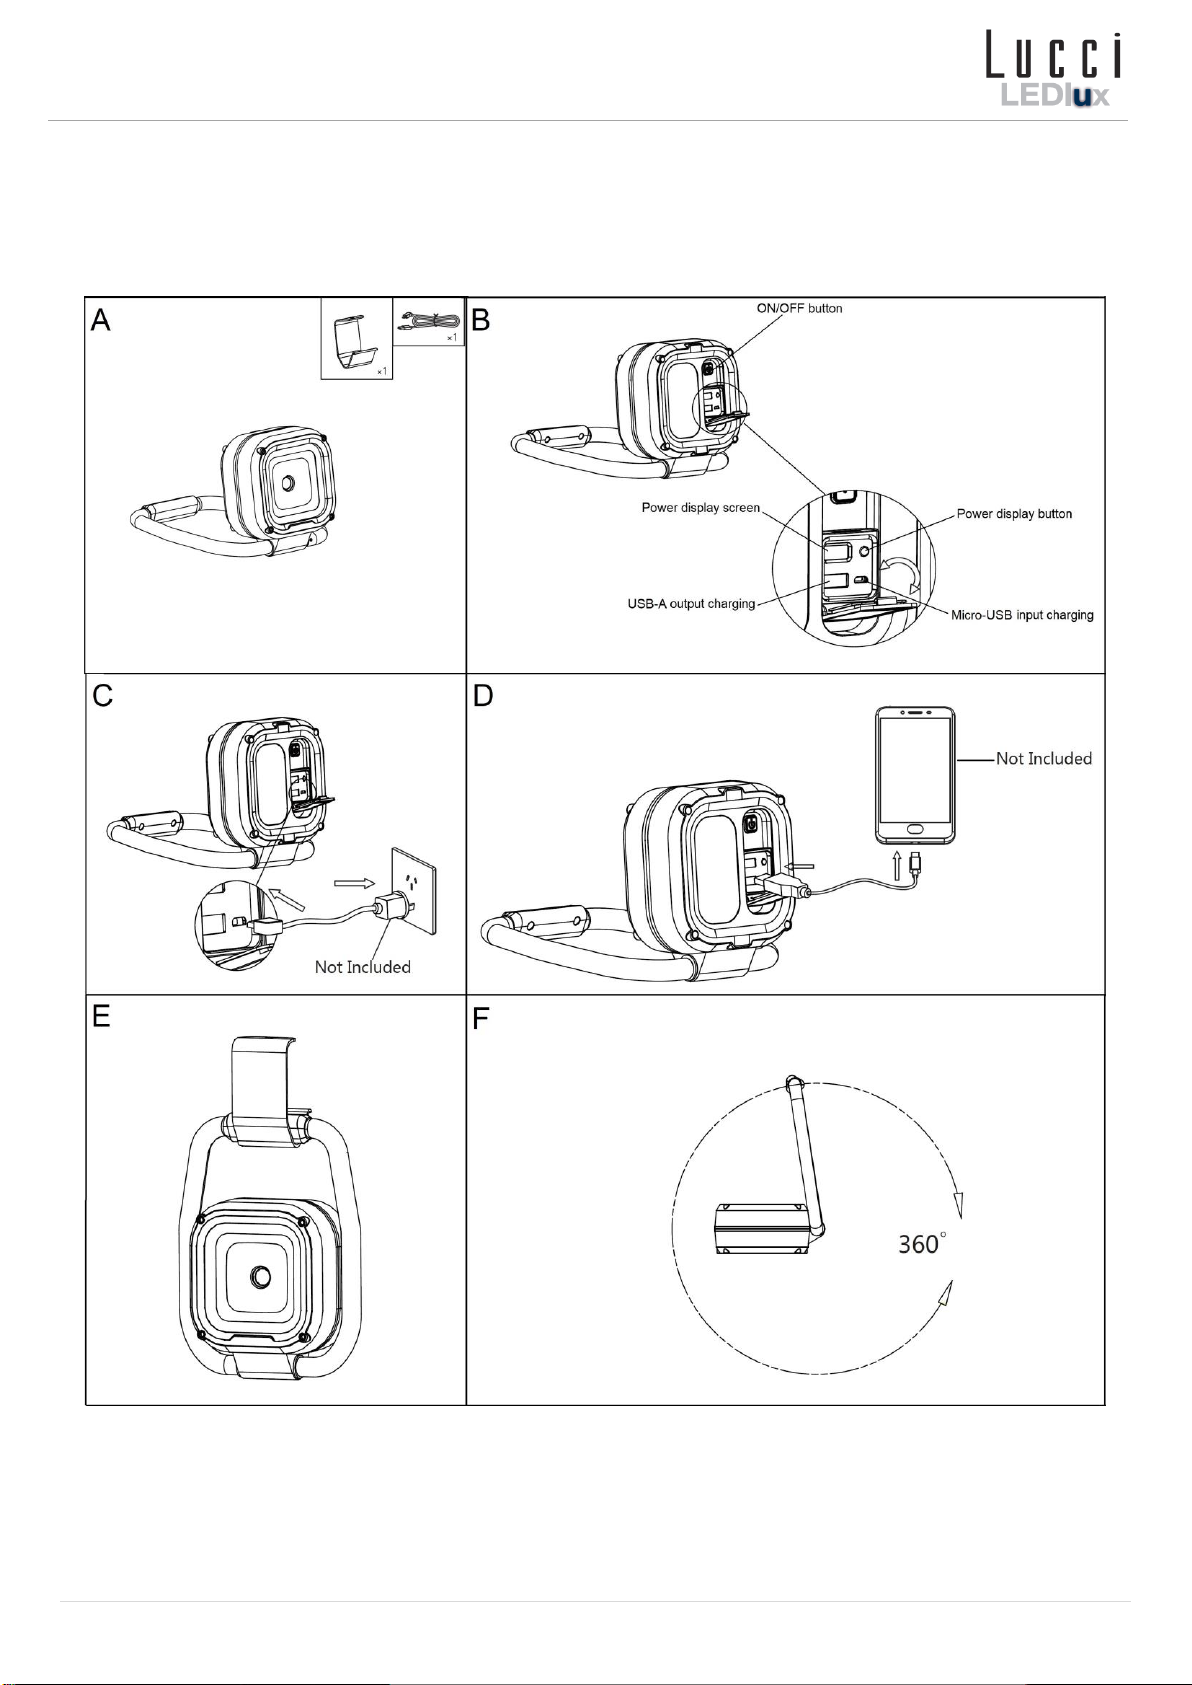
1. Remove all packaging material from the product and be careful not to throw away accessories that may be hidden
within the packaging material. (Fig. A)
2. Use the ON/OFF button to operate the luminaire and set the desired lighting level. (Fig. B)
When the luminaire is off:
- Press the ON/OFF button once to turn the luminaire on low.
- Press the ON/OFF button 2 times for the medium setting.
- Press the ON/OFF button 3 times for the high setting.
- Press the ON/OFF button 4 times to turn off again.
3. Open the clear plastic door to access the power display screen and button. (Fig. B)
Press the power display button to show the remaining battery level in the luminaire.
4. Open the clear plastic door to access the USB ports at the back of the luminaire. (Fig. B & C) Insert the included USB
cable into the micro-USB port and connect the USB cable to a computer/laptop or power adaptor to charge the
luminaire. It will take approximately 5 hours to be fully charged. The power display screen will flash while charging.
When the power display screen has reached 100, the battery is fully charged.
NOTE: Please ensure an appropriate power adaptor is used to charge the luminaire.
The rated input is 5VDC, 1A.

Installation Instructions
2 | P a g e v 1 . 0 (07 / 2 0 2 0 )
5. The luminaire can be used as a power bank battery to charge your electronic device. Connect your electronic device
into the USB-A port on the back of the luminaire to charge. (Fig. B & D)
6. Use the supplied accessory to hang the luminaire in some locations. (Fig. E)
7. The stand/handle can be freely rotated more than 360° without damaging the knuckle joint. (Fig. F)

Installation Instructions
3 | P a g e v 1 . 0 (07 / 2 0 2 0 )
Battery Replacement
This luminaire has a built-in rechargeable lithium battery. (FBC18650, 3.7VDC 4400mAh)
The battery has a limited life. (After 300 cycles, capacity at >80%).
NOTE: The battery replacement should be done by a person with technical experience, if unsure
please contact a person with technical experience to replace.
The battery can be replaced following these steps:
1. Turn the luminaire upside down and place on a smooth, flat non-scratch surface. Remove the 4 screws in each corner.
2. Loosen the 2 screws from the cord anchorage.
3. Remove the battery cord anchorage from the luminaire.
4. Remove the old battery and replace with the new battery. Install the battery connector to the luminaire
NOTE: Dispose of exhausted batteries immediately and safely (so they cannot be retrieved by children).
Contact your local council to dispose of the battery safely.
5. Install the battery cord anchorage onto the luminaire.
6. Secure the cord anchorage by re-installing the 2 screws.
7. Remove the handle and the 2 spring joints from the other side of the luminaire.
8. Install the handle and the 2 spring joints onto the luminaire with the battery.
9. Install the cover onto the luminaire.
10. Carefully turn the luminaire upside down and secure by tightening the 4 screws in each corner.
11. Press the ON/OFF button to test the luminaire and battery is operational.

Installation Instructions
4 | P a g e v 1 . 0 (07 / 2 0 2 0 )
Safety Tips
•Always ensure the power is OFF and the luminaire has cooled down before performing any maintenance, cleaning or
making any adjustment to the luminaire.
•Young children should be supervised to ensure that they do not play with the luminaire.
•Handle the luminaire with care to avoid any damage or breakage.
•To clean, wipe with a soft damp cloth. Do NOT soak or immerse the luminaire in water or other liquids.
•Ensure that the luminaire does not come in contact with corrosive chemicals/solvents or abrasive cleaners etc.
•The luminaire must not be used if the protective shield or shade has been cracked or damaged. Replace the
protective shield or shade before using the luminaire.
•The light source of this luminaire is not replaceable; when the light source reaches its end of life, the whole luminaire
shall be replaced. There are no serviceable parts, do not attempt to dismantle or open the luminaire.
•Dispose of exhausted batteries immediately and safely (so they cannot be retrieved by children). Contact your local
council to dispose of the battery safely.
Specifications
SKU #
229150
Rated Voltage
3.7V DC
Rated Wattage
10W
LED Specs
3-step dimming (High - 1200 lumens, Medium –600 lumens, Low –200 lumens)
Cool-White –4000K, CRI > 80,
Battery Specs
FBC18650, 3.7VDC 4400mAh,
Rechargeable Li-ion battery (included)
Battery life (After 300 cycles, capacity at >80%)
Replaceable battery*
IP Rating
IP54**
Weight
1.1kg
Dimensions
H:410mm W:195mm E:410mm
*Refer to the instruction manual for more details.
** The clear plastic door covering the USB ports and the power display screen and button, must be closed and locked
into position to maintain the IP54 rating.
Table of contents
Other Lucci LEDlux Light Fixture manuals
Popular Light Fixture manuals by other brands

Federal Signal Corporation
Federal Signal Corporation Electraray 224XST Installation and maintenance instructions

Cooper Lighting
Cooper Lighting Cobolight CR211135 Specification sheet

Klus
Klus GIZA-LL Mounting instructions

IKEA
IKEA NAVLINGE V1910 manual

Lightolier
Lightolier POWER JACK REMODELER KIT Assembly and installation

Intermatic
Intermatic AL430 Assembly procedures