Lucent Technologies 9125 User manual

User’s Manual for
Cordless Telephone with
Caller ID/Call Waiting 9125
Part 2
Please read Part 1 — Important Product
Information, included in your package.
Lucent 9125 cover.L1 4/8/98, 11:31 AM3

© 1998 Philips Consumer Communications L.P. All rights reserved.
Printed in China. 848116232 Issue L1
Lucent 9125 cover.L1 4/8/98, 11:30 AM2

1
CONTENTS
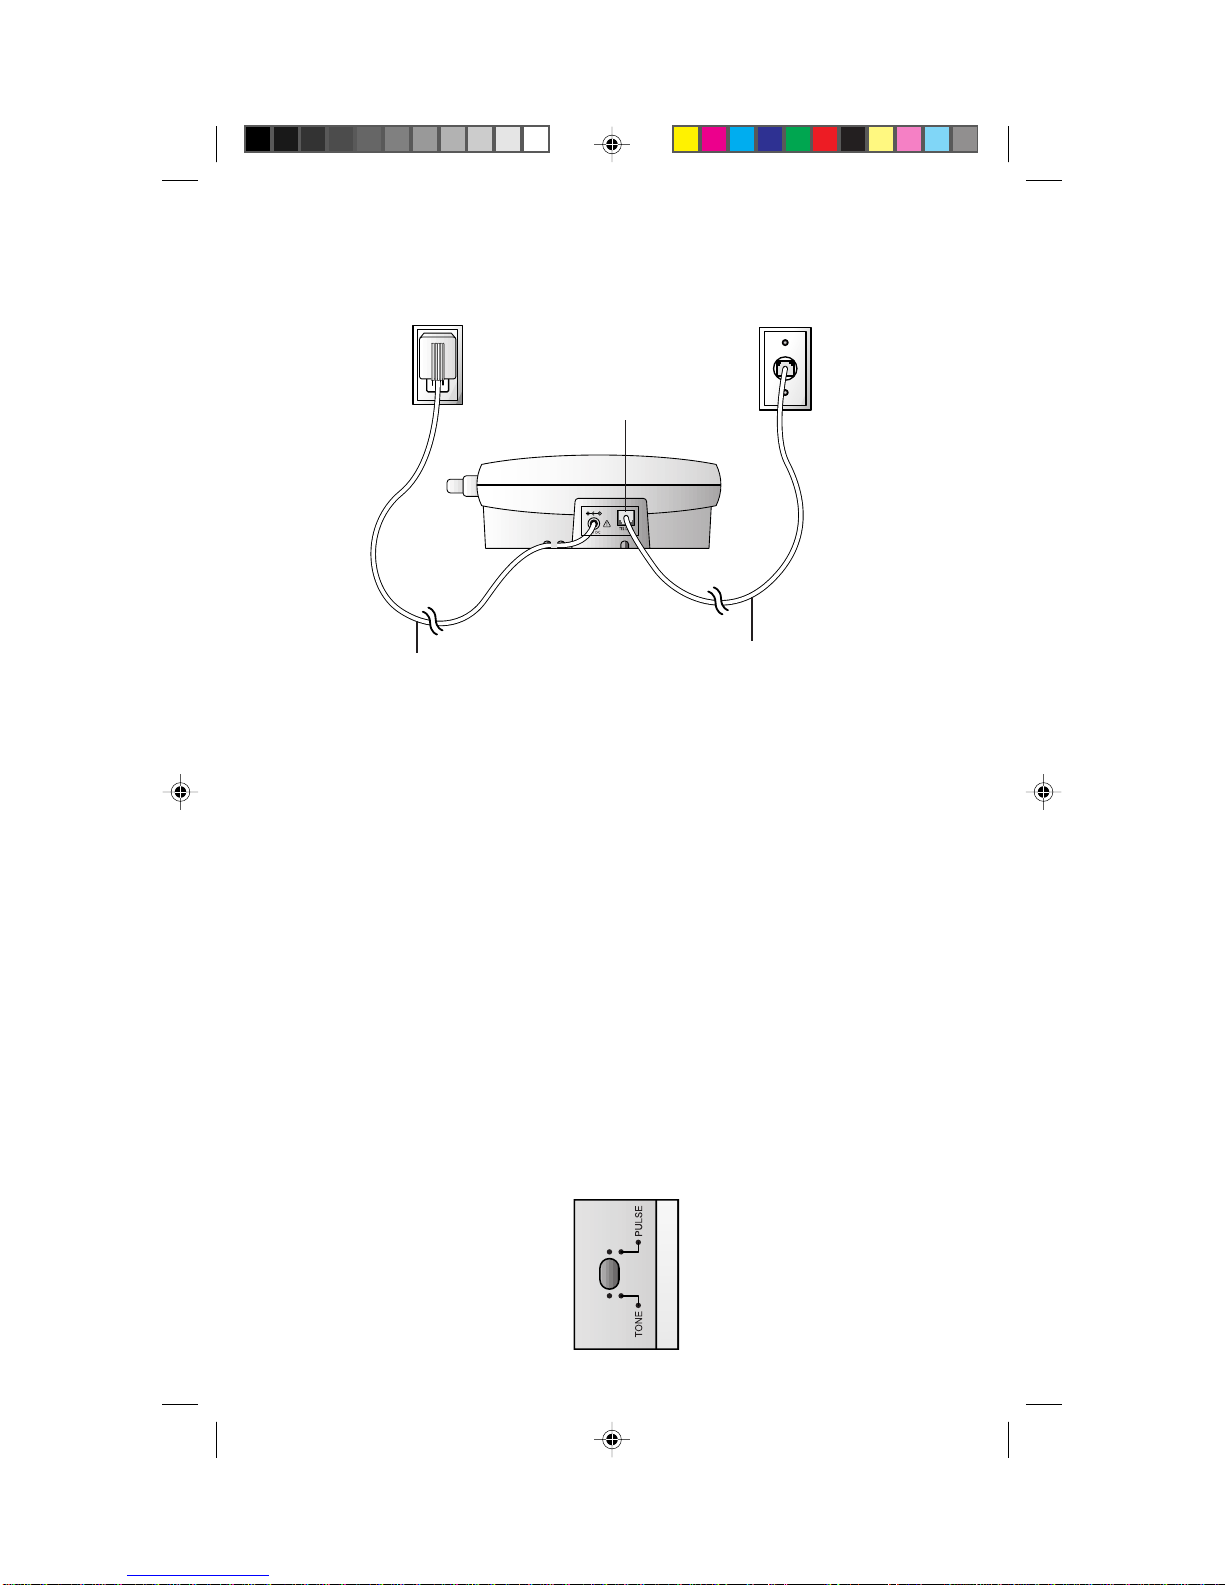
INSTALLATION................................. 3
Table/Desk Installation.......................... 3
Wall Installation..................................... 4
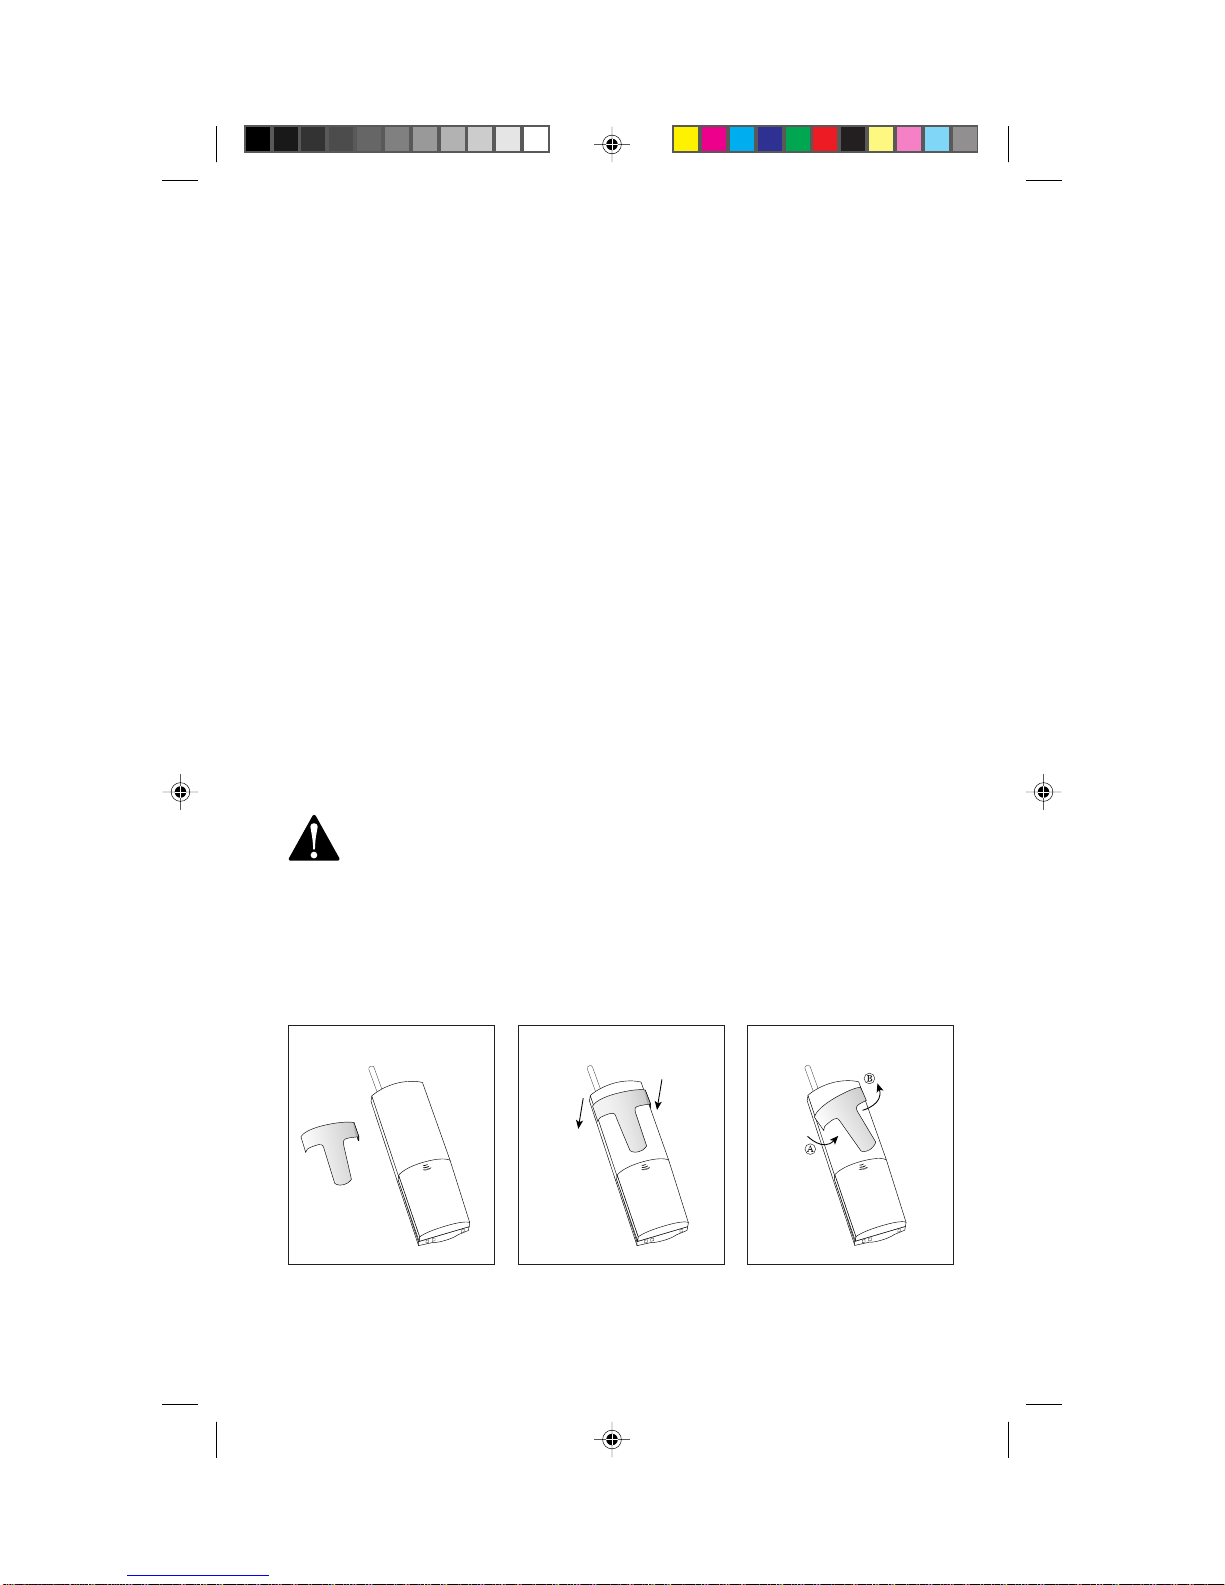
Belt Clip ................................................ 5
TELEPHONE OPERATION ................. 6
Making a Call......................................... 8
Answering a Call ................................... 8
Ending a Call ......................................... 8
Redial .................................................... 8
Hold ...................................................... 8
Mute ...................................................... 8
Handset Ringer Selection ......................9
HandsetVolume .................................... 9
Ringer Mute........................................... 9
TemporaryTone .................................... 9
SpecialTelephone Services .................10
Page/Handset Locator ......................... 10
Headset Jack........................................ 10
OPERATING RANGE ........................11
TELEPHONE MEMORY ....................12
Storing Memory Numbers...................12
Replacing Stored Memory Numbers ...12
Deleting Stored Numbers.................... 12
Storing a Pause in a
Memory Number ............................. 12
Dialing Memory Numbers................... 12
Memory Guard .................................... 12
Caller ID Operation.......................13
About Caller Identification.................. 13
Display Screen Messages ..................... 13
Reviewing Call History........................ 14
Removing a Call from Call History ......14
RemovingAll Calls from Call History ..14
Dialing a Number in Call History ........14
BATTERIES .................................... 15
Charging the Handset Battery Pack.....15
Power Reserve .................................... 15
Charging the Spare Battery Pack .........16
Replacing the Handset Battery Pack ...16
IN CASE OF DIFFICULTY .................17
Lucent 9125 book.L1 4/8/98, 4:14 PM1

2
Lucent 9125 book.L1 4/8/98, 11:24 AM2

3
INSTALLATION
Table/Desk Installation
1 Choose a spot near an electrical outlet and a telephone jack.
This phone requires a modular telephone jack and a standard electrical
outlet (110vAC). The outlet should not be controlled by a wall switch.
2 Install the handset battery.
(For an illustration of battery installation,see BATTERIES in this manual.)
• Remove the battery cover by pressing on the indentation and
sliding downward.
• Install the battery pack so that the metal contacts on the bottom
of the battery are aligned with the charging contacts in the
battery compartment.
• Replace the battery cover by sliding it on its track up over the
battery compartment until it snaps firmly in place.
3 Set the dial mode.
If you have touch tone service,set the switch on the bottom of the
base to TONE. If you have dial pulse (rotary) service, set the switch
to PULSE. Even if you have dial pulse service,you can still use
telephone services requiring tone signals. See“TemporaryTone”in
the OPERATION section of this manual.
Telephone
Line Jack
Modular
Telephone
Jack
Standard
Electrical
Outlet
Power Cord Telephone Line Cord
Lucent 9125 book.L1 4/8/98, 11:24 AM3

4
4 Connect the telephone line cord.
Plug one end of the telephone line cord into the jack on the back of
the base. Plug the other end of the line cord into a modular jack.
Make sure the plugs snap firmly in place.
5 Connect the power cord.
Plug the power adapter into the jack labeled 11V DC on the back of
the base. Plug theAC adapter on the power cord into an electrical
outlet not controlled by a wall switch. The POWER light on the base
goes on.
6 Charge the handset batteries for 16 hours.
Place the handset face down or face up in the base. The CHARGING
light on the base goes on to show the handset is in the right position
to charge the batteries.
7 Check for dial tone.
After the batteries are charged,pick up the handset and extend the
base antenna. Check for a dial tone by pressing P,you should
hear a dial tone.
Wall Installation
INSTALLATION
1 Follow Steps 1–3 under Table/Desk Installation.
2 Turn the base unit over, and attach the wall mounting base to
the lower half of the base unit. Gently press down until it snaps
firmly into place.
Lucent 9125 book.L1 4/8/98, 11:25 AM4

5
INSTALLATION
3 Connect the power cord.
• Plug the power adapter into the jack labeled 11V DC on the
back of the base.
• Run the cord under the tab on the bottom of the base unit and
under the tab on the wall mounting base.
• Plug theAC adapter into an electrical outlet not controlled by a
wall switch.
4 Connect the telephone line cord.
• Using the short telephone line cord supplied,insert one end of
the telephone line cord into the telephone jack on the back of
the base.
• Feed the excess line cord under the tab on the bottom of the
base.
• Plug the line cord into the standard wall jack.
5 Mount the telephone on the wall.
Position the telephone base so the mounting studs on the wall jack
fit into the base of the telephone. Slide the telephone down on the
mounting studs until the phone locks into place.
6 Follow Steps 6 and 7 under Table/Desk Installation.
CAUTION: Use only theAC power adapter supplied with this
telephone,Power Supply for 9125. Input: AC 117V, 60Hz, 12W
Output: DC 11V, 500mA.
Belt Clip
If you wish,you can attach the belt clip to the cordless handset,following
the illustrations below.
To RemoveTo Attach
Lucent 9125 book.L1 4/8/98, 11:25 AM5

6
TELEPHONE OPERATION
Latch for
Spare Battery
Compartment
Light goes on when spare battery (optional) is
placed in Spare Battery Compartment
Light goes on when handset is in use, or
when handset is charging in base
Directory card
Light goes on
when system is
connected to
power and
phone line
Send paging tone to handset
Lucent 9125 book.L1 4/8/98, 11:25 AM6

7
TELEPHONE OPERATION
Headset jack
Handset Volume
Control
End a call
Put caller on hold /
Store a pause in a
memory number
Make or answer
a call / Access custom
calling services
Temporary Tone /
Scroll through
Call History
Access numbers in
telephone memory
Store numbers in
telephone memory
Remove one or all calls
from Call History
Access Call History
for Caller ID service
Scroll through
Call History
Allows you to hear
caller, but caller
doesn’t hear you
Redial last number
called
View the telephone
number of Call
History number on
the display View long
Caller ID names
Lucent 9125 book.L1 4/8/98, 11:25 AM7

8
Making a Call
1Press and release P,and wait for a dial tone. The screen displays
PHONE ON.
2When you hear a dial tone,dial the number.
— OR —
1Enter the number you want to call.
2Press and release P. The screen displays PHONE ON and the call
is dialed.
Answering a Call
Press any key except O, M,or a volume key.
Ending a Call
Press Oon the handset
— OR —
Place the handset in the cradle.
Redial
The last number dialed on this phone (up to 16 digits) is stored in redial
memory until you dial another number.
1PressP.
2When you hear a dial tone,press R. The screen displays the
number being dialed.
Hold
1Press and release Hto put a call on hold. The screen displays
CALL ON HOLD.
2Press and release Hagain to return to the call.
Mute
1Press and release M. The screen displays MICROPHONE MUTED.
You can hear the caller,but the caller can’t hear you.
2Press and release Magain to return to two-way conversation.
TELEPHONE OPERATION
Lucent 9125 book.L1 4/8/98, 11:25 AM8

9
Handset Ringer Selection
You can select from four different handset ringer styles. You can also turn off
the ringer.
1Make sure the handset is off.
2Press G, #.
3Press 1, 2, 3or 4to select your ringer style. You will hear a
sample of the ringer style and the screen will display your selection.
4Press O.
Turning Ringer Off
1Press G, #.
2Press 0.
3Press O. The screen displays RINGER OFF SELECTED.
Checking Handset Ringer Selection
1Press G, #.
2Press #. You will hear the current ringer style selection.
3Press O.
Handset Volume
Adjust the handset volume by using +(increase) or -(decrease) on the left
side of the handset. There are four volume settings.
Ringer Mute
Press Mwhile the phone is ringing to silence the ringer during only that
call.
Temporary Tone
NOTE: If you have touch tone service, you do not need to use the
Temporary Tone feature.
If you have dial pulse (rotary) service,this feature allows you to enter codes
or tones needed to operate answering machines,or use electronic banking
services,calling cards,and other special services. This feature will operate
most special services; however,some services may actually require a touch
tone line. To be sure,ask the company that provides the special service.
1Dial the call,then press *. Any buttons pressed after this send tone
signals.
2After you hang up,the phone automatically returns to dial pulse
(rotary) dialing.
TELEPHONE OPERATION
Lucent 9125 book.L1 4/8/98, 4:03 PM9

10
Special Telephone Services
If you subscribe to special local telephone company services like CallWaiting
or Call Forwarding,you can access them by pressing Pwhenever you
would press the switchhook on a corded phone. This is like the Flash feature
on some other phones.
Page/Handset Locator
The Page feature allows you to signal someone at the handset from the base.
You can also use this feature to help you locate the handset.
Press Lon the base. The handset will ring four times before
ending automatically and the screen will display BASE PAGING HANDSET.
Press Oon the handset or Lon the base to cancel the page.
Headset Jack
You can use this telephone hands-free when you install an optional headset
and use the belt clip provided.
1Attach the belt clip (see“Belt Clip”in the INSTALLATION section of
this manual).
2Plug the headset (purchased separately) into the jack located on
the right side of the handset. (For best results,use only Lucent
TechnologiesAccessory Headset with 2.5 mm plug.) Do not force
the connection,but make sure the plug fits securely.
3Follow instructions under“Making a Call”or“Answering a Call.”
NOTE: The earpiece and microphone on the handset are disabled when
the headset is plugged in.
TELEPHONE OPERATION
Lucent 9125 book.L1 4/8/98, 11:25 AM10

11
OPERATING RANGE
This cordless telephone operates at the maximum power allowed by the
Federal Communications Commission (FCC). Even so,this handset and base
can communicate over only a certain distance — which can vary with the
locations of the base and handset,the weather,and the construction of your
home or office. For best performance,keep the base antenna fully extended.
If you receive a call while you are out of range,the handset might not ring —
or if it does ring,the call might not connect when you press P. Move
closer to the base,then press Pto answer the call.
If you move out of range during a phone conversation,you will hear noise or
interference. To improve reception,move closer to the base.
If you move out of range without pressing O,your phone will be left“off
the hook.” To hang up properly,walk back into range,periodically pressing
O.
This cordless telephone has 10 channels available for maximum performance.
Lucent 9125 book.L1 4/8/98, 11:25 AM11

12
TELEPHONE MEMORY
This cordless phone can store 20 telephone numbers that you can dial just
by pressing mand two number buttons.
Storing Memory Numbers
1Make sure the handset is off.
2Enter the number you want to store (up to 20 digits)
— OR —
Press Rto store the last number dialed.
3Press G. The screen displays PROGRAM LOCATION__.
4Enter a location key (01–20) to select a memory location. The
handset sounds a confirmation tone.
NOTE: If there’s a problem storing numbers, the screen displays
PROGRAMMING INCOMPLETE. Repeat Steps 1–4.
Replacing Stored Memory Numbers
You can replace a stored number by storing a new number in its place.
Deleting Stored Numbers
1 Press m. The screen displays SPEED DIAL LOCATION__.
2 Enter the memory location (01–20) you want to delete.
3 Press c. The screen displays LOCATION XX DELETED.
4 Press Oto exit.
Storing a Pause in a Memory Number
While storing a number in memory,press and release p(H) where
you want a two-second pause to occur. Each time you press p(H)
another two-second pause is stored.
For example,to store 9,PAUSE,555–0123 in memory location 3: Press 9,
p(H), 5550123, G, 03.
Dialing Memory Numbers
1PressP.
2Press m. The screen displays SPEED DIAL LOCATION__.
3Enter the memory location (01–20) of the number you’re calling.
Memory Guard
The phone numbers you store in memory are protected from loss when you
change the handset battery,or in the event of a power failure.
Lucent 9125 book.L1 4/8/98, 11:25 AM12

13
CALLER ID OPERATION
About Caller Identification
This telephone is designed to store and display information about incoming
calls. It must be used with Caller Identification service provided by your
local telephone company;there is a fee for this service,and it may not be
available in all areas. This phone can provide information only if both you
and the caller are in areas offering Caller Identification service,and if both
telephone companies use compatible equipment.
When you use this phone with Caller ID service, you can see who’s calling
before you answer the phone. The phone keeps a record of the names and
numbers of the last 50 calls,whether you answer the call or not. Each call is
numbered in the call history,with newer calls having lower numbers.
When the first call is received,the current time and date are set
automatically (you cannot set them),and are reset each time a new call
comes in.
Call Waiting
Additionally,if you subscribe to CallWaiting combined with Caller ID
service,this phone briefly displays who’s calling while you’re on another
call. If you wish to answer a CallWaiting call,press and release P. To
return to the original call,press and release Pagain.
Display Screen Messages
PHONE ON The phone is in use.
VOLUME Indicates handset volume setting.
LOW BATTERY The handset battery needs charging. The handset
will operate for about 5 more minutes.
CHANNEL The handset is trying to locate the base signal.
SEARCHING
FOUND The handset has located the base signal.
CHANNEL X
EXTENSION Displayed when this handset is off,but another
IN USE phone on the line is in use.
UNAVAILABLE The caller may be out of your call service area.
PRIVATE The caller has blocked call information from being
sent.
TRANSMISSION There is a problem with the transmission of
ERROR information being sent.
Lucent 9125 book.L1 4/8/98, 11:25 AM13

14
CALLER ID OPERATION
Reviewing Call History
1Press and release C. The screen displays CALL #01 and the name
of the most recent caller.
2Press 7to display the phone number and time of the displayed call.
3If call information is followed by →,press 9to see the information
that did not fit on the screen.
4Press >or <to scroll forward or backward through the call history.
Removing a Call from Call History
Press and release cto remove displayed information from the call
history. The screen displays DELETING SINGLE CALL.
Removing All Calls from Call History
1Press and hold cfor more than two seconds. The screen
displays DELETE ALL? DEL TO ALLOW.
2Press and release cagain to remove all calls. The screen
displays DELETING ALL CALLS
— OR —
Press and release any other key to cancel.
Dialing a Number in Call History
As you review calls in history,you can dial a displayed phone number. The
phone will dial only the last seven digits of a phone number,so you may
have to add an area code before sending the call.
1Enter the area code you need (for example,1 973) if necessary.
2Press and release C.
3Use <or >to locate the caller you want.
4Press and release Pto dial the number.
Lucent 9125 book.L1 4/8/98, 11:25 AM14

15
BATTERIES
CAUTION: To reduce the risk of fire or injury to persons or damage
to the telephone,read and follow these instructions carefully.
• Use only Replacement Battery 3470.
• Do not dispose of the battery in a fire. The cell might explode.
Check with local codes for special disposal instructions.
• Do not open or mutilate the battery. Released electrolyte is
corrosive and may cause damage to the eyes or skin. It may be toxic
if swallowed.
• Exercise care in handling batteries in order not to short the battery
pack with conducting materials such as rings,bracelets,and keys.
The battery pack or conductor may overheat and cause harm.
• Charge the battery provided with or identified for use with this
product only in accordance with the instructions and limitations
specified in this manual.
• Make sure the battery is inserted properly so the metal contacts on
the battery are aligned with the charging contacts in the battery
compartment.
Charging the Handset Battery Pack
The batteries need charging when:
• The screen displaysLOW BATTERY.
• The phone does not respond when you press P,and no lights
go on.
Place the handset in the base so the CHARGING light goes on. The batteries
will be fully charged in 10 hours (16 hours for first charge).
NOTE: For optimum battery performance, do not place the handset in the
base until the LOW BATT indicator lights.
Power Reserve
When you install a spare battery (purchased separately) in the base,you
can use this phone even during a power failure. If the battery in the spare
battery compartment is fully charged,you can make and receive calls for
up to five hours.
Lucent 9125 book.L1 4/8/98, 11:25 AM15

16
BATTERIES
Charging the Spare Battery Pack
The Spare Battery Charging Compartment is located in the base cradle. You
can use the spare battery pack to replace the current handset battery pack
right away if it becomes depleted. The spare handset battery pack is
optional,and must be purchased separately.
1Open the battery door on top of the base cradle by lifting the latch
on top.
2Insert the battery. The SPARE BATT CHARGING light goes on.
3Replace the battery door. The spare battery will be charged in about
24 hours.
Replacing the Handset Battery Pack
1Remove the battery cover by pressing on the indentation and sliding
downward.
2Lift out the old battery pack.
3Install the new battery pack so that the metal contacts on the
bottom of the battery are aligned with the charging contacts in the
battery compartment.
4Replace the battery cover by sliding it on its track up over the
battery compartment until it snaps firmly in place.
5The new battery pack must be charged before using this telephone.
Place the handset in the base and allow it to charge for 16 hours.
Your telephone might operate before that,but for best performance,
let the handset battery pack charge fully.
Charging the spare battery pack Replacing the handset battery pack
Lucent 9125 book.L1 4/8/98, 11:25 AM16

17
IN CASE OF DIFFICULTY
If you have difficulty operating this phone,try the suggestions below. If you
still have trouble,call 1 800 PCC–9125.
If the phone doesn’t work at all, check these items first:
• Make sure theAC adapter is plugged into an outlet not controlled by a
wall switch.
• Make sure the telephone line cord is plugged firmly into the base unit
and the modular jack.
• Make sure the base antenna is fully upright.
• If the screen displays LOW BATTERY,the battery pack needs recharging.
If the battery pack will not charge,replace it with Replacement
Battery 3470.
• Make sure the battery pack is installed correctly.
• If you have dial pulse (rotary) service on your phone line,make sure the
dial mode switch is set to PULSE.
If the above suggestions don’t solve the problem, try
re-initializing the handset and base:
1Disconnect the power to the base.
2Remove the handset battery pack.
3Wait a few minutes.
4Connect the power to the base.
5Insert the handset battery pack.
6Put the handset in the base to re-initialize.
If you hear noise or interference when using the phone:
• Make sure the base antenna is fully upright.
• You may be out of range. Move closer to the base.
• Household appliances plugged into the same circuit as the base can
sometimes cause interference. Try moving the appliance or the base to
another outlet.
• The layout of your home or office might be limiting the operating range.
Try moving the base to another location,preferably on an upper floor.
Lucent 9125 book.L1 4/8/98, 11:26 AM17

18
IN CASE OF DIFFICULTY
If the phone does not ring when you receive a call:
• Make sure the handset ringer is on.
• Make sure the telephone line cord is connected firmly to the base and
the telephone jack.
• Make sure theAC adapter is plugged firmly into an outlet not controlled
by a wall switch.
• You might be too far from the base; move closer.
• You might have too many extension phones on your telephone line to
allow all of them to ring. Try unplugging some of them.
If you hear other calls while using your phone:
Disconnect the base from the modular jack and plug in a corded telephone.
If you still hear other calls,the problem is probably in your wiring or local
service. Call your local telephone service company.
Lucent 9125 book.L1 4/8/98, 11:26 AM18
Table of contents
Other Lucent Technologies Cordless Telephone manuals

Lucent Technologies
Lucent Technologies TransTalk 9000 User manual

Lucent Technologies
Lucent Technologies DEFINITY 9601 User manual

Lucent Technologies
Lucent Technologies MDW 9031 User manual

Lucent Technologies
Lucent Technologies WT9001 User manual

Lucent Technologies
Lucent Technologies 4336 User manual

Lucent Technologies
Lucent Technologies 9200 User manual

Lucent Technologies
Lucent Technologies Business Cordless 901 User manual

Lucent Technologies
Lucent Technologies MDW 9031DCP Quick start guide

Lucent Technologies
Lucent Technologies MDW 9031 User manual

Lucent Technologies
Lucent Technologies TransTalk 9000 Quick start guide