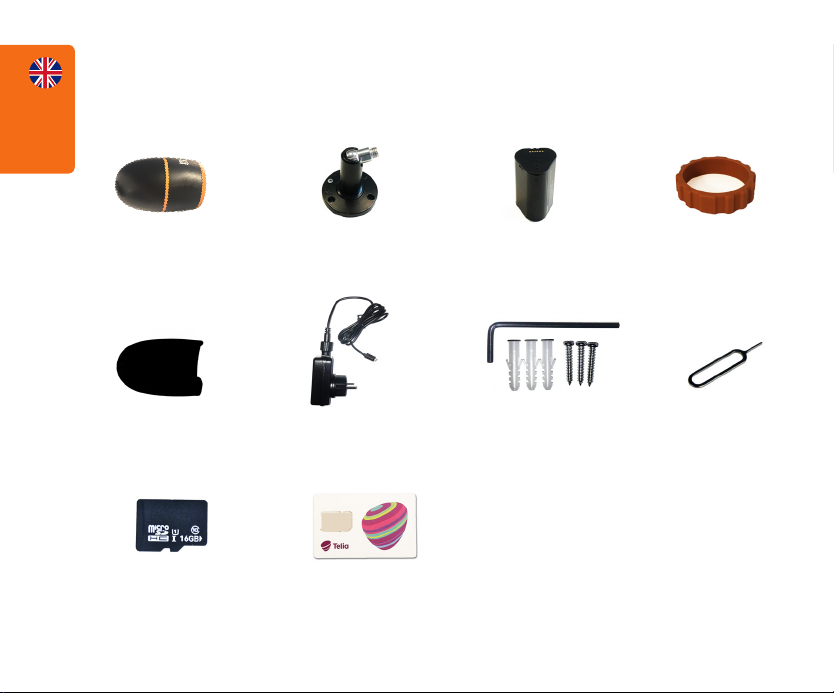
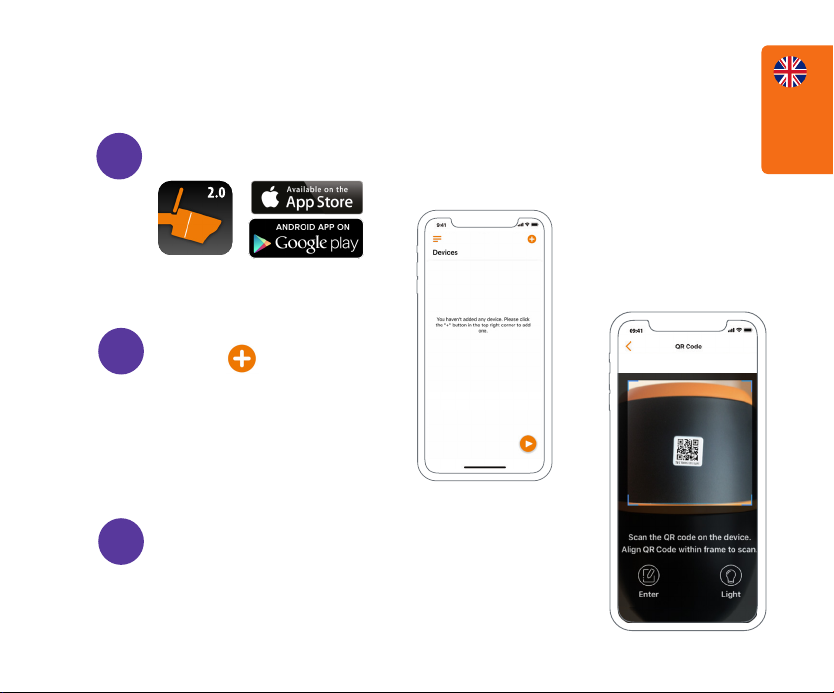
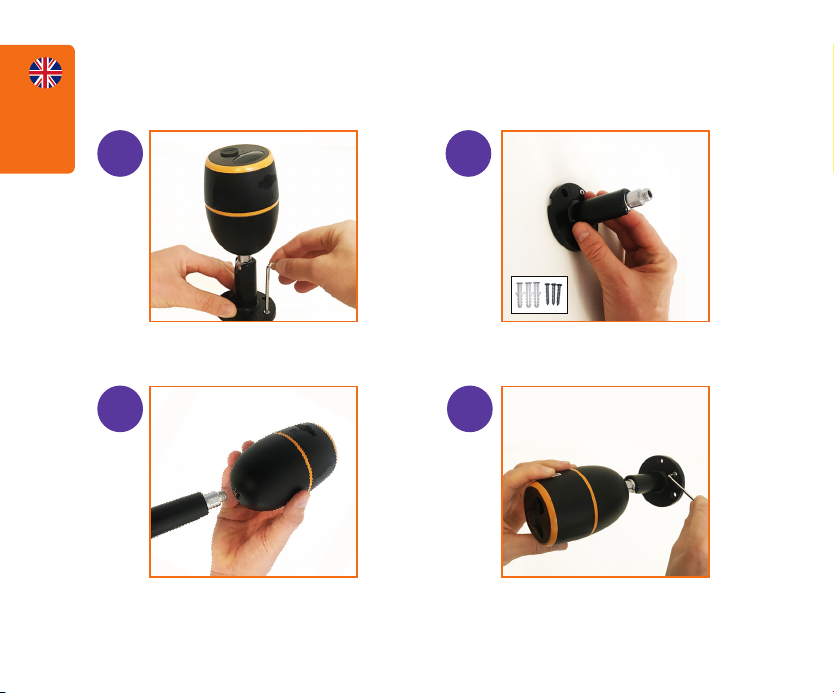
Luda Farm FarmCam Mobility User manual

INSTALLATION GUIDE
Mobility
Mobility

Article number
Frequency bands Europe
Operating temperature
IP classication
Battery
Solar option
DC power
Video resolution
Angle of view
Night vision
Digital zoom
PIR detecting distance
PIR detecting angle
Local storage
Audio
Size
Weight
1086
LTE FDD: B1/B3/B5/B7/B8/B20
–10°C to +50°C
Weatherproof, IP65, IP66 with skin
7800 mAh rechargable battery
Luda.SolarCharger FCM
5V/2A
1920x1080p, 15 fps
110° diagonal
Up to 10 m
6x
Up to 10 m
120° horizontal
Micro SD card, max 64 GB
Speaker and microphone
Ø 75 x 113mm
380 g
TECHNICAL SPECIFICATION

Page 2
Sida 35
Seite 24
Page 13

English
2
Camera MountFarmCam Mobility
Part no.1086
Protective Skin IP44 Power Adapter EU
Part no.6069
Allen wrench and
pack of Screws
SIM card
WHAT’S INCLUDED
ResetTool
16GB Micro SD Card
Rubber Mount
Rechargeable Battery
Part no.7045

English
3
ResetTool
Built-In Mic
Lens
Daylight Sensor
Status LED
Built-in PIR Sensor
Speaker
Micro USB Port
CAMERA FUNCTIONS
Micro SD Card Slot
SimCard Slot
Reset Hole
Battery
Rubber Mount

English
4
Go to https://my.luda.farm and
create an account.
Add FarmCam Mobility Dataplan.
ACTIVATE SIM CARD
1Scan the barcode that you nd
on your SIM card holder.
Alternatively you can enter the
IMSI number.
2
3
4Start your 30 day/1 GB free trial.

English
5
INSERT SIM CARD & BATTERY
Rotate the back cover counter clockwise.
Insert the SD-card into the slot.
Insert the battery into the camera and tighten the back cover.
1
2

English
6
ACTIVATE CAMERA
After the SIM card is activated and the battery is inserted,
a red light will turn on, and you will hear the voice prompt
“Camera is starting up, please wait”. The LED will stay solid
on for some seconds and then go out.
A blue LED will ash for some seconds, then stay solid
before going out. You should hear “Network connection
succeeded”, which means the camera has been successfully
connected to the mobile network.
If you hear ”Network connection failed”, make sure your
free trial dataplan is active at www.my.luda.farm. Also
make sure the 3G or 4G signal is good, then remove the
battery and insert it back again.
If you want to use a dierent SIM card that is not included in this
package go to www.luda.farm/FCM for more information.

English
7
SET UP CAMERA ON FARMCAM 2.0 APP
Download and install the FarmCam 2.0 App from App Store or Google Play.
Open the app.
Click the button on the
top right corner to add the
camera.
Scan the QR code on the side of the camera and follow
the steps to complete the setup
1
2
3

English
8
MOUNT CAMERA
Use the allen wrench to loosen the screw. Screw the mount to the wall. See section
PIR Sensor for placement tips.
Screw the camera to the mount and adjust
the camera to the proper direction.
Tighten the screw using the
allen wrench.
12
3 4

English
9
The angle between the sensor and the detected object should be larger than 10° for
eective motion detection.
The ideal camera detection distance is 2-10 meters, which enables you to recognize a
human. The PIR sensor sensitivity is adjustable. Higher sensitivity oers longer
distance. The default sensitivity of the PIR sensor is 80%.
PIR SENSOR
Optimal viewing distance
2-10 meters
2-3 meters
10°
Entrance

English
10
IMPORTANT NOTES!
HOW TO AVOID FALSE ALARMS
• Do not install the camera facing bright lights. Such as bright lamps, sunshine etc.
• Do not place the camera too close to frequently moving vehicles.
The ideal distance between the camera and vehicle trac is at least 16 meters.
• Do not install the camera where there are strong winds.
• Keep the camera at least 1 meter away from any wireless devices, including Wi-Fi
routers and phones in order to avoid wireless interference.

English
11
APP OVERVIEW
- +
Menu
Add New Device
Enable/Disable PIR
Motion Sensor
Device Settings
Access the Live View
Battery Status
Pause Camera
Take a screenshot
Record
Resolution
Color/Black and white
Full Screen
Quad view
Sound the Alarm
Listen through speaker
Talk through camera mic
Play history
- +
- +
- +
- +
- +
- +
- +
- +
- +
- +
- +
- +
- +
- +
- +
- +
- +
- +
- +
- +
- +

English
12
POWER/CHARGING ALTERNATIVES
Power/charge the battery when it’s
installed in the camera.
Charge the battery separately.
Charge the battery with solar power!
Buy your solar panel here:
www.luda.farm/solarchargerFCM
SolarCharger FCM

Français
13
POWER/CHARGING ALTERNATIVES
Support de la caméra Batterie rechargeable
Pièce n° 7045
FarmCam Mobility
Pièce n° 1086
Revêtement
de protection
IP44 Adaptateur secteur UE
Pièce n° 6069
Clé Allen et paquet
de vis
Carte SIM
QU’EST-CE QUI EST INCLUS
Outil de réinitialisation
16GB Carte SD Micro
Support en caoutchouc

Français
14
Micro intégré
Objectif
Capteur de lumière diurne
LED d’état
Capteur PIR intégré
Haut-parleur
Micro port USB
FONCTIONS DE LA CAMÉRA
Logement de la micro carte SD
Logement de carte SIM
Trou de réinitialisation
Batterie

Français
15
Allez sur https://my.luda.farm et
créez un compte.
Ajoutez FarmCam Mobility
Dataplan.
ACTIVER LA CARTE SIM
1Scannez le code-barre situé sur
le support de la carte SIM. Vous
pouvez aussi entrer le numéro
IMSI.
Commencez votre essai gratuit
de 30 jours/1 Go.
2
3
4

Français
16
INSÉRER LA CARTE SIM ET LA BATTERIE
Tournez le cache arrière dans le sens anti-horaire.
Insérez la carte SD dans la fente.
Insérez la batterie dans la caméra et resserrez le cache arrière.
1
2

Français
17
ACTIVER LA CAMÉRA
Lorsque la carte SIM et la batterie sont insérées, une lumière
rouge s’allume et vous entendez le message vocal : « La caméra
est en train de démarrer, veuillez patienter ». La LED reste
allumée pendant quelques secondes et s’éteint.
Une LED bleue clignote pendant quelques secondes, puis reste
allumée avant de s’éteindre. Vous devriez entendre le message
vocal “Network connection succeeded” (Connexion au réseau
réussie), ce qui signie que la caméra est bien connectée au
réseau mobile.
Si vous entendez « Network connection failed » (La connexion
au réseau a échoué), assurez-vous de bien avoir activé votre
période d’essai gratuit de l’abonnement depuis
www.my.luda.farm. Vériez également la bonne réception du
réseau 3G ou 4G à l’endroit où vous allez placer la caméra puis
retirez la batterie et réinsérez la.
Si vous souhaitez utiliser une carte SIM diérente de celle qui est incluse dans
la boîte, rendez-vous sur la page de notre site internet : www.luda.farm/FCM
pour plus d’informations.

Français
18
CONFIGURATION DE LA CAMÉRA
DANS L’APPLICATION FARMCAM 2.0
Téléchargez et installez l’application FarmCam 2.0 de l’AppStore ou
Google Play.
Ouvrez l’application.
Cliquez sur le bouton dans
le coin supérieur droit pour
ajouter la caméra.
Scannez le code QR gurant sur le côté de la caméra et
suivez les étapes pour terminer la conguration.
1
2
3
Other manuals for FarmCam Mobility
1
This manual suits for next models
1
Table of contents
Languages:
Popular Control System manuals by other brands

Aritech
Aritech RF-4041-07-2 Installation sheet

Spohn & Burkhardt
Spohn & Burkhardt SV1C Series operating instructions

Marshall Amplification
Marshall Amplification RDS PRO Series Calibration manual

MYPV
MYPV CommsSafe AC-1 user manual

BM PRO
BM PRO RVMaster RVMC-LITE Help guide

Icom
Icom rs-ba1 installation guide