Luvion 75 PRO User manual

ICON CLEAR 75 PRO

2

3
LUVION Premium Baby products
FIGURES: FIGUREN / FIGURES / FIGURES .............................................................................. 4
ENGLISH...................................................................................................................8
NEDERLANDS............................................................................................................................18
FRANÇAIS............................................................................................................................30
DEUTSCH...........................................................................................................................42

4
PRODUCTOVERZICHT/ PRODUCT LAYOUT / DESCRIPTION DU PRODUIT
BABY UNIT / BABY APPARAAT / UNITÉ BÉBÉ / BABYEINHEIT
Fig. 1
PARENT UNIT / OUDER APPARAAT / UNITÉ PARENTALE / ELTERNEINHEIT
Fig. 2

5
LUVION Premium Baby products
SETTING UP / INSTALLEREN / MISE EN PLACE / EINRICHTEN
Fig. 3
Fig. 4
FIGURES

6
SETTING UP / INSTALLEREN / MISE EN PLACE / EINRICHTEN
BABY UNIT / BABY APPARAAT / UNITÉ BÉBÉ / BABYEINHEIT
Fig. 5

7
LUVION Premium Baby products
MENU MAP / MENU MAP / PLAN DU MENU / MENÜ PLAN
Fig. 6
FIGURES

8
INSTRUCTION MANUAL
PACKAGE CONTENTS:
PRODUCT OVERVIEW
Baby unit (Fig. 1)
Flashes orange when your monitor is trying to nd a link. Remains solid when the
Parent and Baby units are linked to each other.
.
Press and hold to switch the power on or o.
Illuminates around the base. Press to switch the nightlight on. Press and hold for two
seconds to switch it o.
Turns the loudspeaker volume up or down when playing music or using talkback.
Make sure the sensor has space around it and isn’t in contact with any surfaces to
make sure it’s working at its best.
Switches the music on at the Baby unit. (It’ll be the same music and will play for the same
duration that you last set on the Parent unit.) Press the button again to switch the music o.
Press to switch the Lightshow on or o.
For connecting to the mains power socket using the power adapter
cable supplied.
Parent unit (Fig. 2)
The screen backlight comes on whenever you press a button. It switches o
again after 15 seconds.
Turns the speaker volume up or down and lets you scroll through the main menu.
Opens the main menu. Press again to close the main menu.
Press and hold down to talk to your baby.
for connecting to the mains power socket using the power adapter
cable supplied.
Tells you how much battery life your unit has left.
Press to conrm when you’re scrolling through the main menu.
Press and hold to turn the unit on or o.
Flashes when your monitor is trying to nd a link. Remains solid when the Parent and Baby
units are linked to each other.
remains on when your Parent unit is on mute.
INTRODUCTION

9
LUVION Premium Baby products
INSTRUCTION MANUAL
SAFETY INSTRUCTIONS
• WARNING:Keep the adapter cables out of the reach of children!
•
•
•
•
•
•
•
•
•
•
•
•
•
•
•
SETUP & USE
1. PARENT UNIT SETUP
1.1 Setting up
1.
2.
3.
4.
EN

10
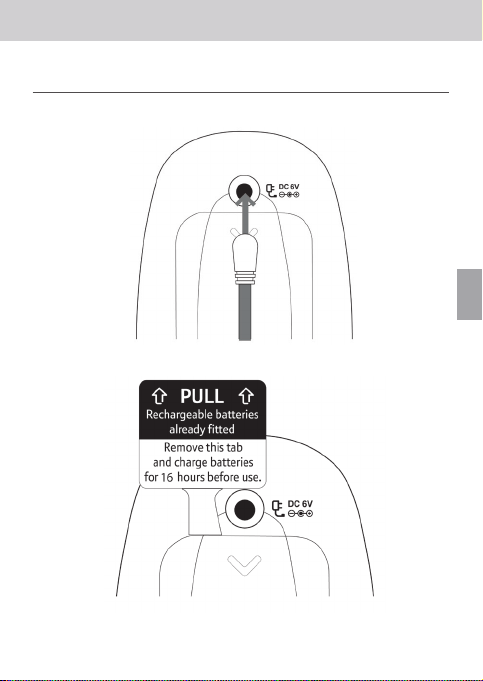
Warning: Only use the power adapters supplied. Using incorrect power adapters may
permanently damage your product.
1.2 Battery low alert on Parent unit
Warning: Always use rechargeable batteries in the Parent unit. Only use the type we’ve
recommended – 2 x AA NiMH 1300mAh batteries. Charge the batteries as instructed in
this user guide. The Parent unit can still be used when it’s charging.
2. BABY UNIT SETUP
2 .1 Setting up
1.
2.
2.2 Switching on and linking the Parent and Baby units
1.
2.
2.3 Deciding where to put your units
Important: The two units will need to be linked before you can start using them. If the link
between the units is broken, the Link indicator lights will ash while they try to look for each
other and The Parent unit will show “I’m Linking...”. After 30 seconds, if the link is still broken,
the Link indicator lights will ash red and the Parent unit display will show “Not Linked”. If
the link is broken, check that:
• the mains power is plugged in and switched on at the Baby unit
• both units are switched on
• the batteries are charged in the Parent unit
• the Parent and Baby units are within range of each other (in ideal conditions, that’s up
to 330 metres outdoors and 50 metres indoors).
3. USINGYOUR LUVION ICON CLEAR 75 PRO AUDIO BABY MONITOR
3.1 Switching the Baby unit on
1.

11
LUVION Premium Baby products
2.
3.2 Switching the Parent unit on
1.
2.
3.3 Changing your Baby unit settings using the Parent unit menu
1.
2.
3.
3.4 Checking or changing the loudspeaker volume on your Parent unit
3.5 Changing the loudspeaker volume on your Baby unit
1.
2.
Note: The unit has ve volume levels plus O (Mute). If you try to set the volume higher or
lower than those, you’ll hear a beep.
3.6 Switch lightshow on/o using the Baby unit
1.
2.
3.7 Switch lightshow on/o on the Parent unit
1. .
2. .
3.8 Setting the lightshow timer
1. .
2.
.
3.
EN

12
.
4.
Note: The Baby unit must be switched on for the lightshow to work but doesn’t need to be
linked to the Parent unit. Its default setting is Constant.
3.9 Talkback
1.
Note: When you’re using talkback, you won’t be able to hear your baby through the Parent
unit until you release the button. Don’t press the button when the Baby unit and
Parent unit are in the same room. You’ll hear a high-pitched noise if you press the button
when the units are within three metres of each other. When using talkback, hold the Parent
unit about 30 centimetres in front of your mouth.
3.10 Switching nightlight on/o using the Baby unit
1.
Note: The Baby unit must be switched on for the nightlight to work but doesn’t need to be
linked to the Parent unit.
3.11 Switching nightlight on/o using the Parent unit
1. .
2.
3.12 Selecting the nightlight brightness level through the Parent unit
1. .
2.
.
3.
3.13 Setting the nightlight timer
1. .
2.
3.
3.14 Turning music on/o using the Baby unit

13
LUVION Premium Baby products
EN
1.
2.
Note: The default music setting is to Play All of the lullaby songs constantly. When you
switch the Baby unit on, there might be a small delay before it’s ready to play music. Adjust
the volume of the music using the or buttons on the Baby unit.
3.15 Turning music on/o using the Parent unit
1. .
2.
3.16 Choosing a song to play using the Parent unit
1. .
2. .
3.
4.
3.17 Changing a song currently playing using the Baby unit
1.
3.18 Setting a play time for music
1. .
2. .
3.
4.
3.19 Starting the feed timer countdown
1.
2.
3.
3.20 Setting how often you want to get feed timer alerts
1. .
2. .
3.

14
3.21 Cancelling the feed timer countdown
1. .
2.
3.22 Switching the timer repeat option on or o
1. .
2. .
3. .
Note: When you set “Repeat On”, the feed timer countdown will start again once the alert
has sounded (if the alert isn’t switched o). The default setting is for the timer to repeat.
3.23 Temperature monitor
Important: Use the temperature sensor only as a rough guide to the temperature of your
baby’s bedroom. What’s displayed might depend on where you put the Baby unit in the
room. It shouldn’t be used in place of medical devices, which may be more accurate.
Please note that your own temperature reference e.g. your central heating thermostat may
not be as accurate, possibly due to tolerances and positioning of the thermostat in relation
to your baby monitor. Healthcare professionals advise that the ideal temperature for your
Baby’s room is between 16°C and 20°C.
3.24 Changing the temperature format
1.
.
2.
3. .
4. .
3.25 Adjusting the monitor’s temperature

15
LUVION Premium Baby products
1.
2. .
3. .
4.
Pre-set temperature alert range: The Baby unit comes with pre-set maximum and
minimum temperatures. If the temperature falls below or goes above the set range, an
alert will sound on the Parent unit and the display will show Too Cold or Too Hot.
3.26 Resetting the temperature on your monitor
1. .
2. .
3. .
4.
3.27 Backlight
1. .
2. .
3.
3.28 List of tones
TONE
3.29 Resetting the units
1.
2.
3.
EN

16
TROUBLESHOOTING
3.23
.
.

17
LUVION Premium Baby products
CARE & MAINTENANCE
•
•
•
•
•
•
•
DISPOSAL OF PRODUCT & BATTERY
•
•
EU DECLARATION OF CONFORMITY
Work Frequency
EN

18
INHOUD DOOS:
PRODUCT OVERZICHT
Baby unit (Fig. 1)
knippert oranje wanneer je babyfoon een link probeert te vinden. Brandt constant
als de ouder- en baby-unit aan elkaar zijn gelinkt.
ingedrukt houden om de baby unit aan of uit te zetten.
Druk hierop om het nachtlampje in te schakelen. Houd twee
seconden ingedrukt om het uit te schakelen.
Zet het luidsprekervolume hoger of lager tijdens het afspelen van muziek of tijdens het
gebruik van de terugspreekfunctie.
Zorg ervoor dat er ruimte rondom de sensor is en geen contact maakt met
oppervlakken om er zeker van te zijn dat hij optimaal werkt.
schakelt de muziek in op de babyunit. (dezelfde muziek en dezelfde duur die je het laatst op de
ouder unit hebt ingesteld.) Druk nogmaals op de knop om de muziek uit te schakelen.
Druk hierop om de lichtshow in of uit te schakelen
Voor aansluiting op het stopcontact met behulp van de
meegeleverde adapterkabel.
Ouder unit (Fig. 2)
de achtergrondverlichting van het scherm gaat aan
wanneer u op een knop drukt en schakelt na 15 seconden weer uit..
zet het luidsprekervolume hoger of lager en laat je door het hoofdmenu
scrollen.
opent het hoofdmenu. Druk nogmaals om het hoofdmenu te sluiten.
Houd ingedrukt om met je baby te praten.
Voor aansluiting op het stopcontact met behulp van de
meegeleverde adapterkabel.
geeft aan hoeveel batterijduur de ouder-unit nog heeft..
druk hierop om te bevestigen wanneer je door het hoofdmenu scrolt.
Ingedrukt houden om het apparaat in of uit te schakelen.
knippert wanneer je babyfoon een link probeert te vinden. Brandt constant wanneer de
ouder- en babyunits aan elkaar zijn gekoppeld.
blijft branden als het geluid van het oudertoestel gedempt is.
INTRODUCTIE
HANDLEIDING

19
LUVION Premium Baby products
VEILIGHEIDSINSTRUCTIES
• WAARSCHUWING:Houd de adapterkabels buiten het bereik
van kinderen!
•
•
•
•
•
•
•
•
•
•
•
•
•
•
•
SETUP EN GEBRUIK
1. PARENT UNIT SETUP
1.1 Setting up
1.
2.
3.
NL
HANDLEIDING

20
4.
Waarschuwing: Gebruik alleen de meegeleverde voedingsadapters. Het gebruik van ver-
keerde voedingsadapters kan je babyfoon permanent beschadigen.
1.2 Batterijen leeg waarschuwing op de ouder unit
Waarschuwing: Gebruik altijd oplaadbare batterijen in de ouderunit. Gebruik alleen het
aanbevolen type batterijen - 2 x AA NiMH 1300 mAh-batterijen. Laad de batterijen op
volgens de instructies in deze gebruikershandleiding. De ouderunit kan nog steeds worden
gebruikt tijdens het opladen.
2. BABY UNIT SETUP
2 .1 Installeren
1.
2.
2.2 Inschakelen en koppelen van ouder- en baby unit
1.
2.
2.3 Beslissen waar je de ouder- en baby unit wil plaatsen
Belangrijk: De twee units moeten worden gekoppeld voordat u ze kunt gaan gebruiken.
Als de verbinding tussen de units verbroken is, zullen de Link-indicatielampjes knipperen
terwijl ze elkaar proberen te zoeken Als de verbinding
na 30 seconden nog steeds is verbroken, gaan de verbindingsindicatielampjes rood knip-
peren Als de link verbroken is, controleer
dan of:
• de voedingskabel is aangesloten en op de baby unit
• beide units aan staan
• de batterijen worden opgeladen in de ouder unit
• de ouder- en baby unit binnen bereik zijn van elkaar (binnen 330 meter buitenshuis,
onder ideale omstandigheden, of binnen 50 meter binnenshuis).
Table of contents
Languages:
Other Luvion Measuring Instrument manuals
Popular Measuring Instrument manuals by other brands

Midtronics
Midtronics CPX-900 WiFi Quick reference guide

Dräger
Dräger DrugTest 5000 Instructions for use

ZHEJIANG FENGDENG ELCTRIC CO.,LTD
ZHEJIANG FENGDENG ELCTRIC CO.,LTD DS5210 Series user manual

ACS contsys
ACS contsys Flowcont UN operating instructions

YOKOGAWA
YOKOGAWA AXF series user manual

Metrohm
Metrohm NIRS manual