Lux Tools A-EWSU-A Set User manual

A-EWSU-A Set
110234
DE Automatische Bewässerung mit
Pumpe
IT Irrigazione automatica con
pompa
FR Irrigation automatique par
pompe
GB Automatic irrigation with pump
CZ Automatické zavlažování
pomocí čerpadla
SK Automatické zavlažovanie
pomocou čerpadla
PL Automatyczne nawadnianie
pompą
SI Samodejni namakalni sistem s
črpalko
HU Automatikus szivattyús öntözés
BA/HR
Automatsko navodnjavanje
pomoću pumpe
RU Автоматическое орошение с
насосом
GR Αυτόματο πότισμα με αντλία
NL Automatische bewatering met
pomp
SE Automatisk bevattning med
pump
FI Automaattinen kastelu pumpun
kanssa
KAZ
Сорғымен автоматты түрде
суару
Bewaesserungspumpe_110234.book Seite 1 Montag, 25. November 2019 12:11 12

2
DE Originalbetriebsanleitung . . . . . . . . . . . . . . . . . . . . . . . . . . . . . 6
IT Istruzioni originali . . . . . . . . . . . . . . . . . . . . . . . . . . . . . . . . . . . 9
FR Notice originale . . . . . . . . . . . . . . . . . . . . . . . . . . . . . . . . . . . . 12
GB Original instructions . . . . . . . . . . . . . . . . . . . . . . . . . . . . . . . . 15
CZ Původní návod k používání . . . . . . . . . . . . . . . . . . . . . . . . . . . 18
SK Pôvodný návod na použitie . . . . . . . . . . . . . . . . . . . . . . . . . . . 21
PL Instrukcja oryginalna . . . . . . . . . . . . . . . . . . . . . . . . . . . . . . . . 24
SI Izvirna navodila . . . . . . . . . . . . . . . . . . . . . . . . . . . . . . . . . . . . 27
HU Eredeti használati utasítás . . . . . . . . . . . . . . . . . . . . . . . . . . . 30
BA/HR
Originalno uputstvo za upotrebu . . . . . . . . . . . . . . . . . . . . . . . 33
RU Оригинальное руководство по эксплуатации . . . . . . . . . . . 36
GR Πρωτότυπο οδηγιών χρήσης . . . . . . . . . . . . . . . . . . . . . . . . . 39
NL Oorspronkelijke gebruiksaanwijzing . . . . . . . . . . . . . . . . . . . . 42
SE Bruksanvisning i original . . . . . . . . . . . . . . . . . . . . . . . . . . . . . 45
FI Alkuperäiset ohjeet . . . . . . . . . . . . . . . . . . . . . . . . . . . . . . . . . 48
KAZ
Пайдалану бойынша түпнұсқа нұсқаулық . . . . . . . . . . . . . . 51
Bewaesserungspumpe_110234.book Seite 2 Montag, 25. November 2019 12:11 12

3
Lieferumfang
Contenu de la livraison
Scope of delivery
Volume di fornitura
Rozsah dodávky
Obsah zásielky
Zakres dostawy
Obseg dobave
Szállított alkatrészek
Sadržaj isporuke
Комплект поставки
Προμηθευόμενος εξοπλισμός
Leveringsomvang
Leveransomfattning
Toimituksen sisältö
Жеткізу жиынтығы
1
2
10
34
5
6
7
9
8
11
Bewaesserungspumpe_110234.book Seite 3 Montag, 25. November 2019 12:11 12

4
Inbetriebnahme
Messa in funzione
Mise en service
Commissioning
Uvedení do provozu
Uvedenie do prevádzky
Uruchomienie
Zagon
Üzembe helyezés
Puštanje u rad
Ввод в эксплуатацию
Θέση σε λειτουργία
Ingebruikname
Idrifttagning
Käyttöönotto
Пайдалануға енгізу
1
a
b
c
2
Bewaesserungspumpe_110234.book Seite 4 Montag, 25. November 2019 12:11 12

5
3
Surface line
Outlet
4
Surface line
Outlet
Bewaesserungspumpe_110234.book Seite 5 Montag, 25. November 2019 12:11 12

DE
6
OriginalbetriebsanleitungAutomatische Bewässerung mit Pumpe
Inhaltsverzeichnis
Bevor Sie beginnen… . . . . . . . . . . . . . . . . . . . . 6
Zu Ihrer Sicherheit . . . . . . . . . . . . . . . . . . . . . . . 6
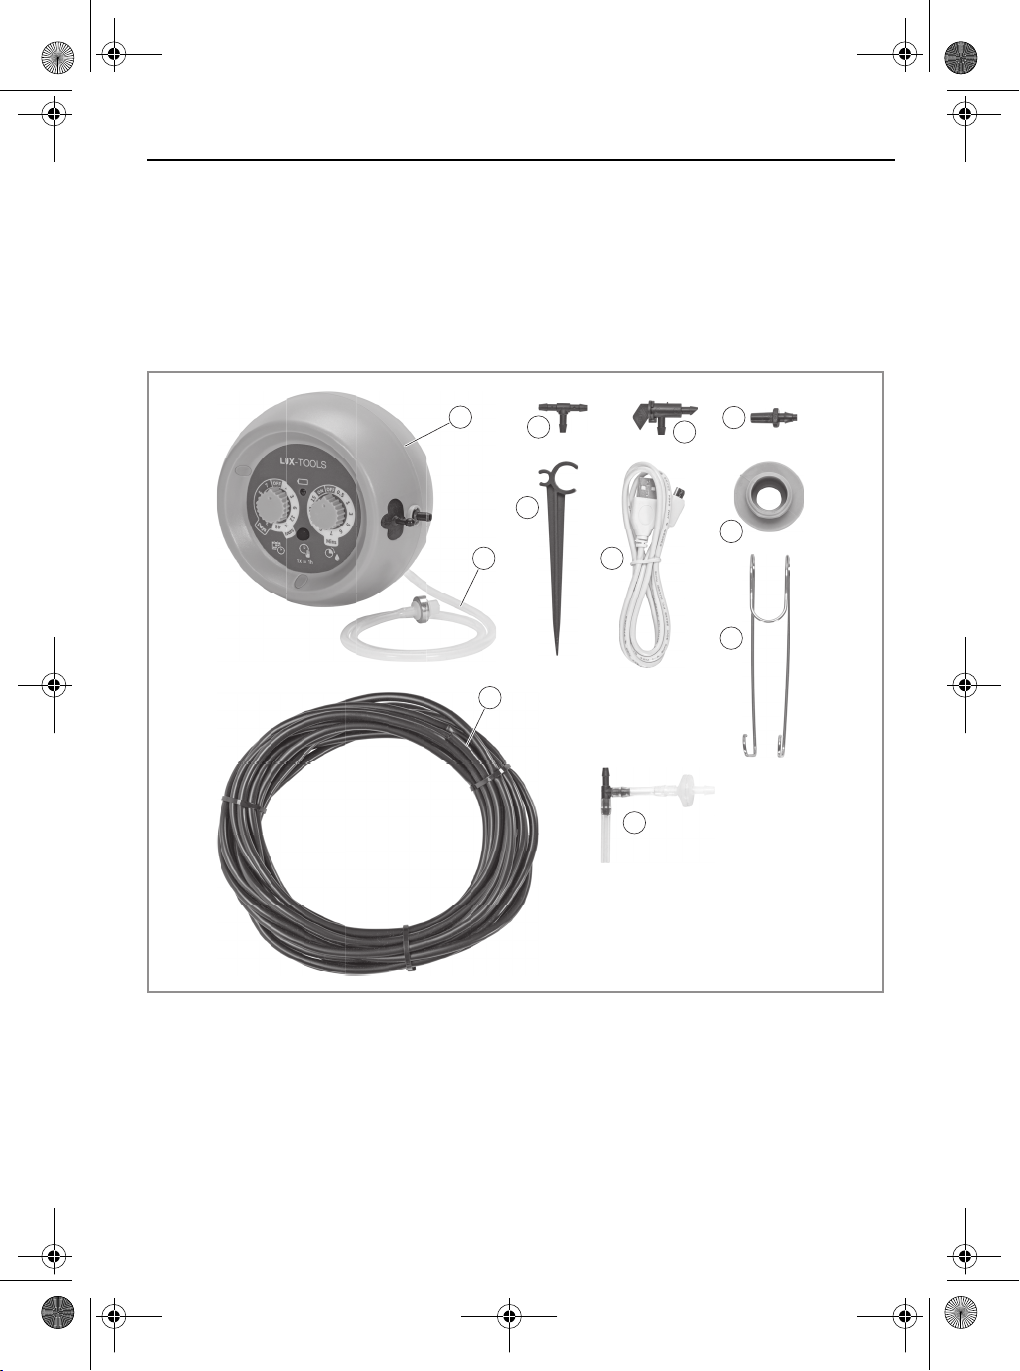
Lieferumfang . . . . . . . . . . . . . . . . . . . . . . . . . . . . 7
Montage und Installation . . . . . . . . . . . . . . . . . . 7
Steuerungsprogrammierung . . . . . . . . . . . . . . . 7
Verlängern der Akkulaufzeit . . . . . . . . . . . . . . . 8
Weitere Vorsichtsmaßnahmen . . . . . . . . . . . . . 8
Entsorgung vorbereiten . . . . . . . . . . . . . . . . . . . 8
Entsorgung . . . . . . . . . . . . . . . . . . . . . . . . . . . . . 8
Technische Daten . . . . . . . . . . . . . . . . . . . . . . . . 8
Mängelansprüche . . . . . . . . . . . . . . . . . . . . . . . 56
Bevor Sie beginnen…
Bestimmungsgemäßer Gebrauch
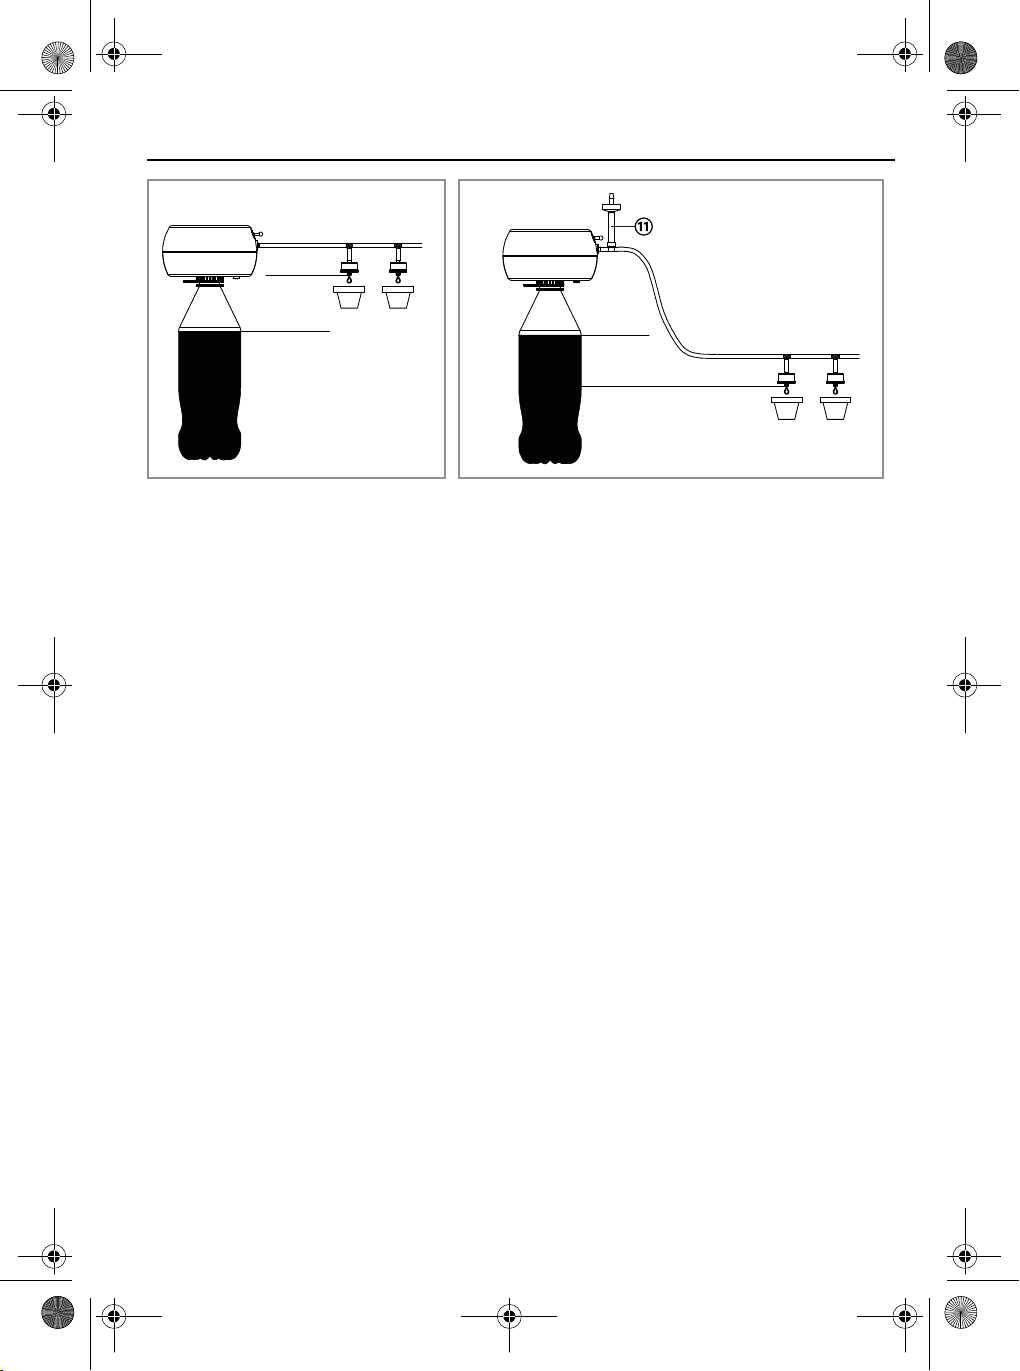
Das Gerät ist ein komplettes Tropfbewässerungsset
mit automatischer Zeitschaltuhr und Pumpe, das
Wasser aus einer Flasche, einem Kanister oder einer
Zisterne pumpen und durch das mitgelieferte Mikro-
rohr und die Tropfer gießen kann, um den Wasserbe-
darf von bis zu maximal 10 Pflanzen zu decken.
Das Gerät ist nicht für den gewerblichen Gebrauch
konzipiert. Allgemein anerkannte Unfallverhütungs-
vorschriften und beigelegte Sicherheitshinweise
müssen beachtet werden.
Führen Sie nur Tätigkeiten durch, die in dieser
Gebrauchsanweisung beschrieben sind. Jede
andere Verwendung ist unerlaubter Fehlgebrauch.
Der Hersteller haftet nicht für Schäden die hieraus
entstehen.
Was bedeuten die verwendeten Symbole?
Gefahrenhinweise und Hinweise sind in der
Gebrauchsanweisung deutlich gekennzeichnet. Es
werden folgende Symbole verwendet:
Zu Ihrer Sicherheit
Allgemeine Sicherheitshinweise
•Für einen sicheren Umgang mit diesem Gerät
muss der Benutzer des Gerätes diese
Gebrauchsanweisung vor der ersten Benutzung
gelesen und verstanden haben.
•Beachten Sie alle Sicherheitshinweise! Wenn Sie
die Sicherheitshinweise missachten, gefährden
Sie sich und andere.
•Bewahren Sie alle Gebrauchsanweisungen und
Sicherheitshinweise für die Zukunft auf.
•Wenn Sie das Gerät verkaufen oder weiterge-
ben, händigen Sie unbedingt auch diese
Gebrauchsanweisung aus.
•Das Gerät darf nur benutzt werden, wenn es ein-
wandfrei in Ordnung ist. Ist das Gerät oder ein
Teil davon defekt, muss es außer Betrieb genom-
men und fachgerecht entsorgt werden.
•Verwenden Sie das Gerät nicht in explosionsge-
fährdeten Räumen oder in der Nähe von brenn-
baren Flüssigkeiten oder Gasen!
•Ausgeschaltetes Gerät immer gegen unbeab-
sichtigtes Einschalten sichern.
•Benutzen Sie keine Geräte, bei denen der Ein-
Aus-Schalter nicht ordnungsgemäß funktioniert.
•Halten Sie Kinder vom Gerät fern! Bewahren Sie
das Gerät sicher vor Kindern und unbefugten
Personen auf.
•Überlasten Sie das Gerät nicht. Benutzen Sie
das Gerät nur für Zwecke, für die es vorgesehen
ist.
•Immer mit Umsicht und nur in guter Verfassung
arbeiten: Müdigkeit, Krankheit, Alkoholgenuss,
Medikamenten- und Drogeneinfluss sind unver-
antwortlich, da Sie das Gerät nicht mehr sicher
benutzen können.
•Dieses Gerät ist nicht dafür bestimmt, durch Per-
sonen (einschließlich Kinder) mit eingeschränk-
ten physischen, sensorischen oder geistigen
Fähigkeiten oder Mangel an Erfahrung und/oder
Wissen benutzt zu werden, es sei denn, sie wer-
den durch eine für ihre Sicherheit zuständige
Person beaufsichtigt oder erhielten von dieser
Anweisungen, wie das Gerät zu benutzen ist.
•Stellen Sie sicher, dass Kinder nicht mit dem
Gerät spielen.
•Immer die gültigen nationalen und internationa-
len Sicherheits-, Gesundheits- und Arbeitsvor-
schriften beachten.
Umgang mit Akkugeräten
•Brandgefahr! Nur vom Hersteller zugelassene
Akkus benutzen. Nur vom Hersteller zugelas-
sene Ladegeräte benutzen. Akku bei Nichtbenut-
zung von Metallgegenständen fernhalten, die
einen Kurzschluss verursachen könnten. Es
besteht die Gefahr von Verletzungen und Brand-
gefahr.
•Vor Anschließen des Ladegerätes muss sicher-
gestellt sein, dass der Netzanschluss den
Anschlussdaten des Gerätes entspricht.
•Die Absicherung muss mit einem Fehlerstrom-
Schutzschalter (FI-Schalter) mit einem Bemes-
sungsfehlerstrom von nicht mehr als 30 mA erfol-
gen.
•Akku nur in geschlossenen Räumen aufladen.
•Stellen Sie sicher, dass das Gerät ausgeschaltet
ist, bevor Sie den Akku einsetzen.
•Gerät niemals während des Ladevorganges ein-
schalten.
GEFAHR! Unmittelbare Lebens- oder
Verletzungsgefahr! Unmittelbar gefährli-
che Situation, die Tod oder schwere Verlet-
zungen zur Folge haben wird.
WARNUNG! Wahrscheinliche Lebens-
oder Verletzungsgefahr! Allgemein
gefährliche Situation, die Tod oder schwere
Verletzungen zur Folge haben kann.
VORSICHT! Eventuelle Verletzungsge-
fahr! Gefährliche Situation, die Verletzun-
gen zur Folge haben kann.
ACHTUNG! Gefahr von Geräteschäden!
Situation, die Sachschäden zur Folge
haben kann.
Hinweis: Informationen, die zum besseren
Verständnis der Abläufe gegeben werden.
Bewaesserungspumpe_110234.book Seite 6 Montag, 25. November 2019 12:11 12

DE
7
•Bei falscher Benutzung kann Flüssigkeit aus
dem Akku austreten. Akkuflüssigkeit kann zu
Hautreizungen und Verbrennungen führen. Kon-
takt unbedingt vermeiden! Bei zufälligem Kontakt
gründlich mit Wasser abspülen. Bei Augenkon-
takt zusätzlich umgehend ärztliche Hilfe in
Anspruch nehmen.
Gerätespezifische Sicherheitshinweise
•Gerät niemals in Innenräumen betreiben.
•Keine wiederaufladbaren Batterien (Akkus)
benutzen.
•Gerät nur senkrecht mit der Überwurfmutter nach
oben montieren, um ein Eindringen von Wasser
in das Batteriefach zu verhindern.
•Die zulässige Maximaltemperatur des durchflie-
ßenden Wassers darf nicht überschritten werden
(► Technische Daten – S. 8).
•Nur sauberes Süßwasser verwenden.
•Das Gerät darf nur im zulässigen Druckbereich
betrieben werden (► Technische Daten – S. 8).
•Zugbelastungen vermeiden. Nicht am ange-
schlossenen Schlauch ziehen.
•Symbole, die sich an Ihrem Gerät befinden, dür-
fen nicht entfernt oder abgedeckt werden. Nicht
mehr lesbare Hinweise am Gerät müssen umge-
hend ersetzt werden.
Lieferumfang
►Lieferumfang – S. 3
1. Pumpensteuerung
2. Versorgungsschlauch mit Filter
3. T-Stück (10×)
4. Tropfer (10×)
5. Endstopfen (2×)
6. Rohrhalterung (10×)
7. USB-Ladekabel
8. Flaschenadapter
9. Aufhänger
10. Mikrorohr
11. Einzelventil
Montage und Installation
►S. 4, Punkt 1
– Montieren Sie die Bewässerungsanlage wie in
der Abbildung gezeigt. Das Rohr (10) in die
gewünschten Längen schneiden. Montieren Sie
die Bewässerungsanlage mit T-Stücken (3),
Stopfen (5) und Tropfern (4) in der gewünschten
Konfiguration und verbinden Sie sie mit dem seit-
lichen Anschluss der Steuerung. Es ist einfacher,
das Rohr aufzusetzen, wenn die Enden des Roh-
res vorher in heißem Wasser gehalten werden.
Den Filterrohrabschnitt (2) mit dem Versorgungs-
anschluss der Steuerung verbinden.
►S. 4, Punkt 2
Das System kann verschiedene Wasserquellen nut-
zen:
A. Eine kleine Kunststoffflasche kann ohne Fla-
schenadapter von oben an die Steuerung ange-
schlossen werden. Dies ist ideal für die Bewäs-
serung kleiner Pflanzen, die nicht viel Wasser
benötigen.
B. Bei größeren Flaschen, z.B. 4l, 5l, 6l, muss die
Pumpensteuerung mit dem Deckel der Flasche
verbunden werden; verwenden Sie den Fla-
schenadapter (8).
C. Es kann jeder offene Behälter, z.B. ein Eimer,
verwendet werden. Zum Aufhängen der Pum-
pensteuerung an den Behälter verwenden Sie
die Halterung (9).
►S. 5, Punkt 3
•Wenn sich die Blumentöpfe über dem Wasser-
spiegel befinden, ist es nicht notwendig, das Ein-
zelventil anzuschließen.
►S. 5, Punkt 4
•Wenn sich die Blumentöpfe unterhalb des Was-
serspiegels befinden, müssen Sie das Einzel-
ventil anschließen.
Steuerungsprogrammierung
– Stellen Sie die gewünschte Zeitspanne zwischen
den Bewässerungen mit dem []-Regler ein.
– Stellen Sie die Bewässerungszeit mit dem []-
Regler ein. Die Bewässerungsdauer darf nicht
größer sein als der Wert der Bewässerungshäu-
figkeit!
– Stellen Sie die Startzeit für die Bewässerung ein,
indem Sie die erste Bewässerung gegenüber der
aktuellen Zeit verschieben. Drücken Sie dazu
die []-Taste länger als 2 Sekunden, bis die LED
dauerhaft leuchtet. Bei jedem weiteren Drücken
der Taste wird eine Stunde hinzugefügt, um den
Bewässerungsbeginn zu verzögern. Zum Bei-
spiel: Wenn Sie jeden Tag 5 Minuten gießen wol-
len und die erste Bewässerung um 18:00 Uhr
beginnen soll, und jetzt ist es 12:00 Uhr, müssen
Sie den Beginn der Bewässerung um sechs
Stunden verzögern, indem Sie die []-Taste 6
mal drücken.
Beispiel:
•Sie müssen jeden Tag 5 Minuten lang gießen.
Stellen Sie ein: [] = 24 Stunden; [] = 5 Minu-
ten.
•Die nächste Bewässerungszeit wird nachberech-
net, wenn Sie die Häufigkeit oder Dauer der
Bewässerung ändern.
Anmerkungen:
•Während des normalen Betriebs des Controllers
blinkt die LED alle 4 Sekunden. Wenn sie schnell
blinkt, z. B. 1 Blinken pro Sekunde, bedeutet
dies, dass die Batterie schwach ist. Der Akku
kann mit einem USB-Kabel aufgeladen werden.
Wenn die Batterie schwach ist, ist die Pumpen-
steuerung deaktiviert.
Ein-Aus-Taste [] oder manuelle Bewässerung:
•Wenn sie länger als 5 Sekunden gedrückt wird,
kann sie als Ein-Aus-Taste verwendet werden.
Wenn Sie sie eine Sekunde lang drücken, wech-
selt die Steuerung in den manuellen Bewässe-
rungsmodus. Die manuelle Bewässerung schal-
tet sich nach 15 Minuten automatisch aus.
Vor Inbetriebnahme Gebrauchsanweisung
lesen und beachten.
Bewaesserungspumpe_110234.book Seite 7 Montag, 25. November 2019 12:11 12

DE
8
Verlängern der Akkulaufzeit
Zur Verlängerung des Pumpenbetriebs kann eine
externe „Powerbank“- Batterie verwendet werden.
Führen Sie Dauertests durch, bevor Sie die Pflanzen
während Ihres Urlaubs allein lassen, um ein gutes
Ergebnis zu erzielen. Die gesamte Akkulaufzeit hängt
von der Art der verwendeten Batterie ab.
Wichtig: Stellen Sie sicher, dass der Akku vor Wasser
geschützt ist. Verwenden Sie diese Art von Akku
nicht im Freien. Luftfeuchtigkeit und die Sonne kön-
nen sie schädigen oder kaputt machen. Und dieser
wiederum könnte die Programmierer-Pumpe ruinie-
ren.
Weitere Vorsichtsmaßnahmen
•Verlängern Sie die Lebensdauer des gerade
erworbenen Produkts, indem Sie es vor Sonne
und Regen schützen. Nicht bei Temperaturen
unter 0 °C oder über 45 °C verwenden.
•Laden Sie den Programmierer niemals über den
USB-Anschluss an der Wand, während das Sys-
tem mit Wasser betrieben wird. Entfernen Sie
das Gerät von jeder Wasserquelle und trocknen
Sie es vor dem Laden.
Entsorgung vorbereiten
Akku entnehmen
Am Ende der Lebensdauer des Gerätes müssen Sie
vor der Entsorgung alle vorhandenen Akkus entfer-
nen.
– Gehäuse öffnen.
– Anschlüsse abtrennen und Akku entnehmen.
– Akkus wie vorgeschrieben entsorgen.
Entsorgung
Gerät entsorgen
Das Symbol der durchgestrichenen Müll-
tonne bedeutet: Batterien und Akkus, Elek-
tro- und Elektronikgeräte dürfen nicht in den
Hausmüll. Sie können umwelt- und gesund-
heitsschädigende Stoffe enthalten.
Verbraucher sind verpflichtet, Elektro-Altgeräte,
Gerätealtbatterien und Akkus getrennt vom Hausmüll
über eine offizielle Sammelstelle zu entsorgen um
eine sachgerechte Weiterverarbeitung zu gewähr-
leisten. Informationen zur Rückgabe erhalten Sie bei
Ihrem Verkäufer. Die Rücknahme erfolgt kostenfrei.
Batterien und Akkus, die nicht fest in Elektro-Altgerä-
ten verbaut sind, müssen vor der Entsorgung ent-
nommen und getrennt entsorgt werden. Lithiumbatte-
rien und Akkupacks aller Systeme sind nur im entla-
denen Zustand bei den Rücknahmestellen
abzugeben. Die Batterien sind immer durch abkleben
der Pole vor Kurzschlüssen zu sichern.
Jeder Endnutzer ist selbst für die Löschung perso-
nenbezogener Daten auf den zu entsorgenden Altge-
räten verantwortlich.
Verpackung entsorgen
Die Verpackung besteht aus Karton und
entsprechend gekennzeichneten Kunststof-
fen, die wiederverwertet werden können.
– Führen Sie diese Materialien der Wie-
derverwertung zu.
Technische Daten
Hinweis: Der Akku ist nicht wechselbar.
VORSICHT! Verletzungsgefahr durch
Splitter! Gerät nicht mit Gewalt zerbre-
chen.
Artikelnummer 110234
Akkutyp 1× 18650, Li-Ion,
3,6 V, 2000 mAh
Ladespannung 5 V=, 500 mA
Betriebsstrom ≤500 mA
Strom im Bereitschaftszustand ≤100 μA
Saughöhe ≤2 m
Förderhöhe ≤2 m
Durchfluss 100–250 ml/min
Bewässerungshäufigkeit 1, 3, 6, 12, 24, 48 h
3, 4, 5, 6, 7 d
Bewässerungsdauer 0.5, 1, 3, 5, 6, 7, 8,
10, 12, 15 min
Schutzart IPX4
Temperaturbereich 0°C – 45°C
Bewaesserungspumpe_110234.book Seite 8 Montag, 25. November 2019 12:11 12

IT
9
Istruzioni originaliIrrigazione automatica con pompa
Indice
Prima di cominciare… . . . . . . . . . . . . . . . . . . . . 9
Per la vostra sicurezza . . . . . . . . . . . . . . . . . . . . 9
Volume di consegna . . . . . . . . . . . . . . . . . . . . . 10
Montaggio e installazione . . . . . . . . . . . . . . . . 10
Programmazione della centralina . . . . . . . . . . 10
Estendere la durata della batteria . . . . . . . . . . 10
Ulteriori precauzioni . . . . . . . . . . . . . . . . . . . . . 11
Preparativi per lo smaltimento . . . . . . . . . . . . . 11
Smaltimento . . . . . . . . . . . . . . . . . . . . . . . . . . . . 11
Dati tecnici . . . . . . . . . . . . . . . . . . . . . . . . . . . . . 11
Reclami per difetti . . . . . . . . . . . . . . . . . . . . . . . 56
Prima di cominciare…
Utilizzo conforme alla destinazione d’uso
Il dispositivo è un kit completo di irrigazione a goccia
con timer automatico e pompa in grado di pompare
l’acqua da una bottiglia, tanica o cisterna e annaffiare
attraverso il microtubo e i gocciolatori in dotazione
per soddisfare il fabbisogno idrico di max. 10 piante.
Questo apparecchio non è destinato all’uso commer-
ciale. Osservare le norme generali relative alla pre-
venzione degli incidenti e le indicazioni di sicurezza in
dotazione.
Eseguire unicamente le attività descritte nel presente
manuale di istruzioni. Qualsiasi altro impiego verrà
considerato come un utilizzo improprio. Il produttore
non risponde per eventuali danni derivanti da tale uti-
lizzo.
Cosa significano i simboli usati?
Indicazioni di pericolo e note sono contraddistinte
chiaramente nel manuale di istruzioni. Si utilizzano i
simboli seguenti:
Per la vostra sicurezza
Precauzioni generali
•Per lavorare e gestire questo apparecchio in
sicurezza è necessario che l’utilizzatore se ne
serva per la prima volta dopo aver letto e ben
compreso le presenti istruzioni per l’uso.
•Osservare tutte le precauzioni! Se non si osser-
vano le indicazioni di sicurezza, si mettono in
pericolo se stessi e gli altri.
•Conservare tutti i documenti con le istruzioni per
l’uso e le precauzioni per il futuro.
•In caso di vendita o di cessione dell’apparecchio,
è indispensabile consegnare insieme anche le
presenti istruzioni per l’uso.
•L’apparecchio può essere utilizzato esclusiva-
mente se si trova in perfette condizioni operative.
Se il dispositivo o una parte di esso presenta un
difetto bisogna subito spegnerlo e smaltirlo nel
modo corretto.
•Non utilizzare mai l’apparecchio in ambienti a
rischio d’esplosione o nelle vicinanze di liquidi o
gas infiammabili!
•Assicurarsi sempre che l’apparecchio sia spento
per evitare riaccensioni involontarie.
•Non usare apparecchi nei quali l’interruttore on/
off non funziona correttamente.
•Tenga lontani i bambini dall’apparecchio! Con-
servi l’apparecchio al sicuro da bambini e per-
sone non autorizzate.
•Non sovraccaricare l’apparecchio. Utilizzare
l’apparecchio solo per gli scopi previsti.
•Lavorare sempre con prudenza e in perfette con-
dizioni personali: stanchezza, malattie, uso di
alcol, influenze di medicinali o droghe non per-
mettono di avere un comportamento responsa-
bile poiché non consentono di utilizzare l’appa-
recchio con sicurezza.
•Questo dispositivo non è concepito per essere
utilizzato da persone (inclusi i bambini) con limi-
tazioni fisiche, psichiche o sensoriali o prive di
esperienza riguardo all’uso del dispositivo stesso
e le stesse dovrebbero essere sorvegliate da una
persona competente, la quale dovrebbe istruirli
sull’uso corretto del dispositivo.
•Assicurarsi che i bambini non giochino con
l’apparecchio.
•Osservare sempre le normative nazionali e inter-
nazionali in vigore e inerenti alla sicurezza, alla
salute e al lavoro.
Utilizzo delle batterie ricaricabili
•Pericolo di incendio! Utilizzare esclusivamente le
batterie consentite dal produttore. Utilizzare
esclusivamente i caricabatterie consentiti dal
produttore. Quando non utilizzate, mantenere le
batterie lontane dagli oggetti in metallo che
potrebbero provocare un cortocircuito. Pericolo
di lesioni e incendio.
•Prima di collegare l’apparecchio alla rete elet-
trica, assicurarsi che la rete ed i dati d’allaccia-
mento siano conformi.
•La protezione deve essere eseguita con un sal-
vavita (interruttore di protezione) con una cor-
rente di guasto nominale non superiore a 30 mA.
•Caricare la batteria soltanto all’interno di
ambienti chiusi.
•Assicurarsi che l’apparecchio sia spento, prima
di inserire la batteria.
•Mai accendere l’apparecchio durante la fase di
ricarica.
PERICOLO! Elevato pericolo di lesioni
gravi o mortali! Situazione altamente peri-
colosa che può comportare lesioni gravi o
mortali.
AVVERTENZA! Probabile pericolo di
lesioni gravi o mortali! Situazione gene-
ralmente pericolosa che può comportare
lesioni gravi o mortali.
ATTENZIONE! Potenziale pericolo di
lesioni! Situazione pericolosa che può
comportare lesioni.
AVVISO! Pericolo di danni all’apparec-
chio! Situazione che può comportare danni
materiali.
Nota: Informazioni indicate per una migliore
comprensione dei procedimenti.
Bewaesserungspumpe_110234.book Seite 9 Montag, 25. November 2019 12:11 12

IT
10
•Nel caso di utilizzo inadeguato, dalla batteria può
fuoriuscire del liquido. Il liquido della batteria può
provocare irritazioni cutanee ed ustioni. Evitare
assolutamente il contatto! Nel caso di contatto
accidentale, lavare a fondo con abbondante
acqua. Nel caso di contatto con gli occhi rivol-
gersi immediatamente ad un medico.
Indicazioni specifiche sull’apparecchio
•Non far funzionare mai l’apparecchio in ambienti
interni.
•Non usare batterie (accumulatori) ricaricabili.
•Montare l’apparecchio solo verticalmente, con il
dado a risvolto rivolto verso l’alto, onde evitare la
penetrazione di acqua nel vano batterie.
•Il flusso d’acqua passante non deve mai supe-
rare la temperatura massima consentita (► Dati
tecnici – p. 11).
•Impiegare soltanto acqua dolce e pulita.
•L’apparecchio può essere utilizzato solo nel
campo di pressione consentito (► Dati tecnici –
p. 11).
•Evitare sollecitazioni da trazione. Non tirare il
cavo collegato.
•Non rimuovere o coprire i simboli riportati
sull’apparecchio. Gli avvisi non più leggibili
sull’apparecchio si devono immediatamente
sostituire.
Volume di consegna
►Volume di fornitura – p. 3
1. Comando pompa
2. Tubo di alimentazione con filtro
3. Raccordo a T (10x)
4. Gocciolatore (10×)
5. Tappo terminale (2×)
6. Supporto per tubo (10×)
7. Cavo di ricarica USB
8. Adattatore per bottiglia
9. Gancio
10. Microtubo
11. Valvola singola
Montaggio e installazione
►P. 4, punto 1
– Montare l’impianto di irrigazione come indicato
dalla figura. Tagliare il tubo (10) alle lunghezze
desiderate. Montare l’impianto di irrigazione con
i raccordi a T (3), i tappi (5) e i gocciolatori (4)
secondo la configurazione desiderata e colle-
garlo all’attacco laterale della centralina. È più
facile montare il tubo se le sue estremità ven-
gono precedentemente tenute in acqua calda.
Collegare la sezione del tubo con il filtro (2)
all’attacco di alimentazione della centralina.
►P. 4, punto 2
Il sistema può utilizzare diverse fonti d’acqua:
A. una piccola bottiglia di plastica può essere colle-
gata dall’alto alla centralina senza l’apposito
adattatore. Ciò è ideale per l’irrigazione di piccole
piante che non hanno bisogno di molta acqua.
B. Per bottiglie più grandi, ad es. da 4, 5 o 6 litri, la
centralina della pompa deve essere collegata al
coperchio della bottiglia utilizzando l’apposito
adattatore (8).
C. Si può utilizzare qualsiasi contenitore aperto, ad
es. un secchio. Utilizzare la staffa (9) per appen-
dere la centralina della pompa al contenitore.
►P. 5, punto 3
•Se i vasi da fiori sono al di sopra del livello
dell’acqua, non è necessario collegare la valvola
singola.
►P. 5, punto 4
•Se i vasi da fiori sono al di otto del livello
dell’acqua, è necessario collegare la valvola sin-
gola.
Programmazione della centralina
– Impostare l’intervallo desiderato tra le irrigazioni
con il regolatore [ ].
– Impostare il tempo di irrigazione con il regola-
tore [ ]. La durata dell’irrigazione non deve
superare il valore della frequenza di irrigazione!
– Impostare l’ora di inizio irrigazione spostando la
prima irrigazione rispetto all’ora corrente. A tale
scopo premere il tasto [ ] per più di 2 secondi
finché il LED non rimane costantemente acceso.
Ogni volta che si preme nuovamente il pulsante,
viene aggiunta un’ora di ritardo per l’inizio
dell’irrigazione. Per esempio: se si desidera irri-
gare per 5 minuti al giorno e iniziare la prima irri-
gazione alle 18:00 e ora sono le 12:00, è neces-
sario ritardare l’inizio dell’irrigazione di sei ore
premendo il tasto [ ] 6 volte.
Esempio:
•si voglia irrigare 5 minuti al giorno. Impo-
stare: [ ] = 24 ore; [ ] = 5 minuti.
•Il tempo di irrigazione successivo viene ricalco-
lato se si modifica la frequenza o la durata
dell’irrigazione.
Osservazioni:
•Durante il normale funzionamento del regolatore,
il LED lampeggia ogni 4 secondi. Se lampeggia
rapidamente, ad es. 1 flash al secondo, significa
che la batteria è scarica. La batteria può essere
ricaricata con un cavo USB. Se la batteria è sca-
rica, la centralina della pompa è disabilitata.
Tasto On-Off [ ] o irrigazione manuale:
•Se viene premuto per più di 5 secondi, può
essere usato come tasto On/Off. Premendolo per
un secondo, la centralina passa alla modalità di
irrigazione manuale. L’irrigazione manuale si
disinserisce automaticamente dopo 15 minuti.
Estendere la durata della batteria
La batteria esterna “Powerbank” può essere utilizzata
per estendere il funzionamento della pompa. Ese-
guire dei test di durata prima di lasciare le piante da
sole durante le vacanze per ottenere un buon risul-
tato. La durata totale della batteria dipende dal tipo di
batteria utilizzato.
Prima della messa in funzione leggere le
istruzioni per l’uso ed attenersi ad esse.
Bewaesserungspumpe_110234.book Seite 10 Montag, 25. November 2019 12:11 12

IT
11
Importante: assicurarsi che la batteria sia protetta
dall’acqua. Non utilizzare questo tipo di batteria
all’aperto. L’umidità dell’aria e il sole possono dan-
neggiarla o distruggerla. E questo a sua volta
potrebbe rovinare la pompa del programmatore.
Ulteriori precauzioni
•Prolungare la vita del prodotto appena acquistato
proteggendolo dal sole e dalla pioggia. Non utiliz-
zarlo mai a temperature sotto 0 °C o sopra 45 °C.
•Non caricare mai il programmatore tramite la
porta USB sulla parete mentre il sistema è in fun-
zione con l’acqua. Rimuovere il dispositivo da
qualsiasi fonte d’acqua e asciugarlo prima di rica-
ricarlo.
Preparativi per lo smaltimento
Rimozione della batteria
Al termine della vita dell’apparecchio, prima di prov-
vedere al suo smaltimento occorre togliere tutte le
batterie in esso presenti.
– Aprire l’alloggiamento.
– staccare i collegamenti e rimuovere le batterie.
– Smaltire la batteria come prescritto.
Smaltimento
Smaltimento dell’apparecchio
Il simbolo del bidone della spazzatura bar-
rato vuol dire che: batterie e accumulatori,
apparecchiature elettriche ed elettroniche
non vanno smaltiti nei rifiuti domestici. Que-
sti potrebbero contenere sostanze dannose
per l’ambiente e la salute.
I consumatori hanno l’obbligo di differenziare le appa-
recchiature elettroniche, le batterie vecchie delle
apparecchiature e gli accumulatori dai rifiuti dome-
stici e di smaltirle presso il centro di raccolta ufficiale
per garantire un riutilizzo consono. Le informazioni
sulla restituzione sono fornite dal venditore. Il ritiro è
gratuito.
Batterie e accumulatori non integrati in modo fisso nei
rifiuti di apparecchiature elettriche vanno tolti prima
dello smaltimento e smaltiti separatamente. Le batte-
rie al litio e gli accumulatori di tutti i sistemi vanno
consegnati ai punti di raccolta solo una volta scarichi.
Le batterie vanno sempre assicurate da possibili cor-
tocircuiti applicando del nastro adesivo sui poli.
L’utente finale è responsabile della cancellazione dei
dati personali dalle apparecchiature da smaltire.
Smaltimento dell’imballaggio
L’imballaggio è composto da cartone e par-
ticolari in plastica adeguatamente contras-
segnati per essere riciclati.
– Si raccomanda di inviare questi mate-
riali al riciclaggio.
Dati tecnici
Nota: La batteria non è sostituibile.
ATTENZIONE! Pericolo di lesioni cau-
sate da schegge. Non frantumare con vio-
lenza l’apparecchio.
Codice articolo 110234
Tipo di batteria 1× 18650, Li-Ion,
3,6 V, 2000 mAh
Tensione di ricarica 5 V=, 500 mA
Corrente di alimentazione ≤500 mA
Corrente in standby ≤100 μA
Altezza di aspirazione ≤2 m
Prevalenza ≤2 m
Portata 100–250 ml/min
Frequenza di irrigazione 1, 3, 6, 12, 24, 48 h
3, 4, 5, 6, 7 d
Durata dell’irrigazione 0.5, 1, 3, 5, 6, 7, 8,
10, 12, 15 min
Grado di protezione IPX4
Gamma di temperature 0°C – 45°C
Bewaesserungspumpe_110234.book Seite 11 Montag, 25. November 2019 12:11 12

FR
12
Notice originaleIrrigation automatique par pompe
Table des matières
Avant de commencer… . . . . . . . . . . . . . . . . . . 12
Pour votre sécurité . . . . . . . . . . . . . . . . . . . . . . 12
Contenu de la livraison . . . . . . . . . . . . . . . . . . 13
Montage et installation . . . . . . . . . . . . . . . . . . . 13
Programmation de contrôle . . . . . . . . . . . . . . . 13
Prolongation de la durée de vie de la batterie 14
Autres mesures de précaution . . . . . . . . . . . . 14
Préparation pour la mise au rebut . . . . . . . . . 14
Mise au rebut . . . . . . . . . . . . . . . . . . . . . . . . . . 14
Caractéristiques techniques . . . . . . . . . . . . . . 14
Réclamations . . . . . . . . . . . . . . . . . . . . . . . . . . 56
Avant de commencer…
Utilisation conforme
L’appareil est un kit d’irrigation par gouttes complet
équipé d’un programmateur automatique et d’une
pompe qui transporte l’eau d’une bouteille, d’un bidon
ou d’un réservoir et qui irrigue via le tuyau micro et le
compte-gouttes fournis pour couvrir le besoin en eau
de jusqu’à 10 plantes.
L’objet n’est pas conçu pour une utilisation commer-
ciale. Les directives généralement reconnues en
matière de prévention des accidents et les consignes
de sécurité jointes doivent impérativement être res-
pectées.
Réalisez uniquement des activités qui sont décrites
dans ce mode d’emploi. Toute autre utilisation est
une utilisation non conforme et non autorisée. Le
fabricant décline toute responsabilité pour les dom-
mages en résultant.
Signification des symboles utilisés
Les mises en garde contre des dangers éventuels et
les consignes de sécurité sont distinctement identi-
fiables dans le mode d’emploi. Les symboles sui-
vants seront utilisés :
Pour votre sécurité
Consignes générales de sécurité
•Pour garantir une utilisation sûre de cet appareil,
l’utilisateur doit avoir lu et compris le présent
mode d’emploi avant la première mise en service
de l’appareil.
•Veuillez observer toutes les consignes de sécu-
rité ! La non-observation des consignes de sécu-
rité vous met en danger, vous et votre entourage.
•Conservez soigneusement le mode d’emploi et
les consignes de sécurité pour les consulter en
cas de besoin.
•Si vous vendez ou donner l’appareil à un tiers,
remettez-lui toujours le manuel d’utilisation cor-
respondant.
•L’appareil peut uniquement être utilisé lorsqu’il
est en parfait état. Si l’appareil ou une partie de
l’appareil est défectueuse, l’appareil doit être mis
hors service et être éliminé de manière ade-
quate.
•Ne faites pas fonctionner l’appareil dans un local
à risque d’explosion, ni à proximité de liquides ou
gaz inflammables !
•Sécurisez toujours l’appareil à l’arrêt contre toute
remise en marche intempestive.
•N’utilisez aucun appareil dont le commutateur
marche-arrêt ne fonctionne pas correctement.
•Ne laissez pas les enfants s’approcher de l’appa-
reil ! Ne laissez pas l’appareil à proximité
d’enfants ou de personnes non autorisées à s’en
servir.
•Ne surchargez pas l’appareil. N’utilisez l’appareil
que pour les travaux pour lesquels il a été conçu.
•Soyez toujours prudent lors du maniement de
l’appareil et veillez à ne l’utiliser que lorsque
votre état vous le permet : travailler par fatigue,
maladie, sous la consommation d’alcool,
l’influence de drogues et de médicaments sont
des comportements irresponsables étant donné
que vous ne pouvez plus utiliser l’appareil avec
sécurité.
•L’utilisation de cet appareil n’est pas prévu
pardes personnes (y compris des enfants) avec
des aptitudes physiques, sensorielles ou men-
tales limitées ou des déficits dans l’expérience et/
ou les connaissances, sauf si elles sont surveil-
lées par une personne responsable de leur sécu-
rité ou si elles ont reçues des instructions de ces
personnes stipulant de quelle manière l’appareil
doit être utilisé.
•Assurez-vous que les enfants ne jouent pas avec
l’appareil.
•Respectez systématiquement les règles de
sécurité, d’hygiène et de travail en vigueur à
l’échelle nationale et internationale.
Maniement des accus
•Risque d’incendie ! N’utilisez que des accus
autorisés par le fabricant. N’utilisez que des char-
geurs autorisés par le fabricant. Quand vous ne
les utilisez pas, gardez les accus loin d’objets
métalliques qui pourraient provoquer un court-
circuit. Il existe un risque de blessures et d’incen-
die.
DANGER ! Danger de mort ou risque de
blessure immédiat ! Situation dangereuse
directe qui a pour conséquence de graves
blessures ou la mort.
AVERTISSEMENT ! Danger de mort ou
risque de blessure probable ! Situation
dangereuse générale qui peut avoir pour
conséquence de graves blessures ou la
mort.
ATTENTION ! Éventuelle risque de bles-
sure ! Situation dangereuse qui peut avoir
des blessures pour conséquence.
AVIS ! Risque de dommages matériels !
Situation qui peut avoir des dommages
matériels pour conséquence.
Remarque : Informations qui aident à une
meilleure compréhension des opérations.
Bewaesserungspumpe_110234.book Seite 12 Montag, 25. November 2019 12:11 12

FR
13
•Avant de brancher le chargeur, il doit être garanti
que le branchement secteur correspond aux
données de raccordement de l’appareil.
•La protection doit être assurée par un disjoncteur
différentiel présentant un courant de fuite assi-
gné de 30 mA maximum.
•Ne chargez les accus que dans des pièces fer-
mées.
•Assurez-vous que l’appareil est éteint avant de
placer l’accu.
•Ne mettez jamais l’appareil en service durant le
chargement.
•En cas d’utilisation incorrecte, du liquide peut
s’écouler des accus. Le liquide des accus peut
provoquer des irritations cutanées et des brû-
lures. Évitez impérativement tout contact ! En
cas de contact, rincez abondamment à l’eau. En
cas de contact avec les yeux, demandez en plus
conseil à une aide médicale.
Consignes propres à l’appareil
•N’utilisez jamais l’appareil dans des locaux.
•N’utilisez pas d’accus rechargeables.
•Montez uniquement l’appareil en position verti-
cale avec l’écrou d’accouplement tourné vers le
haut pour éviter que de l’eau pénètre dans le
logement de la pile.
•La température maximale admissible de l’eau qui
s’écoule ne doit pas être dépassée (► Caracté-
ristiques techniques – p. 14).
•N’utilisez que de l’eau douce propre.
•L’appareil ne doit être utilisé que dans la plage de
pression admissible (► Caractéristiques tech-
niques – p. 14).
•Évitez les décharges de traction. Ne tirez pas sur
le tuyau raccordé.
•Les symboles apposés sur votre appareil ne
doivent être ni retirés ni recouverts. Si certaines
informations apposées sur l’appareil deviennent
illisibles, elles doivent être immédiatement rem-
placées.
Contenu de la livraison
►Contenu de la livraison – p. 3
1. Contrôle de la pompe
2. Tuyau d’alimentation avec filtre
3. Raccord en T (10×)
4. Compte-gouttes (10×)
5. Embout (2×)
6. Support de tube (10×)
7. Câble de chargement USB
8. Adaptateur plat
9. Accrochage
10. Tube micro
11. Vanne individuelle
Montage et installation
►P. 4, point 1
– Montez l’installation d’irrigation comme indiqué
dans l’illustration. Coupez le tube (10) aux lon-
gueurs souhaitées. Montez l’installation d’irriga-
tion avec les raccords en T (3), les bouchons (5)
et les compte-gouttes (4) dans la configuration
souhaitée et connectez-les au raccord latéral de
l’unité de commande. Il est plus facile de poser le
tube lorsque les extrémités du tube ont préala-
blement été maintenues dans de l’eau chaude.
Connectez la section du tube filtrant (2) avec le
raccord d’alimentation de l’unité de commande.
►P. 4, point 2
Le système peut utiliser différentes sources d’eau :
A. Une petite bouteille en plastique peut être raccor-
dée à l’unité de commande depuis le haut sans
adaptateur pour bouteille. C’est la solution idéale
pour l’irrigation de petites plantes que n’ont pas
besoin de beaucoup d’eau.
B. Pour les bouteilles plus grandes, par ex. de 4, 5
ou 6 litres, l’unité de commande de la pompe doit
être raccordée au couvercle de la bouteille. Utili-
sez l’adaptateur pour bouteille (8).
C. Il est possible d’utiliser n’importe quel conteneur
ouvert, par ex. un seau. Utiliser le support (9)
pour suspendre l’unité de contrôle de la pompe
au récipient.
►P. 5, point 3
•Si les pots de fleurs se trouvent au-dessus du
niveau d’eau, il n’est pas nécessaire de raccor-
der la vanne individuelle.
►P. 5, point 4
•Si les pots de fleurs se trouvent en-dessous du
niveau d’eau, vous devez raccorder la vanne
individuelle.
Programmation de contrôle
– Réglez l’intervalle de temps souhaité entre les
irrigations à l’aide du régulateur [ ].
– Réglez le moment d’irrigation avec le régula-
teur [ ]. La durée d’irrigation ne doit pas être
supérieure à la valeur de la fréquence d’irriga-
tion !
– Réglez l’heure de commencement de l’irrigation
en décalant la première irrigation à l’heure
actuelle. Pour cela, appuyez sur la touche [ ]
pendant plus de 2 secondes jusqu’à ce que la
LED reste allumée en continu. Chaque autre
pression de la touche retarde d’une heure le
commencement de l’irrigation. Par exemple : Si
vous voulez irriguer 5 minutes tous les jours, que
la première irrigation doit commencer à 18h00 et
qu’il est maintenant 12h00, vous devez retarder
le début de l’irrigation de six heures en appuyant
6 fois sur la touche [ ].
Exemple :
•Vous devez irriguer 5 minutes chaque jour. Effec-
tuez le réglage : [ ] = 24 heures ; [ ] = 5
minutes.
•Le prochain moment d’irrigation est calculé si
vous modifiez la fréquence ou la durée de l’irriga-
tion.
Remarques :
•Lors d’une utilisation normale du contrôleur, la
LED clignote toutes les 4 secondes. Si elle cli-
gnote rapidement, par ex. 1 fois par seconde,
Veuillez lire les instructions d’utilisation avant
la mise en service de l’appareil et les respec-
ter.
Bewaesserungspumpe_110234.book Seite 13 Montag, 25. November 2019 12:11 12

FR
14
cela signifie que la batterie est faible. La batterie
peut être rechargée à l’aide d’un câble USB. Si la
batterie est faible, l’unité de contrôle de la pompe
est désactivée.
Touche Marche/Arrêt [ ] ou irrigation manuelle :
•Si elle est enfoncée pendant plus de 5 secondes,
elle peut être utilisée comme touche Marche/
Arrêt. Si vous la maintenez enfoncée pendant
une seconde, l’unité de commande passe en
mode d’irrigation manuelle. L’irrigation manuelle
s’éteint automatiquement au bout de 15 minutes.
Prolongation de la durée de vie de la
batterie
Pour prolonger le temps de fonctionnement de la
pompe, il est possible d’utiliser une batterie « Power-
bank ». Effectuez des tests de durée avant de laisser
les plantes seules lorsque vous partez en vacances
afin d’atteindre un bon résultat. Le temps de fonction-
nement total de la batterie dépend du type de batterie
utilisée.
Important : Assurez-vous que la batterie soit proté-
gée de l’eau. N’utilisez pas ce type de batterie à l’air
libre. L’humidité et le soleil pourraient l’endommager
et la casser, ce qui pourrait détruire la pompe à pro-
grammateur.
Autres mesures de précaution
•Prolongez la durée de vie du produit que vous
venez d’acheter en le protégeant de la pluie et du
soleil. Ne pas utiliser à des températures infé-
rieures à 0 °C ou supérieures à 45 °C.
•Ne chargez jamais le programmateur via le port
USB au mur tant que le système fonctionne avec
de l’eau. Retirez l’appareil de toute source d’eau
et séchez-le avant de le charger.
Préparation pour la mise au rebut
Retirer les accus
Avant de mettre l’appareil au rebut à la fin de sa
durée de vie, vous devez retirer tous les accus.
– Ouvrir le boîtier.
– Défaire les branchements et enlever les accus.
– Éliminez les accus comme décrit.
Mise au rebut
Mise au rebut de l’appareil
Le symbole de la poubelle barrée signifie :
Les batteries et les accus, les appareils élec-
triques et électroniques ne doivent pas être
jetées avec les ordures ménagères car ils
pourraient contenir des substances nocives
pour l’environnement et la santé.
Les consommateurs sont tenus d’éliminer appareils
électriques usagés, les batteries et accus usagés
d’appareils électriques séparément en les remettant
à un point de collecte officiel afin de garantir un trai-
tement adéquat. Pour de plus amples informations
sur le retour, adressez-vous auprès de votre reven-
deur. La reprise est gratuite.
Les batteries et les accus qui ne sont pas intégrés
dans les appareils électriques usagés doivent être
retirés et éliminés séparément avant l’élimination.
Les batteries au lithium et les pack accus de tous les
systèmes doivent être remis aux points de collecte
uniquement en état déchargé. Les batteries doivent
toujours être protégées contre les courts-circuits en
collant les pôles.
Chaque utilisateur final est responsable pour la sup-
pression des données personnelles qui se trouvent
sur les appareils usagés à éliminer.
Mise au rebut de l’emballage
L’emballage se compose de carton et de
matières plastiques marquées en consé-
quence qui peuvent être recyclés.
– Eliminez ces matériaux en les condui-
sant au recyclage.
Caractéristiques techniques
Remarque : L’accu n’est pas remplaçable.
ATTENTION ! Risque de blessures par
des éclats ! Ne pas mettre l’appareil en
morceaux par la force.
Référence 110234
Type d’accus 1× 18650, Li-Ion,
3,6 V, 2000 mAh
Tension de charge 5 V=, 500 mA
Courant de service ≤500 mA
Courant en mode veille ≤100 μA
Hauteur d’aspiration ≤2 m
Hauteur de refoulement ≤2 m
Débit 100–250 ml/min
Fréquence d’arrosage 1, 3, 6, 12, 24, 48 h
3, 4, 5, 6, 7 d
Durée d’arrosage 0.5, 1, 3, 5, 6, 7, 8,
10, 12, 15 min
Type de protection IPX4
Plage de température 0°C – 45°C
Bewaesserungspumpe_110234.book Seite 14 Montag, 25. November 2019 12:11 12

GB
15
Original instructionsAutomatic irrigation with pump
Table of contents
Before you begin… . . . . . . . . . . . . . . . . . . . . . . 15
For your safety . . . . . . . . . . . . . . . . . . . . . . . . . 15
Scope of delivery . . . . . . . . . . . . . . . . . . . . . . . 16
Assembly and installation . . . . . . . . . . . . . . . . 16
Controller programming . . . . . . . . . . . . . . . . . . 16
Extend the Duration of the Battery . . . . . . . . . 16
More Important Precautions . . . . . . . . . . . . . . 16
Preparing for disposal . . . . . . . . . . . . . . . . . . . 16
Disposal . . . . . . . . . . . . . . . . . . . . . . . . . . . . . . . 17
Technical data . . . . . . . . . . . . . . . . . . . . . . . . . . 17
Claims for defects . . . . . . . . . . . . . . . . . . . . . . . 56
Before you begin…
Intended use
The device is an automatic irrigation Controller, which
can pump water from a bottle or tank, and deliver
water via pipe and dripper System to water up to 10
plants.
This product is not intended for commercial use. Gen-
erally acknowledged accident prevention regulations
and enclosed safety instructions must be observed.
Only perform work described in these instructions for
use. Any other use is improper. The manufacturer will
not assume responsibility for damage resulting from
such use.
What are the meanings of the symbols used?
Danger notices and information are clearly marked
throughout these instructions for use. The following
symbols are used:
For your safety
General safety instructions
•To operate this device safely, the user must have
read and understood these instructions for use
before using the device for the first time.
•Observe all safety instructions! Failure to do so
may cause harm to you and others.
•Retain all instructions for use, and safety instruc-
tions for future reference.
•If you sell or pass the device on, you must also
hand over these operating instructions.
•The device must only be used when it functions
properly. If the product or part of the product is
defective, it must be taken out of operation and
disposed of correctly.
•Never use the device in a room where there is a
danger of explosion or in the vicinity of flammable
liquids or gases.
•Always ensure that a device which has been
switched off cannot be restarted unintentionally.
•Do not use devices with an on/off switch that
does not function correctly.
•Keep children away from the device! Keep the
device out of the way of children and other unau-
thorised persons.
•Do not overload the device. Do not use the
device for purposes for which it is not intended.
•Exercise caution and only work when in good
condition: If you are tired, ill, if you have ingested
alcohol, medication or illegal drugs, do not use
the device, as you are not in a condition to use it
safely.
•This product is not intended to be used by per-
sons (including children) or who are limited in
their physical, sensory or mental capacities or
who lack experience and/or knowledge of the
product unless they are supervised, or have been
instructed on how to use the product, by a person
responsible for their safety.
•Ensure that children are not able to play with the
device.
•Always comply with all applicable domestic and
international safety, health, and working regula-
tions.
Handling rechargeable devices
•Danger of fire! Only use batteries approved by
the manufacturer. Only use chargers approved
by the manufacturer. Keep battery away from
metal objects that could cause short circuiting
when not in use. There is a risk of injuries and
fires.
•Prior to connecting the charger, verify that the
power supply connection corresponds with the
connecting data of the device.
•The fuse must be a residual current circuit-
breaker with a measured residual current of no
more than 30 mA.
•Only charge the battery in closed rooms.
•Ensure that the device is switched off before
installing the battery.
•Never switch on the device during the charging
process.
•Fluid can escape from the battery when used
incorrectly. Battery fluid may result in skin irrita-
tions and burns. Avoid contact! In the event of
accidental contact, rinse thoroughly with water.
Immediately seek the aid of a physician in the
event of eye contact.
Device-specific safety instructions
•Never operate the unit indoors.
•Do not use rechargeable batteries.
•Only set the unit up upright with the coupling nut
facing upwards to prevent water from entering
into the battery compartment.
DANGER! Direct danger to life and risk
of injury! Directly dangerous situation that
may lead to death or severe injuries.
WARNING! Probable danger to life and
risk of injury! Generally dangerous situa-
tion that may lead to death or severe inju-
ries.
CAUTION! Possible risk of injury! Dan-
gerous situation that may lead to injuries.
NOTICE! Risk of damage to the device!
Situation that may lead to property damage.
Note: Information to help you reach a better
understanding of the processes involved.
Bewaesserungspumpe_110234.book Seite 15 Montag, 25. November 2019 12:11 12

GB
16
•The permitted maximum temperature of the
water flowing through the system may not be
exceeded (► Technical data – p. 17).
•Only use clean freshwater.
•The unit may only be operated in the permitted
pressure range (► Technical data – p. 17).
•Prevent torsion loads. Do not pull on the con-
nected hose.
•Symbols affixed to your tools may not be
removed or covered. Information on the device
that is no longer legible must be replaced imme-
diately.
Scope of delivery
►Scope of delivery – p. 3
1. Controller
2. Filter assembly
3. Barb tee (10×)
4. Dripper (10×)
5. End plug (2×)
6. Tube holder stake (10×)
7. USB charging line
8. Bottle adaptor
9. Hanger
10. Micro tube
11. Single valve
Assembly and installation
►P. 4, item 1
– Assemble the watering system as shown in the
illustration. Cut the tube (10) into the desired
lengths. Use T-pieces (3), plugs (5) and drip
heads (4) to assemble the watering system in the
desired configuration and connect it to the con-
troller’s side connection. It is easier to put on the
tube if the ends of the tube are held in hot water
beforehand. Connect the filter tube section (2) to
the controller’s supply connection.
►P. 4, item 2
The system can use different water sources:
A. A small plastic bottle can be attached from above
the controller without a bottle adapter. This is
ideal for watering miniplants that require little
water.
B. For larger bottles, e.g. 4L, 5L, 6L, the controller
must be connected to the top of the bottle, use an
adapter (8).
C. Any open container, e.g. a bucket, can be used.
To hang the controller on the container, use the
bracket (9).
►P. 5, item 3
•When the flower pots is above the water level, it
is not necessary to connect the single valve.
►P. 5, item 4
•When the flower pots is under the water level,
you need connect the single valve.
Controller programming
– Set the desired span between waterings with
the [] knob.
– Set the watering time with the [] knob. The
duration of watering cannot be greater than the
value of the frequency of watering!
– Set the start time for watering by delaying the first
watering from the current time. To do this, press
the [] button for more than 2 seconds until the
LED is constantly on. Each subsequent press of
the button adds one hour to delay the start of
watering. For example: if the time is now 12:00,
and you need to start watering at 18:00, you need
to postpone watering for 6 hours. To do this,
press the [] button six times.
Example:
•You need to water every day for 5 minutes. Set -
[] = 24 hours; [] = 5 minutes.
•The next watering time will be recalculated if you
change the frequency or duration of watering.
Notes:
•LED will blink every 4 seconds, if it flashes
quickly, like 1 blink each second, it means low
battery, the battery can be recharged with USB
charging cable. In low battery, controller is shut
off.
Power button [] or manual watering:
•If press longer than 5 seconds, it can be used as
a Power ON/OFF button. If press for 1 second, it
is for manual watering. Manual watering will be
automatically turned off after 15 minutes.
Extend the Duration of the Battery
You can use extra energy from a powerbank to
extend the duration of the system. Make same dura-
tion tests before leaving plants alone during your hol-
idays, to make sure of a good result. Total duration
will depend of the kind of powerbank used.
Important: Please make sure powerbank is safe from
water. Do not use it outdoors. Humidity on the enviro-
ment and sun could spoil it. At the same time spoiled
powerbank can spoil the unit too.
More Important Precautions
•Prolong the life of the product you have just
bought, leaving it protected from the sun and
rain. Do not use it with temperatures below 0 °C
or above 45 °C.
•Never put the timer to be charged to the wall by
the USB connection while the system is in use
with water. Remove the unit from any water
source and dry it before charging it.
Preparing for disposal
Removing the battery
At the end of the device lifetime, you should remove
all batteries before disposing of the item.
Before putting the unit into operation, read
and observe the instructions for use.
Note: The battery is not replaceable.
CAUTION! Risk of injury by splintering!
Do not break device forcefully.
Bewaesserungspumpe_110234.book Seite 16 Montag, 25. November 2019 12:11 12

GB
17
– Open the housing.
– Separate the connections and remove the bat-
tery.
– Dispose of the batteries in accordance with the
regulations.
Disposal
Disposal of the appliance
A crossed-out wheelie bin icon means: Bat-
teries and rechargeable batteries, electrical
or electronic devices must not be disposed of
with household waste. They may contain
substances that are harmful to the environ-
ment and human health.
Consumers must dispose of waste electrical devices,
spent portable batteries and rechargeable batteries
separately from household waste at an official collec-
tion point to ensure that these items are processed
correctly. Information on returning these items is
available from the seller. Sellers are required to
accept these items free of charge.
Batteries and rechargeable batteries, which are not
permanently installed in waste electrical devices,
must be removed prior to disposal and must be dis-
posed of separately. Lithium batteries and battery
packs in all systems must only be retuned to a collec-
tion point when discharged. Batteries must always be
protected against short circuits by covering the poles
with adhesive tape.
All end users are responsible for deleting any per-
sonal data stored on waste devices prior to their dis-
posal.
Disposal of the packaging
The packaging consists of cardboard and
correspondingly marked plastics that can
be recycled.
– Make these materials available for
recycling.
Technical data
Part number 110234
Battery pack type 1× 18650, Li-Ion,
3,6 V, 2000 mAh
Charge voltage 5 V=, 500 mA
Working current ≤500 mA
Standby current ≤100 μA
Water pumping height ≤2 m
Elevation height ≤2 m
Flow rate 100–250 ml/min
Watering frequency 1, 3, 6, 12, 24, 48 h
3, 4, 5, 6, 7 d
Watering duration 0.5, 1, 3, 5, 6, 7, 8,
10, 12, 15 min
Protection type IPX4
Temperature range 0°C – 45°C
Bewaesserungspumpe_110234.book Seite 17 Montag, 25. November 2019 12:11 12

CZ
18
Původní návod k používáníAutomatické zavlažování pomocí čerpadla
Obsah
Dříve než začnete… . . . . . . . . . . . . . . . . . . . . . 18
Pro Vaši bezpečnost . . . . . . . . . . . . . . . . . . . . . 18
Rozsah dodávky . . . . . . . . . . . . . . . . . . . . . . . . 19
Montáž a instalace . . . . . . . . . . . . . . . . . . . . . . 19
Naprogramování ovládání . . . . . . . . . . . . . . . . 19
Prodloužení výdrže akumulátoru . . . . . . . . . . 19
Další preventivní opatření . . . . . . . . . . . . . . . . 19
Připravte likvidaci . . . . . . . . . . . . . . . . . . . . . . . 19
Likvidace . . . . . . . . . . . . . . . . . . . . . . . . . . . . . . 20
Technické údaje . . . . . . . . . . . . . . . . . . . . . . . . 20
Reklamace . . . . . . . . . . . . . . . . . . . . . . . . . . . . . 56
Dříve než začnete…
Použití přiměřené určení
Toto zařízení je kompletní sada pro kapkové zavlažo-
vání s automatickými spínacími hodinami a čerpa-
dlem, které může čerpat vodu z láhve, kanystru nebo
cisterny a polévat pomocí dodané mikro trubice a
kapačů k pokrytí potřeby vody pro maximálně 10 rost-
lin.
Přístroj není určen k použití při podnikání. Musí se
dodržovat obecně uznávané předpisy úrazové pre-
vence a přiložené bezpečnostní pokyny.
Vykonávejte pouze činnosti popsané v tomto návodu
k použití. Jakékoli jiné používání je považováno za
neoprávněné chybné použití. Výrobce neodpovídá za
škody, které z toho plynou.
Co znamenají použité symboly?
Upozornění na nebezpečí a pokyny jsou v návodu k
použití zřetelně vyznačeny. Používají se následující
symboly:
Pro Vaši bezpečnost
Všeobecné bezpečnostní pokyny
•Pro bezpečné zacházení s tímto přístrojem si
jeho uživatel musí před prvním použitím přečíst
tento návod k použití a porozumět mu.
•Respektujte všechny bezpečnostní pokyny!
Pokud nebudete dbát bezpečnostních pokynů,
ohrožujete sebe i ostatní.
•Všechny návody k použití a bezpečnostní
pokyny si dobře uložte pro pozdější použití.
•Když přístroj prodáváte nebo předáváte dál, bez-
podmínečně předejte i tento návod k použití.
•Přístroj se smí používat pouze tehdy, pokud je
bez závady. Jsou-li na přístroji nebo na některé
jeho součásti závady, musí být vyřazen z pro-
vozu a odborně zlikvidován.
•Přístroj nepoužívejte v prostorech ohrožených
výbuchem nebo v blízkosti hořlavých kapalin
nebo plynů!
•Vypnutý přístroj vždy zajistěte proti neúmysl-
nému zapnutí.
•Nepoužívejte nářadí, u něhož spínač Zap/Vyp
řádně nefunguje.
•Zabraňte dětem v přístupu k přístroji! Uložte pří-
stroj tak, aby byl bezpečně chráněn před dětmi a
nepovolanými osobami.
•Nepřetěžujte přístroj. Používejte přístroj pouze
pro účely, pro které byl určen.
•Pracujte vždy opatrně a v dobré fyzické kondici:
Pracovat během únavy, onemocnění, požití alko-
holu, pod vlivem léků a omamných látek je
nezodpovědné, protože přístroj nemůžete bez-
pečně používat.
•Nepoužívejte topné těleso s časovým spínačem
nebo s jiným spínačem, který automaticky spíná
přístroj, hrozilo by nebezpeční požáru.
•Zabezpečte, aby si děti nehrály s výrobkem.
•Dodržujte vždy platné národní a mezinárodní
bezpečnostní, zdravotní a pracovní předpisy.
Zacházení s akumulátorovými přístroji
•Nebezpečí požáru! Používejte pouze akumulá-
tory schválené výrobcem. Používejte pouze
nabíječky schválené výrobcem. Pokud akumulá-
tory nepoužíváte, uložte je v bezpečné vzdále-
nosti od kovových předmětů, které by mohly způ-
sobit zkrat. Hrozí nebezpečí poranění a vzniku
požáru.
•Před připojením nabíječky se musí zabezpečit,
aby síťová přípojka odpovídala hodnotám pro při-
pojení přístroje.
•Zajištění přístroje se musí provést pomocí prou-
dového chrániče (spínač FI) s dimenzovaným
chybným proudem nepřesahujícím 30 mA.
•Akumulátor nabíjejte pouze v uzavřených prosto-
rech.
•Než vložíte akumulátor, přesvědčte se, že je pří-
stroj vypnutý.
•Přístroj nikdy nezapínejte během postupu nabí-
jení.
•Při nesprávném použití může z akumulátoru
vytéct kapalina. Kapalina z akumulátoru může
způsobit podráždění pokožky a popáleniny. Bez-
podmínečně zabraňte kontaktu s kapalinou! V
případě náhodného kontaktu důkladně oplách-
něte zasáhnuté místo vodou. Při kontaktu s
očima vyhledejte okamžitě lékařskou pomoc.
Upozornění specifická pro přístroj
•Přístroj nikdy nepoužívejte ve vnitřních prosto-
rách.
•Nepoužívejte dobíjitelné baterie (akumulátory).
NEBEZPEČÍ! Bezprostřední nebezpečí
zranění nebo ohrožení života! Bezpro-
střední nebezpečná situace s následkem
těžkého zranění nebo usmrcení.
VAROVÁNÍ! Pravděpodobné nebezpečí
zranění nebo ohrožení života! Obecně
nebezpečná situace s možným následkem
těžkého zranění nebo usmrcení.
UPOZORNĚNÍ! Případné nebezpečí zra-
nění! Nebezpečná situace s možným
následkem zranění.
OZNÁMENÍ! Nebezpečí poškození pří-
stroje! Situace s možným následkem věc-
ných škod.
Poznámka: Informace, které jsou uvedeny
pro lepší pochopení postupů.
Bewaesserungspumpe_110234.book Seite 18 Montag, 25. November 2019 12:11 12

CZ
19
•Přístroj montujte pouze ve svislé poloze s pře-
vlečnou maticí směrem nahoru, aby se zabránilo
vniknutí vody do přihrádky na baterie.
•Maximální přípustná teplota protékající vody se
nesmí překročit (► Technické údaje – s. 20).
•Používejte pouze čistou sladkou vodu.
•Přístroj se smí používat pouze v přípustném roz-
sahu tlaku (► Technické údaje – s. 20).
•Zabraňte zatížením tahem. Netahejte uchope-
ním za připojenou hadici.
•Symboly, které se nacházejí na vašem přístroji,
se nesmějí odstraňovat ani zakrývat. Nečitelné
pokyny na přístroji se musejí okamžitě vyměnit.
Rozsah dodávky
►Rozsah dodávky – s. 3
1. Ovládání čerpadla
2. Přívodní hadice s filtrem
3. T-kus (10×)
4. Kapač (10×)
5. Koncová zátka (2×)
6. Držák trubice (10×)
7. USB nabíjecí kabel
8. Adaptér na láhev
9. Závěsná pomůcka
10. Mikro trubice
11. Samostatný ventil
Montáž a instalace
►S. 4, bod 1
– Zavlažovací zařízení smontujte tak, jak je zná-
zorněné na obrázku. Trubici (10) nařežte na
požadované délky. Zavlažovací zařízení smon-
tujte pomocí T-kusů (3), zátek (5) a kapačů (4)
do požadované sestavy a připojte jej k boční pří-
pojce ovládání. Nasazování trubice je snadnější,
pokud se konce trubice předtím podrží v horké
vodě. Část filtrační trubice (2) spojte s přívodní
přípojkou ovládání.
►S. 4, bod 2
Systém může využívat různé zdroje vody:
A. Malá plastová láhev se bez adaptéru pro láhve
může připojit shora k jednotce ovládání. To je ide-
ální pro zavlažování malých rostlin, které nepo-
třebují mnoho vody.
B. U větších lahví, např. 4 l, 5 l, 6 l, musí být ovlá-
dání čerpadla spojené s uzávěrem láhve. Pou-
žijte adaptér pro láhve (8).
C. Je možné použít jakoukoliv otevřenou nádobu,
např. kbelík. Pro zavěšení ovládání čerpadla na
nádobu použijte držák.
►S. 5, bod 3
•Pokud se květináče nacházejí nad hladinou vody,
není nutné připojit samostatný ventil.
►S. 5, bod 4
•Pokud se květináče nacházejí pod hladinou vody,
musí se připojit samostatný ventil.
Naprogramování ovládání
– Pomocí regulátoru [ ] nastavte požadovaný
časový interval mezi zavlažováními.
– Pomocí regulátoru [ ] nastavte čas zavlažo-
vání. Trvání zavlažování nesmí být delší než
hodnota četnosti zavlažování!
– Nastavte čas spuštění zavlažování tak, že první
zavlažování posunete vůči aktuálnímu času. Za
tím účelem podržte tlačítko [ ] stisknuté déle
než 2 sekundy, dokud LED dioda nebude nepře-
tržitě svítit. Každý dalším stisknutím tlačítka se
přidá další hodina pro zpoždění začátku zavlažo-
vání. Například: Chcete-li každý den zalévat 5
minut a první zavlažování má začít v 18:00 hod.
a nyní je 12:00 hod., musíte začátek zavlažování
zpozdit o šest hodin tak, že 6x stisknete tla-
čítko [ ].
Příklad:
•Musíte zalévat každý den 5 minut. Nastavte: [ ]
= 24 hodin; [ ] = 5 minut.
•Změníte-li četnost nebo trvání zavlažování, další
čas zavlažování se dopočítá.
Poznámky:
•Během běžného provozu ovládání bude LED
dioda blikat každé 4 sekundy. Pokud bliká rychle,
např. 1 záblesk za sekundu, znamená to, že
baterie je téměř vybitá. Akumulátor lze nabíjet
pomocí USB kabelu. Je-li baterie téměř vybitá,
ovládání čerpadla je deaktiované.
Tlačítko zap./vyp. [ ] nebo manuální zavlažování:
•Drží-li se stisknuté déle než 5 sekund, může se
použít jako tlačítko zap./vyp. Drží-li se stisknuté
jednu sekundu, přejde ovládání do režimu manu-
álního zavlažování. Manuální zavlažování se
vypne automaticky po 15 minutách.
Prodloužení výdrže akumulátoru
Pro prodloužení provozu čerpadla lze použít externí
baterii „Powerbank“. Než rostliny necháte o dovolené
samotné, proveďte zátěžový test k docílení dobrého
výsledku. Celková výdrž akumulátoru závisí na typu
použité baterie.
Důležité upozornění: Ujistěte se, že je akumulátor
chráněný před vodou. Tento druh akumulátoru nepo-
užívejte v exteriéru. Vlhkost vzduchu a slunce ho
mohou poškodit nebo rozbít. A tím by mohlo dojít ke
zničení čerpadlového programátoru.
Další preventivní opatření
•Životnost právě zakoupeného výrobku prodlou-
žíte tím, že jej budete chránit před sluncem a
deštěm. Nepoužívejte při teplotách nižších než 0
°C nebo vyšších než 45 °C.
•Programátor nikdy nenabíjejte přes USB přípojku
na stěně, pokud je systém provozován s vodou.
Před nabíjením zařízení odpojte od zdroje vody a
vysušte jej.
Připravte likvidaci
Vyjměte akumulátor
Na konci životnosti přístroje musíte před likvidací
vyjmout z přístroje všechny akumulátory.
Před uvedením do provozu si přečtěte návod
na použití.
Poznámka: Akumulátor není vyměnitelný.
Bewaesserungspumpe_110234.book Seite 19 Montag, 25. November 2019 12:11 12

CZ
20
– Otevřete kryt.
– Odpojte kontakty a vyjměte akumulátor.
– Akumulátory zlikvidujte v souladu s předpisy.
Likvidace
Likvidace přístroje
Symbol přeškrtnutého kontejneru znamená:
Baterie a akumulátory, elektrické a elektro-
nické přístroje nesmějí být likvidovány spo-
lečně s domovním odpadem; mohou obsa-
hovat látky, které jsou škodlivé pro životní
prostředí a zdraví.
Spotřebitelé jsou povinni zneškodnit staré elektrické
spotřebiče, spotřebované baterie a akumulátory
odděleně od domovního odpadu na oficiálním sběr-
ném místě, aby se zajistilo správné další zpracování.
Více informací o vrácení vám poskytne prodejce. Vrá-
cení je bezplatné.
Baterie a akumulátory, které nejsou ve starých elek-
trických přístrojích vmontované, se před likvidací
musí z přístroje vyjmout a zlikvidovat v rámci třídě-
ného odpadu. Lithiové baterie a akumulátory všech
systémů se musí odevzdat na sběrném místě ve
vybitém stavu. Pól baterie musí být vždy přelepený,
aby se předešlo vzniku zkratu.
Každý koncový uživatel je sám zodpovědný za vyma-
zání osobních údajů z použitých přístrojů, které se
mají zlikvidovat.
Likvidace balení
Balení se skládá z kartonu a příslušně
označených plastů, které mohou být
recyklovány.
– Předejte tyto části na recyklaci.
Technické údaje
UPOZORNĚNÍ! Nebezpečí poranění třís-
kami! Nerozbíjejte přístroj násilím.
Číslo výrobku 110234
Typ akumulátoru 1× 18650, Li-Ion,
3,6 V, 2000 mAh
Nabíjecí napětí 5 V=, 500 mA
Provozní proud ≤500 mA
Napájení v pohotovostním reži-
mu ≤100 μA
Výška nasávání ≤2 m
Dopravní výška ≤2 m
Průtok 100–250 ml/min
Černost zavlažování 1, 3, 6, 12, 24, 48 h
3, 4, 5, 6, 7 d
Doby zavlažování 0.5, 1, 3, 5, 6, 7, 8,
10, 12, 15 min
Stupeň krytí IPX4
Teplotní rozsah 0°C – 45°C
Bewaesserungspumpe_110234.book Seite 20 Montag, 25. November 2019 12:11 12
This manual suits for next models
1
Table of contents
Languages:
Other Lux Tools Irrigation System manuals