LYSON W4020 Service manual

Installation Instruction Manual
Przedsiębiorstwo Pszczelarskie Tomasz Łysoń
Spółka z o.o. Spółka Komandytowa
34-125 Sułkowice, ul. Racławicka 162, Polska
www.lyson.com.pl, email; [email protected]
tel. 33/875-99-40, 33/870-64-02
Headquarters: Klecza Dolna 148, 34-124 Klecza Górna

Before installing the dehumidifier, the dehydrator must be
unplugged.
Unscrew the middle part of the air vent
And in its place screw in the hose end A
Unscrew the air filter and replace it with the
hose with clamp B
Dehumidifier control
A
B

1 2 3 4 5
6 7 8 9
Controller:
1.relative humidity value display
2.work status indicator light
3.defrosting indicator light
4.memory indicator light
5.condensation water container full indicator light
6.memory button
7.humidity increasing button
8.humidity decreasing button
9.ON/OFF button

Dehumidifier 2 8 7
1-dry air vent
2-condenser
3-evaporator 1
4-humid air intake
5-filter
6-water container
7-motor
8-fan
9-compressor
9
Warning!
► The device must always be in the upright position.
► Leave the appliance in a standing position for one hour before connecting it to the mains after
transporting it or when it has been tilted (e.g. during cleaning).
► Keep any objects away from the air inlet and outlet openings.
► The electrical supply must comply with the specifications indicated on the rating plate on the back
of the unit.
► If the power cord is damaged, it must be replaced by an authorised service technician (qualified
person) to avoid any danger.
► Do not, under any circumstances, use the plug to switch the appliance on and off. Always use the
switch on the control panel.
► Before moving the unit, first switch it off and then empty the water tank.
► Do not use bug sprays or other flammable cleaners.
► Under no circumstances should the unit be flooded or sprayed with water.
► THIS EQUIPMENT IS NOT INTENDED FOR USE BY PERSONS (INCLUDING CHILDREN) WITH
REDUCED PHYSICAL, SENSORY OR MENTAL CAPABILITIES, OR LACK OF EXPERIENCE AND
KNOWLEDGE OF THE EQUIPMENT, UNLESS SUPERVISED BY A PERSON RESPONSIBLE FOR
THEIR SAFETY OR FOLLOWING THE INSTRUCTIONS GIVEN IN THIS MANUAL.
► WORK
1. Plug the unit into the correct power outlet. (Please refer to the rating plate on the back of the unit for
the correct voltage/frequency).
2. Press the "ON/OFF" button to switch the unit on. At the first start-up, after pressing only the "ON/
OFF" button without setting the memory, the compressor will start (provided the humidity level in the
room is higher than 50%).

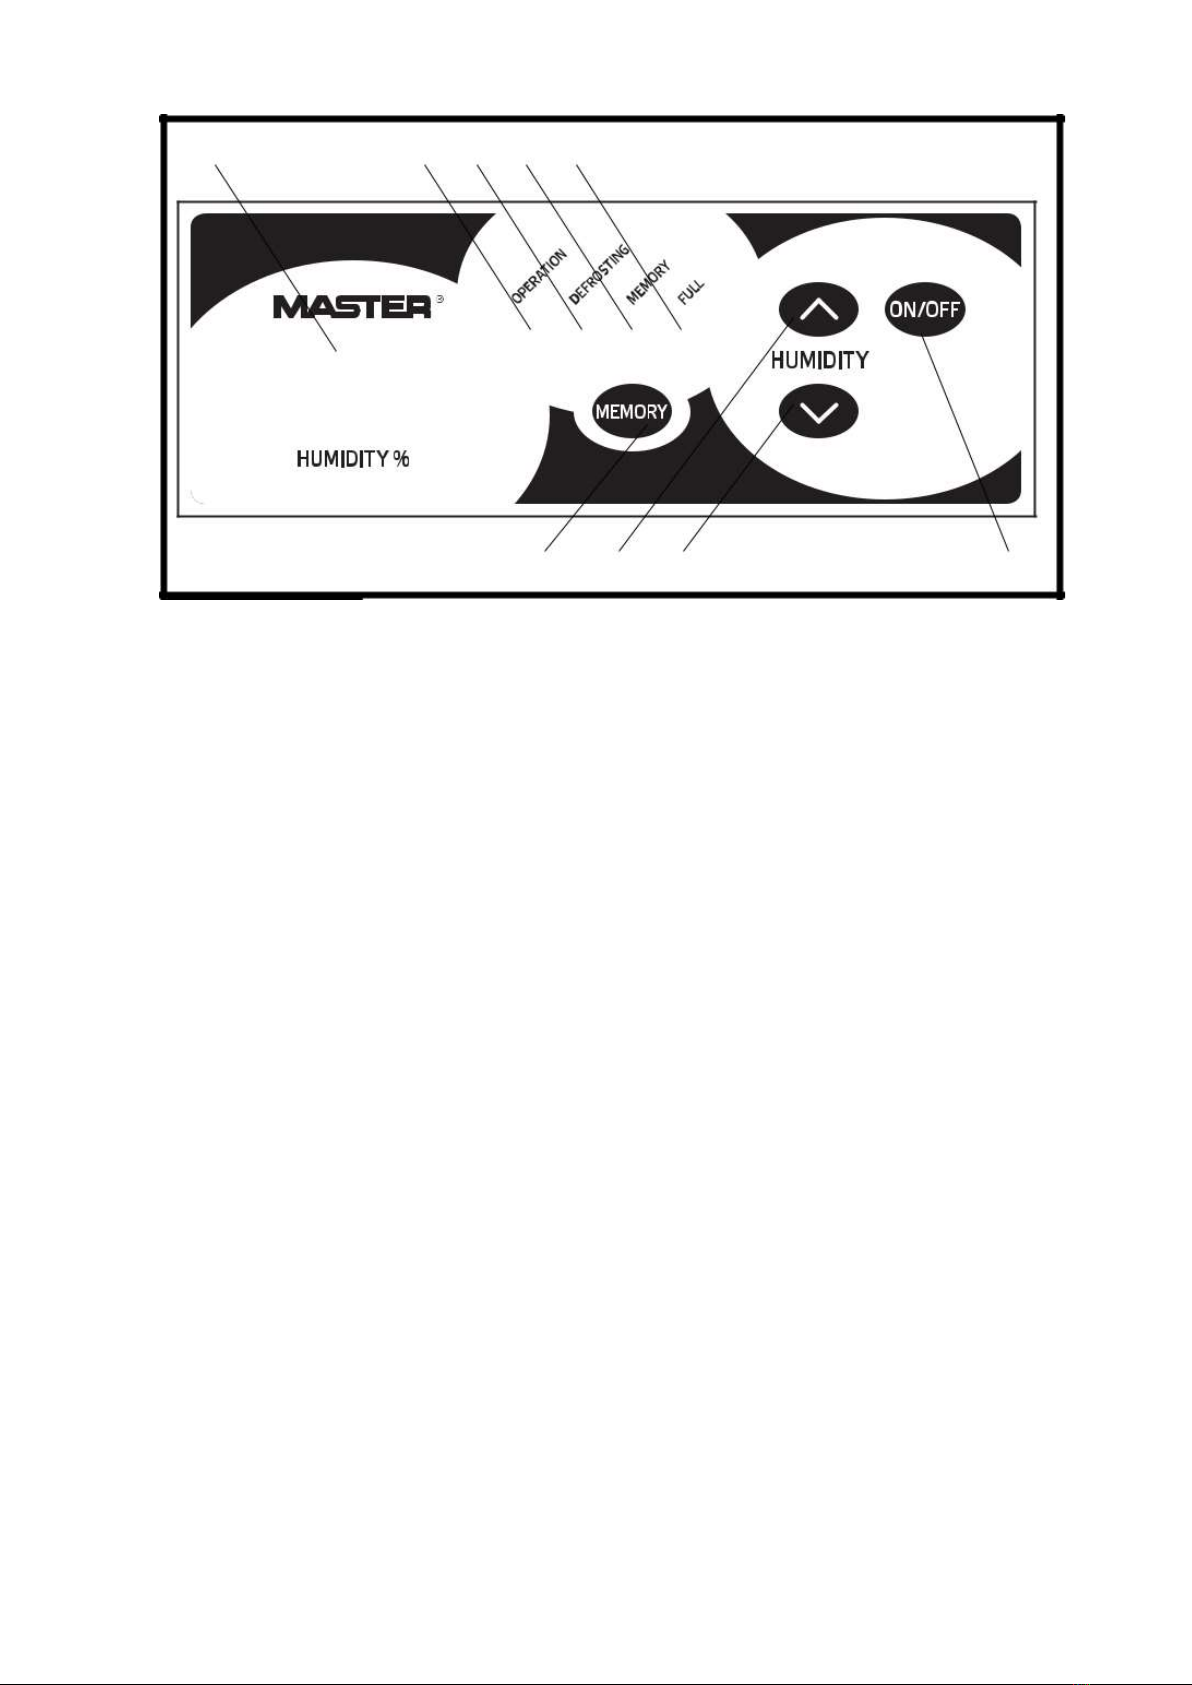
3. Press the decrease or increase button to select the desired humidity level. The available humidity
range is 40%~80%, each press of the corresponding button decreases or increases the humidity by
1%. The humidity set will be shown on the display for 8 seconds, after which the display will show the
actual humidity level in the room again. When the desired humidity level is reached, the compressor
switches off automatically.
***The display shows the humidity in the range 35%~95%, if the humidity level in the room is lower
than 35%, the display shows" LO", if the humidity level is higher than 95%, the display shows" HI".
4. Press the "ON/OFF" button again to switch off the device.
5. When the unit is started for the first time or restarted after a sudden shutdown, the compressor
switches on after 3 seconds for safety purposes.
►► DEFROSTING
The unit has a hot gas defrost function. After 30 minutes of operation the unit automatically checks the
system temperature for defrosting. If the temperature is ≤-1°C, the unit enters hot gas defrost mode,
then the defrost indicator is lit. During defrosting the compressor and the fan are running. This process
lasts for 5 minutes (when the system temperature reaches 10°C, the unit automatically exits defrost
mode).
►► MEMORY
When the Memory button is pressed, the memory display comes on and the unit stores the last
settings in its memory.
►► WORK HOURS COUNTER
1. A special counter is used to count down the operating time of the device.
2. The 7-digit display counts the running time only forward and never goes back to zero.
►►► 6. WATER DRAINING
If the unit is placed incorrectly, the full tank indicator will light up red. When the water tank is full, the
compressor will stop and the “full” indicator will light red and the unit will buzz.
To remove the water tank, carefully pull it out of the unit, preventing it from tilting. After emptying, slide
the tank into place. Ensure that it is positioned in the correct way. The full tank indicator will then
switch off and the appliance can be restarted.
CONTINUOUS DRAINING
When operating in excessively humid conditions, the tank requires more frequent water drainage. In
such a situation, it is more convenient to adapt the unit for continuous drainage by following the
instructions below:
► Remove plug, keep for future use.
► Attach one end of the drain hose to the drain, slide the other end of the hose into the water
drain. DE

CLEANING AND MAINTENANCE
Always disconnect the unit from the mains supply before carrying out maintenance or cleaning.
► Remove the filter.
► Clean it gently with a hoover. Use warm water with a small amount of a gentle detergent in
case of a heavily soiled filter.
► Make sure the filter is completely dry before inserting it back.
► Do not expose the filter to sunlight.
STORAGE
If the unit is not used for a long period of time, switch it off. The power cord should be unplugged
and cleaned.
Empty the water tank completely and wipe clean.
The device should be covered and stored in a place where it will not be exposed to sunlight.
Waste disposal and environmental protection
The used product must be disposed in accordance with the local regulations. Return the device
to a collection point from where it can be submitted for environmentally compatible recycling.
The consumer has the right to return used equipment directly to the manufacturer's distribution
network, free of charge, while replacing it with a new unit as long as the used device is of the
same kind and same application as the newly purchased device.
Gwarancja
The product purchased from the Lyson Company is covered by a manufacturer's warranty. The
warranty period is 24 months from the date of purchase.
All purchased products come with receipts or VAT invoices.
Warranty details at:
www.lyson.com.pl
This manual suits for next models
2
Table of contents
Popular Dehumidifier manuals by other brands

Mycond
Mycond ROOMER 12 user manual

SUNTEC
SUNTEC Klimatronic DryFix 20 Design instruction manual

Heinner
Heinner HDU-10 instruction manual

Kenmore
Kenmore 59600 owner's manual

Quest Engineering
Quest Engineering Quest 150 Dual Installation, operation and maintenance instructions

TOTALINE
TOTALINE TOTALINE P707 Installation and operation instructions