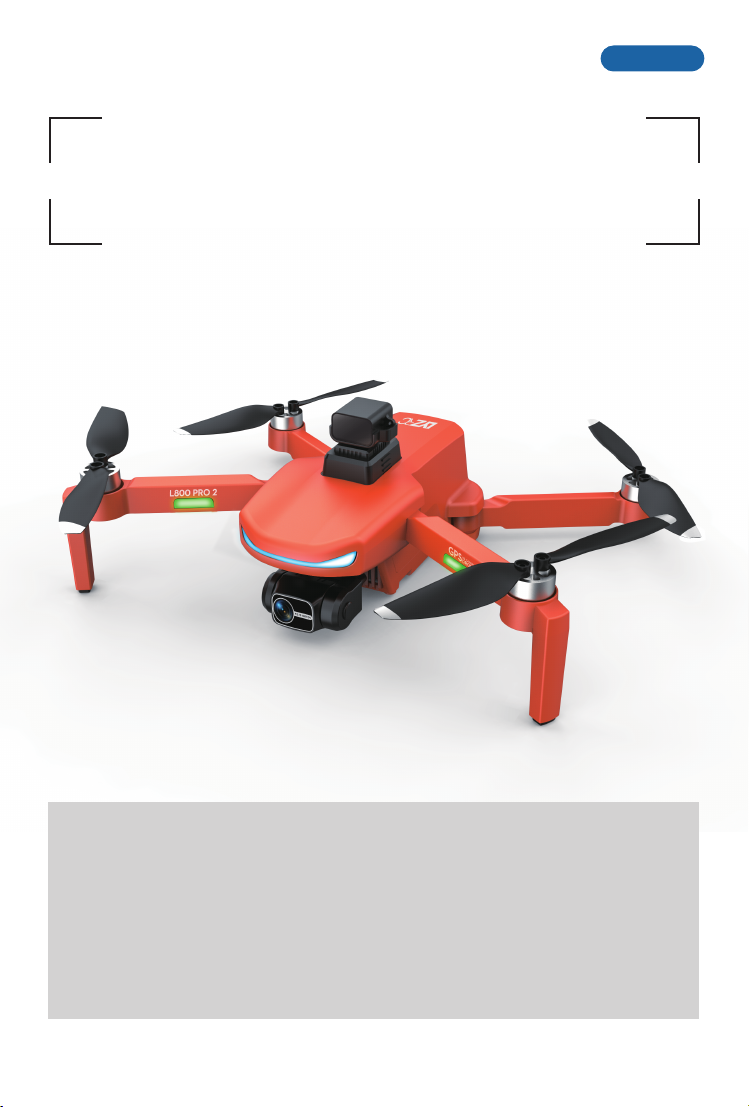
LYZRC L800 PRO 2 User manual

AGE:14+
Safety precautions:
1 in order to ensure the electromagnetic environment requirements of aviation radio station (station), it is prohibited to use various model
remote controllers in the area with the center point of airport runway as the center point and the radius of 5000M. During the period
when the relevant departments of the state issue radio control orders and regional areas, the use of model remote controllers shall be
stopped as required. Please fly in warm, clear, windless weather. Do not fly in severe weather conditions such as overheating,
overheating, strong wind, rainstorm, etc. Please choose indoor or outdoor open area, and keep a safe distance from people, pets,
empty overhead wires and other obstacles. Make sure that no other uses the same frequency. Do not let the aircraft out of sight.
2 after the aircraft is started, please do not contact the high-speed rotating part of the aircraft and keep a distance from the high-speed
rotating propeller to avoid the risk of strangulation. (Including gears, rotors, etc.)
4.During and after the use of the aircraft, the battery and motor will generate high temperature. Please do not touch it to avoid the risk
of scalding.
4 do not look directly at the light beam of the LED to avoid affecting the eyes.
Warm Tip: It is suggested that beginners practice flying at low altitude in an open and unmanned place for
about 3 days, and then fly to high altitude after being familiar with flying
3-AXIS GIMBAL GPS AERIAL DRONE
OPERATING INSTRUCTIONS

11
22
-1-
Gimbal camera
Pre-flight preparation
flight environment
indoor: Spacious space away from obstacles,
crowds or pets are preferred.
Outdoor: Sunny, windy and sunny weather
are preferred.
Please keep the UAV in line of sight and away
from obstacles, high-voltage cables, trees and
personnel during the flight.
Do not fly in extreme environments, such as
heat, cold, strong wind or heavy rain.
1. The fan blade to be replaced must be replaced corresponding to the relative position on the machine.
Fan blade A needs to be installed at position A, and fan blade B needs to be installed at position B.
If fan blade is replaced incorrectly, it can not be controlled.
2. When flying, the fan blade A rotates clockwise, and the fan blade B rotates counterclockwise.
1. Important note
This product is not a toy, wrong use will cause damage.
Please follow the instructions before using this product. Do not disassemble the product yourself. Otherwise, the manufacturer is not
responsible for any damage.
2. Safety instructions
Warning: It is necessary to fly in a safe area or away from others, and do not control the aircraft above a dense crowd. Due to the pilot's
operation error or wireless interference in the operation process, accidents and failures are easy to occur, and damage or injury to the
crowd is easy to occur.
Prohibition: Especially for indoor and outdoor flight, please keep away from obstacles This product is suitable for both indoor and
outdoor flight (wind strength not more than 4). Please choose a place that is free from obstacles, crowds and pets, passers-by, such as,
heating source, heat source, electric wires or electronic power source will not collide with the drone, landing, entanglement, or cause fire,
electrocution and damage to life and property.
Warning: As this product is mainly suitable for people over 14 years old, it may be difficult to learn at first, we recommend you to ask an
experienced pilot for guidance.
Blade replacement:
Subject
Fan blade A
Electric machine
Boom
Fan blade B
Obstacle
avoidance
equipment

-2-
Right hand throttle
Aerial Mobile phone rack
One key return
Power switch
GPS switch
Power indicator
Gyroscope calibration
Geomagnetic calibration
Right control lever
Unlock
Left joystick
Remote control function key and name Description:
Instructions for remote control handle/mobile phone rack:
Lift the mobile phone rack in the middle of the remote controller upward (FIG. 1), and stretch upward to
place the mobile phone (FIG. 2).
Remote control handle: Pull the bottom handle of the remote control down from the middle position and
rotate it into place(FIG. 3).
Note: When the satellite can not be found indoors or outdoors, if the GPS needs to be turned off to start
the aircraft, press and hold the GPS key for 3 seconds, the remote controller "drops" and the display
screen of the remote controller displays "GPS OFF."At this time, press the unlocking key, and the wing
of the aircraft starts to rotate and is ready to take off.
FIG. 1 FIG. 2 FIG. 3
Velocity conversion Camera adjustment
Headless mode
Photo/video
GPS indicator
Charging indicator
Liquid crystal display Headless indicator
Number of satellites
GPS switch
Remote control Electric quantity
Drone Electric quantity
Left hand throttle
Flying distance
Flying height
Note: For mobile phone control,
please refer to the supplied
camera manual mobile phone rack
Long press left and
right hand switch
Left-handed switching:
Default left-handed throttle, long press "left-handed switching key" before linking to switch to right-handed throttle.

-3-
Take out the drone battery: Hold down the position shown in Figure 1, and pull it back to take out the battery.
Please use the original charging cable provided in the
package to connect the USB charger plug to the
computer or mobile phone charger. When charging, the
red light on the Android plug on the battery is on, and
the red light is off and the green light is on when it is
fully charged. (Charging time is about 120 minutes)
Note: If the battery is plugged into the charger and the Android headlight on the battery is on, no
recharging is required
Charging
socket
Instructions for charging controller:
Insert the charging plug of the charging wire into the charging socket of the remote controller, and then connect
the USB charger plug to the computer or mobile phone charger for charging. When charging, the charging
indicator lights up, and the indicator lights out after full charging. (Charging time is about 60 minutes)
Note: If the charge indicator does not change during charging, this indicates that the battery is fully
charged and does not need to be recharged.
Charging
indicator
Instructions for charging drone lithium battery:
Battery charging steps:
Pre-flight environmental requirements:
Please choose an open indoor or outdoor environment without rain and snow and wind force less than
Level 4 to fly. Please stay away from people, trees, electric wires, tall buildings, airports and signal
transmission towers when flying.
!● When charging the rechargeable battery, do not use it for children alone. It must be carried out under the
supervision of an adult. It must be kept away from flammable materials during charging. The guardian should not
leave the aircraft outside the surveillance range during charging.
● Do not short circuit or squeeze the battery to avoid explosion.
● The power supply terminals should not be taken out of the model, and the terminals should not be short-circuit-
ed; do not short-circuit, disassemble or throw the battery into fire; do not place the battery in high temperature and
heat places (such as in a fire or near an electric heating device).
● The model can only use the recommended charger. Regularly check the charger's wires, plugs, shells and other
parts for damage. If you find any damage, stop using it until the repair is complete.
● The charger is not a toy; the charger can only be used indoors.
● The battery must be charged and stored after the flight. If not in use, it is recommended to charge the battery at
least once every 3 months to avoid over-discharging the battery and permanently damaging the battery.
Power Adapter
(Not included)
Power Adapter
(Not included)
It is recommended to use 5V
1-2A power adapter for charging.
It is recommended to use 5V 1-2A power adapter for charging.
Please use the
original charging cable

-4-
Remote controller Video picture shooting instructions:
Video recording
Photograph
Remote control video key, gently press to take photos,
long press to record.
2.Geomagnetic calibration operation
1. UAV frequency and gimbal calibration
3.Gyroscope calibration operation
Place the UAV in a horizontal position, press and hold the "gyroscope calibration" button on the remote controller
(Figure 4), and press and hold for 3 seconds, the UAV light flashes slowly, and the remote controller sends out a
"Di" sound to indicate that the calibration is successful.
As the geomagnetic field is easy to be interfered by other electronic devices, which leads to abnormal data and
affects the flight. Therefore, it is necessary to calibrate the ground magnetism for the first time. Please follow the
steps below to calibrate the ground magnetism and press the remote control (Figure 1) button for 3 seconds, the
remote control will emit a "Di" sound, and the drone light will change from slow to fast flashing, then you can calibrate
it. Hold the UAV in your hand, press (Figure 2) to slowly rotate clockwise for 3 turns in the horizontal direction, the
indicator light on the UAV changes from flash to slow flash, and the remote controller sends out a "Di" sound,
indicating that the horizontal Calibration is successful. At this time, it can be carried out in the vertical direction
(Figure 3). The nose slowly rotates clockwise for 3 turns downward, the red indicator light on the rear of the UAV
slowly flashes and becomes normally on, and the remote controller sends out a "Di" sound to indicate that the
calibration is successful.
Special note:
1. When the calibration of the UAV is completed, place the UAV horizontally in a wide outdoor place, the green light in
front of the aircraft flashes slowly, wait for about 30 seconds for the green light in front of the UAV fuselage to
become normally on, and send out "Di" to indicate that the star Search is successful.
2. Please take the drone to an open area for calibration.
3. The longitude and latitude of each region are different, New customers must calibrate the geomagnetism for the
second takeoff. For example, the difference between Guangdong and Beijing is 28 degrees. Therefore,
non-calibration shows that forward and backward flight is not a straight line flight. Calibration is for the accuracy of
the barometer's height measurement.
FIG. 1 FIG. 2
FIG. 4
FIG. 5
FIG. 3
UAV flight tutorial:
Put the drone on the horizontal ground and turn on the power, then turn on the remote control power, at this time the
lights on the aircraft flashes quickly, the lights on the remote control flashes. Then push up the left joystick of the
remote control and pull down, and the remote control "Di" will beep three times. At this time, the front and back lights
on the UAV will change from slow flashing before and after to alternate slow flashing, indicating that the pairing is
successful. After the linking is successful, it will be automatically calibrated for about 30 seconds, and the gimbal will
automatically return to a level state, and the calibration will be successful.(After the second frequency comparison
after calibration at the same position, the headlight flashes slowly and then the lamp lights up for a long time to
directly enter the star Search state)
After successful calibration, the green indicator light in front of the UAV flashes
slowly, and the red indicator light in the rear is always on. Put the UAV in a
horizontal position for about 30 seconds. The green indicator light in front of the
aircraft changes from slow flash to constant light, the satellites on the remote
control display more than 8 satellites.and the remote controller sends out a "Di"
sound to indicate that the star Search is successful. At this time, press and hold
the "unlock button" of the remote controller (Figure 5) to fly.
4.Search for GPS signals:
( Must be calibrated before takeoff )

-5-
FIG. 1
FIG. 2
FIG. 3
FIG. 4
Manipulation method
When the left lever (accelerator) is pushed upwards, the speed
of the main wind blade increases and the aircraft goes up.
When the left lever (accelerator) is pushed downward, the
speed of the main wind blade slows down and the aircraft
descends
When the left lever (rudder) is pushed to the left,
the aircraft head turns to the left, when pushed to
the right, and the head turns to the right.
When the right lever (rudder) is pushed up, the
aircraft goes forward.
When the right lever (rudder) is pushed down, the
aircraft goes backward.
When the right lever (rudder) is pushed to the right,
the aircraft flies to the right.
When the right lever (rudder) is pushed to the left,
the aircraft flies to the left.
Operation description of remote control function:
Warning: When the Drone is 30 cm away from the ground, the Drone will become unstable due to the
influence of its own blade eddy current, which is called "ground effect reaction". When the height of the
Drone is lower, the effect of ground effect reaction is the largest.
When the drone has successfully positioned itself outdoors, the drone needs
to be unlocked to start, press and hold the remote control.
Press the "unlock" button (Figure 1). At this time, the four propellers rotate at
the same speed, indicating that the unlocking is successful.
When the unlocking is completed, the UAV can operate and fly normally.
1. UAV unlock
2. speed gear adjustment
The take-off speed gear of the UAV defaults to slow gear. When the UAV
flies in the air, the speed gear can be adjusted through the knob (Figure 2).
Rotate the speed knob to the right. The remote controller "drops" twice
indicates that it enters the second gear. When the remote controller is
rotated, the remote controller "drops" three times indicates that it enters the
third gear high-speed mode. Otherwise, the left turn indicates that it enters
the second gear and the first gear low-speed.
3. Camera angle adjustment
The angle of the camera can be adjusted
through the camera adjustment knob
(Figure 3) during UAV flight. Knob right
turn camera angle decreases, knob left
turn camera angle increases
4.headless mode
Place the UAV directly in front of the remote controller, with the nose of the
UAV facing forward, calibrate and take off horizontally after frequency
alignment, press the headless mode button (Figure 4) during flight, and the
remote controller "drops" three times, indicating that the UAV enters
headless mode. At this time,The UAV's front indicator lights flash slowly. To
exit headless mode, press the headless mode button again, and the remote
control drops to exit headless mode.
Make sure that the operator is facing the same direction from beginning to end, in the same direction as the aircraft
took off. At this time, no matter which direction the aircraft faces, the operator dials the direction rocker to retreat,
v and the aircraft will retreat towards the operator.

-6-
Obstacle avoidance function (need to be purchased separately)
Use and effect of obstacle avoidance function
5M
10M
15M
20M
5M
10M
15M
20M
When the drone flies on the left side, as
shown in Figure 7, 20 meters from the
left side of the drone is the effective
scanning range of the obstacle avoider,
and the scanning path is about 90°
between the two arms on the left side.
The same applies to the scanning range
of the shock absorber flying backwards
or right.
When the drone is flying, as shown in
Figure 6, 20 meters in front of the drone
is the effective scanning range of the
obstacle avoider, and the scanning
path is about 90° between the two
arms in the flying direction.
The position where the UAV stops
flying is determined by the flight
speed, when the UAV is flying at full
speed in low gear. After the drone
scans the obstacle at 20 meters, it
starts to calculate and issue a stop
flight instruction. The stop position
of the drone is determined by the
flight speed (the faster the flight
speed, the closer the distance
between the drone and the obstacle,
and the opposite flight The slower
the speed, the farther the distance
between the drone and the obstacle)
When the UAV encounters obstacles
and hover in the scanning range of 20
meters in the flying direction, the UAV
cannot continue to fly in that direction,
and can continue to fly after avoiding
the obstacles or to other obstacles
within 20 meters. In the direction of
flight.
When the UAV takes off, there is an obstacle within 20 meters of the forward direction. The UAV cannot fly in this direction. It can continue
to fly after avoiding the obstacle or fly in the direction of other obstacles within 20 meters.
6. If the UAV encounters an obstacle during GPS intelligent return, the obstacle avoidance device will rise to a safe height again after
scanning the obstacle before returning.
Precautions for the installation and use of obstacle avoidance equipment:
Obstacle avoidance function and working principle
Use note:Obstacle avoidance equipment must be installed before turning on the power of the drone, otherwise it will damage the obstacle
avoidance equipment and affect normal use.
1. Take out the cover for the
installation position of the
obstacle avoidance equipment
2. Insert the obstacle avoidance
equipment as shown in the
picture
The obstacle avoidance equipment will rotate left and right when it is
running. Do not manually interfere with it to prevent it from rotating
when it is rotating, otherwise the equipment may be damaged.
FIG. 6
FIG. 8 FIG. 9
FIG. 7
FIG. 5
Special suggestion:
it is suggested that when the LED light in front of the body flashes slowly during Drone flight, the remote control makes
a "Di" sound,it indicates that the Drone has insufficient power. When the Drone power is insufficient or loses the signal
during flight, the aircraft will automatically enter the return mode and fly back according to the original route.
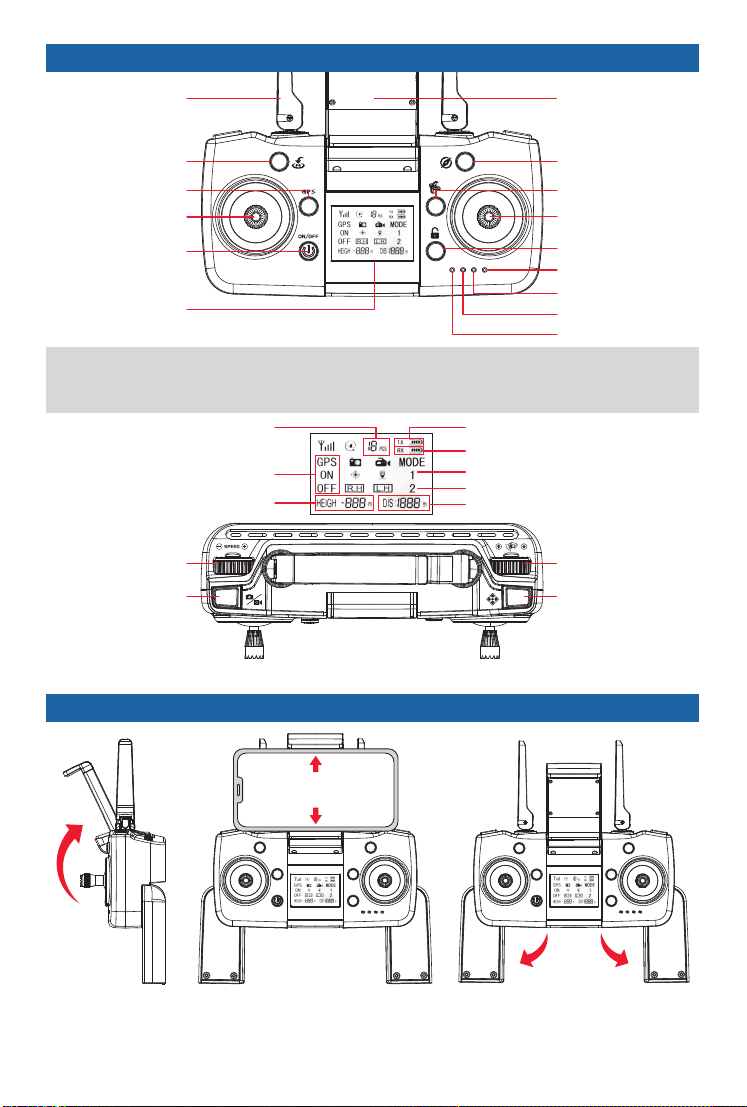
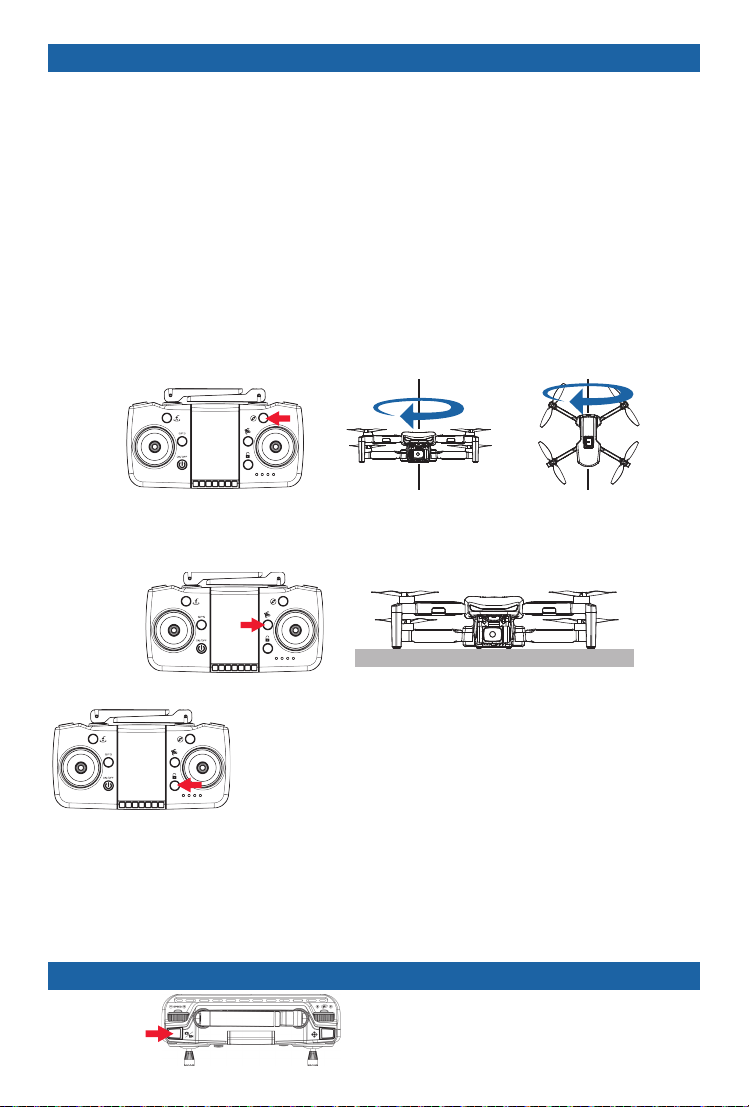
5.One-press for return
When the drone is flying in the air, press
this function button on the remote control
(Figure 5), it will automatically rise or fall
to a height of 50 meters, return straight
and land to the take-off location.
One-press for return
Starting point
End point
When turning on this product, do not touch the obstacle avoidance equipment, because the obstacle avoidance equipment is in the power-on
working state, unauthorized touching will cause the obstacle avoidance equipment to not work normally, and it will most likely damage the
obstacle avoidance equipment function.
When removing the obstacle avoidance equipment, the power of the drone must be turned off before dismantling, otherwise it will damage
the obstacle avoidance equipment and affect normal use.
The product is turned on by default in low-speed mode (50%). The drone has 360° obstacle avoidance function, such as switching to high-
speed mode (100%). Because the aircraft is flying fast, the system has not received the instruction to stop the flight. The aircraft may have
hit an obstacle, and the UAV's obstacle avoidance function automatically fails.
20M
20M
No obstacle
avoidance
No obstacle
avoidance
No obstacle
avoidance
No obstacle
avoidance
No obstacle
avoidance
No obstacle
avoidance
obstacle obstacle
Can go back
Unable to move forward
Can fly left Can fly right
(Please fly in outdoor GPS mode, the indoor space is too small to affect the flight status.)

-7-
Arm components
Receiving board
Obstacle avoidance
equipment
Gimbal camera
components
Resolution guide for common problems
Problems Causes Resolutions
Drone indicator is flashing
while not respond when
operating
1. Unsuccessful Drone
GPS souxing
2. Low power of Drone
1. Move the Drone to an empty place
to perform souxing again
2. Charging the battery
Drone blades turn but
can't fly
1. Low battery
2. Blade deformation
1. Charging the battery
2. Replacement of blade
Can’t keep the drone steady
after fine-tuning to the bottom
1. Blade deformation
2. Poor motor
1. Replacement of blade
2. Replacement of motor
After impact, uncontrolled
flying of Drone when start
again
Triaxial acceleration sensor
overbalances due to impact
Make the Drone standstill for 5-10
seconds
The drone was badly shaken
Blade deformation Replacement of blade
Accessories
Upper cover Lower lid paddle A/B
USB charging cable Remote controlBattery
Table of contents