M-WAVE Stalwart Carry Fold 2 Manual

Bicycle Cargo Trailer ›Stalwart Carry Fold 2‹
Owner’s Manual & Instructions
Please read through this manual and following the instructions before and during use.
1. Assembly of the wheels
Fixing the wheels: Please remove the two black protective caps on each wheel. Unscrew the parts marked”
inside“ in the picture from the quick-action tension jack and push the quick-action tension jack together with
the parts marked“outside“ through the wheel axle. Take one wheel and position it in the guide way provided in
the frame in such a way as to ensure that the quick-action tension jack lever is located
on the outside of the trailer. Now, remount the parts marked„inside”onto the quick-action tension jack,
observing the sequence shown in the picture and then tighten it. Please proceed along the same lines on the
opposite side with the other wheel.
PLEASE NOTE: Ensure that the retaining washers (a) are positioned in the recesses in the frame.
Compatible with hand cart towing bar (art. 640063)
illustration with hand
towing bar (art. 640063)

2. Installing the Tow Bar
Fixing the tow bar: In order to x the tow bar push the round end into the receptacle provided(Figure 1)on the
left-hand side, Secure the inserted tow bar with the quick-action tension jack supplied (Pos.a)and the locking
pin(Pos.b)(Figure 2).The bend in the tow bar is now facing the right with respect to the direction of travel.
Important: Ensure that the pin is securely locked, because a loose tow bar could result in your losing
control of the trailer while riding.
3. Unfolding the Trailer
With the trailer frame lying at, raise the side panels so that they are vertical. Position the roll bar into place until
the holes in the side panels and the holes on the ends of roll bar are line up. Insert the knob from outside of the
side panel and then into the thread on the end of the roll bar. Repeat for the other side and fully tighten both
knobs.
4. Attaching the Safety Flag
Insert the ag pole into the ag pocket on the left rear corner of the side panel. Always use the safety ag. It’s an
essential safety device, which can help make you more visible to motorists and other cyclists.

5. Hitching the Trailer on the Bicycle
NOTE: The universal hitch is only suitable for bicycle with full axle or/and with quick release axle.
5.1. Bicycles with Full Axle
Remove the left hand axle nut from the bicycle. Any spacers or washers can generally be retained. Put the hitch
on the axle and re-attach the nut.
WARNING: The axle nut must be tightened on the axle thread by at least 5 full turns, so that adequate clamping
force is ensured. A thread which is too short can result in accidental loosening of the rear wheel and therefore
cause serious injury or death. If in doubt, contact your specialist dealer.
5.2. Bicycles with Quick Release Axle
Remove the quick release from the bike and guide it through the hitch along with the quick release axle.
Push the quick release through the wheel hollow axle again, screw the nut and clamp the quick release with
the correct pressure.
In order to ensure that the hub is clamped suciently
in the hollow axle, the quick release lever must begin
gripping as it moves from the open to the middle
position, and approaching the closed position you
should clearly feel resistance as you tighten. If it is too
easy or too dicult to move the quick release lever,
tighten or loosen the quick release nut on the other side
of the hub.
WARNING: The thread of the quick release nut must
be tightened on the quick release axle by at least 5 full
turns, so that adequate clamping force is ensured. A quick
release axle with is too short can result in accidental
loosening of the rear wheel and therefore cause serous
injury or death. If in doubt, contact your specialist dealer.
Insert the safety pin through holes in both hitch and hitch connectors. Rotate and lock up the pin.
Wrap the safety strap around the chain stay and fasten it to the tow bar D-ring with the snap hook.
WARNING! Hitch and safety strap must be properly installed. Inspect the hitch and tow bar frequently
for any damage or loose fasteners. Damaged or improperly installed can result in serious injury or death.
Safety Instructions:
• The trailer is intended to carry house goods only. No human passengers!
• Maximum load: 60 kgs
• Maximum speed: 16km/hour.
• Always wear a helmet when riding.
• Carefully check the bolts, nuts and safety pins.
Make sure that all these parts are properly tightened or locked.
• Be aware that riding with the trailer increases your braking distance and may aect your
ability to control the bicycle. Thoroughly practise in a safe area until you become familiar with it.
• Only use factory-supplied wheels, with the tires inated to 30-35 P.S.I. Check pressure before each use.
• Do not make any alterations to the trailer or hitch, which could result in injury or death.

Transportanhänger ›Stalwart Carry Fold 2 ‹
Bedienungsanleitung
Wir gratulieren Ihnen sehr herzlich zum Kauf dieses Transportanhängers!
Bitte lesen Sie die Anleitung aufmerksam durch und bewahren Sie diese auf.
1. Rädermontage
Räder einsetzen: Entfernen Sie die schwarzen Abdeckkappen von den Rädern.
Nehmen Sie die mit„Innen“ markierten Teile vom Schnellspanner und schieben Sie den Schnellspanner mit
den„Außen“-Teilen durch die Laufradachse. Stecken Sie das Laufrad so in die am Rahmen dafür vorgesehene
Halterung, dass der Schnellspannhebel außen am Anhänger sitzt. Montieren Sie jetzt die„Innen“-Teile wieder auf
den Schnellspanner in der korrekten Reihenfolge. Dann den Schnellspanner festziehen (vgl. dazu auch Punkt 6).
Wiederholen Sie dies beim zweiten Rad.
BITTE BEACHTEN: bitte stellen Sie sicher, dass die Haltenasen der Beilegscheiben (a) in die dafür vorgesehenen
Löcher am Rahmen greifen.
Kompatibel mit Handdeichsel (Art. 640063)
Abb. mit Handdeichsel
(Art. 640063)

2. Montage der Zugstange
Schieben Sie das runde Ende der Zugstange in die dafür vorgesehene Halterung links (Bild 1). Sichern Sie die
Stange mit dem beiliegenden Sicherungsstift mit Spange (Bild 2 – a). Die Biegung in der Stange zeigt jetzt nach
rechts in Fahrtrichtung.
Wichtig: Stellen Sie sicher dass der Pin sicher eingerastet ist; eine lockere Zugstange kann zum Kontrollverlust
beim Fahren führen.
3. Den Anhänger aualten
Wenn der Anhänger zusammengefaltet ist, stellen Sie die Seitenwände vertikal auf (Bild 1). Positionieren Sie die
Querstange so, dass ihre Löcher und die Löcher der Seitenteile sich decken (Bild 2). Führen Sie den Drehknopf
von außen ein und ziehen Sie ihn fest. Auf der anderen Seite wiederholen (Bild 3).
4. Anbringung der Flagge
Stecken Sie die Flagge in die dafür vorgesehene Tasche. Benutzen Sie immer die Flagge. Sie ist eine wichtige
Sicherheitsausrüstung und hilft Ihnen, von Autos und Motorrädern gesehen zu werden .

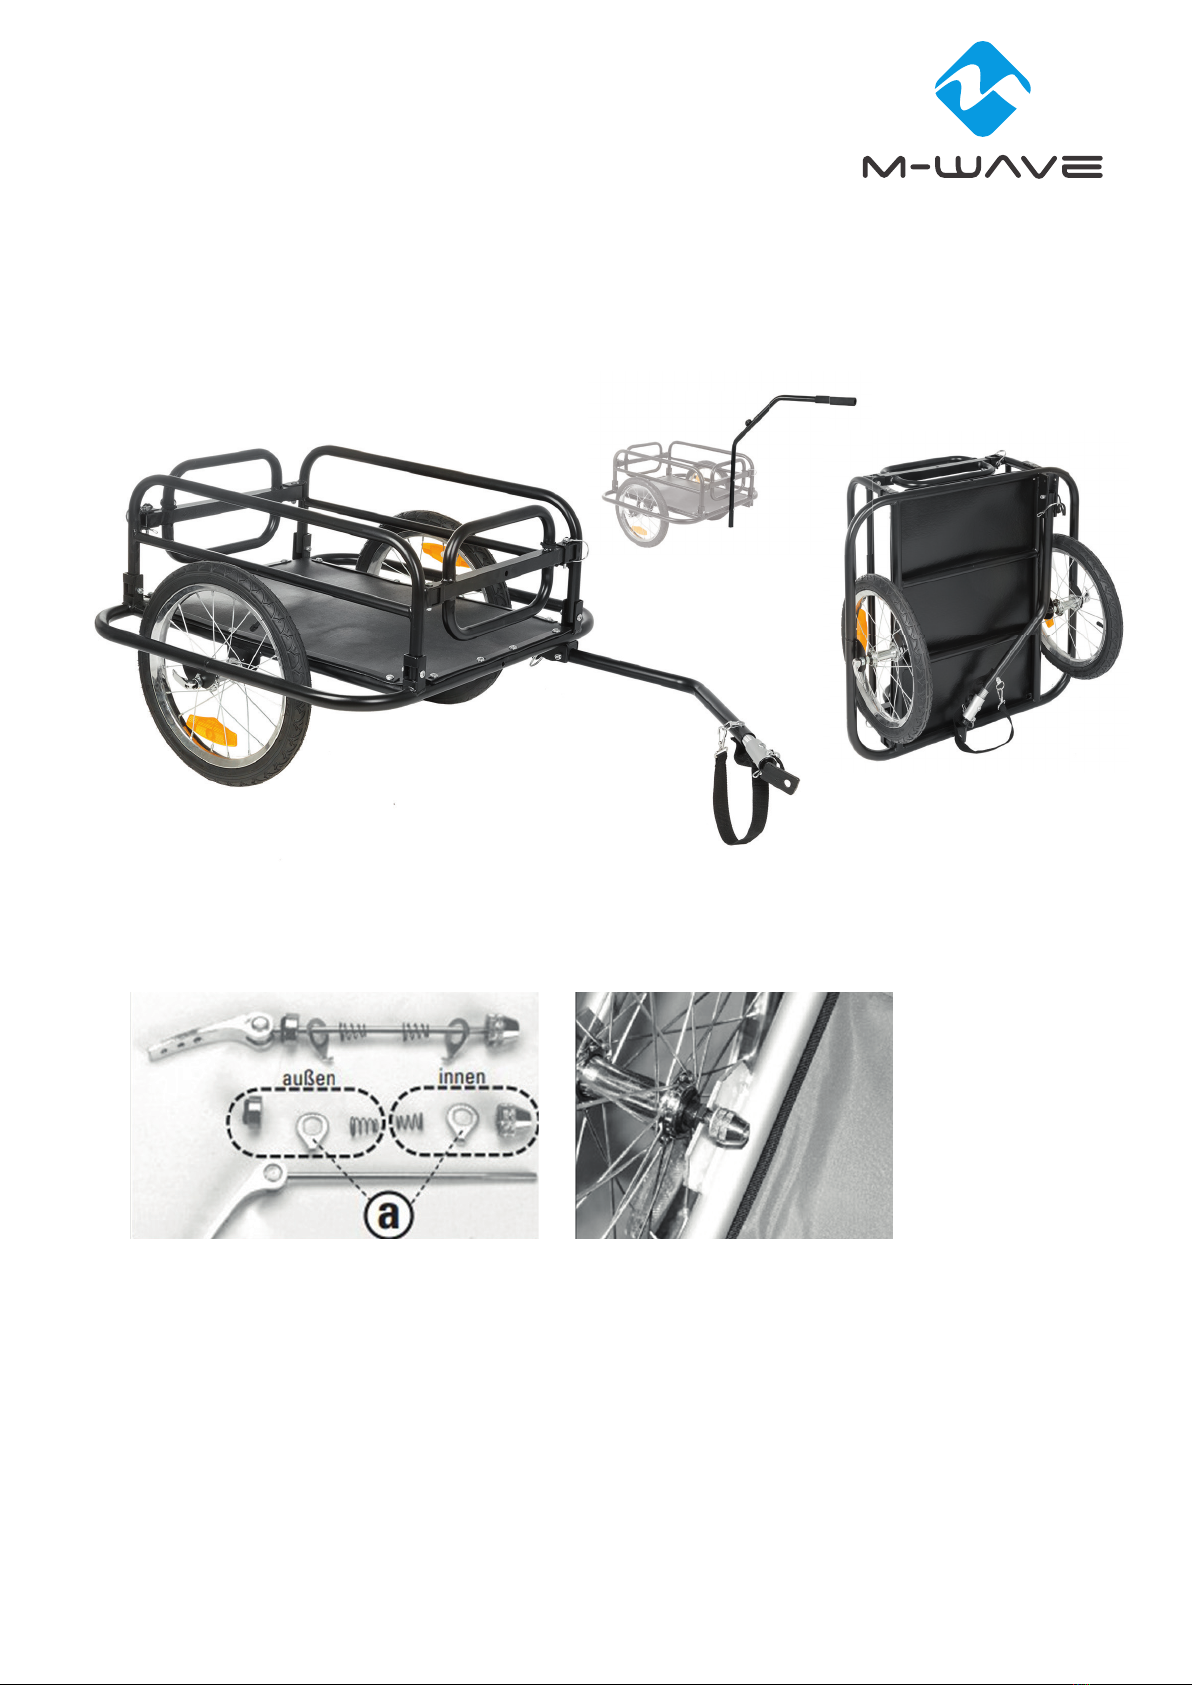
5.1. Fahrräder mit Vollachse / Festachse
Entfernen Sie die linke Achsmutter. Beilegscheiben können montiert bleiben. Stecken Sie die Kupplung auf die
Achse und ziehen Sie die Mutter fest.
WARNUNG: Die Mutter muss mindestens mit 5 vollen Umdrehungen festgezogen werden, um ausreichende
Klemmkraft zu gewährleisten. Ein zu kurzes Gewinde kann ein unbeabsichtigtes Lösen des Hinterrads verursa-
chen und Unfälle mit Verletzungen und Todesfolge verursachen. Im Zweifelsfall fragen Sie einen Fachhändler.
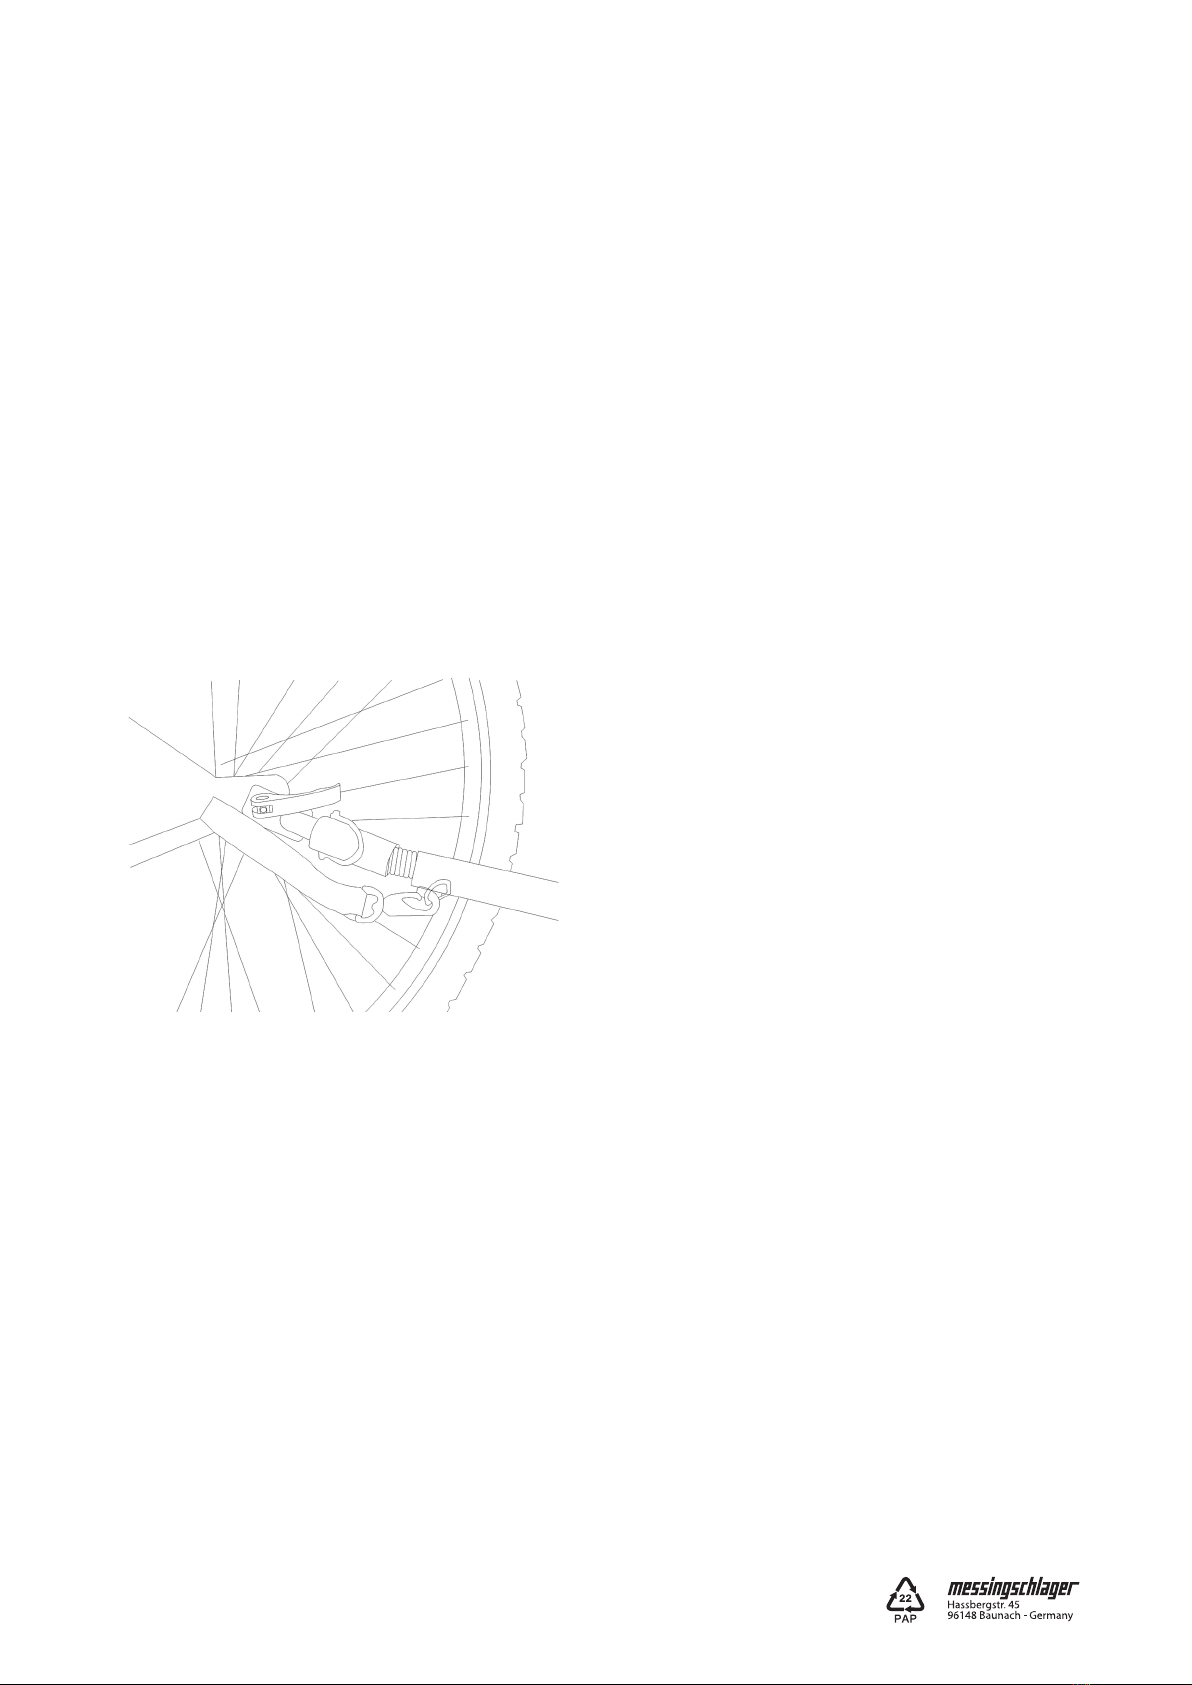
5.2. Fahrräder mit Schnellspannachse
Entfernen Sie den Schnellspanner vom Rad und führen Sie ihn durch die Kupplung in die Schnellspannachse .
Setzen Sie das Gegenstück wieder auf und zeihen Sie es fest, so dass Sie den Schnellspanner mit dem richtigen
Druck verriegeln können.
Um dies zu gewährleisten, muss der Schnellspannhebel
schon beginnen zu greifen, wenn Sie ihn von der geöneten
in die mittlere Position drehen. In der Nähe der geschlossenen
Position müssen Sie deutlich Widerstand spüren. Wenn dies
zu locker oder zu fest ist, verändern Sie die Mutter auf der
anderen Seite der Nabe.
WARNUNG: Die Mutter des Schnellspanners muss mindes-
tens mit 5 vollen Umdrehungen festgezogen werden, um
ausreichende Klemmkraft zu gewährleisten. Ein zu kurzes
Gewinde kann ein unbeabsichtigtes Lösen des Hinterrads
verursachen und Unfälle mit Verletzungen und Todesfolge
verursachen. Im Zweifelsfall fragen Sie einen Fachhändler.
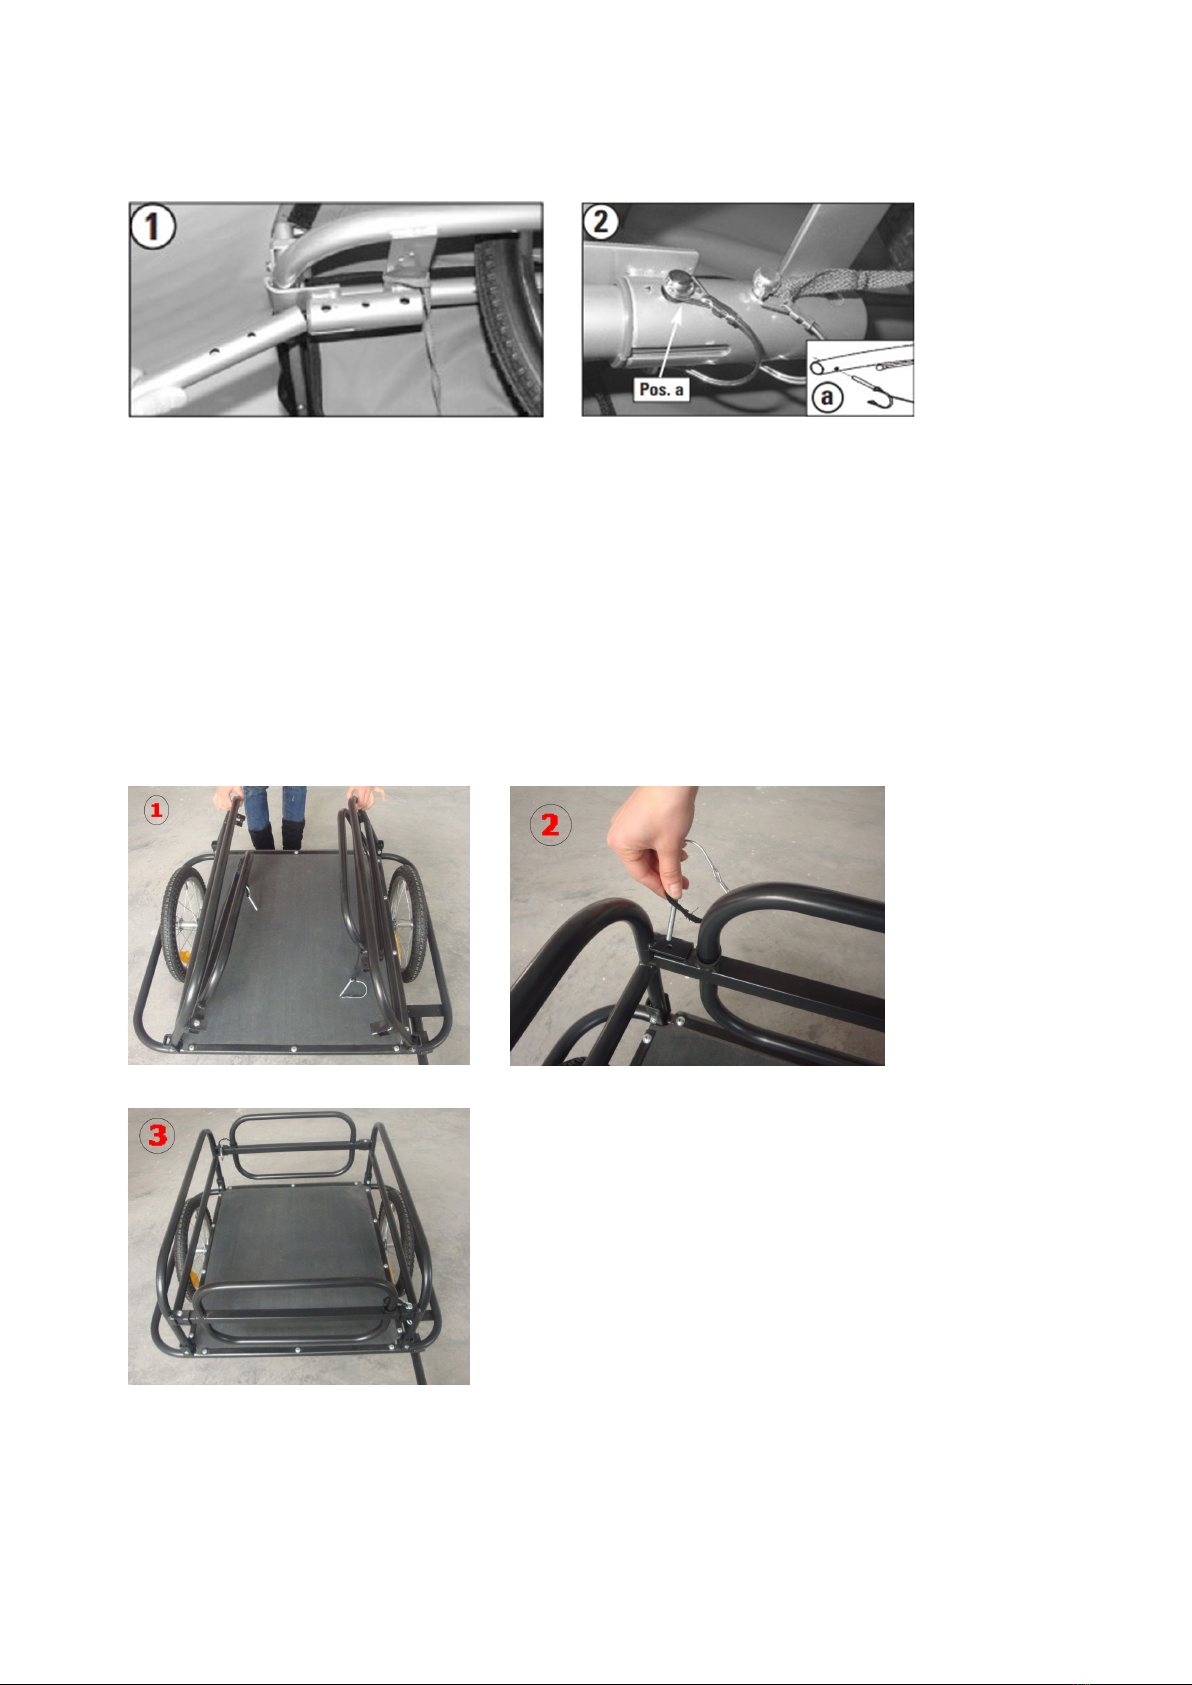
Stecken Sie den Sicherungsstift durch bei Teile der Anhänger-
kupplung . Drehen Sie und verriegeln Sie den Stift. Wickeln
Sie das Sicherungsband um die Kettenstrebe und befestigen
Sie das Band am Ring an der Zugsanne mit dem Schnellver-
schluß.
WARNUNG! Kupplung und Sicherungsband müssen richtig montiert sein. Überprüfen Sie Kupplung und Zug-
stange regelmäßig auf Schäden und lockere Teile. Schäden oder falsch montierte Teile können Unfälle mit
Verletzungen und Todesfolge verursachen.
Sicherheitshinweise:
• Der Anhänger ist nur für Güter geeignet, keine Menschen!
• Maximles Gesamtgewicht: 60 kg
• Höchstgeschwindigkeit: 16km/h.
• Tragen Sie beim Fahren immer einen Helm.
• Prüfen Sie regelmäßig alle Bolzen, Mutter und Sicherungsstifte. Stellen Sie sicher,
dass alle Teile fest angezogen oder verrigelt sind.
• Denken Sie daran, dass ein Anhänger den Bremsweg verlängert und das
Fahrverhalten des Rades beeinusst. Üben Sie am Anfang in einem sicheren Gelände.
• Nutzen Sie nur die originalen Laufräder mit einem Luftdruck von 30-35PSI. Immer vor Fahrtantritt prüfen.
• Nehmen Sie am Anhänger und an der Kupplung keine Veränderungen vor. Schäden oder falsch montierte
Teile können Unfälle mit Verletzungen und Todesfolge verursachen.
5. Befestigung des Anhängers am Fahrrad
WARNUNG: Die Universalkupplung ist nur für Fahrräder mit Vollachse und/oder Schnellspannachse geeignet.
This manual suits for next models
1
Table of contents
Languages:
Popular Utility Vehicle manuals by other brands

Cushman
Cushman Trackster 898002 Operator's manual

Textron
Textron Jacobsen Groom Master II 88009 Maintenance manual

Crown
Crown CU-48 OFF-ROAD SERIES owner's manual

Etnyre
Etnyre Black-Topper CENTENNIAL S-2000 Series Service Material and Reference Tips

HOMCOM
HOMCOM 341-027 owner's manual

Air OPUS
Air OPUS OP2 Owner's handbook