M2TECH HiFace User manual

M2TECH
HI
FACE
192
K
H
Z
/24BIT DIGITAL AUDIO INTERFACE
USER MANUAL
REV. 1.0 – 11/2010

hi
F
ce
192
k
H
z
/24bit digit l udio interf ce
REVISION 1.o – NOVEMBER 2010
Copyright © 2010, M2Tech Snc di Manunta & Marino
2
M2Tech
www.m2tech.biz
Warning!
Changes or modifications not authorized by the manufacturer can invalidate the
compliance to CE regulations and cause the unit to be no more suitable to use. The
manufacturer refuses every responsibility regarding damages to people or things
due to the use of a unit which has been subject to unauthorized modifications or to
misuse or to malfunction of a unit which has been subject to unauthorized
modifications.
This unit is compliant with the following CE regulations when an SB cable less than 3m is used: CEI EN
55022:2009 Class B (Radiated Emissions), CEI EN 55024:1999, CEI EN 55024:A2/2003, CEI EN
55024:IS1/2008 (Radio Frequency Electromagnetic Fields, 50Hz Magnetic Field Immunity Test and
Electrostatic Discharges – ESD).
Recycling
The label above, printed on the product case, indicates that the product, when no more usable, can’t be
treated as generic garbage, but must be disposed of at a collection point for recycling of electrical and
electronic equipment, in compliance with the WEEE regulation (Waste of Electrical and Electronic
Equipment).
By making sure that this unit is correctly recycled, you will help preventing potential damages to environment
and human health, which could be caused by a wrong treatment of this product as generic garbage.
Materials recycling helps saving natural resources. For more in-depth information about recycling this
product, please contact M2Tech Snc di Manunta & Marino.
WARNING: the information contained in this manual are considered to be reliable and accurate.
2Tech reserves the right to change or modify the information any time, without prior advice. It’s up
to the customer to ensure that the manual being consulted is the latest version.

hi
F
ce
192
k
H
z
/24bit digit l udio interf ce
REVISION 1.o – NOVEMBER 2010
Copyright © 2010, M2Tech Snc di Manunta & Marino
3
M2Tech
www.m2tech.biz
Dear customer,
thank you for purchasing hi
F
ce. What you have is a first-rate SB-to-S/PDIF converter
with many unique features conceived to obtain the best audio performance out of a music
file.
Even if getting digital music out of a PC or a Mac is nowadays quite simple, much harder is
to obtain the best sonic performance from it, due to intrinsic limits in SB 1.1 audio
standard and the implementation of digital audio interfaces in computers. Please visit
M2Tech website (www.m2tech.biz) to find extensive literature about this topic.
hi
F
ce overcomes all the limits of usual SB-to-audio interfaces by implementing
proprietary drivers and by using asynchronous data transfer, along with a sophisticated
electronic design.
hi
F
ce is available with either RCA or true 75 Ohms output connector which suites virtually
all DAC’s and A/V receivers around.
We feel that your expectations will be fulfilled by hi
F
ce: you’ll hear your DAC and your
music files in a way like never before, prepare for a whole new experience!
Nadia Marino, CEO
Please annotate here your hiFace purchase date for future reference:
Date of purchase: _________________________

hi
F
ce
192
k
H
z
/24bit digit l udio interf ce
REVISION 1.o – NOVEMBER 2010
Copyright © 2010, M2Tech Snc di Manunta & Marino
4
M2Tech
www.m2tech.biz
INDEX
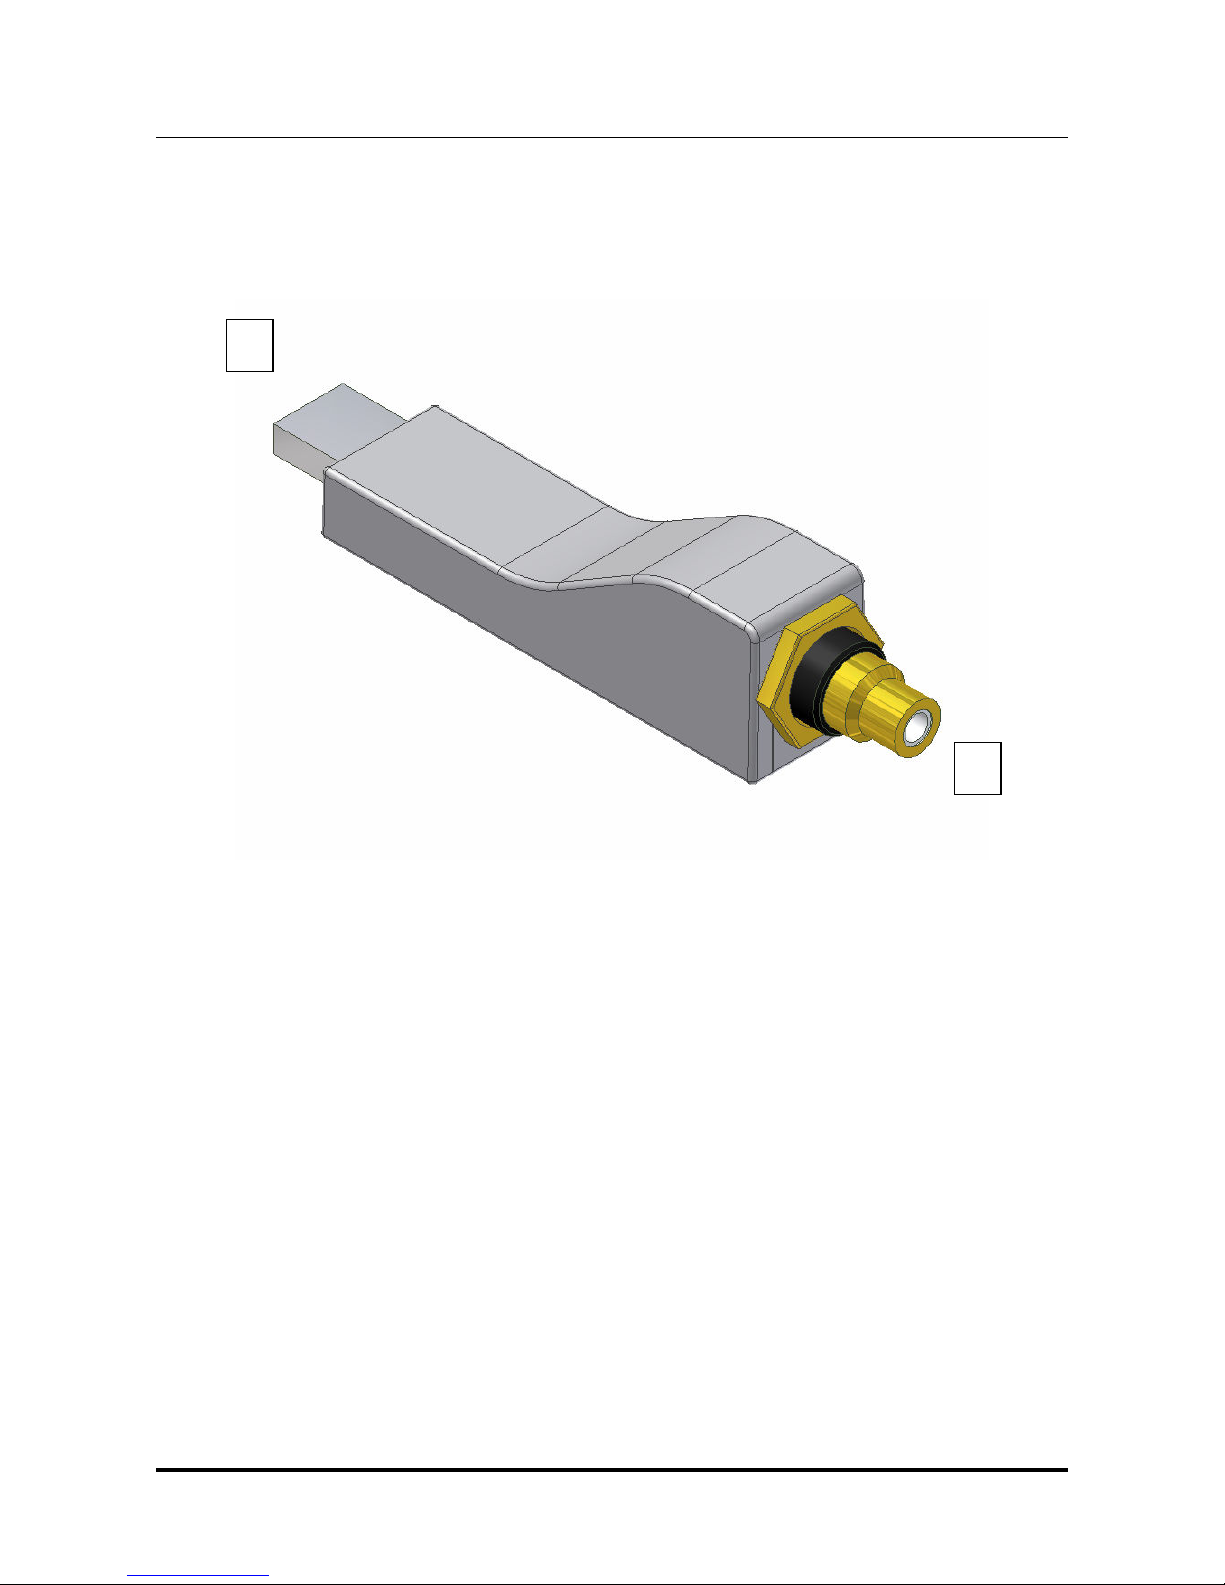
1. Connections.....................................................................................................................5
2. Connection to the host.....................................................................................................6
3.1. Obtaining the driver ...................................................................................................7
3.2. Installing the driver on a Windows-based PC............................................................7
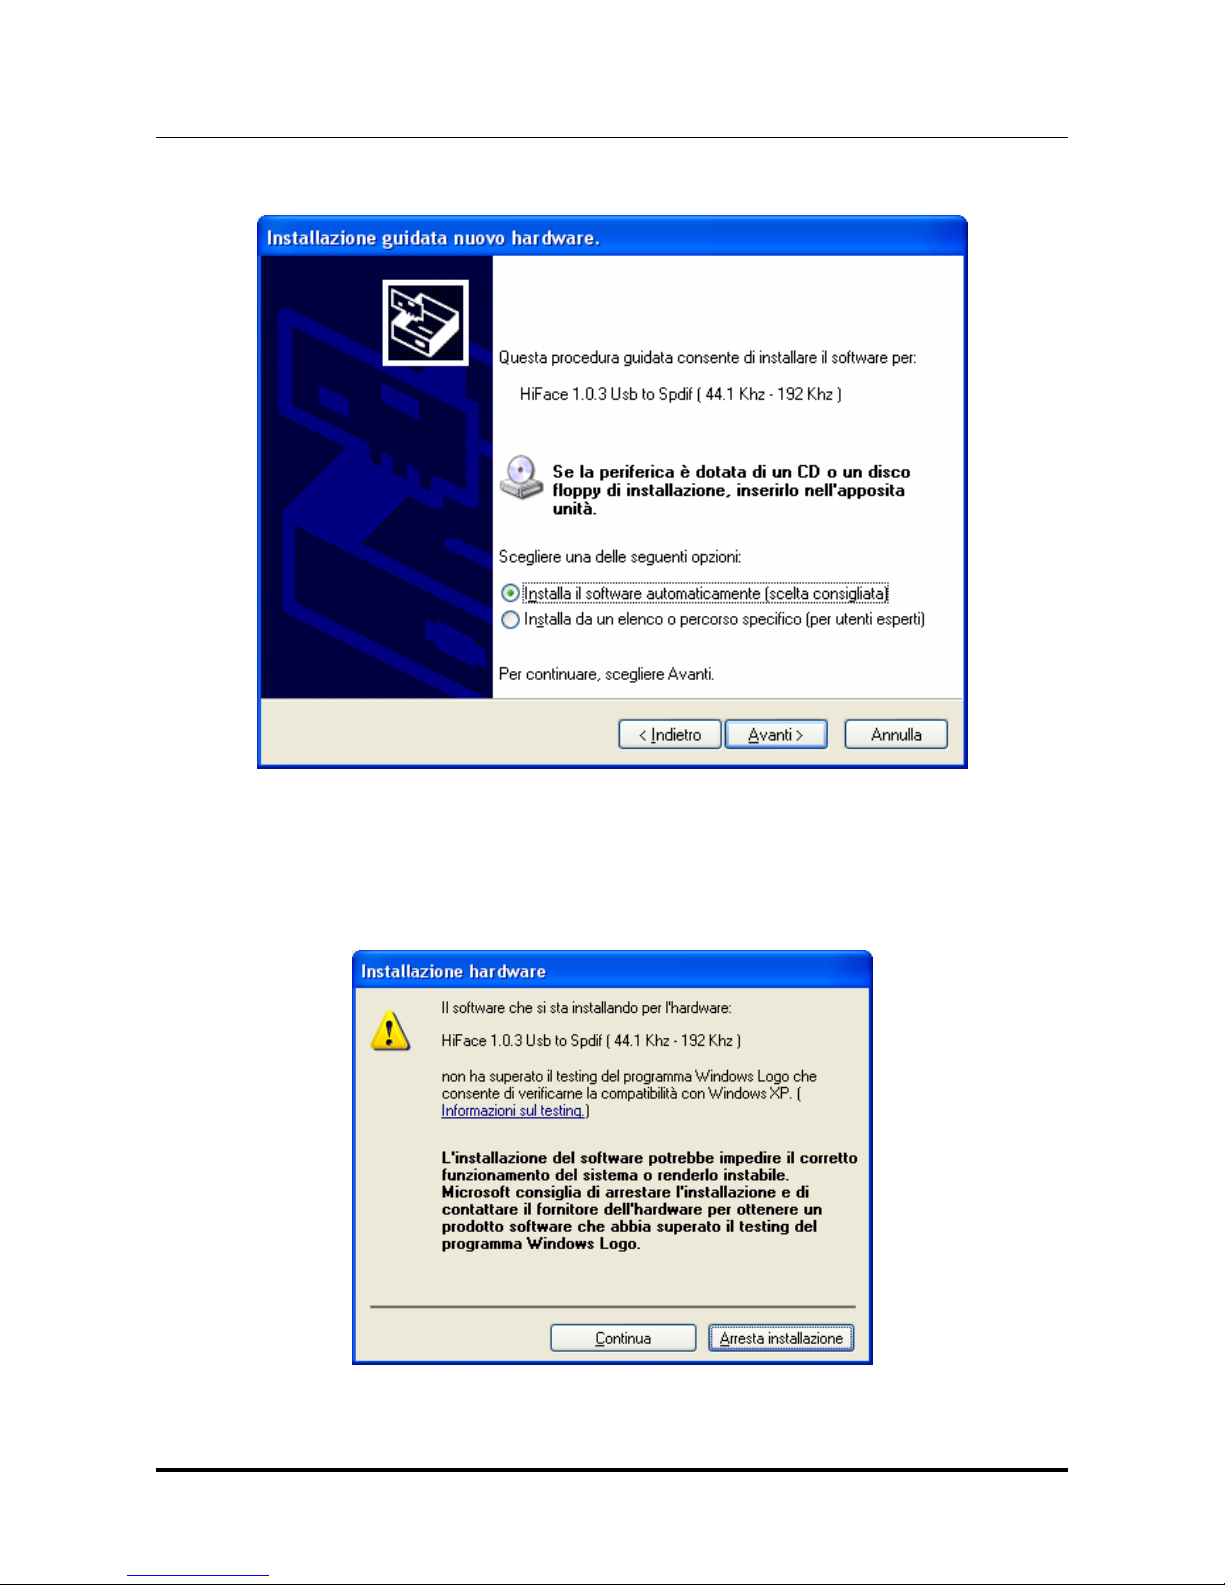
3.2.1. Automatic (guided) installation...........................................................................7
3.2.2. Manual installation ..............................................................................................9
3.3. Installing the driver on a Mac ..................................................................................10
3.4. nistalling the driver................................................................................................12
3.4.1. ninstalling the driver on a Windows-based PC after installation with
setup32.exe or setup64.exe .......................................................................................12
3.4.2. Manually uninstalling the driver on a Windows-based PC ................................12
3.4.3. ninstalling the driver on a Mac........................................................................13
4. Configuring the computer to use hiFace ........................................................................14
4.1. Configuring a PC with Windows XP ........................................................................14
4.1.1. Configuring for Direct Sound with Windows XP................................................14
4.1.2. Configuring for Kernel Streaming with Windows XP .........................................15
4.1.3. sing hiFace in both Kernel Streaming and Direct Sound mode. .....................15
4.2. Configuring a PC with Windows Vista or Windows 7...............................................16
4.2.1. Configuring for Direct Sound with Windows Vista or Windows 7 ......................16
4.2.2. Configuring for Kernel Streaming with Windows Vista or Windows 7 ...............17
4.2.3. Configuring for WASAPI with Windows Vista or Windows 7.............................17
4.3. Configuring a Mac ...................................................................................................17
5.1. FooBar ....................................................................................................................18
5.2. Winamp and MediaMonkey.....................................................................................18
6. Configuring the player for WASAPI: an example ...........................................................20
6.1. FooBar ....................................................................................................................20
7. Interface special features...............................................................................................21
7.1. Output voltage.........................................................................................................21
7.2. Sampling frequency coding in the bitstream............................................................21
7.3. Output connector choice .........................................................................................21
8. Technical Specifications ................................................................................................22

hi
F
ce
192
k
H
z
/24bit digit l udio interf ce
REVISION 1.o – NOVEMBER 2010
Copyright © 2010, M2Tech Snc di Manunta & Marino
5
M2Tech
www.m2tech.biz
1. Connections
Figure 1
1) USB input. Connect directly to the SB 2.0 port of a PC or Mac, or use an SB
extender (A male to A female). In the latter, the extender must be compliant with SB 2.0
an less than 4m, otherwise the bus performance will decrease and the correct operation of
the interface will not be guaranteed. SB type A male connector
2) S/PDIF output. Connect to the DAC input with a 75 Ohms digital cable. RCA male
connector or BNC 75 Ohms male connector.
1
2

hi
F
ce
192
k
H
z
/24bit digit l udio interf ce
REVISION 1.o – NOVEMBER 2010
Copyright © 2010, M2Tech Snc di Manunta & Marino
6
M2Tech
www.m2tech.biz
2. Connection to the host
Please refer to section 1, “Connections”.
Connect the hiFace to the host SB 2.0 port by inserting its SB plug (Figure 1, 1) into the
host socket. If straight insertion is difficult or when in need of avoiding straight insertion, an
SB 2.0 extender cable (A male to A female) can be used. Please avoid using extenders
more than 4m, to avoid invalidating the bus performance.
If a driver hasn’t been installed on your computer, an automatic driver installation wizard
may appear.
Note: If you want to avoid the automatic driver installation, please connect hiFace to
the computer after manually installing the driver (see section 3).

hi
F
ce
192
k
H
z
/24bit digit l udio interf ce
REVISION 1.o – NOVEMBER 2010
Copyright © 2010, M2Tech Snc di Manunta & Marino
7
M2Tech
www.m2tech.biz
3. Driver installation
3.1. Obtaining the driver
The drivers for hiFace are available on the M2Tech website, in the download page
(www.m2tech.biz/download.asp). Download the driver you need for your computer and
operating system. Windows drivers are contained in zip files, Mac drivers are contained in
dmg files.
3.2. Installing the driver on a Windows-based PC
Create a temporary folder in the hard disk of your computer (you can even create it on the
desktop). Then, double-click on the zip file to open it. Select and drag all files in the
temporary folder: this automatically unzips all files.
3.2.1. Automatic (guided) installation
Connect hiFace to the PC. Following the negotiation process, the driver installation wizard
is automatically launched. Select the option “Not now”, as in Figure 2.
Figure 2

hi
F
ce
192
k
H
z
/24bit digit l udio interf ce
REVISION 1.o – NOVEMBER 2010
Copyright © 2010, M2Tech Snc di Manunta & Marino
8
M2Tech
www.m2tech.biz
Click on the button to proceed. A window appears as shown in figure 3:
Figure 3
Choose automatic installation (as recommended) and proceed to next step. Indicate the
folder where you have previously unzipped the driver and proceed to installation. The
window shown in figure 4 will appear:
Figure 4

hi
F
ce
192
k
H
z
/24bit digit l udio interf ce
REVISION 1.o – NOVEMBER 2010
Copyright © 2010, M2Tech Snc di Manunta & Marino
9
M2Tech
www.m2tech.biz
Click on Continue. The installation will proceed to the end. The window shown in figure 5
will appear. Click on Finish to complete the driver installation.
Figure 5
Note: the wizard appearance and the guided installation procedure may slightly vary
from XP to Vista to Windows 7.
3.2.2. anual installation
Sometimes it’s necessary or advisable to install the driver manually. The installation
package offers two installation utilities, “setup32.exe” and “setup64.exe”. The former is for
32 bits operating systems, while the latter is for 64 bits operating systems. Without
connecting hiFace to the PC, double-click on either “setup64.exe” or “setup32.exe”,
depending on your operating system: the driver will be installed in your PC.

hi
F
ce
192
k
H
z
/24bit digit l udio interf ce
REVISION 1.o – NOVEMBER 2010
Copyright © 2010, M2Tech Snc di Manunta & Marino
10
M2Tech
www.m2tech.biz
3.3. Installing the driver on a ac
Double-click on the zip file to open it. It contains a single dmg file. Extract it from the zip
and double-click on it to open it. It only contains a pkg file. Double click on it to start driver
installation. The window shown in figure 6 will appear.
Figure 6
Click on the Continue button. The installation process will go on and the window in figure 7
will appear.
Figure 7

hi
F
ce
192
k
H
z
/24bit digit l udio interf ce
REVISION 1.o – NOVEMBER 2010
Copyright © 2010, M2Tech Snc di Manunta & Marino
11
M2Tech
www.m2tech.biz
Select “Install for all users”, then click on Continue button. Another window will appear as
in figure 8 and you’ll be asked to type in the administrator password. After doing that, the
installation process will continue and you’ll be asked for a confirmation to continue the
process up to the computer restart. Click on Continue Installation button.
The installation will continue until the final window will appear, announcing the successful
installation of the driver.
Figure 8
Click on Restart button to complete the installation process as indicated in figure 9.
Figure 9

hi
F
ce
192
k
H
z
/24bit digit l udio interf ce
REVISION 1.o – NOVEMBER 2010
Copyright © 2010, M2Tech Snc di Manunta & Marino
12
M2Tech
www.m2tech.biz
3.4. Unistalling the driver
Sometimes it is necessary to uninstall the driver to roll back to a previous version. ninstall
is a quite simple procedure which depends on the operating system and the way the driver
was installed.
3.4.1. Uninstalling the driver on a Windows-based PC after installation with
setup32.exe or setup64.exe
Go to the control panel and launch the “Application Installation” utility.
Look for the hiFace driver item in the list.
Double-click on it to launch uninstalling.
3.4.2. anually uninstalling the driver on a Windows-based PC
Connect hiFace to the PC.
Go to the control panel and launch the “System” utility, then select Hardware tab. Open the
Peripheral Management window (see figure 10).
You’ll find hiFace listed under Audio, Video and Game controllers.

hi
F
ce
192
k
H
z
/24bit digit l udio interf ce
REVISION 1.o – NOVEMBER 2010
Copyright © 2010, M2Tech Snc di Manunta & Marino
13
M2Tech
www.m2tech.biz
Figure 10
Right-click to access the available actions.
Select “ ninstall”.
3.4.3. Uninstalling the driver on a ac
Open a console, then type the following commands:
sudo mv /System/Library/Extensions/Hiface.kext /tmp
sudo touch /System/Library/Extensions
sudo pkgutil --forget com.m2tech.driver
Then, restart the Mac.

hi
F
ce
192
k
H
z
/24bit digit l udio interf ce
REVISION 1.o – NOVEMBER 2010
Copyright © 2010, M2Tech Snc di Manunta & Marino
14
M2Tech
www.m2tech.biz
4. Configuring the computer to use hiFace
4.1. Configuring a PC with Windows XP
A PC with Windows XP can use hiFace in two different ways: Direct Sound (DS) and
Kernel Streaming (KS). The former is suitable for players which can’t operate in Kernel
Streaming mode (such as Windows Media Player and iTunes) or for Internet streaming,
while the latter can be chosen (for better performance) with players which can operate in
Kernel Streaming mode (such as FooBar, Winamp, Monkey Media, JRiver).
4.1.1. Configuring for Direct Sound with Windows XP
Connect hiFace to your PC. Then, go to the Control Panel and launch the Sound and
Audio Peripherals utility.
Select the Audio tab. In the Predefined Peripheral drop-down menu of the Playback area,
select “KS hiFace” (see figure 11).
Figure 11
Then, select the “Voice” Tab. Again, select “hiFace Kernel Streaming” in the drop-down
menu of the Playback area. Click on OK button. Please be adviced that even if the

hi
F
ce
192
k
H
z
/24bit digit l udio interf ce
REVISION 1.o – NOVEMBER 2010
Copyright © 2010, M2Tech Snc di Manunta & Marino
15
M2Tech
www.m2tech.biz
peripheral is listed as “kernel streaming”, it will operate in Direct Sound mode when listed
here.
From now on, unless hiFace is disconnected or settings are changed again, hiFace is the
audio peripheral all audio programs will use when operating in direct sound mode.
4.1.2. Configuring for Kernel Streaming with Windows XP
Kernel Streaming has no standard setting in Windows XP. KS must be selected in the
specific player you choose to use.
For example, when using FooBar, with hiFace connected to the PC, go to the
File/Preferences/Playback /Output tab and select “KS: hiFace” as output device.
Other players will require different settings (see section 5).
4.1.3. Using hiFace in both Kernel Streaming and Direct Sound mode.
When hiFace is selected as predefined audio peripheral, it’s possible to use it in Kernel
Streaming mode, too, with a caveat. When using it in KS mode, it is necessary that no
other application accesses hiFace in DS mode. If this happens, Windows XP’s Kernel
Mixer takes control of hiFace’s driver and from then on, no KS application can access
hiFace unless the PC is restarted or hiFace connection to the PC is cycled.

hi
F
ce
192
k
H
z
/24bit digit l udio interf ce
REVISION 1.o – NOVEMBER 2010
Copyright © 2010, M2Tech Snc di Manunta & Marino
16
M2Tech
www.m2tech.biz
4.2. Configuring a PC with Windows Vista or Windows 7
A PC with Windows Vista or Windows 7 can use hiFace in three different ways: Direct
Sound (DS), Kernel Streaming (KS) and WASAPI. DS is suitable for players which can’t
operate in Kernel Streaming mode nor with WASAPI or for Internet streaming; KS can be
chosen (for better performance) with players which can operate in Kernel Streaming mode
(such as FooBar, Winamp, Monkey Media, JRiver). WASAPI (Windows Audio Standard
API) is a standard interface for audio players which allows to get the same performance of
KS with applications which can’t operate in KS mode, at the cost of higher CP load.
4.2.1. Configuring for Direct Sound with Windows Vista or Windows 7
Open control Panel and select Hardware and Sounds. nder Audio, click on Manage
Audio Devices. The following windows will appear, in which hiFace is listed. Set hiFace as
predefined device. Then, click on OK.
Figure 12

hi
F
ce
192
k
H
z
/24bit digit l udio interf ce
REVISION 1.o – NOVEMBER 2010
Copyright © 2010, M2Tech Snc di Manunta & Marino
17
M2Tech
www.m2tech.biz
4.2.2. Configuring for Kernel Streaming with Windows Vista or Windows 7
As for Windows XP, Kernel Streaming has no standard setting in Windows Vista and
Windows 7. KS must be selected in the specific player you choose to use.
For example, when using FooBar, with hiFace connected to the PC, go to the
File/Preferences/Playback /Output tab and select “KS: hiFace” as output device.
Other players will require different settings (see section 5).
4.2.3. Configuring for WASAPI with Windows Vista or Windows 7
As happens with Kernel Streaming, WASAPI cannot be directly accessed. WASAPI must
be selected in the specific player you choose to use.
For example, when using FooBar, with hiFace connected to the PC, go to the
File/Preferences/Playback /Output tab and select “WASAPI: hiFace” as output device.
Other players will require different settings (see section 6).
4.3. Configuring a ac
Go to System Preferences and select Sounds. The following windows will appear. Select
hiFace for output as indicated in Figure 14.
Figure 13

hi
F
ce
192
k
H
z
/24bit digit l udio interf ce
REVISION 1.o – NOVEMBER 2010
Copyright © 2010, M2Tech Snc di Manunta & Marino
18
M2Tech
www.m2tech.biz
5. Configuring the player for Kernel Streaming: some examples
5.1. FooBar
To use FooBar in KS mode it is necessary to download the DLL for Kernel Streaming from
the FooBar2000 website and install it in the Components sub-folder inside FooBar2000
main folder in your hard disk. The DLL can be found at
http://www.foobar2000.org/components/view/foo_out_ks (click on Download). It is a zip
folder which contains the DLL. Extract it from the zip and copy to the Components folder.
Then, restart FooBar, go to the File/Preferences/Playback/Output window and set
parameters as in figure 14.
Figure 14
5.2. Winamp and edia onkey
These two players are actually the same player with different skins, so they can share the
same plug-ins. A freeware plug-in for Kernel Streaming by Steve Monks is available on the
Internet (http://www.stevemonks.com/ksplugin/) that can be used to enable Kernel
Streaming operation with these players.
Download the zip file, extract the dll file and copy it into the Plugins folder inside Winamp
main folder.
With hiFace connected, right-click on Winamp and select Display/Select Plug-ins. The
Preferences window of Winamp will open (see figure 15).

hi
F
ce
192
k
H
z
/24bit digit l udio interf ce
REVISION 1.o – NOVEMBER 2010
Copyright © 2010, M2Tech Snc di Manunta & Marino
19
M2Tech
www.m2tech.biz
Figure 15
Go to Plug-in/Output and select “Kernel Streaming Output”. Then click on Configure
button. Choose HIFACE Kernel Streaming in the output device list (Figure 16).
Figure 16

hi
F
ce
192
k
H
z
/24bit digit l udio interf ce
REVISION 1.o – NOVEMBER 2010
Copyright © 2010, M2Tech Snc di Manunta & Marino
20
M2Tech
www.m2tech.biz
6. Configuring the player for WASAPI: an example
6.1. FooBar
To use FooBar with WASAPI under Windows 7 it is necessary to download the DLL for
WASAPI from the FooBar2000 website and install it in the Components sub-folder inside
FooBar2000 main folder in your hard disk. The DLL can be found at
http://www.foobar2000.org/components/view/foo_out_wasapi (click on Download). It is a
zip folder which contains the DLL. Extract it from the zip and copy to the Components
folder.
Then, restart FooBar, go to the File/Preferences/Playback/Output window and set
parameters as in figure 17.
Figure 17
Other M2TECH Accessories manuals
Popular Accessories manuals by other brands

Motorline professional
Motorline professional VARANDA installation manual

MICRO-EPSILON
MICRO-EPSILON ILD1700 user manual

Star
Star ECONO EC-CCY Operation manual

MediaMatrix
MediaMatrix nWall Hardware manual

iWorX
iWorX TS300 Series installation guide

La Crosse Technology
La Crosse Technology TX-63U-IT instruction manual

DirekTronik
DirekTronik LDDS45 user manual

Burkert
Burkert 8007 instruction manual

Leviton
Leviton ODC10-MDW installation instructions

Pro-Ject Audio Systems
Pro-Ject Audio Systems Measure It Instructions for use

Pepperl+Fuchs
Pepperl+Fuchs R1000 Series manual

Chamberlain
Chamberlain SWG-0500 installation instructions