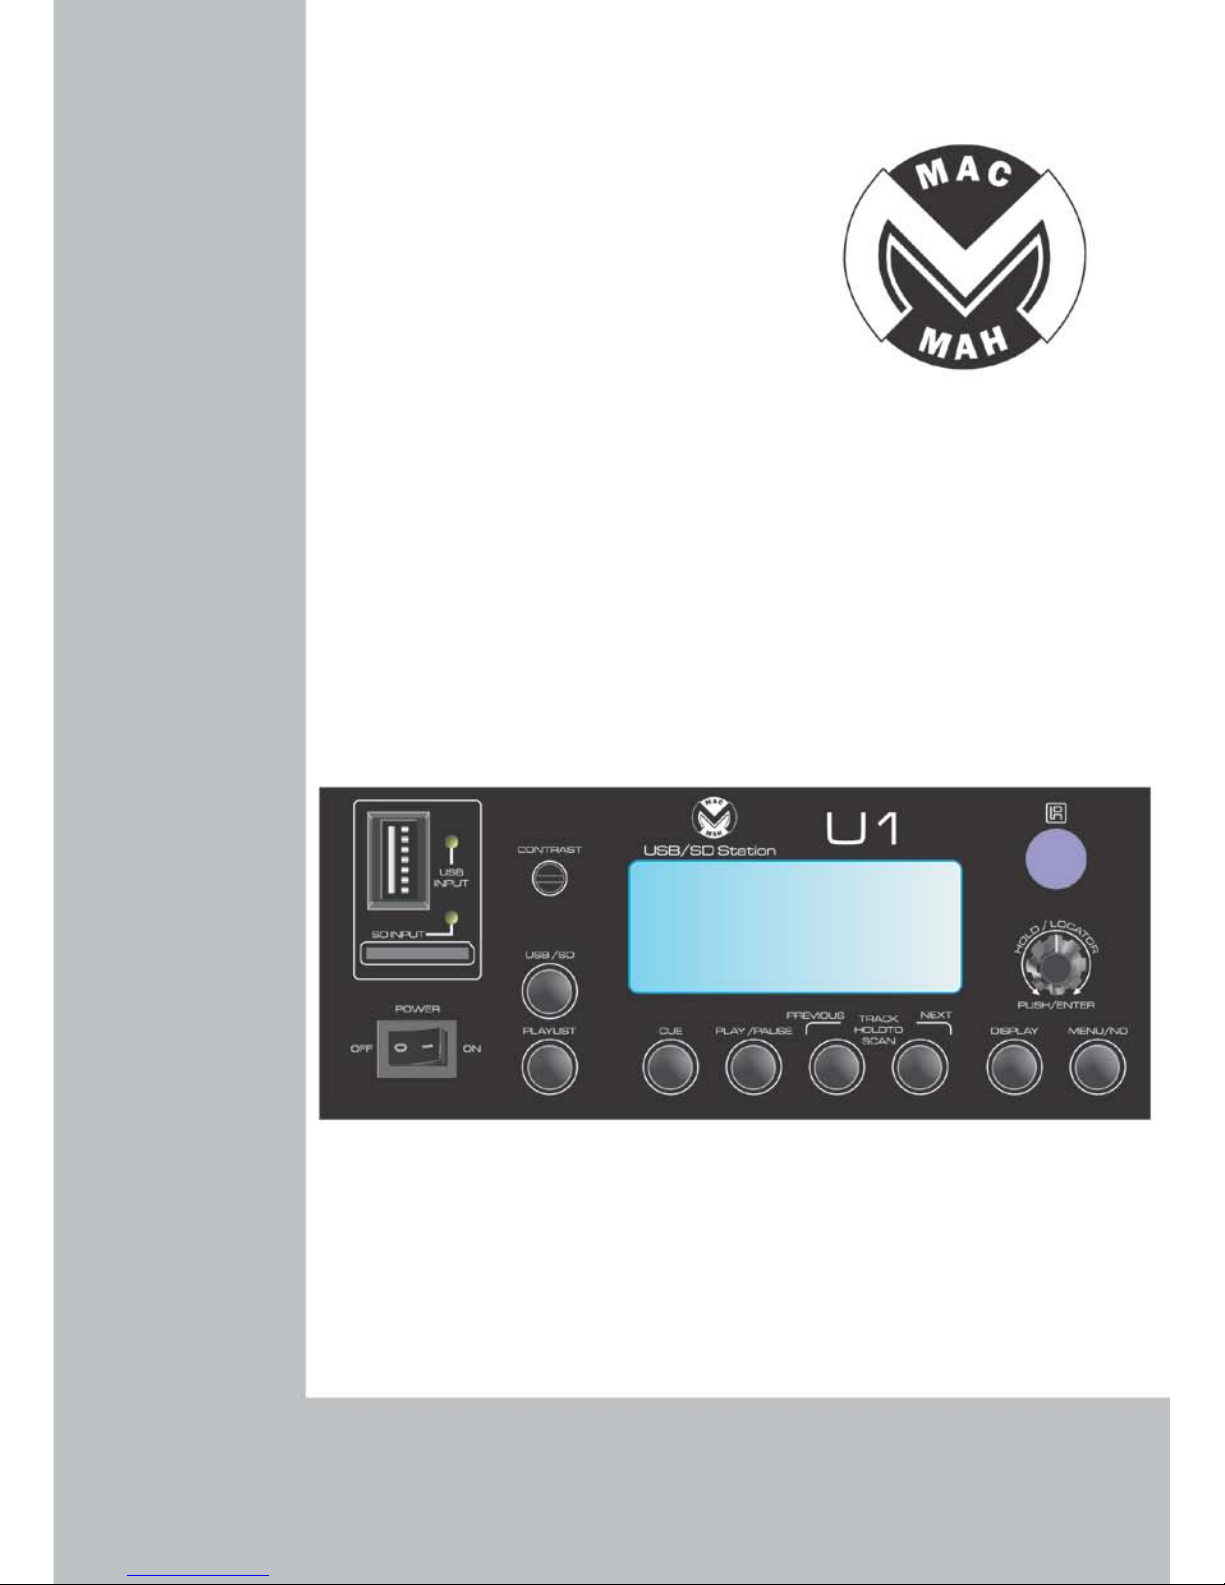
Mac Mah U1 User manual

U-1 MP3 PLAYER
USER MANUAL……….…………………………………………………..1-14

1
TABLE OF CONTENTS
1. Features .................................................................................…………………………...1
2. Safety precautions ...................................................…………………………………....2
3. Descriptions ....................................................................…………………………..........3
3.1 Front panel ................................................................…………………………...3
3.2 Rear panel ................................................................…………………………....4
3.3 Infrared remote control ............................................…………………………..4
3.4 19" rack ears .................................................................………………………...5
4. Operational for MP3 player ....................................................……………………......6
4.1 Loading and playback ............................................…………………………..6
4.2 Create playlist .............................................................………………………....6
4.3 Play playlist ...............................................................…………………………...8
4.4 Erase playlist ...........................................................…………………………….9
4.5 Fast search with EZ search encoder....................………………………….. 10
4.6 CUE ................................................................………………………………..10
4.7 IN/OUT/RELOOP ................................................………………………….......12
5. Configurations ..............................................................……………………………...13
5.1 System Connections ..........................................………………………….....13
5.2 Operation precautions ....................................……………………………...13
6. Technical specifications ..................................................………………………......14
1. FEATURES
1. Giant DOT MATRIX with ID3 song name display.
2. USB drive input-up to 4GB/SD card input-up to 2GB.
3. Plug & Play MP3-No need to connect to Computer.
4. Giant Dot Matrix Display with Contrast adjustment.
5. Full Navigation of Mp3 with EZ Search Encoder.
6. Dual mode display.
7. Full Display of songs of the mass storage: max of 500 Songs.
8. Wireless Remote control.
9. LOOP & RELOOP functions.
10. Fast Search Function.
11. 10 PLAYLIST for the connected Mass storage device.
12. Balanced output & 4 RCA output for 2 Different zones.
13. Gain control for Balanced output.
14. Power supply adaptor &19" rack ears included.

2
2 SAFETY INSTRUCTIONS
The apparatus shall not be exposed to dripping or splashing and that no objects filled with
liquids, such as vases, shall be placed on the apparatus.
WARNING: TO REDUCE THE RISK OF FIRE OR ELECTRIC SHOCK, DO NOT EXPOSE THIS APPLIANCE
TO RAIN OR MOISTURE.
The lightning flash with arrowhead symbol inside an equilateral triangle is
intended to alert the user to the presence of uninsulated "hazardous voltage"
within the product′s enclosure, which may be of sufficient magnitude to induce
a risk of electric shock to persons.
The exclamation mark inside an equilateral triangle is intended to alert the user
to the presence
of important operating and maintenance (servicing)
instructions in the literature accompanying the product.
1. Caution: To reduce the risk of electric shock, do not remove cover(or
back). No user-serviceable parts inside. Refer servicing to qualified personnel.
2. Do not install the equipment in a place exposed to direct sunlight.
3. Do not install the equipment in a dusty, damp or poorly ventilated place.
4. To prevent damage to the equipment, please unplug from the power
outlet if not in use.
5. To unplug the equipment, always handle the power cord using the plug.
Do not pull out the plug by tugging the cord.
6. Place the equipment on a stable surface and avoid placing other objects
on top.
7. Cleaning care: Use a soft, dry cloth for cleaning. For stubborn dirt, soak the
cloth in a weak detergent solution; wring well and wipe to remove the dirt.
Do not use volatile agents such as benzene or paint thinner, as they may
damage the surface finish of the equipment.
8. Please do not block the cooling vents to avoid overheating.
9. No naked flame sources, such as lighted candles, should be placed on the
apparatus.

3
3. DESCRIPTIONS
3.1 Front panel
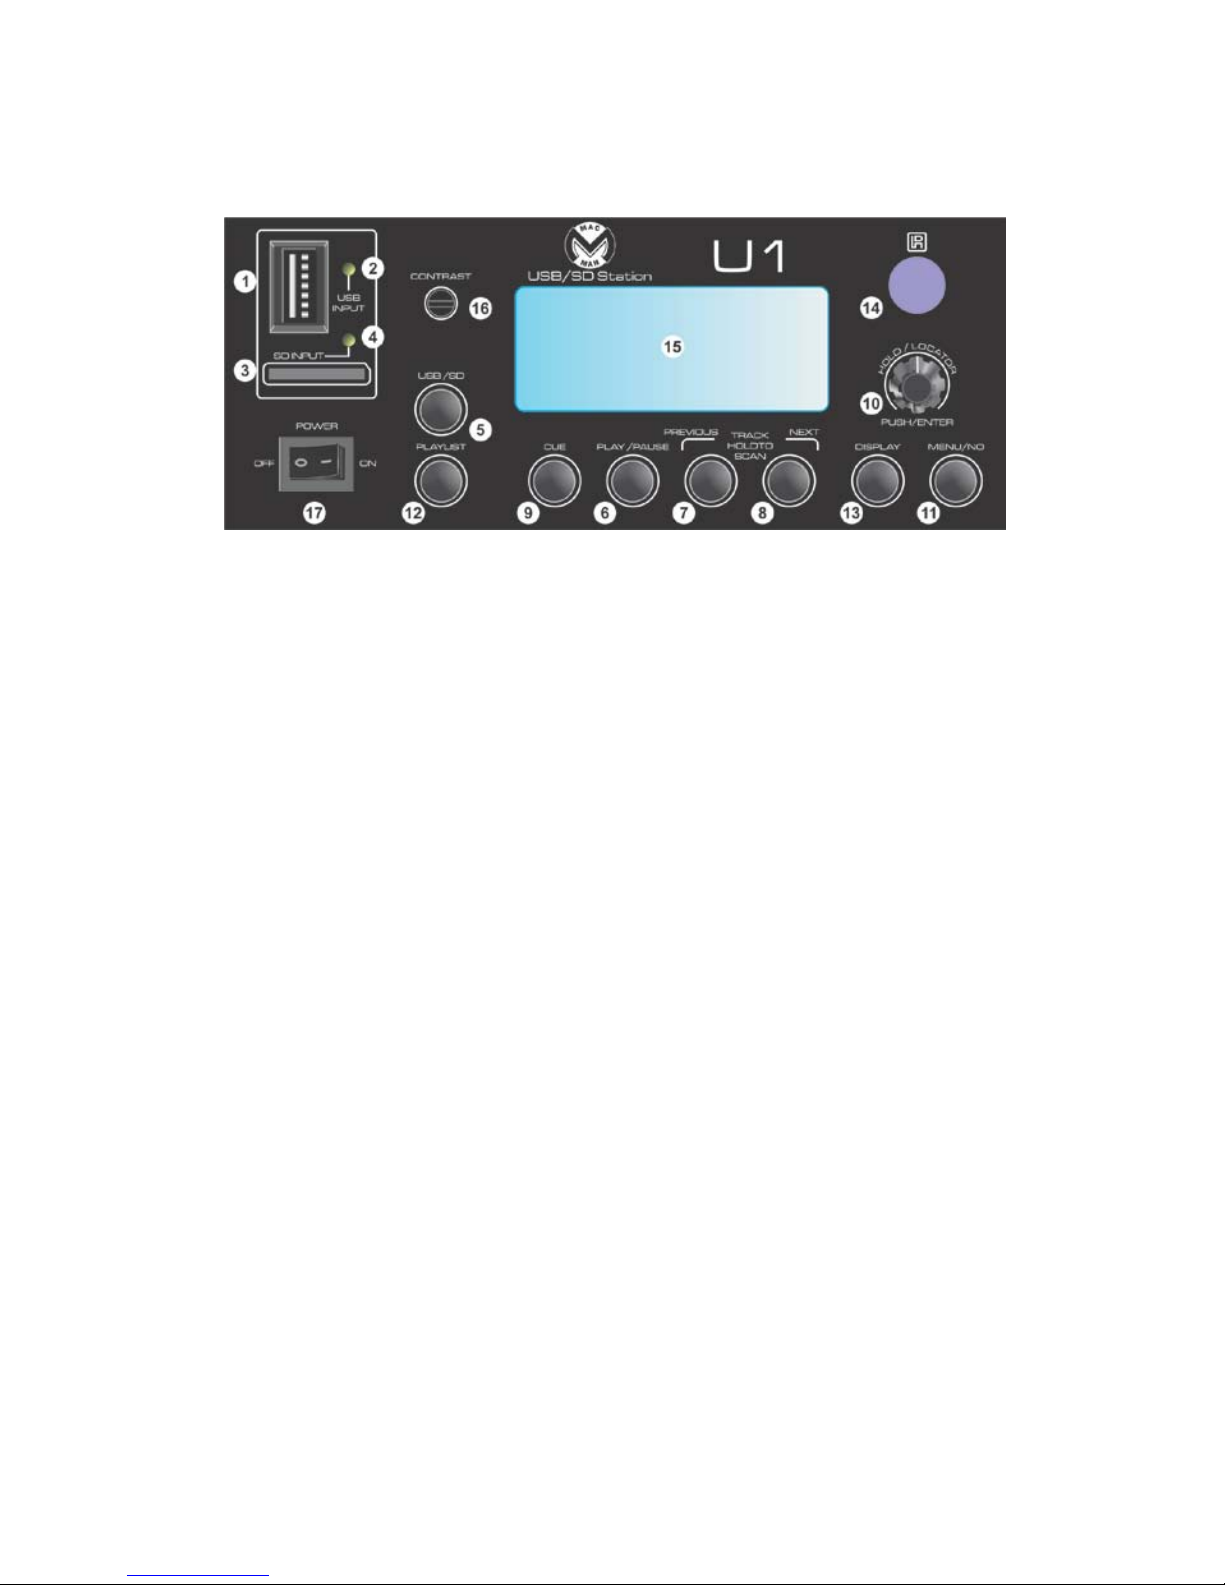
Layout of front panel, please refer to Fig 3.1.1.
Fig3.1.1 Layout of front panel
1. USB input connector「USB INPUT」, insert a USB device with MP3 files here.
2. Indicator for USB, green LED turns on when USB is selected.
3. SD card input connector「SD INPUT」, insert a SD card with MP3 files here.
4. Indicator for SD card, green LED turns on when SD card is selected.
5. Button for selecting input device「USB/SD」, when both USB drive and SD card are inserted,
press this button to switch between 2 devices following instructions on the display.
6. PLAY/PAUSE「PLAY/PAUSE」, this button is used to play or pause the song. It also acts as a
confirmation key in menu or in operations.
7.「PREVIOUS」, this button has multiple functions: 1-Press this button to select the previous song.
2- Press and hold this button to go fast backward when playing. 3-Press this button to move
selection upward in the menu. Please refer to the related sections for detailed operation for
different functions.
8. 「NEXT」, this button has multiple functions: 1-Press this button to select the next song. 2-Press
and hold this button to go fast forward when playing. 3-Press this button to move selection
downward in the menu. Please refer to the related sections for detailed operation for different
functions.
9. 「CUE」, press this button to jump to the CUE position which set previously.
10. EZ Search Encoder with press function「PUSH/ENTER」, use this rotary encoder to scroll up
and down the menu and press to confirm the selection. It is also used in fast search function.
11. 「MENU/NO」, press to switch between menu and playing display. It also act as a cancel
button when in operations.
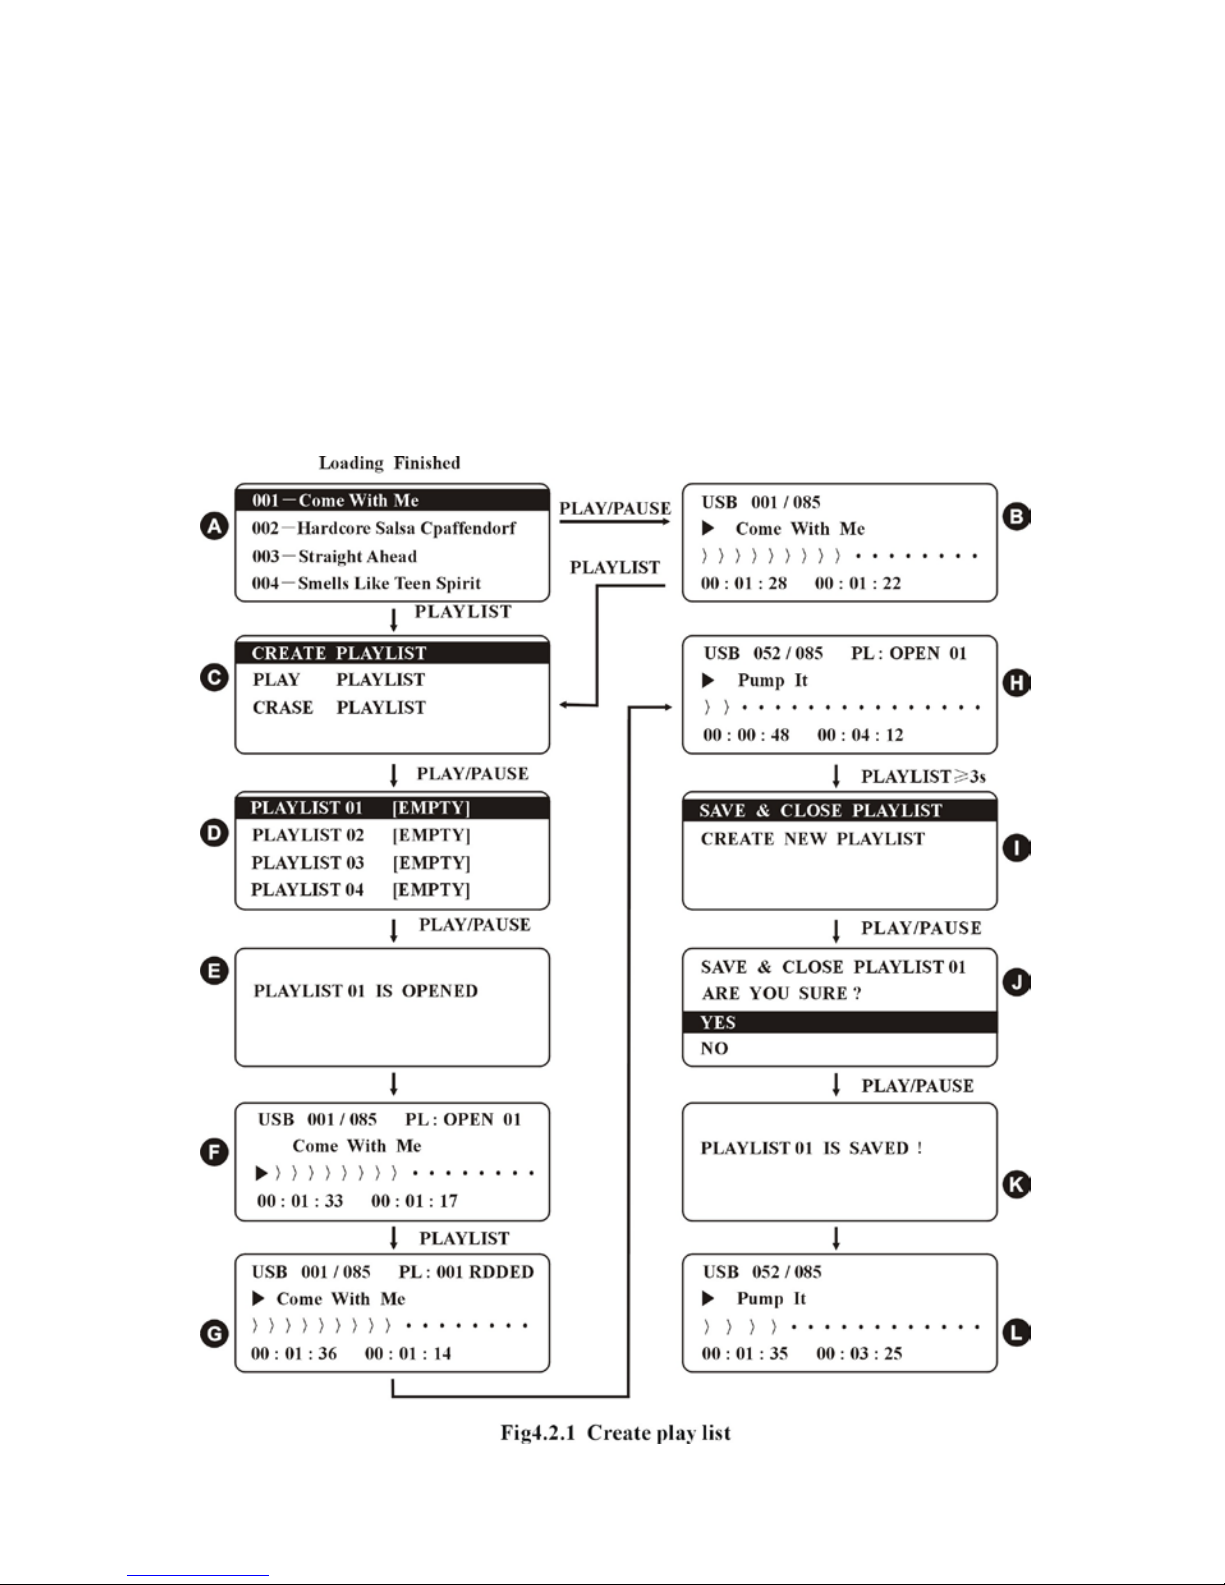
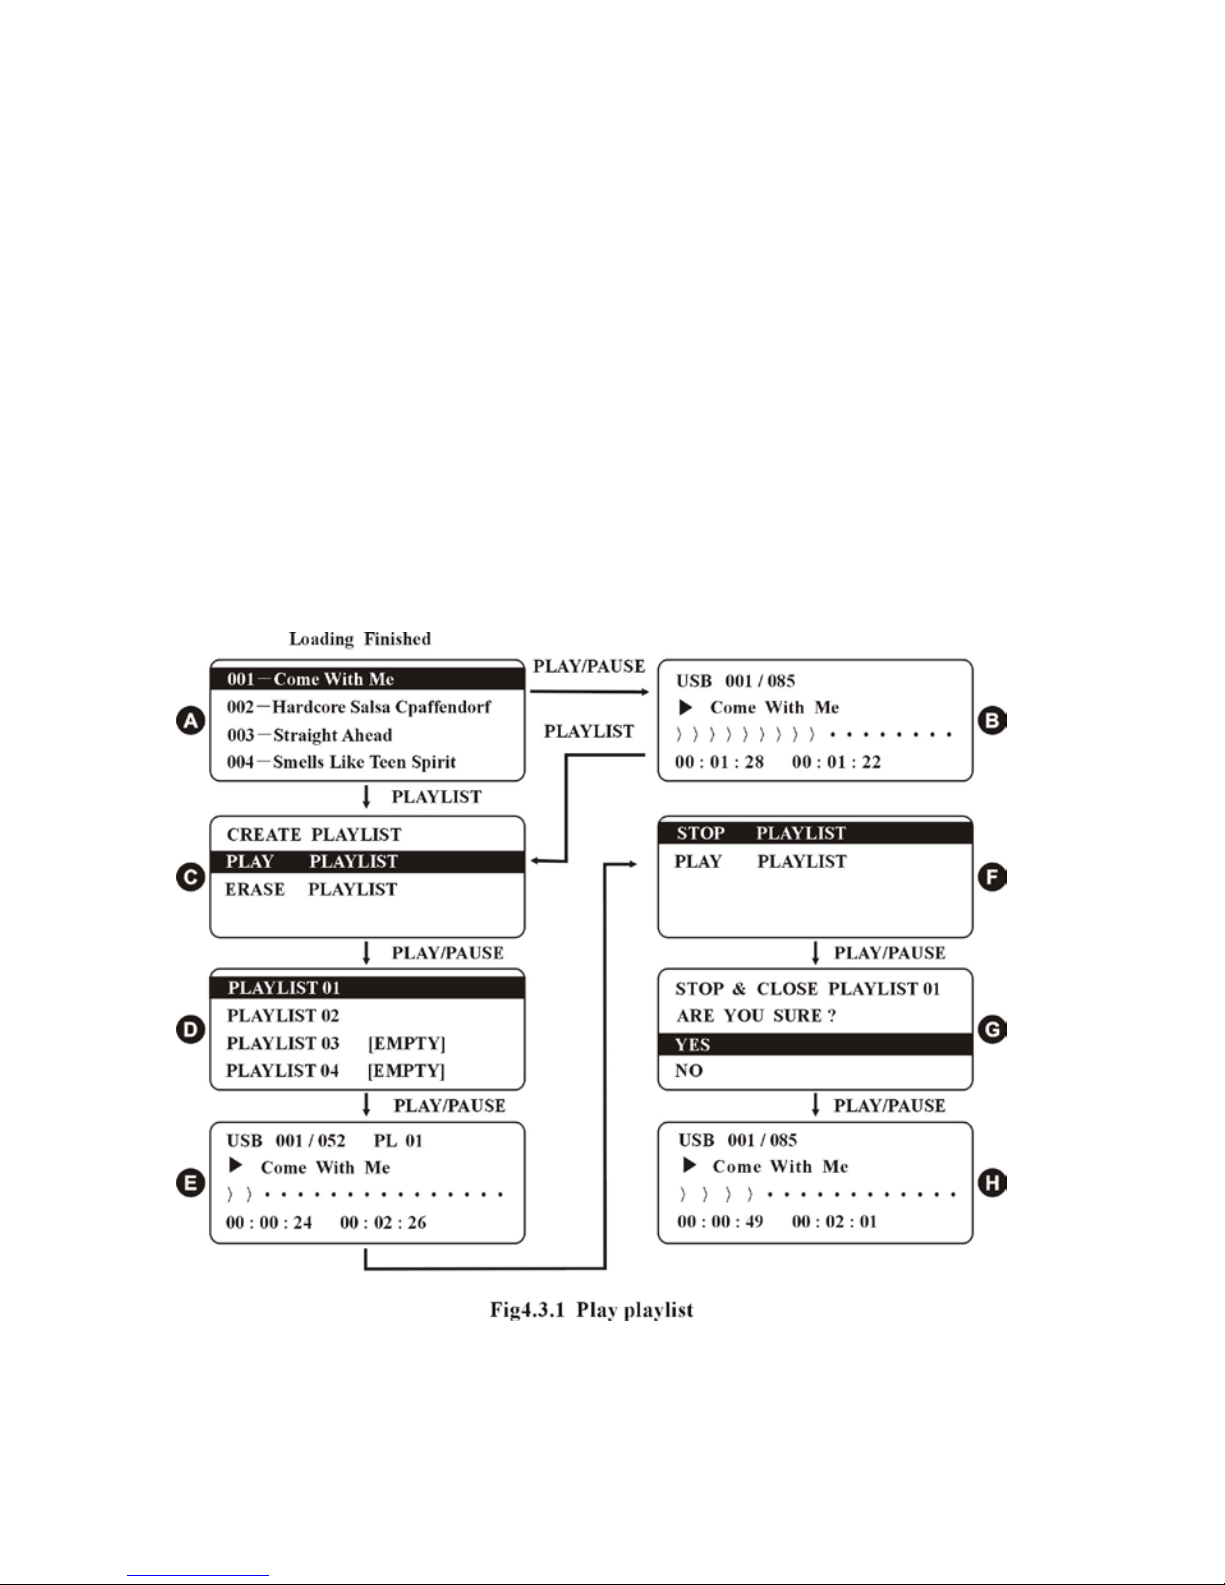
12.「PLAYLIST」, this button is used for playlist function including create, open and erase playlist.
13. 「DISPLAY」, press to switch between menu and playing display.
14. 「REMOTE」, remote control sensor.
15. 「LCD DISPLAY」, giant dot matrix LCD with blue backlight.
16. 「CONTRAST」, use this knob to set the contrast of the display to optimised level.
17. 「POWER」, main power switch for this unit.

4
3.2 Rear panel
Layout of rear panel, please refer to Fig 3.2.1.
Fig3.2.1 Layout of rear panel
1. Power supply connector「AC12V/1.5A INPUT」, connected to power adaptor included or
matched adaptor.
2. First output connector 「AUDIO OUTPUT 1」, RCA stereo output.
3. Second output connector 「AUDIO OUTPUT 2」, RCA stereo output.
4. Third output gain control knob「AUDIO OUTPUT 3-GAIN」, Hide style knob, used to adjust the
level of the third stereo balanced output signal.
5. Third stereo balanced output left channel「AUDIO OUTPUT 3-L」, XLR balance output.
6. Third stereo balanced output right channel「AUDIO OUTPUT 3-R」, XLR balance output.
3.3 Infrared remote control
Layout of infrared remote control, please refer to Fig3.3.1.
1. 「DISPLAY」, same function as `Display` key on front panel.
2. 「MENU/NO」, same function as `Menu/no` key on front
panel.
3. 「MUTE」, press to mute or un-mute the audio. When in mute
status, display will show `MUTE`.
4. 「REPEAT」, press to change between 3 play modes:
1-No repeat (default): The unit will play all the loaded songs
once and stop after finished the last song. Display will be
empty for the repeat status.
2-Repeat All: The unit will play all the loaded songs. When
it finishes the last song, it will start from the first song again.
Display will show `ALL` for the repeat status.
3-Repeat One: The unit will play the current song circularly.
Display will show `ONE` for the repeat status.
5. 「DSP」, press to change between 5 EQ effects: OFF, JAZZ,
ROCK, BASS, NORMAL, CLASSIC.
Fig3.3.1. infrared
remote control

5
3.4 19" rack ears
Attaching the 2pcs of 19" rack ears, please refer to Fig 3.4.1.
There are 2 Attached panels. Please refer to Fig 3.4.2. To install the panels, just remove the
screws at the sides of the unit and attach the panels with the screws. It is convenient for fixing
directly on a standard 19" bracket.
Fig3.4.1 Left, right attached panel for combination
Fig3.4.2 Complete front panel after combination
6. 「USB/SD」, same function as `USB/SD` key on front panel.
7. 「A」, press to set the starting (IN) point for re-loop playing of the current song.
8. 「B」, press to set the ending (OUT) point for re-loop playing of the current song.
9. 「RELOOP」, press to recall or get out of the re-loop playing.
10. 「PREV」, same function as `Previous` key on front panel.
11. 「NEXT」, same function as `Next` key on front panel.
12. 「PLAY/PAUSE」, same function as `PLAY/PAUSE` key on front panel.
13. 「FORWARD」, press this button for fast-forward function. Press and hold this button will
result in a faster speed of fast-forward function.
14. 「BACKWARD」, press this button for fast-backward function. Press and hold this button
will result in a faster speed of fast-backward function.
15. 「CUE」, same function as `CUE` key on front panel.

6
4. Operations for MP3 player
4.1 Loading and playback
Operations of loading and playback refer to Fig 4.1.1.
A. When power on the unit, a welcome message will show.
B. If there is no USB drive or SD card inserted. Message will show and the display will stay until
device is inserted.
C. If USB/ SD is inserted, the unit will start to scan the content of the device. Scan time depends
on the number of songs in the device. This unit can handle up to 500 songs maximum.
D. If USB/ SD is inserted before power on. The unit will select SD Card and start to scan the
content automatically. Only one device, USB or SD can be activated each time. The USB/SD
key can be used to switch between the devices. Scanning will re-start when device is
changed.
E. After scanning finished, all the scanned content will show in the 4-line menu. The unit is
ready to play.
F. Use the encoder switch (or PREVIOUS / NEXT button) to select and press the encoder (or
PLAY button) to play the selected song. A new playing screen will show and display the
related information of the current song.
4.2 Create Playlist
Operations of creating playlist refer to Fig 4.2.1.
A. After finished scanning the device content, select a song to start playback.
B. Press PLAYLIST button to call the Playlist menu.
C. Select `CREAT PLAYLIST` and confirm.

7
D. Choose an empty playlist to open. If a non-empty playlist is chosen, the unit will ask you to
erase the existing playlist and open as a new one.
E. After a playlist is chosen, display will show the message.
F. A playlist status will show in the top right corner of the display e.g. PL:OPEN 01, meaning that
playlist 01 is opened for adding songs.
G. Press PLAYLIST button to add the current song to the opened playlist. Display will show PL:
001 ADDED, meaning that the 1st song is added.
H. After adding the song to playlist, the display will go back to `PL: OPEN01`. More songs can
be added to the playlist by pressing the PLAYLIST button. There are total 10 playlists can be
used, each playlist can store up to 120 songs maximum.

8
I. After finished adding all the wanted songs, press and hold the PLAYLIST button for more than
3 seconds. A menu will display to save and close the playlist or discard the current playlist and
open another playlist.
J. If save and close playlist is chosen, choose YES in the confirmation display.
K. After confirmation, a message will show on the display.
L. The unit will get out of Playlist mode and go back to normal playback.
4.3 Play playlist
The Playlist created in this unit will be stored in the non-volatile memory. That means the playlist
will not be erased even the unit is turned off. However, the Playlist will not recognize the
corresponding USB drive or SD card. Users have to memorize which playlist was created with
which device.
If a wrong device is used or the content of the device has been changed. The order of the
Playlist will not be guaranteed.
Operations of playing playlist refer to Fig 4.3.1.
A, B. Press the PLAYLIST button in normal playback mode.
C. The playlist menu will show and select PLAY PLAYLIST.
D. Choose a playlist to play. If an empty playlist is chosen, a warning message will show and
the playlist will not be played.

9
E. After choosing a playable playlist, the playlist status will show, e.g. `PL01`, meaning that the
playlist 01 is opened for playback.
F. Press PLAYLIST button to call the Playlist menu to stop/ quit the playlist or open another
playlist to play.
G. Confirm the chosen action.
H. The unit will go back to normal playback mode if the playlist is stopped.
4.4 Erase playlist
Operations of erasing playlist refer to Fig 4.4.1.

10
A-C. After finished loading device content, Press PLAYLIST button to call the playlist menu.
D. Select ERASE PLAYLIST in the playlist menu.
E. Choose a non-empty playlist to erase.
F. Confirm to erase the selected playlist.
G. Message will show the selected playlist is erased successfully.
H. The display will go back to normal playback mode after the playlist is erased.
I. If an empty playlist is chosen is E, warning message will show that the playlist cannot be
erased.
J. The unit will go back to the Playlist menu and let user select another playlist.
4.5 Fast search with EZ search encoder
Operations of fast search with EZ search encoder refer to Fig 4.5.1.
A. Select a song to play.
B. Press the EZ search encoder in the playback screen.
C. A locator ` ` will show in the song position bar.
D. Turn the encoder (key PUSH/ ENTER) to move the locator to the desired position of the song.
E. Press the encoder (key PUSH/ ENTER) to confirm the new position or wait for 3s. The song will
play from the new position.
4.6 CUE
Operations of CUE refer to Fig 4.6.1.
A. The default CUE position is set at the beginning of the each playing song. To set a CUE
position start form the normal playback screen.

11
B. Press PLAY/PAUSE to pause the song.
C, D. Press FORWARD or BACKWARD to wanted position for CUE position.
E, F. Stop FORWARD or BACKWARD, the song will pause at that position.
F, H. Press PLAY/PAUSE to play the song again. The position where it starts to play will be stored
automatically as the CUE position, and `CUE` will show on the display indicating that CUE
position is stored.
I, J. To play the CUE position, simply press and hold CUE button. When the CUE button is
released, the song will go back to the CUE position and pause. The CUE position is only valid
within one song. If another song is selected, the old CUE position will be erased and the
beginning of the new song will become the new CUE position.

12
4.7 IN/ OUT/ RELOOP
Operations of IN/ OUT/ RELOOP refer to Fig 4.7.1.
A, B. There is an A-B repeat or IN/ OUT/ RELOOP function in this unit. Users can add customized
loop to the song and recall any time within the song which is playing or paused.
C, D. Press A in the remote control to set the current playing position as the A-position or
IN-position. An `IN` will show on the display.
E, F. Go to the desired ending position of the loop by going forward.
G. Press B to set that position as the B-position or OUT- position. The song will start
immediatelythe A-B Repeat. If the B-position or OUT-position is set accidentally earlier than
A-position/ IN-position, a warning message will show that `B is prior to A` and B-position/
OUT-position will not be stored. Users have to select another correct position to set the
B-position/ OUT-position again.
H. To get out of the loop, press B or RELOOP buttons on the remote control. `MEMO` will show
on the display that the Loop is stored and can be re-called. To recall the Loop, just simply press
the RELOOP button on the remote control. The stored LOOP is only valid within the surrent song.
The loop memory will be clear if a new song is selected.

13
5. SYSTEM CONNECTIONS
5.1 System connections
This unit has only SD card and USB flash disk input connections, so this unit is used as an audio
output device and send signal to external device like mixer or Amplifier. More details please
refer to Fig 5.1.1.
5.2 Operation precautions
The following will give you some hints and precautions on applications. For more operation
details please refer to Chapter 4.
5.2.1. Make sure that the system is installed properly according to former mentioned way,
each unit is connected correctly.
5.2.2. Suggest connecting to power supply of this unit first and then other connection of the
device. While when shutting down the unit, the power of this unit should be turned off at last. It
can avoid impact on the output device from sudden large signal when turn on/ off the unit.
5.2.3. Besides the power supply adaptor included, this unit also can be powered by other
matched adaptor.

14
6. TECHNICAL SPECIFICATIONS
Rated Inputs
SD CARD ................................................................................................. -14dB 15k ohm Stereo
USB............................................................................................................ -14dB 15k ohm Stereo
Rated Outputs
Audio Output 1.................................................................................... 0dB 50 ohm RCA Stereo
Audio Output 2.................................................................................... 0dB 50 ohm RCA Stereo
Audio Output 3...................................................................... 0dB 50 ohm XLR Stereo/Balance
Distortion .............................................................................................................................≤ 0.1%
S/N Ratio ............................................................................................................................ ≥ 75dB
Separability ........................................................................................................................≥ 50dB
Frequency Response .................................................................................... -2dB 20Hz~20kHz
Adapted Power Source .................................................................................. AC 12V 50/60Hz
Max Power Consumption .................................................................................................... 28W
Unit Dimensions .................................... W483mm×H88mm×D98mm (including fixing panel)
Weight ...................................... 2.9 kg (Including Power supply and attached fixing panel)
All features and specifications are subject to change without notice.
Disposal of Old Electrical & Electronic Equipment (Applicable in the European Union and other European
countries with separate collection systems).
This symbol on the product or on its packaging indicates that this product shall not be treated as household
waste. Instead it shall be handed over to the applicable collection point for the recycling of electrical and
electronic equipment. By ensuring this product is disposed of correctly, you will help prevent potential
negative consequences for the environment and human health, which could otherwise be
caused by inappropriate waste handling of this product. The recycling of materials will help
to conserve natural resources. For more detailed information about recycling of this product,
please contact your local Civic Office, your household waste disposal service or the shop
where you purchased the product.
Don't throw away the battery with general house waste, dispose of it correctly as chemical
waste.

15
U1
MODE D’EMPLOI…………………………………………………..16-28

16
Table des matières
1. Caractéristiques…………………………………………………………………………….16
2. Précautionsd’emploi……………………………………………………………………….17
3. Descriptions………………………………………………………………………………….18
3.1 Panneau avant……………………………………………………………………………18
3.2 Panneau arrière…………………………………………………………………………...19
3.3 Télécommande infra-rouge…………………………………………………………….19
3.4 Montage rack 19”………………………………………………………………………...20
4. Domaine de contrôle du lecteur MP3………………………………………………….21
4.1 Chargement et lecture………………………………………………………………….21
4.2 Créer une playlist…………………………………………………………………………21
4.3 Lecture de la playlist……………………………………………………………………..22
4.4 Effacer une playlist……………………………………………………………………….23
4.5 Recherche rapide avec l’encoder EZ……………………………………………….24
4.6 Cue…………………………………………………………………………………………25
4.7 Entrée / Sortie / Reloop…………………………………………………………………26
5. Configurations du système………………………………………………………………27
5.1 Connection du système………………………………………………………………...27
5.2 Précautions d’emploi…………………………………………………………………..27
6. Caractéristiques techniques…………………………………………………………….28
1. Caractéristiques:
1.Affichage DOT MATRIX avec informations sur les pistes ID3
2.USB intégré avec support jusqu’à 4Go / 2Go en carte SD
3.Lecteur MP3 - Pas besoin de connecter à un ordinateur
4.Afficheur géant avec réglage de contraste
5.Navigation complète avec l’encodeur EZ
6.Affichage des pistes stockées : 500 maximum
7.Télécommande sans fil
8.Fonction loop & reloop
9.Fonction recherche rapide
10.10 playlists
11.Sortie stéréo & sortie 4 RCA pour 2 canaux
12.Controle du gain pour la sortie stereo
13.Bloc secteur & fixations pour rack 19” inclus.

17
2. Précaution d’emploi
ATTENTION
RISQUE DE CHOC ÉLECTRIQUE NE PAS OUVRIR.
ATTENTION: AFIN DE RÉDUIRE LE RISQUE DE CHOC ÉLECTRIQUE, NE PAS ÔTER LE COUVERCLE (OU LE PANNEAU ARRIÈRE) AUCUNE PIÈCE
INTERNE N’EST RÉPARABLE PAR L’UTILISATEUR.POUR TOUTE RÉPARATION, S’ADRESSERÀ UN PROFESSIONNEL.
AVERTISSEMENT : AFIN DE PREVENIR LE RISQUE D’INCENDIE OU D’ELECTROCUTION, NE PAS EXPOSER L’APPAREIL
A LA PLUIE OU A L’HUMIDITE.
La fiche d’alimentation est utilisée comme dispositif de débranchement du réseau électrique
et doit donc toujours être accessible.
Ce symbole signifie que cet appareil est doté d’une double isolation. Aucun raccordement de mise à la
terre n’est nécessaire.
Le symbole de l’éclair à flèche à l’intérieur d’un triangle équilatéral avertit l’utilisateur de la
présence d’un “voltage dangereux” non isolé à l’intérieur de la structure du produit, dont la
puissance présente un risque d’électrocution.
Le point d’exclamation à l’intérieur d’un triangle équilatéral avertit l’utilisateur de la présence
d’instructions importantes d’utilisation et d’entretien (réparation) dans la notice jointe au produit.
L’appareil ne doit pas être exposé au suintement ou au renversement d’objets remplis de liquides
comme, par exemple, les vases, placés sur l’appareil.
Attention : afin de réduire le risque de choc électrique, ne pas ôter le couvercle (ou le
panneau arrière). Pour toute réparation, s’adresser à un professionnel.
Pour les réparations, s’adresser à un professionnel.
Ne pas installer le dispositif dans un endroit exposé à la lumière directe du soleil
Ne pas installer l’appareil dans un local poussiéreux, humide ou faiblement ventilé.
Pour éviter toute détérioration de l’appareil, débrancher le câble d’alimentation du
réseau électrique lorsqu’il n’est pas utilisé.
Pour débrancher l’appareil du réseau électrique, toujours saisir le câble d’alimentation
par la fiche. Ne pas retirer la fiche en tirant sur le câble.
Placer l’appareil sur une surface stable et éviter d’y poser d’autre objets.
Nettoyage : utiliser un chiffon propre et sec. Pour une saleté tenace, plonger le chiffon
dans un détergent délicat, bien l’essorer et le passer sur l’unité. Ne pas employer
d’agents volatils comme le benzène ou les diluants, car ils pourraient détériorer le
revêtement extérieur de l’appareil.
Ne pas bloquer les ventilateurs de refroidissement afin d’éviter toute surchauffe.
Ne pas placer de flammes libres, comme les bougies allumées, à proximité de
l’appareil.
Ne pas installer l’appareil dans un local poussiéreux, humide ou faiblement ventilé.

18
3. Descriptions:
3.1 Panneau avant
Schéma du panneau avant de l’appareil Fig 3.1.1
1. Entrée USB, insérez un support USB avec des fichiers MP3 sur ce dernier à cet endroit.
2. Témoin lumineux USB, il s’allume de couleur verte lorsque l’USB est en fonctionnement.
3. Entrée carte SD, insérez une carte SD avec des fichiers MP3 sur cette dernière.
4. Témoin lumineux SD, il s’allume de couleur verte lorsque le SD est en fonctionnement.
5. Bouton pour sélectionner le mode USB ou le mode SD. Pressez ce bouton lorsque les deux
entrées sont utilisées pour sélectionner l’un des deux supports.
6. PLAY/PAUSE : Cette touche est utilisée pour contrôler, lire ou mettre en pause la chanson.
Il agit également comme touche de confirmation dans le menu ou dans des opérations.
7. Précédent : Plusieurs fonctions : 1-Appuyez sur ce bouton pour sélectionner le morceau
précédent. 2-Appuyez et maintenez ce bouton pour aller vite vers l'arrière lors de la lecture.
3-Appuyez sur ce bouton pour déplacer la sélection vers le haut dans le menu. S’il vous plaît
consultez les sections pour le fonctionnement détaillé des différentes fonctions.
8. Suivant : Ce bouton a plusieurs fonctions : 1-Appuyez sur ce bouton pour sélectionner le
prochain morceau. 2-Appuyez et maintenez ce bouton pour aller vite en avant lors de la
lecture. 3-Appuyez sur ce bouton pour déplacer la sélection vers le bas dans le menu. S’il vous
plaît consultez les sections pour en savoir plus sur le fonctionnement de fonction différente.
9. CUE : Appuyez sur ce bouton pour accéder à la position Cue déterminée précédemment.
10. PUSH / ENTRER : EZ recherche Encodeur de recherche avec fonction "Push / ENTRER",
Utilisez ce codeur rotatif pour faire défiler en haut et en bas du menu et appuyez pour
confirmer la sélection. Il est également utilisé pour la recherche rapide.
11. MENU / NON : Appuyez pour basculer entre le menu d'affichage et de lecture. Il va
également agir comme un bouton d’annulation lors des opérations.
12. Playlist : Utilisé pour la fonction de lecture y compris créer/ouvrir/effacer la liste de lecture.
13. Afficheur : Appuyez pour basculer entre le menu affichage et la lecture.
14. Remote : capteur pour la réception du signal infra-rouge de la télécommande.
15. Afficheur LCD : LCD avec rétro-éclairage bleu géant.
16. CONTRASTE : réglage du contraste de l'afficheur pour l'optimisation de luminosité.
17. POWER : pressez ce bouton pour mettre sous tension ou éteindre l’appareil.

19
3.2 Panneau arrière
Schéma du panneau arrière de l’appareil Fig 3.2.1
1. Entrée d'alimentation : Connecté à l'adaptateur secteur inclus ou autres adaptateurs.
2. Sortie audio 1 RCA Stéréo.
3. Sortie audio 2 RCA Stéréo.
4. Gain de sortie pour la sortie audio 3. Ce bouton vous permetde réglerle niveau de sortie du
signal stéréo, interrupteur enfoncé dans la carcasse de l’appareil, utilisez un tournevis pour
modifier le réglage.
5. Sortie XLR canal gauche.
6. Sortie XLR canal droit.
3.3 Télécommande infra rouge
1. Display: ce bouton dispose des mêmes caractéristiques que
le bouton Display sur la façade avant de l’appareil.
2. MENU/NON : ce bouton dispose des mêmes caractéristiques
que le bouton MENU/NON sur la façade avant de l’appareil.
3. MUTE: met l’appareil en muet.
4. REPEAT: 3 modes de repetitions : 1 - Pas de répétition (par défaut) :
l’appareil lit les pistes les unes après les autres de la première à la
dernière. Le témoin de répétition n’apparaît pas dans ce cas.
2 - Repeat all : l’appareil lit les pistes les unes après les autres de la
première à la dernière et recommence une fois la dernière terminée.
Le témoin de répétition affiche alors le logo“ALL”.
3 - Repeat one : l’appareil lit la même piste en boucle.
Le témoin de répétition affiche alors le logo “ONE”.
5. DSP: change le mode EQ entre 5 positions: OFF, JAZZ, ROCK,
BASS, NORMAL et CLASSIC.
6. USB/SD: mêmes caractéristiques que le bouton USB/SD sur la façade avant de l’appareil.
7. A : pressez ce bouton pour enclencher la fonction Reloop sur la piste en cours.
8. B : pressez ce pour désenclencher la fonction Reloop sur la piste en cours.
9. Reloop : Appuyez permet de le rappeler ou de le sortir de la nouvelle boucle de lecture.
10. Précédent : ce bouton dispose des mêmes caractéristiques que le bouton Précédent sur
la façade avant de l’appareil.
11. Suivant : ce bouton dispose des mêmes caractéristiques que le bouton Suivant sur la
façade avant de l’appareil.
Table of contents
Languages: