manuals.online logo
Brands
  1. Home
  2. •
  3. Brands
  4. •
  5. Mackie
  6. •
  7. Tablet Accessories
  8. •
  9. Mackie DL806 User manual

Mackie DL806 User manual

iPad Air / iPad Air 2 Tray Kit Installation Instructions
Parts
iPad Air / iPad Air 2 Tray Kit Contents – Part No. 2043589:
iPad Air / iPad Air 2 Tray Insert (1) – Part No. 2042082
iPad Air 2 Rail Strips (2) – Part No. 2046055
Black Nylon Washers (4) – Part No. 2037889
This instruction sheet (1) – Part No. 2043591
Tools
Required Tools (not included):
Phillips screwdriver
Isopropyl alcohol
Clean, dry cloth
Getting Started
Before doing anything else...
• Turn off the mixer.
• Disconnect all cords.
• Remove mixer from the rack (if applicable).
• Place the mixer on a soft and dry flat surface.
iPad Tray Insert Removal
1. Remove the four screws holding the tray insert
to the mixer, numbered 1 to 4 in the illustration below.
Keep the screws in a safe place, as you will use them
again.
2. Remove the tray insert from the mixer and save it
somewhere safe! You might need to use it again.
2
1
3
4
Tray Insert
Tray
IMPORTANT!
The contents of this kit allow you to replace the iPad tray insert currently installed on the DL806 or DL1608 mixer with
an iPad Air or iPad Air 2 tray insert. Before installing, ensure that you have the right iPad, docking connector and tray insert
for your combination. See the iPad to DL Compatibility Matrix for the latest information:
http://www.mackie.com/products/dlseries/specs
Please first read these instructions carefully to ensure you feel capable of completing the described tasks. Failure
to follow the exact instructions in this document may result in personal injury or damage to the DL806, DL1608, iPad,
or contents of the kit and may void the warranty, as well.
Web: http://www.mackie.com/support
Email: [email protected]
Phone: 425-487-4333
Toll-free: 800-898-3211
LOUD Technologies Inc. • 16220 Wood-Red Road NE
Woodinville • WA • 98072 • 800/258-6883
Outside the U.S. call 425/487-4333 • FAX 425/487-4337
Disclaimer: LOUD Technologies Inc. continually engages in research related to product improvement.
New material, production methods, and design renements are introduced into existing products without
notice as a routine expression of that philosophy. For this reason, any current LOUD Technologies Inc.
product may differ in some respect from its published description, but will always equal or exceed the
original design specications unless otherwise stated.
iPad Air 2 Rail Installation
If using an iPad Air, please follow steps 8-10 to the right.
If using an iPad Air 2, please thoroughly wash and dry your
hands first and continue on with the instructions below.
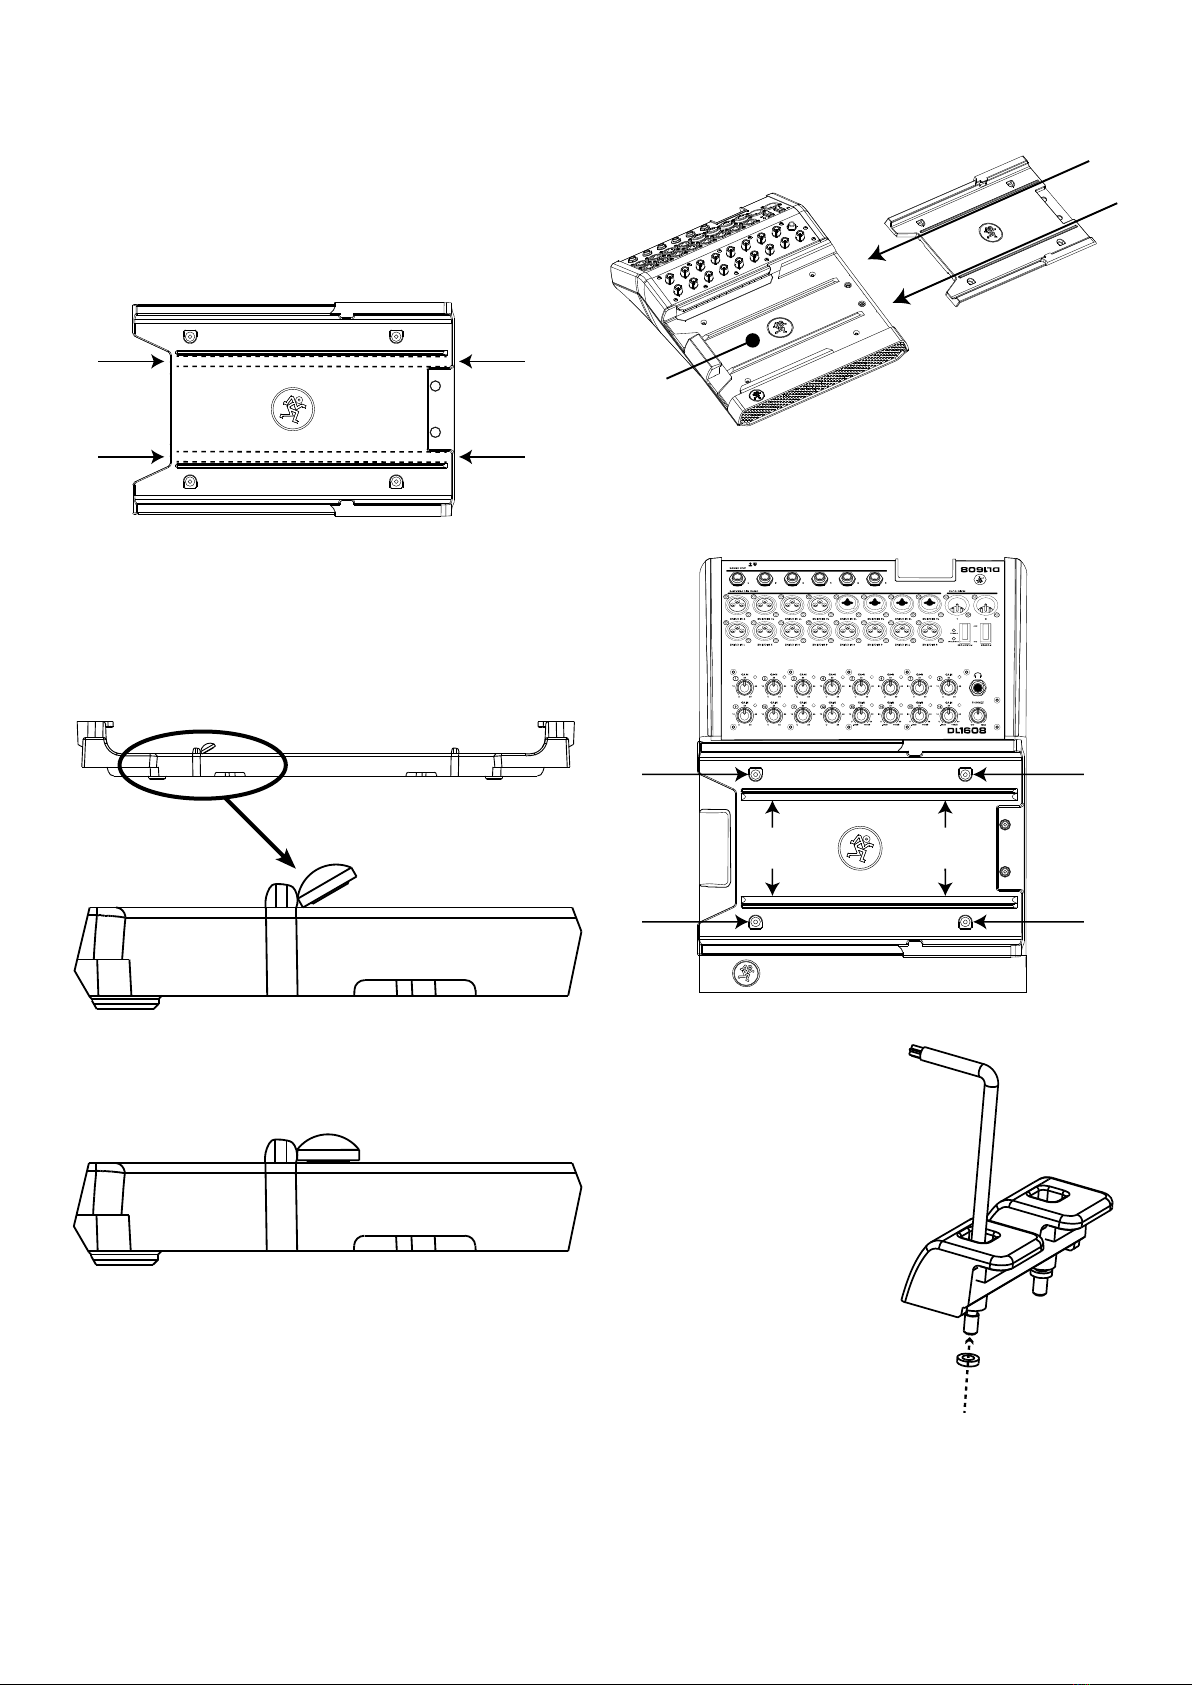
1. Add isopropyl alcohol to the clean, dry cloth
and use it to wipe down the iPad Air tray insert next
to the rails (between the dotted lines) as displayed
below. Let dry thoroughly.
2. Doing your best to not touch any part of the adhesive,
remove the adhesive backing paper of one of the iPad Air 2
rail strips.
3. With the adhesive side facing the tray insert, line up,
angle and place the first rail strip butted up next to the tray
insert’s rail, as shown below.
4. Keeping the rail strip butted up next to the tray insert’s
rail, continue to apply pressure while pushing the rail strip
down against the tray insert until the adhesive sticks.
5. Using a round, non-marking object, – the body of a pen
or pencil, for example – apply pressure to the entire length
of the rail strip for approximately 20-30 seconds.
6. Follow steps 2-5 above for the second adhesive rail strip.
7. It takes approximately 24 hours for the adhesive to fully
set. Continue on with the instructions to the right.
iPad Air Tray Insert Installation
8. Slide the iPad Air / iPad Air 2 tray insert on top of
the mixer tray, making sure to line up the sides and the
screw holes.
9. Place the screws back into the DL mixer from where
they were removed. Screw them into place, but do not
overtighten. If the iPad fit is too tight, loosen all four screws,
then tighten the ones closest to the connector first.
10. To use the PadLock™,
you will need to install the two
nylon washers (included in this
kit). Align them flat against the
threads of each PadLock screw™,
put the driver into the screw
head and slowly turn the screw
to thread the washer over the
screw threads. Apply moderate
pressure against the washer
while turning the screw so the
washer threads. Stop when the
washers clear the screw threads.
Note: This kit contains four
nylon washers, but two are
spares. Keep the other washers
in case the couch eats up the
others, never to be seen again.
Tray Insert
Tray
iPad Air 2 Rail Strip
Screw
here
Screw
here
Screw
here
Screw
here
Part No. SW1059 Rev B 06/15
© 2015 LOUD Technologies Inc. All Rights Reserved.

Other manuals for DL806

6

This manual suits for next models

1

Popular Tablet Accessories manuals by other brands

IOGear GKB633U quick start guide

IOGear

IOGear GKB633U quick start guide

Vivo STAND-PAD1 instruction manual

Vivo

Vivo STAND-PAD1 instruction manual

on stage TCM1500 manual

on stage

on stage TCM1500 manual

Logitech Logitech Keyboard Case user manual

Logitech

Logitech Logitech Keyboard Case user manual

Manhattan 406017 instructions

Manhattan

Manhattan 406017 instructions

Logitech PRO FOLIO SLIM Complete Setup Guide

Logitech

Logitech PRO FOLIO SLIM Complete Setup Guide

Promate keyCase Mini user guide

Promate

Promate keyCase Mini user guide

Basalte eve Pro 10.5" quick start guide

Basalte

Basalte eve Pro 10.5" quick start guide

Mobibooth Cruise Series manual

Mobibooth

Mobibooth Cruise Series manual

inVue CT100 manual

inVue

inVue CT100 manual

Pivot PRO 11 user guide

Pivot

Pivot PRO 11 user guide

Andres Industries aiShell Air user manual

Andres Industries

Andres Industries aiShell Air user manual

Logitech Turnaround Setup guide

Logitech

Logitech Turnaround Setup guide

Zagg FOLIO instructions

Zagg

Zagg FOLIO instructions

Dell PN9315A user guide

Dell

Dell PN9315A user guide

Sanus VTM7 instruction manual

Sanus

Sanus VTM7 instruction manual

Cooper Cases Cooper Touchpad Executive instruction manual

Cooper Cases

Cooper Cases Cooper Touchpad Executive instruction manual

ISkin CE-TX1000 user guide

ISkin

ISkin CE-TX1000 user guide

manuals.online logo
manuals.online logoBrands
  • About & Mission
  • Contact us
  • Privacy Policy
  • Terms and Conditions

Copyright 2025 Manuals.Online. All Rights Reserved.