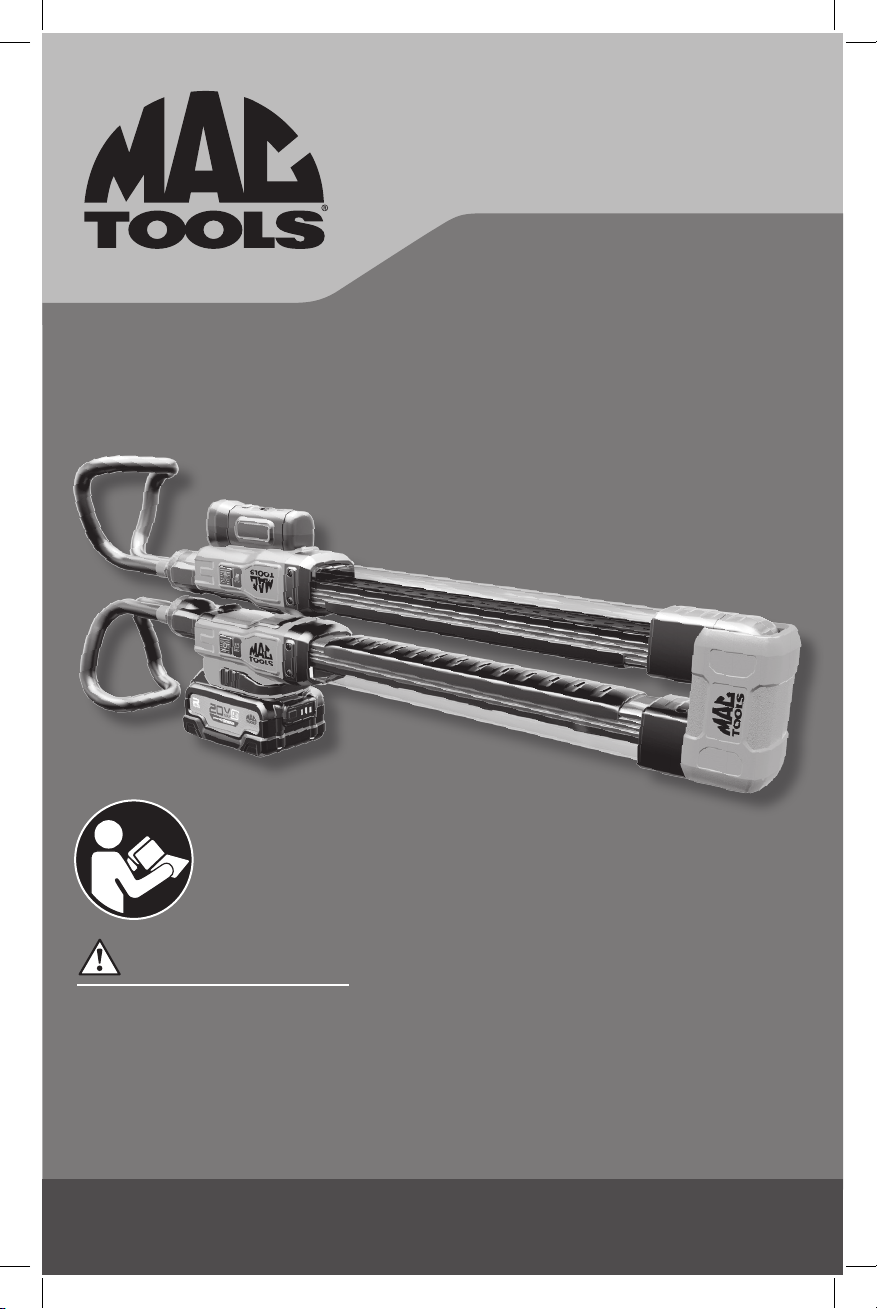
MAG TOOLS MCL045 User manual

MCL045
Instruction Manual
20V MAX
*
LED Hood Light
To reduce the risk of injury, read and
understand these safety warnings and
instructions before using the tool. Keep
these instructions with the tool for future
reference. If you have any questions,
contact your MAC TOOLS representative
or distributor.
WARNING
* Maximum initial battery voltage
(measured without a workload) is
20 volts. Nominal voltage is 18.

English 1
Español 9
Français 19

ENGLISH
1
English
Definitions: Safety Alert Symbols and Words
This instruction manual uses the following safety alert symbols and words to alert you to hazardous situations and your risk
of personal injury or property damage.
DANGER: Indicates an imminently hazardous situation which, if not avoided, will result in death or seriousinjury.
WARNING: Indicates a potentially hazardous situation which, if not avoided, could result in death or seriousinjury.
CAUTION: Indicates a potentially hazardous situation which, if not avoided, may result in minor or moderateinjury.
(Used without word) Indicates a safety related message.
NOTICE: Indicates a practice not related to personal injury which, if not avoided, may result in propertydamage.
WARNING! Read all safety warnings and all
instructions. Failure to follow the warnings and
instructions may result in electric shock, fire and/or
seriousinjury.
WARNING: To reduce the risk of injury, read the
instructionmanual.
Contact your Mac Tools representative or distributor
with any questions concerning the tool and its use.
Mac Tools
505 North Cleveland Avenue
Westerville, Ohio 43082
800.MACTOOLS
MACTOOLS.COM
1 Extendable hooks
2 Work light
3 Motion sensor button
4 Power button
5 Lens
6 Motion sensor
7 Battery
8 Release button
Fig. A
12
3
5
7
4
8
6

ENGLISH
2
Important Safety Instructions
WARNING! When using the hood light, basic
precautions should always be followed, including the
following:
a ) Read all the instructions before using the hood
light.
b ) To reduce the risk of injury, close supervision
is necessary when a hood light is used near
children.
c ) Turn the hood light off when not in use and
before servicing or cleaning.
d ) Do not operate any hood light after it
malfunctions or is dropped or damaged in any
manner. Return hood light to the nearest authorized
service facility for examination, repair, or electrical or
mechanical adjustment.
e ) To reduce the risk of electrical shock, do not put
hood light in water or other liquid. Do not place
or store hood light where it can fall or be pulled into
a tub or sink.
f ) Only use attachments recommended or sold by
the manufacturer.
g ) This hood light is intended for indoor and
outdoor use, store indoors.
h ) Do not grasp hood light to support body weight,
do not hang items from the hood light, it is not
designed to hold additional weight and could
collapse.
NOTE: This hood light has a rating of IP55 which
means it has some level of protection from dust and
water ingress. Refer to IEC60529 IP55 for the specific
meaning of this rating. The battery does not have an IP
rating on its own. Do not submerge hood light or battery in
liquid.
SAVE THESE INSTRUCTIONS
Specific Safety Rules for Hood lights
WARNING: Fire hazard. Do not operate hood light
or charger near flammable liquids or in gaseous or
explosive atmospheres. Internal sparks may ignite
fumes causing personal injury.
• Do not wash hood light or charger with water or allow
water to get inside light or charger. Do not submerge
hood light in water at any time.
• Do not expose the hood light to rain or wet conditions.
• While hood light is in use, do not cover with cloth or
other flammable materials due to increased risk of fire.
• The hood light is intended for commercial and
household use. It can be used outdoors.
• Store the hood light indoors when not in use.
WARNING: Do not place the hood light
in a position which may cause anyone to
intentionally or unintentionally stare into the
light. Serious eye injury could result.
CAUTION: When not in use, place hood light on a
stable surface where it will not cause a tripping
or falling hazard. Some tools with large battery
packs will stand upright on the battery pack but may
be easily knockedover.
The label on your tool may include the following symbols. The
symbols and their definitions are asfollows:
V.........................volts
Hz .......................hertz
min.....................minutes
or DC......direct current
......................Class I Construction
(grounded)
…/min.............. per minute
BPM.................... beats per minute
IPM.....................impacts per minute
RPM.................... revolutions per
minute
sfpm ...................surface feet per
minute
SPM....................strokes per minute
A.........................amperes
W........................watts
or AC........... alternating current
or AC/DC.... alternating or
direct current
......................Class II
Construction
(double insulated)
no.......................no load speed
n.........................rated speed
......................earthing terminal
...................... safety alert symbol
.....................visible radiation
....................Do not stare at the
operating light source
.....................respiratory
protection
.....................eye protection
..................... hearing protection
IPxx..................... ingress protection
......................do not incinerate
BATTERIES AND CHARGERS
The battery pack is not fully charged out of the carton.
Before using the battery pack and charger, read the
safety instructions below and then follow charging
proceduresoutlined. When ordering replacement battery
packs, be sure to include the catalog number andvoltage.
Your hood light uses a Mac Tools charger. Be sure to read all
safety instructions before using your charger.
READ ALL INSTRUCTIONS
Important Safety Instructions for All
Battery Packs
WARNING: Read all safety warnings and all
instructions for the battery pack, charger and
hood light. Failure to follow the warnings and
instructions may result in electric shock, fire and/
or serious injury.
• Do not charge or use the battery pack in explosive
atmospheres, such as in the presence of flammable
liquids, gases or dust. Inserting or removing the battery
pack from the charger may ignite the dust orfumes.
• NEVER force the battery pack into the charger. DO
NOT modify the battery pack in any way to fit into
a non-compatible charger as battery pack may
rupture causing serious personal injury. Charge the
battery packs only in designated Mac Toolschargers.
• DO NOT splash or immerse in water or otherliquids.
• Do not store or use the tool and battery pack in
locations where the temperature may reach or

ENGLISH
3
exceed 104°F (40°C) (such as outside sheds or metal
buildings in summer). For best life store battery packs in
a cool, drylocation.
NOTE: Do not store the battery packs in a tool with
the trigger switch locked on. Never tape the trigger
switch in the ONposition.
• Do not incinerate the battery pack even if it is
severely damaged or is completely worn out. The
battery pack can explode in a fire. Toxic fumes and
materials are created when lithium ion battery packs
areburned.
• If battery contents come into contact with the skin,
immediately wash area with mild soap and water. If
battery liquid gets into the eye, rinse water over the open
eye for 15 minutes or until irritation ceases. If medical
attention is needed, the battery electrolyte is composed of
a mixture of liquid organic carbonates and lithiumsalts.
• Contents of opened battery cells may cause
respiratory irritation. Provide fresh air. If symptoms
persist, seek medicalattention.
WARNING: Burn hazard. Battery liquid may be
flammable if exposed to spark orflame.
WARNING: Fire hazard. Never attempt to open the
battery pack for any reason. If the battery pack case
is cracked or damaged, do not insert into the charger.
Do not crush, drop or damage the battery pack. Do
not use a battery pack or charger that has received a
sharp blow, been dropped, run over or damaged in
any way (e.g., pierced with a nail, hit with a hammer,
stepped on). Damaged battery packs should be
returned to the service center forrecycling.
Transportation
WARNING: Fire hazard. Do not store or carry the
battery pack so that metal objects can contact
exposed battery terminals. For example, do
not place the battery pack in aprons, pockets, tool
boxes, product kit boxes, drawers, etc., with loose
nails, screws, keys, etc. Transporting batteries
can possibly cause fires if the battery terminals
inadvertently come in contact with conductive
materials such as keys, coins, hand tools and the
like. The US Department of Transportation Hazardous
Material Regulations (HMR) actually prohibit
transporting batteries in commerce or on airplanes in
carry-on baggage UNLESS they are properly protected
from short circuits. So when transporting individual
battery packs, make sure that the battery terminals
are protected and well insulated from materials that
could contact them and cause a short circuit.
Fuel Gauge Battery Packs (Fig. B)
Some Mac Tools battery packs include a fuel gauge which
consists of three green LED lights that indicate the level of
charge remaining in the batterypack.
The fuel gauge is an indication of approximate levels of
charge remaining in the battery pack according to the
followingindicators:
Fig. B
75–100% charged
51–74% charged
< 50% charged
Pack needs to be charged
11
To actuate the fuel gauge, press and hold the fuel gauge
button 11. A combination of the three green LED lights will
illuminate designating the level of charge left. When the
level of charge in the battery is below the usable limit, the
fuel gauge will not illuminate and the battery will need to
berecharged.
NOTE: The fuel gauge is only an indication of the charge left
on the battery pack. It does not indicate tool functionality
and is subject to variation based on product components,
temperature and end-userapplication.
For more information regarding fuel gauge battery packs,
please call 1-800-MAC-TOOLS (622-8665) or visit our
website, www.mactools.com.
The RBRC® Seal
The RBRC® (Rechargeable Battery
Recycling Corporation) Seal on the nickel
cadmium, nickel metal hydride or lithium-
ion batteries (or battery packs) indicates
that the costs to recycle these batteries
(or battery packs) at the end of their useful life have already
been paid by Mac Tools. In some areas, it is illegal to place
spent nickel cadmium, nickel metal hydride or lithium-ion
batteries in the trash or municipal solid waste stream and
the Call2Recycle® program provides an environmentally
consciousalternative.
Call 2 Recycle, Inc., in cooperation with Mac Tools and other
battery users, has established the program in the United
States and Canada to facilitate the collection of spent nickel
cadmium, nickel metal hydride or lithium-ion batteries. Help
protect our environment and conserve natural resources by
returning the spent nickel cadmium, nickel metal hydride
or lithium-ion batteries to an authorized Mac Tools service
center or to your local retailer for recycling. You may also
contact your local recycling center for information on
where to drop off the spent battery. RBRC® is a registered
trademark of Call 2 Recycle,Inc.

ENGLISH
4
Important Safety Instructions for All
Battery Chargers
WARNING: Read all safety warnings and all
instructions for the battery pack, charger and
hood light. Failure to follow the warnings and
instructions may result in electric shock, fire and/
or serious injury.
• DO NOT attempt to charge the battery pack with
any chargers other than the ones in this manual.
The charger and battery pack are specifically designed to
worktogether.
• These chargers are not intended for any uses other
than charging Mac Tools rechargeable batteries.
Any other uses may result in risk of fire, electric shock
orelectrocution.
• Do not expose the charger to rain orsnow.
• Pull by the plug rather than the cord when
disconnecting the charger. This will reduce the risk of
damage to the electric plug andcord.
• Make sure that the cord is located so that it will not
be stepped on, tripped over or otherwise subjected
to damage orstress.
• Do not use an extension cord unless it is absolutely
necessary. Use of improper extension cord could result in
risk of fire, electric shock orelectrocution.
• When operating a charger outdoors, always provide
a dry location and use an extension cord suitable
for outdoor use. Use of a cord suitable for outdoor use
reduces the risk of electricshock.
• An extension cord must have adequate wire size
(AWG or American Wire Gauge) for safety. The smaller
the gauge number of the wire, the greater the capacity
of the cable, that is, 16 gauge has more capacity than 18
gauge. An undersized cord will cause a drop in line voltage
resulting in loss of power and overheating. When using
more than one extension to make up the total length,
be sure each individual extension contains at least the
minimum wire size. The following table shows the correct
size to use depending on cord length and nameplate
ampere rating. If in doubt, use the next heavier gauge. The
lower the gauge number, the heavier thecord.
Minimum Gauge for Cord Sets
Volts Total Length of Cord in Feet
(meters)
120 V 25 (7.6) 50 (15.2) 100 (30.5) 150 (45.7)
240 V 50 (15.2) 100 (30.5) 200 (61.0) 300 (91.4)
Ampere Rating
American Wire Gauge
More
Than
Not
More
Than
0 6 18 16 16 14
610 18 16 14 12
10 12 16 16 14 12
12 16 14 12 Not Recommended
• Do not place any object on top of the charger or
place the charger on a soft surface that might block
the ventilation slots and result in excessive internal
heat. Place the charger in a position away from any heat
source. The charger is ventilated through slots in the top
and the bottom of thehousing.
• Do not operate the charger with a damaged cord
orplug.
• Do not operate the charger if it has received a sharp
blow, been dropped or otherwise damaged in any
way. Take it to an authorized servicecenter.
• Do not disassemble the charger; take it to an
authorized service center when service or repair
is required. Incorrect reassembly may result in a risk of
electric shock, electrocution orfire.
• Disconnect the charger from the outlet before
attempting any cleaning. This will reduce the risk of
electric shock. Removing the battery pack will not reduce
thisrisk.
• NEVER attempt to connect 2 chargerstogether.
• The charger is designed to operate on standard
120V household electrical power. Do not attempt to
use it on any other voltage. This does not apply to the
vehicularcharger.
WARNING: Shock hazard. Do not allow any liquid to
get inside the charger. Electric shock mayresult.
WARNING:Burn hazard. Do not submerge the
battery pack in any liquid or allow any liquid to
enter the battery pack. Never attempt to open the
battery pack for any reason. If the plastic housing of
the battery pack breaks or cracks, return to a service
center for recycling.
CAUTION: Burn hazard. To reduce the risk of injury,
charge only Mac Tools rechargeable battery packs.
Other types of batteries may overheat and burst
resulting in personal injury and propertydamage.
NOTICE: Under certain conditions, with the charger
plugged into the power supply, the charger can
be shorted by foreign material. Foreign materials
of a conductive nature, such as, but not limited to,
grinding dust, metal chips, steel wool, aluminum
foil or any buildup of metallic particles should be
kept away from the charger cavities. Always unplug
the charger from the power supply when there is no
battery pack in the cavity. Unplug the charger before
attempting toclean.
Wireless Certifications and Safety
Information
This device complies with part 15 of the FCC Rules. Operation
is subject to the following two conditions: (1) This device may
not cause harmful interference, and (2) this device must accept
any interference received, including interference that may
cause undesired operation.
Changes or modifications not expressly approved by the party
responsible for compliance could void the user’s authority to
operate the equipment.
This equipment has been tested and found to comply
with the limits for a Class B digital device, pursuant to Part
15 of the FCC Rules. These limits are designed to provide

ENGLISH
5
reasonable protection against harmful interference in a
residential installation. This equipment generates, uses, and
can radiate radio frequency energy and, if not installed and
used in accordance with the instructions, may cause harmful
interference to radio communications. However, there is
no guarantee that interference will not occur in a particular
installation. If this equipment does cause harmful interference
to radio or television reception, which can be determined by
turning the equipment off and on, the user is encouraged to try
to correct the interference by one of the following measures:
- Reorient or relocate the receiving antenna.
- Increase the separation between the equipment and
receiver.
- Connect the equipment to an outlet on a circuit
different from that to which the receiver is connected.
- Consult the dealer or an experienced radio/TV
technician for help.
Charging a Battery (Fig. C)
1. Plug the charger into an appropriate outlet before
inserting battery pack.
Fig. C
7
8
2. Insert the battery pack 7 into the charger, making sure
the battery pack is fully seated in the charger. The red
(charging) light will blink continuously indicating that
the charging process has started.
3. The completion of charge will be indicated by the red
light remaining ON continuously. The battery pack is
fully charged and may be used at this time or left in the
charger. To remove the battery pack from the charger,
push the battery release button 8 on the battery pack.
NOTE: To ensure maximum performance and life of lithium-
ion battery packs, charge the battery pack fully before first
use.
Charger Operation
Refer to the indicators below for the charge status of the
battery pack.
MCB101
Charging
Fully Charged
Hot/Cold Pack Delay
Problem Pack or Charger
MCB115
Charging
Fully Charged
Hot/Cold Pack Delay*
*MCB115: The red light will continue to blink, but a yellow
indicator light will be illuminated during this operation.
Once the battery pack has reached an appropriate
temperature, the yellow light will turn off and the charger
will resume the charging procedure.
The compatible charger(s) will not charge a faulty battery
pack. The charger will indicate faulty battery pack by
refusing to light or by displaying a problem pack or charger
blink pattern.
NOTE: This could also mean a problem with a charger.
If the charger indicates a problem, take the charger and
battery pack to be tested at an authorized service center.
Hot/Cold Pack Delay
When the charger detects a battery pack that is too hot
or too cold, it automatically starts a Hot/Cold Pack Delay,
suspending charging until the battery pack has reached an
appropriate temperature. The charger then automatically
switches to the pack charging mode. This feature ensures
maximum battery pack life.
A cold battery pack will charge at a slower rate than a warm
battery pack. The battery pack will charge at that slower rate
throughout the entire charging cycle and will not return
to maximum charge rate even if the battery pack warms.
Electronic Protection System
Li-Ion tools are designed with an Electronic Protection
System that will protect the battery pack against
overloading, overheating or deep discharge.
The tool will automatically turn off if the Electronic
Protection System engages. If this occurs, place the lithium-
ion battery pack on the charger until it is fully charged.
Wall Mounting
MCB115
This charger is designed to be wall mountable or to sit
upright on a table or work surface. If wall mounting, locate
the charger within reach of an electrical outlet, and away
from a corner or other obstructions which may impede
air flow. Use the back of the charger as a template for
the location of the mounting screws on the wall. Mount
the charger securely using drywall screws (purchased
separately) at least 1" (25.4 mm) long, with a screw head
diameter of 0.28–0.35" (7–9mm), screwed into wood to an
optimal depth leaving approximately 7/32" (5.5 mm) of the
screw exposed. Align the slots on the back of the charger
with the exposed screws and fully engage them in the slots.
Charger Cleaning Instructions
WARNING: Shock hazard. Disconnect the charger
from the AC outlet before cleaning. Dirt and grease
may be removed from the exterior of the charger using
a cloth or soft non-metallic brush. Do not use water or
any cleaning solutions.

ENGLISH
6
Important Charging Notes
1. Longest life and best performance can be obtained if
the battery pack is charged when the air temperature is
between 65°F and 75°F (18°– 24°C). DO NOT charge
the battery pack in an air temperature below +40°F
(+4.5°C), or above +104°F (+40°C). This is important
and will prevent serious damage to the battery pack.
2. The charger and battery pack may become warm to the
touch while charging. This is a normal condition, and
does not indicate a problem. To facilitate the cooling of
the battery pack after use, avoid placing the charger or
battery pack in a warm environment such as in a metal
shed or an uninsulated trailer.
3. If the battery pack does not charge properly:
a. Check operation of receptacle by plugging in a lamp
or other appliance;
b. Check to see if receptacle is connected to a light switch
which turns power off when you turn out the lights;
c. Move the charger and battery pack to a location
where the surrounding air temperature is
approximately 65°F– 75°F (18° – 24°C);
d. If charging problems persist, take the tool, battery
pack and charger to your local service center.
4. The battery pack should be recharged when it fails to
produce sufficient power on jobs which were easily
done previously. DO NOT CONTINUE to use under these
conditions. Follow the charging procedure. You may
also charge a partially used pack whenever you desire
with no adverse effect on the battery pack.
5. Foreign materials of a conductive nature such as, but
not limited to, grinding dust, metal chips, steel wool,
aluminum foil, or any buildup of metallic particles
should be kept away from charger cavities. Always
unplug the charger from the power supply when there
is no battery pack in the cavity. Unplug the charger
before attempting to clean.
6. Do not freeze or immerse the charger in water or any
other liquid.
Storage Recommendations
1. The best storage place is one that is cool and dry, away
from direct sunlight and excess heat or cold.
2. For long storage, it is recommended to store a fully
charged battery pack in a cool dry place out of the
charger for optimal results.
NOTE: Battery packs should not be stored completely
depleted of charge. The battery pack will need to be
recharged before use.
SAVE THESE INSTRUCTIONS FOR
FUTURE USE
COMPONENTS (FIG. A)
WARNING: Never modify the power tool or any part
of it. Damage or personal injury couldresult.
Refer to Figure A at the beginning of this manual for a
complete list ofcomponents.
INTENDED USE
This hood light is designed for professional lighting
applications.
DO NOT use in presence of flammable liquids orgases.
DO NOT let children come into contact with the tool.
Supervision is required when inexperienced operators use
thistool.
HOOD LIGHT OPERATION
WARNING: To reduce the risk of serious personal
injury, turn unit off and remove the battery pack
before making any adjustments or removing/
installing attachments or accessories.
Power ON/OFF Button (Fig. A)
To turn the light on, press the power button 4, this initial
setting is high mode, press the button again and the light
will convert to low mode, press again to turn the light off.
Low Battery Indicator
As the battery nears a fully discharged state, the light will
blink twice and then dim, dropping the brightness of the
light below the normal level. The light will continue to blink
twice every 45 seconds until the battery is fully discharged
at which time the light will turn off. Indication time will vary
based on battery pack capacity.
Motion Sensor (Fig. A)
To turn the motion sensor on, press the motion sensor
button 3. To turn it off, press the button again. When
activated, the sensor will detect when no motion has
occured for 3 minutes and will automatically turn the
light off. If the sensor is not activated, the light will stay on
until turned off with the power button or battery is fully
discharged. Motion Sensor will automatically turn off if not
triggered after 4 hours.
Installing and Removing the Battery Pack
(Fig. D)
NOTE: For best results, make sure your battery pack is
fullycharged.
To install the battery pack 7 into the tool handle, align the
battery pack with the rails inside the hood light’s handle and
slide it into the handle until the battery pack is firmly seated
in the tool and ensure that it does notdisengage.
To remove the battery pack from the hood light, press the
release button 8 and firmly pull the battery pack out of the
hood light handle. Insert it into the charger as described in
the charger section of thismanual.
Fig. D
7
8

ENGLISH
7
Attaching Hood Light to Auto Hood (Fig. E)
Unfold the hood light and attach the hook 1 on one side of
the light to the hood of the automobile, then carefully pull
on the other hook so that it extends out from the housing.
Once the hooks extends past the edge of the hood, slowly
allow the hook to slide back into the housing (do not release
the hook) until it attaches to the hood of the automobile.
CAUTION: Ensure area between extended hook and
hood light is clear before releasing hook. Keep your
fingers out of the area between the hook and the light
when it retracts.
NOTE: Before installing on hood, make sure hood is
properly secured in the open position via manufacturer’s
recommendation.
Adjusting the Orientation of the Light (Fig. F)
Once attached to the automobile hood, the light can be
rotated to the desired position. The rotating mechanisms
are located in the base of each hook.
Detachable Work Light (Fig. A)
For even greater illumination of your work, a detachable work
light 2 is included. Slide the light outwards to remove from
the hood light housing. The work light is charged when a
Mac Tools 20 volt battery is installed in the hood light.
Hood
Light
Detachable
Work Light
Detachable Work Light
Indicator Light
On Charging Red
On Charge Complete Green
Off Charging Red
Off Charge Complete Off
Hood Light Storage (Fig. G)
The hood light folds down for storage. Ensure center joint is
clear of obstruction before folding. To secure folded hood
light, align tab 9 to receiver 10 until they snap together.
CAUTION: Keep fingers clear of center hinge when
opening or closing hood light.
MAINTENANCE
Cleaning
WARNING: Never use solvents or other harsh
chemicals for cleaning the non-metallic parts of the
tool. These chemicals may weaken the plastic materials
used in these parts. Use a cloth dampened only with
water and mild soap. Never let any liquid get inside the
tool; never immerse any part of the tool into aliquid.
Accessories
WARNING: Since accessories, other than those offered
by Mac Tools, have not been tested with this product, use
of such accessories with this tool could be hazardous. To
reduce the risk of injury, only Mac Tools recommended
accessories should be used with thisproduct.
Recommended accessories for use with your tool are
available at extra cost from your distributor or on our
website: www.mactools.com.
Repairs
WARNING: To assure product SAFETY and
RELIABILITY, repairs, maintenance and adjustment
should be performed by a Mac Tools repair technician,
contact your distributor or go to our website at
www.mactools.com and click on the customer service
tab. A Repair Instructions menu will give you steps to
getting your tool fixed.
Three Year Limited Warranty
Mac Tools will repair, without charge, any defects due
to faulty materials or workmanship for three years from
the date of purchase. This warranty does not cover
part failure due to normal wear or tool abuse. For
further detail of warranty coverage and warranty repair
information, visit www.mactools.com or call 1-800-MAC-
TOOLS (1-800-622-8665). This warranty does not apply
to accessories or damage caused where repairs have
been made or attempted by others. This warranty gives
you specific legal rights and you may have other rights
which vary in certain states or provinces.
In addition to the warranty, Mac Tools™ tools are
covered by our:
1 YEAR FREE SERVICE
Mac Tools will maintain the tool and replace worn parts
caused by normal use, for free, any time during the first year
afterpurchase.
2 YEARS FREE SERVICE ON MAC TOOLS BATTERY PACKS
MB120, MB127, MBR127, MB201, MB203 and MBR203
3 YEARS FREE SERVICE ON MAC TOOLS BATTERY PACKS
MB200, MB204, MBR204, MB205 and MBR205
NOTE: Battery warranty voided if the battery pack is
tampered with in any way. Mac Tools is not responsible
for any injury caused by tampering and may prosecute
warranty fraud to the fullest extent permitted bylaw.
90 DAY MONEY BACK GUARANTEE
If you are not completely satisfied with the performance of
your Mac Tools power tool for any reason, you can return it
within 90 days from the date of purchase with a receipt for a
full refund – no questionsasked.
LATIN AMERICA: This warranty does not apply to products
sold in Latin America. For products sold in Latin America,
see country specific warranty information contained in
the packaging, call the local company or see website for
warrantyinformation.
FREE WARNING LABEL REPLACEMENT: If your warning
labels become illegible or are missing, call 1-800-MAC-Tools
(1-800-622-8665) for a free replacement.

ENGLISH
8
Fig. E
Fig. F Fig. G
9
10
Luz para cofre LED de 20V MAX*

ENGLISH
9
MCL045
Manual de instrucciones
Luz para cofre LED de 20V MAX*
Para reducir el riesgo de lesiones,
lea y comprenda estas advertencias e
instrucciones de seguridad antes de
utilizar la herramienta. Guarde estas
instrucciones con la herramienta para
futuras consultas. Si tiene preguntas,
contacte con su representante o
distribuidor de MAC TOOLS.
ADVERTENCIA
* El máximo voltaje inicial de
la batería (medido sin carga de
trabajo) es 20 voltios. El voltaje
nominal es de 18.

SPANISH
10
1 Ganchos extensibles
2 Lámpara de trabajo
3 Botón del sensor de movimiento
4 Botón de encendido
5 Lente
6 Sensor de movimiento
7 Batería
8 Botón de liberación
Fig. A
12
3
5
7
4
8
6
Spanish
¡ADVERTENCIA! Lea todas las advertencias de
seguridad e instrucciones. El incumplimiento
de las advertencias e instrucciones puede provocar
descargas eléctricas, incendios o lesionesgraves.
ADVERTENCIA: Para reducir el riesgo de lesiones, lea
el manual deinstrucciones.
Contacte al representante o al distribuidor de Mac
Tools si tiene preguntas sobre la herramienta y su uso.
Mac Tools
505 North Cleveland Avenue, Westerville, Ohio 43082
800.MACTOOLS
MACTOOLS.COM
Definiciones: Símbolos y palabras de alerta de seguridad
Este manual de instrucciones utiliza los siguientes símbolos y palabras de alerta de seguridad para alertarle de situaciones
peligrosas y del riesgo de lesiones corporales o daños materiales.
PELIGRO: Indica una situación de peligro inminente que, si no se evita, provocará la muerte o lesionesgraves.
ADVERTENCIA: Indica una situación de peligro potencial que, si no se evita, podría provocar la muerte o
lesionesgraves.
ATENCIÓN:Indica una situación de peligro potencial que, si no se evita, posiblemente provocaría lesiones leves
omoderadas.
(Utilizado sin palabras) indica un mensaje de seguridad relacionado.
AVISO: Se refiere a una práctica no relacionada a lesiones corporales que de no evitarse puede resultar en daños a
la propiedad.

SPANISH
11
Importantes
Instrucciones de
Seguridad
¡ADVERTENCIA!Al utilizar la luz
para cofre , siempre deben seguirse precauciones
básicas, incluidas las siguientes:
a ) Lea todas las instrucciones antes de utilizar la luz
para cofre .
b ) Para reducir el riesgo de lesión, es necesaria una
supervisión atenta cuando se use una luz de
trabajo cerca de niños.
c ) Apague la luz para cofre cuando no esté
utilizándose y antes de hacer reparaciones o
limpieza.
d ) No utilice ninguna luz de trabajo si no funciona
bien o si se ha caído o está dañada de algún
modo. Devuelva la luz para cofre al establecimiento
de servicio autorizado más cercano para que sea
examinada, reparada o sometida a un ajuste eléctrico
o mecánico.
e ) Para reducir el riesgo de descarga eléctrica, no
ponga la luz para cofre en agua ni en ningún
otro líquido. No coloque ni guarde la luz para cofre
donde pueda caerse o pueda tirarse de ella y caerse en
una bañera o lavabo.
f ) Utilice solamente accesorios recomendados o
vendidos por el fabricante.
g ) La luz para cofre está prevista para uso en
interiores y exteriores. Almacenar en el interior.
h ) No se tome de la luz para cofre para sostener el
peso de su cuerpo, no cuelgue objetos de la luz
para cofre, no fue diseñada para sostener peso
adicional y puede caerse.
NOTA: Esta luz de trabajo tiene una clasificación
de IP55, lo que significa que tiene cierto nivel de
protección contra el acceso del polvo y el agua.
Consulte IEC60529 IP55 para el significado específico de
esta clasificación. La batería no tiene una clasificación IP
por sí misma. No sumerja la luz para cofre o la batería en
ningún líquido.
GUARDE ESTAS INSTRUCCIONES
Normas de seguridad específicas para
luces para cofre
ADVERTENCIA: Peligro de incendio. No utilice
la luz para cofre ni el cargador cerca de líquidos
inflamables o en atmósferas gaseosas o explosivas.
Las chispas internas pueden inflamar los gases y
ocasionar lesiones corporales.
• No lave la luz para cofre ni el cargador con agua ni
permita que entre agua dentro de la luz o el cargador.
No sumerja la luz para cofre en agua en ningún
momento.
• No exponga la luz para cofre a la lluvia ni a condiciones
húmedas.
• Mientras esté utilizando la luz para cofre , no la cubra
con un paño u otros materiales inflamables debido a un
mayor riesgo de incendio.
• La luz para cofre está prevista para uso comercial y
doméstico. Puede utilizarse en exteriores.
• Guarde la luz para cofre en el interior cuando no esté
utilizándose.
ADVERTENCIA: No ponga la luz para cofre en
una posición tal que pudiera hacer que alguien
mire fijamente la luz, ya sea con intención o sin
ella. Podrían producirse lesiones oculares graves.
ATENCIÓN: Cuando no se utilice, coloque la luz
para cofre de atrás en una superficie estable
donde no interrumpa el paso ni provoque una
caída. Algunas herramientas con baterías grandes se
sostienen verticalmente sobre la batería, pero pueden
caerse fácilmente.
La etiqueta de su herramienta puede incluir los siguientes
símbolos. A continuación se indican los símbolos y
susdefiniciones:
V.........................voltios
Hz .......................hertz
min.....................minutos
or DC......direct current
......................Construcción de
Clase I (tierra)
…/min.............. por minuto
BPM.................... golpes por minuto
IPM.....................impactos por
minuto
RPM.................... revoluciones por
minuto
sfpm ...................pies de superficie
por minuto
SPM....................pasadas por
minuto
A.........................amperios
W........................vatios
or AC........... corriente alterna
or AC/DC....corriente alterna
o directa
......................Construcción de
Clase II (doble
aislamiento)
no.......................velocidad sin carga
n.........................velocidad nominal
......................terminal de
conexión a tierra
...................... símbolo de
advertencia de
seguridad
.....................radiación visible
....................Do not stare at the
operating light source
....................No se mire
directamente a la fuente de luz de
funcionamiento
.....................protección
respiratoria
.....................protección ocular
..................... protección auditiva
IPxx..................... protección contra
el acceso
......................no incinerar
BATERÍAS Y CARGADORES
La batería no viene completamente cargada de fábrica.
Antes de utilizar la batería y el cargador, lea las siguientes
instrucciones de seguridad y luego siga los procedimientos
de carga indicados. Cuando pida baterías de repuesto, no
olvide indicar el número de catálogo y el voltaje.
Su luz de trabajo utiliza un cargador Mac Tools. Lea todas
las instrucciones de seguridad antes de usar el cargador.
Consulte la tabla al final de este manual para información
sobre compatibilidad entre cargadores y baterías.

SPANISH
12
LEA TODAS LAS INSTRUCCIONES
Instrucciones de Seguridad Importantes
Para Todas las Unidades de Batería
ADVERTENCIA: Lea todas las advertencias
de seguridad y todas las instrucciones para
la batería, el cargador y la luz para cofre
. El incumplimiento de las advertencias e
instrucciones podría provocar una descarga
eléctrica, un incendio y/o lesiones graves.
• No cargue o use la unidad de batería en atmósferas
explosivas, como en presencia de líquidos, gases
o polvos inflamables. Puede que al insertar o sacar la
unidad de batería del cargador se inflamen el polvo o
losgases.
• NUNCA fuerce la unidad de batería para que entre
en el cargador. NO modifique la unidad de batería
en ninguna forma para que entre en un cargador
no compatible, pues puede producir una ruptura en
la unidad de batería y causar lesiones corporales
graves. Cargue las unidades de batería sólo en los
cargadores designados porMac Tools.
• NO salpique con ni sumerja en agua u otroslíquidos.
• No guarde ni use la herramienta y unidad de batería
en lugares donde la temperatura pueda alcanzar
o superar los 40°C (104 °F), tales como cobertizos
o construcciones de metal durante el verano).
Almacene las unidades de batería en lugares frescos y
secos para maximizar su vidaútil.
NOTA: No almacene las unidades de batería en
la herramienta con el interruptor de gatillo en
posición encendida fija. Nunca use cinta adhesiva
para mantener el interruptor de gatillo en
posiciónENCENDIDA.
• No incinere la unidad de batería, aunque esté
completamente dañada o descargada. La unidad
de batería puede explotar si se quema. Cuando se
queman unidades de batería de iones de litio, se producen
gases y materialestóxicos.
• Si el contenido de la batería entra en contacto con la
piel, lave el área de inmediato con agua y un jabón
suave. Si el líquido de la batería entra en contacto con
sus ojos, enjuáguelos con agua y los ojos abiertos por
15 minutos o hasta que cese la irritación. Si se requiere
de asistencia médica, el electrolito de la batería está
compuesto por una mezcla de carbonatos orgánicos
líquidos y sales delitio.
• El contenido de los elementos abiertos de la batería
puede causar irritación en el tracto respiratorio.
Salga al aire fresco. Si los síntomas persisten, busque
asistenciamédica.
ADVERTENCIA: Peligro de quemaduras. El líquido de
la batería puede ser inflamable si se expone a chispas
ollamas.
ADVERTENCIA: Peligro de incendio. Nunca intente
abrir la unidad de batería por ningún motivo. Si
la caja exterior de la unidad de batería se triza o
daña, no la introduzca en el cargador. No triture,
deje caer o dañe la unidad de batería. No use una
unidad de batería o un cargador que haya sido
golpeado, dejado caer, atropellado o dañado en
cualquier forma (por ejemplo, perforado por un clavo,
golpeado con un martillo, pisado). Lleve sus unidades
de batería dañadas al centro de servicio para que
seanrecicladas.
Transporte
ADVERTENCIA:Peligro de incendio. No guarde
o transporte la batería de forma que los
terminarles expuestos de la misma puedan estar
en contacto con objetos metálicos. Por ejemplo,
no ponga la batería en delantales, bolsillos, cajas de
herramientas, estuches de productos, cajones, etc.,
junto con clavos, tornillos, y llaves, etc. sueltos. El
transporte de baterías puede causar incendios
si sus terminales inadvertidamente entran en
contacto con materiales conductores como
llaves, monedas, herramientas manuales y
otros por el estilo. El Reglamento sobre Materiales
Peligrosos (HMR) del Departamento de Transporte de
EE.UU. prohíbe transportar baterías comercialmente
o en aviones en el equipaje de mano A MENOS que
estén debidamente protegidas contra cortocircuitos.
Por lo tanto, cuando transporte baterías individuales,
asegúrese de que sus terminales estén protegidos
y debidamente aislados de los materiales que
pudieran entrar en contacto con ellos y provocar un
cortocircuito.
Unidades de Batería con Indicador de
Carga (Fig. B)
Algunas unidades de batería Mac Tools incluyen un
indicador de carga que consiste de tres luces LED verdes
que indican el nivel de carga que queda en la unidad
debatería.
El indicador de carga es una indicación de niveles
aproximados de carga que quedan en la batería según los
indicadoressiguientes:
Fig. B
75–100% cargada
51–74% cargada
< 50% cargada
La batería tiene que cargarse
Para activar el indicador de carga, presione y sostenga el
botón del indicador 11. Se iluminará una combinación
de las tres luces LED verdes, que indicará el nivel de carga
que queda. Cuando el nivel de carga está por debajo
del nivel útil, el indicador no se iluminará, y la batería
deberárecargarse.

SPANISH
13
11
NOTA: El indicador de carga es sólo eso: un indicador
de la carga de la unidad de batería. No indica el nivel de
funcionalidad de la herramienta y puede variar de acuerdo
a las piezas del producto, la temperatura y la aplicación que
el usuario ledé.
Para mayor información sobre unidades de batería con
indicadores de carga, por favor llame al 1-800-MAC-TOOLS
(622-8665) o visite nuestro sitio Web:
www.mactools.com.
El sello RBRC®
El sello RBRC® (Rechargeable Battery
Recycling Corporation) en las baterías
(ounidades de batería) de níquel cadmio,
níquel e hidruro metálico o de iones
de litio indica que el costo de reciclaje
de estas baterías (o unidades de batería) al llegar al final
de su vida de servicio ya ha sido pagado por Mac Tools.
En algunas áreas, es ilegal depositar baterías de níquel
cadmio, níquel e hidruro metálico o de iones de litio
gastadas en la basura o la corriente de residuos sólidos
urbanos; el programa Call 2 Recycle® proporciona una
alternativaecológica.
Call 2 Recycle, Inc., en cooperación con Mac Tools y otros
usuarios de baterías, han establecido programas en los
Estados Unidos y Canadá para facilitar la recolección de
baterías de níquel cadmio, níquel e hidruro metálico o
de iones de litio gastadas. Al llevar sus baterías de níquel
cadmio, níquel e hidruro metálico y de iones de litio
gastadas a un centro de servicio autorizado por Mac Tools o
al minorista local para que sean recicladas, ayuda a proteger
el medio ambiente y a conservar recursos naturales.
También puede comunicarse con el centro de reciclaje de
su localidad para mayor información sobre dónde llevar sus
bateríasgastadas.
RBRC® es una marca comercial registrada de Call 2
Recycle,Inc.
Instrucciones Importantes de Seguridad
Para Todos los Cargadores de Baterías
ADVERTENCIA: Lea todas las advertencias
de seguridad y todas las instrucciones para
la batería, el cargador y la luz para cofre
. El incumplimiento de las advertencias e
instrucciones podría provocar una descarga
eléctrica, un incendio y/o lesiones graves.
• NO intente cargar la unidad de batería con otros
cargadores que no sean los descritos en este
manual. El cargador y la unidad de batería fueron
específicamente diseñados para trabajar enconjunto.
• Estos cargadores no fueron diseñados para ser
utilizados para más que cargar las baterías
recargables Mac Tools. Cualquier otro uso puede
producir riesgo de incendios, descargas eléctricas
oelectrocución.
• No exponga el cargador a la lluvia o a lanieve.
• Tire del enchufe y no del cable cuando desconecte el
cargador. De esta forma se reduce el riesgo de daño al
enchufe ycable.
• Asegúrese de que el cable no sea ubicado de
manera que podría ser pisado, causar que alguien
tropiece con él o ser expuesto a otro tipo de daños
ydesgastes.
• No use un alargador a menos que sea
absolutamente necesario. El uso de un alargador
incorrecto podría producir riesgo de incendios, descargas
eléctricas oelectrocución.
• Cuando opere un cargador al exterior, hágalo
siempre en un lugar seco y use un alargador
apropiado para uso al exterior. El uso de un alargador
apropiado para uso al exterior reduce el riesgo de
descargaeléctrica.
• Los hilos del alargador deben ser de un calibre
apropiado (AWG o American Wire Gauge) para
su seguridad. Mientras menor sea el calibre del hilo,
mayor la capacidad del cable. Es decir, un hilo calibre
16 tiene mayor capacidad que uno de 18. Un cable de
un calibre insuficiente causará una caída en la tensión
de la línea dando por resultado una pérdida de energía
y sobrecalentamiento. Cuando se utilice más de un
alargador para completar el largo total, asegúrese que
los hilos de cada alargador tengan el calibre mínimo.
La tabla siguiente muestra el tamaño correcto a utilizar,
dependiendo de la longitud del cable y del amperaje
nominal de la placa de identificación. Si tiene dudas sobre
cuál calibre usar, use un calibre mayor. Cuanto menor sea
el número del calibre, más resistente será elcable.
Calibre mínimo de conjuntos de cables
Voltios Longitud total del cable en pies
(metros)
120 V 25 (7,6) 50 (15,2) 100 (30,5) 150 (45,7)
240 V 50 (15,2) 100 (30,5) 200 (61,0) 300 (91,4)
Amperaje
nominal AWG
Más de Más de
0 6 18 16 16 14
610 18 16 14 12
10 12 16 16 14 12
12 16 14 12 Not Recommended
• No coloque ningún objeto encima del cargador
ni coloque a este sobre una superficie blanda
que pudiera bloquear las ranuras de ventilación
y resultar en un calor interno excesivo. Coloque
el cargador en un lugar alejado de cualquier fuente
de calor. El cargador se ventila a través de las ranuras
que se encuentran en la parte superior e inferior de la
cajaprotectora.
• No opere el cargador si su cable o enchufe
estándañados.

SPANISH
14
• No opere el cargador si ha recibido un golpe agudo,
si se ha caído o si ha sido dañado de alguna otra
forma. Llévelo a un centro de servicioautorizado.
• No desarme el cargador; llévelo a un centro de
servicio autorizado cuando deba ser reparado. Si es
reensamblado incorrectamente, puede causar descargas
eléctricas, electrocución oincendios.
• Desenchufe el cargador antes de intentar limpiarlo.
Esto reducirá el riesgo de descargas eléctricas. El
retirar el paquete de baterías no reducirá esteriesgo.
• NUNCA intente conectar 2 cargadores entresí.
• El cargador está diseñado para operar con una
corriente eléctrica estándar residencial de 120 V. No
intente usarlo con ningún otro voltaje. Esto no aplica
al cargadorvehicular.
ADVERTENCIA: Peligro de descarga eléctrica. No
permita que ningún líquido se introduzca en el
cargador. Puede producir descargas eléctricas.
ADVERTENCIA: Peligro de quemaduras. No sumerja
la unidad de batería en líquido de ningún tipo ni
permita que se introduzca ningún tipo de líquido a
la unidad de batería. Nunca intente abrir la unidad
de batería por ningún motivo. Si la caja plástica de la
unidad de batería se triza o rompe, llévela a un centro
de servicio para su reciclaje
ATENCIÓN: Peligro de quemaduras. Para reducir el
riesgo de lesiones, sólo cargue unidades de batería
recargables marca Mac Tools. Otros tipos de batería
podrían sobrecalentarse y reventar lo que podría
resultar en lesiones corporales y daños a supropiedad.
AVISO: Bajo ciertas condiciones, cuando el cargador
está enchufado a una toma de corriente, el cargador
puede hacer cortocircuito si entra en contacto con
algún material ajeno. Los materiales ajenos de
naturaleza conductora, como el polvo de esmerilado,
las placas de metal, la lana de acero, el papel de
aluminio y otros, o cualquier acumulación de
partículas metálicas deberían mantenerse alejados
de las cavidades del cargador. Desenchufe siempre
el cargador cuando no haya una unidad de batería
en su cavidad. Desenchufe el cargador antes de
intentarlimpiarlo.
Certificaciones inalámbricas e
información de seguridad
Este dispositivo cumple con la sección 15 de las Normas de
la FCC. El funcionamiento está sujeto a las siguientes dos
condiciones: (1) este aparato no puede causar interferencia
dañina, y (2) debe aceptar cualquier interferencia que reciba,
incluida la interferencia que pueda causar un funcionamiento
no deseado.
Cambios o modificaciones no aprobados expresamente por la
parte responsable de asegurar el cumplimiento pueden anular
la autoridad del usuario a poner en funcionamiento el equipo.
Este equipo ha sido probado y cumple con los límites para un
dispositivo digital de clase B, de acuerdo con la Parte 15 de las
Reglas de la FCC. Estos límites están diseñados para brindar
una protección razonable contra interferencias dañinas en
una instalación residencial. Este equipo genera, usa y puede
irradiar energía de radiofrecuencia y, si no se instala y usa
de acuerdo con las instrucciones, puede causar interferencia
perjudicial a la recepción de radio y televisión. Sin embargo,
no hay garantía de que no se produzca interferencia en una
instalación en particular. Si este equipo causa interferencia
perjudicial a la recepción de emisiones de radio o de televisión,
lo cual puede determinarse apagando y encendiendo
el equipo, se sugiere al usuario que intente corregir la
interferencia con una de las siguientes medidas:
- Cambie la orientación o ubicación de la antena de
recepción.
- Incremente la separación entre el equipo y el
receptor.
- Conecte el equipo en un tomacorriente que esté en
un circuito diferente de aquel al que está conectado
el receptor.
- Consulte al distribuidor o a un técnico
experimentado de radio/TV para obtener asistencia.
Carga de una batería (Fig. C)
1. Enchufe el cargador en una toma de corriente apropiada
antes de introducir la batería.
Fig. C
7
8
2. Inserte la batería 7 en el cargador, comprobando
esté bien fija. La luz roja (de carga) parpadeará
continuamente para indicar que se ha iniciado el
proceso de carga.
3. La luz roja se quedará ENCENDIDA continuamente
cuando se haya completado el proceso de carga.
La batería estará entonces completamente cargada
y podrá ser utilizada de inmediato o dejarse en el
cargador. Para sacar la batería del cargador, presione el
botón de liberación 8 de la batería.
NOTA: Para asegurar el máximo rendimiento y vida
útil de las baterías de iones de litio, cargue la batería
completamente antes de usarla por primera vez.
Funcionamiento del cargador
Consulte los indicadores a continuación relativos al estado
de carga de la batería.
MCB101
Unidad en Proceso de Carga
Unidad Cargada
Restraso por Unidad Caliente/Fría
Problema con la Batería o el Cargador

SPANISH
15
MCB115
Unidad en Proceso de Carga
Unidad Cargada
Restraso por Unidad
Caliente/Fría*
*MCB115: La luz roja continuará parpadeando, pero una
luz indicadora amarilla estará iluminada durante esta
operación. Una vez que la batería haya llegado a una
temperatura apropiada, la luz amarilla se apagará y el
cargador continuará con el procedimiento de carga.
El cargador no cargarán una batería defectuosa. El cargador
indicará que la unidad de batería es defectuosa al no
iluminarse o al indicar que existe un problema con la unidad
o el cargador.
NOTA: Esto también puede significar que hay un problema
con el cargador.
Si el cargador indica un problema, lleve el cargador y la
batería a un centro de servicio autorizado para que sean
sometidos a pruebas.
Retraso por batería caliente/fría
Cuando el cargador detecta que una batería está demasiado
caliente o demasiado fría, inicia automáticamente un
Retraso por batería caliente/fría y suspende la carga hasta
que la batería alcanza una temperatura adecuada. En ese
momento, el cargador inicia automáticamente el modo
de carga de la batería. Esta función garantiza la máxima
duración de la batería.
Sistema de protección electrónica
Las herramientas con baterías de iones de litio están
diseñadas con un Sistema de protección electrónico
que protegerá la batería contra la sobrecarga, el
sobrecalentamiento o la descarga completa.
La herramienta se apagará automáticamente si el Sistema
de protección electrónico se activa. Si esto ocurre, coloque
la batería de iones de litio en el cargador hasta que esté
totalmente cargada.
Montaje en la pared
MCB115:
Este cargador está destinado a montarse en la pared o
colocarse de forma vertical sobre una mesa o superficie
de trabajo. Si lo monta en la pared, coloque el cargador
al alcance de una toma de corriente eléctrica y alejado de
las esquinas u otras obstrucciones que puedan impedir
el flujo de aire. Utilice la parte de atrás del cargador como
plantilla para la ubicación de los tornillos de montaje en la
pared. Monte el cargador firmemente utilizando tornillos
para muro seco (comprados por separado) de un mínimo
de 25,4 mm (1") de largo, con una cabeza de un diámetro
de 7-9 mm (0,28–0,35"), atornillados en madera hasta
una profundidad óptima dejando el tornillo expuesto
aproximadamente 5,5 mm (7/32"). Alinee las ranuras en
la parte trasera del cargador con los tornillos expuestos e
introdúzcalos totalmente en las ranuras.
Instrucciones de limpieza del cargador
ADVERTENCIA: Riesgo de descarga eléctrica.
Desconecte el cargador del tomacorriente de CA
antes de limpiarlo. Para limpiar la suciedad y grasa
del exterior del cargador puede usarse un paño o
cepillo suave no metálico. No use agua ni soluciones
limpiadoras.
Notas importantes sobre la carga
1. Se puede obtener una mayor duración y un mejor
rendimiento si la unidad de batería se carga a una
temperatura ambiente de 18– 24 °C (65 – 75 °F).
NO cargue la unidad de batería a una temperatura
ambiental inferior a +4.5 °C (+40 °F) o superior a +40
°C (+104 °F). Esto es importante y evitará causar daños
graves a la batería.
2. Puede que el cargador y la unidad de batería se
calienten ligeramente durante el proceso de carga.
Esto es normal y no representa ningún problema. Para
facilitar el enfriamiento de la unidad de batería después
del uso, evite colocar el cargador o la unidad de batería
en un lugar cálido, como un cobertizo metálico o un
remolque sin aislamiento térmico.
3. Si la unidad de batería no se carga correctamente:
a. Verifique el funcionamiento de la toma enchufando
una lámpara u otro aparato;
b. Revise que la toma de corriente no esté conectada a
un interruptor de luz que corte la corriente cuando
se corte la luz;
c. Mueva el cargador y la unidad de batería a
un lugar donde la temperatura ambiental sea
aproximadamente 18– 24 °C (65 – 75 °F);
d. Si el problema de carga continúa, lleve la
herramienta, unidad de batería y el cargador a su
centro de servicio local.
4. La unidad de batería debería ser recargada cuando
no sea capaz de producir suficiente potencia para
trabajos que eran fácilmente realizados antes. NO
CONTINÚE usándola bajo estas circunstancias. Siga el
procedimiento de carga. También puede cargar una
unidad de batería que haya sido usada parcialmente
cuando lo desee, sin dañarla.
5. Los materiales ajenos conductores por naturaleza, tales
como, pero sin limitarse a, el polvo del esmerilado, las
virutas metálicas, la lana de acero, el papel de aluminio o
cualquier acumulación de partículas metálicas deberían
mantenerse alejados de las cavidades del cargador.
Desenchufe siempre el cargador de la toma de corriente
cuando no haya una unidad de batería en su cavidad.
Desenchufe el cargador antes de intentar limpiarlo.
6. No congele ni sumerja el cargador en agua o cualquier
otro líquido.
Recomendaciones de almacenamiento
1. El mejor lugar de almacenamiento es uno que sea fresco
y seco, lejos de la luz solar directa y del exceso de calor
o frío.

SPANISH
16
2. Para resultados óptimos durante tiempos prolongados
de almacenamiento, se recomienda almacenar la
unidad de batería completamente cargada en un lugar
fresco y seco fuera del cargador.
NOTA: Las unidades de batería no deberían almacenarse
completamente descargadas. La unidad de batería deberá
recargarse antes de ser usada.
GUARDE ESTAS INSTRUCCIONES PARA
VOLVER A CONSULTAR EN EL FUTURO
COMPONENTES (FIG. A)
ADVERTENCIA: Nunca modifique la herramienta
eléctrica, ni tampoco ninguna de sus piezas. Podría
producir lesiones corporales odaños.
Consulte la Figura A al principio de este manual para
obtener una lista completa de loscomponentes.
USO DEBIDO
Esta luz de trabajo ha sido diseñada para aplicaciones de
iluminación profesionales.
NO utilizar en presencia de líquidos o gases inflamables.
NO permita que los niños toquen la herramienta. Si el
operador no tiene experiencia operando esta herramienta,
su uso deberá sersupervisado.
FUNCIONAMIENTO DE LA LUZ PARA COFRE
ADVERTENCIA: Para reducir el riesgo de lesiones
personales graves, apague la herramienta y
desconéctela de la fuente de alimentación retire
el paquete de baterías antes de realizar ajustes
o de retirar/instalar dispositivos o accesorios. Un
arranque accidental podría causarlesiones.
Botón de encendido ON/OFF (Fig. A)
Para encender la luz, presione el botón de encendido 4,
esta configuración inicial está en modo alto, presione el
botón nuevamente y la luz se convertirá al modo bajo,
presione nuevamente para apagar la luz.
Indicador de batería baja
Cuando la batería esté casi totalmente descargada, la
luz parpadeará dos veces y luego la intensidad de la luz
disminuirá por debajo del nivel normal. La luz continuará
parpadeando dos veces cada 45 segundos hasta que la
batería esté totalmente descargada, momento en el que
se apagará la luz. El tiempo de indicación variará según la
capacidad de la batería.
Sensor de movimiento (Fig. A)
Para encender el sensor de movimiento, presione el
botón 3 . Cuando esté activado, el sensor detectará si no
hubo movimiento durante tres minutos y apagará la luz
automáticamente. Cuando esté activado, el sensor detectará
si no hubo movimiento durante tres minutos y apagará
la luz automáticamente. Si el sensor no está activado, la
luz permanecerá encendida hasta que se la apague con el
botón de encendido o hasta que la batería se descargue
por completo. El sensor de movimiento se apagará
automáticamente si no se dispara después de 4 horas.
Cómo instalar y retirar la unidad de
batería (Fig. D)
NOTA: Para obtener los mejores resultados, compruebe que
la batería esté totalmente cargada.
Para instalar el paquete de baterías 7 en el mango de la
herramienta, alinee el paquete de baterías con las guías que
están dentro del mango de la luz para cofre y deslícelo en
el mango hasta que el paquete de baterías esté firmemente
colocado y asegúrese de que no se desenganche.
Para sacar la bateríade de la luz para cofre, apriete el botón
de liberación 8 y saque la batería del mango de la luz para
cofre tirando firmemente de ella. Insértela en el cargador tal
como se describe en la sección del cargador de este manual.
Fig. D
7
8
Cómo enganchar la luz para cofre al cofre
del automóvil (Fig. E)
Desenvuelva la luz para cofre y adjunte el gancho 1 en
uno de los lados del cofre del automóvil, luego tire del otro
gancho para que se extienda fuera de la carcasa. Una vez
que el gancho se extendió más allá del borde del cofre, deje
que el gancho se deslice suavemente dentro de la carcasa
(no suelte el gancho) hasta que esté enganchado al cofre
del automóvil.
PRECAUCIÓN: Asegúrese de que el área entre el gancho
extendido y la luz para cofre esté despejada antes de
soltar el gancho. Mantenga alejados los dedos del área
entre el cofre y la luz cuando se ésta se retrae.
NOTA: Antes de instalar en el capó, asegúrese de que el
capó esté correctamente fijo en la posición abierta según las
recomendaciones del fabricante.
Cómo ajustar la orientación de la luz
(Fig. F)
Una vez que esté enganchado al cofre del automóvil, la luz
se puede rotar hasta la posición deseada. Los mecanismos
rotativos están ubicados en la base de cada gancho.
Mantenga alejados los dedos del área entre el cofre y la luz
cuando se ésta se retrae.
Lámpara de trabajo desmontable (Fig. A)
Para una mayor iluminación de su trabajo, se incluye una
lámpara de trabajo desmontable 2 .Deslice la lámpara
hacia afuera para quitarla de la carcasa de la luz para cofre.

SPANISH
17
Fig. E
Fig. F Fig. G
9
10

SPANISH
18
La lámpara de trabajo se carga cuando se instala una batería
de 20 V Mac Tools en la luz para cofre.
Luz
Para
Cofre
Lámpara de
Trabajo
Desmontable
Luz de trabajo
desmontable
indicador de luz
En Unidad en Proceso
de Carga
Rojo
En Unidad Cargada Verde
Apagado Unidad en Proceso
de Carga
Rojo
Apagado Unidad Cargada Verde
Almacenamiento para luz para cofre (Fig. G)
La luz para cofre se pliega para su almacenamiento.
Asegúrese de que la unión central no contenga
obstrucciones antes de plegarla. Para asegurar la luz para
cofre plegada, alinee la pestaña 9 con el receptor 10
hasta que queden encastrados.
ATENCIÓN: Mantenga los dedos alejados de la
bisagra central al abrir o cerrar la luz para cofre.
MANTENIMIENTO
Limpieza
ADVERTENCIA: Nunca utilice solventes ni otros
químicos abrasivos para limpiar las piezas no
metálicas de la herramienta. Estos productos
químicos pueden debilitar los materiales plásticos
utilizados en estas piezas. Utilice un paño humedecido
sólo con agua y jabón neutro. Nunca permita que
penetre líquido dentro de la herramienta ni sumerja
ninguna de las piezas en unlíquido.
CAUTION: Mantenga los dedos alejados de la bisagra
central al abrir o cerrar la luz para cofre.
Accesorios
ADVERTENCIA: Debido a que no se han probado
con este producto otros accesorios que no sean los
que ofrece Mac Tools., el uso de dichos accesorios con
esta herramienta podría ser peligroso. Para reducir
el riesgo de lesiones, con este producto deben usarse
sólo los accesorios recomendados porMac Tools.
Los accesorios recomendados para usar con su herramienta
están disponibles a un costo adicional en su distribuidor o
en nuestro sitio web: www.mactools.com.
Reparaciones
El cargador y las unidades de batería no pueden
serreparados.
ADVERTENCIA: Para asegurar la SEGURIDAD y la
CONFIABILIDAD, la reparación, mantenimiento y
ajuste deben realizarse por un técnico de reparación
de Mac Tools. Contacte a su distribuidor o visite
nuestro sitio web en www.mactools.com y haga
clic en la pestaña de servicio al cliente. Un menú de
Instrucciones de reparación le indicará los pasos para
reparar su herramienta.
Garantía limitada por tres años
Mac Tools reparará, sin cargo, cualquier falla que surja de
defectos en el material o la fabricación del producto por
hasta tres años a partir de la fecha de compra. Esta garantía
no cubre fallas de las piezas causadas por su desgaste
normal o abuso a la herramienta. Para mayores detalles
sobre la cobertura de la garantía e información acerca de
reparaciones realizadas bajo garantía, visite www.mactools.
com o llame al 1-800-MAC-TOOLS (1-800-622-8665). Esta
garantía no se aplica a accesorios o a daños causados por
reparaciones realizadas o intentadas por terceros. Esta
garantía le otorga derechos legales específicos, además de
los cuales puede tener otros dependiendo del estado o la
provincia en que se encuentre.
Además de la garantía, las herramientas Mac Tools™ están
cubiertas por:
1 AÑO DE SERVICIO GRATUITO
Mac Tools mantendrá la herramienta y reemplazará las piezas
gastadas por su uso normal, gratuitamente, en cualquier
momento durante un año a partir de la fecha de compra.
DOS AÑOS DE SERVICIO GRATUITO PARA BATERÍAS
MAC TOOLS™
MB120, MB127, MBR127, MB201, MB203 Y MBR203
TRES AÑOS DE SERVICIO GRATUITO PARA BATERÍAS
MAC TOOLS™
MB200, MB204, MBR204, MB205 Y MBR205
NOTA: La garantía del producto quedará nula si la unidad de
batería ha sido alterada de cualquier manera. Mac Tools no
es responsable de ninguna lesión causada por alteraciones
y podría iniciar un procedimiento judicial por fraude de
garantía hasta el máximo grado permisible por laley.
GARANTÍA DE REEMBOLSO DE SU DINERO POR 90 DÍAS
Si no está completamente satisfecho con el desempeño de
su herramienta eléctrica Mac Tools por cualquier motivo,
podrá devolverla hasta 90 días después de la fecha de
compra con su recibo y obtener el reembolso completo de
su dinero, sin necesidad de responder a ninguna pregunta.
AMÉRICA LATINA: Esta garantía no se aplica a los
productos que se venden en América Latina. Para los
productos que se venden en América Latina, debe consultar
la información de la garantía específica del país que viene
en el empaque, llamar a la compañía local o visitar el sitio
web a fin de obtener esa información.
REEMPLAZO GRATUITO DE LAS ETIQUETAS DE
ADVERTENCIA: Si sus etiquetas de advertencia se vuelven
ilegibles o faltan, llame al 1-800-MAC-TOOLS (1-800-622-
8665) para que se las reemplacen gratuitamente.
Lampe de capot de LED 20V MAX*
Table of contents
Languages:
Popular Lighting Equipment manuals by other brands

B-K lighting
B-K lighting PRECISION2 CO2 Series installation instructions

lightculture
lightculture NEON MICRO Y installation guide

PoeWit
PoeWit OD-2 quick start guide

Elation
Elation Design LED 36MH Technical specifications

kenall
kenall Sentinall S511 Series installation instructions

Pfannenberg
Pfannenberg AB Operating and installation instruction