Jupiter 130617 User manual

Assembly instructions.
(To be read along with basic assembly instructions)
All kits - lights inline with rail.
Please note - Adjustabar Pushrod is usually delivered pre-assembled.
If so please go to below instruction - Mounting whole assembly to track
Connecting jockey wheel clamp to end of adjustabar pushrod
1. Slide the jockey wheel bracket into pushrod at end opposite to the end with
6mm hole. Pic 1
3. Fasten bolt in jockey wheel bracket using 10 mm spanner. Pic 2
4. Slide eye bolts to underside of adjustabar pushrod and fasten in position. Pic 3
Mounting whole assembly to track
1. Fasten 6x25mm motor bolt to motor chassis, thread in upward position.
Pic 4
2. Slide one motor stopper onto track and fasten no more than half way along track.
3. Slide motor, with the Jupiter 2 sticker facing you, onto left end of track.
4. Slide the other motor stopper on rail, position both stoppers and fasten. Pic 5
5. Fasten both screws using philips head screwdriver then tighten locknuts.
6. Lift the assembled pushrod and slide the jockey wheel end onto right end of rail.
7. Connect pushrod to motor - The pushrod has a 6 mm hole drilled through the end.
Lower the pushrod onto the thread of the 6x25 mm motor bolt making sure the motor
bolt is in the pushrod hole. Pic 6
Mounting reflectors to adjustabar (crossbar)
1. Mount one reflector to 2 eyebolts (hang from chain) or bolt reflector directly to
adjustabar pushrod.
2. Mount ballasts on wall aprox same height as rail.
3. Cable tie lamp cord and the motor cord to eye bolt closest to motor. Now
drape them across to the ballasts. Secure the cords making sure that there
is enough slack for full movement of motor along rail.
4. Do the same as step 3 for cord from reflector under the jockey wheel set.
5. Before powering up lamps connect the motor unit to a 240 VAC power outlet and
watch the motor run along track a few times to make sure the motor runs smoothly
without any snagging of cords etc.
Troubleshooting - [email protected]
If motor appears to stop anywhere between the stoppers check to see if the
drive wheel is making proper contact with the rail and is not losing traction.
Make sure rail is level with the aid of a spirit level (it may look OK by eye but is not).
If no spirit level is handy then unfasten turn around and re-fasten rail. This may work
as the rail will be correctly re-angled to allow traction.
Remember that if the track has
to be mounted on even a slight angle then make sure that the adjustabar end of the
motor is running uphill.
WARNING: READ BEFORE RUNNING
SYSTEM, LAMPS ATTACHED.
Never run the system until the end motor stops have
been adjusted and fastened to the track as instructed.
Otherwise the motor or jockey wheel set, with lamps
attached, may run off the end of the track.
Pic 3
Pic 4
Pic 5
Pic 6
Pic 1
Track mounting
please refer to seperate instruction sheet.
Pic 2
Parts List
1. 1 x motor unit. Inludes 2 x stopper screws with nuts and rail mounting screws.
2. 2 x 1.2, 1.5, 2m or 1 x 2, 2.4 or 3m aluminium rail
3. 1 x 1.2, 1.5 or 2 m adjustabar pushrod aluminium
4. 1 x 6x25mm bolt nut and washers
5. 1 x jockey wheel kit clamp bracket & 1 x 6x45mm bolt
6. 4 or 6 x 6x25mm eyebolts to hang lights from adjustabar

Assembly Instructions.
(To be read along with basic assembly instructions)
All kits - Pushrods With Crossbars
Connecting crossbar to jockey wheel end of pushrod
1. Make sure all the above listed parts are present.
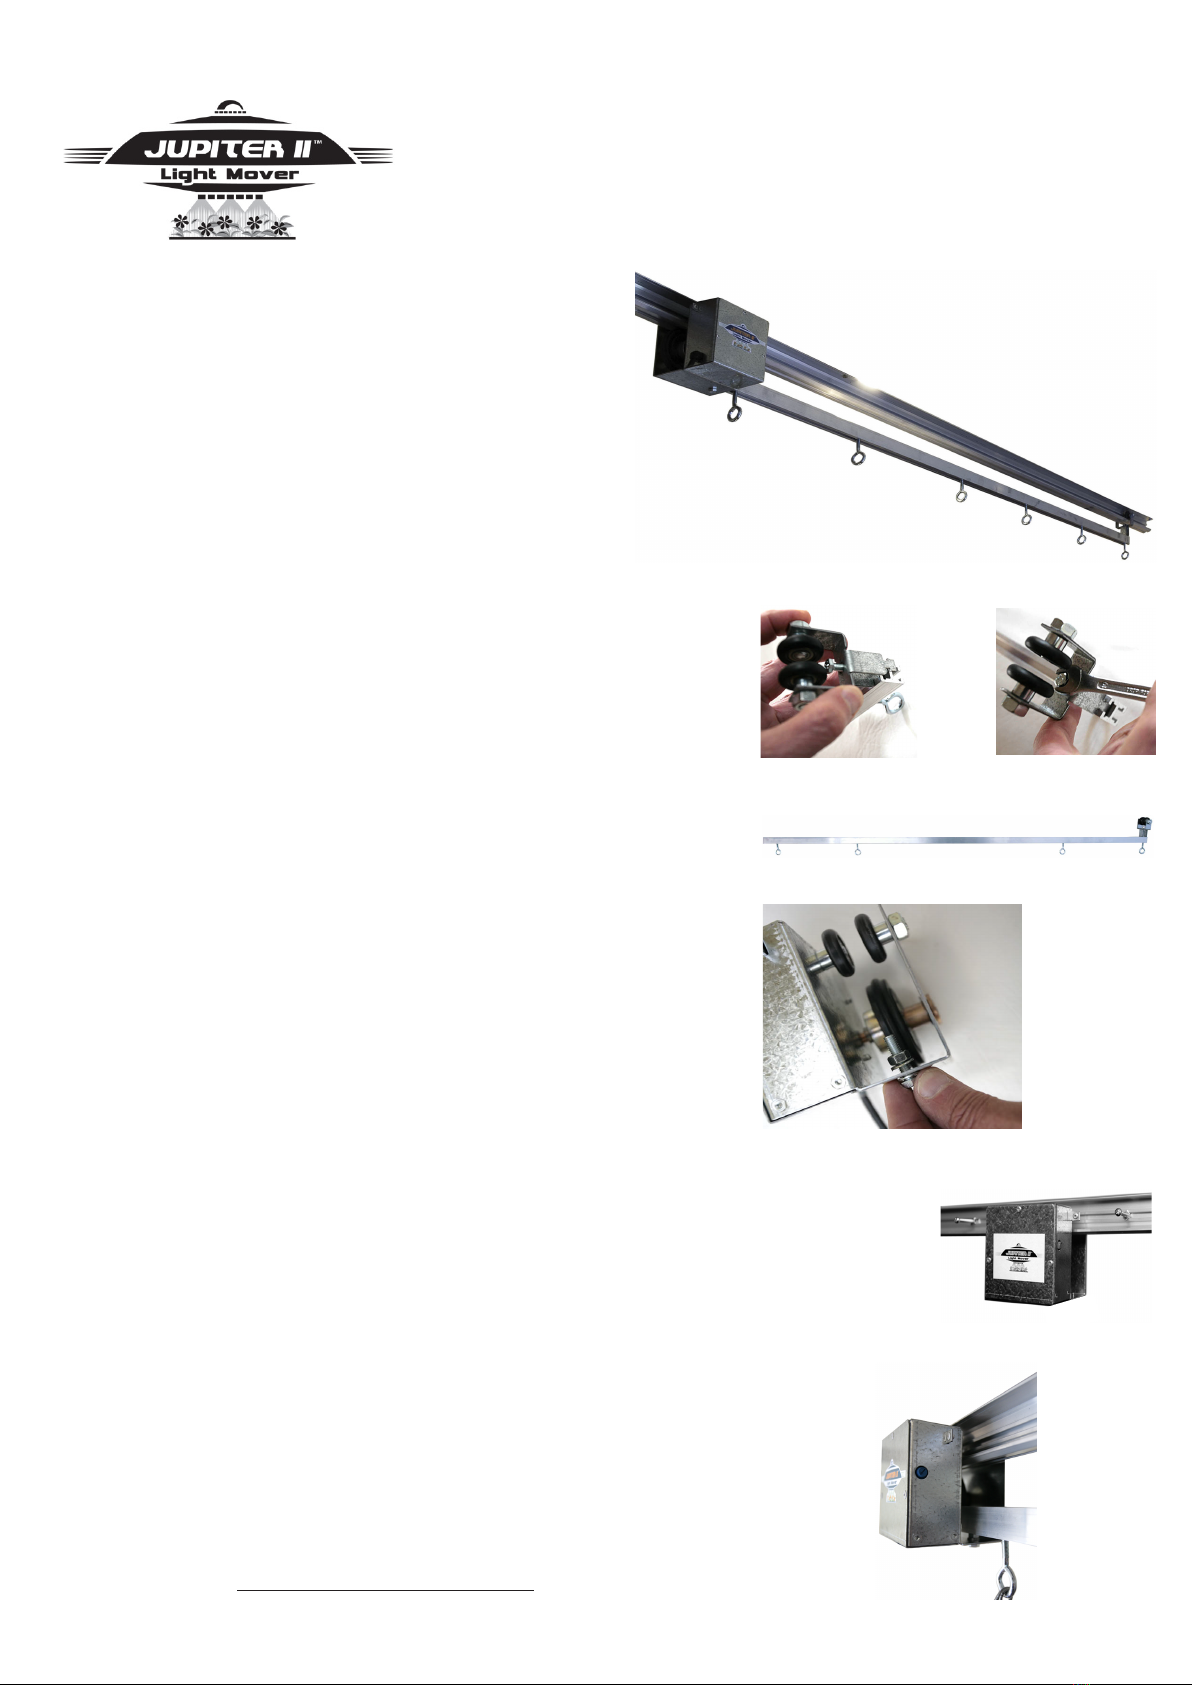
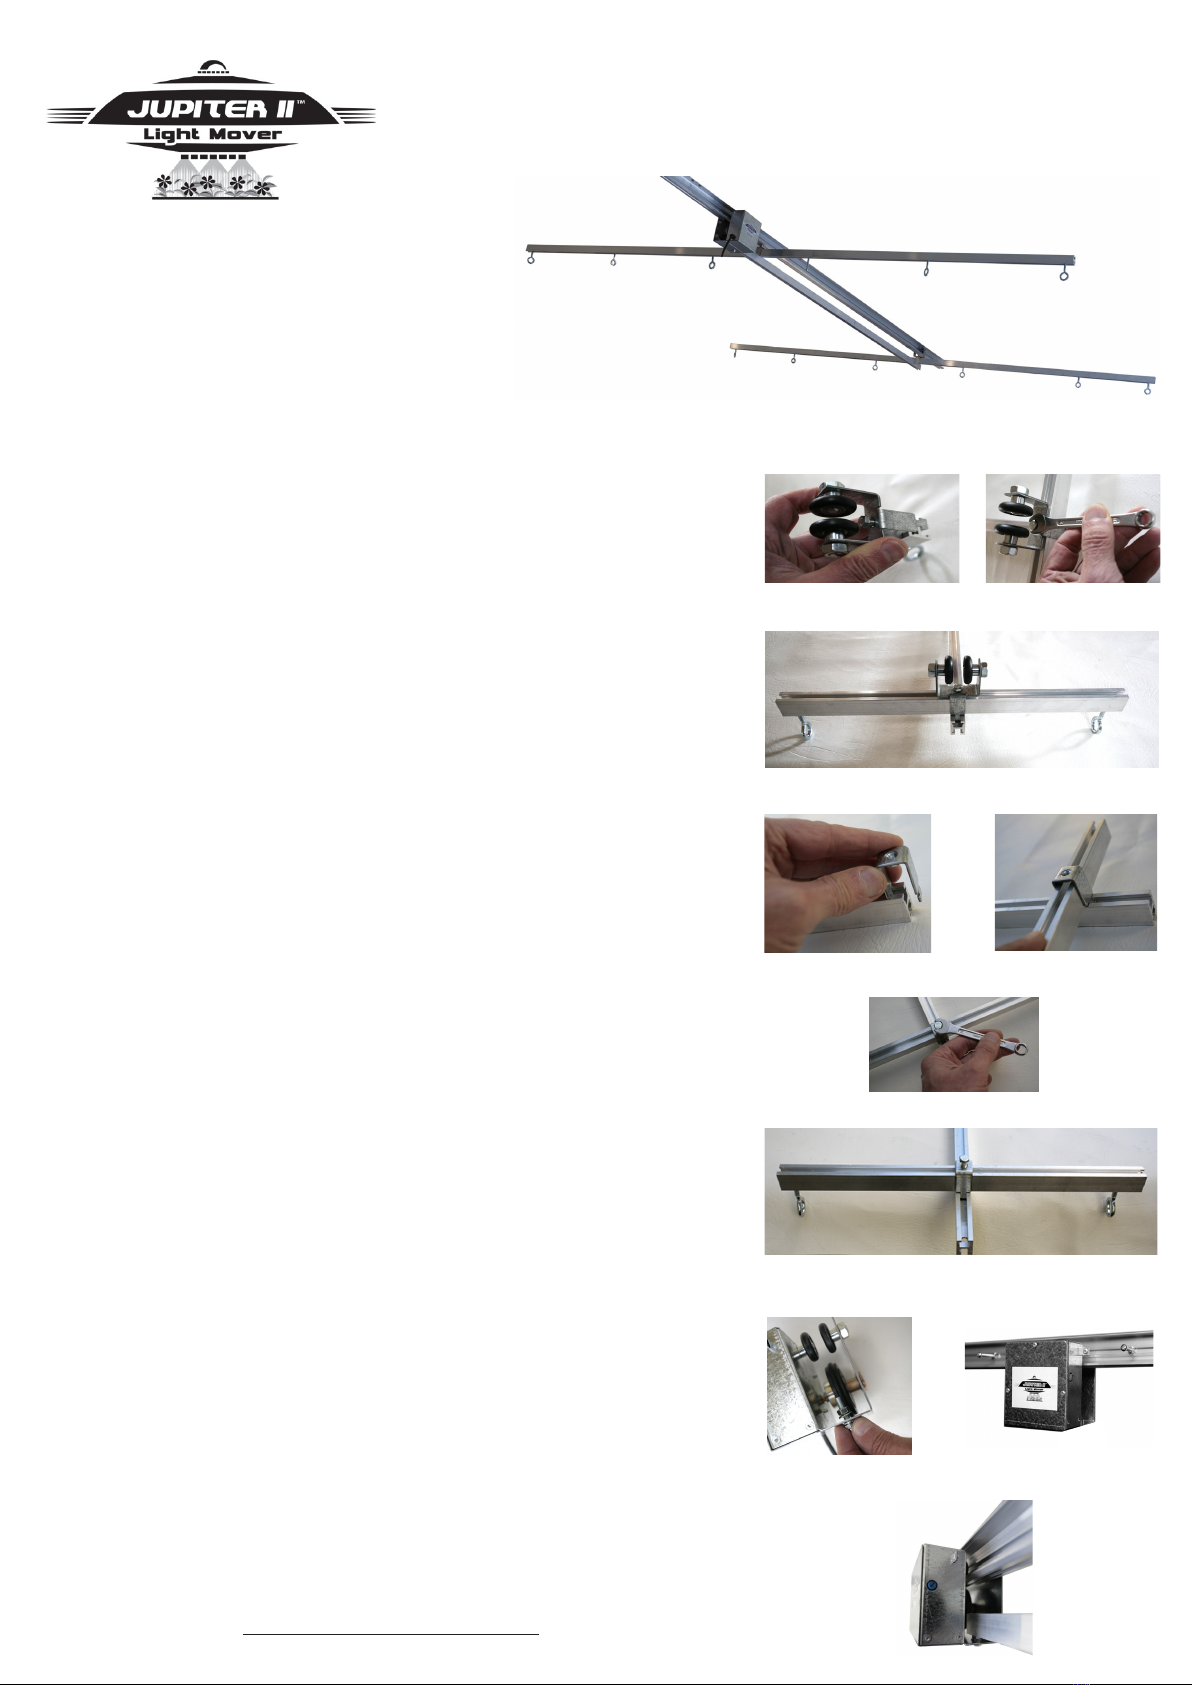
2. Slide jockey wheel clamp bracket into pushrod extrusion. Pic 1
3. Slide crossbar half way of length through clamp bracket.
4. Fasten bolt using 10 mm spanner. Pic 2
5. Slide eye bolts to underside of adjustabar and fasten in position. Pic 3
Connecting crossbar to motor end of pushrod
1. Slide the remaining clamp bracket into other end of pushrod. Pic 5
2. Slide crossbar half way of length through clamp bracket. Pic 6
3. Fasten bolt using 10 mm spanner. Pic 7
4. Slide eye bolts to underside of adjustabar and fasten in position. Pic 8
Mounting whole assembly to track
1. Fasten 6 x 25mm motor bolt to motor chassis, thread in upward position.. Pic 9
1. Slide one motor stopper onto track and fasten about half way along track length.
2. Slide motor, with the Jupiter 2 sticker facing you, onto left end of track.
3. Slide the other motor stopper on rail, position both stoppers and fasten. Pic 10
4. Fasten both screws using philips head screwdriver.
4. Lift the assembled pushrod and slide the jockey wheel end onto right end of rail.
5. Connect pushrod by lowering it onto the thread of the 6x25 mm motor bolt, making
sure bolt is located through pre-drilled hole in pushrod. Pic 11
Mounting reflectors to adjustabar (crossbar)
1. Mount one reflector to 2 eyebolts (hang from chain) or bolt reflector directly to
adjustabars.
2. Mount ballasts on wall aproximately same height as adjustabars .
3. Cable tie lamp cord and the motor cord to eye bolt closest to motor. Now
drape them across to the ballasts. Secure the cords making sure that there
is enough slack for full movement of motor along rail.
4. Do the same as step 3 for cord from reflector under the jockey wheel set.
5. Before powering up lamps connect the motor unit to a 240 VAC power outlet and
watch the motor run along track a few times to make sure the motor runs smoothly
without any snagging of cords etc.
Troubleshooting - [email protected]
If motor appears to stop anywhere between the stoppers check to see if the
drive wheel is making proper contact with the rail and is not losing traction.
Make sure rail is level with the aid of a spirit level (it may look OK by eye but is not).
If no spirit level is handy then unfasten turn around and re-fasten rail. This may work
as the rail will be correctly re-angled to allow traction. Remember that if the track has
to be mounted on even a slight angle then make sure that the adjustabar end of the
motor is running uphill.
Pic 3 -
Pic 5 Pic 6
Pic 7
Pic 8 -
Pic 1
Track mounting
please refer to seperate instruction sheet.
Pic 2
Pic 9 Pic 10
Pic 11
Parts List
1. 1 x motor unit. Inludes 2 x stopper screws with nuts and rail mounting screws.
2. 2 x 1.2, 1.5, 2m or 1 x 2, 2.4 or 3m aluminium rail
3. 1 x 1.2, 1.5 or 2 m adjustabar pushrod aluminium
4. 1 x 6x25mm motor bolt nut and washers
5. 1 x jockey wheel kit clamp bracket & 1 x 6x20mm bolt
6. 1 x clamp bracket per crossbar & 20mm bolt (apart from crossbar under jockey wheels)
6. 12 x 6x25mm eyebolts to hang lights from adjustabar
7. 2 or 3 x selected length adjustabar (crossbar)
WARNING: READ BEFORE RUNNING
SYSTEM, LAMPS ATTACHED.
Never run the system until the end motor stops have
been adjusted and fastened to the track as instructed.
Otherwise the motor or jockey wheel set, with lamps
attached, may run off the end of the track.
cut down Adjustabar shown
Table of contents
Popular Lighting Equipment manuals by other brands

American DJ
American DJ AGGRESSOR User instructions

GE
GE Tetra PowerGrid-Gen 3 installation guide

Stoane Lighting
Stoane Lighting BPX Installation and maintenance instructions

EuroLite
EuroLite 51915381 user manual

Daintree
Daintree GE Current Arize Factor installation guide

legate
legate S50123010 Series Manual guide