3. Operation
How to Determine Current Time Setting
Press and quickly release the push-button on the
MagicCloser receiver. The MagicCloser will indicate it’s
current activation time setting by providing 1 to 8 beeps.
One beep indicates the setting to be 2 minutes, two beeps
represents 5 minutes, etc. (See table 1).
Setting the Activation Time
Press and quickly release the push-button on the
MagicCloser receiver. The first press and quick release
indicates the current time setting. Press and quickly release the push-button again after the
beeps are finished. The setting will advance to the next time period. Continue pressing and
quickly releasing the push-button until the number of beeps heard matches the activation
time delay setting in table #1.
Enabling/Disabling
MagicCloser
Enabling and
disabling of the
MagicCloser. Press
and hold the push-
button approximately
3 seconds until the
MagicCloser chirps.
A short chirp indicates
that the unit has been
enabled. A long chirp
indicates that the unit
has been disabled. If
you are unsure
whether or not it was a
short or long chirp just
press and hold the push-button again to compare the length of the chirp.
IMPORTANT
It is important to note that MagicCloser simply presses the garage door button for you after
a pre-determined amount of time. Therefore, if the garage door is open or partially open (
as in the case of ventaltion during the summer) the direction of the garage door is
determined by the previous travel direction before the door was stopped. Some models will
allow you to leave the garage door partially open after previously traveling in either
direction. Some models will only allow you to leave the garage door open when it was
previously traveling in the up direction. If the MagicCloser activates and the garage door
opens instead of closes the MagicCloser will re-activate and close the garage door within 1
minute as it still senses that the garage door is open.
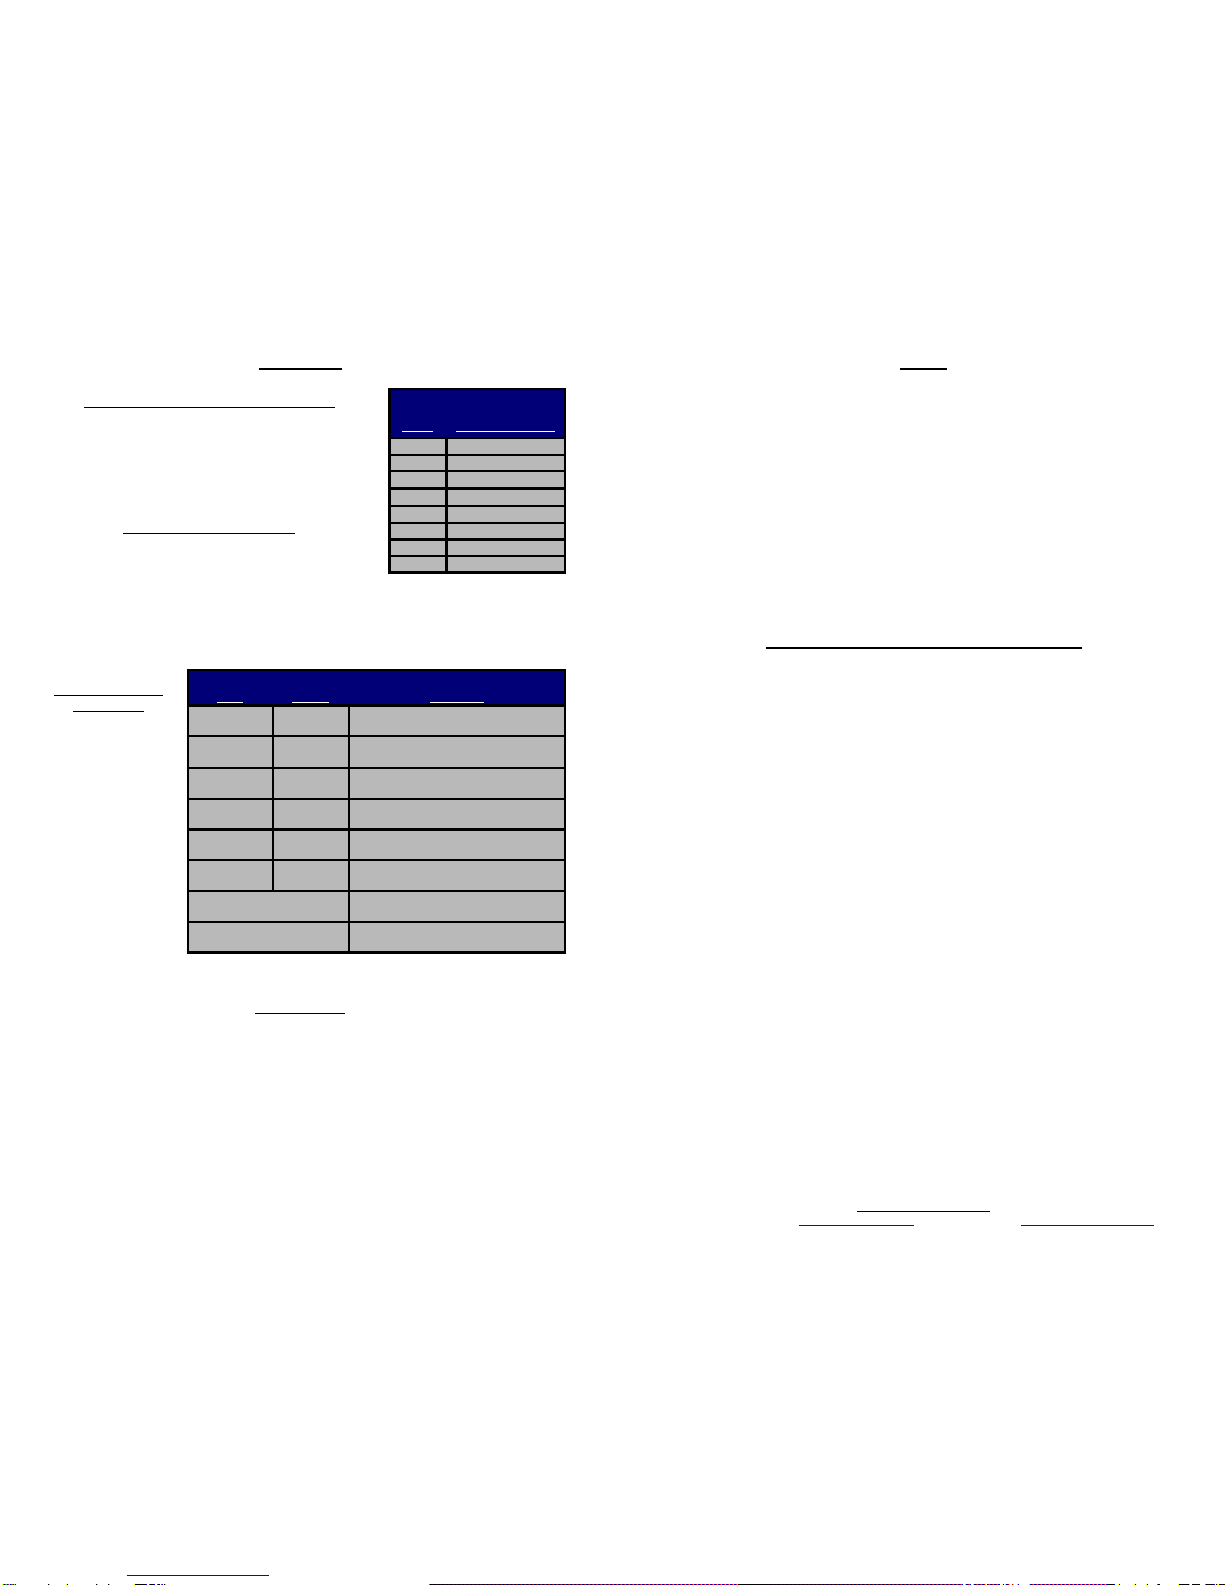
Table 1:
Activation Time Delay
Beeps Time Setting (min)
12
25
310
415
530
660 (1 hour)
7120 (2 hours)
8180 (3 hours)
Table 2: LED/Beeper Indicators
LED Beeper Indication
OFF OFF MagicCloser is disabled
OR garage door is closed
Blinks
Once/sec. OFF
MagicCloser in count down, Activation
between 60 sec. and time setting.
Blinks
Once/sec. Beeps
Once/sec. MagicCloser in count down,
Activation between 15 to 60 sec.
Blinks
twice/sec. Beeps
Twice/sec. MagicCloser in count down,
Actvation less than 15 seconds.
3 Flashes
2 sec. apart OFF
MagicCloser TX battery low,
Replace battery in Transmitter
Rapidly
Blinking OFF
MagicCloser radio link lost,
Check battery in transmitter
LED/Beeper Chirps
(Short Chirp) MagicCloser Enabled
LED/Beeper Chirps
(Long Chirp) MagicCloser Disabled
4. FCC
Note: This equipment has been tested and found to comply with the limits for a Class B
digital device, pursuant to Part 15 of the FCC Rules. These limits are designed to provide reasonable
protection against harmful interference in a residential installation. This equipment generates, uses and
can radiate radio frequency energy and, if not installed and used in accordance with the instructions,
may cause harmful interference to radio communications. However, there is no guarantee that
interference will not occur in a particular installation. If this equipment does cause harmful interference
to radio or television reception, which can be determined by turning the equipment off and on, the user
is encouraged to try to correct the interference by one or more of the following measures: a) Reorient
or relocate the receiving antenna, b) Increase the separation between the equipment and receiver, c)
connect the equipment into an outlet on a circuit different from that to which the receiver is connected,
4) Consult the dealer or an experienced radio/TV technician for help.
“This device complies with Part 15 of the FCC Rules. Operation is subject to the following two
conditions: (1) this device may not cause harmful interference, and (2) this device must accept any
interference received, including interference that may cause undesired operation.”
Changes or modifications not expressly approved by JCV Enterprises, Inc. could void the user’s
authority to operate the equipment.
5. Frequently Asked Questions/Troubleshooting
The MagicCloser is blinking but I do not know when it will activate (close the garage door)?
How can I determine the activation time?
If MagicCloser is blinking and beeping with a one second interval then it is 15 to 60 seconds from
activation. If MagicCloser is blinking and beeping twice per second then it is 15 seconds or less from
activation. If MagicCloser is just blinking then it is actively counting down to activation. Activation
time ranges from one minute up to the activation time setting. If you have forgotten the activation time
setting you may press and quickly release the push button to allow the MagicCloser to indicate its
current time setting. The number of beeps refers to the time activation setting. One beep is 2 minutes, 2
beeps is 5 minutes, etc... Refer to “How to determine current time setting” above or to the chart on the
label of the MagicCloser RX. The MC-RX will restart the activation time after indicating the setting.
I have pressed and released the MagicCloser button and heard 4 beeps. This indicates the time
setting to be 15 minutes. However, before the 15 minutes have expired I decided to disable the
MagicCloser. How do I do that and how do I know if it has been disabled?
Press and hold the MagicCloser push button until a long chirp is heard and the LED turns off. If you
are uncertain if the chirp was a long chirp perform the press and hold of the push button again and
compare if it was a short or long chirp. The enabling/disabling may be done as many times as needed
to make the determination. If the LED was previously blinking and you press and hold the push button
and the LED is turned off then it was disabled. MagicCloser is not actively counting down when the
red LED is not blinking.
Why does the MagicCloser open the garage door instead of close it?
It is possible that when MagicCloser activates the garage door opens. This is possible due to the state
of how the garage door was stopped originally. If it was stopped while traveling down then activation
will open the garage door. This is temporary as MagicCloser will still see that the garage door is open
and re-activate again within 1 minute to close the garage door. This functionality is normal and should
be no cause for concern. Re-activation of the MagicCloser will close the door.
Why isn’t the LED blinking on the MagicCloser?
MagicCloser is disabled or the garage door is closed.
What does the reset pinhole switch do? And why is it needed?
The pinhole switch resets power to the MagicCloser receiver. Instead of having to disconnect wires the
reset switch is a convenient way to reset power to the receiver. At installation it is advisable to press
and hold the reset switch for 5 seconds to allow a complete reset of the receiver. This allows the
receiver to harness power from the garage door opener.
6. Customer Service
Main Website: www.magiccloser.com Sales/Support: support@magiccloser.com