Magic Sing ET-23KH User manual

© 2014 Karaoke Home Entertainment All Rights Reserved –Document Revision 1.0
www.khe.com.au / www.khe.co.nz / www.picknmix.com.au / www.mp3g.com.au
www.how-to-convert-cdg.com / www.magicsingdownloads.com / www.magicsing.com.au
How to connect and user guide for Magic Sing ET-23KH model.
Please follow all steps before calling for addition help.
CONNECTION STEPS
1. Plug the power adaptor into the wall socket and the connection on the other end plugs into
the base unit at the back.
2. This unit allows you to use HDMI (HD-TV) or standard RCA (RED, WHITE and YELLOW)
connections depending on the television which you are using.
3. Decide which connection you need to use and before doing anything, make sure the unit is
SWITCHED OFF. Carefully take off the top piece of plastic on the base unit revealing chip
slots and a small switch. If you are using RCA, make sure the little black switch is toward “TV”
and if you are using HDMI connections, flick it over to “HD-TV”.
4. If you are using standard RCA connections to your television, move onto step 5.
If you wish to connect your unit to your amplifier or home theatre system, skip
to step 6.
If you are going to use your HD connection to your
television, skip to step 7.
Power cable
→ Base Unit
(rear)
Gently Slide
Back the Cover

© 2014 Karaoke Home Entertainment All Rights Reserved –Document Revision 1.0
www.khe.com.au / www.khe.co.nz / www.picknmix.com.au / www.mp3g.com.au
www.how-to-convert-cdg.com / www.magicsingdownloads.com / www.magicsing.com.au
5. Using your RCA (RED, WHITE and YELLOW to BLACK) cables insert the BLACK cable into the
GREEN “AV/OUT” input at the back of base unit. At the end of this cable you will see RED,
WHITE and YELLOW connections.
Plug the RED, WHITE and YELLOW connections into the matching sockets on the side or back
of your television. Skip to step 8.
Hint: You will need to find the appropriate “AV” slot in your television menu
(source/input) once you are ready to switch on the unit.
6. Using your home theatre system or amplifier plug the RED and WHITE connections (from
your RCA cables) into your home theatre system or amplifier and connect the YELLOW into
your television. This way the sound will bypass your television and go through your choice of
amplifier or home theatre setup and provide you with much louder and better quality
sound.
Skip to step 8.
HINT: If you are using your home theatre system, switch the settings to 2-channel stereo,
this way you will be using your main two speakers and be much less likely to damage
them. It will also fix any issues you may be having with voice delay.
Voice Delay: Reasons you may be experiencing some voice delay is if you are plugged in
solely to your television, your TV speakers will be working overtime trying to push out the
sound of the music and your voice at the same time. As they are generally small speakers and
you have to turn the volume up considerably. Your television may not be able to cope,
resulting in this delay. Use your home theatre system/amplifier (see step 6 above) as you will
bypass your television speakers.
Black Cable
→ Base Unit
(rear)
RED, WHITE
and YELLOW
into the
back/side of
television

© 2014 Karaoke Home Entertainment All Rights Reserved –Document Revision 1.0
www.khe.com.au / www.khe.co.nz / www.picknmix.com.au / www.mp3g.com.au
www.how-to-convert-cdg.com / www.magicsingdownloads.com / www.magicsing.com.au
7. Using your HDMI cable, one end of this much thicker cable goes into the back of your base
unit and the other end plugs into the matching connection on your television. Move onto
Step 8.
Hint: You will need to find the appropriate “component”in your television menu
(source/input) once you are ready to switch on the unit.
8. Then you will need to carefully slide the back piece of plastic off each microphone and insert
2x AA Batteries into each microphone.
RED and WHITE
connections into the REAR
of your amplifier
YELLOW into the
side/back of your
television

© 2014 Karaoke Home Entertainment All Rights Reserved –Document Revision 1.0
www.khe.com.au / www.khe.co.nz / www.picknmix.com.au / www.mp3g.com.au
www.how-to-convert-cdg.com / www.magicsingdownloads.com / www.magicsing.com.au
9. Use the switch on the side of the base unit to turn the unit on.
10. Grab your microphones, and using the controls on the front of them, switch the
microphones on by holding down the RED power button until you see P-On (Power On)
appear on the screen.
11. Open up your Magic Sing songbook, once you have decided on a song to sing from your
Magic Sing song book, type the song number (you will find it on the left hand side of the
book, beside the “Song Title”) and press the GREEN “Play/Stop” button in the center of the
microphone.
This will bring up your chosen song, the words will appear on your television screen and the
music will begin to play through your chosen output. The words will change colour as you
are meant to be singing them.
12. Your connections are all done and you are now ready to start the party! Enjoy your new
Karaoke System. If you have purchased extra chips, see tips below for how to insert and
remove them correctly. Please also see the FAQ section below.
Will appear
when
microphones
are switched
on
Song Number

© 2014 Karaoke Home Entertainment All Rights Reserved –Document Revision 1.0
www.khe.com.au / www.khe.co.nz / www.picknmix.com.au / www.mp3g.com.au
www.how-to-convert-cdg.com / www.magicsingdownloads.com / www.magicsing.com.au
How to insert and remove the additional Magic Sing chips
1. Turn off the microphones and base unit, using the relevant off switches –unit can remain
plugged in but MUST be switched off.
Please Note: Failure to follow these steps can result in damage to your Magic Sing unit and
or song chips and will result your warranty being voided.
2. Remove the case on the top of the base unit, revealing chip slots.
3. Take note of the ARROWS on the plastic near the chip slots, and those which are on your
Magic Sing chip.
4. Facing the arrows the same way as is on the base unit, carefully insert the chip.
It may take a little push to get it in properly so that the unit can pick up the songs.
5. In order for the chips to work, they must be left in the top of the base unit as the unit does
not have any additional memory within itself.

© 2014 Karaoke Home Entertainment All Rights Reserved –Document Revision 1.0
www.khe.com.au / www.khe.co.nz / www.picknmix.com.au / www.mp3g.com.au
www.how-to-convert-cdg.com / www.magicsingdownloads.com / www.magicsing.com.au
6. Use the DOWN arrow on your microphone to scroll through and select a song, or use track
number selection, as per previous instructions.
How to use MP3+G Downloads on your Magic Sing ET-23KH
1. You can purchase download credit from our website: www.picknmix.com.au for single song
downloads or you can purchase complete albums.
2. Go to www.picknmix.com.au and click the BLUE banner “Digital Downloads” as above.
3. Click the RED side for SINGLE SONG DOWNLOADS and proceed to point 4 or if you want to
purchase a full album click on the BLUE side for FULL ALBUM DOWNLOADS and follow the
on-screen prompts.
4. On the right hand side panel, click “Sign In”. Enter your KHE account details.
5. Then click to purchase your song credit from 1 song to 500 songs.
6. Then ADD all the songs you wish to your CART. Then click CHECKOUT.
7. You MUST then check your songs one last time (no changes past this point can be made) and
click CHECKOUT/CONFIRM ORDER.
8. Once the order has been processed you will get an email notifying you and you will be able
to download your songs: re-sign into your account.
9. Then click “MY ORDERS” where you can scroll down and see all the songs that you have
chosen in your cart.
10. You can then start clicking DOWNLOAD on each individual song. Make sure you SAVE them.
(NOTE: As stated in the Terms and Conditions, the downloading MP3+G files will not work on
a Mac, as the computer will alter the files as they download, must be done on a PC for initial
download process).
11. You will find the files in the folder MY COMPUTER, under DOWNLOADS (unless you chose an
alternate destination for them).
12. Unzip the files, so that you have 2 files PER SONG = a .cdg and a .mp3 (IMAGE BELOW)
13. BOTH of these files need to be COPIED across to a USB Memory Stick (8GB is
recommended).

© 2014 Karaoke Home Entertainment All Rights Reserved –Document Revision 1.0
www.khe.com.au / www.khe.co.nz / www.picknmix.com.au / www.mp3g.com.au
www.how-to-convert-cdg.com / www.magicsingdownloads.com / www.magicsing.com.au
14. Then, SWITCH OFF your Magic Sing unit, and insert the USB into the front port.
15. You will need to press the APP button on your microphone.
Songs listed as Multiplex Audio will playback on the ET-23K with full cover vocals so you
can sing-along, you cannot switch off the lead vocals with the ET-23KH so choose the
standard version of the song if you don't want full vocals. During MP3+G playback you
cannot change the Key or Tempo of the song.
16. Then scroll across to the KARAOKE CD+G button.
17. Your downloaded files will be here, click to play and get ready to sing!
Apple Mac® Important Notice: The downloading process as standard is only compatible with
Windows® PC's as the Apple® operating system auto unzips the files whilst downloading, and in the
process alters the MP3+G files as it doesn't recognize the format which causes them to no longer
work.
Customers have overcome this issue on the Apple Mac® using a program called "StuffIt Expander"
also a free program.
Converting CD+G Discs to MP3+G Song Files
You can also convert CD+G discs into modern MP3+G song files for use on the
ET-23KH for more information on this visit www.how-to-convert-cdg.com
USB Troubles –is your USB still not working with your unit and you have
already followed all the correct download steps; i.e. using a PC, unzipped the
files, dragged both files across to USB and inserting it in your machine?
Please make sure no other files are on the USB stick, like word documents etc. the USB must be
100% dedicated to MP3+G files. See next page for USB tips.
ZIPPED
UNZIPPED
COPY BOTH FILES TO
USB

© 2014 Karaoke Home Entertainment All Rights Reserved –Document Revision 1.0
www.khe.com.au / www.khe.co.nz / www.picknmix.com.au / www.mp3g.com.au
www.how-to-convert-cdg.com / www.magicsingdownloads.com / www.magicsing.com.au
Try this! Reformat Your USB (FOR PC)
1. Insert your USB in your PC
2. Find the icon for the USB in “My Computer”
3. Empty USB –please make sure you have the files backed up on your computer.
4. Right click the USB drive icon
5. Select “Format”
6. Click “Start” – once process is complete your USB is formatted.
7. This should bring your USB back to FAT32 and allow you to reload all your music files to it,
insert into your machine for easy on-screen playback!
Try this! Reformat Your USB (FOR MAC)
1. Insert USB into your MAC.
2. Make sure you have a backup of your files on your computer somewhere before deleting
everything from the USB.
3. Go to “Spotlight” (Search) and type in and select “DISC UTILITY”.
4. Click into the USB on the side panel.
5. Move onto the “Erase” tab
6. Choose the “Erase” button, NOT THE “Erase Free Space”.
7. Confirm “Erase”
8. Move back to your USB, it is now reformatted and you are able to put your songs back onto
it and try again. It may be a good idea to this regularly and think of it as servicing your car to
keep it running right.
Frequently Asked Questions (FAQ)
Q: Why do all the songs not have someone singing the whole way through?
A: Magic Sing does provide you with 22 Multiplex (full vocal, someone singing the song the entire
way through), however the majority are traditional Karaoke and will only have backing vocals in the
chorus line where the original singer would’ve had backing vocalists.
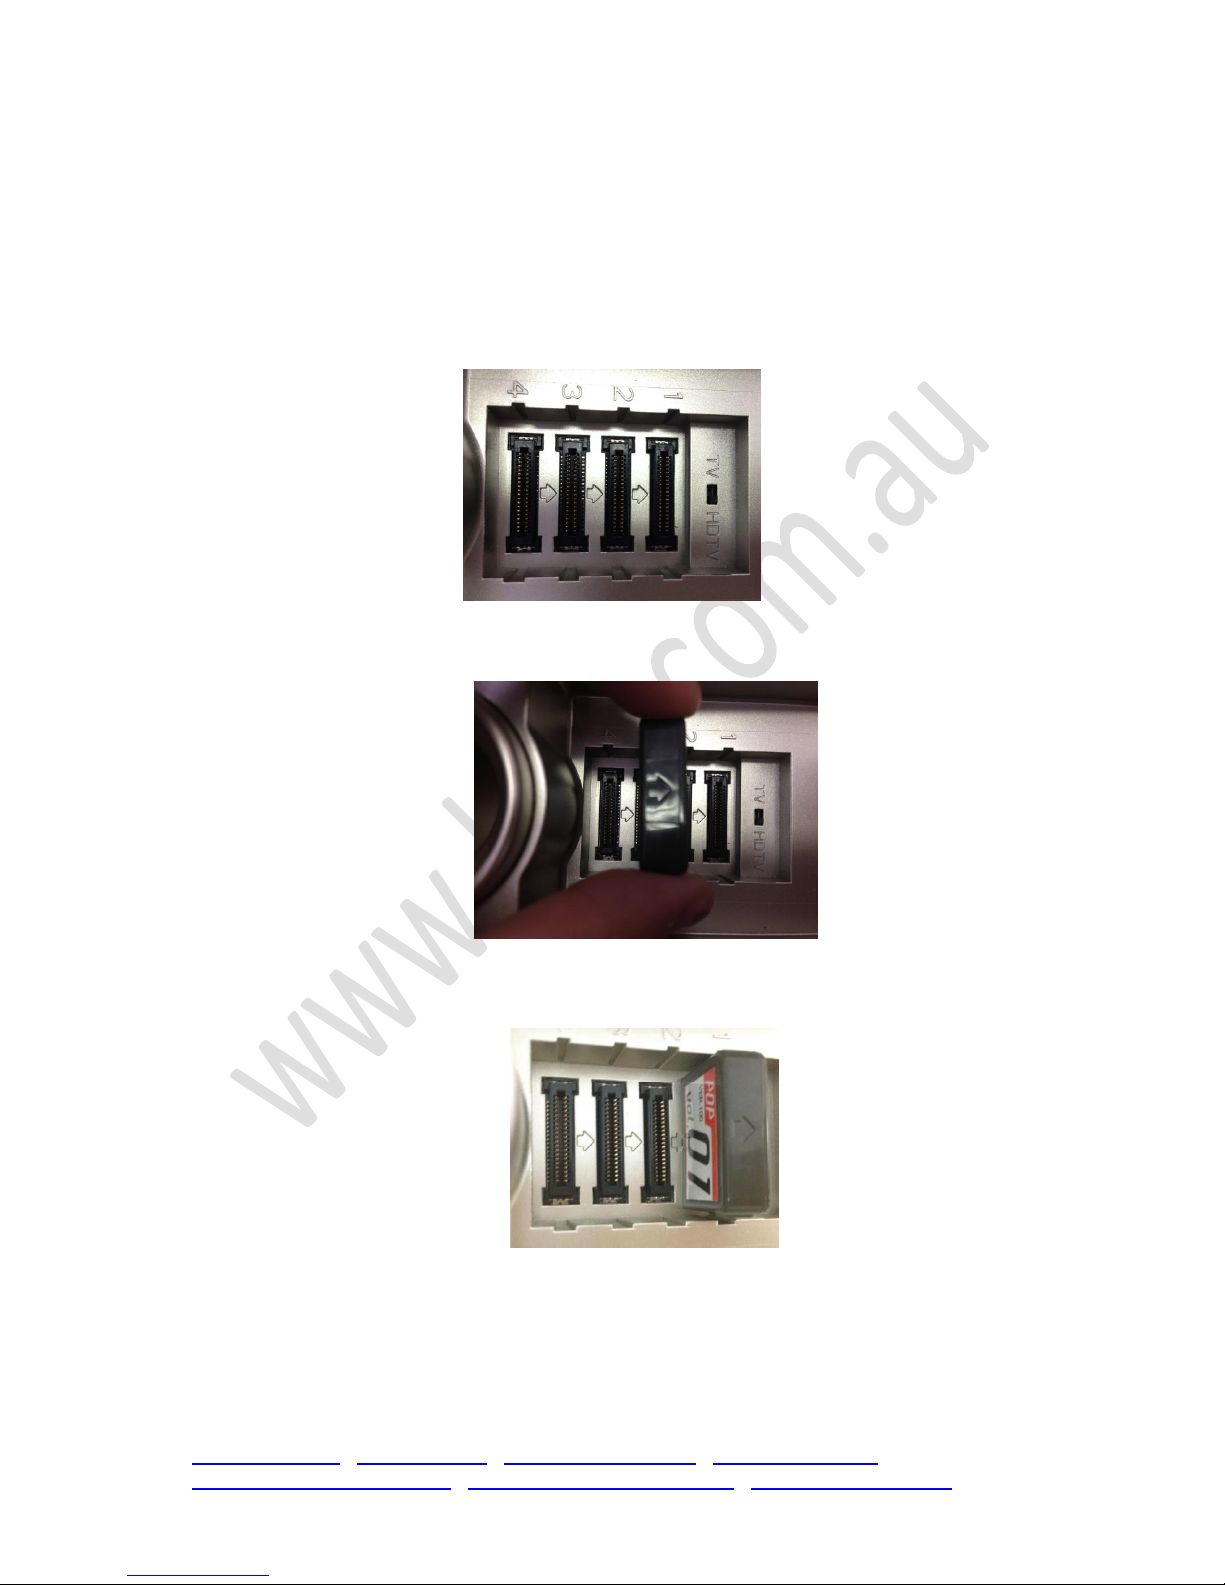
Q: Where do the Magic Sing chips go?
A: The Magic Sing chips get inserted into the base unit, underneath the little plastic cover. Make sure
the arrows on the unit and the chips are facing the same way before inserting (there are instructions
above)

© 2014 Karaoke Home Entertainment All Rights Reserved –Document Revision 1.0
www.khe.com.au / www.khe.co.nz / www.picknmix.com.au / www.mp3g.com.au
www.how-to-convert-cdg.com / www.magicsingdownloads.com / www.magicsing.com.au
Q: Why is the picture not appearing on my television?
A: Have you switched the TV-HDTV switch over to the appropriate option (do so when unit is
switched OFF), this will prevent your unit from appearing on your TV if it is not flicked to the right
side.
Q: Does the base unit charge the microphones when they are stationed in it?
A: Unfortunately, the microphone are operated by 2x AA Batteries, and therefore the unit itself
doesn’t recharge when the microphones are on the holder, they are simply decorative and a means
of storing your microphones without causing damage to them.
Q: Where is the chip for the 2000+ included songs? Can I take them out if I don’t like them?
A: The Magic Sing unit comes with over 2000 songs included, however these songs are hard wired,
and built-into the microphones themselves and are not a detachable chip, therefore they all cannot
be removed, and individual songs cannot be taken off.
Q: Can I make my own chip up with my own chosen songs?
A: There is currently no facility for making your own chip in Magic Sing, however you are lucky! The
ET-23KH you just purchased, does allow you to do MP3+G downloads and play them through a USB
port on the front of your base unit, see instructions above of how to download and get your music
onto your unit.
Q: Why is my voice delayed over the music when I sing? I have the unit plugged straight into my
TV, what am I doing wrong?
A: Please see step 6 for additional information on voice delay and how to fix it.
Should you still require assistance after reading through these step by step instructions and hints,
feel free to call your local KHE Store or email us with any query you may have.
From New Zealand
If you have any suggestions for additions or changes to these documents, customer feedback is
Other manuals for ET-23KH
1
Table of contents
Other Magic Sing Karaoke System manuals

Magic Sing
Magic Sing ET23KM User manual

Magic Sing
Magic Sing ET21KV User manual

Magic Sing
Magic Sing ET23KHC User manual

Magic Sing
Magic Sing ET13K User manual

Magic Sing
Magic Sing ET25K User manual

Magic Sing
Magic Sing ET-23KH Safety guide

Magic Sing
Magic Sing ED-8000 User manual

Magic Sing
Magic Sing E2Dual User manual

Magic Sing
Magic Sing ET9K User manual

Magic Sing
Magic Sing MT14K User manual