Sx2 Tuning-Dongle
with Bosch Acve / Performace
Line cablekit Sx2KB-Perf
Installaon manual
Part no.: 16.100; 16.105
Document: Sx2_Bosch_Acve_Performance_cable-
kit_manual_B01_V10_EN
Creaon date: 01 / 2014
Please read this instrucon carefully before using and
keep them for later use.
Important!
Pedelec drivers, which want to test the drive eciency
with a plugged Sx2 Tuning-Dongle outside the scope of
Road Trac Licensing Regulaon e.g. private land, cor-
doned racetracks, abroad or with an insurance license
plate get with the Sx2 Tuning-Dongle a technical way.
Unplug the Sx2 Tuning-Dongle to set your pedelec back
to the original state.
Instrucon to the road trac regu-
laons and disclaimer
We expressly point out that the Sx2 Tuning-Dongle may
only be used on private closed areas or designated rou-
tes.
Using of the Sx2 Tuning-Dongle manipulates the speed
of your pedelec, this is not allowed on public roads.
No liability is assumed for any current and future re-
sulng damage to objects and / or persons from any
improper installaon and / or improper use. Use at
your own risk!
Your eBike warranty can be limited or expire by the
using and installaon of the SX2 Tuning-Dongle. Be-
cause an installed SX2 Tuning-Dongle is a modicaon
or a manipulaon of your eBike.
12 3
This notice is generated automatically and is valid
without signature.
Created version: November 2012
Features descripon
• Starng between 12 and 25 km/h, the speed is
divided by / 2, and the display shows exactly the
half speed. This provides to keep the BOSCH dri-
ving modes
• Pluggable and compact, this design allows driving
in the public by simply pulling the Sx2 Tuning-
Dongle out of the socket jack.
• For protecon the SX2 Tuning-Dongle is molded,
maintenance free and no baery are required.
• Enhancements like turning o during driving or
cable extensions are possible with trading goods.
Before installaon
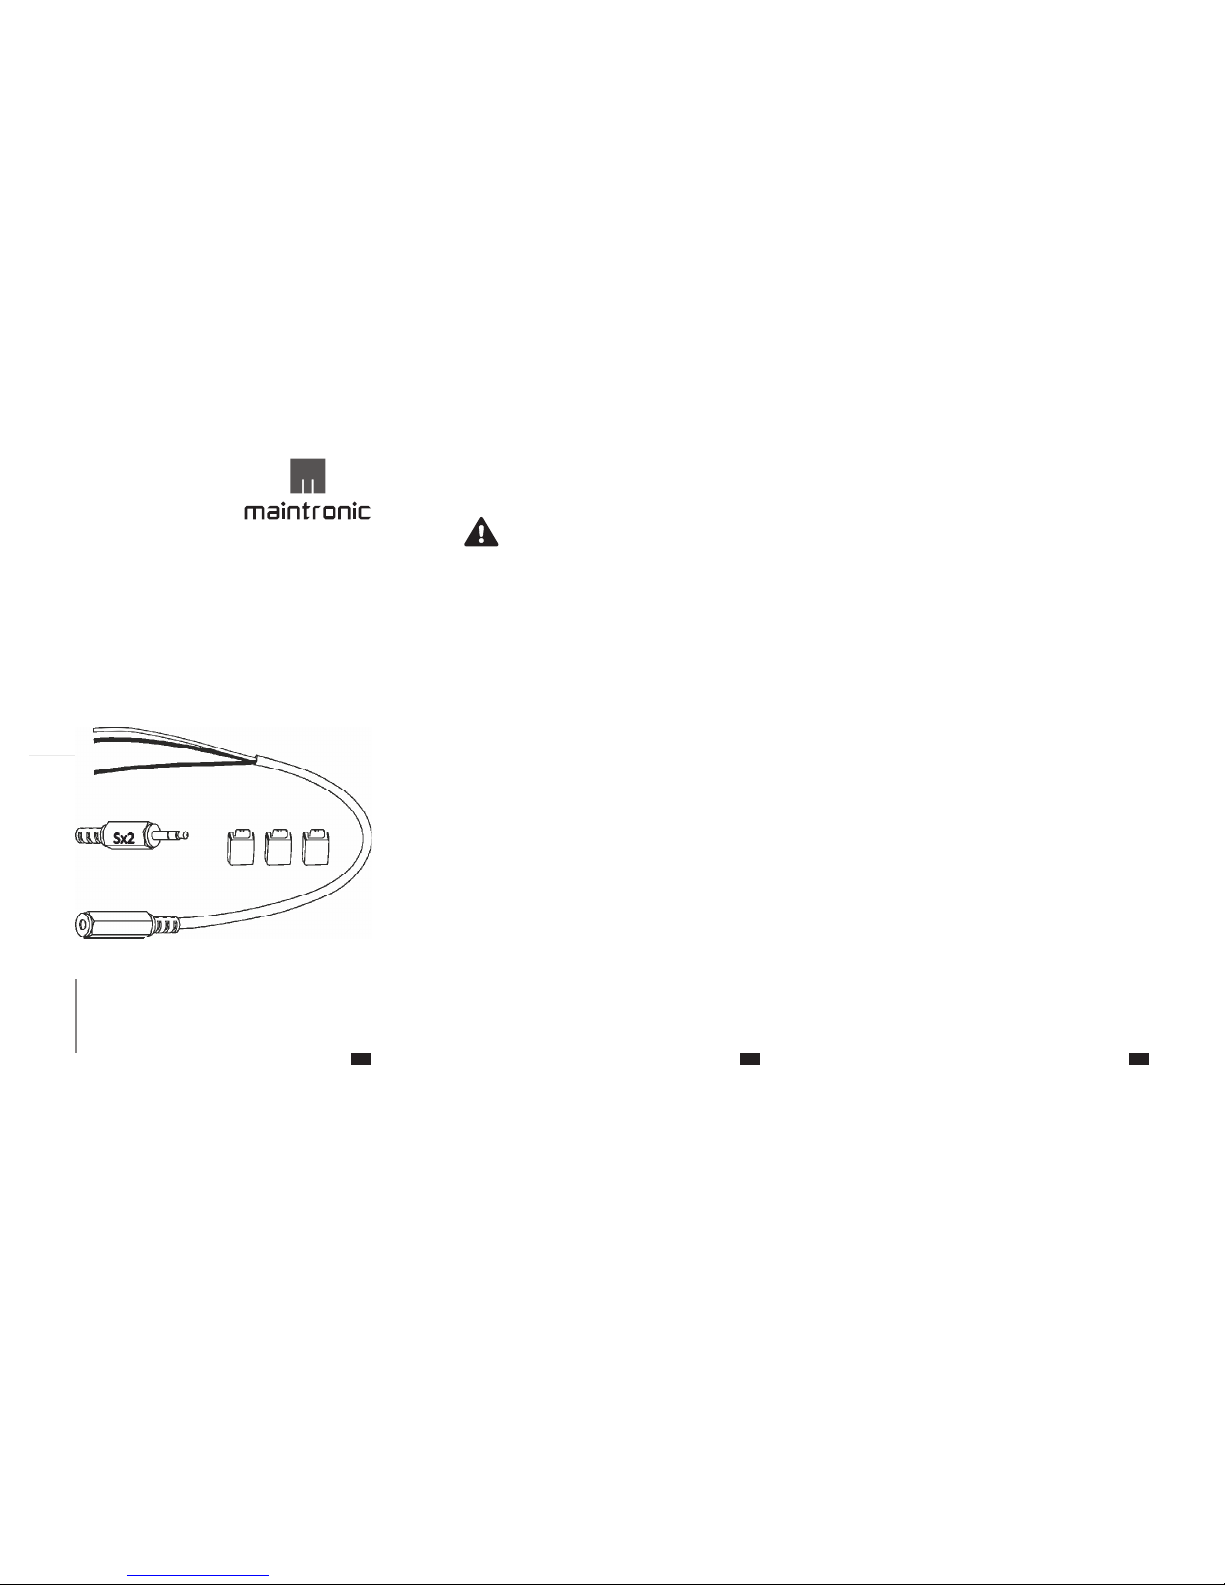
At the end of the cablekit is a 3,5 mm stereo jack so-
cket (7) for plug-in of the Sx2 Tuning-Dongle (8). The Sx2
cablekit for Bosch Acve/Performance Line is connec-
ted parallel to the speedsensor (1) and crimped with gel
insulated blade connectors (2).
The protecve cover of the engine terminal box has to
be removed to get to the terminal.
If you don´t have right tool, it should be installed by a
good eBike dealer.
678 10
Scope of delivery
• 1x cablekit Bosch Acve / Performance Line with
3,5mm stereo jack socket (5)
• 2x gel insulated blade connectors (2)
• 1x Sx2 Tuning-Dongle (6),
• 1x user manual Sx2 Tuning-Dongle with Bosch
Classic Line cablekit
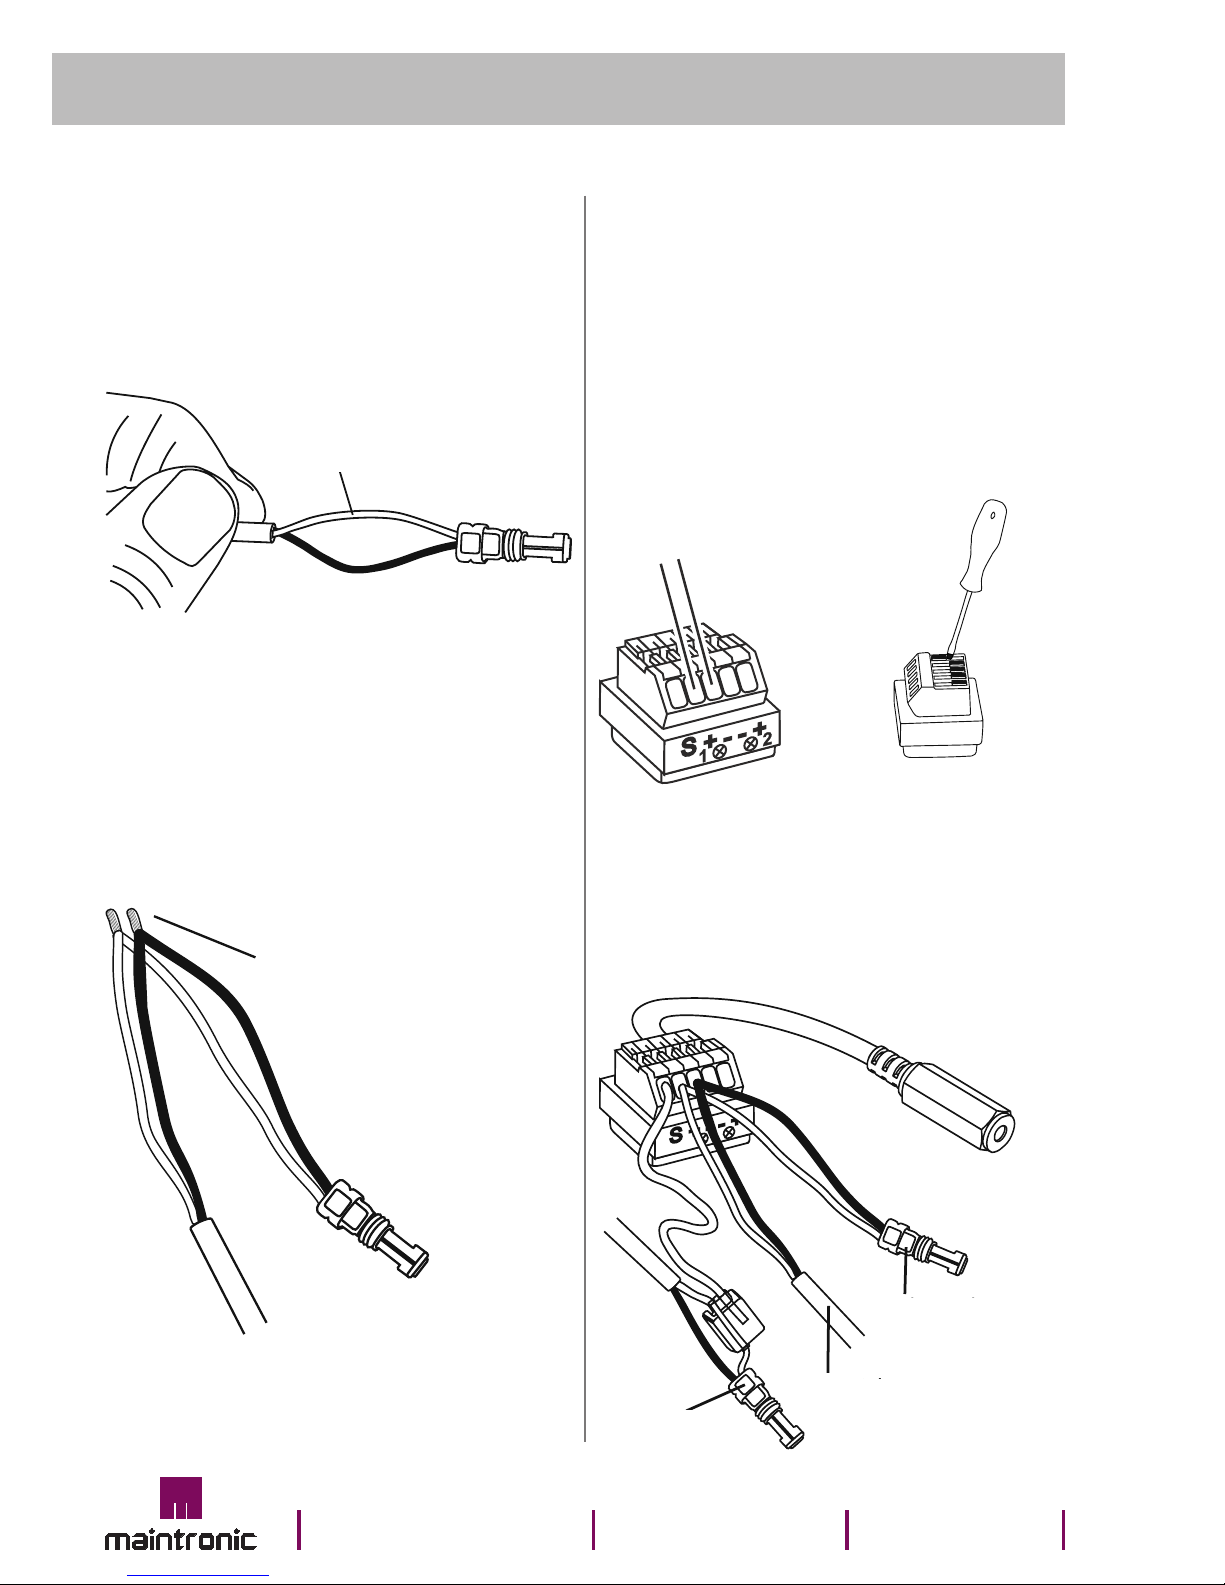
For connecng the wires with the blade connectors
insert each wire (without stripping) of the Sx2 Tuning-
Dongle cable into the one-sided openings of the blade
connectors (2).
The related wires of the speedsensor and the + wire
of the control unit Intuvia (6) are inserted into the
through-opening of the blade connectors. Now press
down with your hand the blade connectors (2) rmly.
Compress with a pliers as possible parallel.
Once the terminals are crimped, the speedsensor plug
(1) should be reconnected to the engine and the chain
applied to the chain wheel.
Now the pedal has to be turned up slowly by hand and
the speedometer should be checked for funcon. If the
speed is shown on the display repeat the procedure
with a plugged Sx2 Tuning-Dongle into stereo jack so-
cket (5). Unl the switch point is reached, the shown
speed jumps to the half speed.
Aer that, assemble the hood and the e-bike together.
The cablekit should be mounted in a way to protect
the connectors from splashing water and mechanical
damage.
On the following page is a picture of the terminal with a
connected cablekit.
FAQ
(further Help you can nd at support.maintronic.de)
I have done the installaon exactly like shown, but the
switchoverpoint is not percepble?
ANSWER:
Distance and Posion of the magnet aecng the
switching me of the speed sensor. The shorter the
switching me, the sooner is the switchoverpoint and
conversely. Try to turn up the pedal by hand while the
engine is turned o ll 50km/h and watch the speedo-
meter.
If the switchoverpoint is below 12km/h or over 28km/h
or not at all please contact your specialist dealer or the
Sx2 Support >>> sx2@maintronic.com
How can I inuence the switchoverpoint?
ANSWER:
If the speed sensor with the magnet is moved into the
axis direcon, the switching speed increase.
Conversely the speed sensor with the magnet is moved
outside to the re direcon, the switching me is shor-
ter and the switching speed is lower.
Manual >>> support.maintronic.de.
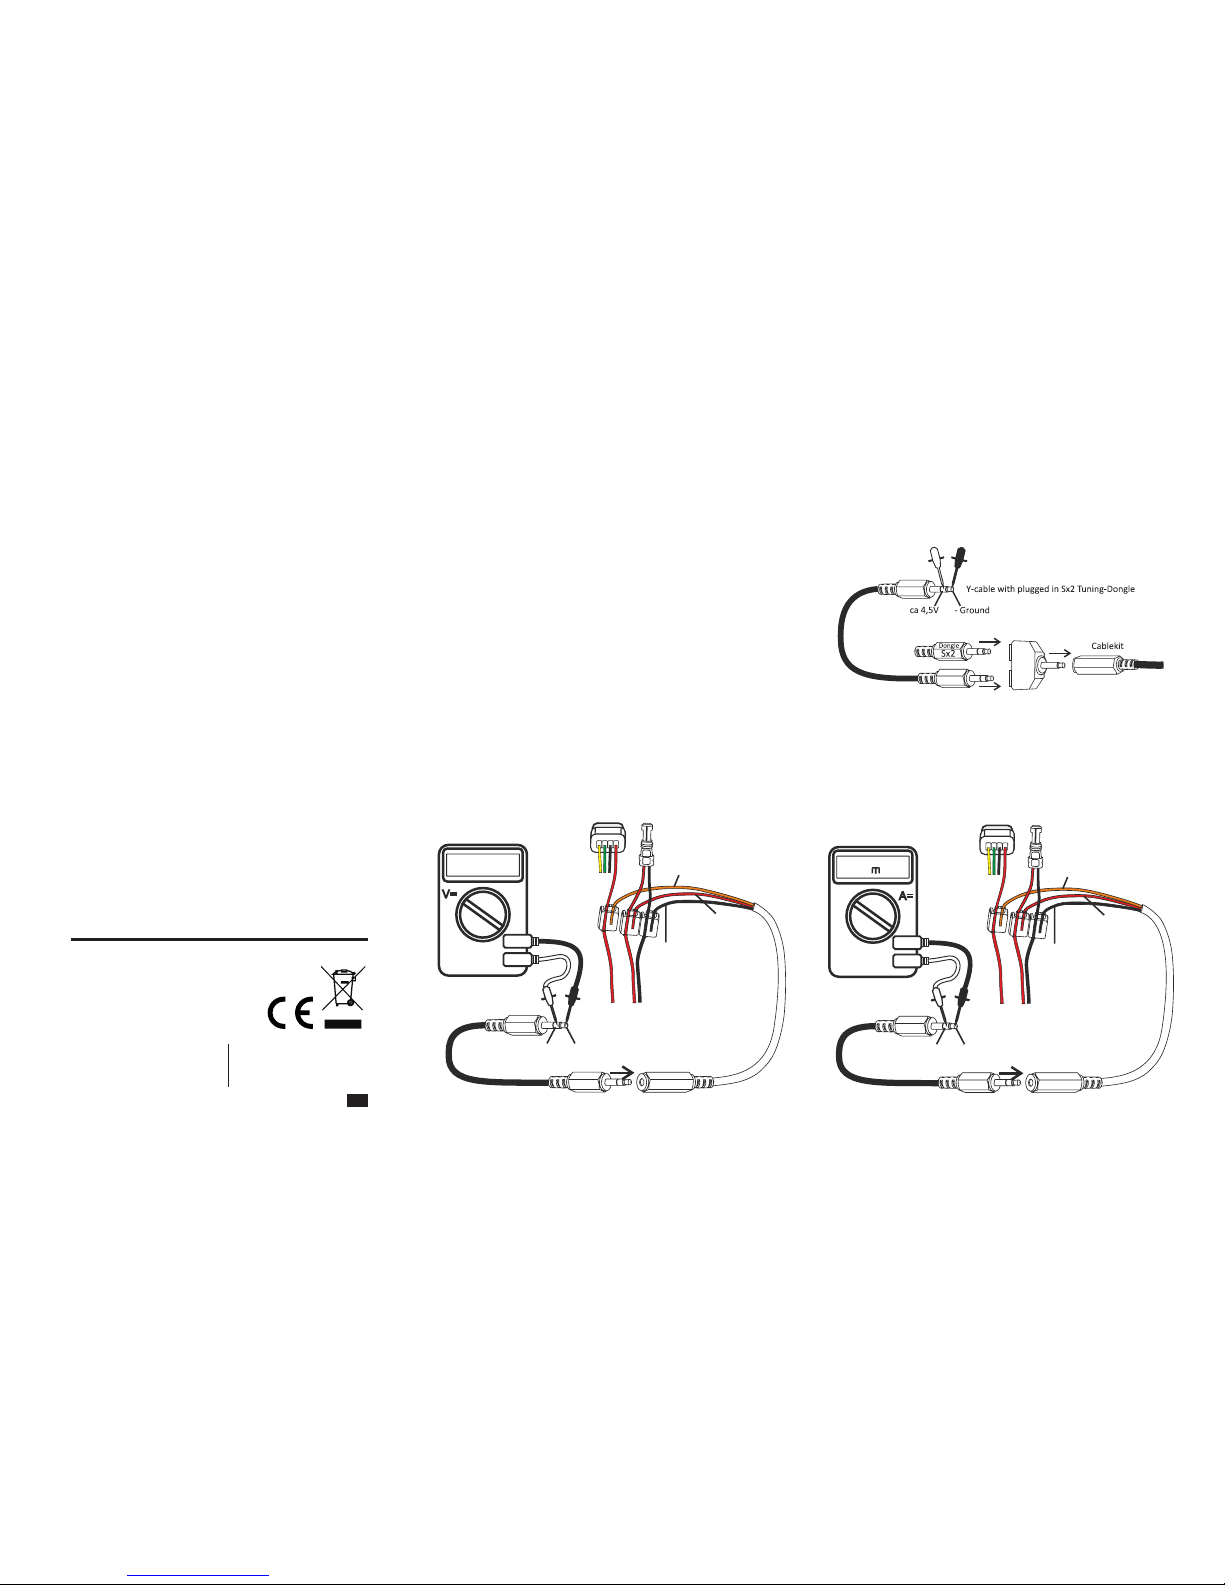
Is the cablekit connected correctly?
ANSWER:
Poor contacts may arise fail pulses with the Sx2 Tuning-
Dongle which causing the error 102. Check the ght-
ness of the Sx2 Tuning-Dongle and its contacts.
(Picture with stereo jack socket and measurement de-
vice)
For a further diagnose a bare 3,5mm stereo jack instead
of the Sx2 Tuning-Dongle are plugged. The measure-
ments must be +5V stable between ground(peak) to
ring, the magnet may not stay over the speedsensor.
Speedsensor
to control unit Intuvia
5
8+5V - Ground
Sx2
7
1
2
6
3black
red
4
black
green
red
yellow
orange
Is an extension of the connecon cable possible?
ANSWER:
Yes, with a commercial standard headphone extension
cord, the Sx2 Tuning-Dongle can be placed anywhere on
the eBike.
Return consignment
The return form has to be lled out step by step with
an exact error descripon. A purchase receipt has to be
included. You need to send our product back in a passed
envelope.
Waste disposal
In accordance with European Direcve 2002/96/EC
(it`s) not longer usable electronic devices and defecve
or used baeries (European Direcve 2006/66EG) must
collected separately and disposed by an environmen-
tally sound recycling.
Please make sure not to dispose the Sx2 Tuning-Dongle
in your household waste.
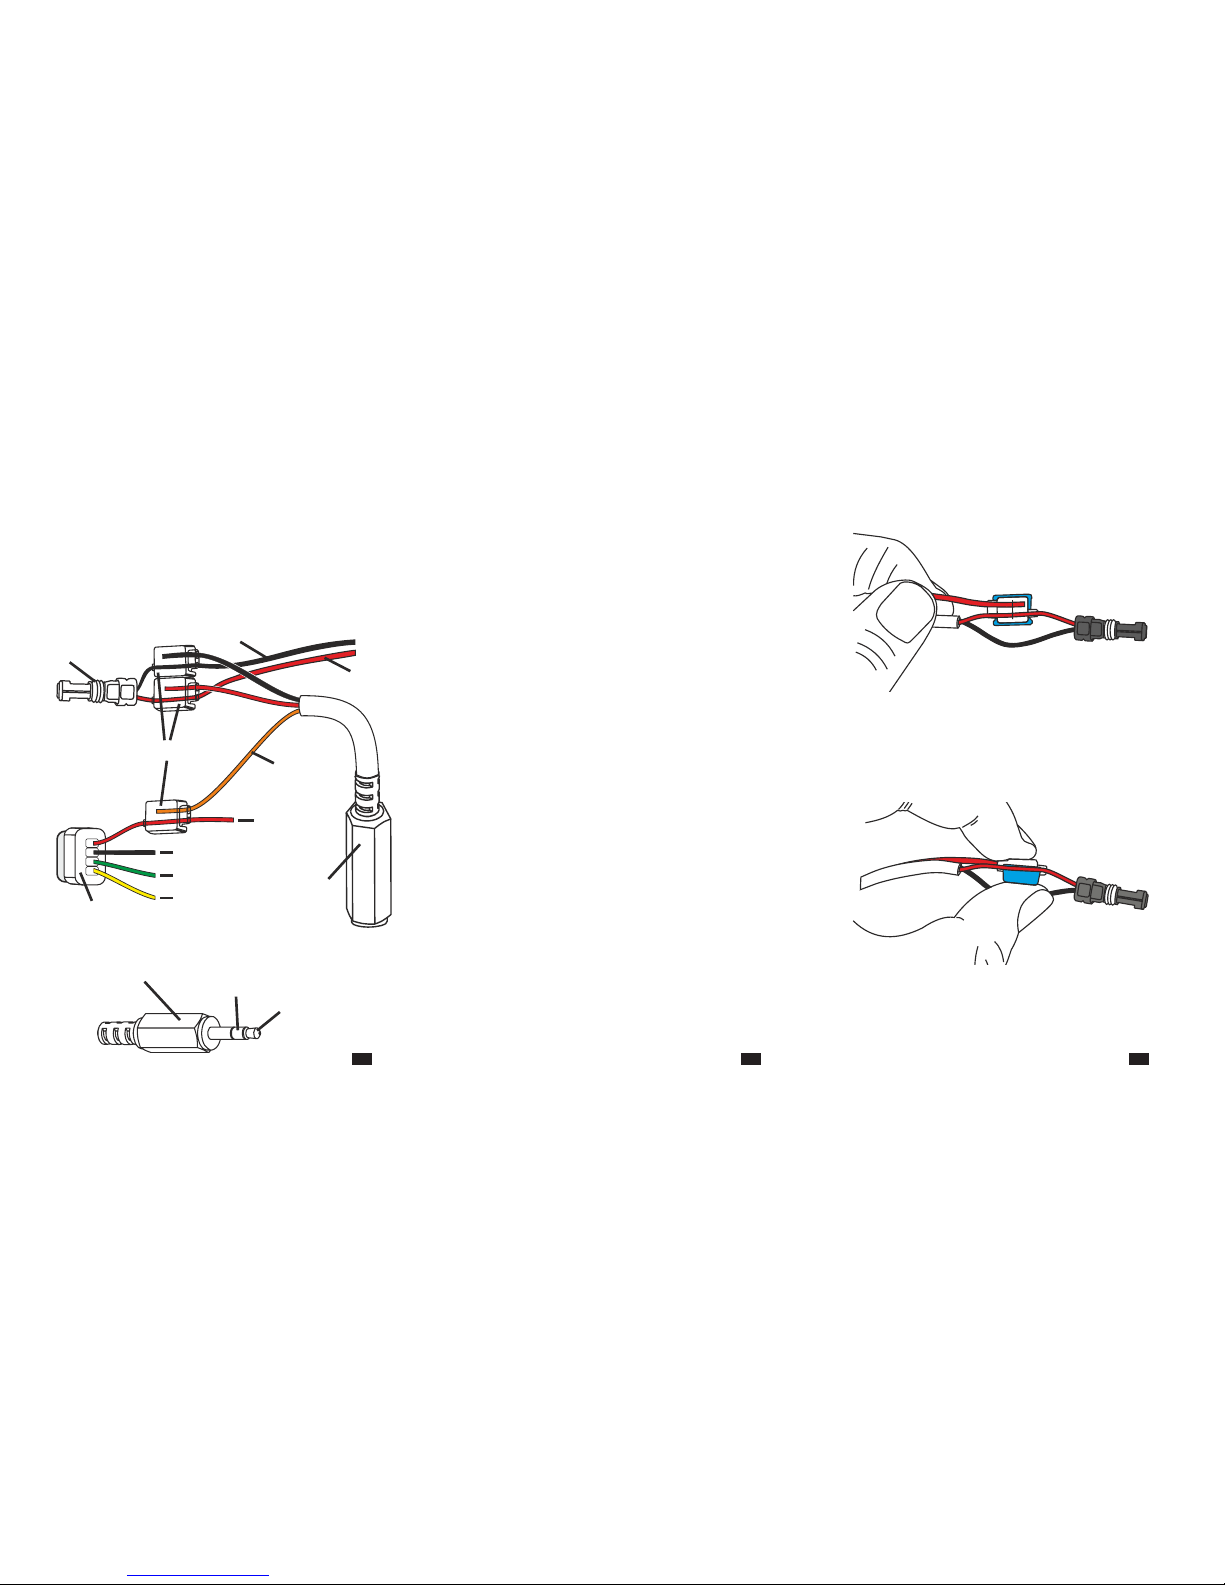
Installaon Bosch
The best soluon is to connect the cablekit directly be-
hind the speedsensor plug inside of the engine termi-
nal.
It is located behind the stone chip cover of the engi-
ne which is screwed on with 3 Torx screws. At rst the
crank crank has to be removed. For this reason the fol-
lowing special tools are required: 8mm 5-hex key to un-
lock the crank screw, Isis crank puller for dismounng
the crank. And a Torx T20 key for the chip cover screws.
Once the crank and the protecve cover are removed
you get access to the speedsensor plug(1). The next
step is to unplug the speed sensor plug (1) from the en-
gine carefully.
Connect the Sx2 Tuning-Dongle parallel to the speed-
sensor. Please take care of the polarity. Red to red (3)
and black to black (4). The orange wire (5) is connected
to the red wire which leads to the + wire of the control
unit Intuvia (6).
Image label Bosch Acve/Performance Cablekit
BOSCH Active Line
BOSCH Performance Line
black
red
Sensor
Sx2
black
red (+5V)
Speed-
sensor
to
AKKU
red
orange
to Control
Unit Intuvia
light-
socket
light-
socket
© 2017 - maintronic® GmbH reserve the right to make
technical changes and product improvement
without prior noce.
Mistakes and typing errors reserved.
All rights reserved.
MTC maintronic GmbH
Carl-Zeiss-Str. 10-14
D-97424 Schweinfurt/Germany
Tel: +49 (0)9721-766-0
www.maintronic.de
support@maintronic.de
Sx2 Tuning-Dongle
with Bosch Acve / Performace
Line cablekit Sx2KB-Perf
Installaon manual
Part no.: 16.100; 16.105
Document: Sx2_Bosch_Acve_Performance_cable-
kit_manual_B01_V10_EN
Creaon date: 01 / 2014
Please read this instrucon carefully before using and
keep them for later use.
Important!
Pedelec drivers, which want to test the drive eciency
with a plugged Sx2 Tuning-Dongle outside the scope of
Road Trac Licensing Regulaon e.g. private land, cor-
doned racetracks, abroad or with an insurance license
plate get with the Sx2 Tuning-Dongle a technical way.
Unplug the Sx2 Tuning-Dongle to set your pedelec back
to the original state.
Instrucon to the road trac regu-
laons and disclaimer
We expressly point out that the Sx2 Tuning-Dongle may
only be used on private closed areas or designated rou-
tes.
Using of the Sx2 Tuning-Dongle manipulates the speed
of your pedelec, this is not allowed on public roads.
No liability is assumed for any current and future re-
sulng damage to objects and / or persons from any
improper installaon and / or improper use. Use at
your own risk!
Your eBike warranty can be limited or expire by the
using and installaon of the SX2 Tuning-Dongle. Be-
cause an installed SX2 Tuning-Dongle is a modicaon
or a manipulaon of your eBike.
12345
This notice is generated automatically and is valid
without signature.
Created version: November 2012
Features descripon
• Starng between 12 and 25 km/h, the speed is
divided by / 2, and the display shows exactly the
half speed. This provides to keep the BOSCH dri-
ving modes
• Pluggable and compact, this design allows driving
in the public by simply pulling the Sx2 Tuning-
Dongle out of the socket jack.
• For protecon the SX2 Tuning-Dongle is molded,
maintenance free and no baery are required.
• Enhancements like turning o during driving or
cable extensions are possible with trading goods.
Before installaon
At the end of the cablekit is a 3,5 mm stereo jack so-
cket (7) for plug-in of the Sx2 Tuning-Dongle (8). The Sx2
cablekit for Bosch Acve/Performance Line is connec-
ted parallel to the speedsensor (1) and crimped with gel
insulated blade connectors (2).
The protecve cover of the engine terminal box has to
be removed to get to the terminal.
If you don´t have right tool, it should be installed by a
good eBike dealer.
78 10
Scope of delivery
• 1x cablekit Bosch Acve / Performance Line with
3,5mm stereo jack socket (5)
• 2x gel insulated blade connectors (2)
• 1x Sx2 Tuning-Dongle (6),
• 1x user manual Sx2 Tuning-Dongle with Bosch
Classic Line cablekit
For connecng the wires with the blade connectors
insert each wire (without stripping) of the Sx2 Tuning-
Dongle cable into the one-sided openings of the blade
connectors (2).
The related wires of the speedsensor and the + wire
of the control unit Intuvia (6) are inserted into the
through-opening of the blade connectors. Now press
down with your hand the blade connectors (2) rmly.
Compress with a pliers as possible parallel.
Once the terminals are crimped, the speedsensor plug
(1) should be reconnected to the engine and the chain
applied to the chain wheel.
Now the pedal has to be turned up slowly by hand and
the speedometer should be checked for funcon. If the
speed is shown on the display repeat the procedure
with a plugged Sx2 Tuning-Dongle into stereo jack so-
cket (5). Unl the switch point is reached, the shown
speed jumps to the half speed.
Aer that, assemble the hood and the e-bike together.
The cablekit should be mounted in a way to protect
the connectors from splashing water and mechanical
damage.
On the following page is a picture of the terminal with a
connected cablekit.
FAQ
(further Help you can nd at support.maintronic.de)
I have done the installaon exactly like shown, but the
switchoverpoint is not percepble?
ANSWER:
Distance and Posion of the magnet aecng the
switching me of the speed sensor. The shorter the
switching me, the sooner is the switchoverpoint and
conversely. Try to turn up the pedal by hand while the
engine is turned o ll 50km/h and watch the speedo-
meter.
If the switchoverpoint is below 12km/h or over 28km/h
or not at all please contact your specialist dealer or the
Sx2 Support >>> sx2@maintronic.com
How can I inuence the switchoverpoint?
ANSWER:
If the speed sensor with the magnet is moved into the
axis direcon, the switching speed increase.
Conversely the speed sensor with the magnet is moved
outside to the re direcon, the switching me is shor-
ter and the switching speed is lower.
Manual >>> support.maintronic.de.
Is the cablekit connected correctly?
ANSWER:
Poor contacts may arise fail pulses with the Sx2 Tuning-
Dongle which causing the error 102. Check the ght-
ness of the Sx2 Tuning-Dongle and its contacts.
(Picture with stereo jack socket and measurement de-
vice)
For a further diagnose a bare 3,5mm stereo jack instead
of the Sx2 Tuning-Dongle are plugged. The measure-
ments must be +5V stable between ground(peak) to
ring, the magnet may not stay over the speedsensor.
Speedsensor
to control unit Intuvia
5
8+5V - Ground
Sx2
7
1
2
6
3black
red
4
black
green
red
yellow
orange
Is an extension of the connecon cable possible?
ANSWER:
Yes, with a commercial standard headphone extension
cord, the Sx2 Tuning-Dongle can be placed anywhere on
the eBike.
Return consignment
The return form has to be lled out step by step with
an exact error descripon. A purchase receipt has to be
included. You need to send our product back in a passed
envelope.
Waste disposal
In accordance with European Direcve 2002/96/EC
(it`s) not longer usable electronic devices and defecve
or used baeries (European Direcve 2006/66EG) must
collected separately and disposed by an environmen-
tally sound recycling.
Please make sure not to dispose the Sx2 Tuning-Dongle
in your household waste.
Installaon Bosch
The best soluon is to connect the cablekit directly be-
hind the speedsensor plug inside of the engine termi-
nal.
It is located behind the stone chip cover of the engi-
ne which is screwed on with 3 Torx screws. At rst the
crank crank has to be removed. For this reason the fol-
lowing special tools are required: 8mm 5-hex key to un-
lock the crank screw, Isis crank puller for dismounng
the crank. And a Torx T20 key for the chip cover screws.
Once the crank and the protecve cover are removed
you get access to the speedsensor plug(1). The next
step is to unplug the speed sensor plug (1) from the en-
gine carefully.
Connect the Sx2 Tuning-Dongle parallel to the speed-
sensor. Please take care of the polarity. Red to red (3)
and black to black (4). The orange wire (5) is connected
to the red wire which leads to the + wire of the control
unit Intuvia (6).
Image label Bosch Acve/Performance Cablekit
BOSCH Active Line
BOSCH Performance Line
black
red
Sensor
Sx2
black
red (+5V)
Speed-
sensor
to
AKKU
red
orange
to Control
Unit Intuvia
light-
socket
light-
socket
© 2017 - maintronic® GmbH reserve the right to make
technical changes and product improvement
without prior noce.
Mistakes and typing errors reserved.
All rights reserved.
MTC maintronic GmbH
Carl-Zeiss-Str. 10-14
D-97424 Schweinfurt/Germany
Tel: +49 (0)9721-766-0
www.maintronic.de
support@maintronic.de