MAJORITY TOWERS Manual

Instructions Guide
TOWERS
DV D PL AY E R
TOW-DVD-BLK

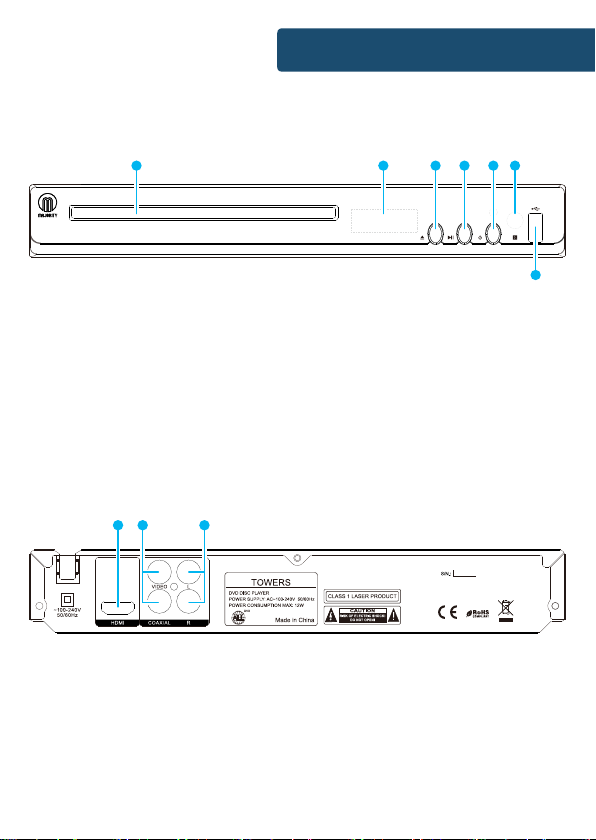
Controls And Funcons���������������������������������������������� 1
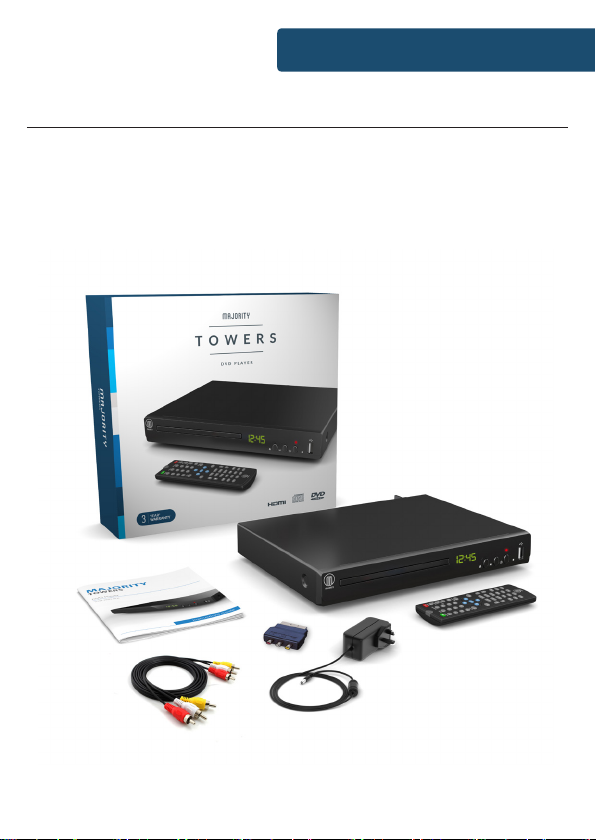
What’s In The Box?����������������������������������������������������5
Support �������������������������������������������������������������������� 6
Instrucons Guide �����������������������������������������������������7
Operaons ���������������������������������������������������������������� 8
Set-up Opons: System��������������������������������������������� 9
Set-up Opons: General ������������������������������������������ 10
Set-up Opons: Audio�����������������������������������������������11
Set-up Opons: Video���������������������������������������������� 12
Set-up Opons: Preference�������������������������������������� 13
Troubleshoong ������������������������������������������������������ 14
Specicaon�������������������������������������������������������������15
Warranty ������������������������������������������������������������������15
Safety Informaon��������������������������������������������������� 16
Contents
Watch video tutorials and register
your product for a FREE 3-year warranty
at www.majorityradios.co.uk
YEAR
WARRANTY

1
Controls And Funcons
Front Panel
Rear Panel
1. Disk Tray
2. LED
3. Open/Close
4. Play/Pause
5. Power
6. Reciever Window
7. USB
8. HDMI Output
9. Coaxial Output
10. Right/Left Output
8 9 10
2 3 4 5 6
7
1

1. Open Disc Tray
Open/close the disc tray
2. Audio
Choose an audio language of the DVD disc
3. Mute
4. Number select (0-9)
5. Setup
6. Navigation (Select/OK)
Navigation arrows/Conrmation button
7. Volume down ( - )
Decrease the volume of the playback
8. Slow
Set the playback in slow motion
9. Play/Pause
Play or pause the playback
10. Step
Go through the playback, frame by frame
11. Stop
12. Mark
13. Fast Forward / Rewind
2
Controls And Funcons
Remote Control
1
2
3
4
6
7
8
9
10
11
12
13
14
16
15
17
19
20
22
24
25
26
27
28
29
30
31
33
32
34
523
21
18

14. Repeat
Reperat chapter playback
15. PBC
Open/Close the PBC playback return to
the menu of the DVD disc
16. Video
17. USB
18. Subtitles
19. Power On/O
20. Menu
Open the menu of the DVD
21. Display
Modify display settings
22. Copy/Delete
23. Return
Return to previous menu screen
24. Volume up ( + )
25. Search
26. A-B
Set a segment of the playback on
repeat
27. Clear
28. Zoom
Increase/decrease the playback
29. Q-Play
30. Skip (Previous / Next)
Skip backward/forward between
chapters
31. Angle
32. Channel
33. Title
34. Program
3
Controls And Funcons

4
Insert the batteries into the battery compartment.
Point the remote at the remote sensor in front of the
player and make sure there are no obstacles in the way
between the remote and the player. The distance between
the remote and the sensor must not exceed 3m.
To prevent damage to the remote control, please remove
the batteries when not in use for long periods of time.
Controls And Funcons
Remote Control Operation

1. Majority Towers DVD
Player
2. Remote Control
3. RCA AV cable
4. Instruction Manual
5
Box Contents
What’s In The Box?

6
Thank you for your purchase of the Majority Towers DVD
player.
Please follow the guidance of the manual to set up your
new purchase and begin enjoying its features.
If you require further assistance with your new DVD player,
please contact our support team on the Majority website:
https://www.majorityradios.co.uk/support
Support
Support

7
Instrucons Guide
Setting Up
Connect the power plug of the DVD player to a wall outlet.
The power indicator on the front panel will illuminate red.
Press the On/O on the front panel or the Remote Control
to start the DVD player. The power indicator on the front
panel will illuminate green.
Follow the below guidance for cable connections to get
your DVD player set up:
Cable Connections
1a. Connect a RCA cable between the Video, Left and Right
Output on the back panel of the DVD player to the RCA
input on your TV.
1b. Connect a HDMI cable between the HDMI Output on
the back panel of the DVD player to the HDMI input on
your TV.
2. If you have a stereo amplier, connect a coaxial cable
between the Coaxial Ouput on the back panel of the DVD
player to the coaxial input on your stereo.
3. Control the playback via the buttons of the Remote
Control.
Getting Started

8
Operations
Instrucons Guide
DVD Operation
Press the Open/Close button on the front panel or on the
Remote Control and place a DVD disc on the Disc Tray.
Press the Open/Close button again to close.
The DVD will read the DVD disc and begin the playback.
Control the playback via the buttons of the Remote
Control.
USB Operation
Insert a USB unit into the USB Port on the front panel of
the DVD player.
Press the USB button on the Remote Control to enter the
USB source. The DVD Player will read and display the le
list of the USB unit.
Browse the le list by pressing the buttons on the
Remote Control. Select a le by pressing the OK button of
the Remote Control.

9
Instrucons Guide
System Setup
Press the Setup button on the Remote Control to open up
the setup of the DVD Player.
There are four dierent menus in the setup: General,
Audio, Video and Preference. Follow the instructions in the
individual paragraphs for a choice of setup options:
General Setup
Audio Setup
Video Setup
Preference Setup
Please note:
Press the button to leave/enter a sub-menu.
To leave the opened menu, press the < button twice.
To close the setup of the DVD player, press the Setup on
the Remote Control.
Set-up Options: System

10
Instrucons Guide
1. Press the buttons on the Remote Control to open
the “General” menu.
2. Seven Submenus will appear that you can select
between. Press the buttons on the remote control to
circle between the sub-menus:
a) TV Shape - Set the aspect ratio of the DVD player
b) OSD Language - Select a language for the OSD setup
c) Caption - Display closed captions (if available)
d) Screen Saver - Select a screen saver for when the TV
display goes into standby.
e) HDCD - Select a output audio signal
f) Last Memory - Resume the memorised playback
g) LINK/CEC Sync - Activate/deactivate syncing and
control of several devices via HDMI protocol.
3. When you enter a sub-menu, a number of options will
appear for the entered sub-menu.
Set-up Options: General

11
Instrucons Guide
1. Press the buttons on the Remote Control to open
the “Audio” menu.
2. Two dierent submenus will appear on the menu.
Press the buttons on the Remote Control to circle
between the sub-menus:
a) Speaker Setup - Select the stereo output.
LT/RT: Switch between left/right audio channels.
Stereo: Select to play the audio via the two front
speakers of the TV.
b) Digital Audio Setup - Select the audio output
3. When you enter a sub-menu, a number of options will
appear for the entered sub-menu.
Set-up Options: Audio

12
Instrucons Guide
1. Press the buttons on the Remote Control to open
the “Video” menu.
2. Six dierent submenus will appear on the sub-menus.
Press the buttons on the Remote Control to circle
between the sub-menus:
a) Sharpness - Set the sharpness of the video picture
b) Brightness - Set the brightness of the video picture
c) Contrast - Set the contrast of the video picture
d) Gamma - Set the gamma of the video picture
e) Hue - Set the hue of the video picture
f) Saturation - Set the saturation of the video picture
3. When you enter a sub-menu, a number of options will
appear for the entered sub-menu.
Set-up Options: Video

13
Instrucons Guide
1. Press the buttons on the remote control to open
the “Preference” menu.
2. Eight dierent submenus will appear on the menu. Press
the buttons on the remote control to scroll to browse
between the sub-menus:
a) TV Type - Select the color system (PAL/NTSC/AUTO)
of your TV.
b) PBC - select if the playback of the disc starts directly
or to enter the disc menu when playing the VCD disc.
c) Audio - Select a language of the audio (if available)
d) Subtitle - Select a subtitle language (if available)
e) Disc Menu - Set the language for the menu of the
DVD disc (if available)
f) Parental - Set the parental level of the DVD disc (if
available)
g) Password - Open the sub menu for the password
settings. Note: The default password is 8806
h) Default - Reset the settings to the factory settings
3. When you enter a sub-menu, a number of options will
appear for the entered sub-menu.
Set-up Options: Preference

14
Troubleshoong
Malfunction Possible causes/measures
No power / function
Check whether the power is switched on or o
at the wall.
Check whether the power adaptor is properly
connected to power outlet or not.
No video
Make sure that the video cables are connected
correctly.
Reset the setups of the DVD player.
Check that the input selection on the TV is
correct.
No audio
Make sure that the audio cables are connected
correctly.
Make sure that the coaxial connected stereo is
powered on.
Reset the setups of the DVD player.
Distorted video Clean DVD disc from dust/dirt
The playback is fast winding backward/forward.
Unable to play
Place a DVD disc in the disc tray.
Place the disc in on the correct side up
Clean DVD disc from dust/dirt
Close the setup of the DVD player.
Check that the le is compatible with the unit.
Remote Control does not
work
Aim the Remote Control towards the front panel
of the DVD player.
Use the Remote Control closer to the DVD player.
Check the battery level of the batteries
Troubleshooting

15
Specicaons
Power Supply AC 110-240V
0.5A
Frequency Response ~ 50/60Hz
Power Consumption <W
Compatible Formats Files: MP/JPEG/MPEG-/DVD
DVD: CD/CD-R/CD-RW/DVD+R/DVD+RW
Dimension (WxHxD) x x . cm
, kg
Specication
All products come with a standard 12 month warranty. All items
must be registered on www.majorityradios.co.uk for the
warranty to be valid. Once on the web page, use the menu to
nd “Register Your Product”. You will also be given the chance
to extend your warranty for an additional 24 months, free of
charge.
Warranty

16
1. Read these instructions.
2. Keep these instructions. Instructions are also
available for download at www.majorityradios.co.uk
3. Heed all Warnings
4. Follow all instructions
5. Do no clean the apparatus near or with water
6. Do not block any ventilation openings. Install in
accordance with the manufacturer’s instructions
7. Do not install near any heat sources such as
radiators, heat registers, stoves, or other apparatus
(including ampliers) that produce heat.
8. Protect the power from being walked on or pinched
particularly at plugs, convenience receptacles, and
the point where they exit from the apparatus.
9. Only use attachments/accessories specied by the
manufacturer.
10. Unplug this apparatus during light storms or when
unused for long periods of time.
11. Refer all servicing to qualied service personnel.
Servicing is required when the apparatus has been
damaged in a way, such as power-supply cord or
plug is damaged, liquid has been spilled or objects
have fallen into the apparatus, the apparatus has
been exposed to the rain or moisture, does not
operate normally or has been dropped.
12. No naked ame sources, such as lit candles, should
be placed on the apparatus.
13. Dispose of used electrical products and batteries
safely according to your local authority and
regulations.
ADDITIONAL WARNINGS
The apparatus shall not be exposed to dripping or
splashing and no objects lled with liquid, such as
vases, shall be places on the apparatus.
Main plug is used to disconnect device and it should
remain readily operable during intended use. In order
to disconnect the apparatus from the main mains
completely, the mains plug should be disconnected
from the main socket outlet completely.
Battery shall not be exposed to excessive heat such as
sunshine, re or the like.
RECYCLING ELECTRICAL PRODUCTS
You should now recycle your waste electrical goods and
in doing so help the environment.
This symbol means an electrical product should
not be disposed of with normal household waste.
Please ensure it is taken to a suitable facility for
disposal when nished with.
IMPORTANT: Please read all instructions carefully
before use and keep for future reference.
Risk of electric shock.
Do not open
Read all instructions carefully before use
and keep for future reference
When servicing, use only identical
replacement parts
ATTENTION
RISQUE D’ELECTROCUTION
NE PAS OUVRIR !
CAUTION
RISK OF ELECTRIC SHOCK
DO NOT OPEN !
!
Safety Informaon
IMPORTANT: Please read all instrucons carefully
before use and keep for future reference
!


www.majorityradios.co.uk
This manual suits for next models
1
Table of contents
Languages:
Other MAJORITY DVD Player manuals