MAJORITY Sierra Plus User manual

Sierra Plus
English (https://www.majority.co.uk) French (https://www.majority.co.uk/fr/) German (https://www.majority.co.uk/de/) Italian (https://www.majority.co.uk/it/) Spanish
(https://www.majority.co.uk/es/)
Box Contents
https://www.majority.co.uk/wp-content/uploads/2021/11/Sierra-Plus-Whats-In-The-Box-1.jpg)
Controls and Functions
Front and Top View
1. Display panel
2. On/Off button
3. Volume up
4. Volume down
5. Select input source
(https://www.majority.co.uk/wp-content/uploads/2021/06/Sierra-Front-and-Top.png)

Back View
6. AC in –Connect to power supply
7. HDMI in 2
8. HDMI in 1
9. HDMI Out (ARC)
10. AUX in
11. Optical in
12. USB in
(https://www.majority.co.uk/wp-content/uploads/2021/06/Sierra-Back-View.png)
Subwoofer Back View
1. LED indicator –Indicates pairing between the soundbar and the subwoofer (make sure that both soundbar and subwoofer are connected to the power supply
simultaneously, and then switch on the soundbar and subwoofer).
2. PAIR button –Automatically pairs the soundbar with the subwoofer. Press and hold to reset the connection between the sound bar and the subwoofer.
3. USB port –For software upgrade only.
4. AC in –Connect to the power supply.
(https://www.majority.co.uk/wp-content/uploads/2021/06/Sierra-Plus-Subwoofer-Back-Updated.png)

Please note all (Ref.) refer to the Controls and Functions in the above diagrams.
Remote Control
1. Power On/Off
2. Pair
3. Volume Up
4. Previous/Back
5. Volume Down
6. Music
7. Treble-Up
8. Treble-Down
9. Mute
10. Input (ARC, HDMI 1, HDMI 2, Bluetooth, AUX, USB & OPTICAL)
11. Next/Skip
12. Movie
13. News
14. Bass-Up
15. Bass-Down
16. 3D
(https://www.majority.co.uk/wp-content/uploads/2021/06/Sierra-Remote.png)
Instructions Guide
Mode Indicator
Input Type
Display Indicator
RCA
The front display will show AUX.
AUX
The front display will show AUX.
HDMI IN
The front display will show HDMI 1 or HDMI2.
HDMI OUT
The front display will show HDMI ARC.
OPTICAL
The front display will show OPTICAL.
USB
The front display will show USB.
Bluetooth Ready
The front display will flash BLUETOOTH.
Bluetooth Connected
BLUETOOTH will stop flashing a connected BEEP will
sound.
Dolby Atmos Connected
The front display will scroll for 3
seconds.
Dolby Surround Connected
The front display will scroll 3 seconds.

Ensure that the power supply voltage is within the range of 110V -240V ~ 50Hz/60Hz. Any other voltage
Please note: The soundbar and subwoofer must be within a 10 metre range of each other in order to be
You will need a TV/audio source with RCA audio output sockets and an RCA to 3.5mm AUX cable
Troubleshooting: If you are not receiving a picture, please ensure that the RCA cable is connected to
You will need a TV/audio source with an HDMI High Definition Multimedia Interface HDMI cable (not
Connecting to the Mains Supply
The Sierra Plus comes with a power adapter for the soundbar. Make sure to unwind the cable to its full length. Connect the plug to a mains socket by fully inserting the plug into the mains
socket.
Connect the adapter to the AC power port in the back of the soundbar (Back View Ref.6).
The display panel will indicate it has registered a power source and is on standby mode.
Press the button on the remote control (Remote Control Ref.1) or press and hold the button for 3 seconds on the top of the soundbar (Front and Top View Ref.2) to
turn the unit on or off.
Connecting the Soundbar and Wireless Subwoofer
The subwoofer and soundbar will wirelessly connect for a surround sound experience. This allows you to place the subwoofer in the corner of the room to ensure that the sound from your
TV fills the room.
To connect them, please ensure that your soundbar is switched on for the initial setup. To do this, press the button (Front and Top View Ref.2) o
button on the remote control (Remote Control Ref.1).
The subwoofer has an indicator light (Subwoofer Back View Ref.1)- this will flash when looking for a connection, and show a solid light when connected.
The subwoofer and soundbar should then automatically connect using a wireless Bluetooth connection.
If you are having connectivity issues, please move the subwoofer closer to the soundbar for setup. If this does not work, please press and hold the PAIR button (Subwoofer Back View
Ref.2) to reset the connection between the subwoofer and the soundbar.
Using the RCA Audio Cable
Connect the RCA stereo audio cable to your stereo RCA (L/R) audio output sockets (for help on how to locate your
Connect the 3.5mm AUX end of the cable to the side of the soundbar via the AUX IN port (Back View Ref.10).
Press on the remote control (Remote Control Ref.10) or the unit (Front and Top View Ref.5) until mode is selected.
If ports, please use an alternative connection method.
Using the HDMI Input
Connect the HDMI cable from the HDMI input on the soundbar (Back View Ref.7 & 8) to the HDMI output on your TV (for help locating
user manual).
Press the button on the remote control (Remote Control Ref.10) or the button on the top of the soundbar (Front and Top View Ref.5) until or
mode is selected. The display will show or (Front and Top View Ref.1).
Using the native controls on your connected device, ensure the audio settings are set to ARC or HDMI Audio.

You will need a TV/audio source with an HDMI High Definition Multimedia Interface HDMI cable (not
You will need an AUX source with an AUX audio output and an AUX audio cable (not included).
You will need an audio source with an optical audio output and a digital optical audio cable (not included).
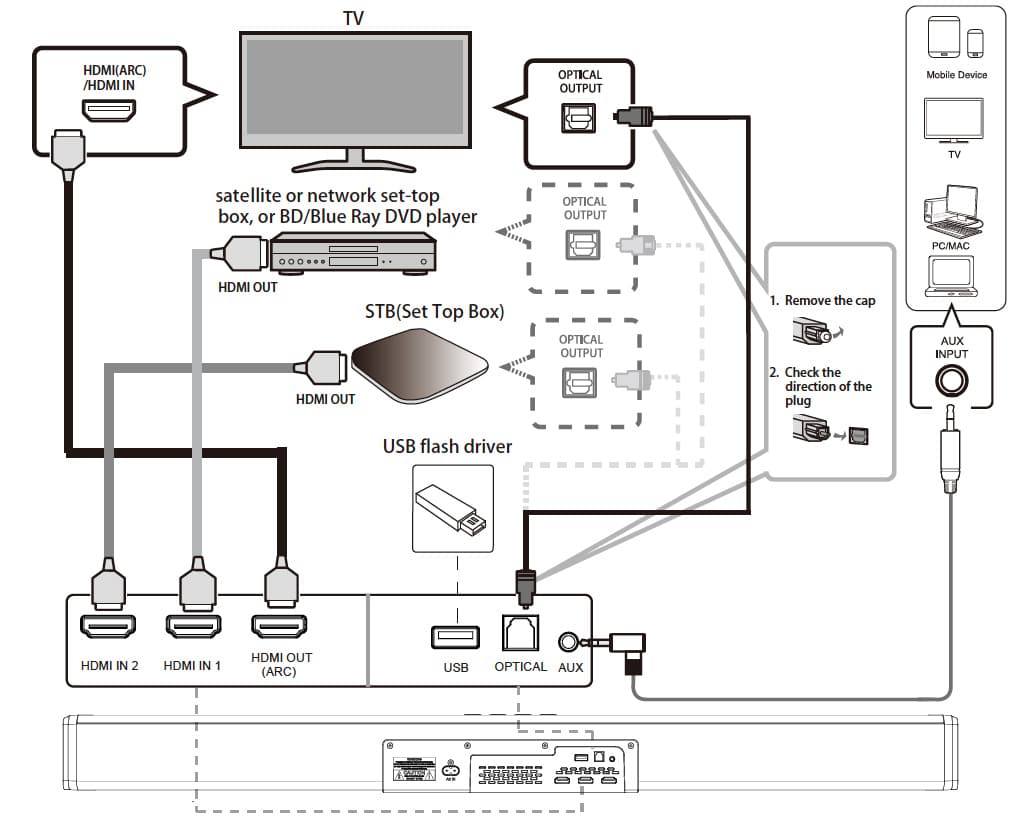
Using the HDMI ARC Output
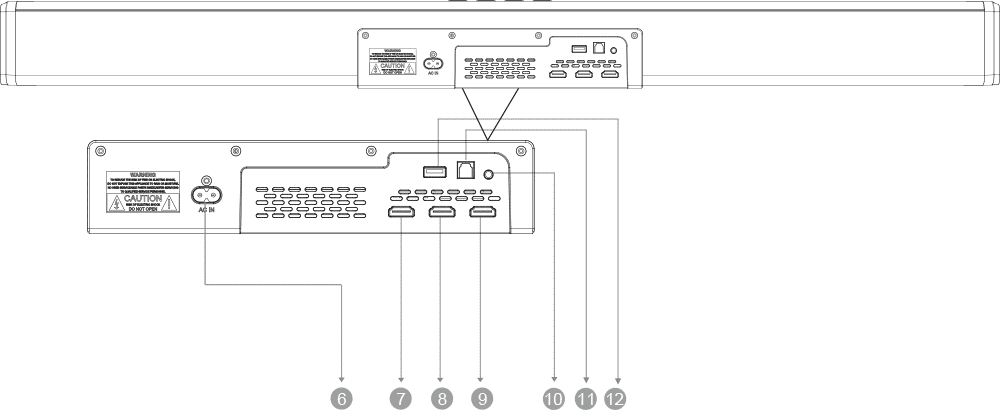
Connect the HDMI cable from the HDMI output on the soundbar (Back View Ref.9) to the HDMI input on your TV( for
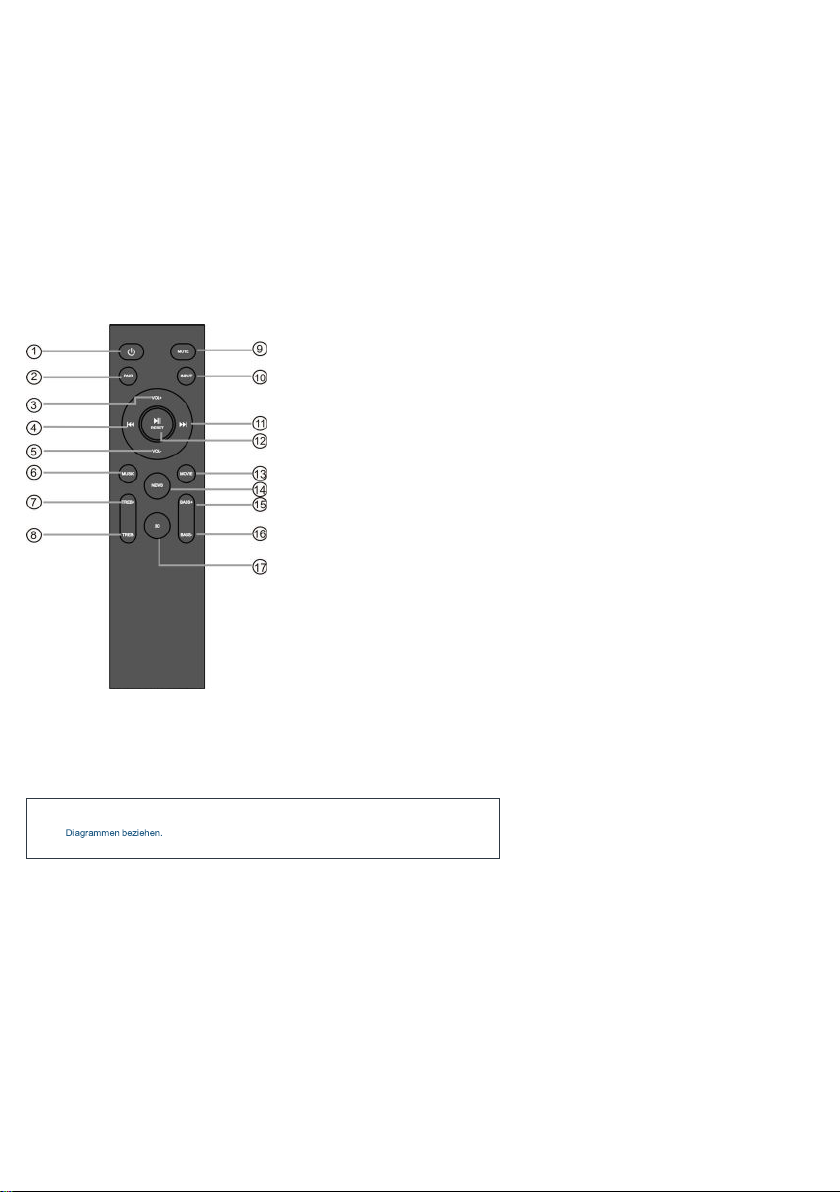
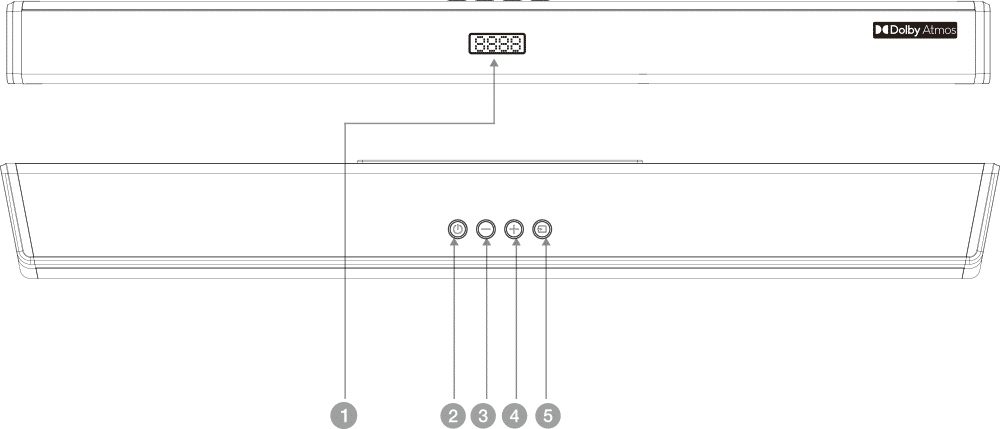
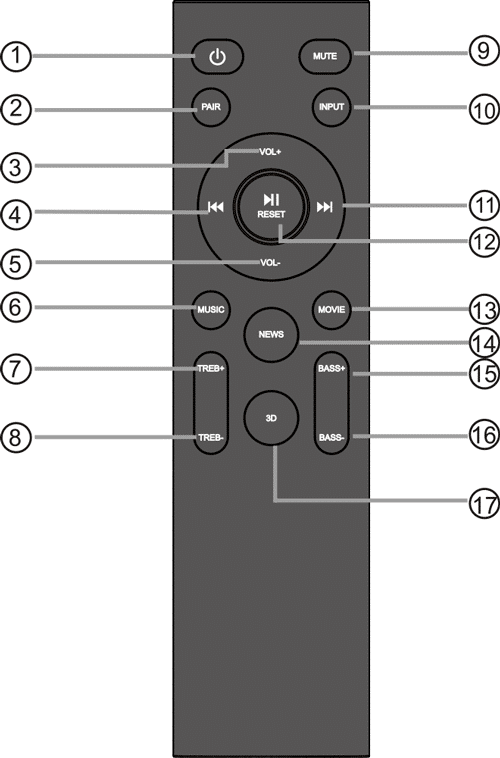
(Remote Control Ref.10) top of the soundbar (Front and Top View Ref.5) until mode is
selected. The display will show (Front and Top View Ref.1).
Using the native controls on your connected device, ensure the audio settings are set to ARC or HDMI Audio.
Using the AUX/Line In Port
Plug one end of a 3.5mm audio input cable into the LINE port on the side of the soundbar (Back View Ref.10). Plug the remaining end of the cable into the audio output/headphone
output on your MP3 player or audio device
Plug the remaining end of the cable into the audio output/headphone output on your MP3 player or audio device.
Press the button on the remote control (Remote Control Ref.10) or the button on the top of the soundbar (Front and Top View Ref.5) to switch to
mode. The Display will show (Front and Top View Ref.1).
Using the Optical Input
Connect the optical cable to the optical output on the audio source and the OPTICAL port in the back of the soundbar
(Back View Ref.11).
tton on the remote control (Remote Control Ref.10) the soundbar (Front and Top View Ref.5) to switch to
mode. The display will show (Front and Top View Ref.1).
How do I set the correct audio settings for Optical Mode?
When using the soundbar in Optical mode, or when using the soundbar with a streaming app, you may experience sound issues if you have your audio settings set up incorrectly. Using
the native controls on your connected device, make sure the audio settings are set to PCM or Optical Audio.
sound menu, where you will find options for
Digital/DTS/DTS Neo (refer to your user manual for more info).
Using the USB Input
Connect your USB stick to the USB port (Back View Ref.12) on the back of the soundbar.
Press the button on the remote control (Remote Control Ref.10) or the button on the top of the soundbar (Front and Top View Ref.5)
(Front and Top View Ref.1).
Bluetooth Operation
Pairing a Bluetooth Device for the First Time
(Remote Control Ref.10) the soundbar (Front and Top View Ref.5) to switch to
mode. The display will show (Front and Top View Ref.1).
Using the native controls on your Bluetooth device, select jority Sierra when prompted to choose a Bluetooth device.
If you encounter issues at this stage, please refer to the user manual for your Bluetooth device.
When successfully paired and connected, a confirmation will issue from the unit and the indicator display will (Front and Top View Ref.1). After the initial
pairing, the unit will stay paired unless unpaired manually by the user, or until the device is reset.
To unpair, hold down the button on the remote control for 3 seconds (Remote Control Ref.2). You can now pair the soundbar with another Bluetooth device.
If your device should become unpaired or you find it is unable to connect, repeat the steps above.

DOLBY ATMOS is only available in and (ARC) modes. For the details of the
If you never see this scrolling message you will need to follow the guidance below to achieve Dolby
Volume Control
To adjust the volume of the soundbar, (Remote Control Ref.3/Ref.5) . Alternatively, press and hold the
or Volume buttons on the top of the soundbar (Front and Top View Ref.3/Ref.4).
Dynamic EQ
To adjust the sound effect of the soundbar, press either the (Remote Control Ref.6) (Remote Control Ref. 12) (Remote Control Ref.13) (Remote
Control Ref.16) on the remote control.
Dolby Atmos
When the Sierra receives a Dolby scrolling display is only temporary and will last for 3 seconds. This will
happen at the start of the film or the studio intro.
To play Atmos on the Sierra Plus, the player or streaming product needs to be Atmos capable. To use Dolby Atmos in HDMI 1 /HDMI 2 / HDMI ARC mode, your TV
has to support Dolby Atmos.
The UHD (Ultra-High-Definition)/Blu-ray player or TV must have the digital output settings set to Bitstream, often
UHD/Blue-Ray disc must be Dolby Atmos- The TV may not be able to pass through the Atmos stream to the soundbar even though it is capable of processing Atmos itself. A
workaround for this is to suggest a direct connection from the player to the soundbar. For example, if your TV or DVD player has 2 x HDMI outputs. 1 is labelled “Audio/Video”. You
can connect this to the TV for the picture. The second connection is labelled “Audio only”. This can be connected directly to the Sierra Plus. If the player output is set to bitstream, then
the Sierra Plus will output Atmos and display Atmos when it first sees the stream.
Connections
(https://www.majority.co.uk/wp-content/uploads/2021/06/Sierra-Connections.jpg)

Warranty
Register your Majority product (https://www.majority.co.uk/register/) within 30 days of purchase to activate your extended 3 Year Warranty. Gain access to all the benefits and lifetime
technical support (see our Extended Warranty (https://www.majority.co.uk/returns-warranty/) details for more info).
Specifications
Soundbar
96 x 10.8 x 8.1 cm
Subwoofer
30.6 x 19 x 37 cm
Power
110~240V
Weight
10.15 kg
Speakers
Stereo
Sound Version
Dolby Atmos
AUX In
3.5 mm
RCA Input
3.5 mm
Safety Info
IMPORTANT
Please read all instructions carefully before use.
WARNING
Risk of electric shock. Do not open.
1. Read these instructions:
2. Heed all warnings.
3. Follow all instructions in the user manual.
4. Do no clean the apparatus near or with water.
5. Do not block any ventilation openings. Install in accordance with the manufacturer’s instructions.
6. Do not install near any heat sources such as radiators, heat registers, stoves, or other apparatus (including amplifiers) that produce heat.
7. Protect the power from being walked on or pinched particularly at plugs, convenience receptacles, and the point where they exit from the apparatus.
8. Only use attachments/accessories specified by the manufacturer.
9. Unplug this apparatus during light storms or when unused for long periods of time.
10. Refer all servicing to qualified service personnel. Servicing is required when the apparatus has been damaged in a way, such as power-supply cord or plug is damaged, liquid has been spilled or objects have fallen
into the apparatus, the apparatus has been exposed to the rain or moisture, does not operate normally or has been dropped.
11. No naked flame sources, such as lit candles, should be placed on the apparatus.
12. Dispose of used electrical products and batteries safely according to your local authority and regulations.
Addition Warnings
The apparatus shall not be exposed to dripping or splashing and no objects filled with liquid, such as vases, shall be places on the apparatus.
Main plug is used to disconnect device and it should remain readily operable during intended use. In order to disconnect the apparatus from the main power completely, the power plug should be disconnected from the main socket
outlet completely.
Battery shall not be exposed to excessive heat such as sunshine, fire or the like.
Recycling Electrical Products
You should now recycle your waste electrical goods and in doing so help the environment. This symbol means an electrical product should not be disposed of with normal household waste. Please ensure it is taken to a
suitable facility for disposal when finished with.
CONTACT SUPPORT
(HTTPS://WWW.MAJORITY.CO.UK/SUPPORT/)

Sierra Plus
English (https://www.majority.co.uk/) French (https://www.majority.co.uk/fr/) German (https://www.majority.co.uk/de/) Italian (https://www.majority.co.uk/it/) Spanish
(https://www.majority.co.uk/es/)
Lieferumfang
(https://www.majority.co.uk/wp-content/uploads/2021/11/Sierra-Plus-Whats-In-The-Box-1.jpg)
Bedienelemente und Funktionen
Vorder- und Draufsicht
1. Anzeigetafel
2. Ein / Aus-Taste
3. Lauter
4. Lautstärke runter
5. Eingangsquelle auswählen
(https://www.majority.co.uk/wp-content/uploads/2021/06/Sierra-Front-and-Top.png)

Rückansicht
6. AC-Eingang –An die Stromversorgung anschließen
7. HDMI-Eingang 2
8. HDMI-Eingang 1
9. HDMI-Ausgang (ARC)
10. AUX-Eingang
11. Optischer Eingang
12. USB-Eingang
(https://www.majority.co.uk/wp-content/uploads/2021/06/Sierra-Back-View.png)
Rückansicht des Subwoofers
1. LED-Anzeige –Zeigt das Pairing zwischen Soundbar und Subwoofer an (stellen Sie sicher, dass Soundbar und Subwoofer gleichzeitig an die Stromversorgung
angeschlossen sind, und schalten Sie dann Soundbar und Subwoofer ein).
2. PAIR-Taste –Koppelt die Soundbar automatisch mit dem Subwoofer. Halten Sie gedrückt, um die Verbindung zwischen Soundbar und Subwoofer zurückzusetzen.
3. USB-Port –Nur für Software-Upgrades
4. AC in –An die Stromversorgung anschließen
(https://www.majority.co.uk/wp-content/uploads/2021/06/Sierra-Plus-Subwoofer-Back-Updated.png)

Bitte beachten Sie, dass sich alle (Ref.) auf die Bedienelemente und Funktionen in den obigen
Fernbedienung
1. Power On / Off
2. Paar
3. Volume Up
4. Zurück/Zurück
5. Volume Down
6. Musik
7. Höhenvergrößerung
8. Höhen-Down
9. Stumm
10. Eingang (ARC, HDMI 1, HDMI 2, Bluetooth, AUX, USB, OPTISCH)
11. Weiter Ȇberspringen
12. Film
13. News
14. Bass-Up
15. Bass-Down
16. 3D
(https://www.majority.co.uk/wp-content/uploads/2021/06/Sierra-Remote.png)
Anleitung

Stellen Sie sicher, dass die Netzspannung im Bereich von 110 V -240 V ~ 50 Hz/60 Hz liegt. Jede andere
Bitte beachten Sie: Soundbar und Subwoofer müssen sich in einem Umkreis von 10 Metern zueinander
Modusanzeige
Eingangstyp
Anzeige anzeigen
RCA
Das Frontdisplay zeigt AUX an.
AUX
Das Frontdisplay zeigt AUX an.
HDMI IN
Das Frontdisplay zeigt HDMI 1, HDMI2 an.
HDMI OUT
Auf dem Frontdisplay wird HDMI ARC angezeigt.
OPTICAL
Das Frontdisplay zeigt OPTICAL an.
USB
Auf dem Frontdisplay wird USB angezeigt.
Bluetooth-fähig
Auf dem Frontdisplay wird BLUETOOTH blinkend
angezeigt.
Bluetooth verbunden
BLUETOOTH hört auf zu blinken und ein verbundener
BEEP ertönt.
Dolby Atmos verbunden
Auf dem Frontdisplay wird 3 Sekunden lang
angezeigt.
Dolby Surround verbunden
Auf dem Frontdisplay wird 3 Sekunden lang
angezeigt.
Anschließen an das Stromnetz
Das Sierra Plus wird mit einem Netzteil für die Soundbar geliefert. Achten Sie darauf, das Kabel bis zur vollen Länge abzuwickeln. Verbinden Sie den Stecker mit einer Netzsteckdose,
indem Sie den Stecker vollständig in die Netzsteckdose stecken.
Verbinden Sie den Adapter mit dem Wechselstromanschluss auf der Rückseite der Soundbar (Rückansicht Ref.6). Das um anzuzeigen, dass es eine Stromquelle
registriert hat und sich im Standby-Modus befindet.
Drücken Sie die 'POWER'-Taste auf der Fernbedienung (Fernbedienung Ref.1) oder halten Sie die 'POWER'-Taste oben auf der Soundbar 3 Sekunden lang gedrückt (Vorder- und
Draufsicht Ref.2) um das Gerät ein- oder auszuschalten.
Anschließen der Soundbar und des kabellosen Subwoofers
Der Subwoofer und die Soundbar werden für ein Surround-Sound-Erlebnis drahtlos miteinander verbunden. Auf diese Weise können Sie den Subwoofer in einer Ecke des Raums
platzieren, um sicherzustellen, dass der Ton von Ihrem Fernseher den Raum erfüllt.
Um sie miteinander zu verbinden, stellen Sie bitte sicher, dass Ihre Soundbar für die Ersteinrichtung eingeschaltet ist. Drücken Sie dazu die 'POWER'-Taste (Vorder- und Draufsicht
Ref.2) am Gerät oder die 'POWER'-Taste auf der Fernbedienung (Fernbedienung Ref.1).
Der Subwoofer hat eine Kontrollleuchte (Subwoofer-Rückansicht Ref.1) dies blinkt, wenn nach einer Verbindung gesucht wird, und leuchtet durchgehend, wenn eine Verbindung
besteht.
Der Subwoofer und die Soundbar sollten sich dann automatisch über eine drahtlose Bluetooth-Verbindung verbinden.
Wenn Sie Verbindungsprobleme haben, stellen Sie den Subwoofer für die Einrichtung näher an die Soundbar. Wenn dies nicht funktioniert, halten Sie bitte die PAIR-Taste gedrückt
(Subwoofer-Rückansicht Ref.2) um die Verbindung zwischen Subwoofer und Soundbar zurückzusetzen.

Sie benötigen eine TV-/Audioquelle mit Cinch-Audioausgangsbuchsen und ein Cinch-auf-3.5-mm-AUX-
Fehlerbehebung: Wenn Sie kein Bild empfangen, stellen Sie bitte sicher, dass das Cinch-Kabel an
die
Sie benötigen eine TV-/Audioquelle mit einem HDMI High Definition Multimedia Interface HDMI-Kabel
Sie benötigen eine AUX-Quelle mit einem AUX-Audioausgang und ein AUX-Audiokabel (nicht im
Verwenden des Cinch-Audiokabels
Verbinden Sie das Cinch-Stereo-Audiokabel mit den Stereo-Cinch-(L/R)-Audioausgangsbuchsen Ihres Fernsehgeräts (Informationen zum Auffinden der Audioausgangsbuchsen Ihres
Fernsehgeräts finden Sie in der Bedienungsanleitung Ihres Fernsehgeräts).
Schließen Sie das 3.5-mm-AUX-Ende des Kabels über den AUX-IN-Anschluss an der Seite der Soundbar an
(Rückansicht Ref.10).
Drücken Sie 'INPUT' auf der Fernbedienung (Fernbedienung Ref.10) oder die Einheit (Vorder- und Draufsicht Ref.5) bis der 'AUX'-Modus ausgewählt ist.
Wenn Ihr Fernsehgerät keine RCA-Ausgangsanschlüsse hat, verwenden Sie bitte eine alternative Verbindungsmethode.
Verwenden des HDMI-Eingangs
Verbinden Sie das HDMI-Kabel mit dem HDMI-Eingang der Soundbar (Rückansicht Ref.7 & 8) an den HDMI-Ausgang Ihres Fernsehgeräts (Informationen zum Auffinden des HDMI
ARC-Ausgangs Ihres Fernsehgeräts finden Sie in der Bedienungsanleitung Ihres Fernsehgeräts).
Drücken Sie die 'INPUT'-Taste auf der Fernbedienung (Fernbedienung Ref.10) oder die 'SOURCE/MODE'-Taste oben auf der Soundbar (Vorder- und Draufsicht Ref.5) bis der Modus
(Vorder- und Draufsicht Ref.1).
Stellen Sie mithilfe der nativen Steuerelemente Ihres verbundenen Geräts sicher, dass die Audioeinstellungen auf ARC oder HDMI Audio eingestellt sind.
Verwenden des HDMI ARC-Ausgangs
Verbinden Sie das HDMI-Kabel mit dem HDMI-Ausgang der Soundbar (Rückansicht Ref.9) an den HDMI-Eingang Ihres Fernsehgeräts an (Informationen zum Auffinden des HDMI ARC-
Eingangs Ihres Fernsehgeräts finden Sie in der Bedienungsanleitung Ihres Fernsehgeräts).
Drücken Sie die 'INPUT'-Taste auf der Fernbedienung (Fernbedienung Ref.10) oder die 'SOURCE/MODE'-Taste oben auf der Soundbar (Vorder- und Draufsicht Ref.5) bis der 'ARC'-
Modus ausgewählt ist. Das Display zeigt 'ARC' (Vorder- und Draufsicht Ref.1).
Stellen Sie mithilfe der nativen Steuerelemente Ihres verbundenen Geräts sicher, dass die Audioeinstellungen auf ARC oder HDMI Audio eingestellt sind
Verwenden des AUX/Line-In-Ports
Stecken Sie ein Ende eines 3.5-mm-Audioeingangskabels in den LINE-Anschluss an der Seite der Soundbar
(Rückansicht Ref.10).
Stecken Sie das verbleibende Ende des Kabels in den Audioausgang/Kopfhörerausgang Ihres MP3-Players oder Audiogeräts.
Drücken Sie die 'INPUT'-Taste auf der Fernbedienung (Fernbedienung Ref.10) oder die 'SOURCE/MODE'-Taste oben auf der Soundbar (Vorder- und Draufsicht Ref.5) um in den 'AUX'-
Modus zu wechseln. Das Display zeigt 'AUX' (Vorder- und Draufsicht Ref.1).

Sie benötigen eine Audioquelle mit optischem Audioausgang und ein digitales optisches Audiokabel
DOLBY ATMOS ist nur im Modus und (ARC) verfügbar. Einzelheiten zum
Wenn Sie diese scrollende Nachricht nie sehen, müssen Sie die folgenden Anweisungen befolgen, um
Verwendung des optischen Eingangs
Verbinden Sie das optische Kabel mit dem optischen Ausgang der Audioquelle und dem OPTICAL-Anschluss auf der Rückseite der Soundbar (Rückansicht Ref.11).
Drücken Sie die 'INPUT'-Taste auf der Fernbedienung (Fernbedienung Ref.10) oder die 'SOURCE/MODE'-Taste oben auf der Soundbar (Vorder- und Draufsicht Ref.5) um in den
'OPTICAL'-Modus zu wechseln. Das Display zeigt 'OPTICAL' an (Vorder- und Draufsicht Ref.1).
Wie stelle ich die richtigen Audioeinstellungen für den optischen Modus ein?
Wenn Sie die Soundbar im optischen Modus verwenden oder wenn Sie die Soundbar mit einer Streaming-App verwenden, können Tonprobleme auftreten, wenn Sie Ihre
Audioeinstellungen falsch eingerichtet haben. Stellen Sie mithilfe der nativen Steuerelemente Ihres verbundenen Geräts sicher, dass die Audioeinstellungen auf PCM oder Optical
Audio eingestellt sind.
Diese Einstellung finden Sie in den Toneinstellungen Ihres Fernsehgeräts, höchstwahrscheinlich unter Einstellu
Benutzerhandbuch Ihres Fernsehgeräts). Für mehr Information).
Verwenden des USB-Eingangs
Verbinden Sie Ihren USB-Stick mit dem USB-Anschluss (Rückansicht Ref.12) auf der Rückseite der Soundbar.
Drücken Sie die 'INPUT'-Taste auf der Fernbedienung (Fernbedienung Ref.10) oder die 'SOURCE/MODE'-Taste oben auf der Soundbar (Vorder- und Draufsicht Ref.5) um in den
'USB'-Modus zu wechseln. Das Display zeigt 'USB' an (Vorder- und Draufsicht Ref.1).
Bluetooth-Betrieb
Zum ersten Mal ein Bluetooth-Gerät koppeln
Drücken Sie die 'INPUT'-Taste auf der Fernbedienung (Fernbedienung Ref.10) oder die 'SOURCE/MODE'-Taste oben auf der Soundbar (Vorder- und Draufsicht Ref.5) um in den
'BLUETOOTH'-Modus zu wechseln. Das Display zeigt 'BLUETOOTH'(Vorder- und Draufsicht Ref.1).
Wählen Sie mit den nativen Bedienelementen Ihres Bluetooth-Geräts Sierra wenn Sie dazu aufgefordert werden, ein Bluetooth-Gerät auszuwählen.
Wenn Sie zu diesem Zeitpunkt auf Probleme stoßen, lesen Sie bitte das Benutzerhandbuch Ihres Bluetooth-Geräts, um Anweisungen zum Koppeln und Verbinden von Bluetooth-Geräten
zu erhalten.
Nach erfolgreicher Kopplung und Verbindung wird ein Bestätigungs- vom Gerät ausgegeben und die Anzeige zeigt an. (Vorder- und Draufsicht Ref.1). Nach
der ersten Kopplung bleibt das Gerät gekoppelt, es sei denn, der Benutzer wird manuell entkoppelt oder bis das Gerät zurückgesetzt wird.
Halten Sie zum Entkoppeln die Taste 'PAIR' auf der Fernbedienung 3 Sekunden lang gedrückt (Fernbedienung Ref.2). Sie können die Soundbar jetzt mit einem anderen Bluetooth-
Gerät koppeln.
Wenn Ihr Gerät entkoppelt werden sollte oder keine Verbindung hergestellt werden kann, wiederholen Sie die obigen Schritte.
Volume Control
Um die Lautstärke der Soundbar einzustellen, drücken Sie entweder die Tasten oder auf der Fernbedienung (Fernbedienung Ref.3/Ref.5)
oder halten Sie die Tasten tstärke oder
oben auf der Soundbar gedrückt (Vorder- und Draufsicht Ref.3/Ref.4).
Dynamischer EQ
Um den Soundeffekt der Soundbar einzustellen, drücken Sie entweder die(Fernbedienung Ref.6) 'FILM' (Fernbedienung Ref. 12) 'NACHRICHTEN' (Fernbedienung Ref.13) '3D'-
Taste (Fernbedienung Ref.16) auf der Fernbedienung.
Dolby Atmos
Wenn der Sierra ein Dolby Atmos-Signal empfängt, scrollt das Frontdisplay durch Atmos/Dolby Diese scrollende Anzeige ist nur temporär und dauert 3 Sekunden. Dies
geschieht zu Beginn des Films oder beim Studio- Intro.

Um Atmos auf dem Sierra Plus abzuspielen, muss der Player oder das Streaming-Produkt Atmos-fähig sein. Um Dolby Atmos im HDMI 1 / HDMI 2 / HDMI ARC-Modus zu
verwenden, muss Ihr Fernseher Dolby Atmos unterstützen.
Beim UHD (Ultra-High-Definition)/Blu-ray-Player oder Fernseher müssen die digitalen Ausgabeeinstellungen auf Bitstream eingestellt sein, oft mit Hinweisen auf
oder gekennzeichnet. UHD/Blue- Ray-Disc muss Dolby Atmos-
Der Fernseher kann den Atmos-Stream möglicherweise nicht an die Soundbar weiterleiten, obwohl er Atmos selbst verarbeiten kann. Um dies zu umgehen, schlagen Sie eine direkte
Verbindung vom Player zur Soundbar vor. Zum Beispiel, wenn Ihr Fernseher oder DVD-Player 2 x HDMI-Ausgänge hat. 1 ist mit „Audio/Video“ beschriftet. Sie können dies für das
Bild an den Fernseher anschließen. Der zweite Anschluss ist mit „Nur Audio“ beschriftet. Dieser kann direkt mit dem Sierra Plus verbunden werden. Wenn die Player-Ausgabe auf
Bitstream eingestellt ist, gibt Sierra Plus Atmos aus und zeigt Atmos an, wenn der Stream zum ersten Mal angezeigt wird.
Verbindungen
(https://www.majority.co.uk/wp-content/uploads/2021/06/Sierra-Connections.jpg)
Garantie
Registrieren Sie Ihr Majority-Produkt (https://www.majority.co.uk/de/register/) innerhalb von 30 Tagen nach dem Kauf, um Ihre Verlängerung zu aktivieren 3 Jahre Garantie. Erhalten Sie
Zugang zu allen Vorteilen und lebenslangem technischem Support (siehe unsere Erweiterte Garantie (https://www.majority.co.uk/de/returns-warranty/) Details für weitere Informationen).
Spezifikationen
Soundbar
96 x 10.8 x 8.1 cm
Subwoofer
30.6 x 19 x 37 cm
Leistung
110~240V
Gewicht
10.15 kg
Lautsprecher
Stereo
Tonversion
Dolby Atmos
AUX In
3.5 mm
Cinch-Eingang
3.5 mm

Sicherheitsinformationen
BEI BEDARF
Bitte lesen Sie alle Anweisungen vor Gebrauch sorgfältig durch.
WARNUNG
Risiko eines elektrischen Schlages. Nicht öffnen.
1. Lesen Sie diese Anweisungen:
2. Beachten Sie alle Warnungen.
3. Befolgen Sie alle Anweisungen in der Bedienungsanleitung.
4. Reinigen Sie das Gerät nicht in der Nähe von oder mit Wasser.
5. Blockieren Sie keine Belüftungsöffnungen. Installieren Sie das Gerät gemäß den Anweisungen des Herstellers.
6. Installieren Sie das Gerät nicht in der Nähe von Wärmequellen wie Heizkörpern, Heizregistern, Öfen oder anderen Geräten (einschließlich Verstärkern), die Wärme erzeugen.
7. Schützen Sie die Stromversorgung vor dem Betreten oder Einklemmen, insbesondere an Steckern, Steckdosen und an der Stelle, an der sie aus dem Gerät austreten.
8. Verwenden Sie nur vom Hersteller angegebene Zubehörteile.
9. Trennen Sie dieses Gerät bei leichten Stürmen oder bei längerem Nichtgebrauch vom Stromnetz.
10. Überlassen Sie alle Wartungsarbeiten qualifiziertem Servicepersonal. Eine Wartung ist erforderlich, wenn das Gerät auf eine Weise beschädigt wurde, wie z. B. das Netzkabel oder der Stecker beschädigt ist,
Flüssigkeit in das Gerät verschüttet wurde oder Gegenstände in das Gerät gefallen sind, das Gerät Regen oder Feuchtigkeit ausgesetzt war, nicht funktioniert normal oder wurde fallen gelassen.
11. Es dürfen keine offenen Flammenquellen wie brennende Kerzen auf das Gerät gestellt werden.
12. Entsorgen Sie gebrauchte elektrische Produkte und Batterien gemäß den örtlichen Behörden und Vorschriften.
Zusätzliche Warnungen
Das Gerät darf keinen Tropfen oder Spritzern ausgesetzt werden und es dürfen keine mit Flüssigkeit gefüllten Gegenstände wie Vasen auf das Gerät gestellt werden.
Der Netzstecker wird zum Trennen des Geräts verwendet und sollte während des bestimmungsgemäßen Gebrauchs leicht bedienbar bleiben. Um das Gerät vollständig vom Stromnetz zu trennen, sollte der Netzstecker vollständig
aus der Netzsteckdose gezogen werden.
Die Batterie darf keiner übermäßigen Hitze wie Sonnenschein, Feuer oder dergleichen ausgesetzt werden.
Recycling elektrischer Produkte
Sie sollten jetzt Ihre Elektro-Altgeräte recyceln und damit der Umwelt helfen. Dieses Symbol bedeutet, dass ein elektrisches Produkt nicht mit dem normalen Hausmüll entsorgt werden darf. Bitte stellen Sie sicher, dass
es nach Fertigstellung einer geeigneten Einrichtung zur Entsorgung zugeführt wird.
KONTAKT SUPPORT
(HTTPS://WWW.MAJORITY.CO.UK/DE/SUPPORT/)

Sierra Plus
English (https://www.majority.co.uk/) French (https://www.majority.co.uk/fr/) German (https://www.majority.co.uk/de/) Italian (https://www.majority.co.uk/it/) Spanish
(https://www.majority.co.uk/es/)
Contenido de la caja
(https://www.majority.co.uk/wp-content/uploads/2021/11/Sierra-Plus-Whats-In-The-Box-1.jpg)
Controles y funciones
Vista frontal y superior
1. Panel de visualización
2. Boton de encendido / apagado
3. Sube el volumen
4. Bajar volumen
5. Seleccionar fuente de entrada
(https://www.majority.co.uk/wp-content/uploads/2021/06/Sierra-Front-and-Top.png)

Vista trasera
6. Entrada de CA: conectar a la fuente de alimentación
7. HDMI en 2
8. HDMI en 1
9. Salida HDMI (ARC)
10. Entrada auxiliar
11. Entrada óptica
12. Entrada USB
(https://www.majority.co.uk/wp-content/uploads/2021/06/Sierra-Back-View.png)
Vista posterior del subwoofer
1. Indicador LED: indica el emparejamiento entre la barra de sonido y el subwoofer (asegúrese de que tanto la barra de sonido como el subwoofer estén conectados a la
fuente de alimentación al mismo tiempo y luego encienda la barra de sonido y el subwoofer).
2. Botón PAIR: empareja automáticamente la barra de sonido con el subwoofer. Mantenga presionado para restablecer la conexión entre la barra de sonido y el
subwoofer.
3. Puerto USB: solo para actualización de software
4. Entrada de CA: conectar a la fuente de alimentación
(https://www.majority.co.uk/wp-content/uploads/2021/06/Sierra-Plus-Subwoofer-Back-Updated.png)

Tenga en cuenta que todas las (Ref.) Se refleren a los controles y funciones en los diagramas anteriores.
Control Remoto
1. Power On / Off
2. Vincular
3. volumen hacia arriba
4. Anterior / Atrás
5. volumen de Down
6. Música
7. Treble-Up
8. Agudos
9. Mudo
10. Entrada (ARC, HDMI 1, HDMI 2, Bluetooth, AUX, USB, OPTICAL)
11. Siguiente / Saltar
12. Película
13. Noticias
14. Bass-Up
15. Bass-Down
16. 3D
(https://www.majority.co.uk/wp-content/uploads/2021/06/Sierra-Remote.png)
Guía de instrucciones

Asegúrese de que el voltaje de la fuente de alimentación esté dentro del rango de 110V -240V ~ 50Hz /
Tenga en cuenta que: La barra de sonido y el subwoofer deben estar dentro de un rango de 10 metros
Indicador de modo
Tipo de entrada
Indicador de pantalla
RCA
La pantalla frontal mostrará AUX.
AUX
La pantalla frontal mostrará AUX.
HDMI EN
La pantalla frontal mostrará HDMI 1, HDMI2.
HDMI OUT
La pantalla frontal mostrará HDMI ARC.
ÓPTICO
La pantalla frontal mostrará OPTICAL.
USB
La pantalla frontal mostrará USB.
Listo para Bluetooth
La pantalla frontal mostrará BLUETOOTH parpadeando.
Bluetooth conectado
BLUETOOTH dejará de parpadear y sonará un BEEP
conectado.
Dolby Atmos conectado
La pantalla frontal mostrará durante 3
segundos.
Dolby Surround conectado
La pantalla frontal se desplazará "Surround" durante 3
segundos.
Conexión a la red eléctrica
Sierra Plus viene con un adaptador de corriente para la barra de sonido. Asegúrese de desenrollar el cable en toda su longitud. Conecte el enchufe a una toma de corriente insertando
completamente el enchufe en la toma de corriente.
Conecte el adaptador al puerto de alimentación de CA en la parte posterior de la barra de sonido (Vista posterior Ref.6).
El panel de visualización mostrará '-' para indicar que ha registrado una fuente de alimentación y está en modo de espera.
Presione el botón 'ENCENDIDO' en el control remoto (Control Remoto Ref.1) o mantenga presionado el botón 'ENCENDIDO' durante 3 segundos en la parte superior de la barra de
sonido (Vista Frontal y Superior Ref.2) para encender o apagar la unidad.
Conexión de la barra de sonido y el subwoofer inalámbrico
El subwoofer y la barra de sonido se conectarán de forma inalámbrica entre sí para una experiencia de sonido envolvente. Esto le permite colocar el subwoofer en la esquina de la
habitación para asegurarse de que el sonido de su televisor llene la habitación.
Para conectarlos, asegúrese de que su barra de sonido esté encendida para la conflguración inicial. Para hacer esto, presione el botón 'ENCENDIDO' (Vista Frontal y Superior Ref.2)
en la unidad o el botón 'POWER' en el control remoto (Control Remoto Ref.1).
El subwoofer tiene una luz indicadora (Vista posterior del subwoofer Ref.1) esto parpadeará cuando busque conexión y mostrará una luz flja cuando esté conectado.
El subwoofer y la barra de sonido deberían conectarse automáticamente mediante la conectividad inalámbrica Bluetooth.
Si tiene problemas de conectividad, acerque el subwoofer a la barra de sonido para conflgurarlo. Si esto no funciona, mantenga presionado el botón EMPAREJAR (Vista posterior del
subwoofer Ref.2) para restablecer la conexión entre el subwoofer y la barra de sonido.

Necesitará una fuente de TV / audio con tomas de salida de audio RCA y un cable AUX de RCA a 3.5 mm
Solución de problemas: Si no recibe una imagen, asegúrese de que el cable RCA esté conectado a
los
Necesitará una fuente de TV / audio con un cable HDMI de interfaz multimedia de alta deflnición HDMI
Necesitará una fuente AUX con una salida de audio AUX y un cable de audio AUX (no incluido).
Uso del cable de audio RCA
Conecte el cable de audio estéreo RCA a las tomas de salida de audio RCA (L / R) estéreo de su televisor (para obtener ayuda sobre cómo ubicar las tomas de salida de audio de su
televisor, consulte el manual del usuario de su televisor).
Conecte el extremo AUX de 3.5 mm del cable al lateral de la barra de sonido a travé s del puerto AUX IN (Vista posterior Ref.10).
Presione 'INPUT' en el control remoto (Control Remoto Ref.10) o la unidad (Vista Frontal y Superior Ref.5) hasta que se seleccione el modo 'AUX'.
Si su televisor no tiene puertos RCA de "SALIDA", utilice un método de conexión alternativo.
Usando la entrada HDMI
Conecte el cable HDMI de la entrada HDMI en la barra de sonido (Vista posterior Ref. 7 y 8) a la salida HDMI de su televisor (para obtener ayuda sobre cómo ubicar la salida HDMI
ARC de su televisor, consulte el manual del usuario de su televisor).
Presione el botón 'INPUT' en el control remoto (Control Remoto Ref.10) o el botón 'FUENTE / MODO' en la parte superior de la barra de sonido (Vista Frontal y Superior Ref.5) hasta
que se seleccione el modo 'HDMI1 O HDMI2'. La pantalla mostrará 'HDMI1 o HDMI2' (Vista Frontal y Superior Ref.1).
Con los controles nativos de su dispositivo conectado, asegúrese de que la conflguración de audio esté establecida en ARC o HDMI Audio.
Uso de la salida HDMI ARC
Conecte el cable HDMI de la salida HDMI en la barra de sonido (Vista posterior Ref.9) a la entrada HDMI de su televisor (para obtener ayuda sobre cómo ubicar la entrada HDMI ARC
de su televisor, consulte el manual del usuario de su televisor).
Presione el botón 'INPUT' en el control remoto (Control Remoto Ref.10) o el botón 'FUENTE / MODO' en la parte superior de la barra de sonido (Vista Frontal y Superior Ref.5) hasta
que se seleccione el modo 'ARC'. La pantalla mostrará 'ARC' (Vista Frontal y Superior Ref.1).
Con los controles nativos de su dispositivo conectado, asegúrese de que la conflguración de audio esté establecida en ARC o HDMI Audio.
Uso del puerto AUX / Line In
Conecte un extremo de un cable de entrada de audio de 3.5 mm al puerto LINE en el lateral de la barra de sonido (Vista posterior Ref.10).
Enchufe el extremo restante del cable en la salida de audio / salida de auriculares de su reproductor MP3 o dispositivo de audio.
Presione el botón 'INPUT' en el control remoto (Control Remoto Ref.10) o el botón 'FUENTE / MODO' en la parte superior de la barra de sonido (Vista Frontal y Superior Ref.5) para
cambiar al modo 'AUX'. La pantalla mostrará 'AUX' (Vista Frontal y Superior Ref.1).
Table of contents
Languages:
Other MAJORITY Speakers System manuals

MAJORITY
MAJORITY Atlas User manual

MAJORITY
MAJORITY SCAFELL PIKE II Manual

MAJORITY
MAJORITY BEN NEVIS II Manual

MAJORITY
MAJORITY K2 Manual

MAJORITY
MAJORITY Teton Plus User manual

MAJORITY
MAJORITY BOWFELL Manual

MAJORITY
MAJORITY Sierra User manual

MAJORITY
MAJORITY BOWFELL PLUS Manual

MAJORITY
MAJORITY BEN NEVIS Manual

MAJORITY
MAJORITY SNO-BAR-BLK User manual
Popular Speakers System manuals by other brands

Bellodigital
Bellodigital BDS4012-40 installation manual

Phase Technologies
Phase Technologies TEATRO PC-3.0 manual

mr. steam
mr. steam AudioWizard Installation, operation & maintenance manual

IMG STAGE LINE
IMG STAGE LINE C-RAY instruction manual

Speed Link
Speed Link Apollo 2 SL-8211 user manual

ProAudio
ProAudio CS520TO user manual