MAJORITY Sierra User manual

Box Contents
(https://www.majority.co.uk/wp-content/uploads/2021/11/Sierra-Whats-In-The-Box.jpg)
Controls and Functions
Front and Top View
1. Display panel
2. On/Off button
3. Volume down
4. Volume up
5. Select input source
(https://www.majority.co.uk/wp-content/uploads/2021/06/Sierra-Front-and-Top.png)
Back View
6. AC in – Connect to power supply
7. HDMI in 2
8. HDMI in 1
9. HDMI Out (ARC)

10. AUX in
11. Optical in
12. USB in
(https://www.majority.co.uk/wp-content/uploads/2021/06/Sierra-Back-View.png)
Remote Control
1. Power On/Off
2. Pair
3. Volume Up
4. Previous/Back
5. Volume Down
. Music
7. Treble-Up
. Treble-Down
9. Mute
10. Input (ARC, HDMI 1, HDMI 2, Bluetooth, AUX, USB ,OPTICAL)
11. Next/Skip
12. Play/Pause
13. Movie
14. News
15. Bass-Up
1. Bass-Down
17. 3D

(https://www.majority.co.uk/wp-content/uploads/2021/06/Sierra-Remote.png)
Instructions Guide
Please note all (Ref.) refer to the Controls and Functions in the above diagrams.
Mode Indicator
Input Type Display Indicator
RCA The front display will show AUX.
AUX The front display will show AUX.
HDMI IN The front display will show HDMI 1, HDMI2.
HDMI OUT The front display will show HDMI ARC.
OPTICAL The front display will show OPTICAL.
USB The front display will show USB.
Bluetooth Ready The front display will show BLUETOOTH as
ashing.
Bluetooth Connected BLUETOOTH will stop ashing and a connected
BEEP will sound.
Dolby Atmos Connected The front display will scroll “Dolby Atmos” for 3
seconds.
Dolby Surround Connected The front display will scroll “Surround” for 3
seconds.

Connecting to the Mains Supply
Ensure that the power supply voltage is within the range of 110V -240V ~ 50Hz/60Hz. Any other
voltage may cause damage to the unit.
The Sierra comes with a power adapter for the soundbar. Make sure to unwind the cable to its full length.
Connect the plug to a mains socket by fully inserting the plug into the mains socket.
Connect the Adapter to the AC power port in the back of the soundbar (Back View Ref.6).
The Display Panel will show ‘–‘ to indicate it has registered a power source and is on standby mode.
Press the ‘POWER’ button on the remote control (Remote Control Ref.11) or press and hold the ‘POWER’
button for 3 seconds on the top of the soundbar (Front and Top View Ref.2) to turn the unit on or off.
Using the RCA Audio Cable
You will need a TV/audio source with RCA audio output sockets and an RCA to 3.5mm AUX
cable (included).
Connect the RCA stereo audio cable to your TV’s stereo RCA (L/R) audio output sockets (for help on how to
locate your TV’s audio output sockets, refer to your TV’s user manual).
Connect the 3.5mm AUX end of the cable to the side of the soundbar via the AUX IN port (Back View Ref.10).
Press ‘INPUT’ on the remote control (Remote Control Ref.10) or on the unit (Front and Top View Ref.5) until
‘AUX’ mode is selected.
Troubleshooting: If you are not receiving a picture, please ensure that the RCA cable is
connected to ‘OUTPUT’ RCA ports on your TV.
If your TV does not have ‘OUTPUT’ RCA ports, please use an alternative connection method.
Using the HDMI Input
You will need a TV/audio source with an HDMI High Denition Multimedia Interface, plus an
HDMI cable (not included).
Connect the HDMI cable from the HDMI input on the soundbar (Back View Ref.7 or 8), to the HDMI output on
your TV (for help on how to locate your TV’s HDMI output, refer to your TV’s user manual).
Press the ‘INPUT’ button on the remote control (Remote Control Ref.10) or the ‘SOURCE/MODE’ button on the
top of the soundbar (Front and Top View Ref.5) until ‘HDMI1 OR HDMI2’ mode is selected. The display will
show ‘HDMI1 or HDMI2’ (Front and Top View Ref.1).
Using the native controls on your connected device, ensure the audio settings are set to HDMI Audio.
Using the HDMI ARC Output
You will need a TV/audio source with an HDMI ARC High Denition Multimedia Interface, plus an
HDMI cable (not included).

Connect the HDMI cable from the HDMI output on the soundbar (Back View Ref.9) to the HDMI input on your
TV (for help on how to locate your TV’S HDMI ARC input, refer to your TV’s user manual).
Press the ‘INPUT’ button on the remote control (Remote Control Ref.10) or the ‘SOURCE/MODE’ button on the
top of the soundbar (Front and Top View Ref.5) until ‘ARC’ mode is selected. The display will show ‘ARC’
(Front and Top View Ref.1).
Using the native controls on your connected device, ensure the audio settings are set to ARC or HDMI Audio.
Using the AUX/Line In Port
You will need an AUX source with an AUX audio output an AUX audio cable (not included).
Plug one end of a 3.5mm audio input cable into the LINE port on the side of the soundbar (Back View Ref.10).
Plug the other end of the cable into the audio output/headphone output on your MP3 player or audio device.
Press the ‘INPUT’ button on the remote control (Remote Control Ref.10) or the ‘SOURCE/MODE’ button on the
top of the soundbar (Front and Top View Ref.5) to switch to ‘AUX’ mode. The Display will show’ AUX’ (Front
and Top View Ref.1).
Using the Optical Input
You will need an audio source with an optical audio output and a digital optical audio cable (not
included).
Connect the optical cable to the optical output on the audio source and to the OPTICAL port in the back of the
soundbar (Back View Ref.11).
Press the ‘INPUT’ button on the remote control (Remote Control Ref.10) or the ‘SOURCE/MODE’ button on the
top of the soundbar (Front and Top View Ref.5) to switch to ‘OPTICAL’ mode. The Display will show ‘OPTICAL’
(Front and Top View Ref.1).
How do I set the correct audio settings for Optical Mode?
When using the soundbar in Optical mode, or when using the soundbar with a streaming app you may
experience sound issues if you have your audio settings set up incorrectly. Using the native controls on your
connected device, make sure the audio settings are set to PCM or Optical Audio.
This setting can be found within your TV’s sound settings, most likely under ‘Additional Settings’ within the
Sound menu, where you will nd options for ‘PCM/Dolby Digital/DTS/DTS Neo 2:5’ (refer to your TV’s user
manual for more info).
Using the USB Input
Connect your USB stick to the USB port (Back View Ref.12) on the back of the soundbar.
Press the ‘INPUT’ button on the remote control (Remote Control Ref.10) or the ‘SOURCE/MODE’ button on the
side of the soundbar (Front and Top View Ref.5) to switch to ‘USB’ mode. The Display Will show ‘USB’ (Front
and Top View Ref.1).
Bluetooth Operation
Pairing a Bluetooth Device for the First Time
Press the ‘INPUT’ button on the remote control (Remote Control Ref.10) or the ‘SOURCE/MODE’ button on the

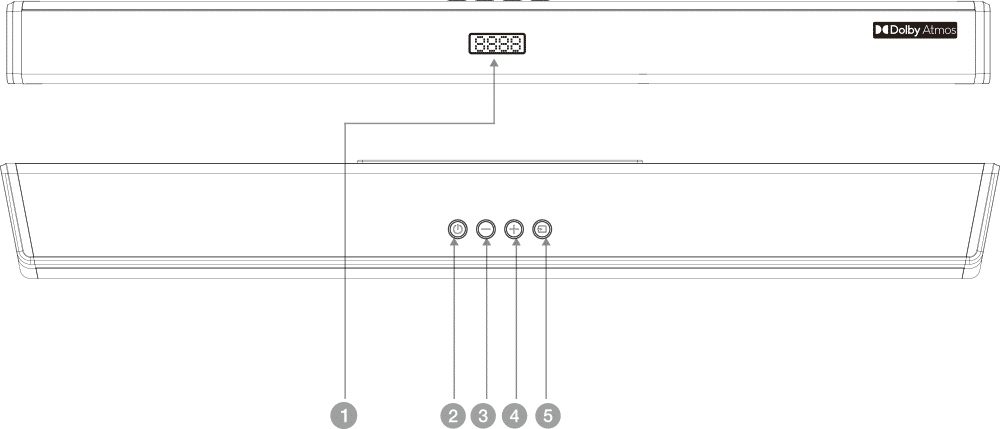
side of the soundbar (Front and Top View Ref.5) to switch to ‘BLUETOOTH’ mode. The Display Will show
‘BLUETOOTH ‘(Front and Top View Ref.1).
Using the native controls on your Bluetooth device, select the “Majority Sierra” when prompted to choose a
Bluetooth device.
If you encounter issues at this stage, please refer to the user manual for your Bluetooth device for
instructions on pairing and connecting Bluetooth devices.
When successfully paired and connected, a conrmation ‘BEEP’ will issue from the unit and the indicator
display will show ‘BLUETOOTH’ (Front and Top View Ref.1). After the initial pairing, the unit will stay paired
unless unpaired manually by the user, or until the device is reset.
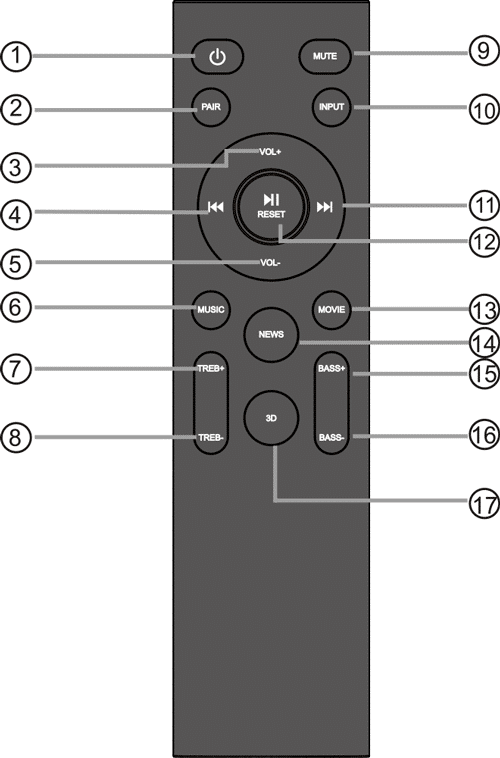
To unpair, hold down the ‘PAIR’ button on the remote control for 3 seconds (Remote Control Ref.2). You can
now pair the soundbar with another Bluetooth device.
If your device should become unpaired or you nd it is unable to connect, repeat the steps above.
Volume Control
To adjust the volume of the soundbar, press either the ‘Volume Up’ or Volume Down’ buttons on the remote
control (Remote Control Ref.1/Ref.3) or press and hold the ‘Volume Up’ or Volume Down’ buttons on the top
of the soundbar (Front and Top View Ref.3/Ref.4).
Sound Effect Modes
To adjust the sound effect of the soundbar, press either the ‘MUSIC’(Remote Control Ref. 6) ‘MOVIE’ (Remote
Control Ref. 13) ‘NEWS’ (Remote Control Ref.14) ‘3D’ button (Remote Control Ref.17) on the remote control.
Dolby Atmos
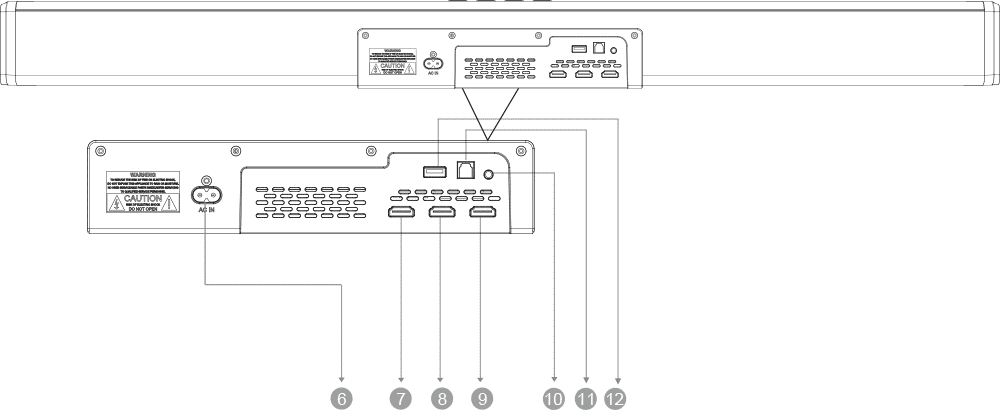
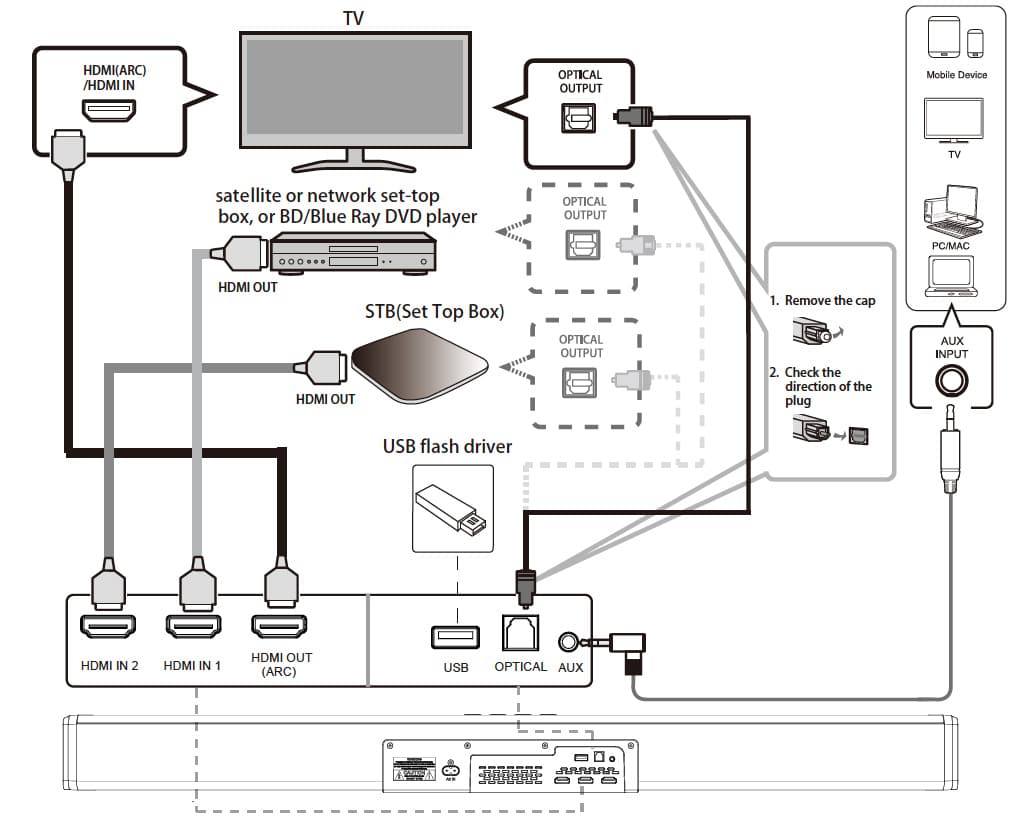
DOLBY ATMOS is only available in ‘HDMI IN’ and ‘HDMI OUT’ (ARC) mode. For the details of the
connection, please refer to HDMI input and HDMI output.
When the Sierra receives Dolby Atmos signal the front display will scroll “Dolby Atmos/Dolby Surround”. This
scrolling display is only temporary and will last for 3 seconds. This will happen at the start of the lm or the
studio intro.
If you never see this scrolling message you will need to follow the guidance below to achieve
‘Dolby Atmos’.
To play Dolby Atmos on the Sierra, the compatible device playing or streaming needs to be Atmos capable.
To use Dolby Atmos in HDMI 1 /HDMI 2 / HDMI ARC mode, your TV has to support Dolby Atmos output.
The UHD(Ultra-High-Denition)/Blu-ray player or TV must have the Digital output settings set to Bitstream,
often labelled with references to ‘Cinema surround’ or ‘Dolby’. “The UHD/Blue-Ray disc must be Dolby
Atmos-enabled”.
The TV may not be able to pass through the Atmos stream to the soundbar even though it is capable of
processing Atmos itself. A workaround for this is to suggest a direct connection from the player to the
soundbar. For example, if your TV or DVD player has 2 x HDMI outputs. 1 is labelled “Audio/Video”. You can
connect this to the TV for the picture. The second connection is labelled “Audio only”. This can be connected
directly to the Sierra. If the player output is set to bitstream then the Sierra will output Atmos and display
Atmos when it rst sees the stream.
Connections Diagram

(https://www.majority.co.uk/wp-content/uploads/2021/06/Sierra-Connections.jpg)
Warranty
Register your Majority product (https://www.majority.co.uk/register/) within 30 days of purchase to activate
your extended 3 Year Warranty. Gain access to all the benets and lifetime technical support (see our
Extended Warranty (https://www.majority.co.uk/returns-warranty/)details for more info).
Specications
Soundbar 96 x 10.8 x 8.1 cm
Subwoofer 30.6 x 19 x 37 cm
Power 12V ~ 1A

Weight 7.9 kg
Speakers Stereo
Sound Version Dolby Atmos
Support Files MP3, FLAC, WAV, WMA
AUX In 3.5 mm
RCA Input 3.5 mm
Safety Info
IMPORTANT
Please read all instructions carefully before use.
WARNING
Risk of electric shock. Do not open.
1. Read these instructions:
2. Heed all warnings.
3. Follow all instructions in the user manual.
4. Do no clean the apparatus near or with water.
5. Do not block any ventilation openings. Install in accordance with the manufacturer’s instructions.
. Do not install near any heat sources such as radiators, heat registers, stoves, or other apparatus (including ampliers) that produce
heat.
7. Protect the power from being walked on or pinched particularly at plugs, convenience receptacles, and the point where they exit from
the apparatus.
. Only use attachments/accessories specied by the manufacturer.
9. Unplug this apparatus during light storms or when unused for long periods of time.
10. Refer all servicing to qualied service personnel. Servicing is required when the apparatus has been damaged in a way, such as
power-supply cord or plug is damaged, liquid has been spilled or objects have fallen into the apparatus, the apparatus has been
exposed to the rain or moisture, does not operate normally or has been dropped.
11. No naked ame sources, such as lit candles, should be placed on the apparatus.
12. Dispose of used electrical products and batteries safely according to your local authority and regulations.
Addition Warnings
The apparatus shall not be exposed to dripping or splashing and no objects lled with liquid, such as vases, shall be places on the
apparatus.
Main plug is used to disconnect device and it should remain readily operable during intended use. In order to disconnect the apparatus
from the main power completely, the power plug should be disconnected from the main socket outlet completely.
Battery shall not be exposed to excessive heat such as sunshine, re or the like.
Recycling Electrical Products
You should now recycle your waste electrical goods and in doing so help the environment. This symbol means an electrical product

y y g g p y p
should not be disposed of with normal household waste. Please ensure it is taken to a suitable facility for disposal when nished with.
Table of contents
Other MAJORITY Speakers System manuals

MAJORITY
MAJORITY 1000002681 User manual

MAJORITY
MAJORITY BEN NEVIS Manual

MAJORITY
MAJORITY BAR-SAX-BLK User manual

MAJORITY
MAJORITY Saxon Manual

MAJORITY
MAJORITY D40 User manual

MAJORITY
MAJORITY Atlas User manual

MAJORITY
MAJORITY SCAFELL PIKE II Manual

MAJORITY
MAJORITY SNO-BAR-BLK User manual

MAJORITY
MAJORITY K2 Manual

MAJORITY
MAJORITY BOWFELL Manual