© 2023 MAKE IT REAL, LLC. All rights reserved. / Tous droits réservés.
Made in China / Fabriqué en Chine
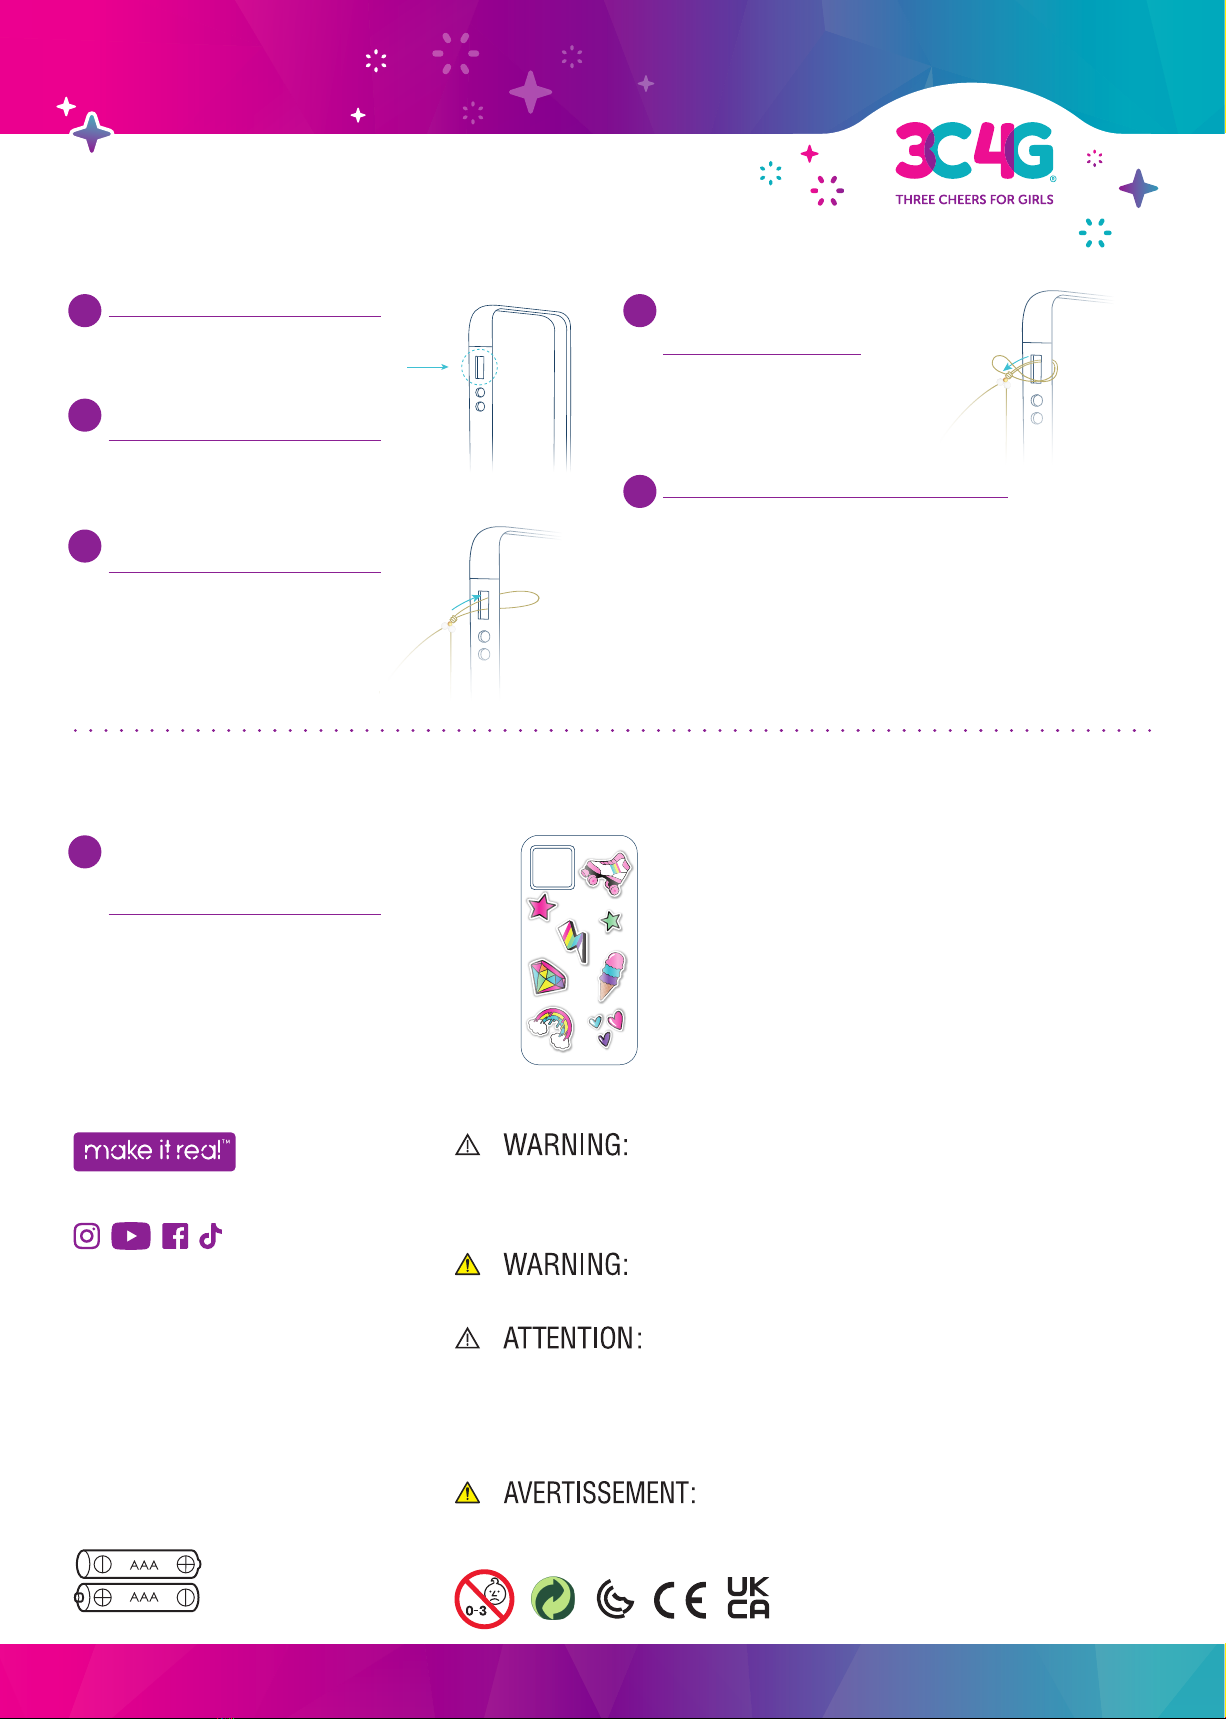
makeitrealplay.com
@makeitrealplay
Always ask an adult for permission before going online. Children should
be supervised while online. / Demande toujours la permission à un adulte
avant d’aller sur Internet. Nous recommandons de superviser les enfants
en tout temps lorsqu’ils naviguent sur Internet.
MANUFACTURED FOR / FABRIQUÉ POUR
THREE CHEERS FOR GIRLS BY / PAR MAKE IT REAL
1700 REISTERSTOWN RD STE 211
PIKESVILLE, MD 21208, USA 410-995-8685
JACTIN HOUSE 24 HOOD STREET
ANCOATS, MANCHESTER, M4 6WX, UK +44 (0) 161 302 4100
EU RESPONSIBLE PERSON (COSMETICS)
PERSONNE RESPONSABLE DE L’UE (COSMÉTIQUES)
EU AUTHORIZED REPRESENTATIVE (TOYS)
REPRÉSENTANT AUTORISÉ DE L’UE (JOUETS) :
MDSS GMBH
SCHIFFGRABEN 41, 30175 HANNOVER, DE
CHOKING HAZARD–Small parts.
Not suitable for children under 3 years.
CAUTION: Stickers not intended to be placed on skin.
CAUTION: Do not expose to or submerge the selfie
light in water. The light is not waterproof.
DANGER D’ÉTOUFFEMENT–Petits éléments.
Ne convient pas aux enfants de moins de 3 ans.
MISE EN GARDE : les autocollants ne sont pas faits
pour être collés sur la peau.
MISE EN GARDE : ne pas exposer la lampe à
égoportrait à l’eau ni l’immerger. La lampe n’est pas
résistante à l’eau.
HOW TO USE THE PHONE LANYARD
UTILISATION DE LA DRAGONNE POUR TÉLÉPHONE
1Remove a sticker from the backing
sheet and apply it to a desired surface.
DO NOT place stickers on delicate
device screens or surfaces.
Décolle un autocollant de la feuille et
place-le sur la surface de ton choix.
NE place PAS d’autocollant sur
l’écran ou d’autres surfaces délicates
de ton téléphone.
Batteries are to be inserted with the correct polarity. Exhausted batteries
are to be removed from the toy. The supply terminals are not to be
short-circuited. Do not mix alkaline, standard (carbon-zinc) or rechargeable
(nickel-cadmium) batteries.
Keep new and used batteries away from children. Non-rechargeable
batteries are not to be recharged. Rechargeable batteries are only to be
charged under adult supervision. Rechargeable batteries are to be removed
from the toys before being charged. Different types of batteries or new and
used batteries are not to be mixed.
Remove battery door. Remove old batteries and discard according to local
laws. Do not use metal tools to remove batteries. Insert new batteries
according to diagram. Replace battery door. Clean with a soft dry cloth.
When batteries of different brands or types are used together, or new and
old batteries are used together, some batteries may be over-discharged due
to a difference in voltage or capacity. This can result in venting, leakage and
rupture, and may cause personal injury.
Uses 2 AAA batteries.
Turn off when not in use to preserve battery life.
Les piles doivent être insérées avec la polarité correcte. Les piles usagées
doivent être retirées du jouet. Les bornes d'alimentation ne doivent pas être
mises en court-circuit. Ne pas mélanger des piles alcalines, standard
(carbone-zinc) et rechargeables (nickel-cadmium).
Tenez les piles nouvelles et usagées hors de la portée des enfants. Les piles
non rechargeables ne doivent pas être rechargées. Les batteries
rechargeables ne doivent être chargées que sous la supervision d'un adulte.
Les piles rechargeables doivent être retirées des jouets avant d'être
chargées. Différents types de piles ou de piles neuves et usagées ne doivent
pas être mélangés.
Retirer la porte de la batterie. Retirer les anciennes batteries et les jeter
conformémentaux lois locales. Ne pas utiliser d’outils métalliques pour
retirer les piles. Insérer de nouvelles piles selon le schéma. Replacer la porte
de la batterie. Nettoyer avec un chiffon doux et sec. L’utilisation de piles de
différentes marques ou de différents types, ou bien d’anciennes piles avec
des nouvelles, peut entraîner des différences de tension ou de capacité,
conduisant certaines piles à se décharger trop vite. Cela peut entraîner des
fissures, des fuites et des ruptures, et peut causer des blessures.
Utilise 2 piles AAA.
Éteignez-le lorsqu'il n'est pas utilisé pour préserver la durée de vie de la batterie.
14031-INSCAN-01-V1
2xAAA (1.5 V)
Batteries not included.
Piles non incluses.
HOW TO USE THE PUFFY STICKERS
UTILISATION DES AUTOCOLLANTS EN RELIEF
5
Tie a simple knot by weaving the
lanyard back through the string
loop. Pull the loop tight.
Fais un nœud simple en refaisant
passer la dragonne dans la boucle.
Tire sur la longueur pour bien
serrer le nœud.
4
Place your phone back into the phone case.
Replace ton téléphone dans sa coque.
INSTRUCTIONS
Please retain the packaging since it contains important information.
Product and colors may vary from those shown.
Veuillez conserver l'emballage car il contient des informations importantes.
Le produit et les couleurs peuvent différer de la présentation.
1Take your phone out of its phone case.
Retire la coque de ton téléphone.
Locate a small hole opening on
your phone case.
Examine ton téléphone de façon à
repérer un petit trou.
2
Slide the looped string of the phone
lanyard through the small hole.
Fais passer la boucle de la dragonne
dans ce trou.
3
CALIFORNIA PROPOSITION 65 CANCER AND
REPRODUCTIVE HARM. www.P65Warnings.ca.gov
PROPOSITION 65 DE LA CALIFORNIE CANCER
ET EFFET NOCIF SUR LA REPRODUCTION.
www.P65Warnings.ca.gov


