Makita BUC121 User manual

1
GB Cordless Chain Saw INSTRUCTION MANUAL
UA Бездротова ланцюгова пила ІНСТРУКЦІЯ ЗЕКСПЛУАТАЦІЇ
PL
Akumulatorowa pilarka łańcuchowa
INSTRUKCJA OBSŁUGI
RO Ferăstrău cu lanţcu acumulator MANUAL DE INSTRUCŢIUNI
DE Akku-Kettensäge BEDIENUNGSANLEITUNG
HU Akkumulátoros láncfűrész HASZNÁLATI KÉZIKÖNYV
SK Ručná reťazová píla NÁVOD NA OBSLUHU
CZ Akumulátorová řetězová pila NÁVOD K OBSLUZE
BUC121
BUC122

2
1
23
1 008565
12
2 008572
12
3 008566
1
2
3
4 008568
2
3
1
5 008630
3
12
6 008631
2
3
1
7 008569 8 008570
12
9 008587
10 008570
2
1
3
11 008571
1
12 008574

3
1
13 008575
1
2
14 008576 15 001742
16 008634
1
2
17 008573 18 008633
19 006927 20 006929 21 008578
12
22 008579
1
23 008580 24 008581

4
1
25 008582
1
26 008635
1
2
27 008584
1
2
3
28 008586
1
29 001145
12
30 008585

5
ENGLISH (Original instructions)
Explanation of general view
1-1. Red part
1-2. Button
1-3. Battery cartridge
2-1. Lock-off button
2-2. Switch trigger
3-1. Sprocket cover
3-2. Knob
4-1. Cutter
4-2. Guide bar
4-3. Arrow
5-1. Spring
5-2. Sprocket
5-3. Boss
6-1. Spring
6-2. Guide bar
6-3. Boss
7-1. Sprocket cover
7-2. Hook
7-3. Hole
11-1. Oil tank cap
11-2. Oil inspection window
11-3. Oil tank opening
12-1. Tip guide
13-1. Lower guide
17-1. Battery cartridge
17-2. Scabbard (chain cover)
22-1. Push nut
22-2. Slotted bit screwdriver
23-1. Filter
25-1. Filter
26-1. Push nut
27-1. Sprocket
27-2. Locking ring
28-1. Locking ring
28-2. Sprocket
28-3. Washer
29-1. Limit mark
30-1. Brush holder cap
30-2. Screwdriver
SPECIFICATIONS
Model BUC121 BUC122
Chain speed per minute (min-1) 4.8 m/s (290 m/min) 5.0 m/s (300 m/min)
Length of guide bar 115 mm
Type 25 AP
Pitch 1/4"
Saw chain
No. of drive links 42
Overall length 422mm 422mm
Net weight 2.5 kg 2.6 kg
Rated voltage D.C. 14.4 V D.C. 18 V
• Due to our continuing programme of research and development, the specifications herein are subject to change without notice.
• Specifications and battery cartridge may differ from country to country.
• Weight, with battery cartridge, according to EPTA-Procedure 01/2003
END005-3
Symbols
The following show the symbols used for the equipment.
Be sure that you understand their meaning before use.
・Read instruction manual.
・Wear eye protection.
・Wear ear protection.
・Wear a helmet, goggles and ear
protection.
・Use appropriate protection for foot-leg
and hand-arm.
・Do not expose to rain.
・Hold the saw with both hands while
working! One-handed use is extremely
hazardous!
・This saw is to be used by properly
trained operators only.
・Only for EU countries
Do not dispose of electric equipment or
battery pack together with household
waste material!
In observance of European Directive
2002/96/EC on waste electric and
electronic equipment, 2006/66/EC on
batteries and accumulators and waste
batteries and accumulators and their
implementation in accordance with
national laws, electric equipment and
battery pack that have reached the end
of their life must be collected separately
and returned to an environmentally
compatible recycling facility.
ENE031-1
Intended use
The tool is intended for cutting lumbers and logs.
For Model BUC121
ENG102-3
Noise
The typical A-weighted noise level determined according
to EN60745:
Sound pressure level (LpA) : 84 dB(A)
Sound power level (LWA) : 92 dB(A)
Uncertainty (K) : 2 dB(A)
Wear ear protection
Cd
Ni-MH
Li-ion

6
ENG221-3
Vibration
The vibration total value (tri-axial vector sum)
determined according to EN60745:
Work mode : cutting wood
Vibration emission (ah) : 4.2 m/s2
Uncertainty (K) : 1.5 m/s2
• The declared vibration emission value has been
measured in accordance with the standard test
method and may be used for comparing one tool
with another.
• The declared vibration emission value may also be
used in a preliminary assessment of exposure.
WARNING:
• The vibration emission during actual use of the
power tool can differ from the declared emission
value depending on the ways in which the tool is
used.
• Be sure to identify safety measures to protect the
operator that are based on an estimation of
exposure in the actual conditions of use (taking
account of all parts of the operating cycle such as
the times when the tool is switched off and when it
is running idle in addition to the trigger time).
For Model BUC122
ENG102-3
Noise
The typical A-weighted noise level determined according
to EN60745:
Sound pressure level (LpA) : 84.6 dB(A)
Sound power level (LWA) : 92.7 dB(A)
Uncertainty (K) : 2 dB(A)
Wear ear protection
ENG221-3
Vibration
The vibration total value (tri-axial vector sum)
determined according to EN60745:
Work mode : cutting wood
Vibration emission (ah) : 4.3 m/s2
Uncertainty (K) : 1.5 m/s2
• The declared vibration emission value has been
measured in accordance with the standard test
method and may be used for comparing one tool
with another.
• The declared vibration emission value may also be
used in a preliminary assessment of exposure.
WARNING:
• The vibration emission during actual use of the
power tool can differ from the declared emission
value depending on the ways in which the tool is
used.
• Be sure to identify safety measures to protect the
operator that are based on an estimation of
exposure in the actual conditions of use (taking
account of all parts of the operating cycle such as
the times when the tool is switched off and when it
is running idle in addition to the trigger time).
ENH026-4
For European countries only
EC Declaration of Conformity
We Makita Corporation as the responsible
manufacturer declare that the following Makita
machine(s):
Designation of Machine:
Cordless Chain Saw
Model No./ Type: BUC121
Specifications: see "SPECIFICATIONS" table.
are of series production and
Conforms to the following European Directives:
2000/14/EC, 2006/42/EC
And are manufactured in accordance with the following
standards or standardised documents:
EN60745, EN/ISO11681
The EC-Type Examination Certificate No.M6T 09 10
24243 110
The EC-Type Examination per 98/37/EC and
2006/42/EC was performed by:
TÜV SÜD Product Service GmbH,
Ridlerstraße 65, 80339 MÜNCHEN, Germany
Identification No. 0123
The technical documentation is kept by our authorised
representative in Europe who is:
Makita International Europe Ltd,
Michigan, Drive, Tongwell,
Milton Keynes,Bucks MK15 8JD, England
The conformity assessment procedure required by
Directive 2000/14/EC was in Accordance with annex V.
Measured Sound Power Level: 92.0dB
Guaranteed Sound Power Level: 94.0dB
4th November 2009
000230
Tomoyasu Kato
Director
Makita Corporation
3-11-8, Sumiyoshi-cho,
Anjo, Aichi, JAPAN
ENH026-4
For European countries only
EC Declaration of Conformity
We Makita Corporation as the responsible
manufacturer declare that the following Makita
machine(s):
Designation of Machine:
Cordless Chain Saw
Model No./ Type: BUC122

7
Specifications: see "SPECIFICATIONS" table.
are of series production and
Conforms to the following European Directives:
2000/14/EC, 2006/42/EC
And are manufactured in accordance with the following
standards or standardised documents:
EN60745, EN/ISO11681
The EC-Type Examination Certificate No.M6T 09 10
24243 110
The EC-Type Examination per 98/37/EC and
2006/42/EC was performed by:
TÜV SÜD Product Service GmbH,
Ridlerstraße 65, 80339 MÜNCHEN, Germany
Identification No. 0123
The technical documentation is kept by our authorised
representative in Europe who is:
Makita International Europe Ltd,
Michigan, Drive, Tongwell,
Milton Keynes,Bucks MK15 8JD, England
The conformity assessment procedure required by
Directive 2000/14/EC was in Accordance with annex V.
Measured Sound Power Level: 93.0dB
Guaranteed Sound Power Level: 95.0dB
4th November 2009
000230
Tomoyasu Kato
Director
Makita Corporation
3-11-8, Sumiyoshi-cho,
Anjo, Aichi, JAPAN
GEA010-1
General Power Tool Safety
Warnings
WARNING Read all safety warnings and all
instructions. Failure to follow the warnings and
instructions may result in electric shock, fire and/or
serious injury.
Save all warnings and instructions for
future reference.
GEB039-2
Cordless Chain saw safety
warnings:
1. Keep all parts of the body away from the saw
chain when the chain saw is operating. Before
you start the chain saw, make sure the saw
chain is not contacting anything. A moment of
inattention while operating chain saws may cause
entanglement of your clothing or body with the
saw chain.
2. Always hold the chain saw with your right
hand on the rear handle and your left hand on
the front handle. Holding the chain saw with a
reversed hand configuration increases the risk of
personal injury and should never be done.
3. Hold the power tool by insulated gripping
surfaces only, because the saw chain may
contact hidden wiring. Saw chains contacting a
"live" wire may make exposed metal parts of the
power tool "live" and could give the operator an
electric shock.
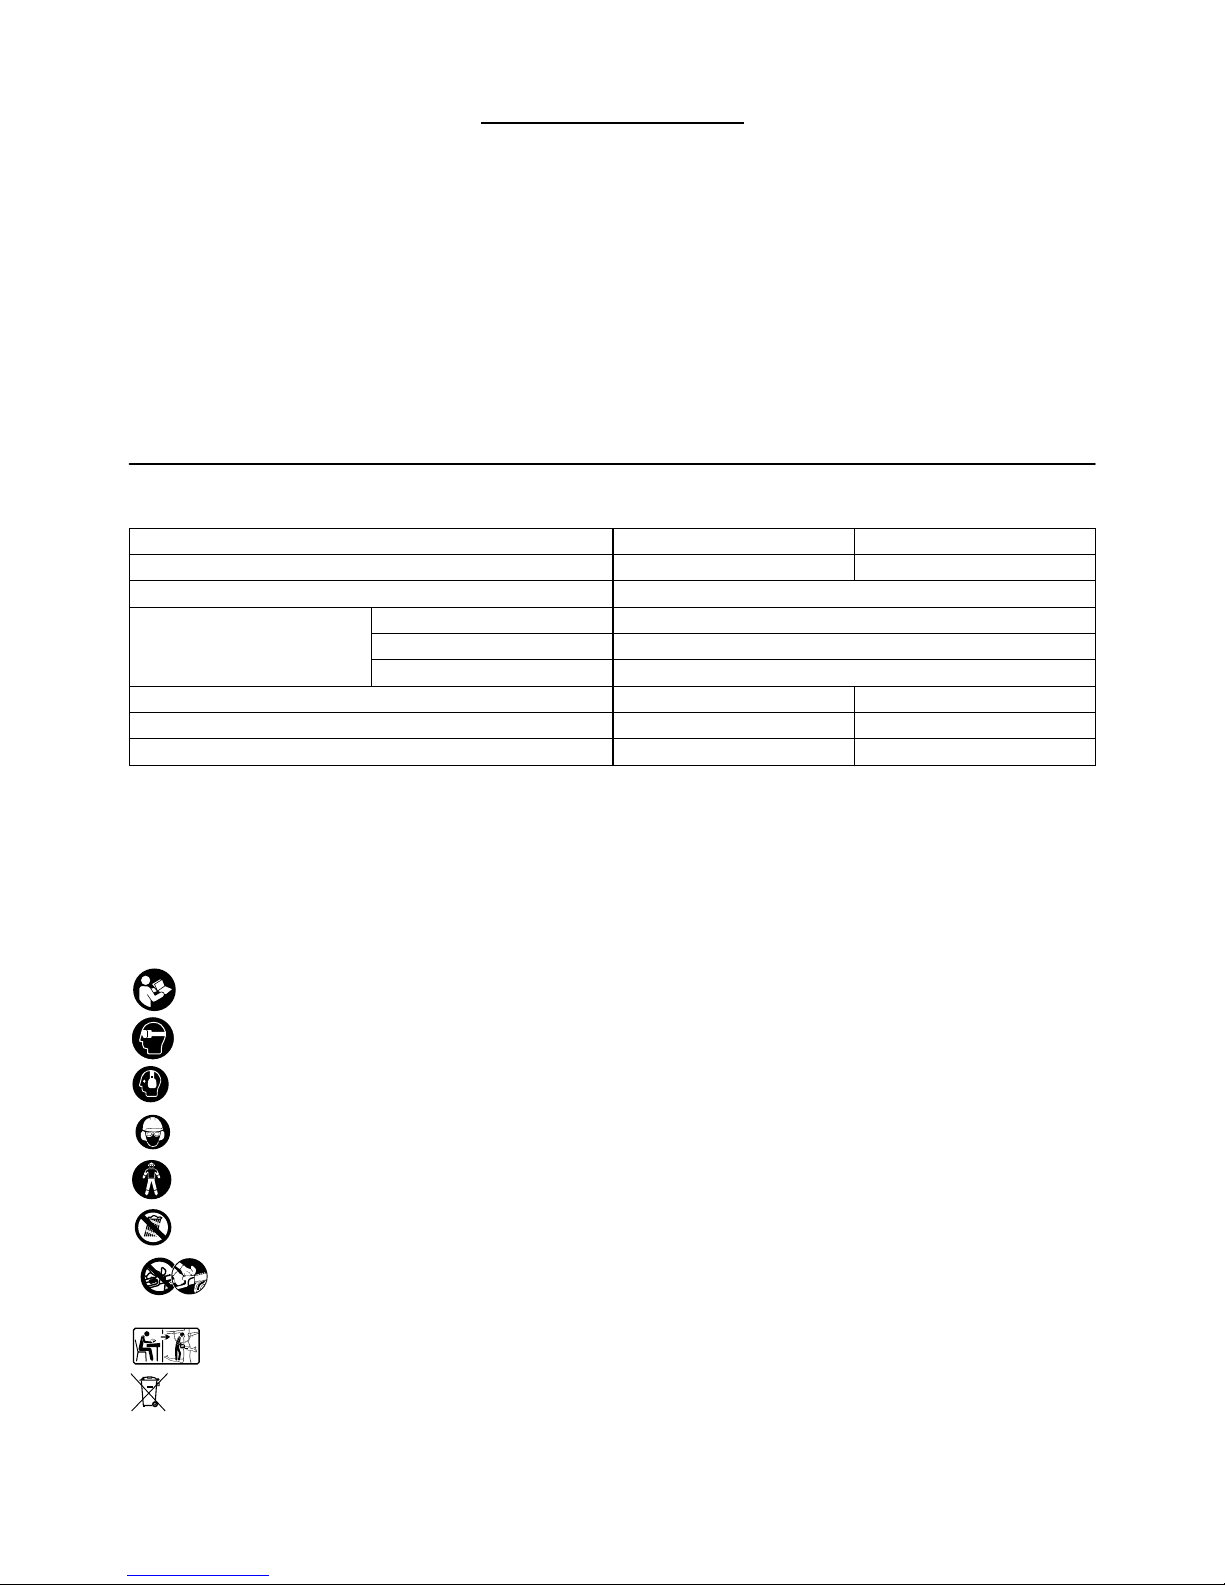
4. Wear safety glasses and hearing protection.
Further protective equipment for head, hands,
legs and feet is recommended. Adequate
protective clothing will reduce personal injury by
flying debris or accidental contact with the saw
chain.
5. Do not operate a chain saw in a tree. Operation
of a chain saw while up in a tree may result in
personal injury.
6. Always keep proper footing and operate the
chain saw only when standing on fixed, secure
and level surface. Slippery or unstable surfaces
such as ladders may cause a loss of balance or
control of the chain saw.
7. When cutting a limb that is under tension be
alert for spring back. When the tension in the
wood fibres is released the spring loaded limb
may strike the operator and/or throw the chain
saw out of control.
8. Use extreme caution when cutting brush and
saplings. The slender material may catch the
saw chain and be whipped toward you or pull you
off balance.
9. Carry the chain saw by the front handle with
the chain saw switched off and away from
your body. When transporting or storing the
chain saw always fit the guide bar cover.
Proper handling of the chain saw will reduce the
likelihood of accidental contact with the moving
saw chain.
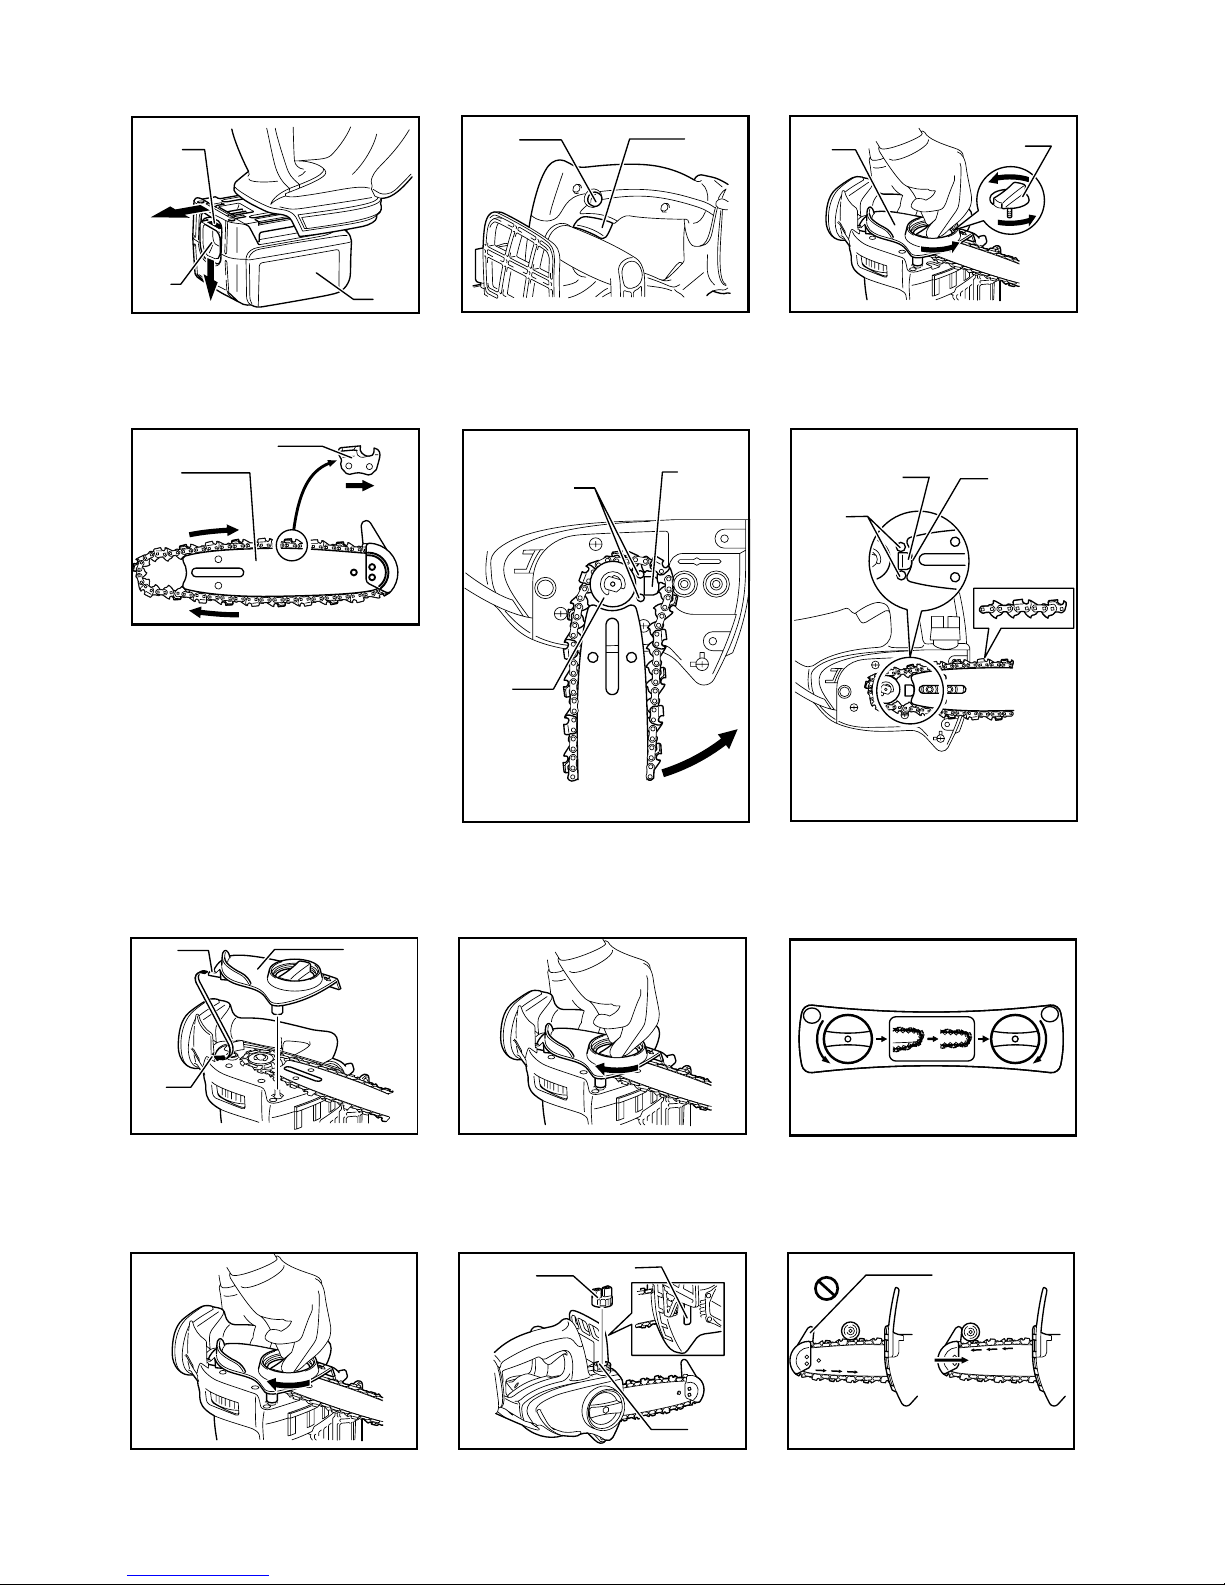
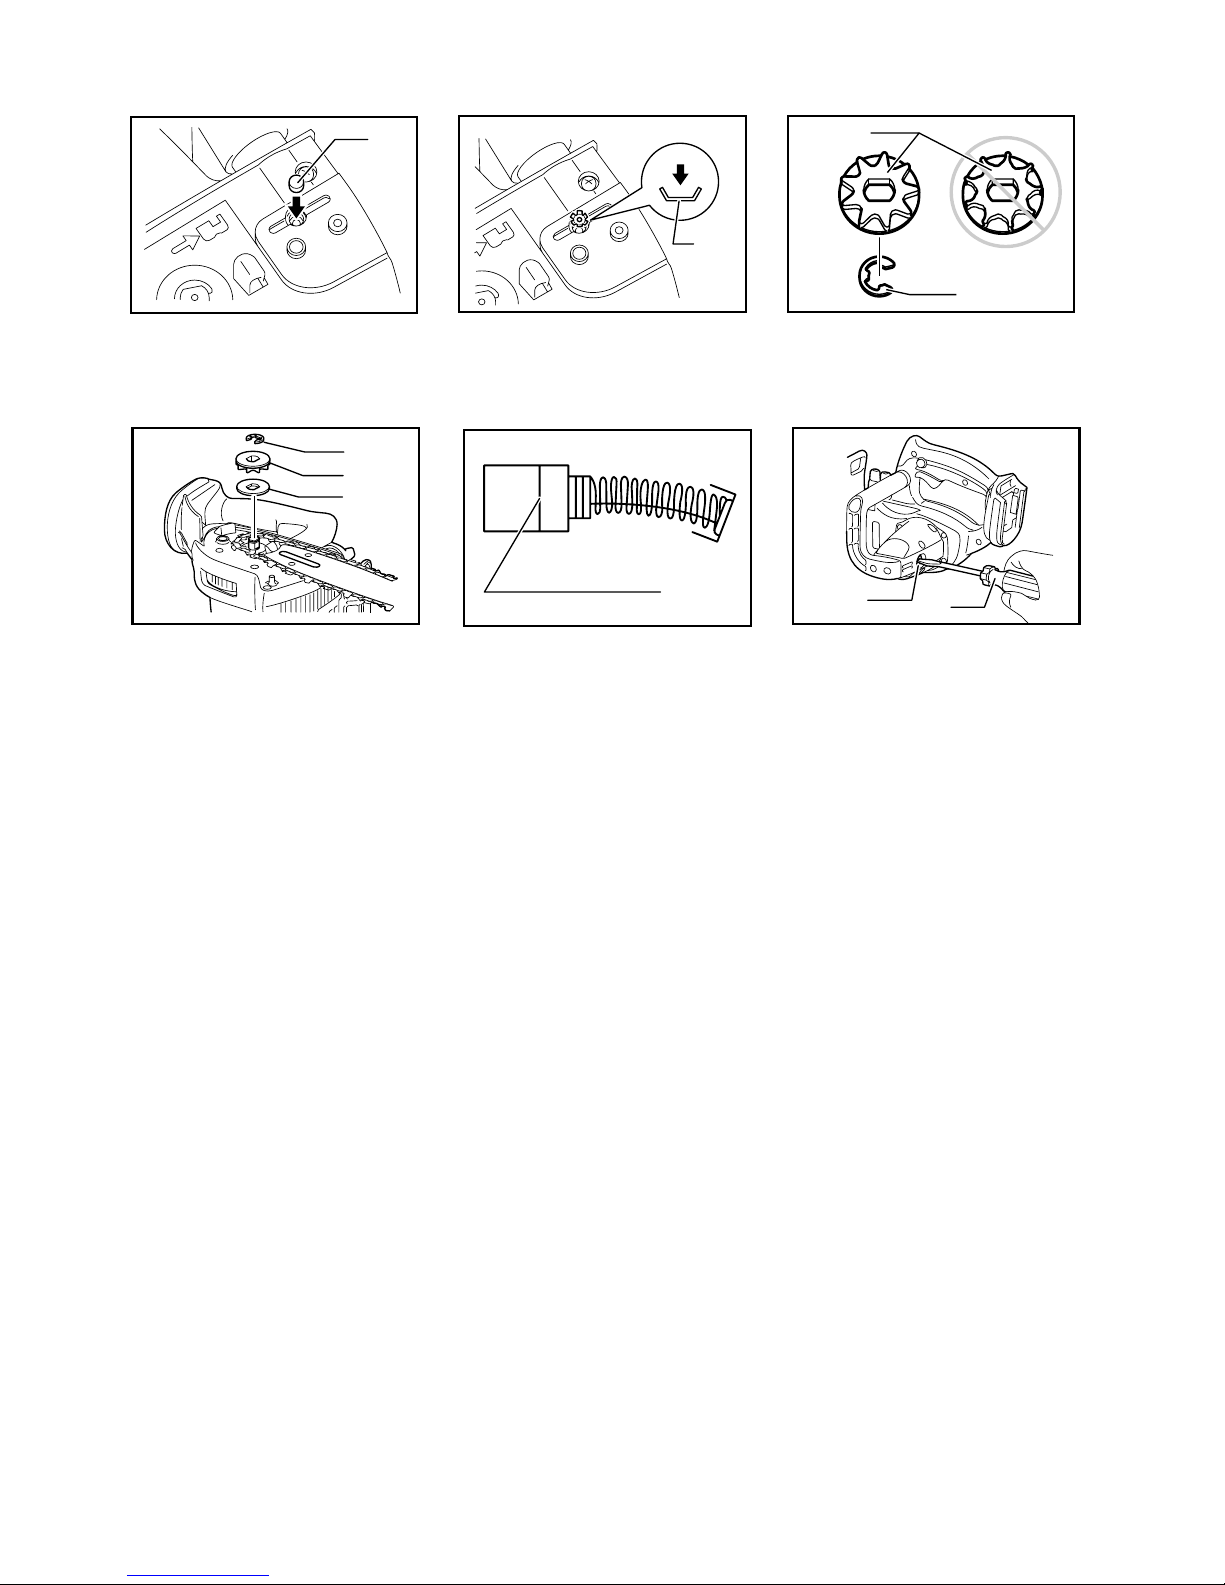
10. Follow instructions for lubricating, chain
tensioning and changing accessories.
Improperly tensioned or lubricated chain may
either break or increase the chance for kickback.
11. Keep handles dry, clean, and free from oil and
grease. Greasy, oily handles are slippery causing
loss of control.
12. Cut wood only. Do not use chain saw for
purposes not intended. For example: do not
use chain saw for cutting plastic, masonry or
non-wood building materials. Use of the chain
saw for operations different than intended could
result in a hazardous situation.
13. Causes and Operator Prevention of Kickback:
Kickback may occur when the nose or tip of the
guide bar touches an object, or when the wood
closes in and pinches the saw chain in the cut.

8
Tip contact in some cases may cause a sudden
reverse reaction, kicking the guide bar up and back
towards the operator.
Pinching the saw chain along the top of the guide
bar may push the guide bar rapidly back towards
the operator.
Either of these reactions may cause you to lose
control of the saw which could result in serious
personal injury. Do not rely exclusively upon the
safety devices built into your saw. As a chain saw
user, you should take several steps to keep your
cutting jobs free from accident or injury.
Kickback is the result of tool misuse and/or
incorrect operating procedures or conditions and
can be avoided by taking proper precautions as
given below:
−Maintain a firm grip, with thumbs and fingers
encircling the chain saw handles, with both
hands on the saw and position your body and
arm to allow you to resist kickback forces.
Kickback forces can be controlled by the
operator, if proper precautions are taken. Do
not let go of the chain saw.
001743
−Do not overreach and do not cut above
shoulder height. This helps prevent
unintended tip contact and enables better
control of the chain saw in unexpected
situations.
−Only use replacement bars and chains
specified by the manufacturer. Incorrect
replacement bars and chains may cause
chain breakage and/or kickback.
−Follow the manufacturer’s sharpening
and maintenance instructions for the saw
chain. Decreasing the depth gauge height
can lead to increased kickback.
SAVE THESE INSTRUCTIONS.
WARNING:
DO NOT let comfort or familiarity with product
(gained from repeated use) replace strict adherence
to safety rules for the subject product. MISUSE or
failure to follow the safety rules stated in this
instruction manual may cause serious personal
injury.
ENC007-4
IMPORTANT SAFETY
INSTRUCTIONS
FOR BATTERY CARTRIDGE
1. Before using battery cartridge, read all
instructions and cautionary markings on (1)
battery charger, (2) battery, and (3) product
using battery.
2. Do not disassemble battery cartridge.
3. If operating time has become excessively
shorter, stop operating immediately. It may
result in a risk of overheating, possible burns
and even an explosion.
4. If electrolyte gets into your eyes, rinse them
out with clear water and seek medical
attention right away. It may result in loss of
your eyesight.
5. Do not short the battery cartridge:
(1) Do not touch the terminals with any
conductive material.
(2) Avoid storing battery cartridge in a
container with other metal objects such as
nails, coins, etc.
(3) Do not expose battery cartridge to water
or rain.
A battery short can cause a large current
flow, overheating, possible burns and
even a breakdown.
6. Do not store the tool and battery cartridge in
locations where the temperature may reach or
exceed 50 ゚C (122 ゚F).
7. Do not incinerate the battery cartridge even if
it is severely damaged or is completely worn
out. The battery cartridge can explode in a fire.
8. Be careful not to drop or strike battery.
9. Do not use dropped or struck battery.
SAVE THESE INSTRUCTIONS.
Tips for maintaining maximum battery life
1. Charge the battery cartridge before
completely discharged.
Always stop tool operation and charge the
battery cartridge when you notice less tool
power.
2. Never recharge a fully charged battery
cartridge.
Overcharging shortens the battery service life.
3. Charge the battery cartridge with room
temperature at 10 ゚C - 40 ゚C (50 ゚F - 104 ゚F).
Let a hot battery cartridge cool down before
charging it.

9
Parts supplied
1
2
3
4
5
6
7
8
9
10
11
12
13
008588
1
2
3
4
5
7
8
9
10
11
12
6
Top handle
Battery cartridge
Sprocket cover
Front hand guard
Guide bar
Tip guard
Saw chain
knob
Lock off button
Switchtrigger
Front handle
Chaincover
13
Carabiner or rope
attachment point
008589

10
FUNCTIONAL DESCRIPTION
CAUTION:
• Always be sure that the tool is switched off and the
battery cartridge is removed before adjusting or
checking function on the tool.
Installing or removing battery cartridge
Fig.1
• Always switch off the tool before installation or
removal of the battery cartridge.
• To remove the battery cartridge, withdraw it from
the tool while sliding the button on the front of the
cartridge.
• To insert the battery cartridge, align the tongue on
the battery cartridge with the groove in the housing
and slip it into place. Always insert it all the way
until it locks in place with a little click. If you can
see the red part on the upper side of the button, it
is not locked completely. Insert it fully until the red
part cannot be seen. If not, it may accidentally fall
out of the tool, causing injury to you or someone
around you.
• Do not use force when inserting the battery
cartridge. If the cartridge does not slide in easily, it
is not being inserted correctly.
Switch action
CAUTION:
• Before inserting the battery cartridge into the tool,
always check to see that the switch trigger
actuates properly and returns to the "OFF" position
when released.
Fig.2
To prevent the switch trigger from being accidentally
pulled, a lock-off button is provided.
To start the tool, depress the lock-off button and pull the
switch trigger. Release the switch trigger to stop.
ASSEMBLY
CAUTION:
• Always be sure that the tool is switched off and the
battery cartridge is removed before carrying out
any work on the tool.
Installing or removing saw chain
CAUTION:
• Always be sure that the tool is switched off and the
battery cartridge is removed before installing or
removing the saw chain.
• Always wear gloves when installing or removing
the saw chain.
• Use only saw chain and guide bar with bar tip
designed for this chain saw (see the Extract from
the spare parts list).
• In order to prevent kickback, do not remove the bar
tip or replace the guide bar with one without a bar
tip.
Fig.3
Loosen the screw by turning counterclockwise the knob
until the sprocket cover comes off.
Remove the sprocket cover.
Remove saw chain and guide bar from the tool.
Fig.4
Fit in one end of the saw chain on the top of guide bar.
At this time, fit the saw chain as shown in the figure
because it rotates in the direction of arrow.
Fig.5
Place the saw chain so that the spring and boss are
positioned inside it and fit in the other end of saw chain
around the sprocket as shown in the figure.
Fig.6
While turning the guide bar counterclockwise, install it so
that the end of guide bar contacts the spring.
Fig.7
Insert the hook of sprocket cover into the hole in the tool
and then place the sprocket cover on the tool.
Fig.8
Turn the knob clockwise to tighten the screw firmly.
Adjusting saw chain tension
Fig.9
Just a slight loosening of the screw allows the saw chain
tension to be adjusted. After adjusting, retighten the
screw firmly.
Fig.10
CAUTION:
• For a while after a new saw chain is installed, it
tends to become loosened. From time to time
check the saw chain tension before use.
• Low tension of saw chain may cause coming out of
place.
• Installing or removing saw chain should be carried
out in a clean place free from sawdust and the like.
OPERATION
Lubrication
Fig.11
Saw chain is automatically lubricated when the tool is in
operation.
Check the amount of remaining oil in the oil tank through
the oil inspection window.
To refill the tank, remove the cap from the oil tank
opening. The oil tank capacity is 80 ml.
After refilling the tank, always screw the provided oil tank
cap on the chain saw.
CAUTION:
• When filling the chain saw with chain oil for the first
time, or refilling the tank after it has been

11
completely emptied, add oil up to the bottom edge
of the filler neck. The oil delivery may otherwise be
impaired.
• As a saw chain oil, use oil exclusively for Makita
chain saws or oil available in market.
• Never use oil including dust and particles or
volatile oil.
• When pruning trees, use botanical oil. Mineral oil
may harm trees.
• Never force the chain saw when pruning trees.
• Before cutting out, make sure that the provided oil
tank cap is screwed in place.
Hold the chain saw away from the tree. Start it and wait
until lubrication on saw chain is adequate.
Bring the tip guide/lower guide into contact with the
branch to be cut before switching on. Cutting without
bringing the tip guide/lower guide into contact with the
branch may cause the guide bar to wobble, resulting in
injury to operator.
Saw the wood to be cut by just moving it down.
Pruning trees
Fig.12
Fig.13
CAUTION:
• Keep all parts of the body away from the saw chain
when the motor is operating.
• Hold the chain saw firmly with both hands when
the motor is running.
• Do not overreach. Keep proper footing and
balance at all times.
Bring the tip guide/lower guide into contact with the
branch to be cut before switching on. Cutting without
bringing the tip guide/lower guide into contact with the
branch may cause the guide bar to wobble, resulting in
injury to operator.
When cutting thick branches, first make a shallow
undercut and then make the finish cut from the top.
Fig.14
If you try to cut off thick branches from the bottom, the
branch may close in and pinch the saw chain in the cut.
If you try to cut off thick branches from the top without a
shallow undercut, the branch may splinter.
Fig.15
If you cannot cut the timber right through with a single
stroke:
Apply light pressure to the handle and continue sawing
and draw the chain saw back a little; then apply the
spike a little lower and finish the cut by raising the
handle.
Fig.16
Carrying tool
Fig.17
Always remove the battery cartridge from the tool and
overlap the guide bar with the scabbard before carrying
the tool. Also cover the battery cartridge with the battery
cover.
MAINTENANCE
CAUTION:
• Always be sure that the tool is switched off and the
battery cartridge is removed before attempting to
perform inspection or maintenance.
• Always wear gloves when performing any
inspection or maintenance.
• Never use gasoline, benzine, thinner, alcohol or
the like. Discoloration, deformation or cracks may
result.
Sharpening the saw chain
CAUTION:
• Always remove the battery cartridge and wear
safety gloves when performing work on the saw
chain.
Fig.18
Sharpen the saw chain when:
−Mealy sawdust is produced when damp wood is
cut;
−The chain penetrates the wood with difficulty, even
when heavy pressure is applied;
−The cutting edge is obviously damaged;
−The saw pulls to the left or right in the wood. The
reason for this behaviour is uneven sharpening of
the saw chain, or damage to one side only.
Sharpen the saw chain frequently, but remove only a
little material each time.
Two or three strokes with a file are usually sufficient for
routine resharpening. When the saw chain has been
resharpened several times, have it sharpened in a
MAKITA specialist repair shop.
File and file guiding
−Use a special round file (optional accessory) for
saw chains, with a diameter of 4 mm, to sharpen
the chain. Normal round files are not suitable.
Fig.19
−The file should only engage the material on the
forward stroke. Lift the file off the material on the
return stroke.
−Sharpen the shortest cutter first. The length of this
cutter is then the gauge dimension for all other
cutters on the saw chain.
−Guide the file as shown in the figure.
−The file can be guided more easily if a file holder
(accessory) is employed. The file holder has
markings for the correct sharpening angle of 30 °
(align the markings parallel to the saw chain) and
limits the depth of penetration (to 4/5 of the file
diameter).
Guide the file as shown in the figure.
−After sharpening the chain, check the height of the
depth gauge using the chain gauge tool (optional
accessory).

12
Fig.20
−Remove any projecting material, however small,
with a special flat file (optional accessory).
−Round off the front of the depth gauge again.
−Wash away dust and particles from saw chain after
adjusting the height of depth gauge.
Cleaning guide bar
Fig.21
Chips and sawdust will build up in the guide bar groove,
clogging it and impairing oil flow. Always clean out the
chips and sawdust when sharpening or replacing the
saw chain.
Cleaning the oil filter at the oil discharge hole
Small dust or particles may be built up in the oil filter at
the oil discharge hole during operation.
Small dust or particles built up in the oil filter may impair
the oil discharge flow and cause an insufficient
lubrication on the whole saw chain.
When a poor chain oil delivery occurs at the top of
guide bar, clean the filter as follows.
Remove the battery cartridge from the tool.
Remove the sprocket cover and saw chain from the tool.
(Refer to the section titled " Installing or removing saw
chain ".)
Fig.22
Remove the push nut using a slotted bit screwdriver with
a slender shaft or the like.
Fig.23
Take the filter out of the chain saw and remove small
dust or particles from it. When the filter is too dirty,
replace it with a new one.
Insert the battery cartridge into the tool.
Fig.24
Pull the switch trigger to flow built-up dust or particles off
the oil discharge hole by discharging chain oil.
Remove the battery cartridge from the tool.
Fig.25
Insert the cleaned oil filter into the oil discharge hole.
When the filter is too dirty, replace it with a new one.
Fig.26
Insert the push nut with its correct side facing up as
shown in the figure into the oil discharge hole to secure
the filter. When the filter cannot be secured with a
disfigured push nut, replace the push nut with a new
one.
Reinstall the sprocket cover and saw chain on the tool.
Replacing the sprocket
Before fitting a new saw chain, check the condition of the
sprocket.
Fig.27
CAUTION:
• A worn sprocket will damage a new saw chain.
Have the sprocket replaced in this case. The
sprocket need to be installed so that it always
faces as shown in the figure.
Fig.28
Always fit a new locking ring when replacing the
sprocket.
Replacing carbon brushes
Fig.29
Remove and check the carbon brushes regularly.
Replace when they wear down to the limit mark. Keep
the carbon brushes clean and free to slip in the holders.
Both carbon brushes should be replaced at the same
time. Use only identical carbon brushes.
Use a screwdriver to remove the brush holder caps.
Take out the worn carbon brushes, insert the new ones
and secure the brush holder caps.
Fig.30
Storing tool
Clean the tool before storing. Remove any chips and
sawdust from the tool after removing the sprocket cover.
After cleaning the tool, run it under no load to lubricate
the saw chain and guide bar.
Cover the guide bar with the scabbard.
Remove oil from the oil tank to empty it and place the
chain saw with the tank cap facing upward.
To maintain product SAFETY and RELIABILITY, repairs,
any other maintenance or adjustment should be
performed by Makita Authorized Service Centers,
always using Makita replacement parts.
ACCESSORIES
CAUTION:
• These accessories or attachments are
recommended for use with your Makita tool
specified in this manual. The use of any other
accessories or attachments might present a risk of
injury to persons. Only use accessory or
attachment for its stated purpose.
If you need any assistance for more details regarding
these accessories, ask your local Makita Service Center.
• Various type of Makita genuine batteries and
chargers
• Saw chain
• Scabbard
• Guide bar complete
• File

13
УКРАЇНСЬКА (Оригінальні інструкції)
Пояснення до загального виду
1-1. Червона частина
1-2. Кнопка
1-3. Касета закумулятором
2-1. Кнопка блокування вимкненого
положення
2-2. Кнопка вимикача
3-1. Кришка зірочки
3-2. Ручка
4-1. Різак
4-2. Шина
4-3. Стрілка
5-1. Пружина
5-2. Зірочка
5-3. Втулка
6-1. Пружина
6-2. Шина
6-3. Втулка
7-1. Кришка зірочки
7-2. Скоба
7-3. Отвір
11-1. Кришечка мастильного бака
11-2. Оглядове вікно мастильного
бака
11-3. Отвір мастильного бака
12-1. Кінцева напрямна
13-1. Нижня напрямна
17-1. Касета закумулятором
17-2. Піхви (чохол для пили)
22-1. Натискна гайка
22-2. Викрутка із шліцованим
наконечником
23-1. Фільтр
25-1. Фільтр
26-1. Натискна гайка
27-1. Зірочка
27-2. Стопорне кільце
28-1. Стопорне кільце
28-2. Зірочка
28-3. Шайба
29-1. Обмежувальна відмітка
30-1. Ковпачок щіткотримача
30-2. Викрутка
ТЕХНІЧНІ ХАРАКТЕРИСТИКИ
Модель BUC121 BUC122
Швидкість ланцюга за хвилину (хв.-1) 4,8 м/с(290 м/хв.) 5,0 м/с(300 м/хв.)
Довжина шини 115 мм
Тип 25 AP
Крок 1/4"
Ланцюгова пила
Кількість приводних ланок 42
Загальна довжина 422мм 422мм
Чиста вага 2,5 кг 2,6 кг
Номінальна напруга 14,4 Впост. Тока 18 Впост. Тока
• Через те, що ми не припиняємо програми досліджень ірозвитку, наведені тут технічні характеристики можуть бути змінені
без попередження.
• Технічні характеристики приладу та касета закумулятором можуть відрізнятися врізних країнах.
• Вага разом зкасетою закумулятором відповідно до EPTA-Procedure 01/2003
END005-3
Символи
Далі наведені символи, які застосовуються для
позначення обладнання. Перед користуванням
переконайтеся, що Ви розумієте їхнє значення.
・Прочитайте дану інструкцію.
・Вдягайте засоби захисту очей.
・Вдягайте засоби захисту вух.
・Обов'язково одягайте шолом,
окуляри та засоби захисту органів
слуху.
・Використовуйте належний захист ніг
та рук.
・Не залишайте інструмент під дощем.
・Під час роботи тримайте пилу обома
руками! Експлуатація за допомогою
тільки однієї руки євкрай
небезпечною!
・Цю пилу може використовувати
тільки належним чином навчений
персонал.
・Тільки для країн ЄС
Не викидайте електроприлади або
акумуляторні батареї разом з
побутовим сміттям!
Згідно зЄвропейською директивою
2002/96/ЕС про утилізацію
електричного та електронного
обладнання та 2006/66/EC відносно
батарей та акумуляторів ібатарей та
акумуляторів, термін служби яких
закінчився, та їх використання з
дотриманням національних законів,
електричне обладнання та
акумуляторні батареї, термін служби
яких закінчився, потрібно збирати
окремо та повертати на відповідні
підприємства по їх переробці.
Cd
Ni-MH
Li-ion

14
ENE031-1
Призначення
Інструмент призначено для різання пиломатеріалу та
колод.
Для моделі BUC121
ENG102-3
Шум
Рівень шуму за шкалою Аутиповому виконанні,
визначений відповідно до EN60745:
Рівень звукового тиску (LpA) : 84 дБ(A)
Рівень звукової потужності (LWA): 92 дБ(A)
Погрішність (К): 2 дБ(A)
Обов'язково використовуйте протишумові
засоби
ENG221-3
Вібрація
Загальна величина вібрації (сума трьох векторів),
визначена згідно зEN60745:
Режим роботи: пиляння деревини
Вібрація (aгод) : 4,2 м/с2
Похибка (К): 1,5 м/с2
• Заявлене значення вібрації було виміряно у
відповідності до стандартних методів
тестування та може використовуватися для
порівняння одного інструмента зіншим.
• Заявлене значення вібрації може також
використовуватися для попередньої оцінки
впливу.
УВАГА:
• Залежно від умов використання вібрація під час
фактичної роботи інструмента може
відрізнятися від заявленого значення вібрації.
• Забезпечте належні запобіжні заходи для
захисту оператора, що відповідатимуть умовам
використання інструмента (слід брати до уваги
всі складові робочого циклу, такі як час, коли
інструмент вимкнено та коли він починає
працювати на холостому ході під час запуску).
Для моделі BUC122
ENG102-3
Шум
Рівень шуму за шкалою Аутиповому виконанні,
визначений відповідно до EN60745:
Рівень звукового тиску (LpA) : 84,6 дБ(A)
Рівень звукової потужності (LWA): 92,7 дБ(A)
Погрішність (К): 2 дБ(A)
Обов'язково використовуйте протишумові
засоби
ENG221-3
Вібрація
Загальна величина вібрації (сума трьох векторів),
визначена згідно зEN60745:
Режим роботи: пиляння деревини
Вібрація (aгод) : 4,3 м/с2
Похибка (К): 1,5 м/с2
• Заявлене значення вібрації було виміряно у
відповідності до стандартних методів
тестування та може використовуватися для
порівняння одного інструмента зіншим.
• Заявлене значення вібрації може також
використовуватися для попередньої оцінки
впливу.
УВАГА:
• Залежно від умов використання вібрація під час
фактичної роботи інструмента може
відрізнятися від заявленого значення вібрації.
• Забезпечте належні запобіжні заходи для
захисту оператора, що відповідатимуть умовам
використання інструмента (слід брати до уваги
всі складові робочого циклу, такі як час, коли
інструмент вимкнено та коли він починає
працювати на холостому ході під час запуску).
ENH026-4
Тільки для країн Європи
Декларація про відповідність стандартам
ЄС
Наша компанія, Makita Corporation, як
відповідальний виробник, наголошує на тому, що
обладнання Makita:
Позначення обладнання:
Бездротова ланцюгова пила
№моделі / тип: BUC121
Технічні характеристики: див. таблицю "Технічні
характеристики".
єсерійним виробництвом та
Відповідає таким Європейським Директивам:
2000/14/EC, 2006/42/EC
Та вироблені увідповідності до таких стандартів та
стандартизованих документів:
EN60745, EN/ISO11681
№сертифіката ЄС на проведення типових
випробувань.M6T 09 10 24243 110
Огляд за вимогами ЄС на відповідність 98/37/EC та
2006/42/EC був проведений:
TÜV SÜD Product Service GmbH,
Ridlerstraße 65, 80339 MÜNCHEN, Germany
Ідентифікаційний №0123
Технічна документація знаходиться унашого
уповноваженого представника вЄвропі, асаме:
Makita International Europe Ltd,
Michigan, Drive, Tongwell,
Milton Keynes,Bucks MK15 8JD, Англія
Процедура оцінки відповідності, яка вимагається
Директивою 2000/14/EC, відбулася згідно здодатком
додатку V.
Виміряний рівень акустичної потужності: 92,0дБ
Гарантований рівень акустичної потужності: 94,0дБ

15
4 листопада 2009
000230
Томоязу Като
Директор
Makita Corporation
3-11-8, Sumiyoshi-cho,
Anjo, Aichi, ЯПОНІЯ
ENH026-4
Тільки для країн Європи
Декларація про відповідність стандартам
ЄС
Наша компанія, Makita Corporation, як
відповідальний виробник, наголошує на тому, що
обладнання Makita:
Позначення обладнання:
Бездротова ланцюгова пила
№моделі / тип: BUC122
Технічні характеристики: див. таблицю "Технічні
характеристики".
єсерійним виробництвом та
Відповідає таким Європейським Директивам:
2000/14/EC, 2006/42/EC
Та вироблені увідповідності до таких стандартів та
стандартизованих документів:
EN60745, EN/ISO11681
№сертифіката ЄС на проведення типових
випробувань.M6T 09 10 24243 110
Огляд за вимогами ЄС на відповідність 98/37/EC та
2006/42/EC був проведений:
TÜV SÜD Product Service GmbH,
Ridlerstraße 65, 80339 MÜNCHEN, Germany
Ідентифікаційний №0123
Технічна документація знаходиться унашого
уповноваженого представника вЄвропі, асаме:
Makita International Europe Ltd,
Michigan, Drive, Tongwell,
Milton Keynes,Bucks MK15 8JD, Англія
Процедура оцінки відповідності, яка вимагається
Директивою 2000/14/EC, відбулася згідно здодатком
додатку V.
Виміряний рівень акустичної потужності: 93,0дБ
Гарантований рівень акустичної потужності: 95,0дБ
4 листопада 2009
000230
Томоязу Като
Директор
Makita Corporation
3-11-8, Sumiyoshi-cho,
Anjo, Aichi, ЯПОНІЯ
GEA010-1
Застереження стосовно техніки
безпеки при роботі з
електроприладами
УВАГА! Прочитайте усі застереження
стосовно техніки безпеки та всі інструкції.
Недотримання даних застережень та інструкцій може
призвести до ураження струмом та виникнення
пожежі та/або серйозних травм.
Збережіть усі інструкції зтехніки
безпеки та експлуатації на майбутнє.
GEB039-2
Попередження про необхідну
обережність під час роботи з
акумуляторною ланцюговою
пилою:
1.
Коли ланцюгова пила працює, слід забрати
усі частини тіла від пильного ланцюга.
Перед тим, як запускати ланцюгову пилу
слід перевірити, щоб пильний ланцюг
нічого не торкався.
Відволікання на короткий
час під час роботи пили може призвести до
того, що одяг буде затягнено пильним
ланцюгом.
2. Слід завжди тримати ланцюгову пилу
правою рукою за задню ручку, алівою – за
передню.Якщо пилу тримати по-іншому, то це
підвищує ризик травм, тому цього ніколи
неможна робити.
3. Електроінструмент слід тримати тільки за
ізольовані поверхні держака, оскільки
ланцюг пили може зачепити сховану
електропроводку.Торкання ланцюгом пили
струмоведучої проводки може призвести до
передання напруги до оголених металевих
частин електроінструмента та до ураження
оператора електричним струмом.
4. Слід одягати засоби захисту органів зору та
слуху. Також рекомендується
використовувати засоби захисту голови,
рук, ніг та ступнів.Належний захисний одяг
знижує кількість травм від сміття. Що
розлітається, або від випадкового контакту з
пильним ланцюгом.
5. Заборонено користуватись пилою,
знаходячись на дереві.Робота із пилою на
дереві може призвести до травм.
6. Слід завжди твердо стояти на ногах, та
працювати пилою стоячи на стійкій,
надійній та рівній поверхні.Робота на
слизьких або нестійких поверхнях, таких як
драбини, може призвести до втрати рівноваги
та контролю над пилою.

16
7.
Під час різання гілки, що знаходиться під на
тяжінням, слід остерігатись відскоку.
Коли
натяг волокон деревини знімається, то
натягнута гілка може вдарити оператора
та/або відкинути пилу із втратою контролю над
нею.
8.
Слід бути дуже обережнім під час
обрізання кущів та порості.
Гнучкі гілки
можуть бути затягнені впильний ланцюг та їх
може потягнути унапрямку до оператора, або
оператора може потягнути, івін втратить
рівновагу.
9.
Ланцюгову пилу слід переносити за
передню ручку увимкненому стані,
відвернувши її від тіла. Під час
перевезення або зберігання пили на неї
слід завжди встановлювати кожух для
шини.
Вірне поводження із ланцюговою пилою
знизить вірогідність випадкового контакту із
пильним ланцюгом, що рухається.
10. Виконуйте вимоги інструкцій щодо
змащування, натягу ланцюга та заміни
приналежностей.Невірно натягнута або
змащена пила може або зламатись, або буде
підвищено ризик віддачі.
11. Ручки повинні бути сухими, чистими та не
бути забрудненими мастило або жиром.
Жирні або забруднені мастилом ручки є
слизькими, що призводить до втрати контролю
над інструментом.
12. Можна різати тільки деревину. Пильний
ланцюг слід застосовувати тільки за їх
призначенням. Наприклад: Заборонено
використовувати ланцюгову пилу для
різання пластика або не дерев’яні
будівельні матеріали.Використання
ланцюгової пили не за призначенням може
призвести до створення небезпечної ситуації.
13. Причини та заходи запобігання віддачі:
Якщо кінець шини торкається якогось предмета,
або коли дерев’яна деталь закривається та
защипає ланцюг впропилі, може трапитись
віддача.
Торкання кінцем вдеяких випадках може
призвести до раптової зворотної реакції, коли
шину буде підкинуто догори та назад внапрямку
оператора.
Затискання пильного ланцюга уверхній частині
шини може призвести то різкого штовхання
шини внапрямку оператора.
Будь-яка зцих реакцій може призвести до
втрати контролю над пилою, що всвою чергу
може призвести до серйозних травм. Не слід
суцільно покладатись на засоби безпеки,
встановлені на пилі. Як користувач ланцюгової
пили, ви повинні вжити декілька заходів, щоб
захиститись від нещасних випадків або
поранень під час пиляння.
Причинами віддачі єнеправильне користування
інструментом та/або неправильний порядок
експлуатації або умови експлуатації, але їх
можна уникнути дотримуючись запобіжних
заходів, що наведені нижче:
−Слід міцно триматись за ручки пили усіма
пальцями обох рук, та розташовувати своє
тіло таким чином, щоб було можливо
протистояти силі віддачі. Оператор може
контролювати силу віддачі, якщо було
вжито належних заходів. Неможна
відпускати пилу.
001743
−Ніколи не слід тягнутися інструментом
до робочої деталі та різати вище рівня
плеча.Дотримання цих правил допоможе
уникнути непередбачуваного контакту з
ріжучою частиною пили та дозволить
краще контролювати ланцюгову пилу у
непередбачуваних ситуаціях.
−Використовувати слід тільки запасні
шини та ланцюги, вказані виробником.
Використання невідповідних запасних шин
та ланцюгів може призвести до поломки
ланцюга та/або віддачі.
−Слід дотримуватись інструкцій
виробника щодо заточування та
обслуговування пили.Зменшення
висоти калібру глибини може призвести до
посилення віддачі.
ЗБЕРІГАЙТЕ ЦІ ВКАЗІВКИ
УВАГА:
НІКОЛИ НЕ СЛІД втрачати пильності та
розслаблюватися під час користування виробом
(що приходить при частому використанні); слід
завжди строго дотримуватися правил безпеки під
час використання цього пристрою. НЕНАЛЕЖНЕ
ВИКОРИСТАННЯ або недотримання правил
безпеки, викладених вцьому документі, може
призвести до серйозних травм.

17
ENC007-4
ВАЖЛИВІ ІНСТРУКЦІЇ БЕЗПЕКИ
ДЛЯ КАСЕТИ АКУМУЛЯТОРА
1.
Перед тим як користуватися касетою
акумулятора, слід прочитати усі інструкції та
попереджуючі відмітки щодо (1) зарядний
пристрій акумулятора, (2) акумулятор та (3)
вироби, що працюють від акумулятора.
2. Не слід розбирати касету акумулятора.
3. Якщо період роботи дуже покоротшав, слід
негайно припинити користування. Це може
призвести до ризику перегріву, опіку та
навіть вибуху.
4. Якщо електроліт потрапив до очей, слід
промити їх чистою водою та негайно
звернутися за медичного закладу. Це може
призвести до втрати зору.
5. Не замкніть касету акумулятора.
(1) Не слід торкатися клем будь яким
струмопровідним матеріалом.
(2) Не слід зберігати касету акумулятора в
ємності зіншими металевими
предметами, такими як цвяхи, монети і
т.д.
(3) Не залишайте касету акумулятора під
дощем, запобігайте контакту зводою.
Коротке замикання може призвести до
великого струму, перегріву, можливих
опіків та навіть виходу зладу.
6. Не слід зберігати інструмент та касету з
акумулятором вмістах, де температура
може сягнути та перевищити 50гр.゚C (122 ゚
F).
7. Не слід спалювати касету закумулятором
навіть, якщо вона була неодноразово
пошкоджена або повністю спрацьована.
Касета закумулятором може вибухнути в
огні.
8. Не слід кидати або ударяти акумулятор.
9. Не слід використовувати акумулятор, що
зазнав падіння або удару.
ЗБЕРІГАЙТЕ ЦІ ВКАЗІВКИ
Поради по забезпеченню максимального
строку експлуатації акумулятора
1. Касету закумулятором слід заряджати до
того, як він розрядиться повністю.
Завжди слід зупинити роботу інструменту
та зарядити акумулятор, якщо ви помітили
зменшення потужності інструменту.
2. Ніколи не слід заряджати повторно
повністю заряджену касету закумулятором.
Перезарядження скорочує строк
експлуатації акумулятора.
3. Касету закумулятором слід заряджати при
кімнатній температурі 10 ゚C - 40 ゚C (50 ゚F -
104 ゚F). Перед тим як заряджати касету з
акумулятором слід залишити її доки вона не
остигне.

18
Запчастини, що поставляються
1
2
3
4
5
6
7
8
9
10
11
12
13
008588
1
2
3
4
5
7
8
9
10
11
12
6
Верхня ручка
Касета з акумулятором
Кришка зірочки
Передня захисна
огорожа для рук
Шина
Кожух наконечника
Ланцюгова пила
Ручка
Кнопка блокування
вимкненого положення
Кнопка вимикача
Передня ручка
Кришка ланцюга
13
Місце для закріплення
карабіна або мотузки
008589

19
ІНСТРУКЦІЯ ЗВИКОРИСТАННЯ
ОБЕРЕЖНО:
• Завжди перевіряйте, щоб прилад був
вимкнений, акасета закумулятором була знята,
перед регулюванням або перевіркою
функціонування інструмента.
Встановлення та зняття касети з
акумулятором.
Fig.1
• Перед тим, як встановлювати або знімати
касету закумулятором, інструмент слід завжди
вимикати.
• Для того, щоб зняти касету закумулятором, її
слід витягти зінструмента, натиснувши кнопку
спереду касети.
• Для того, щоб вставити касету закумулятором,
слід сумістити шпонку касети збатареями із
пазом вкорпусі та вставити касету. Касету слід
завжди вставляти до упору доки не почується
щиглик, ікасету буде заблоковано вробочому
положенні. Якщо на верхній частині кнопки
видна червона частина, це означає, що вона
заблокована неповністю. Вставте касету
повністю, доки червону частину не буде видно.
Якщо цього не зробити, то касета може
випадково випасти зінструмента та поранити
вас або людей, що знаходяться поряд.
• Не застосовуйте силу, вставляючи касету з
акумулятором. Якщо касета не вставляється
легко, то це означає, що ви її невірно
вставляєте.
Дія вимикача.
ОБЕРЕЖНО:
• Перед тим, як вставляти касету закумулятором
вінструмент, слід перевірити належну роботу
курка вмикача, тобто щоб він повертався у
положення "ВИМК.", коли його відпускають.
Fig.2
Для того, щоб запобігти випадковому натисканню
курка вмикача, єкнопка блокування вимкненого
положення.
Для того, щоб запустити інструмент, слід натиснути
на кнопку блокування вимкненого положення та
натиснути на курок вмикача. Для зупинення роботи
курок слід відпустити.
КОМПЛЕКТУВАННЯ
ОБЕРЕЖНО:
• Завжди перевіряйте, щоб прилад був
вимкнений, акасета закумулятором була знята,
перед тим, як проводити будь-які роботи на
інструменті.
Встановлення та зняття пильного ланцюга
ОБЕРЕЖНО:
•
Завжди перевіряйте, щоб прилад був вимкнений,
акасета закумулятором була знята, перед
встановленням або зняттям пильного ланцюга.
•
Під час встановлення або зняття пильного
ланцюга на руки повинні бути вдягнені рукавиці.
• Використовуйте тільки шину та наконечник, які
підходять для даного пильного ланцюга (див.
виписку зпереліку запчастин).
• Для того, щоб запобігти віддачі, неможна
знімати наконечник шини, або заміняти шину на
таку, що не має наконечника.
Fig.3
Послабте гвинт, повернувши ручку по годинниковій
стрілці, доки не зніметься кришка зірочки.
Зніміть кришку зірочки.
Зніміть зінструмента пильний ланцюг та шину.
Fig.4
Встановіть кінець пильного ланцюга на верхню
частину шини. Тепер пильний ланцюг слід
встановити, як показано на малюнку, оскільки він
обертається унапрямку, що вказаний стрілкою.
Fig.5
Розташуйте ланцюг таким чином, щоб пружина та
втулка були розташовані всередині ланцюга, апотім
надіньте другий кінець на зірочку, як показано на
малюнку.
Fig.6
Повертаючи шину по годинниковій стрілці, її слід
встановити таким чином, щоб кінець шини торкався
пружини.
Fig.7
Вставте гак кришки зірочки вотвір вінструменті, а
потім встановіть кришку зірочки на інструмент.
Fig.8
Поверніть ручку по годинниковій стрілці для того,
щоб щільно затягнути гвинт.
Регулювання натягу пильного ланцюга
Fig.9
Просто невелике послаблення гвинта дозволяє
відрегулювати натяг пильного ланцюга. Після
регулювання затягніть гвинт.
Fig.10
ОБЕРЕЖНО:
• Протягом деякого часу після встановлення
пильний ланцюг послаблюється. Слід
періодично перевіряти натяг пильного ланцюга
перед використанням.
• Слабкий натяг пильного ланцюга може
призвести до того, що він зіскочить.
• Встановлювати або знімати пильний ланцюг
слід учистому місці, уякому немає тирси та ін.

20
ЗАСТОСУВАННЯ
Змащування
Fig.11
Пильний ланцюг автоматично змащується під час
роботи інструмента.
Перевірте кількість мастила вмастильному баку,
поглянувши воглядове вікно.
Для того, щоб залити бак, слід зняти кришку з
горловини бака. Об’єм мастильного бака – 80 мл.
Після заправки бака слід завжди загвинчувати
кришку мастильного бака на ланцюговій пилі.
ОБЕРЕЖНО:
• Під час першого заливання мастила для
пильного ланцюга або під час заправки пустого
бака, мастило слід заливати до рівня нижньої
частини заливної горловини. Інакше постачання
мастила може бути утрудненим.
• Уякості мастила для ланцюга слід
використовувати тільки мастило Makita для
ланцюгових пил, що продається на ринку.
• Заборонено використовувати мастило, що
містить частки пилу або летуче мастило.
• Під час обрізання дерев слід використовувати
ботанічне мастило. Мінеральне мастило може
пошкодити дерева.
• Заборонено натискати на ланцюгову пилу із
силою під час обрізання дерев.
• Перед тим, як щось вирізати, слід перевірити,
щоб було належним загвинчено кришку
мастильного бака.
Слід тримати пилу на відстані від дерева. Запустіть її
та заждіть, Доки пильний ланцюг буде достатньо
змащений.
Перед тим як вмикати пилу, слід піднести напрямну
наконечника або нижню напрямну до гілки, що
різатиметься. Різання без піднесення напрямної
наконечника або нижньої напрямної до гілки може
спричинити коливання шини, що може призвести до
поранення оператора.
Дерево слід пиляти просто пересуваючи пилу
додолу.
Підрізування дерев
Fig.12
Fig.13
ОБЕРЕЖНО:
• Коли працює мотор, слід забрати усі частини
тіла від пильного ланцюга.
• Коли працює мотор, слід міцно тримати
ланцюгову пилу обома руками.
• Не слід тягнутись занадто далеко. Слід завжди
твердо стояти на ногах та тримати рівновагу.
Перед тим як вмикати пилу, слід піднести напрямну
наконечника або нижню напрямну до гілки, що
різатиметься. Різання без піднесення напрямної
наконечника або нижньої напрямної до гілки може
спричинити коливання шини, що може призвести до
поранення оператора.
Під час різання товстих гілок, спочатку слід зробити
неглибокий надріз знизу гілки, апотім остаточно
відрізати гілку зверху.
Fig.14
Якщо намагатись різати товсті гілки знизу, то гілка
може опуститись та затиснути врозрізі пильний
ланцюг.
Якщо гілку різати зверху, не зробивши неглибокий
надріз знизу, то гілка може розщепитись.
Fig.15
Якщо дерево розрізати за один прохід неможливо:
трохи натисніть на ручку та продовжуйте пиляти й
відтягніть пилу трохи назад; потім встановіть шип
нижче та закінчіть різання піднімаючи ручку.
Fig.16
Перенесення верстата
Fig.17
Перед тим, як переносити інструмент, слід завжди
знімати касету закумулятором, ашину закривати
піхвами. Касету закумулятором слід також закрити
кришкою.
ТЕХНІЧНЕ ОБСЛУГОВУВАННЯ
ОБЕРЕЖНО:
•
Завжди перевіряйте, щоб прилад був
вимкнений, акасета закумулятором була знята,
перед проведенням перевірки або
обслуговування.
• Під час перевірки або обслуговування слід бути
узахисних рукавицях.
• Ніколи не використовуйте газолін, бензин,
розріджувач, спирт та подібні речовини. Їх
використання може призвести до зміни кольору,
деформації та появи тріщин.
Заточка ланцюгової пили
ОБЕРЕЖНО:
• При виконанні робіт на ланцюговій пилі знеї
слід завжди знімати касету закумулятором та
вдягати захисні рукавиці.
Fig.18
Пильний ланцюг слід заточити, коли:
−Під час пиляння сирого дерева утворюється
борошниста тирса;
−Ланцюг входить вдерево на силу, навіть якщо
на пилу натиснути;
−Ріжуча кромка явно пошкоджена;
−Пилу вдереві тягне вправо або вліво. Причина
такої поведінки - нерівномірна заточка пильного
ланцюга або пошкодження однієї сторони.
Other manuals for BUC121
9
This manual suits for next models
1
Table of contents
Languages:
Other Makita Chainsaw manuals

Makita
Makita HCU01 User manual

Makita
Makita DUC256 User manual

Makita
Makita EA3601F User guide

Makita
Makita UC120D User manual

Makita
Makita DUC303Z User manual

Makita
Makita 5012B Quick start guide

Makita
Makita DUC252 User manual

Makita
Makita UC3050A Manual

Makita
Makita EA3200S User manual

Makita
Makita UC4010A Manual

Makita
Makita BUC121 User manual

Makita
Makita XCU07 User manual

Makita
Makita EA3500S User manual

Makita
Makita EA3500F Instruction Manual

Makita
Makita DUC256 User manual

Makita
Makita UC3041A User manual

Makita
Makita GCU04 User manual

Makita
Makita UC3020A Manual

Makita
Makita DUC204 User manual

Makita
Makita EA3700T User guide