Makita EA3200S User manual

1
Operator’sManual
forGasolineChainSaws
Manueld’utilisation
detronçonneusesthermiques
Manualdeempleo
paramotosierras
EA3200S
EA3201S
WARNING!
ReadandunderstandthisManual.AlwaysfollowsafetyprecautionsintheOwner’sandSafetyManual.
Improperusecancauseseriousinjury!
ATTENTION!
Suiveztoujourslesconseilsdesécuritéduprésentmanueld’emploietdesécurité.Uneutilisationincorrectedela
tronçonneusepeutentraînerdesblessuresgraves!
¡ADVERTENCIA!
Observesiemprelasinstruccionesdeseguridadcontenidasenelmanual.Leaycompenétreseconelcontenido
delmanual.Elusoinadecuadodelamotosierrapuedecausarlesionesdegravedad.

2
ENGLISH
WARNING!
FUELSWITHMORETHAN10%ETHANOLARENOTAPPROVEDFORUSEINMAKITA2STROKEENGINES!
Useofalternativefuels,suchasE20(20% ethanol),E85(85% ethanol)oranyfuelsnotmeetingMAKITArequirementsarenotappro
vedforuseinMAKITA2strokegasolineengines!
USEOFALTERNATIVEFUELSCANCAUSETHEFOLLOWINGPROBLEMS:
Poorengineperformance,lossofpower,overheating,fuelvaporlock,improperclutchengagement,prematuredeteriorationoffuel
lines,prematuredeteriorationofgaskets,prematuredeteriorationofcarburetors.
USINGALTERNATIVEFUELSAND/OR2STROKEOILSNOTACCORDINGTOJASOFCORISOLEGDINMAKITA2STROKEENGINES
WILLVOIDYOURENGINEWARRANTY!
EMISSIONSCONTROLWARRANTYSTATEMENT
YOURWARRANTYRIGHTSANDOBLIGATIONS
The U.S. Environmental Protection Agency (EPA), the California Air Resources Board and MAKITA U.S.A., Inc are
pleasedtoexplaintheemissionscontrolsystem’swarrantyonyour2011modelyearsmalloffroad(equipmenttype)
engines.InCalifornia,newequipmentthatusesmalloffroadenginesmustbedesigned,built,andequippedtomeet
theState’sstringentantismogstandards.MAKITAmustwarranttheemissionscontrolsystemonyoursmalloffroad
(equipmenttype)enginefortheperiodlistedbelowprovidedtherehasbeennoabuse,neglectorimpropermaintenance
ofyourequipment.
Youremissionscontrolsystemmayincludepartssuchas:carburetorsorfuelinjectionsystem,ignitionsystem,catalytic
converters,fueltanks,valves,filters,clamps,connectors,andotherassociatedcomponents.Also,includedmaybe
hoses,belts,connectors,sensors,andotheremissionrelatedassemblies.
Whereawarrantableconditionexists,MAKITAwillrepairyoursmalloffroad(orequipmenttype)engineatnocostto
youincludingdiagnosis,partsandlabor.
MANUFACTURER’SWARRANTYCOVERAGE:
Thisemissionscontrolsystemiswarrantedfortwoyears.Ifanyemissionsrelatedpartonyourequipmentisdefective,
thepartwillberepairedorreplacedbyMAKITA.
OWNER’SWARRANTYRESPONSIBILITIES:
• Asthesmalloffroad(equipmenttype)engineowner,youareresponsibleforperformanceoftherequiredmain
tenance listed in your owner’s manual. MAKITA recommends that you retain all receipts covering maintenance on
yoursmalloffroad(equipmenttype)engine,butMAKITAcannotdenywarrantysolelyforthelackofreceiptsoryour
failure to ensure the performance of all scheduled maintenance.
• Asthesmalloffroad(equipmenttype)engineowner,youshouldhoweverbeawarethatMAKITAmaydenyyouwar
rantycoverageifyoursmalloffroad(equipmenttype)engineoraparthasfailedduetoabuse,neglect,orimproper
maintenanceorunapprovedmodifications.
Youareresponsibleforpresentingyoursmalloffroad(equipmenttype)enginetoaMAKITAdistributioncenterorservice
centerassoonastheproblemexists.Thewarrantyrepairsshouldbecompletedinareasonableamountoftime,not
toexceed30days.Ifyouhaveaquestionregardingyourwarrantycoverage,youshouldcontacttheMAKITAWarranty
ServiceDepartmentat18004MAKITA(4625482).
DEFECTSWARRANTYREQUIREMENTS:
(a) Thewarrantyperiodbeginsonthedatetheengineorequipmentisdeliveredtoanultimatepurchaser.
(b) GeneralEmissionsWarrantyCoverage.MAKITAwarrantstotheultimateownerandeachsubsequentowner
thatthesmalloffroadengineorequipmentis:
(1)Designed,built,andequippedsoastoconformwithallapplicableregulationsadoptedbytheAirResources
Board; and
(2) Free from defects in materials and workmanship that causes the failure of a warranted part for a period of two
years.
(c)Thewarrantyonemissionsrelatedpartswillbeinterpretedasfollows:
(1)Anywarrantedpartthatisnotscheduledforreplacementasrequiredmaintenanceinthewritteninstructions
requiredbysubsection(d)mustbewarrantedforthewarrantyperioddefinedinSubsection(b)(2).Ifanysuch
partfailsduringtheperiodofwarrantycoverage,itmustberepairedorreplacedbythemanufactureraccordingto
Subsection(4)below.Anysuchpartrepairedorreplacedunderthewarrantymustbewarrantedfortheremaining
warranty period.

3
(2)Anywarrantedpartthatisscheduledonlyforregularinspectioninthewritteninstructionsrequiredbysubsection
(d)mustbewarrantedforthewarrantyperioddefinedinSubsection(b)(2).Astatementinsuchwritteninstructions
totheeffectof“repairorreplaceasnecessary”willnotreducetheperiodofwarrantycoverage.Anysuchpart
repairedorreplacedunderwarrantymustbewarrantedfortheremainingwarrantyperiod.
(3)Anywarrantedpartthatisscheduledforreplacementasrequiredmaintenanceinthewritteninstructionsre
quiredbysubsection(d)mustbewarrantedfortheperiodoftimepriortothefirstscheduledreplacementpoint
forthatpart.Ifthepartfailspriortothefirstscheduledreplacement,thepartmustberepairedorreplacedbythe
enginemanufactureraccordingtoSubsection(4)below.Anysuchpartrepairedorreplacedunderwarrantymust
bewarrantedfortheremainderoftheperiodpriortothefirstscheduledreplacementpointforthepart.
(4)Repairorreplacementofanywarrantedpartunderthewarrantymustbeperformedatnochargetotheowner
at a warranty station.
(5)NotwithstandingtheprovisionsofSubsection(4)above,warrantyservicesorrepairsmustbeprovidedatall
manufacturerdistributioncentersthatarefranchisedtoservicethesubjectengines.
(6)Theownermustnotbechargedfordiagnosticlaborthatleadstothedeterminationthatawarrantedpartisin
fact defective, provided that such diagnostic work is performed at a warranty station.
(7)Themanufacturerisliablefordamagestootherenginecomponentsproximatelycausedbyafailureunder
warranty of any warranted part.
(8)ThroughouttheemissionswarrantyperioddefinedinSubsection(b)(2),themanufacturermustmaintaina
supplyofwarrantedpartssufficienttomeettheexpecteddemandforsuchparts.
(9)Anyreplacementpartmaybeusedintheperformanceofanywarrantymaintenanceorrepairsandmustbe
providedwithoutchargetotheowner.Suchusewillnotreducethewarrantyobligationsofthemanufacturer.
(10)AddonormodifiedpartsthatarenotexemptedbytheAirResourcesBoardmaynotbeused.Theuseofany
nonexemptedaddonormodifiedpartswillbegroundsfordisallowingawarrantyclaim.Themanufacturerwillnot
beliabletowarrantfailuresofwarrantedpartscausedbytheuseofanonexemptedaddonormodifiedpart.
(11)Themanufacturerissuingthewarrantyshallprovideanydocumentsthatdescribethatmanufacturer'swarranty
proceduresorpolicieswithinfiveworkingdaysofrequestbytheAirResourcesBoard.
(d) EmissionWarrantyPartsList
(1) FuelMeteringSystem
(I) Carburetor
(II) Fuelfilter,ifapplicable
(III) Choke (Cold start enrichment system)
(IV) Fuel Tank
(2) AirInductionSystem
(I) Intake manifold.
(II) Airfilter.
(3) IgnitionSystem
(I) Spark Plug
(II) Ignition coil
(III) Flywheel Magneto
(4) ExhaustGasRecirculation(EGR)System(ifapplicable)
(I) EGRchamber
(5) Catalyst,ifapplicable
(I) Catalyticconverter,ifapplicable
(6) MiscellaneousItemsUsedinAboveSystems
(I) Hoses,belts,connectors,sealinggaskets,clamps,fasteners
(II) Fuel cap
MAKITAwillfurnishwitheach newenginewritteninstructionsforthemaintenanceanduseofthe enginebythe
owner.

4
WARNING!
Carelessorimproperuseofthisproductcancauseseriousorevenfatalinjury.
Before operating a chain saw or other MAKITA products it is important that you read, fully understand and
carefullyfollowtheinstructionsoutlinedinthisownersmanual.Kickbackmaycausesevereorfatalinjuryand
isoneofmanypotentialdangersinoperatingachainsaw.Kickbackandothersafetyrelatedprecautionsare
describedindetailwithinthisownersmanual.Additionalownersmanualsareavailablefromwww.makitausa.
comand18004MAKITA(4625482)andMAKITACANADAINC.,1950ForbesStreet,Whitby,Ontario,L1N
7B7, Canada, Telephone: (905) 571 22 00.
TheEA3200SandEA3201Swillbedeliveredinaprotectivecardboardboxtopreventtransportdamage.Card
boardisabasicrawmaterialandisconsequentlyreuseableorsuitableforrecycling(wastepaperrecycling).
Thisproductcomplieswith: American National Standard Institute B175.12000chainsawsafetystandard.
Canadian Standards Association Z62.103chainsawsafetystandard.
Z62.304chainsawkickbackstandard.
Society of Automotive Engineers SAEJ 335Jun 95 “Multiposition small
engine exhaust system fire ignition sup
pression”
TheEmissionsCompliancePeriodreferredtoontheemissionCompliancelabelindicatesthenumberofoperat
inghoursforwhichtheenginehasbeenshowntomeetfederalemissionsrequirements.CategoryC=50hours,
B=125hours,andA=300hours.
WiththepurchaseofthischainsawyouhavechosenaGermanqualityproduct.Importantinstructionsforthe
assemblyandoperationofthissawaregiveninthismanual.Foryourownsafety,weaskyoutoreadtheaccident
preventioninstructionsverycarefullybeforeputtingyourchainsawintooperation,asincorrecthandlingcan,
despite all precautions, lead to accidents. With a little care and attention you will have good service and lasting
satisfactionfromthisfirstrateproduct.
EA3200S,EA3201S
Contents Page
Delivery inventory .................................................... 5
Symbols................................................................... 5
Safety precautions ..............................................617
Denomination of components ................................ 18
Technical data........................................................ 19
Onlyformodelswithfasteningnutsonthesprocket
guard
Mountingtheguidebarandsawchain......... 2021
Tightening the saw chain .................................. 21
Checking the chain tension............................... 22
Retightening the saw chain ............................... 22
OnlyfortheQuickSetguidebar
Mountingtheguidebarandsawchain.............. 23
Tensioning the saw chain .................................. 24
Checking the chain tension............................... 24
Retensioning the saw chain .............................. 24
Onlyformodelswithquicktensioneronsprocketguard
(TLC)
Mountingtheguidebarandsawchain.............. 25
Tightening the saw chain .................................. 26
Checking the chain tension............................... 27
Retensioning the saw chain .............................. 27
For all models
Chainbrake ........................................................... 27
Engagingthechainbrake(braking) ....................... 27
Fuel / Refuelling ................................................2829
Contents Page
Chainlubrication.................................................... 30
Starting the engine................................................. 31
Stopping the engine............................................... 31
Checkingthechainbrake ...................................... 32
Adjustingthecarburetor......................................... 33
Sharpening the saw chain.................................3435
Cleaningthebrakebandandsprocketguard......... 36
Cleaningtheguidebar........................................... 36
Replacing the saw chain ........................................ 37
Cleaningtheairfilter .............................................. 38
Replacing the spark plug ....................................... 39
Checkingthemufflerscrews.................................. 39
Replacingthestartercable .................................... 40
Replacing the return spring.................................... 40
Mounting the fan housing....................................... 40
Cleaningthecylinderfins....................................... 41
Replacing the suction head.................................... 41
Replacing / cleaning the spark arrester screen ...... 41
Instructions for periodic maintenance .................... 42
Service, spare parts and guarantee ....................... 43
Troubleshooting ..................................................... 44
Extract from the spare parts list.........................4546

5
Further
symbols
see page 7.
4
5 6
32
1
Deliveryinventory
1.Chainsaw
2.Guidebar
3.Sawchain
4.Chainprotectioncover
5.Universalwrench
6.Screwdriverforcarburetoradjustment
7.Owner’sandSafetyManual(not shown)
In case one of the parts listed should not be included in the
delivery inventory, please consult your sales agent.
Symbols
YouwillnoticethefollowingsymbolsonthesawandintheOwner’sandSafetyManual:
Caution,kickback!
Chainbrake
Fuelandoilmixture
Carburetoradjustment
Chainoilfill/oilpump
Sawchainoil
adjustmentscrew
Firstaid
Donottouchhot
surfaces!
Recycling
ReadOwner’sandSafetyManual
andfollowthewarningandsafety
precautions!
Particularcare
andcaution!
Forbidden!
Wearprotectivehelmet,
eyeandearprotection!
Wearprotective
gloves!
Nosmoking!
Noopenfire!
Stopengine!
Startengine
Combinationswitch,
Choke/ON/STOP
Safetyposition

6
Safetyprecautionsforchainsawoperators
While operating the chain saw please observe the
following rules:
a) Contactoftheguidebarnosewithanyobject
shouldbeavoided.
b) Tipcontactmaycausetheguidebartomove
suddenlyupwardandbackward,whichmaycause
seriousorfatalinjury.
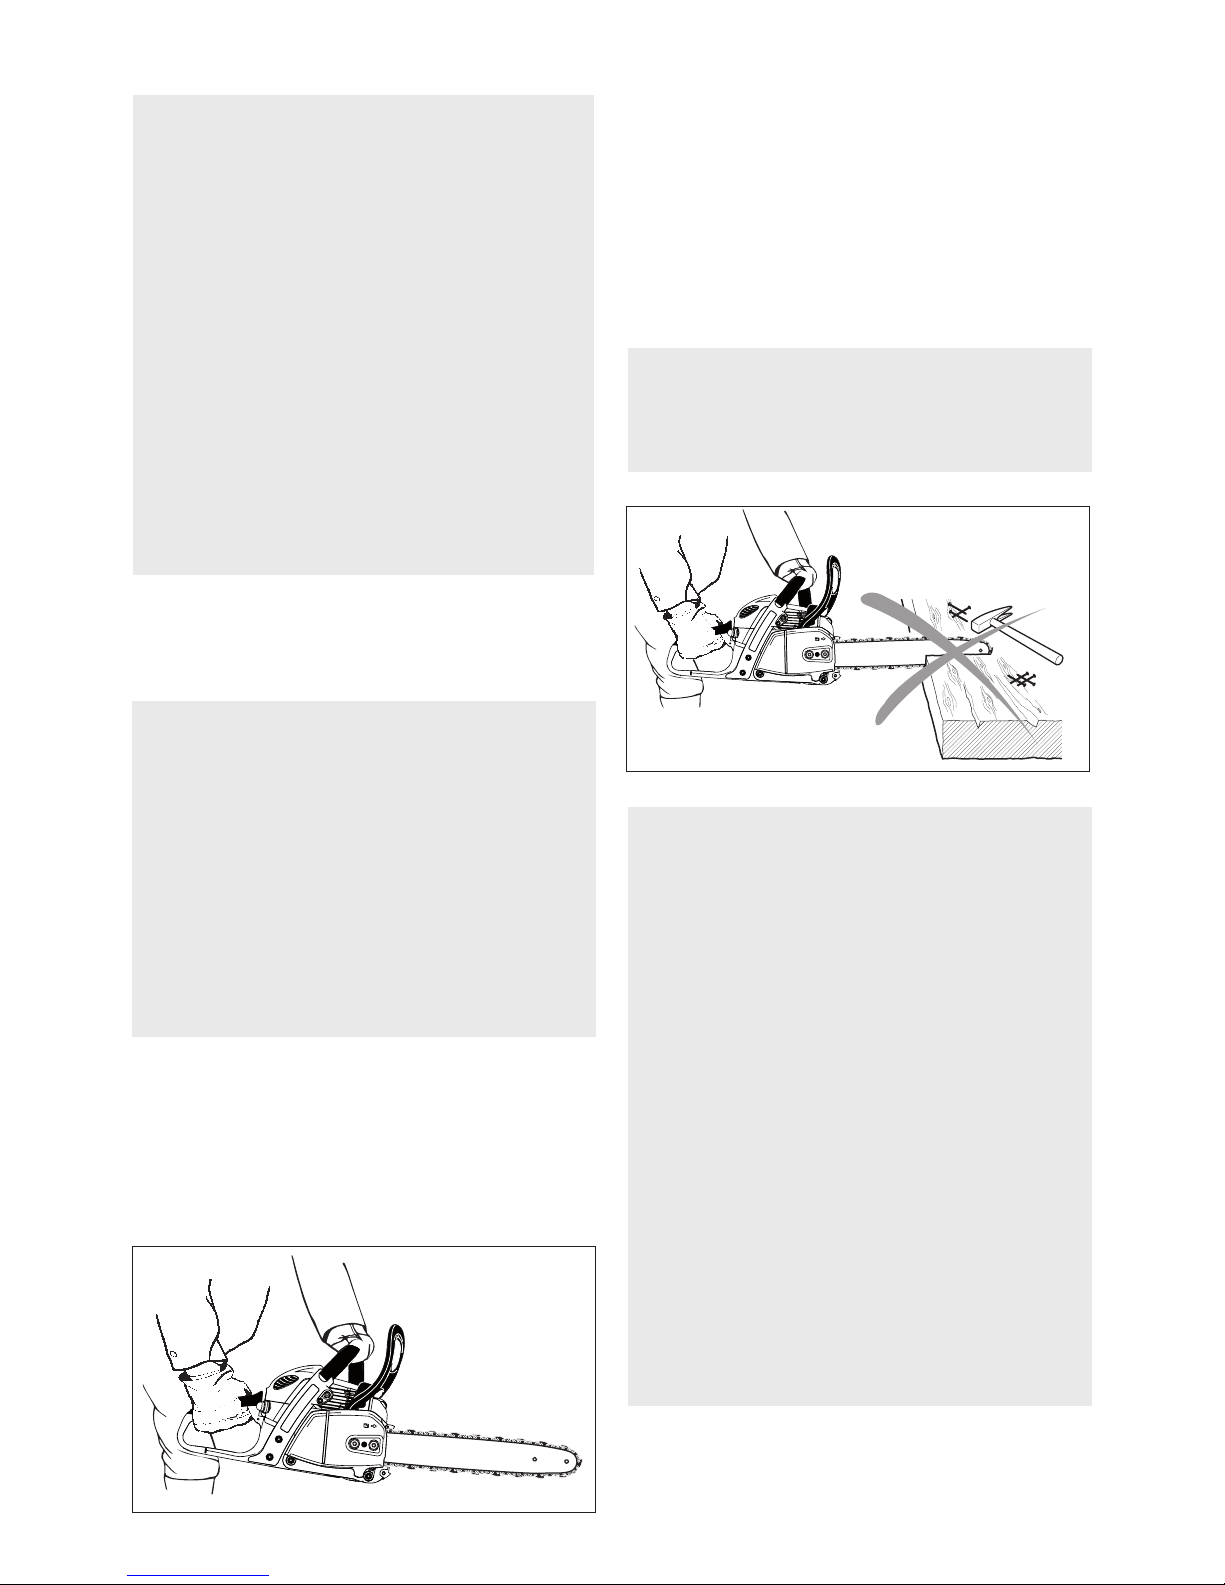
c)Alwaysoperatethechainsawwithbothhands.
WARNING!
Readandfollowall safety precautionsinthe owner’s
manual. Failure to follow instructions could result in
seriousinjury.Itisrecommendedtolendthechain
saw only to people who are experienced in working
withchainsaws.AlwayshandovertheOwner’sand
Safety Manual.
WARNING!
This chain saw is capable of severe kickback
thatcouldresultinseriousinjurytotheoperator.
Do not operate this chain saw unless you have
extraordinary cutting needs and experience in and
special training for dealing with kickback. Chain
sawswithsignificantlyreducedkickbackpotential
areavailable.
WARNING!
Kickbackmayoccurwhenthenoseortipoftheguide
bartouchesanobject,orwhenthewoodclosesin
and pinches the saw chain in the cut. This contact
mayabruptlystopthesawchainand in some cases
may cause a lightning fast reverse reaction,kicking
theguidebarupandbacktowardstheuser,orpush
theguidebarbacktowardstheoperator.Kickback
may cause you to lose control of the saw.
As a chain saw user, you can take several steps to
reducetheriskofakickbackandpotentialinjury.
A. Withabasicunderstandingofkickback,youcan
reduceoreliminatetheelementof surprise. Itisa
suddensurprisethatcontributestoaccidents.
B. Keep a good firm grip on the saw with both
hands, your right hand on the rear grip and
yourlefthandonthetubularhandle,whenthe
engineisrunning.Useafirmgripwiththumbs
andfingersencirclingthechainsawhandles.A
firmgripcanneutralizekickbackandhelpyou
maintain control of the saw. Don’t let go!
C. Make sure that the area in which you are cutting
isfreefromobstructions.Donotletthenoseof
theguidebarcontactthelog,branch,orany
otherobstructionswhichcouldbehitwhileyou
are operating the saw.
D. Do not overreach or cut above shoulder
height.
E. Followmanufacturer’ssharpeningand main
tenance instructions for the saw chain.
F. Onlyusereplacementbarsandchainsspecified
bythemanufacturerortheequivalent.
Additionalsafetyprecautions
Thefollowingadditionalsafetyprecautionsmustbe
observedbyallusersofchainsaws:
1. Do not operate a chain saw when you are fatigued.
2. Usesafetyfootwear;snugfittingclothing;
protective gloves; and eye, hearing, and head
protection devices.
3. Use caution when handling fuel. Move the chain
saw at least 10 feet (3 m) from the fueling point
beforestartingtheengine.
4. Donotallowotherpersonstobenearthechain
saw when starting or cutting with the chain saw.
Keepbystandersandanimalsoutofthework
area.
5. Do not start cutting until you have a clear work
area, secure footing, and a planned retreat path
from the falling tree.
6. Keepallpartsofyourbodyawayfromthesaw
chain when the engine is running.
7. Before you start the engine, make sure that the
saw chain is not contacting anything.
8. Carry the chain saw with the engine stopped,
theguidebarandsawchaintotherear,andthe
mufflerawayfromyourbody.
9. Do not operate a chain saw that is damaged, is
improperlyadjusted,orisnotcompletelyand
securelyassembled.Besurethatthesawchain
stops moving when the throttle control trigger is
released.
10. Shutofftheenginebeforesettingitdown.
11. Useextremecautionwhencuttingsmallsize
brushandsaplingsbecauseslendermaterial
maycatchthesawchainandbewhippedtoward
youorpullyouoffbalance.
12.Whencuttingalimbthatisundertensionbealert
forspringbacksothatyouwillnotbestruckwhen
thetensiononthewoodfibersisreleased.
13. Keep the handles dry, clean, and free of oil or fuel
mixture.
14.Operatethechainsawonlyinwellventilated
areas.
15. Do not operate a chain saw in a tree unless you
havebeenspecificallytrainedtodoso.
16.Allchainsawservice,otherthantheitemslisted
in the owner’s manual maintenance instructions,
shouldbeperformedbyMAKITA.(Forexample,if
impropertoolsareusedtoremovetheflywheelor
ifanimpropertoolisusedtoholdtheflywheelin
order to remove the clutch structural damage to
theflywheelcouldoccurandcouldsubsequently
causetheflywheeltoburst.)
17. When transporting your chain saw, use the chain
protection cover.
18. Lowkickbackbarsandlowkickbackchainsare
designedtoreducetheriskofkickbackinjury.
AskyourMAKITAdealeraboutthesedevices.

7
WARNING!
Reactiveforces,includingkickback,canbedan
gerous. Careless or improper use of any chain saw
maycauseseriousorfatalinjury.
Have your MAKITA dealer show you how to operate
yourchainsaw.Observeallapplicablelocalsafety
regulations, standards and ordinances.
WARNING!
Minors should never be allowed to use a chain
saw.
Bystanders, especially children and animals should
notbeallowedintheareawhereachainsawisin
use(fig.1).
Never let the saw run unattended.
Store it in a locked place away from children. Fill the
fuel tank to 7/8 th full (see storing the saw).
DonotlendyourchainsawwithoutthisOwner’sand
Safety Manual. Be sure that anyone using your saw
understands the information given.
Proper use of a chain saw involves
1. the operator
2. the saw
3. the use of the saw.
WARNING!
Prolonged use of chain saws exposing the operator
tovibrationsmayproduceWhitefingerdisease(Ray
naud’s phenomenon). This phenomenon reduces
thehand’sabilitytofeelandregulatetemperature,
producesnumbnessandburningsensationsand
may cause nerve and circulation damage and tis
sue necrosis.
All MAKITA saws are therefore provided with an an
tivibrationsystemwhichisessentialforthoseusing
chainsawsonaregularorsustainedbasis.Antivi
brationsystemsdonotguaranteethatyouwillnot
sustainWhitefingerdisesase,however,theyreduce
thisdangerconsiderably.Nevertheless,continual
andregularusersshouldobservetheirhandsand
fingersandincaseofanyabnormalsymptoms,seek
medical advice immediately.
GeneralSafetyPrecautions
Theuseofanychainsawmaybehazardous.Atfull
throttle chain speed can reach 45 mph (20 m/s). It
is important that you read; fully understand and ob
serve the following safety precautions and warnings.
ReadtheOwner’sManualandthesafetyinstructions
periodically.
Discriptionofsymbolsusedonchain
saws:
CSAStandards Z62.103
Class1A Z62.304
ANSIStandard B175.12000
SAE Standard SAE J335
Maximum Computed Kickback Angle
(CKA)* with using the chain brake when
using the recommended bar and chain
combinations(InthisexampletheCKAis40°).
Theoperator
PhysicalCondition
You must be in good physical condition and mental
healthandnotundertheinfluenceofanysubstance
(drugs, alcohol), which might impair vision, dexterity
orjudgment.
Always use two hands when
operating the chain saw!
*TheComputedKickbackAngleisacalculatedvalue
fromenergiesmeasuredonatestbench.Itisnot the
angle of the guide bar moved upward in case of a
KICKBACK.
Reduced Kickback Bar and
Chaincombinationthathasbeen
evaluated with the power head
to achieve kickback protection
(according to ANSI and CSA
standards).
Contactoftheguidebartipwith
anyobjectshouldbeavoided!
Tip contact may cause the guide
bar to move suddenly upward
andbackward,whichmaycause
seriousinjury!
Maximum Computed Kickback Angle
(CKA)*withoutusingthechainbrakewhen
using the recommended bar and chain
combinations(InthisexampletheCKAis45°).
1
2

8
3
Thesaw
Parts of the chain saw: illustrations and description of
parts see page 18.
WARNING!
Nevermodifyachainsawinanyway.Onlyattach
mentssuppliedbyMAKITAorexpresslyapproved
byMAKITAforuse withthespecificsawareau
thorized.
WARNING!
Bowguidebarssubstantiallyincreasethepotential
forkickbackandsevereorfatalinjuryduetothe
greaterkickbackzoneofthebowdesign.Bowguide
barsarenotrecommended for use on MAKITA
chainsawsnoraretheyapprovedbytheANSIB
175.12000chainsawsafetystandard.
Theuseofthesaw
Transportingthechainsaw
WARNING!
Alwaysstoptheenginebeforeputtingachainsaw
down or carrying it. Carrying a chain saw with the
engine running is extremely dangerous. Accidental
acceleration of the engine can cause the chain to
rotate.
Avoidtouchingthehotmuffler.
By hand: Whencarryingyoursawbyhand,the
enginemustbestoppedandthesawmustbein
the proper position.
Thechainprotectioncovershouldbeoverthechain
and the guide bar must point backwards. When
carrying your saw the bar should be behind you
(fig.4).
Byvehicle:When transporting in a vehicle, keep
chainandbarcoveredwiththechainguard.Properly
secure your saw to prevent turnover, fuel spillage
and damage to the saw. Make sure the saw in not
exposed to heat or sparks.
Properclothing
Clothing must be sturdy and snugfitting, but allow
complete freedom of movement. Avoid loosefitting
jackets,scarfs,neckties,jewelry,flaredorcuffedpants,
oranythingthatcouldbecomeentangledwiththesaw
orbrush.Wearoverallsorjeanswithareinforcedcutting
resistantinsert(fig.3).
Protect your hands with gloves when handling saw and
sawchain.Heavyduty,nonslipglovesimproveyourgrip
and protect your hands.
Wearprotectivehelmet,
eyeandearprotection!
Good footing is most important in chain saw work.
Wearsturdybootswithnonslipsoles.Steeltoedsafety
bootsarerecommended.
Propereyeprotectionisamust.Nonfogging,vented
goggles and a face screen is recommended. Their
usereducestheriskofeyeandfacialinjury.
Wear an approved safety hard hat to protect your
head. Chain saw noise may damage your hearing.
Always wear noise protection equipment (ear plugs
orearmuffs)toprotectyourhearing.
Continual and regular users should have their
hearing checked regularly.
4

9
6
5
10feet
5a
6a
Chainsawoperatinginstructions
Forassemblyfollowtheprocedureintheappropriate
section“MountingGuideBarandChain”ofthismanual.
MAKITAchain,guidebarandsprocketmustmatcheach
other (see the appropriate section in this manual).
WARNING!
Propertensionof the chain is extremelyimportant.In
order to avoid false setting the tensioning procedure
mustbefollowedasdescribedinthismanual.Always
make sure the hexagonal nut(s) for the sprocket
guard is (are) tightened securely after tensioning
the chain. Check chain tension once more after
having tightened the nuts and thereafter at regular
intervals(alwaysbeforestartingtowork).Ifthechain
becomesloosewhilecutting,shutofftheengineand
then tighten. Never try to tighten the chain while the
engine is running!
Fueling
YourMAKITAsawusesonoilgasolinemixtureforfuel
(seechapter“Fuel”ofthismanual).
Wipeoffanyspilledfuelbeforestartingyoursawand
check for leakage.
Check for fuel leakage while refueling and during op
eration. If fuel or oil leakage is found, do not start or run
theengineuntilleakisfixedandspilledfuelhasbeen
wipedaway.Clothingwithfuelonithastobechanged
immediately (this is a danger to your life!).
Avoid skin contact with fuel.Never loosen or remove the
cap of the fuel tank while the engine is running.
Starting
Donotdropstart.Thismethodisverydangerousbe
causeyoumaylosecontrolofthesaw(fig.6).
WARNING!
Gasolineisanextremelyflammablefuel.Useex
treme caution when handling gasoline or fuel mix.
Donotsmoke orbringanysparksorflamenear
thefuel(fig.5).
Fuelinginstructions
Fuel your chain saw in well ventilated areas or out
doors.Alwaysshutofftheengineandallowittocool
before refueling. Select bare ground for fueling and
move the chain saw at least 10 feet (3 m) from fueling
spotbeforestartingtheengine(fig.5a).
Placethechainsawonfirmgroundorothersolidsurface
inanopenarea.Maintainagoodbalanceandsecure
footing. Place your right foot through the rear handle
openingandfirmlygraspthefronthandlewithyourleft
hand(fig.6a).
Beabsolutelysurethatguidebarandchainareclearof
youorallotherobstructionsandobjects,includingthe
ground,becausewhentheenginestartsinsemithrottle
position,enginespeedwillbefastenoughfortheclutch
to engage the sprocket and turn the chain which may
causeakickback.
Neverattempttostartthesawwhentheguidebaris
in a cut or kerf.
When you pull the starter grip, don’t wrap the starter
rope around your hands. Do not allow the grip to snap
back,butguidethestarterropeslowlybacktopermitthe
rope to rewind properly. Failure to follow this procedure
mayresultininjurytohandorfingersandmaydamage
the starter mechanism.

10
7
Importantadjustments
WARNING!
Atcorrectidlespeed,chainshouldnotturn.Fordi
rectionstoadjustidlespeed,seetheappropriate
section of this instruction manual.
Donotuseasawwithincorrectidlespeedadjust
ment.Adjusttheidlespeedyourselfaccordingto
the appropriate section of this manual.
Have your MAKITA dealer check your saw and make
properadjustmentsorrepairs.
Checkthesawchaintensionfrequently,especially
justafterinstallinganewchain.Newchainsmay
stretch more during their initial use. A properly ad
justedsawchaincanbepulledfreelyaroundthe
guide bar by hand without sagging. Always stop
theengineandweargloveswhencheckingorad
justingthechaintension.
Workingconditions
Operateyourchainsawonlyoutdoors.Operatethesaw
undergoodvisibilityanddaylightconditionsonly.
WARNING!
Take extreme care in wet and freezing weather
(rain,snow,ice).Putofftheworkwhentheweather
is windy, stormy or rainfall is heavy. Clear the area
where you are working.
WARNING!
Avoidstumblingonobstaclessuchasstumps,roots
or rocks and watch out for holes or ditches. Be ex
tremely cautious when working on slopes or uneven
ground. There is increased danger of slipping on
freshlydebarkedlogs.
Cuttinginstructions
Alwaysholdthesawfirmlywithbothhandswhenthe
engineisrunning.Placeyourlefthandonthetubular
handle and your right hand on grip and throttle lever.
Lefthandersshouldfollowtheseinstructionstoo.
WARNING!
Donotoperateyourchainsawinsemithrottlepo
sition. Cutting in this position does not permit the
operator proper control of the saw or chain speed.
WARNING!
Never come too close to a rotating chain with your
handsorbody.
WARNING!
Do not cut any material other than wood or
woodenobjects.
Useyourchain sawforcuttingonly.It is not designed
forpryingorshovelingawaylimbs,rootsorother
objects.
When sawing, make sure that the saw chain does
not touch any foreign materials such as rocks, nails
and the like (fig. 8). Such objects may be flung
off, damage the saw chain or cause the saw to
kickback.
Wrapyourfingerstightlyaroundthehandles,keeping
thehandlescradledbetweenyourthumbandforefinger
(fig.7).Withyourhandsinthisposition,youcanbest
opposeandabsorbthepush,pullandkickbackforces
of your saw without having it slip out of your grip (see
section of reactive forces). Make sure your chain saw
handle and grip are in good condition and free of mois
ture, pitch, oil or grease.
Always start a cut with the chain running at full speed
andthespikebarincontactwiththewood.
WARNING!
Never use the saw with one hand.You cannot control
reactive forces (see pages 11 to 13) and may lose
control of the saw.
8

11
9
10
12
Positionthechainsawinsuchawaythatyourbodyis
clear of the cutting attachment whenever the engine is
running(fig.10).
Don’t put pressure on the saw when reaching the end
ofacut.Thepressuremaycausethebarandrotating
chain to pop out of the cut or kerf, go out of control and
striketheoperatororsomeotherobject.Iftherotating
chainstrikessomeotherobjectareactiveforce(see
pages 11 to 13) may cause the chain to strike the op
erator.
Reactiveforcesduringthecut,includingkickback
WARNING!
Reactive forces, that may occur during any cut are
kickback, pushback and pullin. Reactive forces
canbedangerous!Inanychainsaw,thepowerful
forceusedtocutwoodcanbereversed(andwork
against the operator).
Iftherotatingchainissuddenlystoppedbycontact
withanysolidobjectlikealogorbranchorispinched,
the reactive forces instantly occur. These reactive
forces may result in loss of control which may, in
turn,causeseriousorfatalinjury.Anunderstanding
of the causes of these reactive forces may help you
avoid loss of control.
The most common reactive forces are
kickback,
pushback,
pullin.
In order to keep control of your saw, always maintain
afirmfoothold.Neverworkonaladder,inatreeoron
anyotherinsecuresupport.Neverusethesawabove
shoulderheight(fig.9).
This reaction can occur in a fraction of a second and
undersomecircumstances,causetheguidebarand
chain to strike the operator with enough force to cause
severeorfatalinjury.Itmayalsooccurduringlimbing.It
alsooccurswhenthenoseoftheguidebarispinched
unexpectedly, unintentionally contacts solid material
inthewood(fig.12)orisincorrectlyusedtobegina
plungeorboringcut.
Thegreatertheforceofthekickbackreaction,themore
difficultitbecomesfortheoperatortocontrolthesaw.
Many factors influence the occurence and force of
Kickback:
Kickbackoccurswhentheupperquadrantofthebar
nosecontactsasolidobjectinthewoodorispinched
(fig.11).Thereactionofthecuttingforceofthechain
causes a rotational force of the chain saw in the direc
tion opposite to the chain movement, mainly in the plane
ofthebar.Thismayflingthebarinanuncontrolledarc
towards the operator.
11

12
Toavoidkickback
Thebestprotectionfrompersonalinjurythatmayresult
fromkickbackistoavoidkickbacksituations:
1.Hold the chain saw firmly with both hands and
maintain a secure grip.
2.Beawareofthelocationoftheguidebarnoseat
all times.
3. Neverbringthenoseoftheguidebarincontact
with any object. Do not cut limbs with the nose
oftheguidebar.Beespeciallycarefulwithsmall,
toughlimbs,smallsizebrushandsaplingswhich
may easily catch the chain.
4. Don’t overreach.
5.Don’tcutaboveshoulderheight.
6. Begin cutting and continue at full throttle.
7. Cut only one log at a time.
8.Useextremecautionwhenreenteringaprevious
cut.
9. Do not attempt plunge cuts (see page 15) if you are
notexperiencedwiththesecuttingtechniques.
10. Be alert for shifting of the log or other forces that
may cause the cut to close and pinch the chain.
11. Maintain saw chain properly. Cut with a correctly
sharpened, properly tensioned chain at all times.
12. Stand to the side of the cutting path of the chain
saw.
thekickbackreaction.Thetypeofbarandsawchainyou
useisafactorintheforceofthekickbackreaction.
Thespeedofcontactatwhichthecuttercontacts
theobject.
Kickbackforceincreasewiththerateofimpact.
The contact angle between the nose of the bar
andtheforeignobject(fig.11).
Kickbackismost pronouncedin the upperquadrant
ofthebarnose.
MAKITAchaintypesaredesignedtoreducekickback
forces.
Thedepthgauges:
Improper lowering of the depth gauges also increases
theriskofakickback.
Sawchaincuttersharpness:
WARNING!
A dull improperly sharpened chain may increase
the risk of kickback. Always cut with a properly
sharpened chain.
Devicesforreducingtheriskofkickbackinjury
MAKITAhavedevelopedaspecialchainbraketoreduce
theriskofkickbacks.
This chain brake increases the safety factor on the
job,e.g.whenthesawsuddenlybucksupwardsthechain
stopsrotatingwithinafractionofasecond.Adeflection
guardonthedisengagingleverofthechainbrakeand
a scoop rear handle ensure that the operator’s hands
are fully protected at all times.
Kickbacktendencyincreasesastheradiusorsizeof
theguidebarnoseincreases.MAKITAhavedeveloped
guidebarswithsmallnoseradius,toreducethekick
backtendency.
WARNING!
Nochainbrakepreventskickback.
Thesebrakesaredesignedonlytostopthechain,
if activated.
Toensureaproperoperationofthechainbrake,it
must be properly maintained. Furthermore, there
mustbeasufficientdistancebetweentheopera
torandthebartoensurethatthechainbrakehas
sufficienttimetoactivateandstopthechainbefore
potential contact with the operator.
13

13
14
15
Toavoidpushback
1. Be alert to forces or situations that may cause mate
rial to pinch the top of the chain.
2. Do not cut more than one log at a time.
3. Do not twist the saw when withdrawing the bar
fromaplungecutorunderbuckcut(figures25to
27and33,pages15and17),becausethechain
can pinch.
Pullin:
Pullinoccurswhenthechainonthebottomofthebar
issuddenlystopped.Thechainonthebottomofthe
barstopswhenitispinched,caughtorencountersa
foreignobjectinthewood(seefig.15).Thereactionof
the chain pulls the saw forward, causing the operator
to lose control.
Pullin frequently occurs when the spike bar of the
sawisnotheldsecurelyagainstthetreeorlimband
whenthechain is notrotatingat fullspeedbefore it
contacts the wood.
WARNING!
Useextremecautionwhencuttingsmallsizebrush
and saplings which may easily catch the chain and
pullyouoffbalance.
Toavoidpullin
1. Alwaysstarta cutwiththe chain rotatingatfull speed
andthespikebarincontactwiththewood.
2. Pullin may also be prevented by using plastic
wedges to open the kerf or cut.
Cuttingtechniques
Felling
Felling is cutting down a tree.
Before felling a tree, consider carefully all conditions
whichmayaffectthedirectionoffall,including:
The intended direction of the fall.
The neutral lean of the tree.
Anyunusuallyheavylimbstructure.
Surroundingtreesandobstacles.
The wind direction and speed.
WARNING!
Alwaysobservethegeneralconditionofthetree.
Look for decay and rot in the trunk. If it is rotted
inside, it could snap and fall toward the operator
whilebeingcut.
Alsolookforbrokenordeadbrancheswhichcould
vibratelooseandfallontheoperator.Whenfelling
onaslope,theoperatorshouldstandontheuphill
side.
Pushback:
Pushbackoccurswhenthechainonthetopofthebar
is suddenly stopped when it is pinched, caught or en
countersaforeignobjectinthewood.Thereactionofthe
chaindrivesthesawstraightbacktowardtheoperator
causinglossofsawcontrol.Pushbackfrequentlyoccurs
whenthetopofthebarisusedforcutting(fig.14).
When felling in the vicinity of roads, railways and
powerlines,etc.,takeextraprecautions(seefig.16).
Inform the police, utility company or railway authority
beforebeginningtocut.
16

14
45°
45°
=cuttingdownarea
2
1
2
17
18
19
20
21
22
23
45°
Firstclearthetreebaseandworkareafrominterfering
limbsandbrushandcleanitslowerportionanaxe(see
fig.18).
When felling, maintain a distance of at least 2 1/2 tree
lengthsfromthenearestperson(seefig.17).
Note:
The noise of your engine may drown any warning call.
Fellinginstructions:
Then,establishapathofescapeandremoveallob
stacles.Thispathshouldbeoppositetotheplanned
directionofthefallofthetreeandata45°angle(fig.19).
Analternatepathmustalsobeselected.Placealltools
andequipmentasafedistanceawayfromthetree,but
not on the escape path.
Then, determine the placement of the felling notch
(fig.21).Thefellingnotchwhenproperlyplaced de
termines the direction in which the tree will fall. It is
madeperpendiculartothelineoffallandshouldbeas
closetothegroundaspossible.Cutthefellingnotch
toadepthofaboutonefifthtoonefourthofthetrunk
diameter(fig.22).Itshouldbeinnocasehigherthan
it is deep. Make the felling notch very carefully.
Ifthetreehaslargebuttressroots,cutintothelargest
buttressesverticallyfirst(horizontallynext)andremove
(fig.20).
Secondcut
Firstcut
Directionoffall
Fellingnotch
Hinge
Fellingcut
Hinge
Fellingnotch

15
24
25
26
27
28
Begin the felling cut slighty higher than the felling notch
andontheoppositesideofthetree(fig.22).Thencut
horizontally through towards the felling notch. Apply
thechainsawwithitsspikesdirectlybehindtheuncut
portion of wood and cut toward the notch (fig. 23).
Leaveapproximately1/10ofthetreediameteruncut!
Thisisthehinge(fig.23).Donotcutthroughthehinge
becauseyoucouldlosecontrolofthedirectionofthe
fall. Drive wedges into the felling cut where necessary
tocontrolthedirectionofthefall.Wedgesshouldbeof
wood,lightalloyorplasticneverofsteel,whichcan
causekickbackanddamagetothechain.
Always keep to the side of the falling tree. When the
tree starts to fall, shut off the engine, withdraw the
barandwalkawayonthepreplannedescapepath.
Watchoutforfallinglimbs.
WARNING!
Be extremely careful with partially fallen trees which
are poorly supported.
When the tree hangs or for some other reason does
not fall completely, set the saw aside and pull the
treedownwithacablewinch,blockandtackleor
tractor. If you try to cut it down with your saw, you
maybeinjured.
SectioningMethod
WARNING!
Felling a tree that has a diameter greater than the
lengthoftheguidebarrequiresuseofeitherthe
sectioningorplungecutmethod.Thesemethods
are extremely dangerous because they involve
theuseofthenoseoftheguidebarandcanresult
in kickback. Only properly trained professionals
shouldattemptthesetechniques.
Forthesectioningmethod(fig.24)makethefirstcut
withtheguidebarfanningintowardthehinge.Then,
usingthebumperspikeasapivot,repositionthesaw
for the next cut. Avoid repositioning the saw more than
necessary. When repositioning for the next cut, keep
the guide bar fully engaged in the kerf to keep the
fellingcut straight.Ifthesawbegins to pinch, insert
awedgetoopenthecut.Onthelastcut,donotcut
the hinge.
PlungeCutMethod
Timberhavingadiametermorethantwicethelengthof
theguidebarreauirestheuseoftheplungecutmethod
beforemakingthefellingcut.
First, cut a large, wide notch. Make a plunge cut in the
center of the notch.
Theplungecutismadewiththeguidebarnose.Begin
theplungecutbyapplyingthelowerportionoftheguide
barnosetothetreeatanangle(fig.25).Cutuntildepth
ofthekerfisaboutthesameasthewidthoftheguide
bar(fig.26).Next,alignthesawinthedirectioninwhich
therecessistobecut.Withthesawatfullthrottle,insert
theguidebarinthetrunk(fig.27).
Enlargetheplungecutasshowninillustration(fig.28)

16
29
30
31
32
WARNING!
Thereisanextremedangerofkickbackatthispoint.
Extracautionmustbetakentomaintaincontrolof
the saw.To make the felling cut, follow the sectioning
methoddescribedpreviously(fig.29).Ifyouarein
experiencedwithachainsawplungecuttingshould
notbeattempted.Seekthehelpofaprofessional.
Limbing
Limbingisremovingthebranchesfromafallentree.
WARNING!
Thereisanextremedangerofkickbackduringthe
limbingoperation.Donotworkwiththenoseofthe
bar.Beextremelycautiousandavoidcontactingthe
logorotherlimbswiththenoseoftheguidebar.Do
notstandonalogwhilelimbingityoumayslipor
the log may roll.
Startlimbingbyleavingthelowerlimbstosupport
thelogofftheground(fig.30).Alwayscutfromthe
topof thelimb. Donotunderbuckfreelyhanging
limbs.Apinchmayresultorthelimbmayfall,caus
ing loss of control.If a pinch occurs, stop the engine
andremovethesaw,byliftingthelimb.
WARNING!
Be extremely cautious when cutting limbs under
tension.The limbs could spring back toward the
operator and cause loss of control of the saw or
injurytotheoperator.
Bucking
Bucking is cutting a log into sections.
WARNING!
1. Whenbucking,donotstandonthelog.Make
surethelogwillnotrolldownhill.Ifonaslope,
standontheuphillsideofthelog(seefig.31).
Watch out for rolling logs.
WARNING!
2. Cut only one log at a time.
WARNING!
3.Shattered wood should be cut very carefully.
Sharpsliversofwoodmaybecaughtandflung
in the direction of the operator of the saw.
WARNING!
4.Whencuttingsmalllogs,useasawhorse(fig.32).
Neverpermitanotherperson toholdthelog.Never
hold the log with your leg or foot.

17
34
MaintenanceandRepair
Never operate a chain saw that is damaged, improperly
adjusted or not completely or securely assembled.
Follow the maintenance and repair instructions in the
appropriate section of this manual.
WARNING!
Always stoptheengine and make surethatthechain
isstoppedbeforecommencinganymaintenance
or repair work or cleaning the saw. Allow the chain
sawtocooloffbeforedoinganymaintenancework
(burnhazard)! Chain saws with catalytic converter
take longer to cool down!
Do not attempt any maintenance or repair work not
describedinthismanual.Havesuchworkperformed
byyourMAKITAserviceshoponly.
Maintainingandstoringthesaw
Keepthechain,barandsprocketcleanandlubricated;
replace worn sprockets or chains.
Keep the chain sharp.You can spot a dull chain when
easytocutwoodbecomeshardtocutandburnmarks
appear on the wood.
Keepthechainatpropertension.Tightenallnuts,bolts
andscrewsexceptthecarburetoradjustmentscrews
after each use.
Keep spark plug and wire connection tight and clean.
Store saws in a high or locked place, away from
children.
WARNING!
5.Logs under strain require special attention to
preventthesawfrompinching.Thefirstcutis
made on the compression side to relieve the
stressonthelog(seefig.33,34).Thebucking
cut is then made as shown. If the saw pinches,
stop the engine and remove it from the log.
WARNING!
6.Onlyproperlytrainedprofessionalsshouldwork
inanareawherethelogs,limbsandrootsare
tangled(i.e.ablowdownarea,fig.35).Working
inblowdownareasisextremelyhazardous.
WARNING!
7.Dragthelogsintoaclearareabeforecutting.Pull
outexposedandclearedlogsfirst.
35
33

18
Denominationofcomponents
2 31
4
6
5
7
9
1314 1112 10
8
1615
17 18
19
20
22
23 21
2425
26
1Handle
2 Cover
3Hood lock (under the hood cap)
4 Tubularhandle
5 Handguard(releaseforchainbrake)
6 Muffler
7Spikebar
8Chain tensioning screw
9Retaining nuts
10 Chain catcher
11 Sprocket guard
12 Adjustingscrewforoilpump(bottomside)
13 Fuel pump (Primer)
14 Identificationplate
15 Starter grip
16 Combinationswitch(Choke/ON/Stop)
17 Throttle lever
18 Safetylockingbutton
19 Rear hand guard
20 Fuel tank cap
21 Adjustingscrewsforcarburetor
22 Fanhousingwithstartingassembly
23 Oiltankcap
24 Chain (Blade)
25 Guidebar
26 Sprocketguardquicktensioner(TLC)

19
EA3200S EA3201S
Stroke volume cu. in (cm)31.95 (32)
Bore inch (mm) 1.50 (38)
Stroke inch (mm) 1.11 (28.2)
Max. power at speed hp / rpm 1.8 / 10,000
Max. torque at speed Nm /rpm 1.6 / 7,000
Idling speed / max. engine speed with bar and chain rpm 2,800 / 12,800
Coupling speed rpm 4,100
Sound pressure level at the operator´s ear at full load according
to ANSI B 175.1
dB (A) 102
Sound pressure level at the bystanders position (50 ft/15 m
distance) according to ANSI B 175.1
dB (A) 77.5
Carburetor Type diaphragm carburator
Ignition system Type electronic
Spark plug Type NGK CMR6A
or spark plug Type --
Electrode gap inch (mm) .024 (0.6)
Fuel consumption at max. load per ISO 7293 kg/h 0.68
Specificconsumptionatmax.loadperISO7293 g/kWh 500
Fuel tank capacity floz 13.5
Chain oil tank capacity floz 9.5
Mixture ratio (fuel/two-stroke oil)
- when using MAKITA synthetic oil 50 : 1
- when using other synthetic oils (oil quality must be JASO
FC or ISO-L-EGD)
50 : 1
Chain brake engages manually or in case of kickback
Sprocket pitch inch 3/8
Number of teeth Z 6
Chain type see the Extract from the spare-parts list
Pitch / gauge inch / (mm) 3/8 / 0.050 (1.3) / 3/8 / 0.043 (1.1)
Guide bar, length of a cut inch / (cm) 12, 14, 16 (30, 35, 40)
Guide-bar type see the Extract from the spare-parts list
Weight (fuel tank empty, without chain, guide bar and accessories) lbs (kg) 9.1 (4.1) 9.4 (4.2)
(For Canada)
NOTE: This spark ignition system complies with the Canadian standard ICES-002.
WARNING:
This chain saw is capable of severe kickback that coult result in serious injury to the user. Do not operate this chain
sawunlessyouhaveextraordinarycuttingneedsandexperienceandspecializedtrainingfordealingwithkickback.
Chainsawswithsignificantlyreducedkickbackpotentialareavailable.
Technical data

20
Putontheguidebar(7).Make sure that the pin (5) of the chain
tensionerengagesintheholeintheguidebar.
Mountingtheguidebarandsawchain
Use the universal wrench delivered with the chain saw for
the following work.
Putthechainsawonastablesurfaceandcarryoutthefol
lowingstepsformountingtheguidebarandsawchain:
Release the chain brake by pulling the hand guard (1) in
direction of arrow.
Unscrew retaining nuts (2).
Pulloffthesprocketguard(3).
PUTTINGINTOOPERATION
Onlyformodelswithfasteningnuts
onthesprocketguard
CAUTION:
Beforedoinganyworkontheguidebarorchain,al
waysswitchofftheengineandpulltheplugcapoffthe
sparkplug(see“Replacingthesparkplug”).Alwayswear
protectivegloves!
CAUTION:
Startthechainsawonlyafterhavingassembleditcom
pletelyandinspected.
Turn chain tensioning screw (4)totheleft(counterclockwise)
until the pin (5) of the chain tensioner is underneath the
threaded pin (6).
Other manuals for EA3200S
15
This manual suits for next models
1
Table of contents
Other Makita Chainsaw manuals

Makita
Makita DUC302Z User manual

Makita
Makita EA6100P Instruction Manual

Makita
Makita UC002G User manual

Makita
Makita DUC303 User manual

Makita
Makita UC3020A User manual

Makita
Makita XCU01 User manual

Makita
Makita ADCU10 User manual

Makita
Makita UC3041A User manual

Makita
Makita DUC254CZ User manual

Makita
Makita UC3020A User manual

Makita
Makita UC 3000 Instruction Manual

Makita
Makita EA3200S User guide

Makita
Makita BUC121 User manual

Makita
Makita 5016N8 User manual

Makita
Makita DUC121 Manual

Makita
Makita UC 4001A User manual

Makita
Makita DUC252 User manual

Makita
Makita UC002G User manual

Makita
Makita 5014B Manual

Makita
Makita EA5600F User manual