Makita GA7030R Manual

L
H
W
PRODUCT
P 1/ 11
Standard equipment
Optional accessories
Note: The standard equipment for the tool shown above may vary by country.
Output
Lock nut wrench 35 .................... 1 pc
Vibration absorbing side grip ..... 1 pc
Dimensions: mm (")
Width (W)
Height (H)
Length (L)
Model No. GA7030R
GA7040R
GA9030R
GA9040R
503 (19-4/5)
200 (7-7/8) 250 (9-7/8)
140 (5-1/2)
Toolless quick adjustable wheel cover, Toolless lock nut, Dust cover attachment, Plastic carrying case
GA7030R/ GA7040R: Accessories for 180mm angle grinder
GA9030R/ GA9040R: Accessories for 230mm angle grinder
Model No.
Description
CONCEPT AND MAIN APPLICATIONS
Specification
GA7030R, GA7040R/ GA9030R, GA9040R
Continuous Rating (W)
Voltage (V) Cycle (Hz) Input Max. Output (W)
110
120
220
230
240
15
15
11.5
11.0
10.5
50/ 60
50/ 60
50/ 60
50/ 60
50/ 60
1,650
---
2,400
2,400
2,400
850
900
1,700
1,700
1,700
2,900
2,900
4,500
4,500
4,500
Current (A)
Continuous Rating (W)
Voltage (V) Cycle (Hz) Input Output Max. Output (W)
110
120
220
230
240
23
15
12.5
12
11.5
50/ 60
50/ 60
50/ 60
50/ 60
50/ 60
2,400
---
2,600
2,600
2,600
1,500
1,000
1,800
1,800
1,800
3,700
3,700
4,900
4,900
4,900
Current (A)
GA7030R/ GA9030R
GA7040R/ GA9040R
Angle Grinders 180mm (7'')/ 230mm (9'')
Soft start feature
Anti-restart function
Double insulation
Net weight*3: kg (lbs)
Power supply cord: m (ft)
No load speed: min-1= rpm.
Wheel size: mm (") Diameter
Specification Model No. GA7030R/ GA7040R GA9030R/ GA9040R
Hole diameter
6,6008,500
Yes
Yes
Yes
180 (7)
22.23 (7/8)
230 (9)
2.0 (6.6)*1/ 2.5 (8.2)*2
6.3 (13.8)/ 6.6 (14.6) 6.5 (14.4)/ 6.9 (15.2)
Models GA7030R/ GA7040R/ GA9030R/ GA9040R are developed
as sister tools of GA7030S/ GA7040S/ GA9030S/ GA9040S.
Additionally to the benefits of GA7030S series models,
Models GA7030R/ GA7040R/ GA9030R/ GA9040R feature:
Anti-restart function
Large trigger switch with a lock lever having two different
actions for releasing the switch from Lock-off position and
locking the switch on in order to comply with the requirement
of the new IEC Regulations
Wheel size is:
180mm (7'') for Models GA7030R/ GA7040R
230mm (9'') for Models GA9030R/ GA9040R
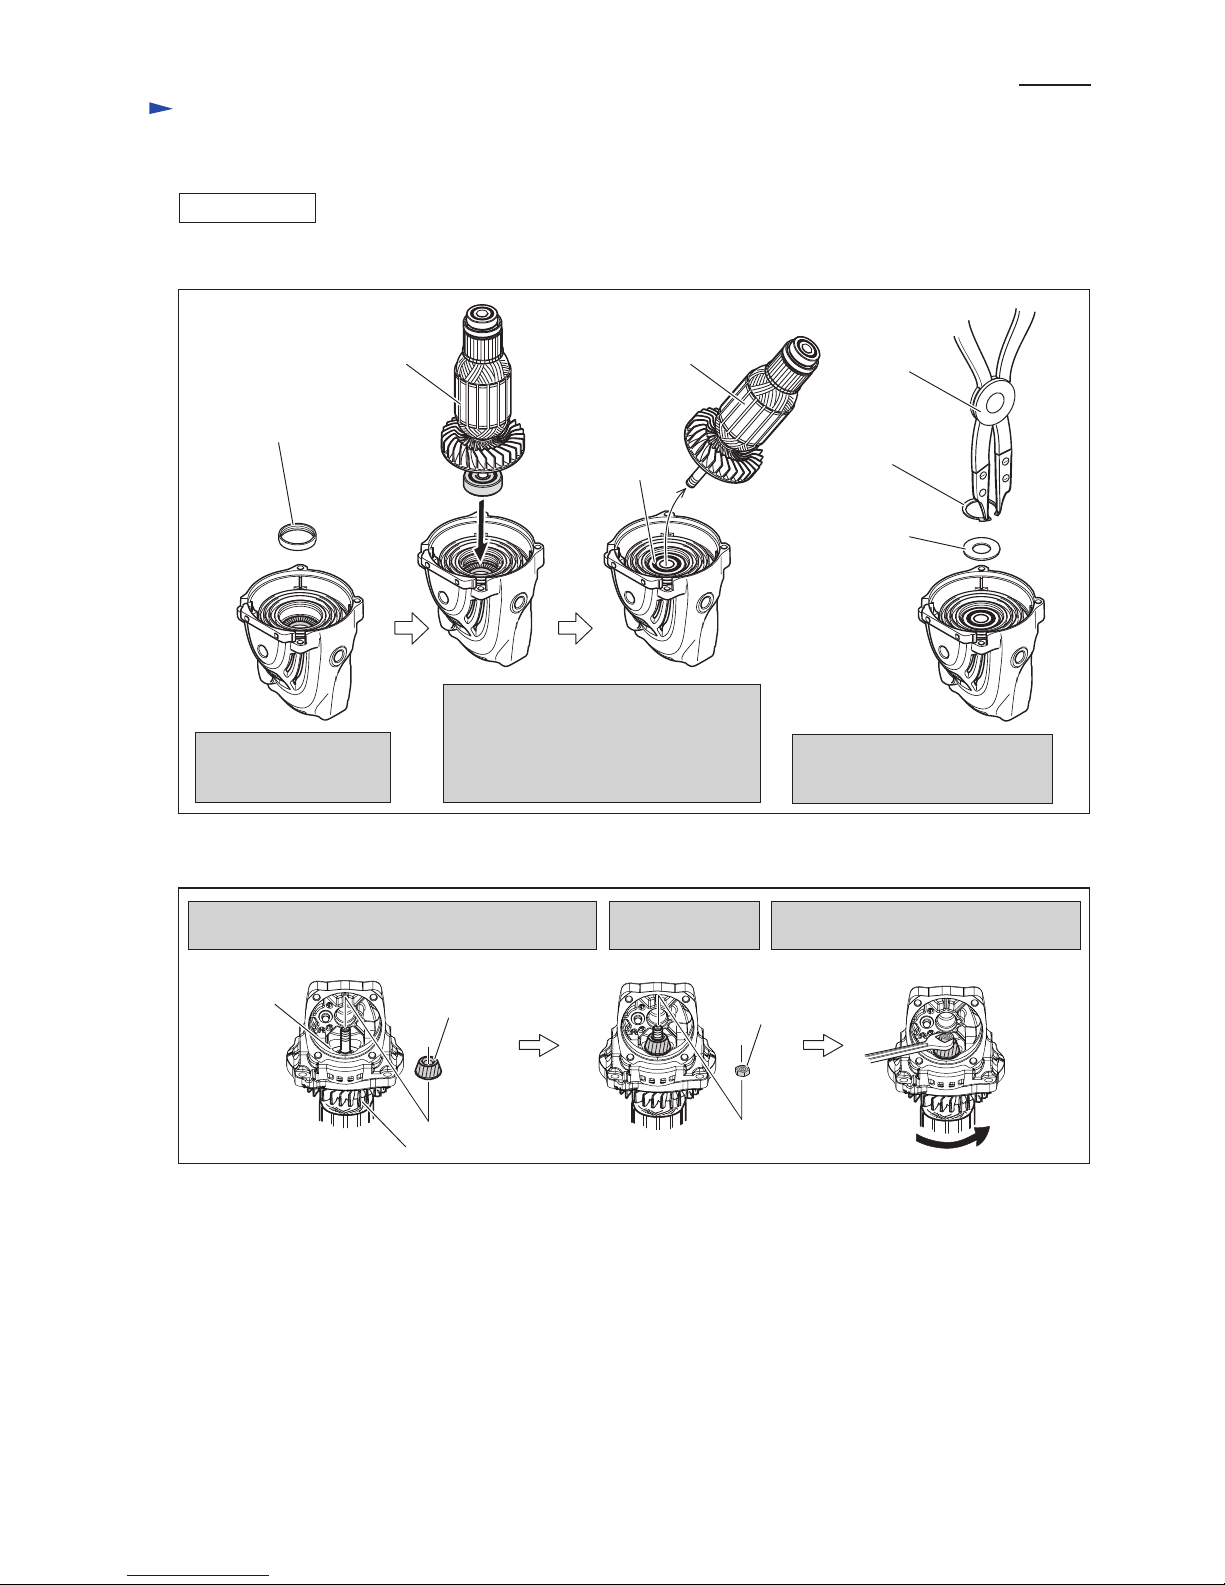
TECHNICAL INFORMATION
*1 for Brazil, Australia
*2 for all countries except the two listed above
*3 Weight according to EPTA-Procedure 01/2003, with Side grip, Wheel cover, Inner flange, Lock nut

[1] NECESSARY REPAIRING TOOLS
[2] LUBRICATIONS
Fig. 1
Code No. Description Use for
1R005 Retaining ring pliers RT-2N Removing Retaining ring R-42 from Gear housing complete
1R252 Round bar for arbor 30-100 Assembling Felt ring 18 to Gear housing complete
1R269 Bearing extractor Assembling / disassembling Ball bearings
1R204 Jig for tightening Nut M15-23
Assembling / disassembling Torque limiter section1R223 Torque wrench shaft 20-90N.m
1R224 Ratchet head 12.7
Item No.
Apply the following lubricants to protect parts and product from unusual abrasion.
Description Portion to lubricate AmountLubricant
5Gear housing complete Gear room
5
not grooved
grooved
44 Lock washer portion where Large spiral bevel gear contacts
portion where Large spiral bevel gear contacts
portion where Ball bearing 6203DDW contacts
44
Bearing box
Large spiral
bevel gear
48
53
Ball bearing 6000LLB
M15-23 nut
Cup washer 20
48 Flat washer 15
53 Spindle complete Drum portion where Large spiral bevel gear contacts
61g
a little
a little
Molybdenum desulfide
Makita grease SG
No.0
[3] DIFFERENCE BETWEEN GA7030R/ GA7040R AND GA9030R/ GA9040R
Item No. Parts of GA7030R, GA7040R
Spiral bevel gear 16 Spiral bevel gear 12
Parts of GA9030R, GA9040R
7
45
In addition to Wheel cover and available Wheels, the following parts are different.
Spiral bevel gear 53D Spiral bevel gear 53C
Small spiral bevel gear
Description in Technical information
Large spiral bevel gear
P 2/ 11
Repair
CAUTION: Repair the machine in accordance with “Instruction manual” or “Safety instructions”.

P 3/ 11
Repair
[4] DISASSEMBLY/ASSEMBLY
[4]-1. Armature, Small spiral bevel gear, Ball bearing 6301DDW
DISASSEMBLING
5x35 Tapping screw
(4pcs.)
(1) Disassemble Armature and Spiral bevel gear (small) as illustrated in Figs. 2 and 3.
(2) Disassemble Ball bearing 6301DDW as illustrated in Figs. 4 and 5.
M6x22 Hex socket head bolt (4pcs.)
Brush holder cap
Carbon brush
Armature
Turn Armature counterclockwise while
holding M8 Hex nut with Wrench 13.
M8 Hex nut can be removed.
Remove Carbon brushes. And then
remove 5x35 Tapping screws.
Remove Gear housing complete
together with Armature.
Remove Bearing box and M6x22
Hex socket head bolts.
Wrench 13 for locking M8 Hex nut
M8 Hex nut
Pull off Armature while
holding Small spiral bevel gear.
Small spiral
bevel gear
Armature
Fig. 2
Fig. 3
Remove Retaining ring R-42 with 1R005,
then remove Flat washer 20.
Fig. 4 Fig. 5
Retaining ring
R-42
Flat washer 20
Ball bearing 6301DDW
M8 Hex nut
Ball bearing 6301DDW
Felt ring 18 (a component of Gear housing complete)
Rubber ring 38
Gear housing complete
Set Armature and Small spiral bevel gear to Gear housing complete.
And set M8 hex nut in place temporarily by reversing the step of
Fig. 3.
Tap the end of Gear housing complete with a plastic hammer.
Ball bearing 6301DDW can be removed from Rubber ring 38 in
Gear housing complete. Felt ring 18 falls off at that time.
Gear housing complete
Note: If the above work is very difficult
due to the seizing of Small spiral
bevel gear, spray a lubricant
between Armature shaft and Small
spiral bevel gear. And then turn
and pull Armature while holding
Small spiral bevel gear with pliers
and a cloth.
Small spiral bevel gear

P 4/ 11
Repair
[4] DISASSEMBLY/ASSEMBLY
[4]-1. Armature, Small spiral bevel gear, Ball bearing 6301DDW (cont.)
DISASSEMBLING
ASSEMBLING
(3) Disassemble Armature as illustrated in Fig. 6.
Assemble Gear housing section by setting Felt ring 18, Ball bearing 6301DDW, Flat washer 20 and Retaining ring
(INT) R-42 in place of Gear housing complete.
(1) Set Felt ring 18 in place as illustrated in Fig. 7 when disassembling Ball bearing 6301DDW.
Remove M8 Hex nut and small Spiral bevel gear again.
Ball bearing 6301DDW can be removed by hand.
Remove Ball bearing 6200DDW with 1R269.
Fig. 6
Fig. 7
M8 Hex nut
1R269
Ball bearing 6301DDW Ball bearing 6200DDW
Small spiral bevel gear
Felt ring 18
V-block
Felt top portion
Steel cup portion
1R252
Cross-section of the bottom
of the bearing room
1R252 Rubber ring 38
Felt ring 18
Flat washer
0.5mm
Put a Flat washer (illustrated above) temporarily on Felt ring 18.
Then press down the Flat washer with arbor press and 1R252
carefully to move the Flat washer to only 0.5mm downwards.
Remove the Flat washer after setting Felt ring 18 in place.
Bottom step in Gear housing complete
28mm in outer
diameter
0.5mm in
thickness
Flat washer as a jig
Hold Gear housing complete with two
V-blocks, and pressfit Felt ring 18 into
the hole of Gear housing complete so that
the felt top portion and the bottom step of
Gear housing complete is in line.

P 5/ 11
Repair
[4] DISASSEMBLY/ASSEMBLY
[4]-1. Armature, Small spiral bevel gear, Ball bearing 6301DDW (cont.)
ASSEMBLING
(2) Assemble Ball bearing 6301DDW to Gear housing complete as illustrated in Fig. 8.
(3) Assemble Armature and small Spiral bevel gear to Gear housing complete as illustrated in Fig. 9.
Fig. 8
Armature with Ball
bearing 6301DDW Armature
Assemble Ball bearing 6301DDW to
Armature temporarily.
After setting Ball bearing 6301DDW in
place of Gear housing complete, pull off
Armature.
Retaining ring R-42
Flat washer 20
Make sure that Rubber
ring 38 is set in place.
(Refer to Fig. 7)
Putting Flat washer 20 on Ball
bearing 6301DDW, secure them
with Retaining ring R-42.
Rubber ring 38
1R005
Small spiral
bevel gear M8
Hex nut
Armature
Ball bearing
6301DDW
Insert Armature shaft through Small spiral bevel gear
and Ball bearing 6301DDW in Gear housing.
Set M8 Hex nut to
Armature shaft.
Holding M8 Hex nut with Wrench 13,
turn Armature clockwise by hand firmly.
Fig. 9
(4) Assemble Gear housing complete to Motor housing, And assemble Bearing box section to Gear housing complete.
Reverse the disassembling step in Fig. 2.
Ball bearing
6301DDW

P 6/ 11
Repair
[4] DISASSEMBLY/ASSEMBLY
[4]-2. Large spiral bevel gear, Ball bearing 6203DDW
DISASSEMBLING
1R204
M6x22 Hex socket head
bolt (4pcs.)
1R269
The subject parts in Bearing box can be disassembled as illustrated in Fig. 10, 11, 12A or Fig. 12B.
Separate Bearing box section
by removing four M6x22 Hex
socket head bolt.
Clamping the flat surface of Spindle with Vise,
remove M15-23 nut with Repairing tools
illustrated below.
Remove Ball bearing 6000LLB
with 1R269.
Ball bearing
6000LLB
Fig. 10
Fig. 11
Fig. 12A Fig. 12B
1R224
Lock washer
Bearing retainer 50
Large spiral bevel gear
M15-23 Nut
1R223
M15-23 Nut
Spindle
complete
Two Cup spring 20, Lock washer, Large
spiral bevel gear and Flat washer 15
can be removed.
Remove Spindle complete with
arbor press.
Remove Bearing retainer 50
from Bearing box by loosening
three M5x16 Pan head screws.
If the work mentioned in Fig. 12A
is not successful, remove Ball
bearing 6203DDW with arbor press.
Remove Ball bearing 6203DDW by striking Bearing box
against work table.
Ball bearing
6203DDW
Bearing box
Round bar of
Appropriate
diameter size
Bearing box
Ball bearing
6203DDW
M5x16 Pan head
screw (3pcs.)
Cup spring 20 (2pcs.)
Flat washer 15

P 7/ 11
Repair
[4] DISASSEMBLY/ASSEMBLY
[4]-2. Large spiral bevel gear, Ball bearing 6203DDW
ASSEMBLING
Bearing retainer 50
Make sure that O ring 78 is mounted to
Bearing box as illustrated below.
Assemble Ball bearing 6203DDW and
Bearing retainer 50 to Bearing box.
M5x16 Pan head
screw (3pcs.)
Ball bearing
6203DDW
O ring 78
Note in Assembling of Cup spring 20 to M15-23 Nut
Bearing box
Assemble as illustrated in Figs. 13 and 14.
Lock washer
Flat washer 15
Cup spring 20
Large spiral
bevel gear
Large spiral
bevel gear
Lock
washer
M15-23 Nut
Spindle
complete
Set Spindle complete in place
carefully with Arbor press.
Clamp the flat portions of
Spindle complete with vise,
and assemble the components
of Torque limiter to Spindle.
1R204
1R224
M15-23 Nut
1R223
Pre-setting 1R223 to 55- 60 N.m fastening torque,
tighten M15-23 Circular nut by turning 1R223 counterclockwise.
Fig. 13
Fig. 14
1) Align the center of two Cup springs 20 with that of Spindle
as illustrated below when tightening M15-23 Nut.
Do not to pinch two Cup springs 20 between the round end
of M15-23 Nut and Lock washer as illustrated right.
2) Pay attention to the direction of two Cup springs 20.
Refer to the following illustration and Fig. 13.
Spindle
Lock washer
Spindle
complete
Round end of
M15-23 Nut
Oval top of
M15-23 Nut
Cup spring 20
Cup spring 20
Spindle complete

P 8/ 11
Repair
[4] DISASSEMBLY/ASSEMBLY
[4]-3 Shaft lock mechanism
DISASSEMBLING
Fig. 15
Fig. 17 Fig. 18
ASSEMBLING
(1) Remove Gear housing complete from Motor housing.
Remove Bearing box from Gear housing complete as illustrated in Fig. 2.
(2) Remove Armature from Gear housing complete as illustrated in Fig. 3.
(3) Shaft lock mechanism can be disassembled as illustrated in Figs. 15 and 16.
Applying 1R268 to Shoulder pin 5 through the small hole
on Pin cap, tap 1R268 with Plastic hammer.
Shoulder pin 5 comes out from Gear housing complete.
Release 1R268 from Pin cap while paying
attention that Pin cap would not be slung
by Compression spring 12.
Shoulder pin 5
Pin cap
Note: Do not reuse Pin cap, Removal of
Shoulder pin 5 damages the inside surface
of Pin cap, producing plastic dust.
Pin cap
Compression
spring 12
Pin cap
Compression
spring 12
Fig. 16
(1) Be sure to use a new Pin cap for replacement and to remove all the plastic dust on Shoulder pin 5. (Fig. 17)
(2) Assemble the parts for Shaft lock mechanism as illustrated in Fig. 18.
Plastic dust
O ring 9
Shoulder pin 5
Shoulder pin 5
Make sure that O ring 9 is
mounted to Shoulder pin 5
illustrated below.
Assemble Compression spring 12
and Pin cap by pressing them to
Shoulder pin 5.
Insert Shoulder pin 5
through the hole of Gear
housing complete.
1R268

P 9/ 11
Repair
[4] DISASSEMBLY/ASSEMBLY
[4]-4. Handle R, L
DISASSEMBLING
ASSEMBLING
Fig. 19
Fig. 20 Fig. 21
Remove Handle complete (R) by loosening four 4x25 Tapping screws.
Switch, Power supply cord, Lock button can be replaced.
4x25 Tapping screw
(4pcs.)
Switch
Power supply
cord
Nylon washer 89
Lock button
Disassemble Handle section as illustrated in Fig. 19.
(1) Assemble Nylon washer 89 and Vibration proof rubber to Motor housing complete. Refer to Fig. 19.
(2) Mount Handle complete (L) as illustrated in Figs. 20 and 21.
(3) Assemble Lock button and Compression spring 7 to Handle complete (L) as illustrated in Fig. 22.
(4) Assemble Handle complete (R) to Handle complete (L). Refer to Fig. 19.
Motor housing
complete
After assembling Vibration proof rubber to
Motor housing, align the center line of Protrusion
of Vibration proof rubber to the center line of
depression of Motor housing.
Vibration
proof rubber
Handle
Complete (R)
Handle complete (L)
Remove Handle complete (L).
Nylon washer 89 and Vibration proof rubber
can be replaced.
Center lines
Protrusion of
Vibration proof rubber
depression of
Motor housing
complete
Depression of
Handle complete (L)
Protrusion of
Vibration proof
rubber
Fitting the depression of Handle complete (L)
to the protrusion of Vibration proof rubber,
set Handle complete L in place.
Handle complete (L)
Lock button
Handle complete (L)
Handle complete (L)
Compression spring 7
Fig. 22

LED
Circuit diagram
Wiring diagram
P 10/ 11
Fig. D-1
Power supply cord Switch Noise
suppressor
Controller
Makita
logo side
Brown lead wire is used
for some countries.
Blue lead wire is used
for some countries.
Blue lead wire is used
for some countries.
Belly side
(Name plate side)
Back side
(Bumper side)
White
Color index of lead wires' sheath
Black Red
Motor housing
viewed from
Commutator side
Noise suppressor (if used)
Do not pinch Lead wires between Switch
and inner wall of Handle set.
Wiring in Handle complete (L)
Fig. D-2
Hole
Tenon
Pin
Mount Power / Warning Lamp by fitting the tenon
and the pin into the holes on Handle set (L).
Power / Warning lamp
Put Lead wires of power supply
cord between Switch and Rib.
Rib
Fix Controller’s Lead wires with Lead wire holder.
Switch
Controller
Power / Warning Lamp

Wiring diagram
P 11/ 11
Fig. D-3
Makita logo side
Belly side (Name plate side)
Wiring in Motor housing
on Commutator side
Put Connecters here on
MaKita logo side.
Guide out Field lead wire
(black) by this Hook.
Guide out Field lead wire
(white) by this Hook.
Fix Field lead wire (white)
with these Lead wire holders.
Fix Field lead wires
(black, white) with these
Lead wire holders.
Other manuals for GA7030R
1
This manual suits for next models
3
Table of contents
Other Makita Grinder manuals

Makita
Makita 9561CH User manual

Makita
Makita 9533 User manual

Makita
Makita M9003G User manual

Makita
Makita GA4040 Manual

Makita
Makita GA7020 User manual

Makita
Makita GD0800C User manual

Makita
Makita 9902 Quick start guide

Makita
Makita DGA900PT2 User manual

Makita
Makita 9564P User manual

Makita
Makita 9526PB User manual

Makita
Makita GA021G User manual

Makita
Makita GA5040C01 User manual

Makita
Makita M0901 User manual

Makita
Makita DGA461 User manual

Makita
Makita 9564PC User manual

Makita
Makita 9565PCV User manual

Makita
Makita GA027G User manual

Makita
Makita GA036G User manual

Makita
Makita 9561CR Manual

Makita
Makita M9100 User manual