MAKSIWA MK.300.I User manual
1
MK.300.I
___________________________________________________________________
INSTRUCTION MANUAL
___________________________________________________________________
_
ATTENTION: READ THIS MANUAL BEFORE USING THE PRODUCT.
MITER SAW 10″ WITH LASER GUIDE AND DUAL SLIDING RAIL
2
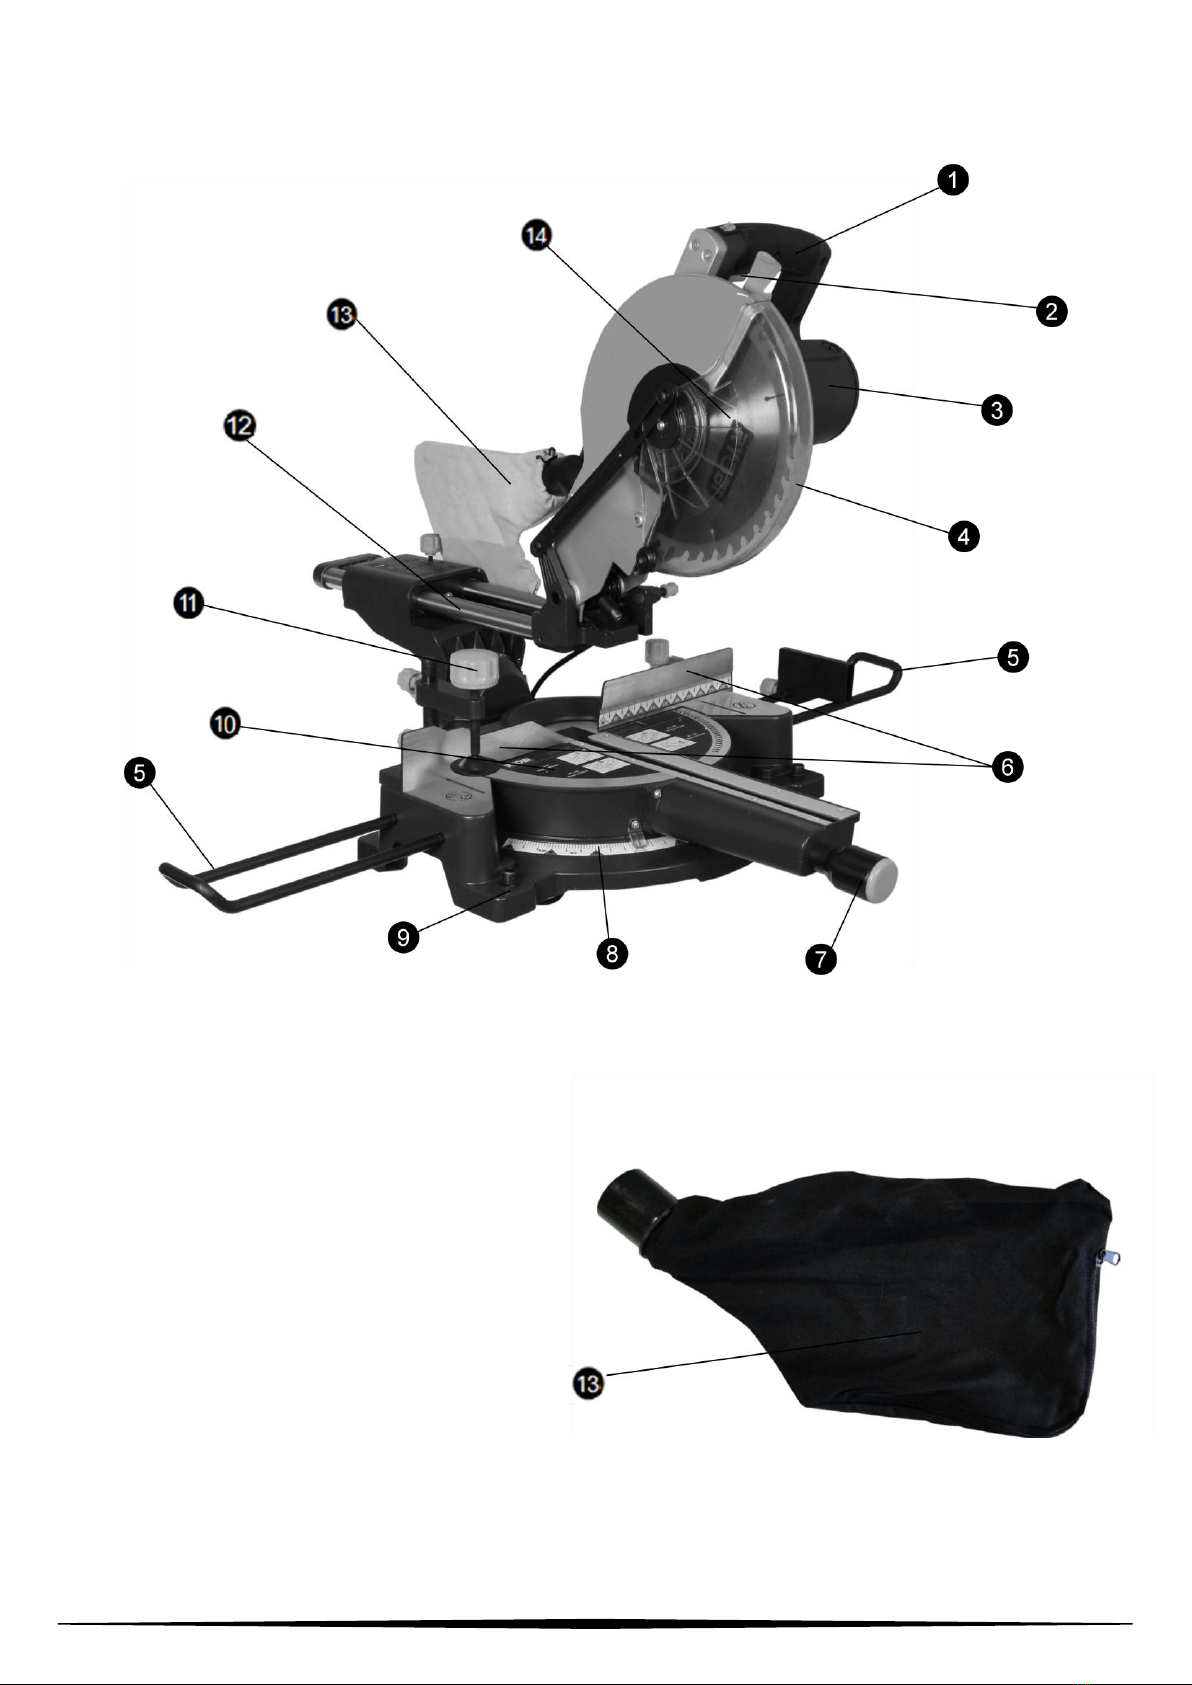
PICTURE 1
(Illustrative Picture)
1. Grip
2. Trigger switch
3. Engine Housing
4. Saw protector
5. Side Extenders
6. Side Guides
7. Square fastener button
8. Square Scale
9. Table Mounting Holes
10. Table
11. Fastener
12. Telescopic Guide
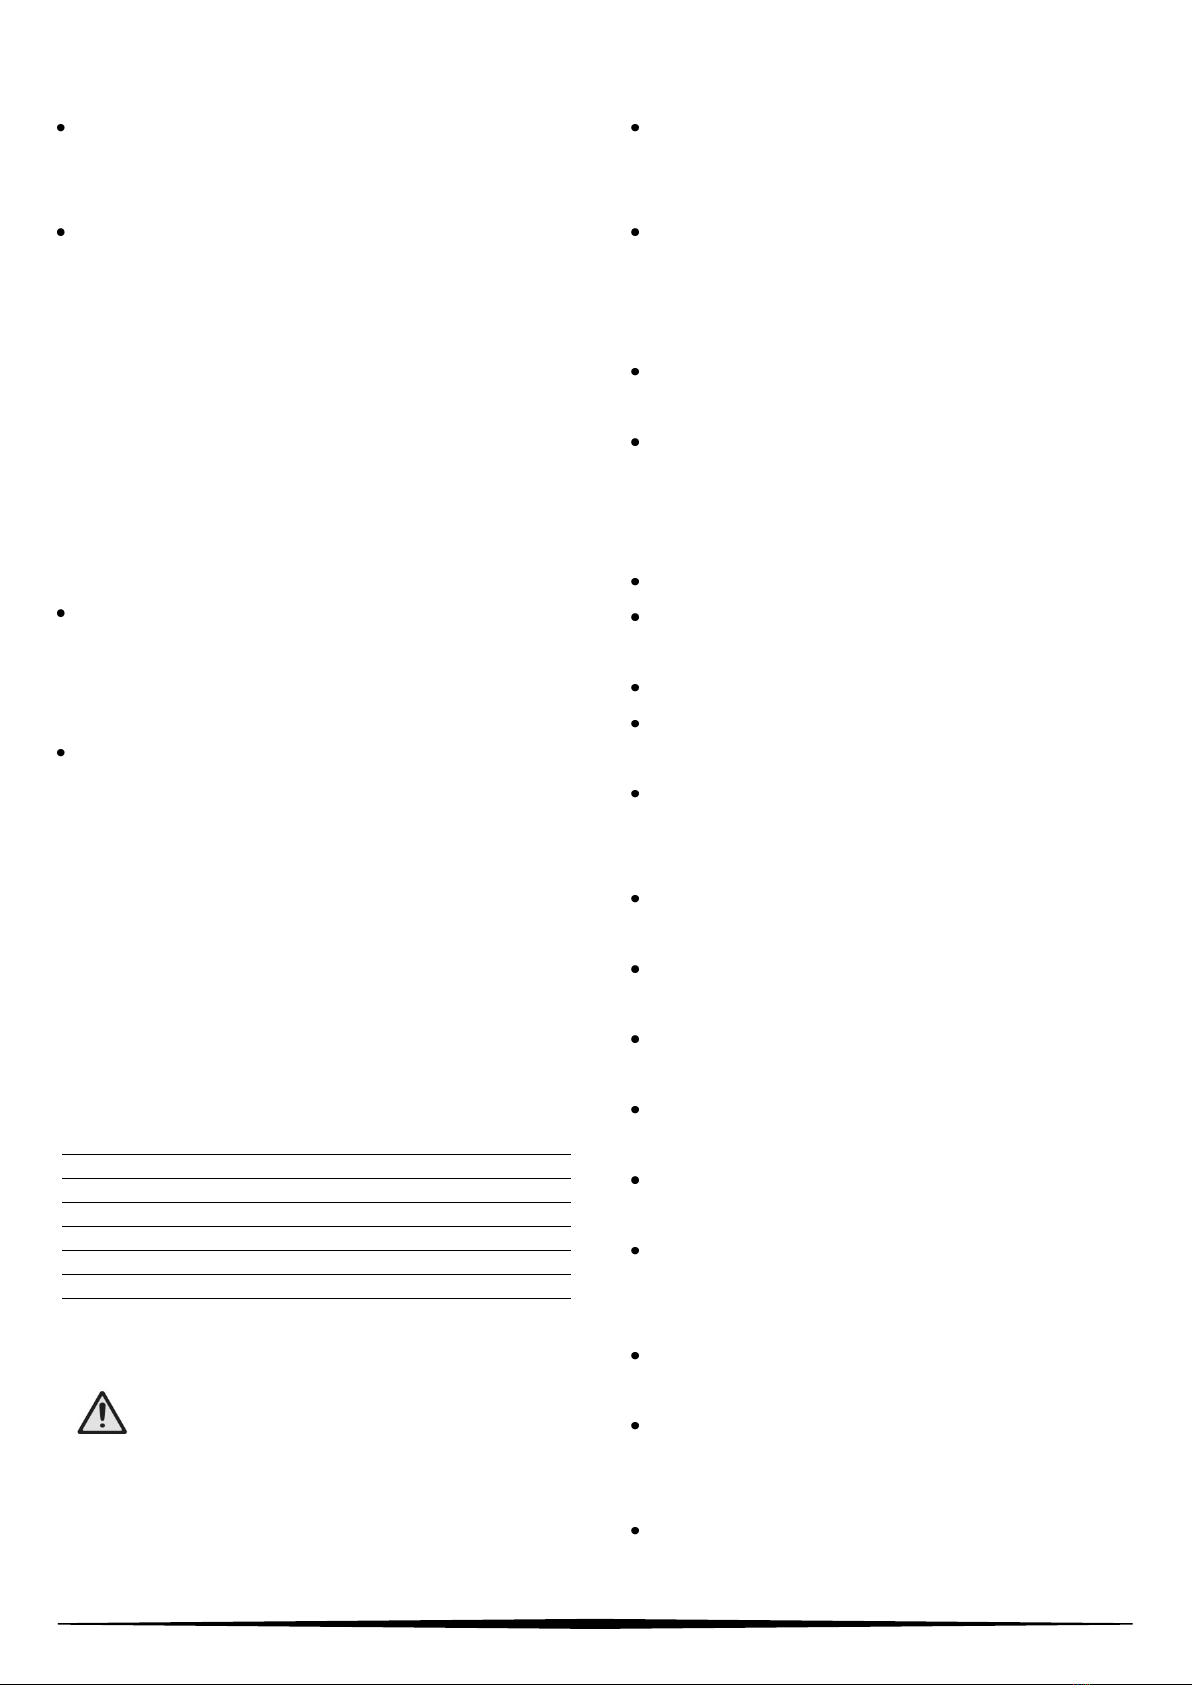
13. Dust Collector Bag
14. Cutting Disc
Picture 2
(Illustrative Picture)

3
INSTRUCTION MANUAL
Important information you should know:
Make cuts only with sharp blades. Discs that are not
sharp do not cut properly and overload the engine.
If the saw does not cut accurately, refer to the
PROBLEM DETECTION table in this manual.
ALWAYS USE PROPER PROTECTIVE
EQUIPMENT WHEN OPERATING THIS
EQUIPMENT.
Important Safety Instructions
ATTENTION: When using power tools, always
follow safety precautions to reduce the risk of
fire, electric shock and personal injury, including
the following:
READ ALL INSTRUCTIONS
Double Insulation
Double insulation tools are constructed with two
separate layers of electrical insulation or double
insulation thickness between you and the tool's electrical
system. Tools built with this insulation system should not
be grounded. As a result, your tool is equipped with a
two-pin plug that allows the use of an electrical
extension without the concern of maintaining a
connection to the ground wire.
NOTE: Double insulation does not replace normal safety
precautions when operating this tool. The isolation
system is to add protection against personal accidents
resulting from a possible failure in the electrical
insulation of the tool.
CAUTION: WHEN MAINTAINING, REPLACE
ONLY WITH INDENTICAL PARTS. Repair or
replace damaged wires.
SECURITY INSTRUCTIONS
FOR ALL TOOLS
Remove the adjustment key. Make it a habit to
ensure that the adjustment wrench is removed from
the shaft before starting the tool.
Keep the work surface clean. Disorganized areas
and work surfaces invite accidents.
Do not use the saw in hazardous environments. Do
not use power tools in damp or wet or exposed to rain.
Keep the work area well lit.
Keep children away. All visitors must be kept at a
safe distance from the work area.
Make the workplace childproof by using padlocks,
master keys or by removing the ignition key.
Do not force the tool. It will do the job better and
safer for the intended use. Use the correct tool.
Do not force the tool when doing work for which it
was not designed.
Use suitable equipment. Do not wear loose clothing,
gloves, chains, rings, bracelets or other accessories
that could get caught in moving parts. Shoes with non-
slip soles are recommended. Wear hair protection to
secure it.
Always wear safety glasses. Also wear a face mask.
Secure the part to be worked. Use fasteners or vises
when you are unable to secure the workpiece to the
table and against the guide by hand or when your
hand is dangerously close to the blade.
Do not overreach. Keep your balance and your feet
in a comfortable position at all times.
Keep tools in order. Keep tools sharp and clean for
better and safer performance. Follow instructions on
lubricating and changing accessories.
Disconnect tools before servicing or changing
accessories, such as blades, tips, cutters, etc.
Reduce the risk of unintentional starting. Make sure
the switch is in the “OFF” position before connecting
the wire to the plug,
Use recommended accessories. Refer to the
instruction manual to check the recommended
accessories. Improper use of accessories can cause a
risk of accident for people.
4
Never step on the tool. A serious accident can occur
if the tool is tilted or if the tool is touched accidentally.
Check for damaged parts. Before continuing to use
the tool, a guard or other part that is damaged must be
carefully examined to determine its proper functioning
and perform its function properly. Check the alignment
of moving parts, broken parts, assembly and any other
condition that may affect its operation. A protector or
other part that is damaged must be repaired or
replaced immediately. Do not use the tool if switch
does not turn it on or off.
Never leave a tool running unattended. Turn off the
ignition key. The engines of these tools can emit
sparks and explode flammable gases.
Extension cables. Make sure your extension is in
good condition. When using an extension cord, ensure
that it is capable of transmitting the electrical current
used by your product. An undersized cable will cause
a voltage drop resulting in loss of power and
overheating. The following table shows the correct size
to be used depending on the cable diameter and the
amperage rating. If in doubt, use a cable with higher
voltage capacity. CAUTION: Do not use extension
cords longer than 20 meters.
2-Way Wire 3-Way Wire
Ø (mm2)
Amperage
Ø (mm2)
Amperage
0,5
9
0,5
8
1,0
13
1,0
12
1,5
16,5
1,5
15
2,5
23
2,5
20
Additional Safety Rules for Miter Saw:
CAUTION: FAILURE TO MEET THESE
WARNINGS MAY RESULT IN PERSONAL
ACCIDENT AND SERIOUS DAMAGE TO
THE MACHINE.
Protect the power supply line with at least a 15 amp
fuse or a circuit breaker.
Make sure that the blade is turning in the correct
direction and that the teeth at the bottom of the blade
are pointing towards the rear of the miter saw.
Make sure the fasteners are secure before starting
any operation.
Make sure that all washers on the blade and
fasteners are clean and that the sides preceded by
flanges are against the blade. Tighten the axle screw
securely.
Keep the saw blade sharp.
Keep the engine vents free of chips or dirt.
Always use the blade guard.
Keep your hands out of the way of the saw blade.
Turn off the saw, disconnect the cable from the
power outlet and wait until the blade stops completely
before performing maintenance or adjustments to the
tool. Support long pieces with a wood fixing device.
Do not attempt to operate the saw at a voltage other
than the designated voltage.
Do not operate the saw unless all fasteners are
secure.
Do not use blades larger or smaller than
recommended.
Do not force anything against the fan to hold the
motor shaft.
Do not force the cut. Partial or total forced shutdown
of the engine can cause serious damage. Allow the
engine to reach full speed before starting to cut.
Do not cut ferrous metals or any masonry material.
Do not use abrasive bearings. Excessive heat and
abrasive particles generated by these will damage the
saw.
Do not allow anyone to remain behind the saw.
5
Do not apply lubricant to the blade when in
operation.
Do not put any hand on the blade area when the
saw is connected to the power outlet.
Do not use blades designed for less than 5,500
RPM.
Do not cut small pieces without the aid of fasteners.
Keep your hands away from the blade.
Do not operate the saw without the guides.
Do not perform any hands-free operation.
Do not reach around or behind the blade.
Do not put your hands within 6 inches of the saw
blade.
Do not put your hands under the saw unless it is
disconnected and unplugged. The saw blade is
exposed at the bottom of the saw.
Do not move your hands from the saw or workpiece
or raise your arms until the blade has stopped.
Do not use the saw without the base or when it is
wider than 10mm (3/8 ’’).
Do not use lubricants or cleaning products
(particularly sprays and aerosols) in the vicinity of the
plastic protector. The polycarbonate material used in
the protector is sensitive to certain chemicals.
ATTENTION: Any dust created by
sanding,cutting, grinding, drilling and other construction-
related activities contain chemicals that can cause
cancer, birth defects and other reproductive harm. Some
examples of these products are: lead-based paints; brick
silica crystal, cement and other masonry products; and
arsenic and chromium from chemically treated wood.
CAUTION: Do not connect the unit to an electrical
outlet or power on until all instructions have been
read and understood.
Always tighten the adjustment clips before
using the saw. Keep hands at 15 cm
away from the saw blade. Never perform hands-free
operations. Never cross your arms in front of the saw
blade. Think, how can I avoid accidents!
Do not operate the saw unless the guards are in
place. Never place your hands on the saw blade.
Always wear safety glasses. Turn the tool off and wait
for the disc to stop before restarting service, making
adjustments or moving your hands.
Electrical Connection
Make sure your power supply matches the designation
on the plate. A 10% decrease in voltage or more will
cause loss of power and overheating. All MAKSIWA
equipment is tested at the factory. If this tool does not
work, check the power supply.
Familiarize yourself with the machine
Place the tool on a smooth, flat surface, such as a
workbench or a strong, flat table. Check figures 1 and
2, and pay attention to the part descriptions to
familiarize yourself with its different components. The
next section will deal with the necessary adjustments
for the tool to function properly, and will refer to the
end that accompanies the illustrations. To do this, you
must know these parts and you must know where they
are. The name of each component is followed by a
corresponding number in the illustration.
Specifications
Wattage
2000 W
Speed
4500 RPM
Net Weight
19,5 Kg
Saw Dimension
Ø254 x 16 x 2,8mm
Table Tilt
45º esquerda –45º direita
Saw Tilt
0º a 45º
Max Cutting
90º x90º: 90 x 305mm
90º x 45º: 90 x 215mm
45º x 90º: 42 x 305mm
45º x 45º: 42 x 215mm
Transport and Installation
For packaging reasons, the machine is not completely
assembled.
If you notice any damage caused by transportation
while opening the package, notify your supplier
immediately. Do not operate the machine.
6
Dispose the packaging in a sustainable
environmental way.
The miter saw is designed to operate indoors and
must be placed on a firm, stable and level surface, as
explained below:
Mounting on a workbench
The four legs of the saw have holes, as shown in
figure 1, to facilitate the assembly of the table. Always
assemble your saw by securing it firmly to prevent it
from moving. To improve the transport of your tool,
you can mount it on a piece of wood 13mm (1/2 ’’) or
thicker, which can be fixed on the raised support to
other work places.
NOTE: If you are going to fix your saw on a wooden
plate, make sure that the screws will not go through
the thickness of the wood. The wood must be parallel
to the work table. When attaching the saw to any work
surface, use vise or sergeants and fix it only by the
feet where the screw holes are located. Attachment to
any other part of the saw may interfere with the proper
functioning of the equipment.
CAUTION: To prevent the saw from becoming
move and cause lack of precision, make sure that the
table where the saw is supported is not uneven. If the
saw moves over the surface, place a support under the
base until the saw settles firmly on the surface.
Installing a New Blade on the Equipment
IMPORTANT: Remove the miter saw from the
socket.
Do not cut ferrous materials or masonry materials with
this miter saw.
With the saw arm in the raised position, raise the blade
guard as far as possible. Loosen (but do not remove)
the guard console screw, until the guard console can
be raised high enough to allow access to the blade
screw. The blade guard will be held in the raised
position by the console guard screw. Push the button
lock the shaft with one hand and use the blade wrench
with the other to loosen (clockwise) the screw in the
slot on the left side of the blade.
NEVER TIGHTEN THE AXLE LOCK PIN WHILE THE
BLADE IS SPINNING. Be sure to hold the guard
console down and securely secure the guard console
screw when you finish installing the saw blade. Failure
to do so will cause serious damage to the saw and
possible personal injury.
NOTE: There are two different cut diameters on the
inner plate, which have marked 25.4mm and 16mm.
When installed, the outer diameter of the inner plate
must correspond with the diameter of the saw blade.
To install, place the blade and screw. Press and hold
the shaft and tighten the screw in the opposite
direction of the cranks with the key, then tighten again
in the direction of the cranks (clockwise) with the metal
guard screw.
NOTE: Only use the key that comes with the saw to
install and remove the saw blade.
Saw assembly and adjustment: Switch off the saw
before adjusting it.
Installing the square fastener button: Remove plastic
bag square fastener button
Carefully screw on the arm located at the front of the
saw.
Dust Bag Installation
Your saw comes with a dust bag. To install the bag,
place the plastic opening in the dust extraction socket
of the tool.
The saw can be used with a suction hose fitted to the
machine's dust extraction support, or without any
device.
MAKE THE ADJUSTMENTS HAVING THE SQUARE
SAW DISCONNECTED FROM THE OUTLET.
NOTE: Your miter saw was precisely adjusted at the
factory during manufacture. If it is necessary to
readjust according to the transport and

7
handling or any other reason, follow the steps below
to adjust your saw. Once these adjustments are
made, they will remain accurate. Follow these
instructions carefully to maintain the accuracy your
saw is capable of.
Adjusting the Miter Scale
Place a square against the saw blade and guide (do
not touch the tips of the blade teeth with the square.
This will cause the fine adjustment to fail). Loosen the
square fastener button and rotate the square arm until
the square edge locks in the 0º position. Do not press
the fastener button. If the saw blade is not exactly
perpendicular to the guide, loosen the two screws that
hold the square scale to the base and move the scale /
square arm assembly to the right or left until the blade
is perpendicular to the guide, as measured with
square.Retighten the two screws. Do not pay attention
to reading the square pointer at this point.
Protector Activation and Visibility
The saw blade guard is designed to lift automatically
when the arm bends down and covers the disc when
the arm rises.
The guard can be lifted manually when installing and
removing the cutting disc or when necessary
inspection of the saw.
NEVER LIFT THE CUTTING DISK PROTECTOR
WHEN THE SAW IS IN OPERATION.
NOTE: Certain special cuts require you to lift the
guard manually. To do this, simply place your right
thumb on the top of the protector and slide it upwards
to generate enough space for the piece to pass. Never
remove the protector or prevent normal operation.
Connect the saw to any electrical outlet. Refer to the
rating plate on your tool for the proper voltage. Make
sure that cable is not on your way.
Switch:
Turn on the saw, press the trigger switch. To turn the
tool off, release the switch. There is no mechanism to
lock the switch in the on position.
Hand and Body Positioning
The proper positioning of the body and hands during
the operation of the miter saw will make cutting easier,
more accurate and safer. Never place your hands near
the cutting area. Place your hands no closer than 15
cm from the blade. Hold the piece firmly against the
table and the guide while cutting.
Keep your hands in position until the trigger has been
released and the blade has come to a complete stop.
ALWAYS DO A TRIAL TEST (DISCONNECTED
FROM THE POWER) BEFORE MAKING FINNISHING
CUTS SO YOU CAN CHECK THE BLADE PATH.
Cutting with your saw
NOTE: Although your saw cuts wood and many other
non-ferrous materials, we will limit ourselves to
discussing only wood cutting. The same guidelines
apply to other materials. DO NOT CUT FERROUS
MATERIALS (containing iron and steel) OR
MASONRY MATERIALS WITH THIS SAW.
DO NOT USE ABRASIVE BLADES.
Cross sections
Cutting multiple pieces is not recommended, but can
be done safely by ensuring that each piece is securely
fastened against the table or the guide.
Cross-cutting is done by cutting the wood in the
opposite direction to the fibers at any angle. A straight
cross section is made with the miter arm in the 0º
position. Set the square to zero, hold the wood firmly
on the table against the guide. Turn the saw on by
pulling the trigger. When the saw starts to pick up
speed (after approximately 1 second), gently lower
your arm to perform the
OPERATION

8
cut in the wood. Allow the blade to come to a complete
stop before lifting the arm.
Transverse cuts are made with the square arm at any
angle other than 0º. This angle is often 45º for making
corners, but can be adjusted from 0º to 45º to the right
or left. After selecting the desired angle, be sure to
press the square fastener button. Make the cut as
described above. Beveled Cuts
A bevel cut is a cross-section made with the saw blade
not perpendicular to the wood. To adjust the chamfer,
loosen the chamfer holder button and move the saw to
the left as desired (it is not necessary to move the left
side of the guide to allow opening). Once the chamfer
is at the desired angle, press the fastener button firmly.
The chamfer angles can be adjusted up to 45º to the
left and the cut can be made with the square arm
positioned between 0º and 45º to the right or left.
Cut Quality
The smoothness of any cut depends on a number of
variables. Factors such as the type of material being
cut, type of blade, blade sharpening and rate of cut
contribute to the quality of the cut.
When smoother cuts are required for frames or other
precision work, a sharp blade (60 - 80 carbon teeth)
and a slower and more uniform rate of cut will produce
desired results. Make sure that the material does not
vibrate when cutting. Hold it firmly in place. Always
wait for the blade to stop completely before raising
your arm.
If small wood fibers continue to splash on the back of
the piece, place a piece of masking tape on the wood
where the cut will be made. Saw through the tape and
carefully remove it when the cut is finished.
Setting the Workpiece
Unplug and unplug the saw.
If you are unable to secure the workpiece on the table
and against the guide by hand (irregular shapes, etc.)
or if your hand is less than 15 cm from the blade, a
fastener or other fixation method should be used.
Other accessories such as spring clips, bar or “C”
press may be suitable for certain sizes and shapes of
material. Be careful in the selection and placement of
these fasteners. Make sure to test with the tool off
before making the cut.
Support for Long Pieces
Unplug and unplug the saw.
ALWAYS SUPPORT LONG PARTS.
Support long pieces using any convenient shape such
as easels or similar structures to prevent the ends from
falling.
CHECK THE MAKSIWA CATALOG AND FIND
PRODUCTS FOR THIS FUNCTION. Cutting Frames,
Boxes and Other Parts with Four Sides
To better understand how to make the items listed
above, we suggest that you do some simple projects
using wood scraps until you develop a certain skill with
your saw.
Your saw is the perfect tool for cutting corners in
frames. The adjustment of the square to chamfer the
ends of two boards at an angle of 45º each produces
a corner of 90º. For this joint, the square arm must be
locked at 45º. The wood must be positioned with the
wide, flat side against the table and the thin portion
against the guide. The cut can also be done by cutting
to the right and left with the wide surface against the
guide.
The following table provides the appropriate angles for
a number of shapes. The table assumes that all sides
are the same length. For a format that is not shown in
the table, use the following formula: 180º divided by
the number of sides is equal to the angle of the
chamfer or the square.

9
Examples
Number of sides Chamfer or Square angle
4
45º
5
36º
6
30º
7
25,7º
8
22,5º
9
20º
10
18º
Cutting Compound Frames
A composite frame is a cut made using a square angle
and a chamfer angle at the same time. This type of cut
used to make frames or boxes with slanted sides.
NOTE: if the cutting angle varies from cut to cut, check
that the chamfer firing button and the square lock
button are securely tightened. These buttons must be
pressed after any changes to the chamfer or square
have been made. The table shown will help to select
the appropriate settings for chamfer and square for
cutting common frame compounds.
Cutting of frames
In order to make a proper adjustment, the frames must
be cut very precisely. The two flat surfaces of a frame
have angles that, when joined, add exactly 90º. Most
frames have an upper back angle (the side that goes
against the flat part) of 52º and a lower back angle
(the side that goes against the wall) of 38º.
In this case, doing preliminary tests with patchwork of
frames is very important! Place the lower part (which
goes against the wall) against the guide of the miter
saw. Place the upper part (the one that goes against
the flat part) against the saw table and the frame
guide.
Instructions for cutting angular frames between
the guide and the saw table, for all types of cuts:
1. Place the frame so that the bottom
of this (the one that goes against the wall when
affixed) is against the guide and the upper part of
the frame against the saw table.
2. 2. The miter plans at the rear of the frame must fit
directly on the guide and the saw table.
3. 3. Check the cuts so that they are flat, thus
avoiding free spaces for their accuracy.
INTERNAL CORNER:
Left side
1. 45º left cut
2. Keep the left side of the cut
Right Side
1. 45º Right cut
2. Keep the right side of the cut
EXTERNAL CORNER:
Left side
3. 45º left cut
4. Save the left side of the cut
Right side
3. 45º straight cut
4. Keep the right side of the cut
SPECIAL CUTS
NEVER MAKE A CUT IF THE MATERIAL IS NOT
SECURE ON THE TABLE AND GUIDE.
Aluminum Cutting
Use only specific discs for this cut. The instructions for
aluminum, such as those used to make frames, rails
etc., can be easily executed with the saw, using a disc
for cutting non-ferrous metals. Place the material so
that the thinnest part is exposed to the cut. When
cutting aluminum, use wax lubricant. Apply the wax
directly to the disc before cutting. Never apply wax
when the disc is in motion. The wax available in most
tool stores or in deposits of industrial suppliers offers
adequate lubrication and prevents the frames from
damaging the cutting disc. Make sure you have
properly fixed the part. Due to their size, shape and
surface finish, some parts may require

10
press, a mold or any other element to prevent
movement during cutting.
Arched Material
When cutting a material that is arched, position it with
the hollow facing the front of the equipment, and never
facing the side guides. The incorrect position of the
material may cause it to tighten the disc before
finalizing the cut.
Cutting of Plastic Tubing and Other Circular
Cross-Cutting Materials
The plastic tubing can be easily cut with your saw, just
like cutting wood. For this, the material must fit firmly
against the guide in order to prevent its movement,
particularly when making angular cuts.
1. All fixed parts of the saw are sealed. They are
permanently lubricated and require no
maintenance.
2. Clean and remove all dust and wood chips from the
surroundings and under the base and rotary table
periodically. Even if there are consoles to allow that
waste to drain, there will be
3. the accumulation of dust.
4. The bushings are designed to provide several years
of use.
Important: To maintain security and reliability
of the product, repairs, maintenance and adjustments
should only be carried out by authorized technical
assistance that will use identical parts for replacement.
Frequent Troubleshooting Guide Be sure to follow the
safety rules and instructions according to the table
below.
CAUTION: The use of any accessory not
recommended as a set for cutting channels, cutting
frames or discs abrasives, can be dangerous.
TECHNICAL ASSISTANCE
For your greater safety, entrust repairs, maintenance
and adjustments (including inspection and
replacement) to the technical assistance
recommended by MAKSIWA, which will always use
genuine spare parts and accessories, reassembling
your saw in the same way as the original.
The use of this tool for professional or industrial
purposes is not recommended by MAKSIWA. Before
using an extension cord, check for loose or exposed
wires, damaged insulation and defective fittings.
Repair or replace the extension if necessary.
Imported by Maksiwa USA Inc.
4100 N Powerline Rd, Suite D3 Pompano Beach, FL 33073
www.maksiwa.com
754-205-6717
MAINTENANCE
ISSUE CAUSE HOW TO FIX IT
Saw doesn't turn on
The saw is not connected to power Connect the saw
There is a burned fuse Exchange the fuse
The switch is open. Close the switch
The wire is damadged Exchange the wire at a authorized workshop
The coals have worn out. Replace the coals at an authorized workshop.
Saw doesn't make
satisfactory cuts
The disc is not sharp. Exchange the disc
The disc is mounted upside down. Switch the position of the disc
The disc is dirty. Take off the disc and clean it
Wrong disk for the job type. Exchange the disc
Part is poorly fixed. Fix the part properly to your saw.
The angle scale is not adjusted. Check and adjust the scale.
The disc is not aligned with the guide. Check and adjust.
The disc is not perpendicular to the table. Check and adjust according to the instructions.
The moving work table. Fit the workpiece to the guide.
The disc does not
reach working speed.
Extension cable too thin or too wide. Replace with a suitable extension.
Dirt preventing movement of the disc. Remove the disc and clean it.
The electric current is too low (oscillating). Contact your power supplier
The machine vibrates
excessively.
Saw incorrectly attached to the table. Check the assembly instructions.
Table or bench with uneven surface r. Place the saw on a suitable surface.
The saw blade is damaged. Replace the disc.
The material
damages the disc.
It is cutting arched material. Place the part according to the instructions.
Material in disagreement with the instructed. See instructions for materials.
Table of contents
Other MAKSIWA Saw manuals


Popular Saw manuals by other brands


Black & Decker
Black & Decker BDCCS20 instruction manual

Gude
Gude GWS 600 EC 230 Volt Translation of the original instructions

Scheppach
Scheppach Deco-flex instruction manual

Holzmann
Holzmann DKS 21PRO user manual

DeWalt
DeWalt DE3000 instruction manual

Powermatic
Powermatic 64B Operating instructions and parts manual


