MAKSIWA BMS.3200.IR User manual

1
BMS.3200.IR
INSTRUCTIONS MANUAL
S. C. Sliding Panel Saw 3200 mm
Attention: Read this manual before using the machine.

2
INSTRUCTIONS MANUAL
Important information you need to know:
Read all of these instructions. Failure to follow all of
these instructions listed below may result in personal
injuries and damage to the equipment.
SAVE THIS MANUAL
ATTENTION: When you use electrical equipment,
always follow the safety measures to reduce re
hazard,electrical shock and personal injuries, including
but not limited to:
1. WORK AREA:
• Maintain a clean work area. Messy work spaces are a
huge cause of work related accidents.
• Do not use saws in dangerous areas. Do not use
electronic tools in humid areas, wet areas, exposed to
rain, in the presence of liquids or ammable gasses.
Maintain your work area well illuminated.
• Maintain kids away from the machine. All visitors
should maintain a safe distance to avoid injuries.
• Maintain kids away from the machine. Utilize locks
to lock the machine’s main power switch, activate
the emergency buttons and un-plug the machine to
prevent it from being turned on.
2. ELECTRONIC SAFTY
Make sure that your outlet is in accordance with the
machine. An increase or decrease of 10% in the voltage
may cause the machine to malfunction or even get
damaged. All of MAKSIWA’s tools are tested in our
factories. In case this machine does not work, check
your power supply.
CAUTION: WHEN DOING MANTNENCE ONLY SWAP
PARTS FOR IDENTICAL PARTS
• Fix or change damaged wires.
• The plug of the equipment needs to be compatible
with the outlet. Never modify the plug. Do not use
a plug adapter with this equipment. By note using
adapters and using only compatible sockets you
reduce the risk of electric based injuries.
• Avoid physical contact with any component
connected to your ground wires. There is an increase
in getting electrocuted if you are in direct contact
GENERAL SAFTY GUIDELINES
with such components.
3. PERSONAL SAFETY
• Be alert, look at what you are doing and use common
sense when using this tool. Do not use this tool if you
are tired, under the inuence of any drug, alcohol or
medicine. A moment of distraction when operating
this machine could cause severe injury.
• Always use safety glasses, mask agents the dust,
shoes that do not slip, gloves, and ear plugs to reduce
any risk.
• Use adequate equipment. Do not use large clothes,
gloves, chains, rings, bracelets or other accessories
that may get snagged on the moving parts. It is
recommended that you use shoes that do not slip.
Use hair protection so it can’t get snagged on the
equipment.
• Do not stretch yourself out to reach something.
Always maintain your balance to avoid falling on the
sawblade.
• Unplug the machine before doing any maintenance
on it including, but not limited to, removing the saw
blade.
•Reduce the risk of unintentionally turning the
machine on by always checking it the main power
switch is o before plugging the machine in.
• Use only recommended accessories. Consult the
instructions manual to validate it the accessories is
recommended. Use of inappropriate accessories may
increase the risk of accidents.
• Never step on the machine nor clime on top of
it. Sirius accidents may occur to either you or the
machine if you do.
4. HOW TO USE AND MAINTAIN THE EQUIPMENT
• Only make cuts with sharp blades. Dull blades do
not cut well and put too much strain on the motor.
• Do not force the equipment. If you are feeling a
resistance, remove your panel and look around to nd
the issue. Forcing your equipment will only increase
risk of injury and/or damaging the equipment.
• Use the appropriate equipment. Do not force the
machine to cut something it was not meant to.
ALWAYS USE THE APROPRIET SAFTY
EQUIPMENT WHEN OPERATEING THIS
EQUIPMENT.

3
• Fixate the panel that will be worked on. Use clamps
to hold down panels and press it against the guide.
Be attentive when holding the panel to not cut your
hand.
• Maintain the equipment sharp and clean for a much
easier and safer work environment and production.
Follow the cleaning, accessories change and
lubrication instruction.
• Check any damaged component before continuing
to use the equipment. Any damaged component must
be examined in detail to determine if the damage
hinders its performance. Verify the alignment of any
moving part that is damaged before use. Any safety
equipment that is broken and no longer serves its
function adequately needs to be xed or changed
immediately. Do not use the equipment in case the
circuit breaker does not turn on or o.
• Never leave a machine working alone, always have
someone supervising it. Turn of the main power
switch. Motors may emit a small electrical discharge
and ignite ammable gasses.
WARNING: FAILURE TO FOLLOW THESE WARNINGS
MAY RESAULT IN ACIDENTS TO YOU OR THE
MACHINE.
• DO NOT operate this machine until it is assembled in
accordance with the instructions.
• PROTECT the power supply cable with a minimum
of a 30 amps fuse or a circuit breaker.
• CONFIRM that the blades are spinning in the
correct direction. The main blade’s top teeth should
be pointing and spinning towards the front of the
machine (where the buttons are) while the scoring
blade should be pointing and spinning towards the
back of the machine (away from the buttons).
• CHECK the washers and nuts of the blades to see
if they are clean and tighten. The washers and nuts
need to be pressing the blade together with no lth in
between to avoid accidents.
• MAINTAIN a sharp blade.
• MAINTAIN the tubes for the motor free of any pieces
of wood and lth.
• ALWAYS use a guard protected for the blade.
• ALWAYS maintain your hands away from the path
of the blades.
• TURN OFF the machine, disconnect the power
cable and wait till the blade stops spinning before
attempting to do any maintenance.
• ALWAYS support long panels with clamps or other
similar devices.
• DO NOT attempt to use the machine in a voltage
that it was not designed to handle.
• DO NOT use blades bigger nor smaller than the
recommended.
• DO NOT put anything inside of the motors.
• DO NOT force the machine to cut if it is giving
resistance. A partial or full stop of the motor caused
by forcing a cut may result in damages to the motor.
Wait until the motor is running at full speed before
continuing.
• DO NOT attempt to cut metals, concrete nor cement.
• DO NOT use sanders nor sand paper on the machine.
The heat generated and the particles emitted may
damage the machine.
• DO NOT allow anyone behind the machine.
• DO NOT apply any type of grease nor lubrication
on the blade if it is in motion.
• DO NOT put any of your hands near the blades when
the machine is receiving power.
• DO NOT use blades designed for less than 5,500
RPM
• DO NOT cut small pieces with ought clamps. Maintain
your hands away from the blades.
• DO NOT operate the machine with ought any guides.
• DO NOT cut anything with ought holding it.
• DO NOT grab anything in front of or behind the
blades with your bare hands.
• DO NOT put your hands less than 5 inches away
from the blades.
• DO NOT put your hands below the machine unless
the machine is o and un-plugged.
• DO NOT remove your hands from the panel until it
has been completely removed from the blades.
ADITIONAL SAFTEY RULES FOR
CIRCULER SAWS

4
The BMS.3200.IR is a sliding panel saw tailor made
to provide high quality precise cuts in diverse angles
with a max cut depth of 4 inches (100 mm) at 90º.
It includes a 5 CV motor, cutting guides, miter guide,
blade guard. The noise level of this equipment is 76.5
dB (the machine turned on only) up to 110 dB (with
the machine on and the exhaust system on. The noise
will vary in accordance with the location the machine
is in and the materials used).
Specications
• General:
- Weight: 1,470 LBS
- Machine dimensions (closed): 130” X 126” X 48’’
- Machine dimensions (max): 180” X 262” X 48’’
- Mobile table dimension: 14 11/64” X 125 63/64”
- Mobile table max travel length: 262”
- Fixed table max width: 49 7/32”
- Guide size (closed): 67”
- Guide size (max): 120’’
• Electric - Main motor:
- 3 Phases
- 220V
- 5 HP
- 10 Amps
- Non-loaded blade speed: 4,000 RPM
• Electric - Scoring motor:
- 3 Phases
- 220V
- 3/4 HP
- 1.5 Amps
- Non-loaded blade speed: 4000 RPM
- Non-loaded scoring blade speed: 8000 RPM
- Does not come with an outlet wire
• Blade:
- Main blade diameter: 13 25/32”
- Main blade arbor size: 1 3/16”
- Scoring blade diameter: 4 ¾’’
- Scoring blade arbor size: 25/32”
- Max tilt: 45°
- Max depth cut: 3 15/16”
- Max cutting length: 125 63/64”
• Dust collection:
- Port 1 diameter: 4’’
- Port 2 diameter: 4’’
- Minimum CFM needed: 600 CFM
NOTE: Pictures and illustrations contained in this
manual are only ILLUSTRATIONS and may not reect
the color, tags or accessories and is present to only
demonstrate the technique.
• DO NOT use the machine if it is not xated properly.
• DO NOT grease nor lubricants nor any cleaning
product (sprays in particular) around plastic guards.
The materials used to make them are highly sensitive
to chemicals and may cause damage.
• AVOID KICKBACKS (when the panel moves back
unintentionally) by maintaining the blades sharp,
clean, maintaining the guide on the mobile table in a
right-angle position relevant to the blades,maintaining
the guide from the immobile table in parallel to the
blades, and utilize all the safety equipment from the
machine.
• DO NOT make longitudinal cuts on a piece that is
twisted, deformed or does not had a at side to use
as a guide.
• ALWAYS use a Push Stick to push loose pieces,
never use your hands and you risk injuring yourself.
• NEVER cut a big piece that cannot be clamped
down on the machine.
• NEVER orientate yourself based on the cutting
guide when making a transverse cut.
• NEVER cut wood knots nor other deformities on the
wood.
ATENTION: Some dust caused by the act of sanding,
cutting, molding, drilling, and other activities related
to construction contain chemicals that may cause
cancer, birth defects, and other raspatory problems.
Some examples of this products are: lead based paint;
crystal of silica bricks, cement and other masonry
products; and arsenic and chromium from chemically
treated woods.
CAUTION: Do not connect the equipment to an outlet
before reading and understanding all the instructions.
Always tighten the adjustable tabs before utilizing the
equipment. Maintain your hands at least 6 inches (15
cm) from the blade. Never utilize the machine with
free hands. Never cross your arms on the equipment.
Always think “What can I do to prevent accidents?”
Do not operate the equipment with ought taking the
necessary safety measures. Never put your hands
on the saw blade. Always utilize protection goggles.
Always turn o the machine and wait for the blade
to stop spinning completely before preforming any
adjustment, cleaning and reassuming your task.
FUNCTIONAL DISCRIPTION

5
Install the equipment on top of a at surface. The next
section will talk about the necessary adjustments
needed to maintain your equipment running at its
best and the illustrations will refer to these steps.
For this you need to know the parts and know where
they are located. The name of each component will
be accompanied by a number and/or letter for its
respective part on the illustrations.
Transportation and Installation
For packaging reasons, the equipment is not fully
assembled. If you notice any damage that occurred
when transporting the equipment or while you are
opening the equipment, notify the store where you
bought it from immediately. Do not turn on the
machine. Remove the equipment from the crate with
cation. A lot of the parts are loose on either the top,
side or inside the equipment. Remove all the stretch
wrap from all the parts. You can clean the non-painted
areas of the equipment with a piece of cloth and some
solvent (be cautious as some solvents may damage
the paint). After cleaning the non-painted areas, you
can pass some wax on it.
REMEMBER TO DISCARD THE TRASH IN
ITS APPROPRIATE RECYCLING BIN.
TRANSPORTATION:
To move the equipment with a crane or a pallet jack/
fork lift follow the positioning indicated in the following
pictures avoiding contact with the nonstructural parts
(the thin metal sheets) of the equipment. Do not use
any equipment to lift this equipment if it can’t support
up to 2,200 LBS (1 metric ton).
Position the machine in accordance with your space,
remember to leave space for the sliding table along
with the necessary space for your panels. For greater
stability bolt the machine to the oor:
GET TO KNOW YOUR SLIDING PANEL
SAW
ASSEMBLY Assemble the remaining components which includes:
the mobile table, mobile table guide (3200mm), side
and back stationary tables, stationary table guide,
miter guide, stopper, blade guard, among others.
Since the equipment was already assembled in our
factory, you will not have any issues to assemble your
BMS.3200.IR.
CAUTION: Never remove the blade guard. It should
always be in the correct position at all times to avoid
any possible accidents.
STATIONARY TABLE:
Install the tables that extend the work top area for
the stationary table as it is depicted on the next
illustration.
6
Fixate the rail of the guide in the front of the stationary
table keeping in mind that the three parts need to be
parallel to each other:
Install the second part of the table and adjust the
Hight to suit your needs and install the guide on top
of the table:
In case you need to straighten out the guide you can
by adjusting the nuts and allen screw. The left most
nuts need to be tight at all times. If the guide is too
low or too high, adjust the allen screw underneath the
middle nut to move it up or down. Keep the middle
nut loose for now. To adjust the front tip of the guide
(the closest edge to the blade) to the left (towards
the blade) you will tighten the right nuts, to move it
to the right (way from the blade) you will loosen the
right nuts. After installing and adjusting it, cut some
boards to test it. In case you need to, you can always
re-adjust it.
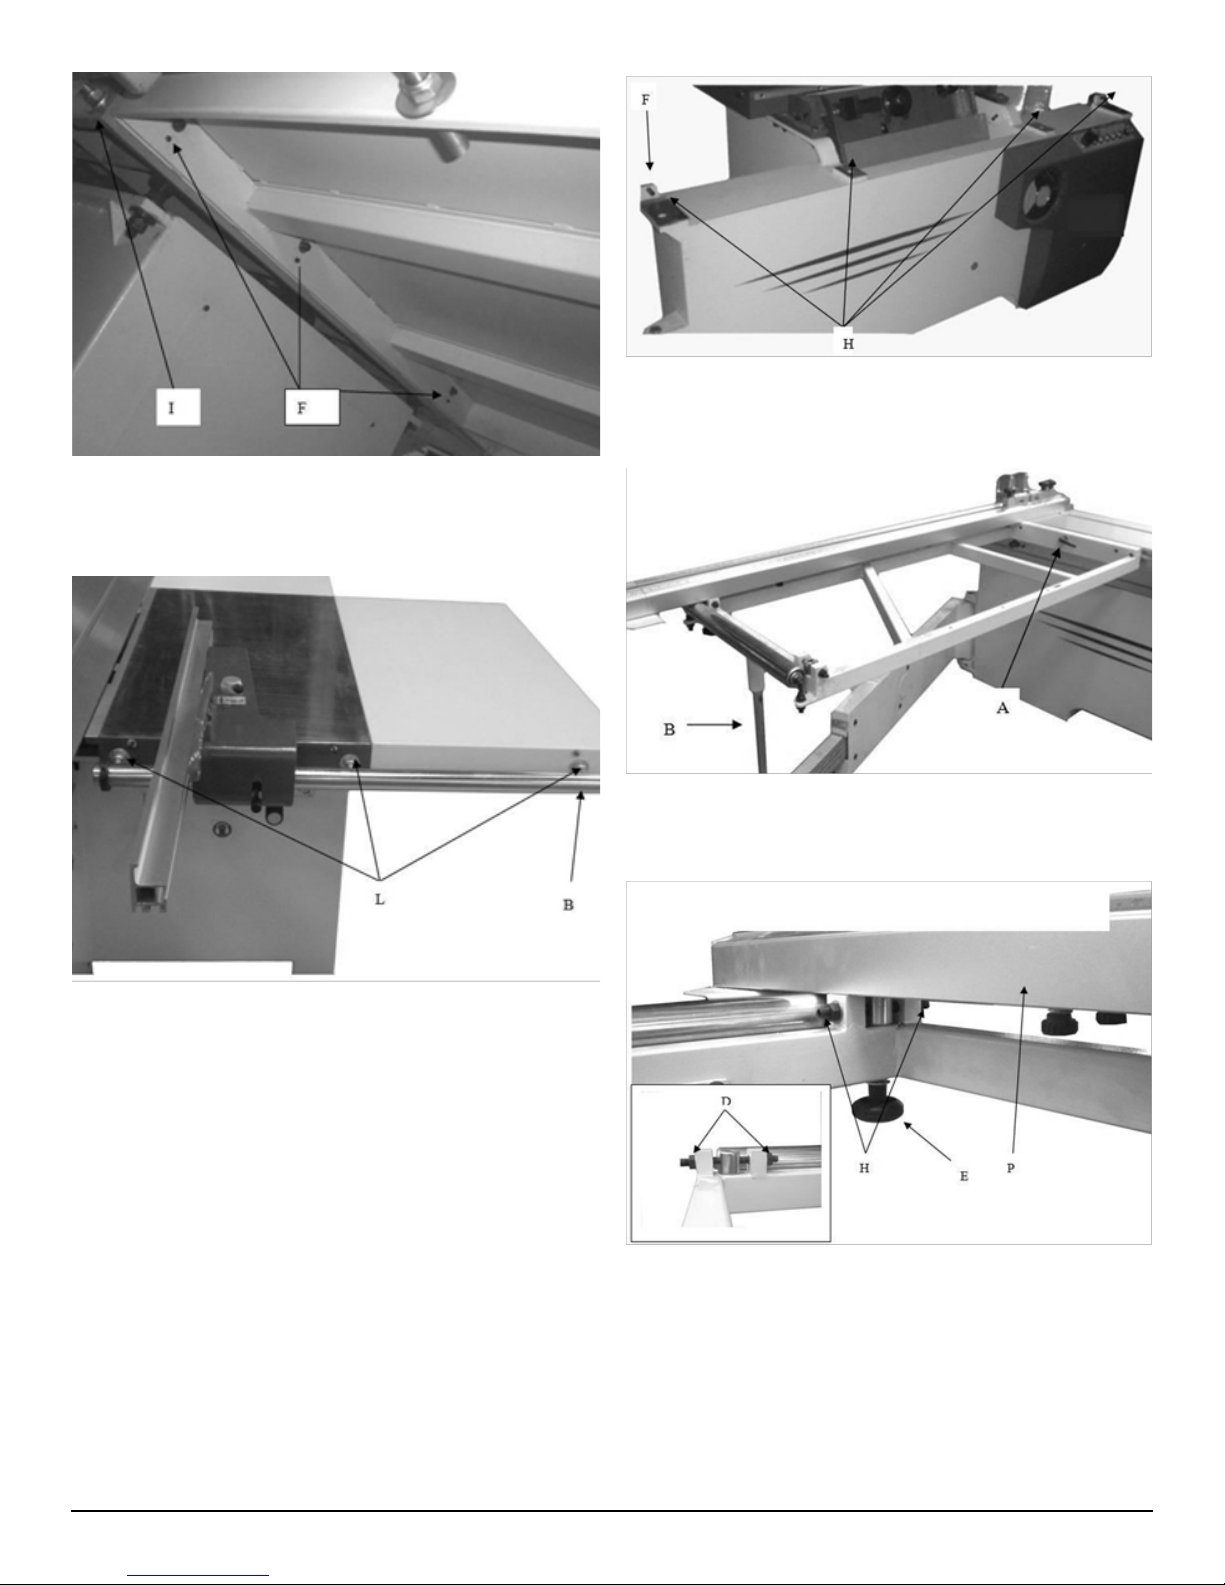
SLIDING TABLE:
With the help of another person, install the sliding
table (3200mm) on the base of the equipment. Screw
it in place to hold rmly as seen in the illustration next
to:
To properly adjust the guide, and to straighten you
cuts, you will rst grab a panel and cut all four sides
by rotating the panel counter clock-wise. After you
did the fourth cut, you will place that side agents the
guide. Now you will cut once more then ip your panel
over so the side that you just cut is now on the opposite
side and the side that was touching the guide is still
touching the guide. Cut once more. Measure the side
that is touching the guide and the opposite side.
Fixate the guide Pon top of the sliding table and
adjust the screws underneath it to manipulate the
guide and to straighten out your cuts:

7
If the opposite side is larger then the side touching
the guide, you will loosen the left allen screw Hthen
tighten the right allen screw Hon the illustration above.
If the opposite side is smaller than the side touching
the guide, you will loosen the right allen screw Hthen
tighten the left allen screw H on the illustration above.
Repeat this until both sides are of equal sizes, cut all
four sides again and measure all four sizes to see if it
all matches. If it does not match, repeat these steps
until it matches.
SAW BLADE PROTECTION:
All of the safety systems need to be installed and
used at all times. Install the splitter (riving knife) with
a maximum distance of 8mm.
ENERGY:
With the machine still not plugged in, connect the
cable’s wires to the equipment.
Familiarize yourself with the front panel of your
equipment:
Spin the left knob to move the scoring blade up and
down while spinning the right knob will move the
scoring blade left and right. The scoring blade needs
to align with the main blade. To test if it is you will
grab a panel and pass it through the scoring blade
and only a little bit on the main blade. Then go back
and remove the piece. You will see both the Scoring
blade and the main blade cuts on the panel and can
make the adjustments as needed.
SAW BLADE INSTALLATION:
To install the main blade, you will use the provided
allen wrench and wrench. To remove the main blade,
hold the nut with the provided wrench and the allen
wrench in the middle and spin the wrench clock wise.
Allow only trained professionals to work on the
electrical wires of this equipment to avoid damages
and injuries.
CAUTION: Do not connect this equipment to an
outlet before reading and understanding all of the
instructions. This equipment can be connected to
a 220V 3 phase or 380V 3 phase outlet. Verify with
your electricity company what you have and then
verify both the motors and the transformer of the
equipment. Utilize a cable that is at least 2,5mm².
DUST COLLECTOR PORT:
An adequate dust collection system needs to be
connected to both exhaustion ports (one on top of the
blade guard and one on the side of the equipment)
for a cleaner and safer work area. Consult Maksiwa’s
catalog for several dust collection options.
FRONT PANEL:
A – Blade angle adjustment weal
B – Blade angle indicator
C – LED power indicator
D – Main saw blade on button
E – Scoring blade on button
F – O button
G – Emergency o button
SCORING BLADE:
The scoring blade can be adjusted in accordance with
the pictures below.

8
The blade will always spin clock wise so when putting
your blade conrm that the teeth are pointing clock
wise. For the scoring blade it is the same but mirrored.
Spin the nut counter clock wise to loosen and the
teeth must face counter clock wise when putting the
blade.
Always check to see if the blade is fastened properly
before turning on the machine. Test the blades if
needed.
MOTOR BELT:
Adjust the tensioner Aindicated to adjust the tension
in accordance with your necessities.
Always check the tension of the belt every 500
hours of use. Always preform this with the machine
unplugged.
STATIONARY TABLE GUIDE:
To adjust the only the guide for the stationary table,
release leaver Aand move the guide forward and
back. To move the entire part, release Bto move it.
PUSH STICK:
The push stick needs to be used to maintain your hand
at least 150mm (5’’) from the blade to avoid injuries.
It is a safety precaution to reduce the risk of cutting a
nger o with a cut on the tip to help push the panel
safely.
You can use the provided push stick or make your
own. The push stick needs to be thinner then the
panel that it will be pushing. See the diagram below
for an example (illustration C).

9
NOTE: Your BMS.3200.IR was adjusted in the factory
during its fabrication. In case it needs to be re-adjusted
because of the transportation or any other reason,
follow the following steps. Once these adjustments
are done they will stay correct. Follow these steps
carefully to maintain your equipment’s precision.
Connect the equipment in an outlet that matches
your equipment’s voltage and phase. Certify that the
wire is not in your way to avoid possible accidents.
HAND AND BODY POSITIONING
The correct hand and body position during the use of
this equipment will make the cut easier, precise and
safer. Never put your hand close to the blade. DO not
put your hand any closer than 15 cm (6”) of the blade.
Hold the piece rmly agents the guide during the cut.
ALWAYS RUN A TEST (WITHOUGHT TURNING THE
MACHINE ON) BEFORE YOU DO ANY CUTS TO
VERIFY THE BLADE’S PATH. DO NOT CROSS YOUR
HANDS IN FRONT OF THE EQUIPMENT.
CUTTING WITH YOUR BMS.3200.IR
NOTE: Although your equipment can cut wood and
other materials non-metal based, we will only be
discussing cuts with wood. The same parameters will
apply to any material though. DO NOT USE SAND
DISC BLADES.
TRANSVERSAL CUTS
It is not recommended to cut multiple panels together
but it is possible if the panels are safely and rmly
held down on the table and against the guide. A
transversal cut is made when you cut a panel in the
opposite orientation to the bers of the wood in any
angle. A straight transversal cut is done with the blade
at 0º. Put the miter gauge at 0º, hold the wood rmly
agents both the guide and the miter gauge. Turn
the equipment on. When it is at max speed (about
1 second) move the panel smoothly forward to cut
the wood. Transversal cuts are usually made with the
miter gauge at an angle greater than 0º. This angle is
usually 45º to make corners but can be adjusted from
0º to 45º. After selecting your angle, tighten the knob
on your miter gauge and make the cut as described
above.
BEVEL CUTS
A bevel cut is a cut made with the blade at an angle.
To adjust the blade, you need to spin the Blade angle
adjustment weal and the height of the blade. After
you have the desired angle, put your miter gauge at
FUNCTIONALITY 0º against the panel and tighten it. The blade can tilt
up to 45º.
QUALITY CUT
The quality of the cut depends on several factors such
as the type of material being cut, the type/quality of
the blade being used, how sharp the blade is, etc…
When you want smoother cuts for precision cuts, a
sharp blade with 80 or more teeth is recommended
along with moving the sliding table slowly. Certify that
the panel being cut is held down rmly by locking it
down. In case small bers start to splinter out of your
panel when you cut you can put a piece of tape along
where you will cut, cut as normal along the tape then
peel o the tape slowly.
FIXATING THE PANEL
To xate the panel, use the provided miter gauge and
clamp to hold it down. If you decide to use a dierent
tool, turn your equipment o rst and test it with the
machine o. Remember to keep your hands at least 15
cm (6”) away from the blade. Be cautious and mindful
of your safety when selecting a new clamp or tool.
Thoroughly test it before using it.
SUPPORT FOR LONG PANELS
Turn o the equipment rst and foremost. ALWAYS
SUPPORT LONG PANELS. Support long panels using
any available support to avoid the panel from falling.
Consult Maksiwa’s catalog for several roller stand
options.
CUTTING 4 SIDED PANELS
To better understand the above-mentioned cuts, we
recommend you start with small and simple projects
to get use to your new equipment. The beveled cut
of 45º onto two panels will make a 90º corner. The
following table will show you what angle you need to
set the equipment to in order to make a perfect shape:
Number of sides Angel of the blade
4 45º
5 36º
6 30º
7 25.7º
8 22.5º
9 20º
10 18º

10
MAINTENANCE
1. All of the locked and soldered components do not
need maintenance.
2. Apply the correct oil on the parts that move only
when the equipment is completely clean.
3. Clean and remove all the saw dust and pieces of
wood periodically. Even if you use dust collectors
there may still be pieces that remain as they are not
perfect.
4. The parts were projected to las for several years of
use and should not break easily.
For your own safety always check the repairs and
adjustments made before using your equipment.
Always contact Maksiwa to get recommended
technicians and appropriate parts that will work on
the equipment and maintain its quality. Before using
any extension cords verify if it has any lose or exposed
wires. Swap the extension cord if necessary.
Imported by:
Maksiwa International Inc.
2707 NW 19th St
Pompano Beach, FL, 33069
Oce: (754) 205-6717
Toll free: (844) 319-6594
e-mail: customer.service@maksiwa.com
www.maksiwa.com
TECHNICAL ASSISTENCE
Other manuals for BMS.3200.IR
2
Table of contents
Other MAKSIWA Saw manuals


