Mamava Solo User manual

Mamava, the leading expert in lactation space design, provides dignified lactation
accommodations and breastfeeding resources for employers and organizations
around the world. Our mission is to create a healthier society through
infrastructure and support for breastfeeding.
Certified B Corporation, Women-Owned Small Business (WOSB), Assembled in U.S.A.
The curved lactation suite design is a TM/SM of Mamava, Inc. All rights reserved.
service@mamava.com
(802) 347-2111
Assembly
Guide
Assembly
| Solo and Solo Base
It should take 2 people approximately
1.5 hours to assemble this Mamava pod.
Mamava Solo
Mamava Solo Base
Table of Contents
Tools + Hardware.......................................................................................................................................................................................................................... 2
Parts .................................................................................................................................................................................................................................................. 3
Warnings ......................................................................................................................................................................................................................................... 4
Shipping Crate ............................................................................................................................................................................................................................. 5
Base................................................................................................................................................................................................................................................... 6
Wall Plug Wiring........................................................................................................................................................................................................................... 8
Wall Panels + Door ...................................................................................................................................................................................................................... 9
Roof Frame................................................................................................................................................................................................................................... 15
Wiring + Lighting ....................................................................................................................................................................................................................... 18
Roof Panel.................................................................................................................................................................................................................................... 20
Seat.................................................................................................................................................................................................................................................. 21
Shelf + Laptop Desk................................................................................................................................................................................................................. 23
Notes.............................................................................................................................................................................................................................................. 28

220616
service@mamava.com • (802) 347-2111 • 180 Battery St, Suite 210, Burlington, VT 05401
| Solo 2
Tools + Hardware
Not included
Provided
180 Battery St, Suite 210, Burlington, VT 05401
2-6’ step ladder
Adjustable wrench
Flat head screwdriver Phillips head #2 screwdriver
5 mm hex key
Light working gloves
Provided
(Up to 17mm)
*For crate disassembly only
(16370)
(22) M8 x 55
Flange Head Bolt
(11290)
(2) #8 x .75”
Phillips Pan Head Screw
(4) M8 x 20
Button Head Cap Screw
(16835)
(11) M8 x 35
Button Head Cap Screw
(16840)
(2) .25” x 2”
Phillips Pan Head Screw
(16870)
Cordless drill
with #2 Phillips bit
(16980)
180 Battery St, Suite 210, Burlington, VT 05401
5/32” hex key

220616
service@mamava.com • (802) 347-2111 • 180 Battery St, Suite 210, Burlington, VT 05401
| Solo 3
Parts
16350
14980
17160
16765
16615
16715 16770
16710
16700
16705
16595
15015
16355 / 17180
14915
14955
15065 /17175
15450
PART NUMBER PART
14915 Roof Panel
14955 Left Wall Panel
14980 Back Wall Panel
15015 Right Wall Panel
15065 (Solo Base) Door
17175 (Solo)
15450 GFCI Plug
16350 Base
16355 (Solo Base) Roof Frame
17180 (Solo)
PART NUMBER PART
16595 Seat Back
16615 Shelf
16700 Seat Frame Right Side
16705 Seat Frame Left Side
16710 Seat Base
16715 Seat Frame Front
16765 Light Fixture
16770 Laptop Desk
17160 Wire Cover
17215 Caster Wheels (optional)

220616
service@mamava.com • (802) 347-2111 • 180 Battery St, Suite 210, Burlington, VT 05401
| Solo 4
Warnings
Electrical Hazard: Disconnect power during assembly and before
servicing or disassembly.
Electrical Hazard: Connect the power cord to a properly grounded
outlet only.
Electrical Hazard: Do not use the pod if you notice any defects
to electrical equipment.
Do not climb on top of the pod or place any load on the roof
of the pod.
Read and understand the assembly guide and all safety instructions
before assembly and use of this equipment.
Only assemble with tools as described in this assembly guide. Use
of power tools in place of hand tools will damage hardware.
The weight of many components exceeds 40 lb. Two person lift
required.
This unit is intended to be installed in an indoor location only. The
unit should not be installed in any area where it will be exposed
to moisture, excessive humidity, wind or other outdoor elements
or extreme temperatures (below 40°F (4°C) or greater than 90°F
(32°C)).
Protective gloves should be worn during assembly, maintenance,
or disassembly.
Use care when raising and lowering the laptop desk. The space
between the desk and the shelf can be a pinch point.
Keep ventilation openings (under the fan in the roof and under
the seat) free of debris. Do not use the pod if the ventilation
openings are blocked.
Maximum load for the laptop desk is 70 lb (31 kg).
Maximum load for the seat is 275 lb (125 kg).
Maximum load for the shelf is 80 lb (36 kg).
Maximum load for the coat hook is 15 lb (7 kg).
Electrical ratings for the pod:
Branch Circuit: 120 vAC/ 15 A / 50-60 Hz
Pod: 12 vDC / 7 A
Outlet: 120 vAC / 13.3 A

220616
service@mamava.com • (802) 347-2111 • 180 Battery St, Suite 210, Burlington, VT 05401
| Solo 5
1. Use a cordless drill with a #2
Phillips bit to remove the screws
from the crate cross braces. Set
aside the cross braces.
2. Remove the screws from the end
panels of the crate. Set aside the
end panels.
3. Remove the screws from the side
panels of the crate. Set aside the
side panels.
Shipping Crate
TOOLS AND PARTS
• Cordless drill with a #2 Phillips bit

220616
service@mamava.com • (802) 347-2111 • 180 Battery St, Suite 210, Burlington, VT 05401
| Solo 6
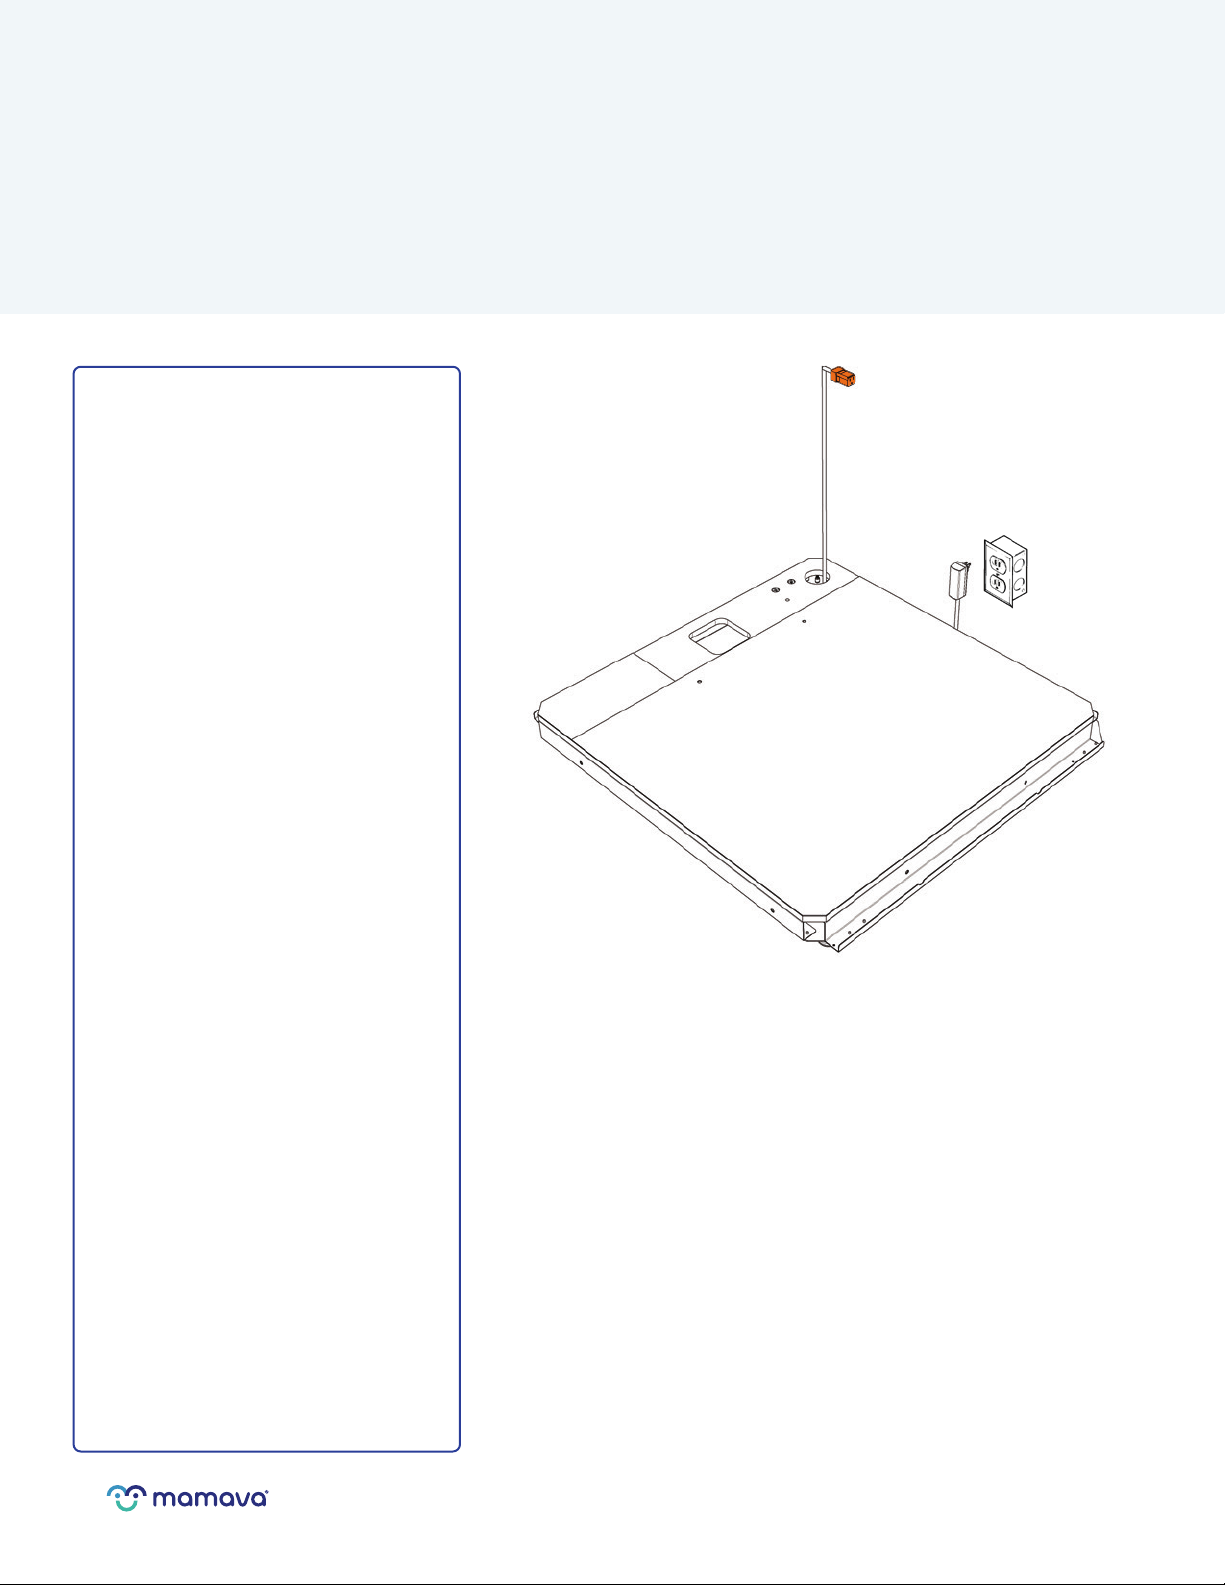
1. Unpack the base (16350) from
Box 2: Base.
With the vinyl side facing down, set
the base on the floor.
2. If you ordered accessory caster
wheels (17215), remove them from
Box 9: Caster Wheels.
Use a 5 mm hex key to fasten all 4
caster wheels to the bottom of the
base with M8 x 20 button head cap
screws (16835) (4 per wheel).
Base
TIP: Assemble the Mamava Solo pod as close to its final location as possible. Once a location is selected,
ensure the floor is level and there aren’t any gaps greater than 1” between the bottom of the level and the floor.
TOOLS AND PARTS
• 5 mm hex key (provided)
• Adjustable wrench
• Base (16350)
• Caster Wheels (17215) + (16) M8 x 20 Button Head Cap
Screws (16835) (optional)
X16

220616
service@mamava.com • (802) 347-2111 • 180 Battery St, Suite 210, Burlington, VT 05401
| Solo 7
3. Flip the base over, so that the
vinyl side is facing up.
4. Adjust leveling feet by rotating
them clockwise by hand until they
are in contact with the floor. Make
sure the base is level and stable.
If the base wobbles, adjust the
height of the leveling feet.
*If installing caster wheels, adjust
the leveling feet so they extend an
inch beyond the caster wheels.
5. Turn the base on its side.
Lock each foot in place by
tightening the M8 nut with an
adjustable wrench until flush with
the frame of the base.
Set the base back on the floor and
ensure it is level and stable.
220616
service@mamava.com • (802) 347-2111 • 180 Battery St, Suite 210, Burlington, VT 05401
| Solo 8
1. Unpack the GFCI plug cord
(15450) from the plastic bag
of parts.
Route the orange end of the
GFCI cord up through the
round hole in the base leaving
approximately 2’ of cord inside.
Leave the GFCI plug outside the
pod.
2. Check that the GFCI plug can
reach the nearby outlet, but don’t
plug in yet.
Wall Plug Wiring
TOOLS AND PARTS
• GFCI Plug (15450)

220616
service@mamava.com • (802) 347-2111 • 180 Battery St, Suite 210, Burlington, VT 05401
| Solo 9
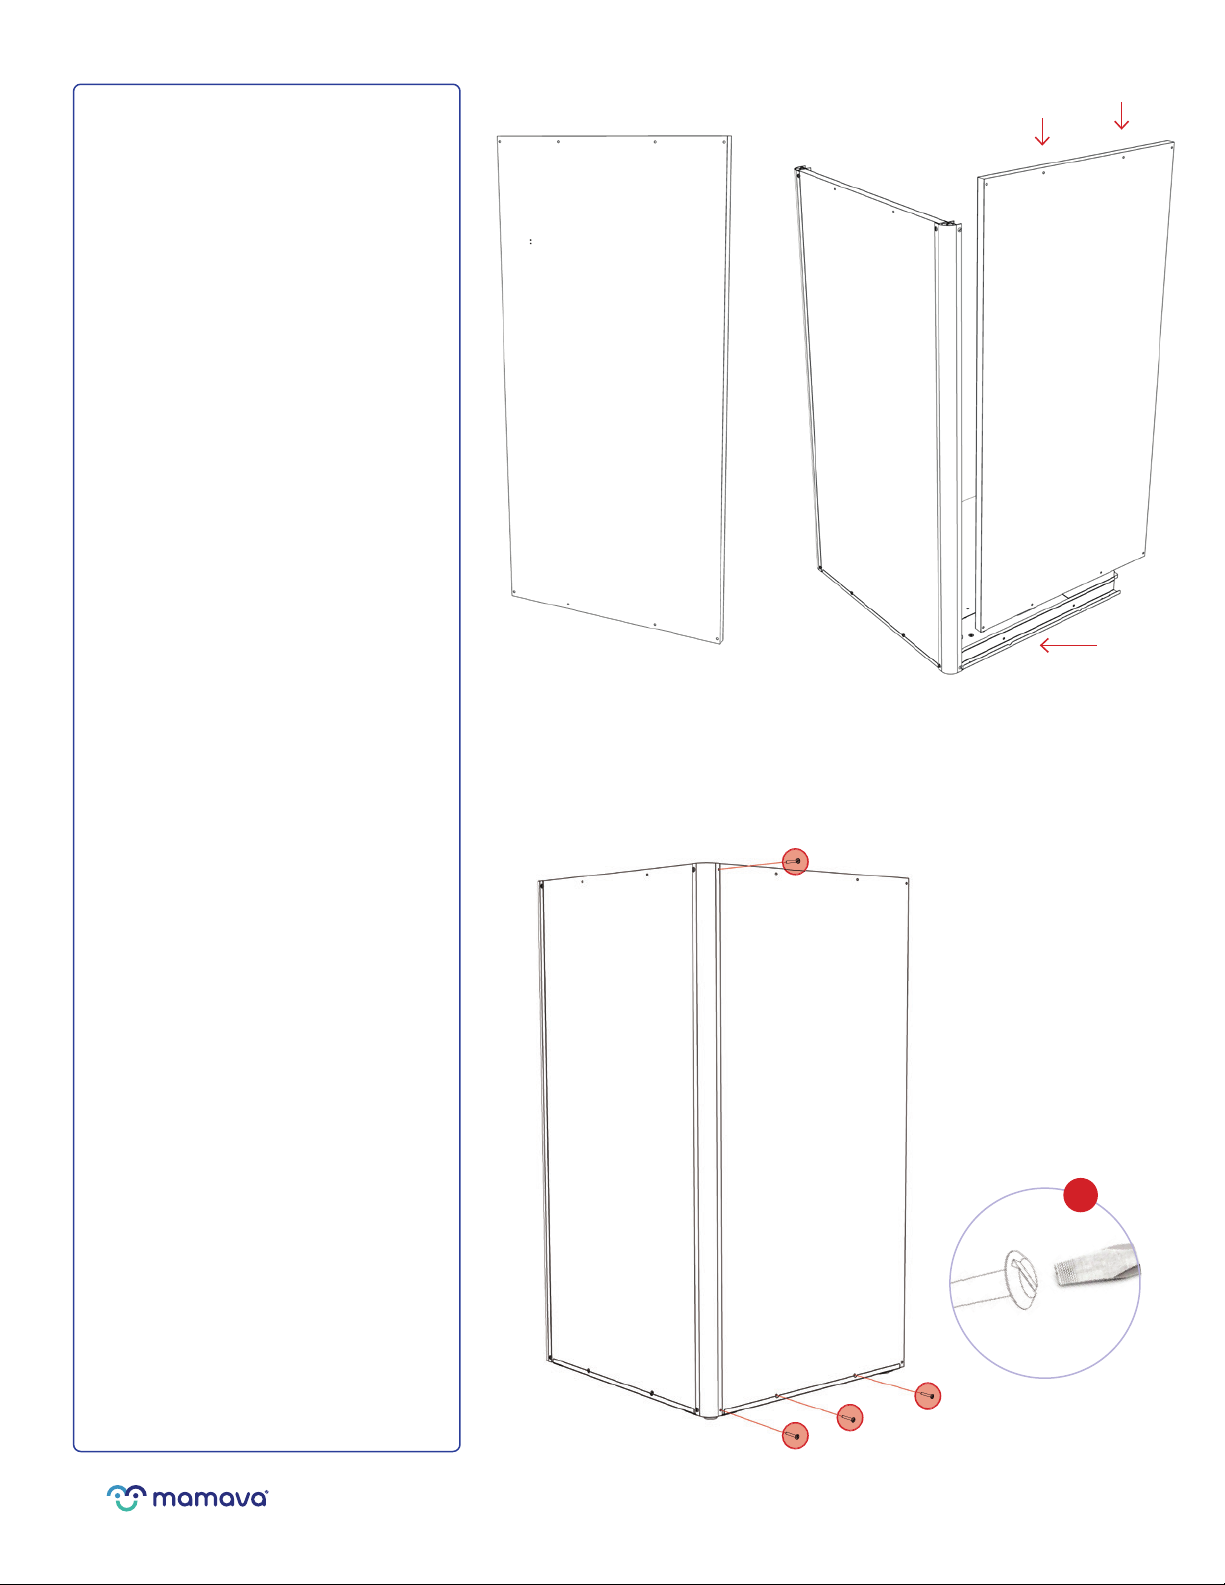
1. Unpack the back wall panel
(14980) from Box 3: Wall Panels.
Set the bottom of the back wall
panel inside the back channel
of the base at a 45° angle, then
straighten into place. The aluminum
flange on the pod base should be
visible at the bottom of the wall.
The screw holes at the bottom of
the back wall panel should line up
with the notches in the aluminum
flange.
Once in place, one person should
continue to hold the wall panel.
2. Use a flat head screwdriver to
fasten the back wall panel to the
base with (2) M8 x 55 flange head
bolts (16370). If the bolt doesn’t
tighten, you may need to adjust the
alignment of the wall panel. Loosely
tighten for now, you’ll secure later.
Wall Panels + Door
TOOLS AND PARTS
• Flat head screwdriver
• Phillips head screwdriver
• (16) M8 X 55 Flange Head Bolt (16370)
• (2) #8 x .75” Phillips Pan Head Screw (11290)
• Back Wall Panel (14980)
• Left Wall Panel (14955)
• Right Wall Panel (15015)
• Door (15065)
• Door Handle
• Coat Hook (11130)
X2
220616
service@mamava.com • (802) 347-2111 • 180 Battery St, Suite 210, Burlington, VT 05401
| Solo 10
3. Unpack the left wall panel
(14955) from Box 3: Wall Panels.
With the white side of the left wall
panel facing the interior, place the
bottom of the wall panel into the
left channel and push the panel
towards the back of the pod until
flush with the back wall panel.
The holes should line up with the
notches in the aluminum flange.
4. Use a flat head screwdriver to
fasten the left wall panel to the
base and the back wall with (4)
M8 x 55 flange head bolts (16370).
Start from the top left to ensure the
pod wall is stable. Loosely tighten
for now, you’ll secure later.
Insert first
bolt here
Drop down first
Then slide back
X4

220616
service@mamava.com • (802) 347-2111 • 180 Battery St, Suite 210, Burlington, VT 05401
| Solo 11
5. Remove the coat hook (11130)
from the plastic bag of parts.
Align the two holes in the coat
hook with the two holes on the left
wall.
Use a Phillips head screwdriver to
attach in place with (2) #8 x .75”
Phillips pan head screws (11290).
X2
220616
service@mamava.com • (802) 347-2111 • 180 Battery St, Suite 210, Burlington, VT 05401
| Solo 12
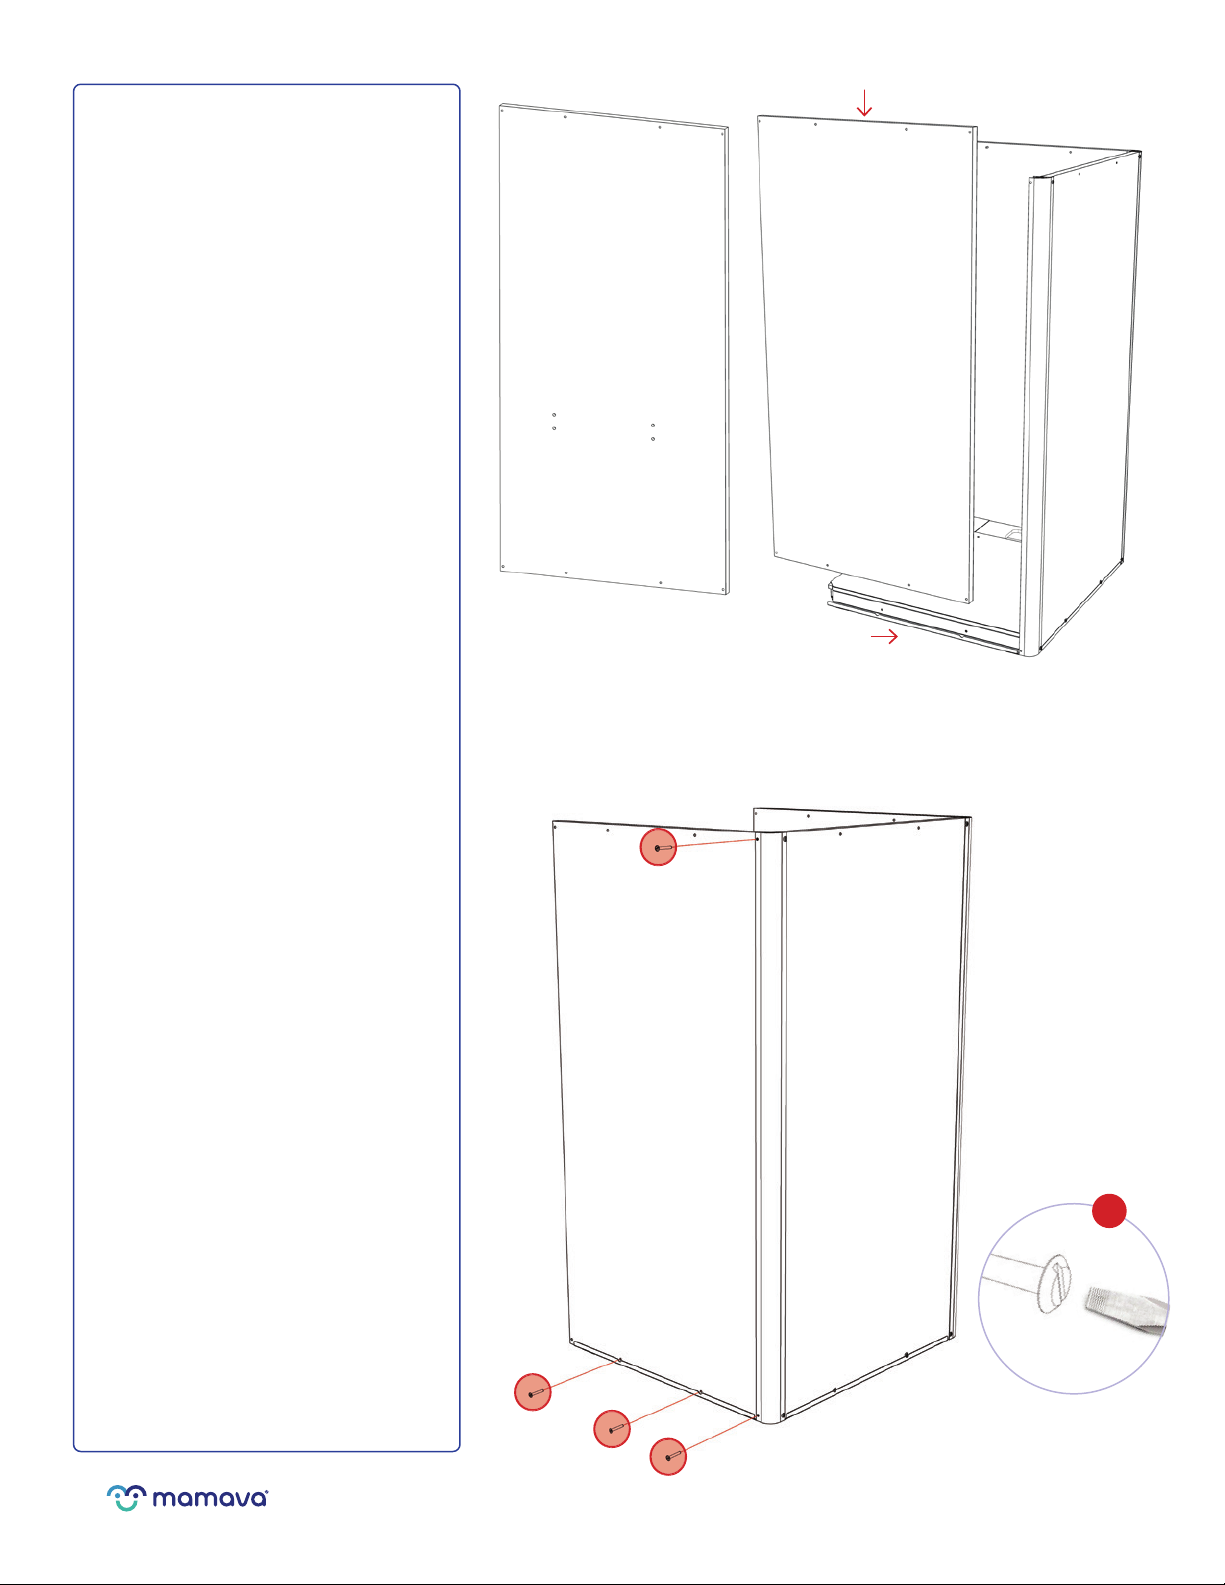
6. Unpack the right wall panel
(15015) from Box 3: Wall Panels.
With the white side of the right
wall panel facing the interior, place
the bottom of the wall panel into
the right channel and slide the
panel towards the back of the pod
until flush with the back wall panel.
The holes should line up with the
notches in the aluminum flange.
7. Use a flat head screwdriver to
fasten the right wall panel to the
base and back wall panel with (4)
M8 x 55 flange head bolts (16370).
Start from the upper right to
stabilize the pod. Loosely tighten
for now, you’ll secure later.
Insert first bolt here
Drop down first
Then slide back
X4
220616
service@mamava.com • (802) 347-2111 • 180 Battery St, Suite 210, Burlington, VT 05401
| Solo 13
8. Unpack the door (15065 or
17175) from Box 4: Door and the
door handle from the plastic bag of
parts.
Slide the door handle onto the
body of the lock until it clicks.
Repeat this step for the interior
handle.
9. Place the door on the base so
that the bottom aluminum flange
sits on top of the threshold and the
aluminum corners align with the
left and right wall panels.

220616
service@mamava.com • (802) 347-2111 • 180 Battery St, Suite 210, Burlington, VT 05401
| Solo 14
10. Use a flat head screwdriver to
fasten the door to the left and right
walls with (4) M8 x 55 flange head
bolts (16370). Fasten the top left
and right bolts first, then fasten the
lower left and right bolts. Loosely
tighten for now, you’ll secure later.
It may be helpful to have a second
person push on the door and/or
side walls to help line up the holes.
11. Use a flat head screwdriver to
fasten the door to the base with (2)
M8 x 55 flange head bolts (16370).
To access the second hole, open
the door by entering 8008# on the
keypad. Keep the door propped
open. It may be helpful to use the
deadbolt to do so. Loosely tighten
for now, you’ll secure later.
Insert first
bolt here
Insert second
bolt here
X4
X2

220616
service@mamava.com • (802) 347-2111 • 180 Battery St, Suite 210, Burlington, VT 05401
| Solo 15
1. Set up your ladder behind the
pod.
Unpack the three-sided roof frame
(16355 or 17180) from Box 5: Roof.
Remove the roof panel (14915) from
the roof frame and set aside.
*If you have the Solo Base model,
skip ahead to step 3.
2. Remove the antennas from the
plastic bag of parts.
Attach the two antennas to the top
of the Pod Control Device (PCD),
with the shorter antenna closest
to the power cord. Once secured,
keep the antennas upright.
Roof Frame
TOOLS AND PARTS
• Flat head screwdriver
• BLE and LTE Antennas
• (6) M8 X 55 Flange Head Bolt (16370)
• Roof Frame (16355 or 17180) / Roof Panel (14915)

220616
service@mamava.com • (802) 347-2111 • 180 Battery St, Suite 210, Burlington, VT 05401
| Solo 16
3. Orient the roof frame with the
fan towards the back wall panel.
The antennas should face the
ceiling (not applicable to the Solo
Base model).
Hand the roof frame over the top
of the pod to the person on the
ladder. At this point, it’s useful to
have a third person help lift it.
4. Slide the roof frame inside the
top of the wall panels until the
aluminum flange caps the top of
the wall.
Ensure the wires hang inside at the
back left corner of the pod.
5. Use a flat head screwdriver to
secure the roof frame to the left,
back, and right walls with (6) M8
x 55 flange head bolts (16370).
Loosely tighten for now, you’ll
secure later.
X6

220616
service@mamava.com • (802) 347-2111 • 180 Battery St, Suite 210, Burlington, VT 05401
| Solo 17
6. Once the roof frame is in place,
use the flat head screwdriver to
fully tighten all of the exterior M8
x 55 flange head bolts (16370).
Bolts should be secure, but stop
tightening if the wall panels begin
to dimple.
7. Connect the two wires at the top
left of the door frame and the two
wires at the top right of the door
frame. Then tuck them into the
channel.
220616
180 Battery St, Suite 210, Burlington, VT 05401
17
X22

220616
service@mamava.com • (802) 347-2111 • 180 Battery St, Suite 210, Burlington, VT 05401
| Solo 18
1. Enter the pod (use keypad code
8008# if your door isn’t propped
open.)
Uncoil the black power cord from
the back left corner of the roof
frame and let it drop to the floor.
Uncoil the red and black wire from
the back left corner of the roof
frame.
2. Remove the aluminum wire cover
(17160) from Box 4: Door.
Insert the loose end of the red and
black wire through the hole at the
top of the wire cover. Make sure the
black power cord is hanging behind
the wire cover.
3. Snap the wire cover into the
back left corner and slide it up until
it touches the roof frame.
Wiring + Lighting
TOOLS AND PARTS:
• 5 mm hex key (provided)
• (3) M8 x 35 Button Head Cap Screw (16840)
• Light Fixture (16765)
• Wire Cover (17160)

220616
service@mamava.com • (802) 347-2111 • 180 Battery St, Suite 210, Burlington, VT 05401
| Solo 19
4. Remove the light fixture (16765)
from Box 1: Assembly Guide +
Hardware.
Place into position at the top of the
back wall with the plug towards the
left wall. The three holes in the light
fixture should line up with the three
holes in the back wall.
5. While one person holds the light
fixture, use a 5 mm hex key to
fasten it to the back wall using (3)
M8 x 35 button head cap screws
(16840). It’s helpful to use a small
step stool inside the pod or a
ladder outside the pod.
6. Connect the two wires in the left
corner of the light fixture.
X3

220616
service@mamava.com • (802) 347-2111 • 180 Battery St, Suite 210, Burlington, VT 05401
| Solo 20
1. With one person on the ladder,
lift the roof panel (14915) over the
top of the pod, guiding the panel
under the metal corner brackets
and bolts, but on top of the small
aluminum flange in the center of
the roof frame. (Make sure your
hands are clean before handling
the roof.)
Roof Panel
PARTS AND TOOLS
• Roof Panel (14915)
Other manuals for Solo
5
This manual suits for next models
1
Table of contents
Other Mamava Personal Care Product manuals


Popular Personal Care Product manuals by other brands

Dreamland
Dreamland D3630 operating instructions

Aura
Aura Elite Compact Sprayer Translation of the original operating instructions

Thuasne
Thuasne Genu Ligaflex quick start guide

Philips
Philips Wisp Pediatric Nasal Mask manual

SOLTRON
SOLTRON L-65xtra TWIN POWER operating instructions

Better Bathrooms
Better Bathrooms BeBa 26145 user manual


