Carlton CC3040 User manual

DER M AV ISAGE
MAINTAINENCE AND
TROUBLESHOOTING
GUIDE
INCORPORATING MODELS CC3040 | CC3045 | CC3050
Setting the standard in electrotherapy equipment

Setting the standard in electrotherapy equipment
Index
Introduction page 3
Operating Instructions page 4
Looking After Your Machine page 8
Troubleshooting Guide page 10

3
Introduction
to the Dermaviasge Unit
Thank you for purchasing the CARLTON DERMAVISAGE Microdermabrasion
machine. Your microdermabrasion machine is equipped with the most reliable
and modern technology available, ensuring absolute safety and ease of use.
Technical And Manufacturer Details
There are no particular requirements with regards to the
siting of the equipment, but it is recommended that the unit
is placed on a trolley adjacent to the couch or chair where
the treatment is performed. Care should be taken to ensure
that the mains cable is routed to avoid becoming entangled
with the electrode connecting cables.
Operating conditions
Permissible temperature range 0º to 50º C
Permissible relative humidity range 20% to 75%
Cleaning
Before carrying out any cleaning procedure, ensure that the
mains lead is disconnected from the inlet at the rear of the
unit.
The metal case of the unit may be cleaned with a damp
cloth. Alternatively, a cloth impregnated with a small quantity
of Isopropyl.
Alcohol may be used (Azo Wipes), or Sterilsafe Wipes.
The cables should only be cleaned, if required, with a
mild, non-abrasive, household-type cleaner. They will not
withstand steam sterilisation.
Technical Details
Mains Input: 220/240V / 50 Hz
Input Power: 110 Watts
Weight: 12 Kg
Measurements: 8cm wide,
40cm deep,
22cm high
Warning Symbols
ATTENTION,
consult accompanying
documents
Manufacturer Details
Carlton Professional,
Unit 32-33, Malmesbury Road,
Cheltenham Gloucestershire GL51 9PL
+44 1242 538 334
www.carltonprofessional.com

4
Dermavisage
Operating Instructions
Installation And Preparation For Use
Unpack the unit before first use, and check you have everything listed on
the Packing List.
The unit is shipped to you ready for use.
The Handpiece:
This consists of the following components: - Plastic Treatment Tip - Crystal
Nozzle – Handpiece Body – Tubing (Clear & Black)
Before use, the tubing will need to be attached to the front of the unit.
When fixing the Handpiece and tubing to the unit, ensure Tube 1 and
Tube 2 are lined up with the corresponding outlet on the front of the
DermaVisage, and push firmly into place using a slight twisting action.
Turning the DermaVisage on:
Turn the DermaVisage on via the Green On/Off switch at the back of the
machine. The Crystal Peel Selector Button on the front of the machine will
illuminate red. Press the Crystal Peel Selector Button, and the button will
change from red to green.
Diamond Peeling Selector
Diamond Peeling
Intensity Dial
Diamond Peeling
Directional Rotation
Switch
Outlet for Diamond Peeling
Handpiece
Colour Therapy Selector Button
Outlet for Colour
Therapy Applicator
Vacuum Suction
Intensity Level
Crystal Peeling
Selector
Crystal Peeling Vacuum
Suction Intensity Dial
Outlet for
Tube 1
Outlet for
Tube 2
Crystal Dispensing Canisters
Treatment Tips:
To operate, a plastic
treatment tip must be
attached to the working
end of the Handpiece. To
attach, simply push the tip
rmly into place using a
slight twisting action. These
should be disposed of after
each treatment.
The Crystal Peeling (8),
Diamond Peeling (1) and
Colour Therapy (5) Selector
Buttons all incorporate a
“Switching Delay”. When
pressed the buttons will
only change from On to O
(and vice versa) if 3 seconds
elapse between each press
of the button.

5
When the Crystal Peeling Selector Button is pressed, and this part of the
machine is active, the Cooling Fan will switch on. The fan only operates
when the Crystal Peeling function is selected, and will continue to operate for
15 minutes after the Crystal Peel function has been switched off.
Vacuum Suction Gauge:
Vacuum suction changes the atmospheric pressure in the unit.
To get a VS reading, always put your nger over the treatment tip.
The Dermavisage translates the Vacuum pressure into easily visible lights.
The pump is quicker to respond than the lights. When adjusting the VS,
turn the dial slowly, and allow the lights to settle before working on the skin.
The Diamond Peeling
and Colour Therapy
sections of the machine
will only become active
when the correct
accessory is connected
to the appropriate outlets.
When these accessories
are connected, the
corresponding Selector
Buttons will illuminate red.
If the machine is left
unattended with the Crystal
Peel function switched
on (and the pump active),
the vacuum pump will
automatically switch o
after 2 hours.
-0.5 to -3PSI Gentle;
For general use on all skin types.
-3.5 to -7.5PSI Medium – Strong;
For use on pigmentation, scarring, and stretch marks.
-8 to -10 PSI Maintenance Only.
Never to be used on the skin.
Lower Vacuum Suction = more gentle
Higher Vacuum Suction = harsher
RED
AMBER
GREEN
Checking the crystal ow.
Sometimes it may appear as if you have no ow of crystals.
The best way to check if you have crystal ow is to close the hand-piece
with your thumb and set the vacuum regulator to maximum.
Now observe the fresh crystal canister. When hand piece occluded,
crystals should percolate or bounce inside the canister.
Look also into the used crystal canister. If you have crystal ow then you
will see them lling this area.

6
Vacuum pressure
The more sensitive the
skin the less pressure
should be used.
Too much pressure is
uncomfortable for the client
and may lead to a greater
peel than is needed.
The most sensitive skin is
found around the eyes and
on the neck below the chin.
We recommend a working
pressure for sensitive skin
of –2 PSI.
The rest of the face (and
body) is less sensitive.
Depending on the depth of
peel and the condition of
the skin a working pressure
of –3 to –4 PSI is adequate
Beginning Treatment:
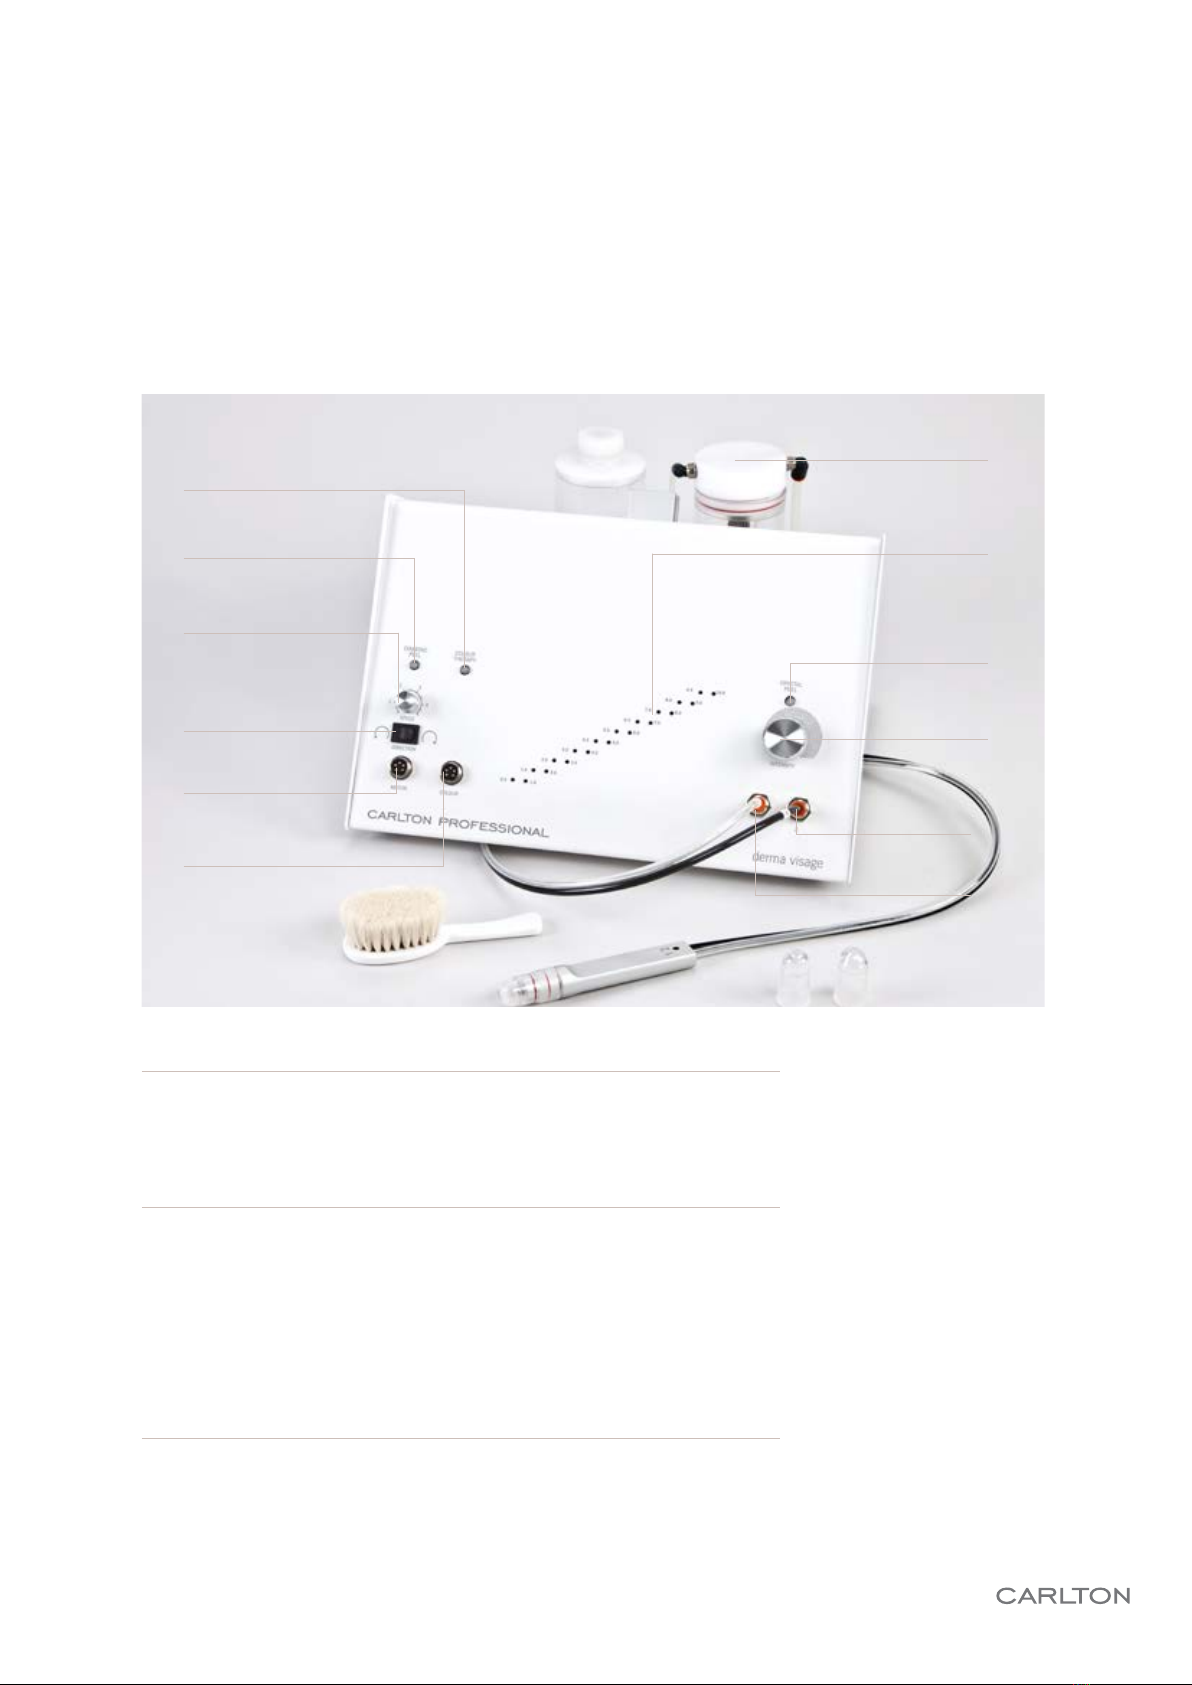
Once you have checked the following, the machine is ready to use:
Tubing attached securely to Handpiece and to DermaVisage.
Plastic treatment tip securely attached to Handpiece
Fresh crystal container is lled to required level.
The rst step is to set the working vacuum for the hand-piece.
To do this, place your thumb over the hand-piece tip and turn on the
machine. Keeping the hand-piece closed set the vacuum regulator to
show –3 psi. (This is the standard setting for facial peeling) You are now
ready to treat.
Treatment technique:
Place a nger on the skin to one side of the area to be treated. This
keeps the skin taut and hinders the skin from being pushed forward by
the hand-piece. Keeping your nger placed here, apply the treatment tip
gently to the skin and move it smoothly away from your nger.
It is better not to run the treatment-tip backwards and forwards over
the same area of skin, but to start from the same position next to your
nger and to move in one direction only. The treatment will otherwise be
signicantly more intensive.
The crystals can only ow when the system is completely closed, in
other words when the treatment tip is in proper contact with the skin.
Always support the skin with one hand and do not exert any pressure
on the skin with the hand-piece. The vacuum itself ensures that the
system is properly closed.
A hand-piece pushed too tightly against the skin will only cause irritation
and reddening, with no positive eects on the intensity of the treatment.
General Treatment Guidelines
Do not place the hand-piece onto the skin with too much pressure.
This has no bearing on the peeling results. Too much physical
pressure is uncomfortable for your client.
Place a nger onto the skin and work away from this with the hand-
piece. This keeps the skin taught and hinders the skin form being
pushed forward by the hand-piece.
Avoid peeling in a circular motion. Peel in one direction only lifting the
hand-piece from the skin at the end of each pass.

7
Tips & Tricks
Turning and Setting the Vacuum Regulator
When setting the regulator to maximum, you will notice that after one revolution you
cannot turn the regulator any more. This is normal and means you have reached the
maximum pressure possible. Do not try to turn the regulator further, otherwise it may stick.
Depth of peeling
The depth of peeling can be regulated in addition to the vacuum pressure by three
other means:
Running the treatment tip slowly over the skin. The treatment is more intensive because
the crystals work for a longer period on the same area of skin.
Running the treatment tip back and forth between two fingers placed on the skin. This
stops the skin being pushed and pulled with the movement of the treatment head.
Multiple runs over the same area
When unit is not in use
At the end of each working day you must completely empty both crystal containers, the used
crystals can be discarded and the unused crystals can be returned to their storage tub.

8
Looking aer your
machine
Although your machine is itself extremely robust, the crystals used are extremely fine and therefore sensitive to the
conditions under which they are used. The following tips are designed to keep your machine in top condition and
to minimize the risk of downtime due to crystal flow problems.
Please take this section seriously. Following our advice will save you time and effort in the future.
Filling the Fresh Crystal Container:
Fill the container through a sieve. This will remove any fine clumps of crystals that may have built up in the
container. Choose a sieve whose holes allow the crystals to flow through when lightly shaken. Using a funnel
under the sieve will ensure they flow into the container easily.
Monitoring the Desiccant Sachet:
The lid of the Fresh Crystal Container has a removable holder which contains a desiccant sachet. The sachet
contains orange beads of desiccant which keep the air, and therefore the crystals dry, this ensures no blockages
due to humidity. The sachet must be replaced when the colour has changed from ORANGE to WHITE.
To change the sachet, unscrew the plastic holder from the lid, remove the sachet, and replace with a new one.
Spare sachets must be kept in a sealed bag.
At the end of the day:
Empty the Fresh Crystal Container.
Remove the Fresh Crystal Container from the base plate but leave
the tubing attached. (Picture 1).
Hold the container over a tub to catch the crystals.
Unscrew the filter underneath the container (Picture 2), and allow the
unused crystals to flow into an airtight tub.
Tip the container slightly to ensure all crystals have been removed.
Refit the filter, ensuring it has been tightened fully.
Place the container back onto the base plate.

9
Flushing the machine through.
The Fresh Crystal Container should be empty before commencing.
Turn the machine on.
Turn the vacuum control knob fully clockwise (but do not force the
control knob past its natural stopping point).
Lift the fresh crystal container away from the base plate and using
your thumb and index finger, block both the filter underneath the
container, and the small hole on the metal section of the tubing
connector (Picture 3).
Using your other hand, cover the end of the hand piece. The display
will indicate full vacuum (-10psi, all lights illuminated).
Release your finger covering the filter on the underneath of the Fresh
Crystal Container. This will clear out the tubes running from the Fresh
Crystal Container, via the Handpiece, to the Used Crystal Container.
When you are satisfied the tubes are clear, release your fingers from
the remaining outlets, and turn the Vacuum Intensity back down.
Replace the container back into the base.
Empty the Used Crystal Container
Lift the lid off the Used Crystal Container.
Do not disconnect any of the tubes from the jar connectors, or
the connectors at the rear of the unit.
Lift the Used Crystal Container from its base, and empty the used
crystals into the bin.
Replace the Used Crystal Container.
Cleaning The Used Crystal Container Filter
Remove the lid as detailed above.
Unscrew the filter (located on the underside of the lid) by hand. DO
NOT hold by the filter mesh, but by the nut at the top of the filter.
Once removed, use a stiff brush to clean the filter, the filter can also
be tapped gently on a hard surface to remove any deposits.
To replace, simply screw back in. Do not use any tools to screw it
back in, as it should only be hand tight.

10
Dermavisage –
Troubleshooting Guide
There are two possible scenarios, excessive high vacuum or very low vacuum.
In general, excessive high vacuum will be caused by a crystal blockage in the machine and low vacuum
will be caused by air leaks and poor tubing connections.
Both of these conditions will result in poor performance and lack of crystal ow.
Before progressing with the tests please ensure that the lid of the Used Crystal Container is tted
correctly, please refer to the photograph below.
The following procedure only applies to machines with serial
numbers up to and including DV1076.
The lid is tted with two connectors, the connector with the longer
metal body should be connected via the shorter length of tubing to the
connector in the centre of the machine.
Important: Please note the following procedure!
If the lid has been tted in reverse and the machine has been operated
with crystals you will rst need to clean the lter before re-tting the lid
correctly.
Remove the lid completely from the container.
Unscrew the pleated lter from the inside of the lid – be prepared for
spillage of crystals!
Clean the lter and lid of any crystals with the brush supplied, pay
particular attention to the threaded section of the lid into which the lter
screws and also the internal hollow section of the lter itself.
Screw the lter back onto the lid, avoid turning the lter by the pleated
section, use the hexagonal metal base and hand tight is sucient.
Re-t the lid to the container.

11
Step by Step Guide
The following procedure tests for vacuum at the various sections of the
machine and will pin point the cause of any problems very quickly.
STEP 1
Disconnect the black hand piece tubing from Outlet 2 and connect the short
length of Blue “test” tubing supplied in the machine toolkit (see picture).
Switch on the Crystal Peel and cover the open end of the blue tubing with
your finger, the front display should indicate full vacuum (-8.5 to -10psi) and
should drop to -0.5 or no display when you remove your finger.
CHECK
Unless otherwise stated.
please ensure the hand
piece is connected
properly, the vacuum
control on the front of
the panel is turned fully
clockwise (to maximum)
and both containers are
empty.
Did The Machine Indicate Full Vacuum?
YES
Disconnect the
blue tubing and
reconnect the
black tubing to
outlet 2.
GO TO STEP 2
NO
Check that the blue tubing (as seen
above) is pushed fully into outlet 2.
Check that the two red o-rings fitted
to the waste crystal container lid are
present and in good condition. Replace
if necessary.
Check that the two tubes associated
with the waste crystal container are
pushed fully into the connectors on the
rear of the machine and the connectors
on the lid of the container.
REPEAT STEP 1 continued overleaf

12
STEP 2
Disconnect the clear hand piece tubing from the front panel connector,
Outlet 1 as illustrated in picture below
Switch on the Crystal Peel and cover both the open end of the tubing
and the hole in the hand piece Treatment tip with your fingers.
The front display should indicate full vacuum (-8.5 to -10psi) and should
drop to -0.5 or no display when you remove your finger from the Treatment
Tip or the end of the tubing.
Did The Machine Indicate Full Vacuum?
YES
Reconnect the
tubing to the
machine and
GO TO STEP 3
NO
Check that the black hand
piece is pushed fully into outlet
2.
Check to see if the tubing that
connects the hand piece to the
machine is damaged or split
and that both tubes are pushed
fully into the hand piece. Check
the condition of the o-rings
under the treatment tip and
replace any that are missing.
Did the display stay at full vacuum when you
removed your nger from the tubing?
NO
There may be a blockage in the hand
piece. Remove the Treatment tip from
the top of the hand piece. Remove
the Flow Nozzle from the hand piece
by unscrewing with the Allen Key
supplied. Check thatbthe small hole
in the Flow Nozzle is not blocked.
Check both holes in the hand piece
for blockages. Re-assemble the hand
piece and
REPEAT STEP 2
YES
continued overleaf

13
STEP 3
Remove the fresh crystal container from the base but leave it connected to
the machine.
Using your thumb and forefinger, block both the filter underneath the
container and the small hole on the top of the metal section of the container
tubing connector, as shown in the picture below.
Switch on the Crystal Peel and cover the hole in the hand piece Treatment
Tip with your finger. The front display should indicate full vacuum (-8.5 to
-10psi) and should drop to -0.5 or no display when you remove your finger
from the Treatment Tip or the end of the tubing.
Did The Machine Indicate Full Vacuum?
YES
Switch off and
refit the fresh
crystal container
to the base. Turn
the intensity to
zero.
NO
Check that the fresh crystal container
tubing is pushed fully into the machine
and container connectors.
Check that the filter on the underside of
the container is tightened fully. Check
that the lid is fitted correctly and its
o-ring is in postition and not damaged.
REQUIRE
ASSISTANCE?
If you are experiencing
recurring issues with
your Carlton machine
please contact us by
calling 01242 538334

14
This manual suits for next models
2
Table of contents
Other Carlton Personal Care Product manuals
Popular Personal Care Product manuals by other brands

Artforma
Artforma LED Hexagon Mirror Instruction & installation manual

Windmere
Windmere THE CLOTHES SHAVER CS-1 user manual

MobileHelp
MobileHelp Touch quick start guide

Philips
Philips Nose & Ear Trimmer NT9110 Usage instructions

mychway
mychway MS-2173 user manual

Boots
Boots Smooth skin Instructions for use