Mania NIGHTOWL User manual

INSTRUCTION MANUAL
WI-FI SECURITY CAMERA
NIGHTOWL
COMPONENTS
•IP Camera
•Power adapter
•Wi-Fi antenna 5 dBi
•Set of mounting screws
•Screwdriver
•Foam base
•User manual
TECHNICAL SPECIFICATIONS
•Image sensor: 2.0M HD CMOS
•Lens: 3.6mm
•Min. illumination: 0.5 Lux (colour mode), 0.1 Lux
(black & white mode)
•Resolution: 1920 x 1080P
•Video compression: H.264/ MJPEG
•Frame rate: 25-30fps
•Audio compression: G.711a
•Audio input: built-in-48dB microphone
•Audio output: built-in 8Ω 1W speaker
•Alarm trigger: motion detect
•Wireless Lan: IEEE802.11b/g/n
•Wireless security: WEP/WPA-PSK/WPA2-PSK
data encryption
•Protocols: ONVIF, TCP, UDP, DHCP, DNS, RTSP,
P2P
•Memory: micro SD card slot
•Power supply: DC12V±10%
•Waterproof standard: IP66
•Operation condition: temperature-25°C -+65°C
•Humidity: 10%-90%
•Number of online users: max 5 users
•Rotation angle: 320°horizontally/110°vertically
•Night vision: automatic switching of double
filters, 4 dot-infrared lamps, irradiation distance
10-30 m
FEATURES
(1) Wi-Fi antenna
(2) Micro SD card slot
(3) Power port
(4) Reset button
(5) 1080p HD lens
(6) Speaker
(7) PIR sensor
(8) Microphone
(9) White LED
(10) Infrared LED
MOUNTING THE SECURITY CAMERA
ON A WALL
1. Drill three holes on the wall by using the base
of the security camera as a template. Make
sure to position the base unit so the camera is
in the upright direction. It is recommended
that you mark the locations of the holes with a
pencil before drilling. The diameter of each
hole is approximately 6mm, and the depth is
approximately 25mm.
2. Insert the three plastic anchors into the holes
on the wall.

3. Match the grooves on the bottom of the
camera unit with the plastic anchors in the
wall. Use a screwdriver to fasten the camera
on a wall with screws.
NOTE: When mounting the security camera on a
wall please note that the wall must be able to
support at least triple the product's total weight.
CONNECTING CAMERA WITH
APPLICATION
OMAIN FUNCTION DESCRIPTION
OHOW TO DOWNLOAD MOBILE APP
•Search and download “YCC365 Plus” in
Apple Store or Android app store.
•Scan the QR code as below
OHOW TO OPERATE THE MOBILE APP
REGISTER AN ACCOUNT
When you use this app for the first time, you need to
use your email to register an account, click “Sign Up”
and set a password according to this procedure.
* If you forget your password, you can reset it by
clicking "Forgot password” on the login page.
* Password should be at least 6 characters and not
longer than 30 characters. It should be a
combination of letters and numbers.
Note: the current version only supports mobile
phone number registration in Vietnam.
Please use email to register in other areas.
ADD CAMERA
Note: the camera only supports 2.4G WIFI, before
adding devices, make sure your router is
2.4G WIFI, and your phone is connected to 2.4G
WIFI.
Scan QR code to add device
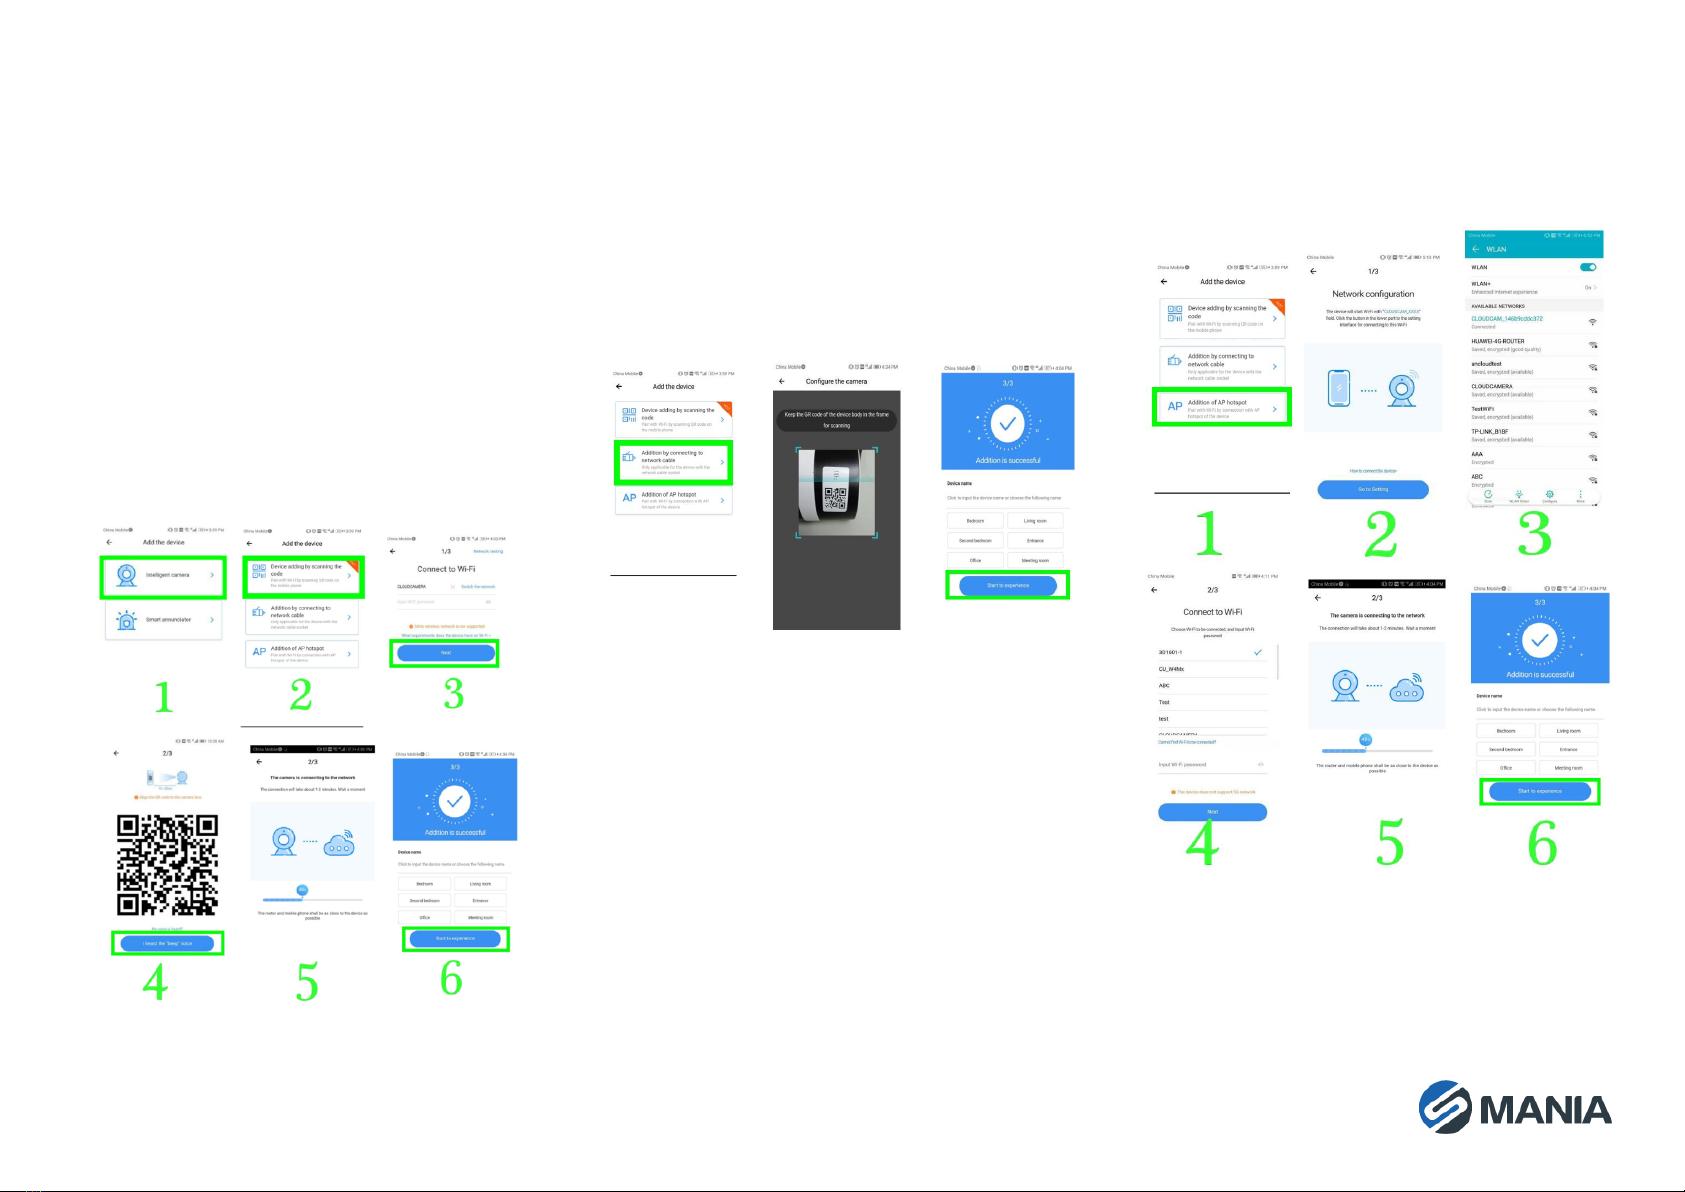
•Please make your phone connect to the Wi-Fi,
and then click “Device adding by scanning the
code”, reset the camera, after hearing the voice
message “Please configure camera by scanning
code or AP hotspot”, please click the “Connect
to the network”.
•Select your own Wi-Fi and login with your
password.
•Align the two-dimensional QR code displayed on
the phone with camera lens, maintain the
distance of 10-20cm and keep in balance.
•Click “I heard the beep voice”after hearing the
beep, a few seconds later you will hear the voice
»Internet connected. Welcome to use cloud
camera. «
Addition by connecting to network cable (Only
supports Lan Port Device)
•Please connect Ethernet cable between camera
and Wi-Fi router.
•After your phone connects to the Wi-Fi, click
“Add device” and “Addition by connecting to
network cable”
•Please scan the QR code on the device and wait
for the network connection to succeed.
Addition of AP hotspot
•After your phone connects to a Wi-Fi , please
click on “Add device” and “Addition of AP
hotspot”,, after hearing the voice “Please
configure camera by scanning code or AP
hotspot”, please click the “Connect to the
network”, if you do not hear the voice, please
reset you camera.
•Follow the wizard make your phone connect to
“CLOUDCAM_XXXX” network and Return to
YCC365 plus app.
•Click “Next” and Select your own Wi-Fi and login
with your password.
•Wait for the Wi-Fi connection to succeed then
Hear the voice “Internet connected welcome to
use cloud camera”
AP DIRECT MODE (special)
•Power up the camera and hear the voice "Please
configure camera by scanning code or AP
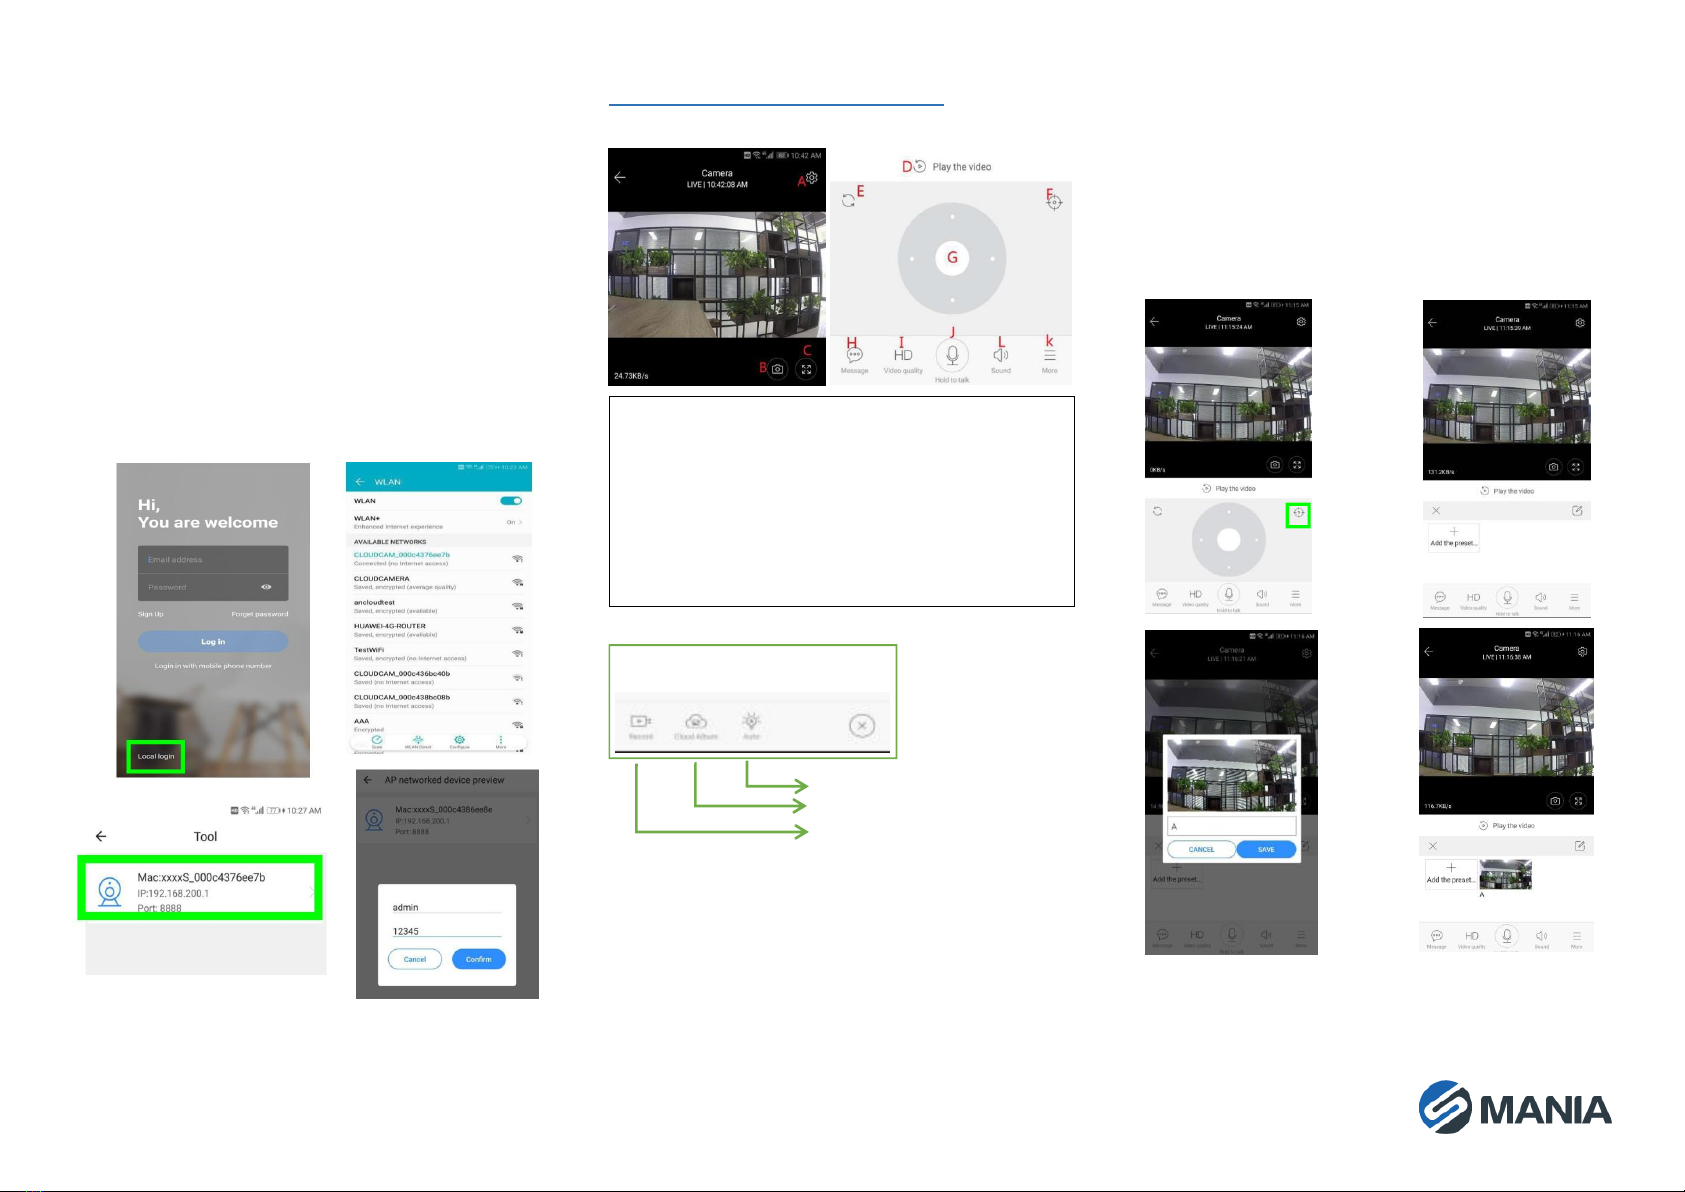
hotspot" (if you don't hear the voice, reset the
camera)
•Open the YCC365 plus app to enter the login
interface, click “Local login”.
•Make your phone connect to
“CLOUDCAM_XXXX” network”
•Click “AP networked device preview” and Click
“Next”.
•Scan for the device among the Wi-Fi networks
detected by your phone, then click on the
device.
•Enter username: admin password: 12345,click
“CONFIRM”, then you can preview the interface.
FUNCTION INTRODUCTION
Real-time preview interface
A: Parameter menu
G: Pan & Tilt
B: Snapshot
H: Message
C: Full screen
I: Video quality
D: Video playback
J: Hold to talk
E: Pan-tilt reset
L: Sound
F: Preset
K: More
OPTZ/PRESET
•PTZ
By sliding the steering wheel or sliding the screen
on the live preview can control the camera's
rotation.
•Preset
1. Click the preset icon to enter the preset
management interface.
2. Add the preset: several presets can be added.
3. Delete the preset: click the edit icon to delete
the preset that has been added.
Add the preset
Control white light
View cloud albums
Video to the phone
Delete the preset
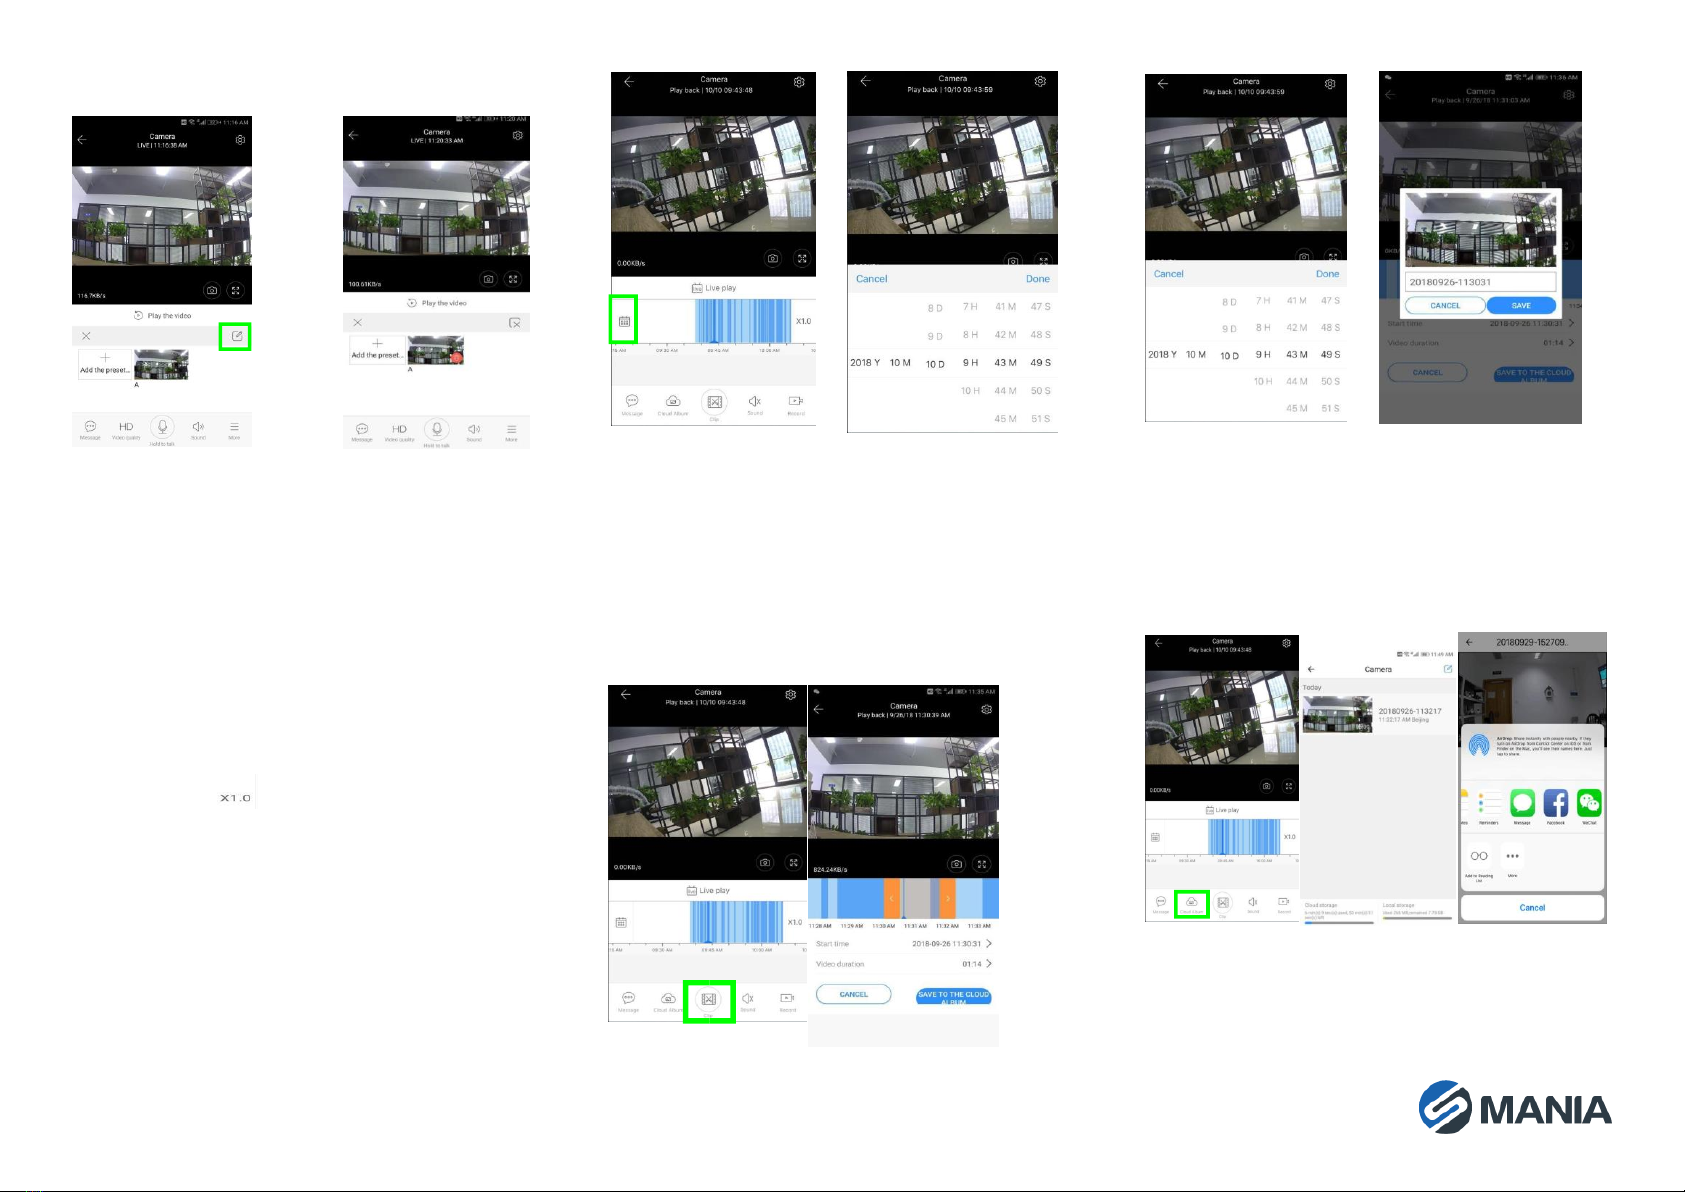
OVIDEO PLAYBACK
Video is by default recording to cloud. If you want
to play the video on the TF card, you can switch it
by choosing “play videos from” to “SD card”.
•Cloud video uses colour mapping, dark blue
indicates the alarm recording and light blue
indicates non-alarm recording. TF card video
colour uniform light blue.
•Click the date icon to play the video from the
selected date.
•Clicking the “ ”icon can adjust the cloud
video playback speed, but it is not supported on
TF cards.
OVIDEO CLIP
Note: Only the cameras with cloud service package
have this feature.
Drag the playback cursor and click the clip icon,
select start time and click “save to the cloud
album”, enter the video name and click “save”.
ODOWNLOAD CLOUD VIDEO / SHARE
CLOUD VIDEO
Click the cloud album icon and click the video clip,
click “Download” to save the video to your phone
or click “Share” to share your video on Facebook
and YouTube.
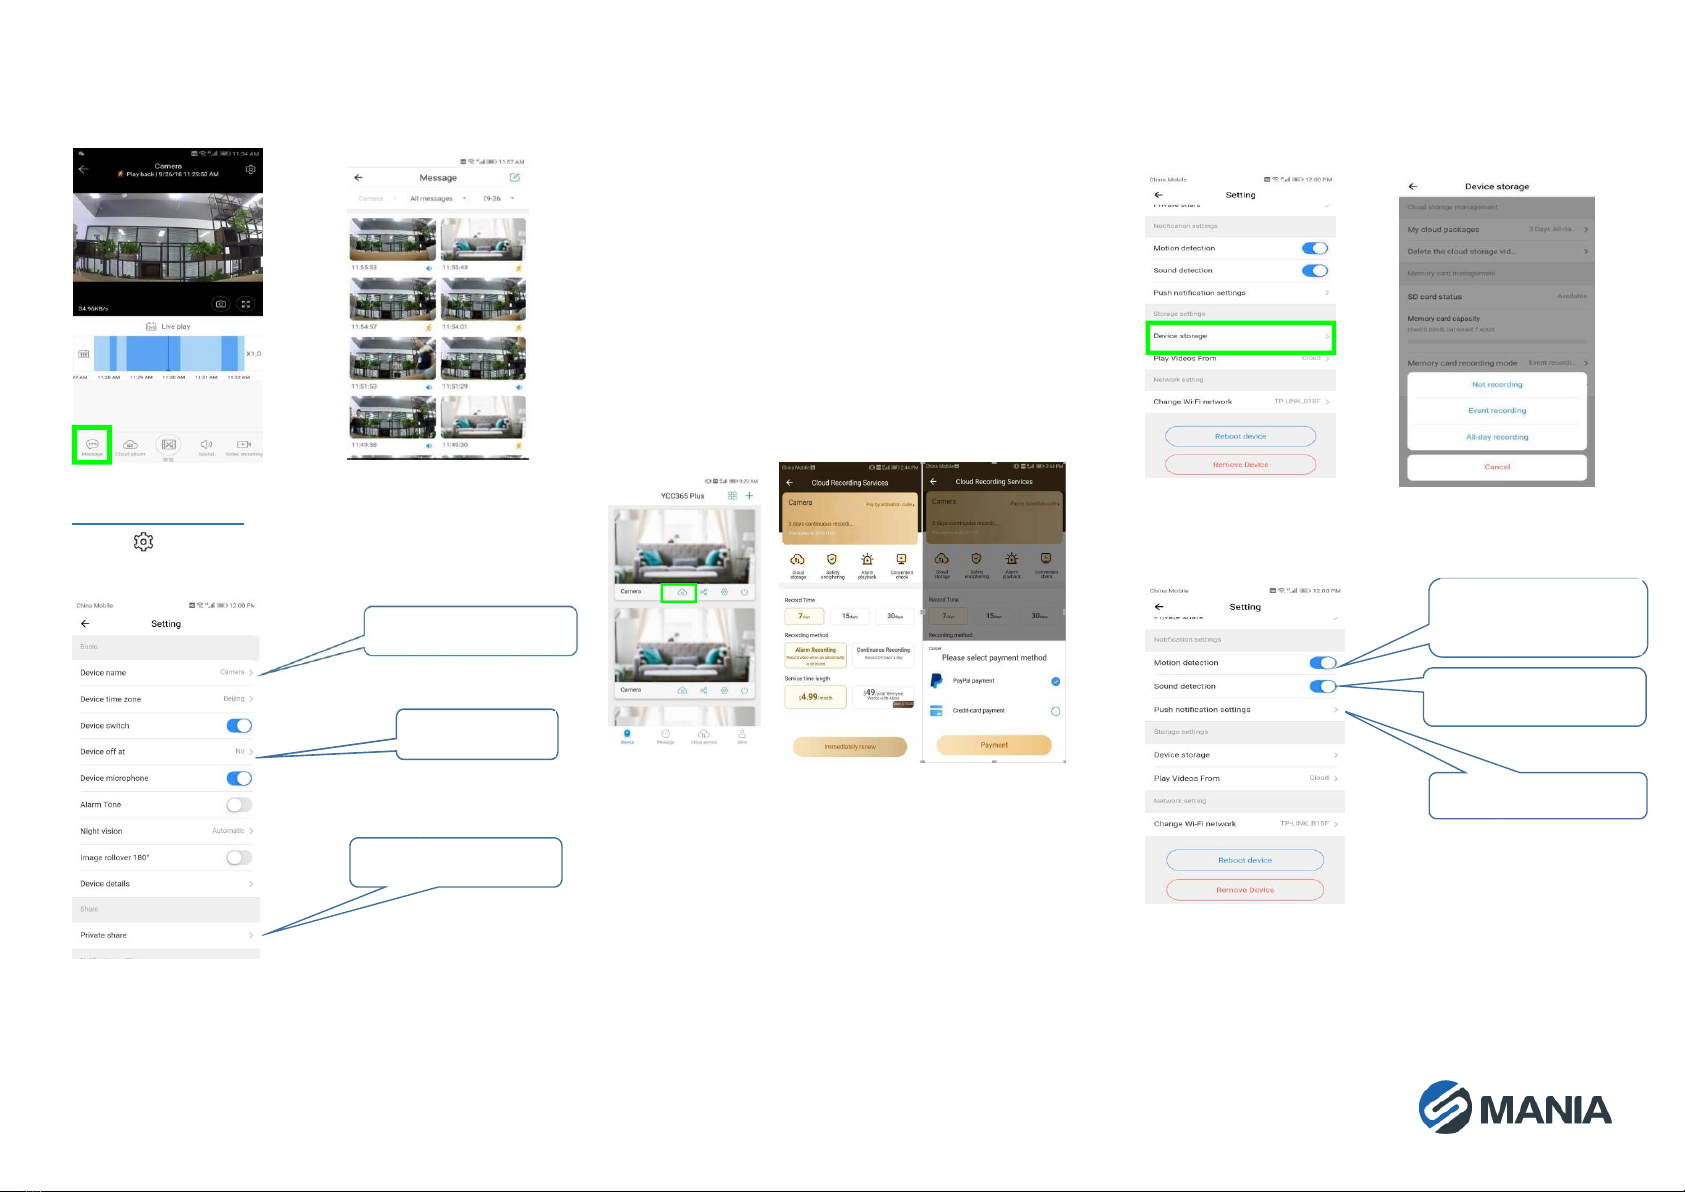
OCLOUD VIDEO PLAYBACK
Click “Message” to view the alarm video.
PREFERENCES
Click » « in the preview screen to check the
parameter menu.
OCLOUD STORAGE SERVICE
We offer a 30-day-long cloud service, which
everyone can enjoy for free. After that you can
choose to pay for the service at a low cost.
Select “Cloud service” and check Subscription
packages.
There are three kinds of subscription packages for
you. You can choose to pay for this service monthly
or yearly.
We support PayPal payment system, click “Go to
PayPal now” and then finish the payment (please
install PayPal app in advance).
OSET TF CARD RECORDING MODE
Insert the TF card into the card slot and power on
the camera.
TF card requirements:
•Memory space 8-128G
•C10 TF card
•Use after formatting.
•Recommend Kingston/SanDisk/Samsung
Click “Device storage” to check the memory.
Click “Memory card recording mode” to select the
video mode of TF card.
ONOTIFICATION SETTINGS
Rename the device
Set the end time of
recording
Share with other users
Turn on the motion
detection switch
Turn on the sound switch
Push notification setting

OOTHER FUNCTIONS SETTINGS
Device Microphone:
Switch the microphone on/off
Night Vision:
•Off, switch the night vision off
•On, night vision always on
•Auto, automatic switchover
Image rollover 180°:
Invert the picture when the camera is installed
under the roof.
Change Wi-Fi Network:
Change the Wi-Fi on the device.
Note:
The Wi-Fi must be searchable, if the location
changed and the Wi-Fi is different, please reset and
connect to a new Wi-Fi again.
Device Details: Check the ID and the number of the
software\hardware of the device.
Remove Device: Please remove the camera in your
account if you need to use another account to add
the camera.
OSPLIT SCREEN TO WATCH(ONLY
FOR MULTIPLE EQUIPMENT UNDER
THE SAME ACCOUNT)
HOW TO USE A CAMERA ON A
COMPUTER
Log in: www.ucloudcam.com
FREQUENTLY ASKED QUESTIONS
1. Can’t add the device?
A. Please make sure the camera has been
reset. Press the Reset button until hear the
prompt tone
B. Only support 2.4GHZ Wi-Fi, if your Wi-Fi
router is 5GHZ, please switch to 2.4/5GHZ
dual mode.
C. Please turn on the GPS service before
adding the device on the Android mobile
phone. After installation is complete, you
will be asked to turn on GPS service when
you use the app at the first time, if you
choose not to turn on the GPS service,
please uninstall and reinstall the app again
D. Please confirm the camera wasn’t binding
by the other account.
There are four voice prompts in the progress:
(1) “Please configure camera by scanning code
or AP hot spot”
(2) Select your Wi-Fi and login with your
password, after the device makes a noise
like “beep” you will hear this “Please wait
for Wi-Fi connecting”.
(3) “Please wait for internet connecting” after
getting the Internet IP address.
(4) “Internet connected welcome to use cloud
camera”
A. If you can’t go to the second step,
please check your Wi-Fi channel is not
hidden, and the Wi-Fi router is not too
far from the camera. If this way

doesn’t work, please scan the QR code
to add the camera.
B. If you can’t go to the third step, please
reduce the number of the Wi-Fi users,
and delete the special characters of
your Wi-Fi password.
C. If you can’t go to the fourth step,
please try again, if it still doesn’t work,
please contact the seller.
2. Why does it have an interval while the video
is recording to the TF card?
The size of the video file is limited. Once the video
size is close to the critical value, the video file will
be created and the next video will continue to be
recorded, there is an interval but very short.
3. The TF card can’t be identified?
Please check the TF card if it meets the quality
requirements, when the Wi-Fi signal is not good, it
also can’t be identified.
4. The video recording timeline is blank after the
cloud service expired.
The video can’t be replayed after cloud service
expired, if there is no TF card in the camera, the
video can’t be recorded.
If the TF card is always working, but the video files
disappeared, please check the Check TF card state,
if it is normal in the App but no video has been
recorded, please format the TF card. If it still
doesn’t work, please get a new TF card and try
again.
5. Why I can’t get the notifications on my
phone?
Make sure the App gets the message pushing rights
Otherwise, when you are watching the real-time
video in the App, there is no warning notifications,
because it’s unnecessary to send notifications when
you are watching the video online.
Advanced message push system, the warning
notifications won’t be pushed to your phone all the
time, but it will record all the messages and videos.
6. Camera disconnects?
Please check the power and the Internet then
restart the camera. If this way doesn’t work, please
remove the camera and add it again in the App.
7. Circle in the video, video runs slowly.
Circle in the video means it’s still loading, please
check your network environment.
8. How do the other people watch the video?
Share the App account with the other people.
9. How many people can use the account
simultaneously?
There is no theoretical limit.
10. Why adding camera to another account would
fail?
One camera one account, if the other account
needs to add the camera, please remove the
camera in the current device.
11. How can I get my camera connected to the
other Wi-Fi?
Two ways:
A: When you need to change to another Wi-Fi
without moving the place.
Parameter setting >> Wi-Fi Network >> select
the Wi-Fi
B: When the camera is moved to another place,
please start the camera, you will see the “Device
disconnected” on the main page, and then click
“TROUBLESHOOT” to connect to the Wi-Fi again.
OSAFETY CAUTIONS
•Make sure the power supply voltage is correct
before using the camera.
•Do not drop the camera or subject it to physical
shock.
•Do not touch sensor modules with fingers. If
cleaning is necessary, use a clean cloth with a bit
of ethanol and wipe it gently. If the camera will
not be used for an extended period of time, put
on the lens cap to protect the sensor from dirt.
•Do not aim the camera lens at the strong light
such as sun or incandescent lamp. The strong
light can cause fatal damage to the camera.
•The sensor may be burned out by a laser beam,
so when any laser equipment is being used,
make sure that the surface of the sensor is not
exposed to the laser beam.
•Do not place the camera in extremely hot or cold
temperatures, dusty or damp environment, and
do not expose it to high electromagnetic
radiation.
•To avoid heat accumulation, ensure there is
good ventilation to the device.
•Do not immerse camera in water or other
liquids.
•While shipping, pack the camera in its original,
or equivalent, packing materials.
Notes:
For the camera supports IR, you are required to pay
attention to the following precautions to prevent IR
reflection:
•Dust or grease on the dome cover will cause IR
reflection. Please do not remove the dome cover
film until the installation is finished. If there is
dust or grease on the dome cover, clean the
dome cover with clean soft cloth and isopropyl
alcohol.
•Make certain the installation location does not
have reflective surfaces of objects too close to
the camera. The IR light from the camera may
reflect back into the lens causing reflection.
WARRANTY
The warranty is valid for 12 months, and you can
apply it to the seller (us), through the contact
details listed in the bottom right corner, to submit a
warranty claim, send the number and the date of
purchase.
WEEE disposal and recycling symbol.
The WEEE symbol is attached to the
product in compliance with the EU
directive 2012/19/EU on Waste
Electrical and Electronic Equipment
(WEEE). It is intended to deter the
improper disposal of this product and to
promote reuse and recycling.
Table of contents


 Owner's instructions")


