Manta 5 HYDROFOILER XE-1 User manual

A | AS00004- REV1 MANTA5 XE-1 OWNERS MANUAL
ENGLISH - ORIGINAL INSTRUCTIONS:
This manual was drafted in English language and may have been translated
into other languages (Translation of the original instructions) accompanying the original instructions.
AS00004- REV2 MANTA5 XE-1 OWNERS MANUAL


WE ENCOURAGE YOU TO VISIT OUR WEB SITE WWW.MANTA5.COM FOR A DIGITAL VERSION OF THIS
MANUAL AND UPDATED TECHNICAL SUPPORT INFORMATION.
WARNING
USE OF THIS PRODUCT AND PARTICIPATION IN THE SPORT INVOLVES INHERENT RISKS OF INJURY OR DEATH.
TO REDUCE RISKS:
• Ride in water conditions that do not exceed the skills of the rider.
• Riders should remain within reasonable swimming distance to shore at all times.
• Attempting to ride in rough water, or in waves can increase the risk of injury or death.
• Do not use in shallow water or near swimmers or other watercraft.
• Always wear a suitable personal floatation device that is approved by your relevant local regulating body .
• Riders are highly recommended to wear suitable aquatic footwear and swimwear to protect from potential
injury.
• Understand and abide by your local maritime regulations.
• When losing control of the bike, push off pedals to fall away from the bike.
• Children shall be a minimum of 16 years of age to operate the bike.
• Never ride after consuming drugs or alcohol.
• Never ride without a suitable communication device or supervision from the land.
• Read the User Manual before use.

TABLE OF CONTENTS
PART 1. INTRODUCTION 6
1.1 MANUFACTURER DETAILS ............................................................................................................................................................................................................ 6
1.2 SUPPORT ............................................................................................................................................................................................................................................ 6
1.3 WARRANTY ........................................................................................................................................................................................................................................ 6
1.4 GENERAL INFORMATION ABOUT YOUR HYDROFOILER XE-1 ............................................................................................................................................ 6
1.4.1 HYDROFOILER XE-1 GENERAL INFORMATION ........................................................................................................................................................ 6
PART 2. IMPORTANT SAFETY INFORMATION 7
2.1 IMPORTANT SYMBOLS AND WARNINGS: ................................................................................................................................................................................. 7
2.2 IMPORTANT SAFETY NOTICES ..................................................................................................................................................................................................... 7
2.3 LITHIUM-ION BATTERY SAFETY .................................................................................................................................................................................................. 8
2.3.1 BATTERY SAFETY ALERTS ............................................................................................................................................................................................... 8
PART 3. BATTERY AND CONTROL SYSTEM 8
3.1 CHARGING THE BATTERY ............................................................................................................................................................................................................... 8
3.1.1 BATTERY REMOVAL ........................................................................................................................................................................................................... 8
3.1.2 BATTERY CHARGING ......................................................................................................................................................................................................... 9
3.1.3 BATTERY STATE OF CHARGE INDICATIONS ............................................................................................................................................................. 10
3.1.4 CONTROL SYSTEM ........................................................................................................................................................................................................... 10
3.2 GARMIN® EBIKE REMOTE ........................................................................................................................................................................................................... 10
3.2.1 DEVICE OVERVIEW .......................................................................................................................................................................................................... 10
3.2.2 PAIRING THE REMOTE WITH YOUR HYDROFOILER XE-1 ................................................................................................................................... 10
3.2.3 STATUS LED ........................................................................................................................................................................................................................ 10
PART 4. TRANSPORTATION & HANDLING 11
4.1 TRANSPORT THE HYDROFOILER XE-1 BY CAR ..................................................................................................................................................................... 11
4.1.3.1 IN-CAR/TRAILER TRANSPORT .................................................................................................................................................................. 11
4.2 TRANSPORT THE HYDROFOILER XE-1 MANUALLY ............................................................................................................................................................. 11
4.3 TRANSPORTING THE HYDROFOILER XE-1 BATTERY .......................................................................................................................................................... 11
4.4 POST-RIDE DISASSEMBLY & TRANSPORT ............................................................................................................................................................................. 11
4.4.1 IMPORTANT SAFETY INFORMATION ......................................................................................................................................................................... 11
4.4.2 DISCONNECT & REMOVE THE BATTERY ................................................................................................................................................................... 11
4.4.3 REMOVE THE PROPELLER ............................................................................................................................................................................................ 12
4.4.4 REMOVE FRONT TILLER ................................................................................................................................................................................................. 12
4.4.5 REMOVE THE REAR FOIL ............................................................................................................................................................................................... 12
4.4.6 REMOVE THE PEDALS (OPTIONAL) ............................................................................................................................................................................ 12
4.5 AFTER-USE ....................................................................................................................................................................................................................................... 12
4.5.1 WASH DOWN ..................................................................................................................................................................................................................... 12
4.5.2 CHARGING THE BATTERY ............................................................................................................................................................................................. 12
4.5.3 HYDROFOILER XE-1 STORAGE ..................................................................................................................................................................................... 12
4.5.4 STORAGE OF FOILS ......................................................................................................................................................................................................... 13
4.5.5 HYDROFOILER XE-1 BATTERY STORAGE .................................................................................................................................................................. 13
PART 5. HYDROFOILER XE-1 OPERATING INSTRUCTIONS 13
5.5.1 OPERATING CONDITIONS .............................................................................................................................................................................................. 13
5.5.2 INTENDED USE ................................................................................................................................................................................................................. 13
5.5.3 MISUSE ................................................................................................................................................................................................................................ 13
5.5.4 OPERATING POSITIONS ................................................................................................................................................................................................. 13
5.5.5 ACCIDENT OR BREAKDOWN ......................................................................................................................................................................................... 14
5.5.6 FOULING OR BLOCKAGE ................................................................................................................................................................................................. 14
5.1 LAUNCHING ..................................................................................................................................................................................................................................... 14
5.1.1 PLATFORM (DOCK OR JETTY) LAUNCH ..................................................................................................................................................................... 14
5.1.2 BEACH LAUNCHING (ASSISTED) ................................................................................................................................................................................. 14
5.1.3 BEACH LAUNCHING (SOLO) .......................................................................................................................................................................................... 15
5.1.4 SUBMERGED LAUNCHING ............................................................................................................................................................................................ 15
PART 6. MANTA5 SUPPORT 16
6.1 MASTER THE RIDE COURSE ........................................................................................................... ...................................................................................... 16

6.2 HELP DESK ........................................................................................................................................................................................................................................ 16
6.3 CUSTOMER SERVICE SUPPORT ................................................................................................................................................................................................. 16
6.4 MAINTENANCE ............................................................................................................................... ...................................................................................... 16
PART 7. MANTA5 HYDROFOILER XE-1 WARRANTY 17
7.1 MANTA5 LIMITED WARRANTY ................................................................................................................................................................................................... 17

6 | AS00004- REV1 MANTA5 XE-1 OWNERS MANUAL
PART 1. INTRODUCTION
Thank you for purchasing a Hydrofoiler XE-1. This Owners Manual advises
essential safety information, Hydrofoiler care and miantenance processes. It is
important that you read and understand the information in this manual before
assembling, riding and maintaining your hydrofoil bike. You will also be provided
an online PDF version from the Manta5 support team. This manual contains
useful information for the full lifecycle of your hydrofoil bike.
The Hydrofoiler XE-1 is advised for users over 16 years old. Parents or
guardians, if this hydrofoil bike is for a child or dependent, please make sure
they understand all safety information in this manual and are supervised at all
times by a competent adult. In this manual, ‘you’, ‘operator’ or ‘rider’ refers to
the person or persons installing, operating, adjusting, maintaining, cleaning,
repairing or moving the Hydrofoiler XE-1.
The Hydrofoiler XE-1 Owners Manual consists of six main sections: IMPORTANT
SAFETY INFORMATION, BATTERY AND CONTROL SYSTEM, TRANSPORTATION,
OPERATING INSTRUCTIONS, CUSTOMER SUPPORT & WARRANTY. Some
information is repeated between sections for safety reasons.
For initial assembly instructions, please refer to the Inital Assembly
Guide*hyperlink to Hubspot document?).
For basic waterside assembly instructions, please refer to the Quick Start
Guide*hyperlink to Hubspot document?).
1.1 MANUFACTURER DETAILS
MANTA5 LP
PO Box 16132, Ulrich, Hamilton, Waikato 3282, New Zealand.
Please note that Manta5 operates a policy of continuous improvement, all
manual contents are subject to change and update without notice.
1.2 SUPPORT
Please visit: www.manta5.com for more information, FAQ’s and contact
information for customer support.
1.3 WARRANTY
Your Hydrofoiler XE-1 comes with a manufacturing defect warranty. A copy of
the Manta5 Warranty document is included at the end of this manual. To be
eligible for a warranty you must be the original owner. This warranty does not
cover normal wear and tear to the Hydrofoiler, crashes, miscalculated landings
and collisions. If something unfortunate occurs to your hydrofoiler that is not
covered by the warranty, Manta5 will provide reasonably priced replacement
parts for the support and maintenance of your hydrofoiler. Our goal is to ensure
and advocate for safe riding whilst providing great customer service.
For further information visit www.manta5.com or get in touch via support@
manta5.com.
Manta5 Hydrofoiler XE-1
OWNERS MANUAL
© MANTA5 LP, NEW ZEALAND, June 2020
Document No: AS00004- Revision 1
1.4 GENERAL INFORMATION ABOUT YOUR
HYDROFOILER XE-1
1.4.1 HYDROFOILER XE-1 GENERAL INFORMATION
The Hydrofoiler XE-1 is made up of a sturdy aircraft grade aluminium chassis
mounting: the ebike motor, battery and gears, two main carbon fibre foils and
the front tiller section to automatically trim the hydrofoil bike’s level in the
water.
With a top speed of 22 km/h (13 mph) and a cruising speed between 11–13
km/h (6-7 mph), the bike is designed for users weighing between 60-100 kg
(130lbs-220 lbs) . The Hydrofoiler XE-1 itself currently weighs approximately
29 kg (64 lbs) including the battery and motor.
Fully assembled Hydrofoiler XE-1 dimensions: 1.4 m High x 2 m Wide x 2.2 m
Long (4,5 ft High, 6,5 ft Wide, 7,2 ft Long)
Main box dimenions: 1.5m length, 0.22m width, 1.05 height (5 ft length, 0.7 ft
width, 3.4 ft height)
Foil box dimensions: 2.04m length, 0.29m width, 0.1m height ( 6.7 ft length,
0.95 ft width, 0.3 ft height)
CHASSIS & GEARS
In addition to being resistant against saltwater and corrosion, the Hydrofoiler’s
frame and gears have several design features and details that stay true to the
simplicity of a well crafted eBike.
FEATURES
• 6061-T6 aluminium frame.
• Hybrid drivetrain featuring standard components for easy replacement.
• Buoyancy modules designed to streamline the Hydrofoiler both above
and below water.
• Marine grade componentry.
CARBON FIBRE FOILS
This combination has been fine tuned to strike a balance between stability and
maneuverability in many types of water conditions.
FEATURES
• Foil tip design minimises drag and extends effective wingspan.
• Rear wingspan measures 2 m. Front wing, 1.2 m.
• General purpose foils. Suitable for lakes, rivers, and the ocean.
• Modular design for easy assembly and in-car transport.
ELECTRIC MOTOR & BATTERY
This waterproof duo is designed to push the limits of what’s possible on water.
The motor has proven resilient against rigorous maritime tests yet produces
no more than a quiet hum and produces no harmful emissions into the
environment.
FEATURES
• Fully submersible IPX8 waterproof rated battery housing system.
• Easy access charging connector with a 4 hour recharge time.
• IPX8 waterproof rated electric motor.
• Nominal 460 watts (max 800 watts) of pedal assist power.
• 60 minutes run time on maximum assist level. Please note, estimated
battery run time may vary depending on the weight of the rider, weather
conditions, and level of assist.

7
PART 2. IMPORTANT SAFETY INFORMATION
2.1 IMPORTANT SYMBOLS AND WARNINGS:
Your safety is important. When reading this manual you will find symbols and
warnings with information to help keep you safe.
WARNING! Warns of hazards which could result in personal
injury or threat to health, including potential danger zones in
which any exposed person (wholly or partially within) is subject
to a risk to their health or safety.
CAUTION: Indicates a potentially hazardous situation, which, if
not avoided, may result in risk to user health or safety or, is an
alert against unsafe practice.
NOTICE: Alert of information of particular importance which if
not adhered to could result in damage to your hydrofoiler or
void your warranty.
INFORMATION: Indicates information of particular importance,
or a tip noting key information to improve your experience with
your Hydrofoiler.
TORQUE: Indicates that a torque wrench or similar is
recommended to avoid fasteners either coming loose or being
overtightened.
LUBRICATE: Symbol indicates the specified lubricant should be
applied as instructed.
FRICTION PASTE: Symbol indicates friction paste should be
applied. Avoid lubricant here.
2.2 IMPORTANT SAFETY NOTICES
INFORMATION: Read this important safety information
before riding your hydrofoil bike.
WARNING! Accident or breakdown: In case of accident
or breakdown, always be prepared and take a suitable
communication device in a water-proof case. Always ensure
to let someone know where you are intending to hydrofoil and
what time you expect to be back. Remember not to venture too
far in case of an emergency. Always ride in a place that you are
completely confident you can swim back to shore.
WARNING! Operating Environment: Always take the
necessary steps to prevent unauthorised use of the Hydrofoiler
XE-1. Do not leave unattended with the battery fitted or nearby.
WARNING! Personal Protective Equipment: Your safety is
paramount.
• Always wear a life jacket or other suitable floatation
device.
• Use a wetsuit to keep you warm in cold conditions.
• If you feel there may be a possibility of hitting your head
on anything (such as a jetty or other obstacles) then wear
a helmet (such as a windsurfing helmet).
• Remember non-slip beach footwear is always a good
idea to keep your feet from cuts while transporting the
Hydrofoiler XE-1.
CAUTION: Operating Environment: The Hydrofoiler XE-1 is
used in a hazardous (water) environment presenting risks to the
health and safety of the rider, while the Hydrofoiler itself may
also give rise to a hazardous environment for other water goers.
Avoid other water goers to avoid risk of collision and associated
injuries.
CAUTION: Operating Environment: Before use, please inform
yourself of all applicable legal regulations and requirements in
your country or state. There may be restrictions on riding your
hydrofoil bike in public waterways, lakes or beaches, as well
as applicable water safety requirements, age restrictions or
insurance requirements. Regulations and laws are frequently
updated and vary from location to location so always check
first with the relevant authority to obtain the latest relevant
information.
CAUTION: Operating defensively: Maintain safe speeds for the
conditions and keep a safe distance away from people, objects
and other watercraft. Take early action to avoid collisions -
remember the Hydrofoiler XE-1 does not have brakes.
• Do not follow directly behind other watercraft.
• Do not go near others - remember the rear foil protrudes
1 m each side.
• Avoid sharp turns or manoeuvres that make it hard for
others to understand where you are going.
• Avoid areas with submerged objects or shallow water.
WARNING! Know your limits: Any water sports can be
dangerous - especially if you try to exceed the limits of your
own ability. Know your skill level and swimming capability and
don’t ride beyond it. A water safety course is recommended
and may be a requirement in some locations. All riders will have
variability of physical dimensions, strength and stamina which
should always be taken into account by the rider.
WARNING! Know your limits: Manta5 recommends a minimum
rider age of 16 years old. Adults must supervise use by minors.
WARNING! Know your limits: Be aware of your changing
environment, avoid dangerous situations such as water traffic
or swimmers, obstacles (visible or subsurface), surf or rapid
water. As a general rule, don’t ride where you wouldn’t swim
and don’t ride where there are swimmers.
CAUTION: Know your limits: The Hydrofoiler XE-1 is heavy
for one person and is best handled with two people. Where
necessary get help to assemble, handle, lift, transport or
manoeuvre the Hydrofoiler XE-1 to avoid muscle strain.
CAUTION: Handle with care: Some parts of the Hydrofoiler
XE-1 could injure you if mishandled, such as the propeller which
could cut skin, and even cause puncture wounds if pressed
with the weight of the bike or user in a vulnerable area. eBike
components are especially vulnerable, such as the electric
cables, connectors, battery which could all potentially be
damaged if not handled with car, or have internal parts exposed
to water. Modifications to your Hydrofoiler could make it unsafe,
so only replace parts with official Manta5 replacements which
have been carefully designed and tested.
CAUTION: The Hydrofoiler XE-1 contains some complex items
such as the battery, motor and gearboxes that can not be
dismantled by the user. This user manual is not intended as a
fully comprehensive: use, assembly, service, maintenance or
repair guide. Where events uncover topics not covered in the
manuals then please see your nearest Authorised service and
repair centre.
8 | AS00004- REV1 MANTA5 XE-1 OWNERS MANUAL
NOTICE: Know your Hydrofoiler XE-1’s limits: The Hydrofoiler
XE-1 is made to withstand the conditions of intended use.
Riding outside those conditions could affect the product
performance or cause damage, even affecting the warranty.
The Hydrofoiler XE-1 is not indestructible and its parts will not
last forever. If you misuse your hydrofoil bike such as: if you ride
in extreme conditions, if it is involved in an accident, if it is used
for rentals or for commercial purposes then wear and damage
may occur more frequently, so ensure to inspect and maintain
your Hydrofoiler XE-1 at more frequent intervals.
2.3 LITHIUM-ION BATTERY SAFETY
WARNING! RISK OF FIRE OR EXPLOSION: Risk of fire or
overheating in failure may result in: gases, liquids, vapours
or other substances produced, fire damage, injury. In case of
battery fire, the battery cell(s) could explode. If a battery emits
excessive heat, smoke or unfamiliar audible noises then there is
risk of extreme temperatures and/or fire, with the possibility of
hot material being ejected. Call emergency services if necessary.
Never handle or approach the battery unless it has cooled down
and is wrapped in a fire blanket or similar.
CAUTION: Do not use the battery if the battery casing is
broken or if the battery emits an unusual odor, smoke, or
excessive heat or leaks any substance. Avoid contact with any
substance seeping from the battery.
CAUTION: Keep out of reach of children and pets. Exposure to
battery voltage could result in death or serious injury.
CAUTION: Thecells within thebatteries containtoxic substances.
Do not attempt to open the battery. Do not insert any object
into the battery or use any device to pry at the battery casing.
If you insert an object into any of the battery ports or openings
you could suffer electric shock, injury, burns, or cause a fire.
The battery is fitted with tamper-proof fasteners. Attempting
to open the battery casing will damage the casing and could
release toxic and harmful substances, and will render the pack
unusable and void any warranty.
NOTICE: Failure to charge the battery could result in permanent
damage. Left unplugged, the battery could fully discharge over
time, causing permanent damage. Charge the battery to 50%
every 2 months to avoid the risk of permanent damage.
NOTICE: Use only charging devices approved by Manta5 and
never attempt to bypass or override their charging protection
circuits.
NOTICE: Do not submerge the batteries in water whilst powered
on without the motor properly connected. This could short-
circuit the battery and cause a failure.
NOTICE: In the event of a malfunction during charging, isolate
the energy sources by switching off and unplugging the charger
from the wall mains socket. Stand clear and monitor the
situation. Allow the battery to cool before handling it.
2.3.1 BATTERY SAFETY ALERTS
The battery will communicate safety information through:
a. The battery switch’s illuminated LED flashing; and
b. By emitting audible ‘beeps’.
Warnings are indicated as follows:
WARNING ILLUMINATED SWITCH LED AUDIBLE
Low battery
(<10%)
Red, single LED flash,
repeating
Single beep, repeating
Motor over
temperature
Red, double LED flash,
repeating
Double beep,
repeating
Battery over
temperature
Red, triple LED flash,
repeating
Triple beep, repeating
Battery error Red, quadruple flash off,
repeating
Quadruple beep,
repeating
Note: Each flash of the LED/beep has a duration of 150ms, a delay of 100ms
between consecutive LED flash/beeps and a 5 second-delay before repeating.
PART 3. BATTERY AND CONTROL SYSTEM
3.1 CHARGING THE BATTERY
NOTICE: The battery should be re-charged once every 2 months
when it is not used. Negligence could lead to complete discharge
of the battery and would make the warranty on the battery void.
NOTICE: It is not recommended to have the battery pack
connected permanently to the charger.
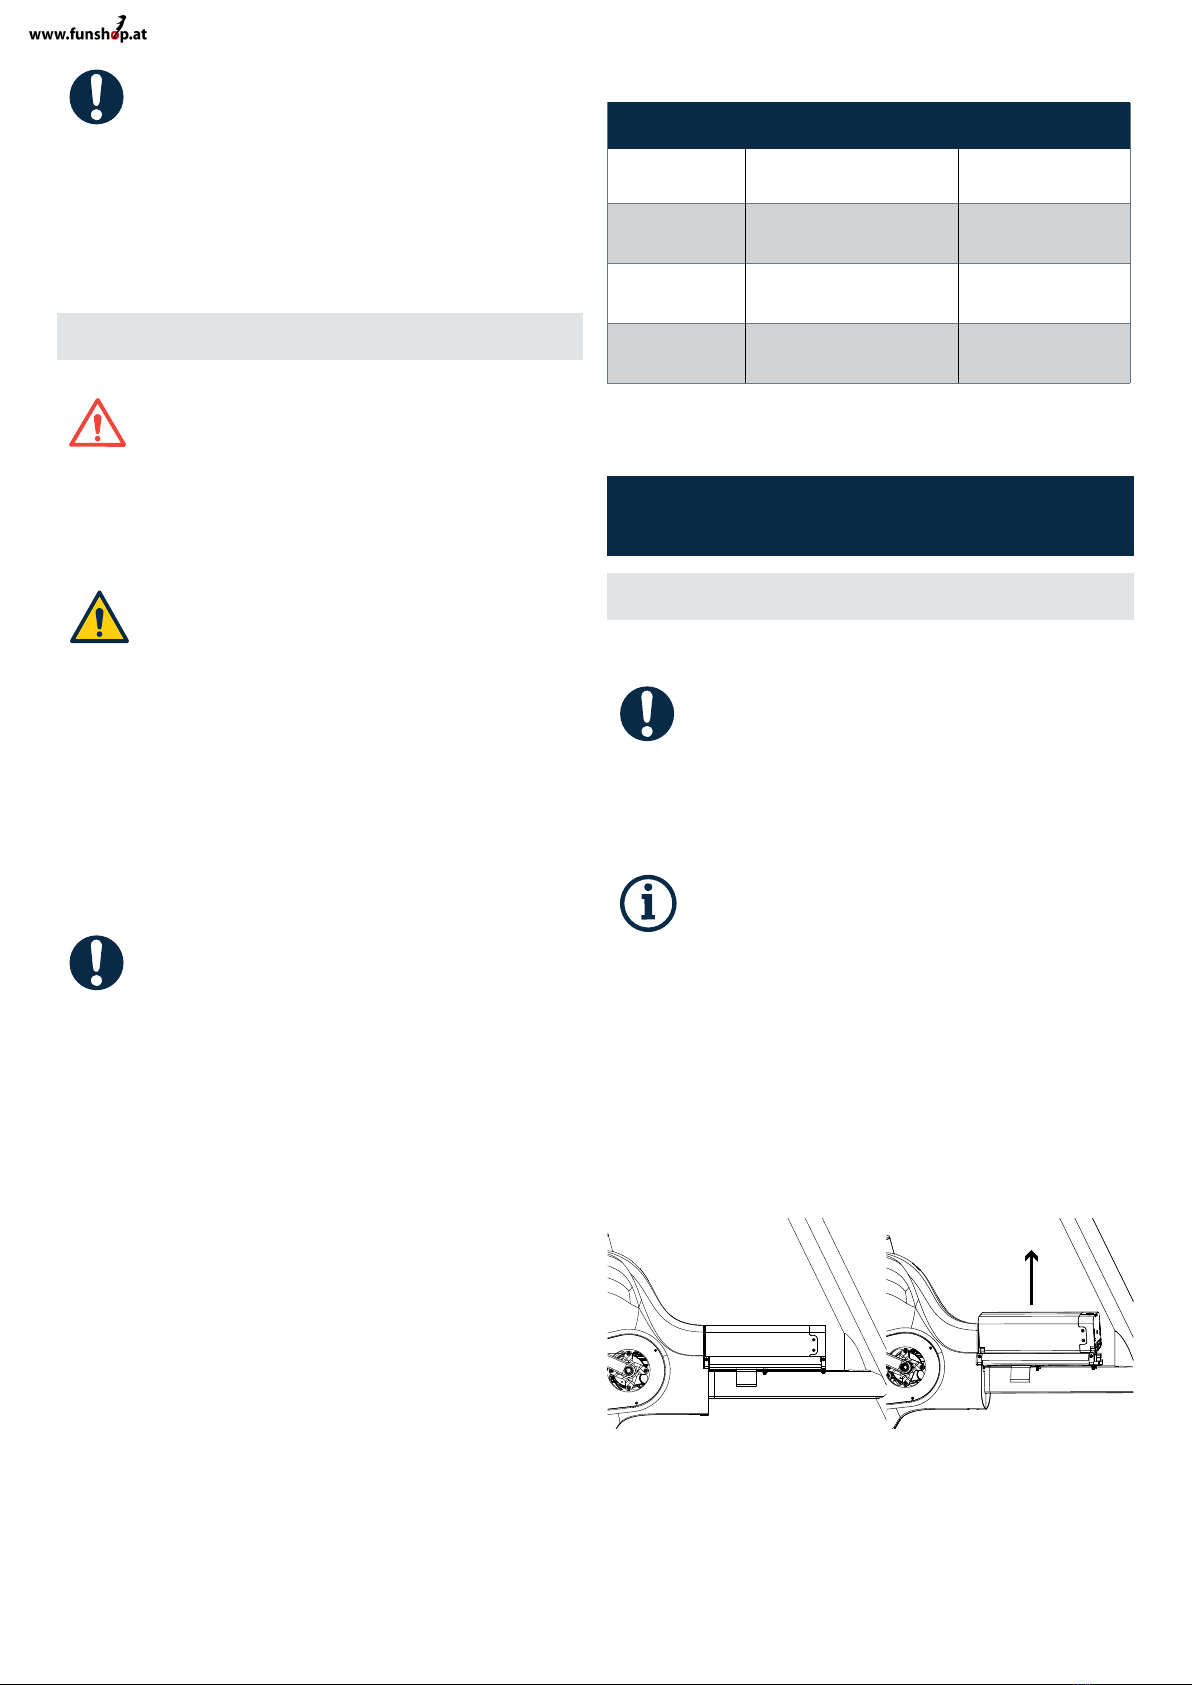
3.1.1 BATTERY REMOVAL
INFORMATION: Requires 4 mm hex key.
a. Make sure the battery is switched off by checking there is no
illuminated ring around the battery switch. Turn it on, then off again
if you are unsure.
b. Remove the battery from your Hydrofoiler. First unfasten the battery
by unscrewing the two grub screws far enough not to impede the
removal of the battery but leaving the grub screws retained in the
battery tray.
c. Carefully remove the battery pack from the battery tray by tilting
the battery towards the two lugs on the left hand side of the tray to
disengage with the notches in the battery casing.
d. Should the battery be plugged in; disconnect the connector by twisting
the blue lock collar (anti-clockwise).
e. Fully remove the battery from the battery tray for charging.

9
3.1.2 BATTERY CHARGING
WARNING! - RISK OF FIRE: Lithium-ion battery packs can be
dangerous if charged incorrectly. Use only the battery charger
supplied by Manta5 for charging the Hydrofoiler XE-1 lithium-
ion battery.
WARNING! - RISK OF FIRE: Do not use the Manta5 battery
charger with any other batteries.
WARNING! - RISK OF FIRE: Never connect the charger to an
unregulated generator.
WARNING! - RISK OF FIRE: Never let a battery be charged
unattended. The battery and charger can get hot while charging.
Do not charge near any sources of heat, humidity or flammable
materials and never cover the charger or battery with clothes
or other objects.
WARNING! - RISK OF FIRE: The battery will not charge if it is
0°C (32°F) or less and greater than 40°C (104°F).
CAUTION - RISK OF INJURY: Do not allow children to handle the
battery or charger.
NOTICE: Charge the battery in a cool, dry, well-ventilated
location on a non-flammable surface. Do not charge the battery
in wet, high-temperature or high-humidity environments. This
means out of direct sunlight, and away from bath/shower-
rooms and similar.
NOTICE: If the battery is to be stored, then the battery should
be charged to 50% before storage, and stored in a room with a
working smoke detector. Use the store charge profile on your
charger.
INFORMATION: When you first receive your Hydrofoiler, the
battery will be partially charged. To get the best life out of your
battery; ensure to charge to full capacity before using for the
first time. For charging the battery pack, read and observe
the operating instructions of the charger. The battery can be
charged to/from any level of charge. Interrupting the charging
process does not damage the battery pack.
INFORMATION: Always remove the battery from the bike when
charging. Make sure the battery is dry and has cooled down
after use.
CHARGING PROCEDURE
a. Make sure the battery is powered OFF (There should not be illuminated
ring around the switch).
b. Connect the battery charger input lead to an AC mains power socket
with the power switch off. Do not use an extension cable.
c. Connect the battery charger to the battery by pushing the blue
connector into the battery socket. Press the plug in firmly until you
hear and/or feel the blue lock collar click indicating that the plug is
fully engaged, it clicks into place and the red dot becomes obscured.
d. Check to ensure the red dot is not visible.
e. Switch ON the power at the AC mains power socket - or omit this step
if you socket does not have a switch.
f. Turn on the battery and charging will commence. The battery switch
LED will illuminate according to the state of charge with a flashing
pulse, indicating the battery is charging.
g. Standard charge takes 4 hours for the battery to be fully charged.
Charging is complete when the battery switch LED turns solid green.
h. To abort charging, hold down the top button until “Abort Charge” is
displayed on the screen, then release the button.
i. Switch the battery off.
j. Unplug the battery from the charger.
k. Switch the charger off at the wall.
CHANGING CHARGING PROFILES
To change the charge profile from the recommended default
setting given, the user must select the appropriate charge rate.
Please note, fast charging in warmer ambient temperatures can
cause the battery to overheat and stall the recharge process.
Select the charging profile and hold down the bottom button
until the “Hold to Start” text at the bottom of the display
changes to “Okay”, release the button.
1. Fast Charge - 3hrs
2. Standard Charge (Default) - 4hrs
3. Slow Charge -5.7 hrs
4. Store Charge (For storing over long periods) - 2hours
CHARGE MODE CHARGER DISPLAY
FAST CHARGE
STANDARD CHARGE
(DEFAULT)
SLOW CHARGE
STORE CHARGE
NOTICE: Refer to storage PART 4 TRANSPORTATION AND
HANDLING
Store the battery in a cool, dry environment as per the battery storage instructions.

10 | AS00004- REV1 MANTA5 XE-1 OWNERS MANUAL
3.1.3 BATTERY STATE OF CHARGE INDICATIONS
At power on, while the battery is initialised, the switch LED will stay purple for 1
second then the LED will flash and the battery will give an audible ‘beep’.
The number of repeated flashes/beeps indicates the approximate level of
charge as per the table below:
STATE OF CHARGE RANGE NUMBER OF FLASHES/BEEPS
75 - 100 % 4
50 - 75% 3
25 - 50 % 2
0 - 25 % 1
When switched on, the battery illuminated switch LED will indicate the state of
charge per table below:
BATTERY STATE OF
CHARGE
ILLUMINATED SWITCH LED AUDIBLE
0-10% Red flashing beeping
10-25% Red solid -
26-50% Orange solid -
51-75% Yellow solid -
76-100% Green solid -
3.1.4 CONTROL SYSTEM
Automatic Battery Shutdown Timeout: The battery will automatically turn
itself off if the pedals have not been turned for 5 minutes, or if the battery is not
connected to the motor. Turning the pedals restarts the 5 minute timer. After
charging is complete, the battery will turn itself off after 5 mins.
Note- if the battery turns itself off due to timing out. The power switch must be
pressed twice to turn the battery back on.
Tip-over Rider Protection: The battery detects the roll of the Hydrofoiler XE-1
using a tilt sensor. If the angle exceeds 60 degrees from vertical, the motor will
be disabled to protect the user whilst floating in the water. The switch LED will
repeatedly flash on for 1 second and off for 1 second (0.5 Hz) indicating the
motor is disabled.
When the angle of the bike comes within 30 degrees from vertical, the motor
will be re-enabled and the switch LED will stop flashing.
If the battery is upside down or exceeds 90 degree pitch in either direction. The
motor will be disabled.
3.2 GARMIN® EBIKE REMOTE
3.2.1 DEVICE OVERVIEW
1
2
3
1 Select to increase the assist
level.
2 Select to decrease the assist
level.
Hold to turn off the assist
function.
3 Status LED.
3.2.2 PAIRING THE REMOTE WITH YOUR HYDROFOILER XE-1
The first time you connect the GARMIN® eBike with your Hydrofoiler, you must
pair it
a. The battery must be out of the water in order to pair successfully.
b. Bring the remote within 1 m (3 ft.) of the Hydrofoiler and HydroCell
battery.
NOTE: You must stay 10 m (33 ft.) away from other ANT+’” sensors while
pairing.
c. Turn on the battery.
d. On the GARMIN® eBike remote, hold two keys simultaneously until
the LED starts alternating green and red, and release the keys.
The remote will search for your Hydrofoiler XE-1. Once the LED flashes green
6 times, pairing is complete and successful. Once paired, the GARMIN® eBike
Remote connects to your XE-1 whenever it is in range and turned on. You may
need to wake the remote by selecting any key.
3.2.3 STATUS LED
The green LED flashes one time when you press a key.
LED ACTIVITY STATUS
Flashing green The remote is searching for a
paired eBike.
Alternating red and green The remote is attempting to pair
with an eBike.
6 rapid green flashes The remote success fully paired
with an eBike.
Solid red Pairing has failed or the connection
was lost.
1 red flash every 5 seconds The remote has a low battery.
2 red flash every 5 seconds The eBike has a low battery.
3 red flash every 5 seconds The eBike has an error message.

11
PART 4. TRANSPORTATION & HANDLING
NOTICE: When transporting the Hydrofoiler XE-1, take care to
avoid damaging the light-weight buoyancy modules and foils.
CAUTION - HEAVY ITEM: When fully assembled the Hydrofoiler
XE-1 weighs 30.5 kg (67 lbs). It is important that users adhere
to safe lifting practice. Manta5 recommend a two-person lift
when needed.
INFORMATION: Move the seat to the downwards position to
ease transport of the Hydrofoiler XE-1, especially when fitting
it to tight spaces.
4 .1 TRANSPORT THE HYDROFOILER XE-1 BY CAR
The Hydrofoiler XE-1 can be transported by car either: within a car of sufficient
size, or on a tow bar mounted bike rack.
CAUTION- RISK OF INJURY: Manta5 does not recommend
transporting the Hydrofoiler XE-1 on roof racks.
• The weight of the cycle could put users at risk of strain.
• Mounting or dismounting the cycle from a height could
create a hazard such as pinch, falling-object or crush with
resulting injuries.
• The Hydrofoiler XE-1 should always be maintained in a
stable position.
NOTICE - RISK OF DAMAGE: Manta5 does not recommend
transporting the Hydrofoiler XE-1 on roof racks. This could risk
damaging the product.
NOTICE: Manta5 only recommend in-car transport of the
Hydrofoiler XE-1 using a suitable sized car or van.
Only rest the Hydrofoiler XE-1 on a clean soft debris-free
interior or transport surface.
4.1.3.1 IN-CAR/TRAILER TRANSPORT
Set the seat to its lowest position or remove the seat-post with saddle and set
aside.
a. Remove the rear foil, stow it or set aside on a non-scratch surface
such as soft sand.
b. Remove the front tiller taking care to replace all loose items such
as bushings and fasteners to the steering fork. Set aside out of
thoroughfare on a non-abrasive surface.
c. Remove the propeller and replace the fasteners onto the propeller
shaft or stow them in safe place. Set aside out of thoroughfare.
d. Take care when loading the Hydrofoiler XE-1 into the vehicle/trailer
or trolley. Avoid resting the Hydrofoiler XE-1 on sharp edges or
objects that could put force onto the buoyancy modules. Secure the
Hydrofoiler XE-1 sufficiently to prevent the load shifting during your
journey.
e. Load in the remaining items.
f. Travel safely.
4.2 TRANSPORT THE HYDROFOILER XE-1 MANUALLY
When you first receive the Hydrofoiler XE-1, there are some parts to assemble.
This is described in the Initial Assembly Guide provided to you by Manta5. Once
assembled, the Hydrofoiler XE-1 is ready to be transported to the water.
CAUTION HEAVY ITEM - RISK OF INJURY: Only ever lift
within your own capability. Always use a two person lift when
necessary to avoid personal injury or damage to the product.
CAUTION SLIPS, TRIP & FALLS - RISK OF INJURY: Prior to
manual carrying: Always check that the route is clear to avoid
slips, trips or falling. Always wear suitable footwear for the
conditions.
Prior to any manual handling; Manta5 recommend that you take a few
minutes to evaluate the risks associated with carrying the Hydrofoil XE-1 to
its destination. You are responsible for your own safety and wellbeing. Manta5
have identified some common risks (list not exhaustive) as examples of what
to look out for:
a. Risk of strain during manual handling: Only ever lift with your own
capability. When you do need to carry the Hydrofoiler XE-1, Manta5
recommend a two-person lift when carrying.
b. Risk of a slip, trip or fall: Prior to manual carrying: Always check that
the route is clear to avoid slips, trips or falling. Always wear suitable
footwear for the conditions and avoid uneven ground that could
destabilise you and your Hydrofoiler XE-1.
c. Risk of destabilisation by wind and/or waves: Take care if
transporting the Hydrofoiler XE-1 through surf and avoid if possible.
Note how wind or waves could knock someone over so avoid carrying
the Hydrofoiler XE-1 with it on the upward wind/waves side - such
that if you or the bike is toppled over or falls that you will not be
underneath the Hydrofoiler. Always put the bike on down-wind side
and don’t put the bike between you and a wave.
4.3 TRANSPORTING THE HYDROFOILER XE-1 BATTERY
a. If you carry your Hydrofoiler outside of your car, e.g. on a luggage rack,
remove the battery in order to avoid damaging it.
b. The battery packs are subject to the Dangerous Goods Legislation
requirements. Private users can transport undamaged battery by road
without further requirements.
CAUTION - DANGEROUS GOODS: You cannot fly with the lithium-
ion battery on a passenger aircraft. When being transported by
commercial users or third parties (e.g. air transport or forwarding
agency), special requirements on packaging and labelling must
be observed (e.g. ADR regulations). If necessary, an expert for
hazardous materials can be consulted when preparing the item
for shipping.
c. Dispatch battery only when the housing is undamaged. Tape or mask
off open contacts and pack up the battery in such a manner that it
cannot move around in the packaging. Inform your parcel service
that the package contains dangerous goods. Please also observe the
possibility of more detailed national regulations.
d. In case of questions concerning transport of the battery, please
refer to an authorised Manta5 dealer who can also provide suitable
transport packaging.
4.4 POST-RIDE DISASSEMBLY & TRANSPORT
The design of the Hydrofoiler XE-1 is modular to enable easy transportation.
When transporting the Hydrofoiler XE-1 there are items that will need to be
removed to enable safe and easy transportation. These items are detailed
below:
4.4.1 IMPORTANT SAFETY INFORMATION
Refer to PART 2 IMPORTANT SAFETY INFORMATION.
4.4.2 DISCONNECT & REMOVE THE BATTERY
a. Using a 4 mm hex key undo the 2 grub screws that are securing the
12 | AS00004- REV1 MANTA5 XE-1 OWNERS MANUAL
battery in the battery tray.
b. Once loosened, lift the battery out of the tray and disconnect from the
Hydrofoiler connector cable.
c. Place battery down on a soft surface out of direct sunlight or store
away. For storage insctructions please REFER TO SECTION 4.5.5
HYDROFOILER XE-1 BATTERY STORAGE.
4.4.3 REMOVE THE PROPELLER
CAUTION - RISK OF INJURY: It is essential that the propeller
is removed while the hydrofoil bike is in transit. This reduces
the risk of injury or damage to the product. Always handle the
propeller with care and stow it safely.
CAUTION - RISK OF INJURY: Propellers can contain sharp edges.
Take care handling the propeller not to touch sharp features.
INFORMATION: Requires 17 mm spanner.
a. Unscrew by hand (turn anti-clockwise) the nose cone piece from the
front of the propeller.
b. Using a 17 mm spanner remove the nut and washer. Take care to hold
the propeller whilst avoiding any sharp edges or corners.
c. Slide propeller with the hex block off the propeller shaft. Take care not
to dislodge the flanged bushings.
d. Store all propeller assembly parts together to avoid losing any
components.
4.4.4 REMOVE FRONT TILLER
The front tiller assembly should always be removed for transport.
INFORMATION: Requires 5 mm hex key.
a. Remove the front tiller assembly by loosening the countersunk screw
from the nylock nut and removing the front tiller from the steering
fork assembly.
4.4.5 REMOVE THE REAR FOIL
INFORMATION: Requires 6 mm hex key.
a. Using a 6 mm hex key, loosen (turn anti-clockwise) the captive cap-
screw in the metal shoe which secures the rear foil to the frame.
b. The foil and shoe assembly will slide forward and can be removed as
the captive screw is loosened.
c. Place the foil down on a grass surface or surface free of debris that
could scratch or damage your foil.
4.4.6 REMOVE THE PEDALS (OPTIONAL)
In some instances it may be necessary to remove the pedals, but this is largely
up to you and the method of transportation.
INFORMATION: Requires either a 6 mm hex key or a 15 mm
spanner.
INFORMATION: The pedals have ‘L’ and ‘R’ marked on them.
Ensure the L and R side pedals are assembled to the correct
side. The right-hand pedal has a right-hand thread (screw in
clockwise), and the left-hand pedal has a left-hand thread
(screw in anti-clockwise).
1. Unscrew each pedal the correct direction of rotation while holding the
corresponding crank arm. A 15 mm spanner can be used across the flats of the
pedal or a 6 mm hex key can be passed through the hole in the crank arm and
used in the pedal hex recess.
4.5 AFTER-USE
4.5.1 WASH DOWN
CAUTION: Always remove the battery before washing down the
Hydrofoiler.
NOTICE: Do not use a high-pressure water jet to clean the
Hydrofoiler XE-1, as this may cause ingress of water into
electrical parts and could cause product failure.
NOTICE: Do not use abrasive or solvent-based cleaning agents.
These could damage the materials used on your hydrofoiler.
INFORMATION: Ideally, use warm soapy water and a soft cloth
to clean the Hydrofoiler XE-1 after use.
INFORMATION: While cleaning the Hydrofoiler XE-1, inspect for
any signs of damage or corrosion of metal parts. If any damage
or corrosion is observed, contact Manta5 for recommendations
a. Ensure that the battery is powered off and removed from the hydrofoil
bike before cleaning.
b. The battery can be cleaned by wiping with a damp cloth, and then
drying with a dry cloth afterwards. Make sure you do not touch the
power socket.
c. If there is sand/dirt in the battery connector use a plastic/nylon brush
and a vacuum to remove the material. Do not put metallic objects into
the connector openings.
d. Do not attempt to reconnect the battery to the charger or the bike
if the connector is dirty. Doing so may result in permanent damage
to the battery. If you are unable to fully clean the connector, please
e. After use in salt water the Hydrofoiler should always be washed down
with fresh water as soon as possible.
f. Where the Hydrofoiler is frequently used in salt-water, Manta5
recommend that the right side buoyancy modules be removed and
the bike internals are washed down with fresh water.
g. The motor and chain can be cleaned by inserting a low-pressure hose
through the hole in the chain-guard panel through which the crank
and pedal protrude.
LUBRICATE: Using Manta5 Prolan chain lubricant, apply to the
chain after wash-down. This will help prevent corrosion and
extend the life of the components used on your hydrofoiler.
4.5.2 CHARGING THE BATTERY
For instructions and safety information relating to charging your battery, please
refer to: OWNERS MANUAL PART 3 BATTERY AND CONTROL SYSTEM.
4.5.3 HYDROFOILER XE-1 STORAGE
a. Remove the battery and store as per OWNERS MANUAL PART 4.5.5
HYDROFOILER XE-1 BATTERY STORAGE.
b. Remove the propeller and stow it safely to ensure no risk of damage
or injury.
c. The buoyancy modules should be removed, allowing the Hydrofoiler
XE-1 to be thoroughly washed with fresh water and then aerate. The
buoyancy modules may be stored separately out of direct sunlight,

13
with nothing on top of them.
d. The frame assembly should be washed and dried before storing.
e. The Hydrofoiler XE-1 should be stored safely and without damage.
This means a clean dry environment, and mounted or rested and
secured in a stable place upright, not on its side.
4.5.4 STORAGE OF FOILS
Before storing the foils you should:
a. Wash down the foils with fresh water, and dry them.
b. Store the foils in soft wrapping to prevent them from damage.
c. Stow the foils in a secure place to prevent damage.
4.5.5 HYDROFOILER XE-1 BATTERY STORAGE
The battery life can be prolonged when being properly maintained and especially
when being operated and stored at the right temperatures. With increasing age,
however, the battery capacity will diminish, even when properly maintained. A
significantly reduced operating period after charging indicates that the battery
is worn out and must be replaced.
NOTICE: Never store a completely discharged battery as it
might result in permanent damage. During the winter or long
storage periods, it is recommended that you charge the battery
to 50% charge every 2 months.
a. The battery should be charged to 50% before storage.
b. It is not recommended to have the battery pack connected permanently
to the charger.
c. Store the battery in the following locations:
• In a room with a smoke alarm.
• Away from combustible or easily flammable objects.
• Away from heat sources.
d. Store the batteries at temperatures between 10°C and 20°C (50°F
and 68°F). Never store them at temperatures below –10°C (14°F)
or above +60°C (140°F). To ensure that the battery lifetime is as
long as possible, storage at approx. 20°C (room temperature) is
recommended.
e. Take care that the maximum storage temperature is not exceeded. As
an example, do not leave the battery in a vehicle in summer and store
it out of direct sunlight. It is recommended to not store the battery on
the bike.
PART 5. HYDROFOILER XE-1 OPERATING
INSTRUCTIONS
This section covers the key aspects of safely operating your Hydrofoiler XE-
1. We aim to give you helpful advice and information regarding: operating
conditions, the Hydrofoiler XE-1 control system, Hydrofoiler XE-1 operating
positions, learning to ride the Hydrofoiler XE-1, and what to do if you have an
accident or breakdown.
5.5.1 OPERATING CONDITIONS
NOTICE: You can ride on oceans, rivers and lakes, handling
moderate chop and swell. The front tiller section of the
Hydrofoiler self-levels helping to punch through chop and over
swell as you ride. Always ride to your ability and practice caution
in riskier conditions. Your Hydrofoiler can be ridden in a range
of water conditions depending on your skill level. As a general
guideline, the Hydrofoiler can be ridden in waves and chop that
are less than 0.5 m high (1.6 ft) with 0.5 m being the maximum
wave height Manta5 would recommend riding in - around
Degree 2 on the international sea and swell scale or Beaufort
number 2. Exercise extreme caution when riding in conditions
that you have not experienced before.
5.5.2 INTENDED USE
NOTICE: The Hydrofoiler XE-1 is intended for recreational
use, for hydrofoiling on oceans, rivers and lakes clear of
obstacles and traffic, handling moderate chop and swell, with
a minimum water depth of 1.5 m. The Hydrofoiler XE-1 is not
designed to be surfed. The Hydrofoiler XE-1 is for a single rider
- so no passengers. Manta5 recommends users are confident
swimmers between 60 kgs-100 kgs (130 lbs - 200 lbs) and a
minimum age of 16 years old.
The Hydrofoiler is designed to be capable of being launched from:
• A platform (such as a jetty, pontoon or suitable sized duck-board of a
large boat);
• A beach location - flat or with small rolling waves, a flat sandy surface
(excludes beaches with rocks or other abrasive surfaces); or
• Deep water (sub-launch) with a minimum clear water depth of 2.5 m
required, and optimised for riders weighing between 60-90 kgs (130 lbs
- 200 lbs).
5.5.3 MISUSE
NOTICE: For elimination of doubt, misuse constitutes using your
Hydrofoiler XE-1: riding in extreme conditions, landing the foils
onto rocks or other debris likely to cause damage if it is dropped
or involved in an accident, if it is used for rentals or for commercial
purposes (unless pre-agreed with Manta5 under special terms &
conditions). The Hydrofoiler XE-1 is for a single rider only. It shall
not be towed or used for towing, and should not be used in surf
exceeding the intended use or operating conditions.
5.5.4 OPERATING POSITIONS
There are three main operating positions when riding the Hydrofoiler XE-1.
a. Transition: This is when transitioning from being off the bike, to
mounting the bike. This position is used for example - when launching
from a jetty, mounting the bike for a beach launch or sinking and
mounting the Hydrofoiler XE-1 for a sub-launch. This position has the
highest risk as the rider generally only has a few points of contact at
a time. Extra care should be taken to avoid the propeller in Transition
positions.

14 | AS00004- REV1 MANTA5 XE-1 OWNERS MANUAL
b. Standing (on the pedals): Riders will need to use the standing position
to transfer weight while mastering techniques such as sub-launching
and turning. Use the standing position to shift weight to the fore
(forward) and aft (rear), or to the left (port) and right (starboard).
Combining these to put weight onto the handlebars while leaning
forward/backwards and/or to the sides is essential to balance and
control the bike.
c. Sitting: Once foiling the rider is generally intended to sit, so use the
saddle when you can to take weight off your legs and allow you to
enjoy a longer ride time.
5.5.5 ACCIDENT OR BREAKDOWN
WARNING! - Operating Environment: Always ensure to let
someone know where you are intending to hydrofoil, and what
time you expect to be back. Remember not to venture too
far in case of an emergency. Always be prepared and take a
communication device in a water-proof case.
WARNING! - Plan your ride: Check with your local authorities
and create an emergency action plan should you ever become
stranded in open water.
a. In the case of an accident or break-down; assess any injuries (if
applicable) and if required use your communication device to alert
emergency services.
b. Return to shore if possible and safe to do so. If returning to shore is
not possible then call emergency services with your communication
device.
c. Switch off the battery if not foiling.
d. Manta5 recommend that you follow your local maritime procedures if
stranded in open water. If in doubt remain with the Hydrofoiler XE-1
using it as a floatation device until help arrives.
5.5.6 FOULING OR BLOCKAGE
NOTICE - BLOCKAGE: There is a possibility of the propeller or
foils becoming fouled by debris during operation. Follow the
operating method for the items to be safely unblocked.
Depending on the quality of the water, a blockage may occur. Typical instances
are debris blocking the propeller and preventing it spinning, or debris entangled
on the foils. If this happens do the following:
a. Dismount the Hydrofoiler and switch off the battery.
b. If near the shoreline return to shore and to a safe location. If in deep
water use the Hydrofoiler XE-1 to aid flotation during the unblocking
process.
c. Inspect the front and rear foil for debris. Generally this is easily
removed by hand safely.
d. Inspect the propeller for debris. Typically weeds or even fishing lines
can become wrapped around the propeller. If this is the case, take care
to unravel the debris, avoiding any sharp edges associated with the
propeller blades.
e. Once all debris is removed, switch the battery back on and re-mount
your Hydrofoiler XE-1 to continue your ride, re-launching from a safe
position free from the debris.
5.1 LAUNCHING
The Hydrofoiler XE-1 offers 3 various different launching techniques which
riders can choose from dependant on riding location, skill level and water
conditions.
5.1.1 PLATFORM (DOCK OR JETTY) LAUNCH
This is the first and forms the basis of your foiling knowledge. Starting here
means that you can take in the ride experience, focus on where you are riding
and become familiar with the feeling of flying on the water’s surface for the
first time ever.
STEPS:
a. Once the Hydrofoiler XE-1 is in the water, ensure handlebars and bike
are facing straight forward
b. Lift your bike out of the water when ready to launch
c. Set your non-dominant foots’ crank to 2 o’clock
d. Give a big push off from the jetty- the larger the push, the larger your
grace period to get up and foiling.
Learning tip: Ideal platform height is around 0-30 cm with relatively high water
conditions. If you do not have these conditions, use the assisted beach launch
technique for your first rides instead.
Watch the breakdown of this technique at training.manta5.com.
5.1.2 BEACH LAUNCHING (ASSISTED)
Beach launching does take more practice. You will need to familiarise yourself
with not only your body, but also hydrofoil bike positioning. We recommend
learning with a friend in order to best master this technique. Assisted launching
is an intermediary step before you can solo launch.
STEPS:
a. Ensure that the water is not too deep- the waterline should be midway
up the bouyancy when the Hydrofoiler is resting on the bottom of the
lake/ocean floor.
b. Make sure you body weight is centred over the body of the hydrofoiler.

15
c. Lean back, shifting your weight backwars and lifting the front of the
Hydrofoiler off the lake/ ocean floor.
d. Make sure your friend gives a good push from behind as you pedal.
Watch the breakdown of this technique at training.manta5.com.
5.1.3 BEACH LAUNCHING (SOLO)
Solo launching is simply using your strength, body weight and bike positioning
to adjust the Hydrofoiler’s angle in order to get up and foiling.
STEPS:
a. Ensure that the water is not too deep- the waterline should be midway
up the bouyancy when the Hydrofoiler is resting on the bottom of the
lake/ocean floor.
b. Make sure you body weight is centred over the body of the hydrofoiler.
c. Lean back, shifting your weight backwars and lifting the front of the
Hydrofoiler off the lake/ ocean floor.
d. Make sure you shift your weight forward as you pedal, releasing the
rear foil so that you get up and foiling.
Watch the breakdown of this technique here at training.manta5.com.
5.1.4 SUBMERGED LAUNCHING
This is the XE-1’s most advanced technique and where the learning curve comes
in. Submerged launching typically takes a fair amount of practice (30mins-1hr
consistently), but your ride experience dramatically changes when able to re-
launch from deep water.
IMPORTANT - To perform a submerged launch you need a minimum depth of
2.5 m (8 ft) in order to safely clear underwater obstacles.
STEPS:
a. Push the bike down under the water, keeping it horizontal.
b. Using your non-dominant foot to keep this horizontal, pull on the
handlebar and bring these towards your chest.
c. Step your dominant foot over the bike, mount it as if you were
regularly foiling.
d. Once the Hdyrofoiler is beneath you begin to pedal forward with the
nose lifting up and our first.
e. Lean over the handlebars as you pedal to ensure you slowly rise out of
the water and begin to foil.
Watch the breakdown of this technique at training.manta5.com.

16 | AS00004- REV1 MANTA5 XE-1 OWNERS MANUAL
PART 6. MANTA5 SUPPORT
Find FAQ’s work instruction articles, ride technique breakdowns and more using
the resources below:
6.1 MASTER THE RIDE COURSE
Designed to get you up and foiling as fast as possible, get familiar with the
launching and riding techniques on the Hydrofoiler XE-1 by working through
our Course at training.manta5.com.
Broken down into simple, easy to digest parts, riders can quickly identify top
tips and tricks, mastering the art of foiling.
6.2 HELP DESK
Put together by our customer service team and engineers, the Manta5 Help
Desk will allow you to quickly and easily solve burning questions as well as help
with troubleshooting. From work instructions on get initial assembly complete
through to how to swap over parts - it’s all covered.
Access our Knowledge Base at helpdesk.manta5.com/knowledge.
6.3 CUSTOMER SERVICE SUPPORT
For general FAQ’s, these are covered on our website here. If you can’t find an
answer for the question you have, please get in touch and our customer service
team will be able to help.
Need to get in touch with us? Log a ticket with our customer support team by
clicking here.
6.4 MAINTENANCE
The Manta5 Customer Service team will send you Maintenance email updates.
Maintenance updates will be sent directly to you via email. You can also access
our Help Desk at helpdesk.manta5.com/knowledge to troubleshoot or find
further answers on required maintenance for the Hydrofoiler XE-1.

17
PART 7. MANTA5 HYDROFOILER XE-1
WARRANTY
7.1 MANTA5 LIMITED WARRANTY
1. This Manta5 Limited Warranty (“warranty”) applies to the Manta5
Hydrofoiler TM XE-1 (the “Hydrofoiler”) and is subject to either the
New Zealand Pre-Sale Contract or International Pre- Sale Contract
(whichever is relevant). The purchaser of the Hydrofoiler is referred
to as the “Customer” in this warranty. The warranty is personal to the
Customer and is not transferable.
2. Manta5 warrants for the relevant coverage periods that the
Hydrofoiler will be free from defects in material and workmanship
under normal use in accordance with Manta5’s Product Materials.
Manta5’s “Product Materials” include, without limitation, user
manuals, safety guidelines, specifications, training videos, social
media posts, and service communications from Manta5 or its
authorised representatives.
3. The warranty coverage period begins from the date of delivery of the
Hydrofoiler and extends for the periods detailed below:
• ONE YEAR For components comprising the Body of the Bike, as
are further described in the Hydrofoiler’s user manual(s).
• TWO YEARS For all components comprising the Hydrofoils, as
may further be described in the Hydrofoiler’s user manual(s).
• ONE YEAR OR 300 CYCLES Whichever occurs first. Battery
cycles for the Hydrofoiler’s battery and motor assemblies, as
are further described in the Hydrofoiler’s user manual(s).
Noting throughout that some jurisdictions may prohibit a disclaimer of
warranties, and the consumer may have other rights that vary from jurisdiction
to jurisdiction.
4. Claims under this warranty should be directed to Manta5 by email.
Manta5’s designated email address for warranty claims will be
published in its Product Materials and on its website. Proof of
purchase is required to be eligible for this warranty.
5. In the event of a warranty claim:
a. Manta5 will first attempt to diagnose and resolve the
Customer’s claim by telephone, email or online chat. Manta5
may direct the Customer to download and install particular
software updates or Product Materials.
b. If the claim cannot be resolved through the methods above,
the Customer may be required to deliver the Hydrofoiler to
Manta5 or a Manta5 Authorised Service Provider for further
examination.
6. Any Hydrofoiler required to be returned to Manta5 must be returned
to the designated Manta5 certified service agent located in the
Customer’s territory. The Manta5 website contains a list of all available
service agents and will be updated as further service agents are added
across Manta5’s territories.
7. If the claim cannot be resolved through Manta5’s diagnostic processes,
Manta5 may (at its sole option);
a. Repair the affected Hydrofoiler at no charge using new parts
or parts that are equivalent to new in performance and
reliability; or
b. Replace the affected Hydrofoiler with a functionally equivalent
Hydrofoiler that is new; or
c. Refund the Customer for the original purchase price of the
affected Hydrofoiler.
8. Manta5 at its discretion will bear the costs associated with shipping
under a warranty claim. In some instances the Customer will arrange
for and pay all transportation and insurance costs associated with the
warranty claim.
9. The warranty will be voided and will be of no effect:
a. By improper use of the Hydrofoiler, including not using the
Hydrofoiler in accordance with the Product Materials.
b. By damage due to crash, physical impact, collisions or fire
resulting from non-manufacturing processes, or use in unsafe
locations or unsafe conditions.
c. By damage or defects caused by transport, loading, unloading,
dropping, out of water handling, or inappropriate storage
including, without limitation, damage or defects caused by
exposure to temperatures stated in the Product materials.
d. By failure to properly maintain and care for the Hydrofoiler
and its components in accordance with the Product Materials,
including the use of cleaning products not approved by the
Product Materials.
e. If any of the Hydrofoiler parts (including, without limitation,
the motor, battery or Heads Up Display) are tampered
with without consulting Manta5, or if a Customer receives
consultation but tampers with the Hydrofoiler in such a way
that is not consistent with the advice received.
f. If the Customer replaces any part on the Hydrofoiler with an
unauthorised or unauthenticated third-party product or other
part not produced by Manta5.
g. By damage caused by operating the Hydrofoiler with a low
charge battery.
h. By damage caused by lightning, hail, rain, flooding, wind, sand,
floods or other environmental or natural conditions or Acts of
God.
i. By damage or defects caused by usage of the Hydrofoiler
after a warranty issue is made or reported, or after such time
that a Customer reasonably should have made such a claim
exercising reasonable diligence.The warranty will not cover
any loss or damage caused by negligence of the Customer
or other user of the Hydrofoiler. It also does not cover any
software programs, whether provided with the Hydrofoiler or
installed subsequently, or any loss of the Customer’s data.
10. This warranty is governed by the laws of New Zealand. In the event of
any translation, the English version of the warranty will prevail. In the
event of any dispute, the parties irrevocably submit to the exclusive
jurisdiction of the courts of New Zealand.
CAB-442297-2-153-V2:JGA-e


WWW.MANTA5.COM
Other manuals for HYDROFOILER XE-1
8
Table of contents


