MantaroBot TeleMe User manual
MantaroBot™
20410 Century Boulevard Suite 120 Germantown Maryland 20874
www.MantaroBot.com info@mantarobot.com
Phone 301 528 2244 Fax 301 528 1933
MANTAROBOT™ TELEME
User Guide
And
Operating Manual

MANTAROBOT TELEME
User Guide & Operating Manual
MantaroBot™
20410 Century Boulevard Suite 120 Germantown Maryland 20874
www.MantaroBot.com info@mantarobot.com
Phone 301 528 2244 Fax 301 528 1933
2 Version 3.1
Table of Contents
1 Checking the contents of your shipment..............................................................................................8
2 Knowing your MantaroBot TeleMe and its limits.................................................................................9
2.1 Overview .....................................................................................................................................10
2.2 Moving or Shipping the MantaroBot ..........................................................................................11
2.3 WARNINGS..................................................................................................................................12
3 Getting Started....................................................................................................................................13
3.1 Attaching the Mast and Device Holder.......................................................................................13
3.2 Attaching the Device Holder .......................................................................................................13
3.3 Powering On................................................................................................................................14
3.4 Powering Off ............................................................................................................................... 14
3.5 Charging ......................................................................................................................................15
3.5.1 Charging TeleMe .................................................................................................................15
3.5.2 Charging User Device ..........................................................................................................15
4 First-Time Setup and Configuration Mode .........................................................................................16
4.1 Configure User Device:................................................................................................................17
4.1.1 Single Wifi Radio Solution...................................................................................................17
4.1.2 Multi-Wifi Radio Solution....................................................................................................18
5 MantaroBot Software .........................................................................................................................20
5.1 Robot Application Overview .......................................................................................................20
5.2 Controller Application Overview.................................................................................................20
6 Robot Application ...............................................................................................................................21
6.1 TeleMe Main Page ......................................................................................................................21
6.2 Network Selection Page (sub-menu) ..........................................................................................23
6.3 Wifi Profile Editor (sub-menu)....................................................................................................25
6.4 User Administration (sub-menu) ................................................................................................26
6.5 Advanced Settings (sub-menu)...................................................................................................27

MANTAROBOT TELEME
User Guide & Operating Manual
MantaroBot™
20410 Century Boulevard Suite 120 Germantown Maryland 20874
www.MantaroBot.com info@mantarobot.com
Phone 301 528 2244 Fax 301 528 1933
3 Version 3.1
6.6 About (sub-menu).......................................................................................................................29
6.7 Upgrading the Software..............................................................................................................30
7 Controller Application......................................................................................................................... 31
7.1 Remote PC / Mac Requirements / Web-browser.......................................................................31
7.2 Installation & Upgrades ..............................................................................................................32
7.3 MantaroBot Contact List Configuration......................................................................................32
7.3.1 Creating MantaroBot Contact List ......................................................................................34
7.3.1.1 Configure MantaroBot TeleMe Using WebRTC ..............................................................35
7.3.1.2 Configure MantaroBot TeleMe for MantaroBot Communications Service ....................38
7.3.1.3 Configure MantaroBot TeleMe for Direct Socket Connection........................................40
7.3.2 Editing MantaroBot Contact List.........................................................................................41
7.4 Connecting to a MantaroBot (using Skype as Audio/Video Conferencing Application).............41
7.4.1 The First Time or after Software Updates...........................................................................41
7.4.2 Normal Operation ...............................................................................................................42
7.5 Connecting to a MantaroBot (using Other as the Audio/Video Conferencing Application) ......43
7.6 Controlling a MantaroBot ...........................................................................................................44
7.6.1 Drive Motor Control Pad.....................................................................................................44
7.6.1.1 Driving MantaroBot ........................................................................................................44
7.6.1.2 Proximity IR Sensors........................................................................................................45
7.6.2 Camera Control...................................................................................................................46
7.6.2.1 Pan/Tilt............................................................................................................................46
7.6.2.2 Memory Positions ...........................................................................................................47
7.6.3 Laser Pointer .......................................................................................................................48
7.6.4 Charging User Device ..........................................................................................................48
7.7 Options –Settings.......................................................................................................................49
7.7.1 User Administration............................................................................................................49
7.7.2 Robot Settings.....................................................................................................................51

MANTAROBOT TELEME
User Guide & Operating Manual
MantaroBot™
20410 Century Boulevard Suite 120 Germantown Maryland 20874
www.MantaroBot.com info@mantarobot.com
Phone 301 528 2244 Fax 301 528 1933
4 Version 3.1
7.7.3 Controller Settings ..............................................................................................................52
7.7.4 Change Password................................................................................................................53
7.8 Options –Help / About / Accessories .........................................................................................54
7.8.1 Help.....................................................................................................................................54
7.8.2 About...................................................................................................................................54
7.8.3 Accessories..........................................................................................................................55
7.9 Miscellaneous .............................................................................................................................56
7.9.1 Connection Delay................................................................................................................56
7.9.2 Battery Indicator .................................................................................................................56
7.9.3 Wifi Meter...........................................................................................................................57
8 Using 3rd Party Accessories .................................................................................................................58
8.1 Bluetooth® Headset ....................................................................................................................58
8.2 Joystick........................................................................................................................................58
9 Maintenance .......................................................................................................................................59
9.1 Battery Maintenance ..................................................................................................................59
9.2 Replacing the Battery..................................................................................................................59
10 Warranty.........................................................................................................................................60
11 Appendix A......................................................................................................................................61
11.1 Keyboard Mapping......................................................................................................................61
11.2 Joystick Mapping.........................................................................................................................61

MANTAROBOT TELEME
User Guide & Operating Manual
MantaroBot™
20410 Century Boulevard Suite 120 Germantown Maryland 20874
www.MantaroBot.com info@mantarobot.com
Phone 301 528 2244 Fax 301 528 1933
5 Version 3.1
Version
Date
Change Summary
1.0
05/01/2012
-Initial Customer Release.
1.1
10/22/2012
-Added information regarding upcoming support to use video-conferencing
applications other than Skype;
-Fix definition of power switches, added warning to remind user to ensure user
device is properly plugged into device holder.
2.0
11/08/2012
-Now supports other audio/video conferencing applications in addition to
Skype.
2.1
02/13/2013
-Added main page for status indication on the Robot application web interface.
2.2
03/06/2013
-Mac controller now available for TeleMe. Added Mac specific instructions
and guidelines.
2.3
09/04/2013
-Added feature to remotely turn on charging of user device (head) using
internal TeleMe battery while in a call.
-Added more information regarding charging of the TeleMe.
2.4
03/06/2014
-Added basic information on new web-based browser controller, MantaroBot
TeleGo controller (www.mantarobot.com/telego).
-Updated Advanced Setting on the Robot application web interface to include
new links: ‘Advanced Network Configuration’ (allows for Static IP
configuration and ‘Manual Software Update’ (allows for update on closed
networks).
-Replaced Robot Application –Upgrading the Software section with a
reference to a separate more comprehensive document.
-Added information on configuring Wifi on user device based on TeleMes with
Single Wifi or Multi-Wifi Radio solution.
-Added Accessories list on web interface About page.
-Added ability to contact TeleMe (when using direct socket connection) via its
serial name instead of IP address.
2.41
03/28/2014
-Updated broken cross-references
2.42
05/14/2014
-Added more features via the ‘Advanced Network Configuration’ link
(capability to configure network time server and ability to disable Multi-WiFi
radio option)
3.00
01/02/2015
-Skype control path removed (Microsoft ended support)
-Added WebRTC control path
-Added ability to disable 2.4 GHz WiFi band for TeleMes with 2.4 GHz and 5
GHz WiFi cable radio
3.1
04/24/2015
-Added factory reset option
-Config mode now accessible by double-pressing push-button on the head.
-TeleGo now supports administrative functions previously available only using
MANTAROBOT TELEME
User Guide & Operating Manual
MantaroBot™
20410 Century Boulevard Suite 120 Germantown Maryland 20874
www.MantaroBot.com info@mantarobot.com
Phone 301 528 2244 Fax 301 528 1933
6 Version 3.1
desktop controller.
Note: New or significantly modified features from version 3.00 are marked as

MANTAROBOT TELEME
User Guide & Operating Manual
MantaroBot™
20410 Century Boulevard Suite 120 Germantown Maryland 20874
www.MantaroBot.com info@mantarobot.com
Phone 301 528 2244 Fax 301 528 1933
7 Version 3.1
Trademark Information
Skype is a trade mark of Skype or its related companies. This product / application has not been checked, verified,
certified or otherwise approved or endorsed by Skype, Skype Communications S.a.r.l. or any of their related
companies.
Skype, associated trademarks and logos and the “S” logo are trademarks of Skype.
Android is a trademark of Google Inc.
Apple, Mac, iPad, iPhone, FaceTime are trademarks of Apple Inc., registered in the U.S. and other countries.
Microsoft, Windows and DirectX are registered trademarks of Microsoft Corporation in the United States and/or
other countries.
Samsung and Galaxy Tab are trademarks of Samsung Electronics Co., Ltd. and/or its related entities.
DISCLAIMER
MantaroBot will not be held responsible for misuse or improper assembly of the telepresence robot that
results in damage or harm to the robot itself, the user device (tablet or smartphone), other people or
the surroundings in which the robot is used.

MANTAROBOT TELEME
User Guide & Operating Manual
MantaroBot™
20410 Century Boulevard Suite 120 Germantown Maryland 20874
www.MantaroBot.com info@mantarobot.com
Phone 301 528 2244 Fax 301 528 1933
8 Version 3.1
Thank you for purchasing a MantaroBot TeleMe. Please read the contents of this User Guide completely
before using your MantaroBot.
1Checking the contents of your shipment
The following items should be in your shipment(s):
1. MantaroBot TeleMe base and user device holder
2. Mast extension 30” long
3. AC/DC Power Adapter (Battery Charger)
4. A CD containing:
a. The MantaroBot TeleMe User Guide (this document)
b. The MantaroBot TeleGo User Guide
c. The TeleMe Assembly Instructions & Quick Start Guide
d. The MantaroBot Controller Application
e. The MantaroBot Docking Station User Guide
f. The MantaroBot TeleMe Robot Application Update Instructions guide
g. TeleMe Packing Instructions
5. Information sheet
6. Other accessories that you may have purchased may also be included in the same shipment.
MANTAROBOT TELEME
User Guide & Operating Manual
MantaroBot™
20410 Century Boulevard Suite 120 Germantown Maryland 20874
www.MantaroBot.com info@mantarobot.com
Phone 301 528 2244 Fax 301 528 1933
9 Version 3.1
2Knowing your MantaroBot TeleMe and its limits
MANTAROBOT TELEME
User Guide & Operating Manual
MantaroBot™
20410 Century Boulevard Suite 120 Germantown Maryland 20874
www.MantaroBot.com info@mantarobot.com
Phone 301 528 2244 Fax 301 528 1933
10 Version 3.1
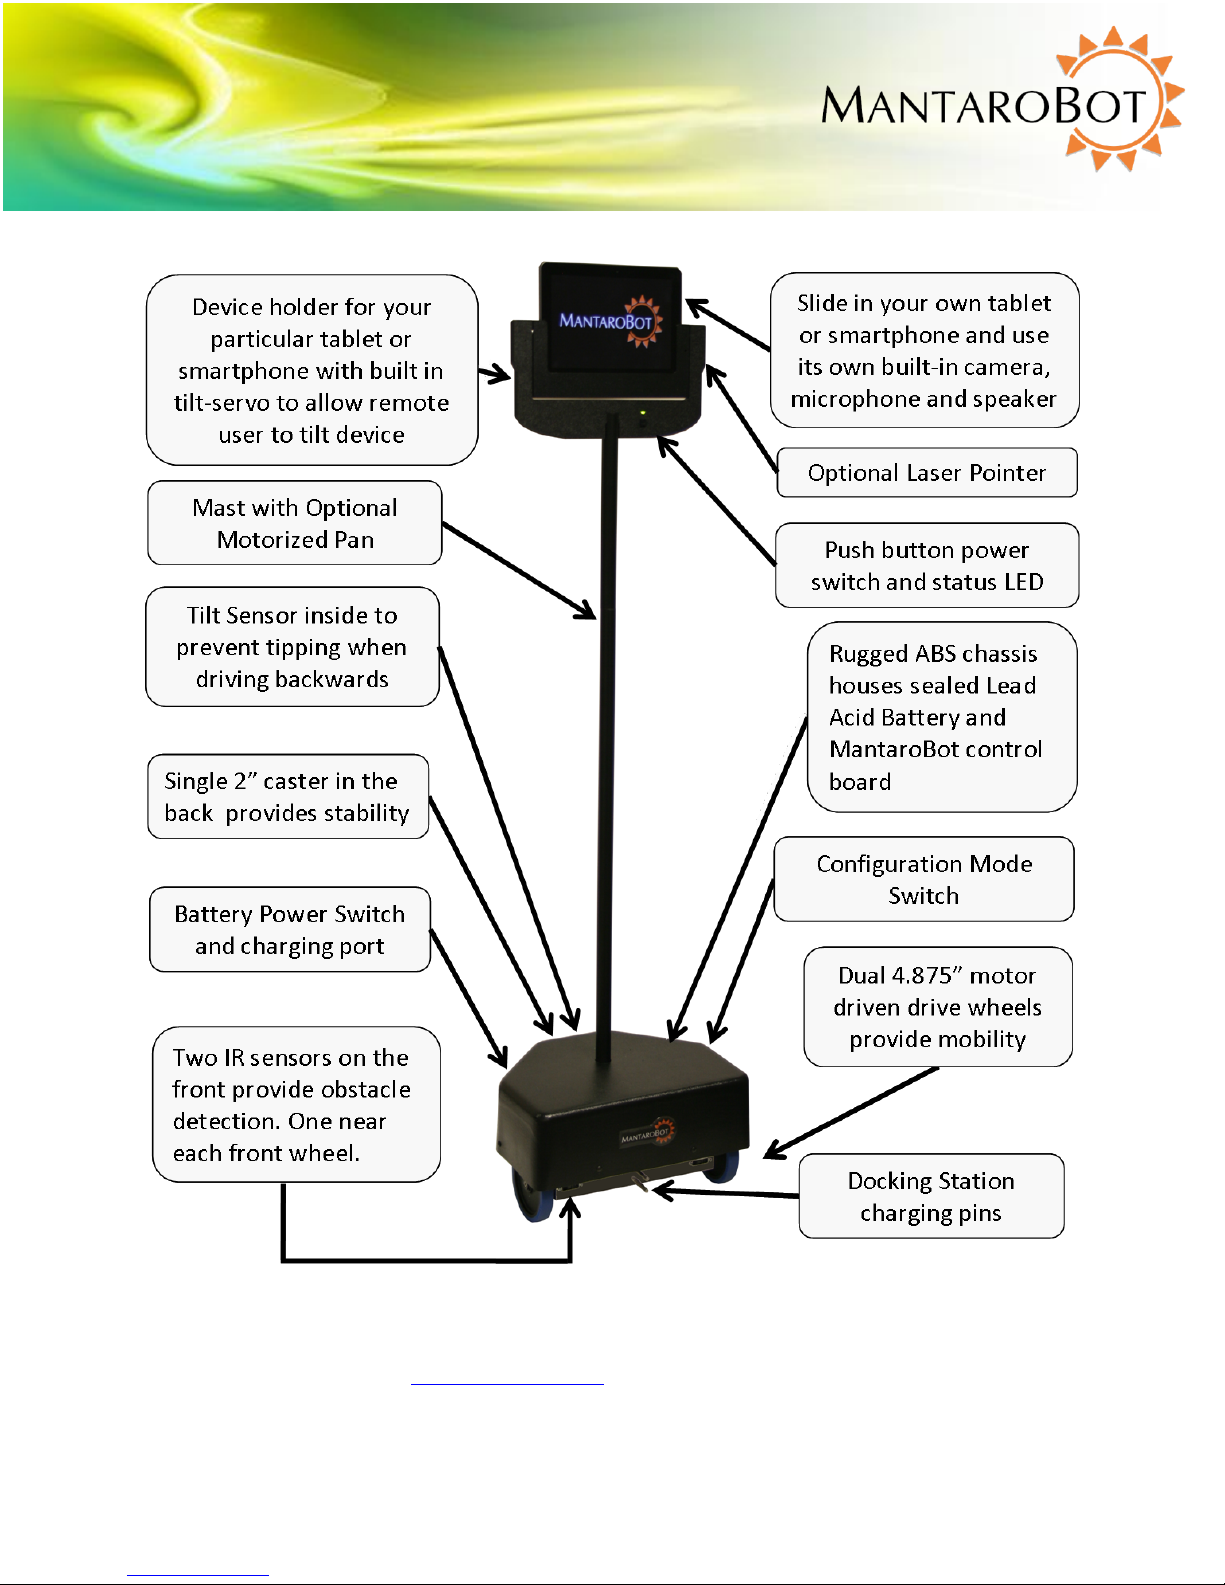
2.1 Overview
The diagram above shows the hardware features of the MantaroBot. Each of these features is discussed
below.
Device Holder –A holder specifically designed to accept the user’s tablet or smartphone (user device)
and function as the “head” of the MantaroBot with its integrated camera, microphone, and speaker.
The holder is comprised of a stationary holder and a bezel that holds the user device.
Video and Audio –The MantaroBot TeleMe utilizes the integrated camera, microphone and speakers of
the user device to provide the teleconferencing capability. The resolution of the video image and audio
quality will depend on the quality of your tablet or smartphone and the communications link quality. To
accommodate slower link speeds or network congestion, the video quality may be automatically
reduced in resolution by the teleconferencing application that you are using.
Tilt Mechanism –The user device holder has a built-in tilt servo mechanism which allows the end user
to tilt up/down the entire tablet/smartphone to provide a wide viewing range.
Battery Power Switch –The Battery Power Switch (rocker style) is located next to the charger input and
is used to connect and disconnect the battery power in the MantaroBot. This switch should be placed in
the OFF position when the MantaroBot is shipped or stored. When in normal use the switch should be
in the ON position.
Power ON/OFF Button and LED Status Indicator –The push button and green LED located on the front
of the holder directly below the user’s device is used to turn the MantaroBot TeleMe on or off (provided
either the Battery Power Switch is ON or the TeleMe is plugged into the external charger). When the
button is pressed it will toggle the power state ON/OFF. When first powered ON, the LED light will turn
on and blink while the TeleMe is booting up and connecting to WiFi. When the boot up process is done,
ascending tones will be heard. When a WiFi connection is established the LED will be on solid. New
feature: Quickly double-pressing the push button switch also allows the TeleMe to enter Configuration
Mode (requires the latest Robot Application Software).
Configuration Mode Switch –This push button switch is located on the bottom left side of the
MantaroBot near the left wheel. It is used to place the TeleMe into configuration mode and will be
discussed in more detail in this user guide. When the TeleMe is in configuration mode the LED will blink
(repeating pattern: two blinks and a pause).

MANTAROBOT TELEME
User Guide & Operating Manual
MantaroBot™
20410 Century Boulevard Suite 120 Germantown Maryland 20874
www.MantaroBot.com info@mantarobot.com
Phone 301 528 2244 Fax 301 528 1933
11 Version 3.1
Mast with Motorized Pan Mechanism –Factory available option. The optional pan capability allows the
remote user to rotate the user device in the device holder to look left and right without having to turn
the entire robot. This makes looking left and right faster and easier and is also useful in aiming the
optional Laser Pointer.
Laser Pointer -- Factory available option. The laser pointer is mounted in the holder and can be pointed
and controlled by the remote user using the camera tilt and optional pan functions.
19.5V Charging Input –The Charging Input is located underneath the rear of the MantaroBot. The
MantaroBot should be plugged into the charger whenever it is not in use. The TeleMe can be used in a
call while plugged in, but care must be taken to disconnect the charger before it is driven away.
Docking Station Charging Pins –Two pins are located at the front of the motor bracket that allow the
MantaroBot to be charged in the optional Docking Station. No voltage is present on these pins unless it
is connected to the Docking Station.
Tilt Sensor –Inside the MantaroBot there is a tilt sensor that will stop the MantaroBot from moving if
the user is driving backwards (and into an obstacle) that causes it to tip forward. A message on the
Controller application status bar will also be displayed.
IR Sensors –There are two forward looking obstacle sensors on the MantaroBot that alert the user of
obstacles in front of the MantaroBot. One of the sensors is located near the left wheel and one is
located near the right wheel. If an obstacle is detected a red area will appear in the TeleMe Control
Application and the forward speed of the TeleMe will be reduced.
2.2 Moving or Shipping the MantaroBot
To relocate the MantaroBot manually, lift the MantaroBot by its mast or roll it on its rear caster wheel.
It is not recommended that the MantaroBot be moved manually while resting its drive wheels on the
ground. To transport or ship the MantaroBot, power off the TeleMe as described in Section 3.4.
Disassemble and pack the TeleMe into its original shipping box as described in the “TeleMe Packing
Instructions” document included in the CD that was shipped with your TeleMe.
NOTE: The optional extended battery (LiFePO4) is restricted from being shipped on passenger airplanes.

MANTAROBOT TELEME
User Guide & Operating Manual
MantaroBot™
20410 Century Boulevard Suite 120 Germantown Maryland 20874
www.MantaroBot.com info@mantarobot.com
Phone 301 528 2244 Fax 301 528 1933
12 Version 3.1
2.3 WARNINGS
USER DEVICE INSTALLATION –PLEASE ensure that the user device (i.e. tablet or smartphone) is plugged
all the way into the device holder and is fully mated with the docking connector inside the bottom of the
device holder. If a landscape holder was purchased for a user device (e.g. iPad) that has the charging
connector on the short side (normally designed for charging in portrait orientation), please insure the
lock on the back of the holder is turned to the lock position. Improper installation could result in your
device falling out of the holder and breaking!!!
TIPPING HAZARD –The remote operator is responsible for keeping the MantaroBot under control. The
MantaroBot has been designed to reduce the potential of tipping during normal operation. Rapid
accelerating and stopping or sharp turns while moving at full speed may cause the MantaroBot to tip
over and cause injury.
INCLINES –The MantaroBot is intended for indoor applications on level ground. Inclines of more than
10 degrees may cause the MantaroBot to tip over.
DRIVING IN REVERSE –It is not recommended that the MantaroBot be driven in reverse for more than a
short distance. The camera cannot be faced to see in the rearward direction. It is recommended that
the MantaroBot be turned around and driven forward in the direction desired whenever possible. The
MantaroBot is more susceptible to tipping when driven in reverse.
STEPS AND STAIRS –Great care should be taken to avoid driving the MantaroBot down stairs or steps.
The camera should be aimed in the direction that the robot is moving and aimed down such that
obstacles can be readily seen.
CAMERA VIEW –It is the remote user’s responsibility to have an awareness of where the MantaroBot is
being driven. It is recommended that the camera on the user’s device be tilted down such that
obstacles can be readily seen when driving the MantaroBot.
NETWORK DELAY –The video coming from the camera and the robot control commands may travel
through the network with varying amounts of delay. Due to the varying delays, the video you are
viewing may not represent the current location of the TeleMe. Network delays can cause commands
that are sent to the MantaroBot to be buffered and delivered at a later time. When network delays
exceed one second great care is required by the operator to ensure that the TeleMe remains in control.
SECURITY –The MantaroBot has user level password control to help prevent unauthorized access.
However Skype and other video conferencing applications can be configured to various levels of
permission for accepting calls as well. It is recommended that you review the Call Settings for the video
conferencing application in use on your tablet or smartphone.

MANTAROBOT TELEME
User Guide & Operating Manual
MantaroBot™
20410 Century Boulevard Suite 120 Germantown Maryland 20874
www.MantaroBot.com info@mantarobot.com
Phone 301 528 2244 Fax 301 528 1933
13 Version 3.1
3Getting Started
3.1 Attaching the Mast and Device Holder
The MantaroBot TeleMe is shipped from the factory with a short connector tube where the mast is
attached and an 8 pin electrical connector that provides control and power to the holder and user
device. To attach the mast and device holder please refer to the TeleMe Assembly Instructions that
were provided with the shipment.
3.2 Attaching the Device Holder
Device holders are available for several models of tablets and smart phones. To ensure that the device
fits properly in the device holder, make sure that the device holder is the correct model for your device.
Do not attempt to forcefully push, slide, or wedge any device into a device holder, as this will likely
result in damage to either the device holder or tablet or smart phone.
Check the MantaroBot website (www.mantarobot.com) for the list of currently available device holders
and the device models that they are designed to fit. If the device you would like to use is not listed
please email us at info@mantarobot.com.
To install the user device into the device holder, orient the device with the charging connector port
facing towards its mating connector and the screen and camera facing the front of the MantaroBot. This
will ensure that the device is oriented properly, and will properly connect to the charging connector. If a
landscape holder was purchased for a device (e.g. iPad) that has the charging connector on the short
side (normally designed for charging in portrait orientation), then slide the device all the way down in
the holder with the charging connector facing the right side. Once the device is all the way down, slide it
to the right until it is fully seated into the charging connector. Then rotate the lock on the back of the
holder into the lock position. (NOTE: The locked position will not prevent the user from removing the
user device if they pull up on it. It is only intended to prevent the user device from sliding to the left and
falling out during operation)
PLEASE ensure that the user device (i.e. tablet or smartphone) is plugged all the way into the device
holder and is fully mated with the docking connector inside the bottom or side of the device holder (and
lock is in lock position if your device holder has one). Improper installation could result in your device
falling out of the holder and breaking!!!

MANTAROBOT TELEME
User Guide & Operating Manual
MantaroBot™
20410 Century Boulevard Suite 120 Germantown Maryland 20874
www.MantaroBot.com info@mantarobot.com
Phone 301 528 2244 Fax 301 528 1933
14 Version 3.1
3.3 Powering On
The battery power switch (rocker style) is located directly behind the motorized wheel on the right side
of the TeleMe. Toggle the switch to the ON position. This will connect the TeleMe’s internal battery and
allow it to supply power to the robot. This switch should be placed in the OFF position when the
MantaroBot is shipped or stored. When in normal use the switch should remain in the ON position.
To power on your TeleMe press the push button on the front of the device holder. A single beep will be
heard and the LED will turn on and blink. The TeleMe will take approximately 30 seconds to boot up.
Once the boot up process is complete, the TeleMe will make a series of ascending tones. Now wait until
the LED is lit solid indicating that a successful Wifi connection was established. If the LED status
indicator is blinking fast (faster than during the boot up process) many times followed by a pause, the
TeleMe needs to be configured for use with a wireless network. To configure the robot for a wireless
network see Section 4.
3.4 Powering Off
To turn the TeleMe OFF, press the button on the device holder. A series of tones will be heard
indicating the button was pressed and the LED will blink while the robot is powering down. Once the
robot is OFF the LED will be off as well. The battery power switch can also be turned off but it is not
necessary unless the robot is being shipped or stored. NOTE: For normal operation, the TeleMe should
remain in the ON position (LED on) during charging. See Section 3.5 for more information.

MANTAROBOT TELEME
User Guide & Operating Manual
MantaroBot™
20410 Century Boulevard Suite 120 Germantown Maryland 20874
www.MantaroBot.com info@mantarobot.com
Phone 301 528 2244 Fax 301 528 1933
15 Version 3.1
3.5 Charging
3.5.1 Charging TeleMe
The TeleMe contains an internal rechargeable battery. To charge the battery use one of the following
methods:
1. Manually plug the supplied charger into the 19.5V charging input located underneath the rear of
the TeleMe.
2. Drive the TeleMe into the optional charging docking station such that the two pins located at
the bottom front of the TeleMe plug into the dock.
IMPORTANT NOTE: For the battery charging level to be recorded properly, the TeleMe should be in the
Powered ON state with the LED on the device holder being green. If the TeleMe is charged while being
Powered OFF no damage will occur, however, the charging level indicator on the controller application
will be incorrect. To correct, allow the battery to fully discharge through normal use, and then allow it
to fully charge while ensuring the TeleMe is in the Powered ON state as described above.
IMPORTANT NOTE: Please review Section 9.1 on Battery Maintenance.
3.5.2 Charging User Device
The user device, while plugged into the device holder of the TeleMe, can be charged using one of the
following methods:
1. Whenever the TeleMe is connected to the supplied charger or connected to the charging
docking station, the user device will also be charged.
2. When the TeleMe is not being charged the user device will not be charged as well. However,
while in a call, the remote user has the option of allowing the TeleMe’s internal battery to
charge the user device. See Section 7.6.4 for more information.
NOTE: The user device may or may not charge as quickly in the TeleMe as it may with the charger that
came with your user device.

MANTAROBOT TELEME
User Guide & Operating Manual
MantaroBot™
20410 Century Boulevard Suite 120 Germantown Maryland 20874
www.MantaroBot.com info@mantarobot.com
Phone 301 528 2244 Fax 301 528 1933
16 Version 3.1
4First-Time Setup and Configuration Mode
The MantaroBot comes equipped with a Wifi adapter that must be configured to a network prior to use.
The following steps describe configuring of the TeleMe base for use in a Wifi network when it has not
already been previously configured OR the network that it is configured for is no longer accessible.
Note: Your network must have a connection that will allow use of Skype or your chosen audio/video
conferencing application. Secure closed networks are also supported.
ENTERING CONFIGURATION MODE:
1. Power ON the MantaroBot TeleMe as described in Section 3.3. Wait some time for the LED on
the device holder to either be lit solid on (configured for a Wifi network) or blink fast many
times followed by a pause (not configured for a Wifi network).
2. Locate the Configuration Mode switch (push-button switch) near the left motorized wheel and
press it one time. After a few moments, there should be an audible series of beep-tones
indicating the button was pressed. The LED will be solid on until either the TeleMe enters
Configuration Mode successfully or fails. If the TeleMe enters Configuration Mode successfully
the LED will blink (repeating pattern: two blinks and a pause). If it does not, the LED will blink
fast many times followed by a pause (same sequence as when TeleMe is powered and has no
Wifi connection). If the TeleMe does not go into Configuration Mode, power off the TeleMe and
go back to Step 1.
3. Using a Wifi capable tablet, smartphone, or a computer, browse for available wireless
connections in your area. Make sure the computer or device’s Wifi is enabled, and then look for
the connection named “MantaroBot-TeleMe_<#>”. The <#> at the end of the name will be the
digits at the end of the TeleMe device’s serial number. Select this connection. It is
open/unsecure and requires no password credentials to connect. This is a wireless access point
(network) hosted by the TeleMe itself and will be used only temporarily for configuration.
4. Once the Wifi connection is established, open a web browser on the device used in Step 3
above, type http://192.168.0.1 in the address bar, and hit Enter. The browser will show the
MantaroBot TeleMe main page webpage. Note: On this wireless network that is hosted by the
TeleMe in Configuration Mode, the above IP address will always be the same.
CONFIGURING WIFI ADAPTER:
5. See Section 6.2 for these steps.
CHECK ADVANCED SETTINGS:
6. All of the advanced settings of the TeleMe are configured in the factory. To verify or modify
these settings see Section 6.5.
MANTAROBOT TELEME
User Guide & Operating Manual
MantaroBot™
20410 Century Boulevard Suite 120 Germantown Maryland 20874
www.MantaroBot.com info@mantarobot.com
Phone 301 528 2244 Fax 301 528 1933
17 Version 3.1
4.1 Configure User Device:
By following the steps in the previous page, the TeleMe base should now be configured for use. Now, it
is time to configure the user device that will be plugged in to the TeleMe as its head. Follow one of the
two configuration sections below based on if your TeleMe has the Single WiFi Radio or Multi-Wifi Radio.
4.1.1 Single Wifi Radio Solution
The user device (e.g. tablet) used with TeleMes with one single Wifi radio are to be configured as
follows:
1. Configure the Wifi of the user device to use the customer Wifi network (same configuration as
Wifi in the TeleMe base).

MANTAROBOT TELEME
User Guide & Operating Manual
MantaroBot™
20410 Century Boulevard Suite 120 Germantown Maryland 20874
www.MantaroBot.com info@mantarobot.com
Phone 301 528 2244 Fax 301 528 1933
18 Version 3.1
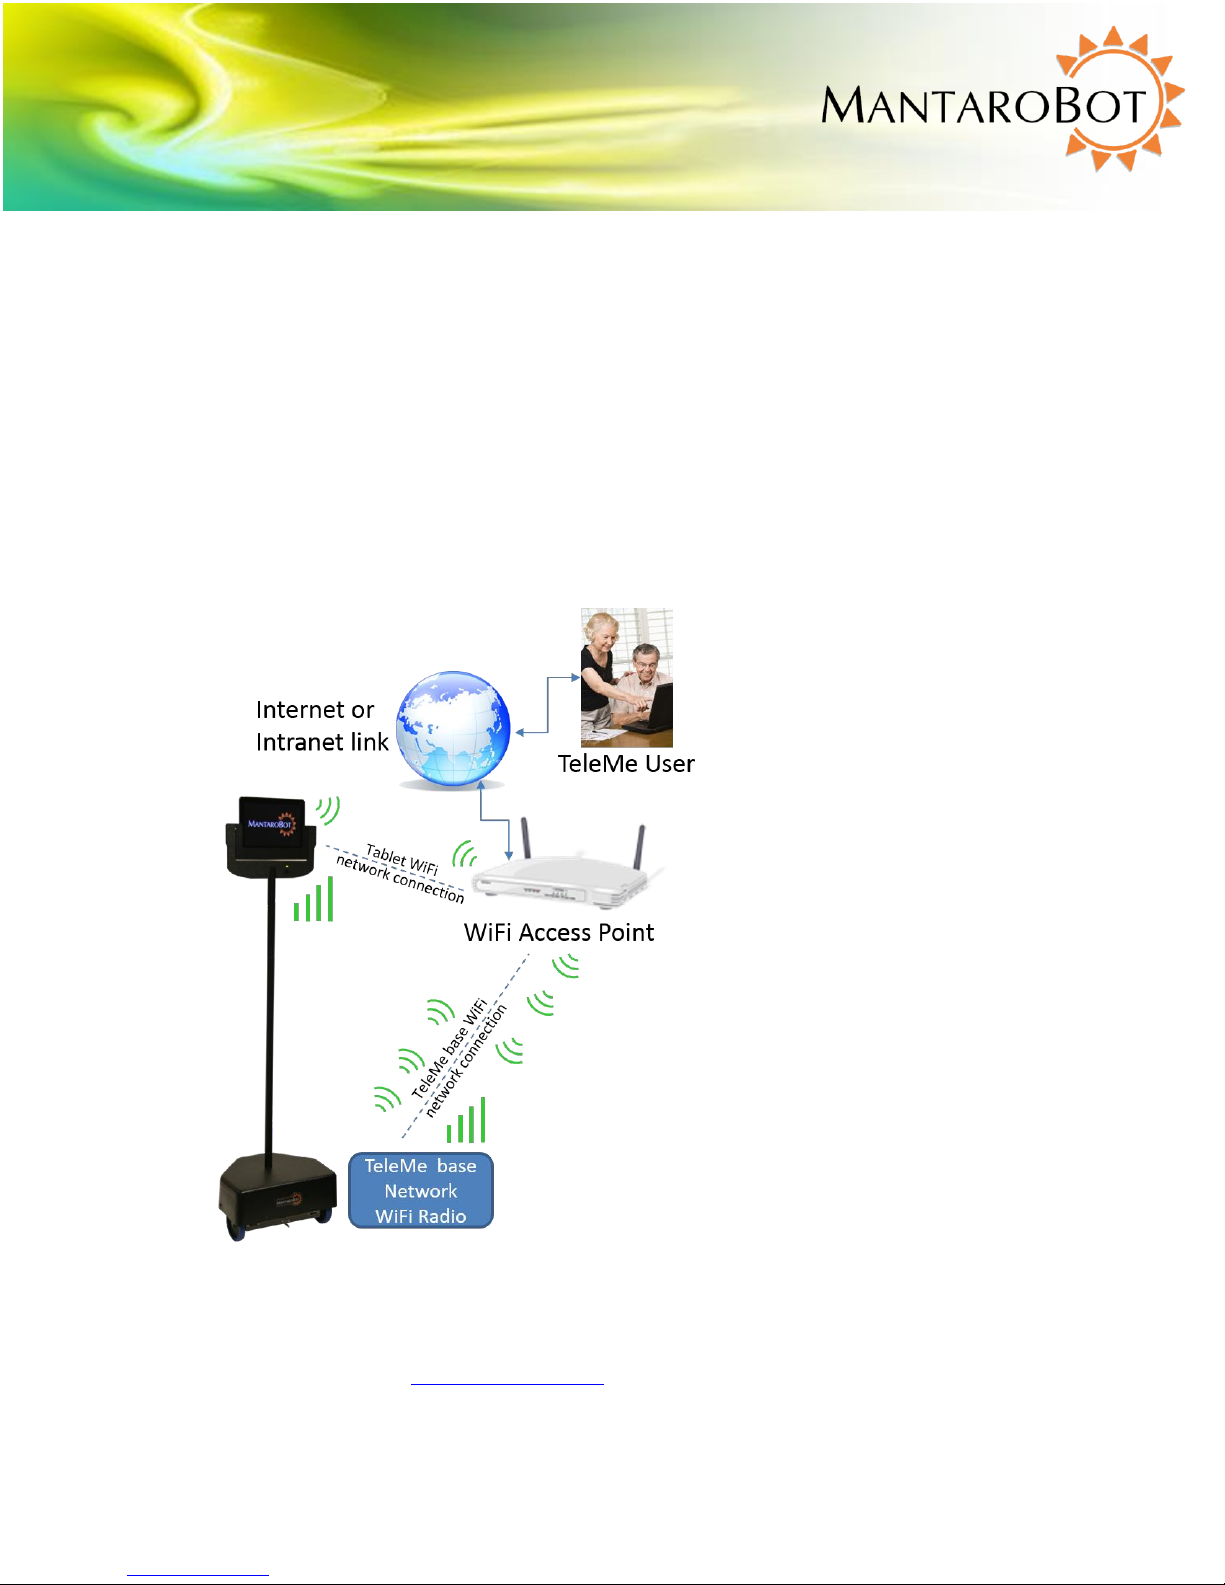
4.1.2 Multi-Wifi Radio Solution
The Multi-Wifi Radio option includes 3 Wifi radios in the TeleMe base. The Local Wifi Radio as shown in
the diagram below is dedicated for use with the user device (e.g. tablet) that is used as the head of the
TeleMe. Some environments where the TeleMe is used are very large and the network may be setup
with multiple Access Points (APs). Some tablets are not very good at keeping an ongoing conference call
from dropping when automatically switching from one AP to another. By configuring the tablet to use
the local Wifi of the TeleMe, the tablet will never have to switch the Wifi network it is listening to. All
data will be routed through the other 2 Network Wifi radios of the TeleMe base which will handle
switching from one AP to another seamlessly. NOTE: The only requirement is that the IP address of the
TeleMe should not change when it goes from one AP to another.

MANTAROBOT TELEME
User Guide & Operating Manual
MantaroBot™
20410 Century Boulevard Suite 120 Germantown Maryland 20874
www.MantaroBot.com info@mantarobot.com
Phone 301 528 2244 Fax 301 528 1933
19 Version 3.1
1. Configure the Wifi of the user device to use the Local Wifi Radio in the TeleMe base (as shown in
the picture above). The SSID name and password are configurable in the Advanced Settings
page of the TeleMe web front. For information on the SSID name/password of this Local Wifi
see Section 6.5. (The user is not required to connect the user device to the Local Wifi and can
still configure it to use the customer Wifi network if they choose to.)
2. No further WiFi configuration is required if the steps in Section 4 were followed previously as
both Network Wifi Radios in the TeleMe get configured for the same customer Wifi network.
One of these radios will be active and the second will always be searching for another AP (access
point) that may have a stronger signal strength in the same network. If a stronger signal is
detected, the TeleMe will auto-switch.

MANTAROBOT TELEME
User Guide & Operating Manual
MantaroBot™
20410 Century Boulevard Suite 120 Germantown Maryland 20874
www.MantaroBot.com info@mantarobot.com
Phone 301 528 2244 Fax 301 528 1933
20 Version 3.1
5MantaroBot Software
This section provides an overview of the software needed to use the MantaroBot before providing
further details later in this user guide.
5.1 Robot Application Overview
The MantaroBot Robot application runs on the control hardware located in the base of the MantaroBot
and is already pre-installed. The Robot application is only accessible via a web browser either when the
MantaroBot is in Configuration Mode or when the robot is in the same wireless network as another
computer or WiFi device with browser support. When new software updates are available they can be
installed only by someone local to the MantaroBot, not remotely unless connecting over a VPN
connection (information for updating is provided later). This application is where the TeleMe
configuration and initial user administration must occur for the MantaroBot. A user with administrator
privileges will also be able to perform some administrative tasks remotely using the MantaroBot
Controller application.
5.2 Controller Application Overview
The TeleMe can be remotely controlled either by the Windows desktop installable, MantaroBot
Controller application, or the web browser based MantaroBot TeleGo controller. The requirements of
the devices that can be used to control the TeleMe are described later in this guide. The controller is
used to connect to your MantaroBot for remote use and allows the user to drive the MantaroBot and
hold audio/video (A/V) teleconferences.
NOTE: The desktop installable MantaroBot Controller application for the TeleMe is different than the
MantaroBot Controller application for the MantaroBot Classic TelePresence Robot. If you own a
Classic, you will still have to separately install the Controller application for the TeleMe. Only one
controller application should be running at any given time. The Controller application for the TeleMe
can be used for any of the TeleMe line of products.
Once an administrator user account is created on the MantaroBot Robot application, an administrator
will be able to remotely login to the MantaroBot using this Controller application and perform user and
some robot administration tasks. There are certain configuration parameters that can only be done
from the Robot application.
Table of contents


