Mark Fitness XM-4419 User manual

Owner’s Manual
8/09
XM-4419
Read all precautions and
instructions in this manual before
using this equipment.
FID BENCH with
LEG & PREACHER

2
Table of Contents
Important Safety Information
Assembly
Parts List
Exploded View
Warranty Information
4
5-11
12
13
14

3
MODEL: XM-4419
XM-4419
This manual will guide you through the assembly process. If at any time you
are having trouble with the assembly or use of this product, then please contact
When calling please have the following product information available:
Model Name :
Date Mfg.:
Serial #
Model Name Decal Location
Before You Start
REGISTRATION CARD
QUESTIONS?
CALL 1-800-719-4605
Monday-Friday
8:30 a.m.-5:00 p.m.
(Central Standard Time)
MAILING ADDRESS
7501 Trammel Drive
Shreveport, LA 71108
THANK YOU for making this unit a part of your exercise
program.
XMARK Fitness
assures the very best in value,
appearance, durability and biomechanics.
XMARK FITNESS SERIES
XMARK Fitness
To avoid unnecessary delays in warranty parts and to insure that a permanent
record of your purchase is on file with our company, be sure to send in the war-
ranty registration card or register online at www
.xmarkfitness.com
within 10 days
of purchase.
us at our
XMARK Fitness help line. We have trained service technicians on site to
take care of you, our valued customer.

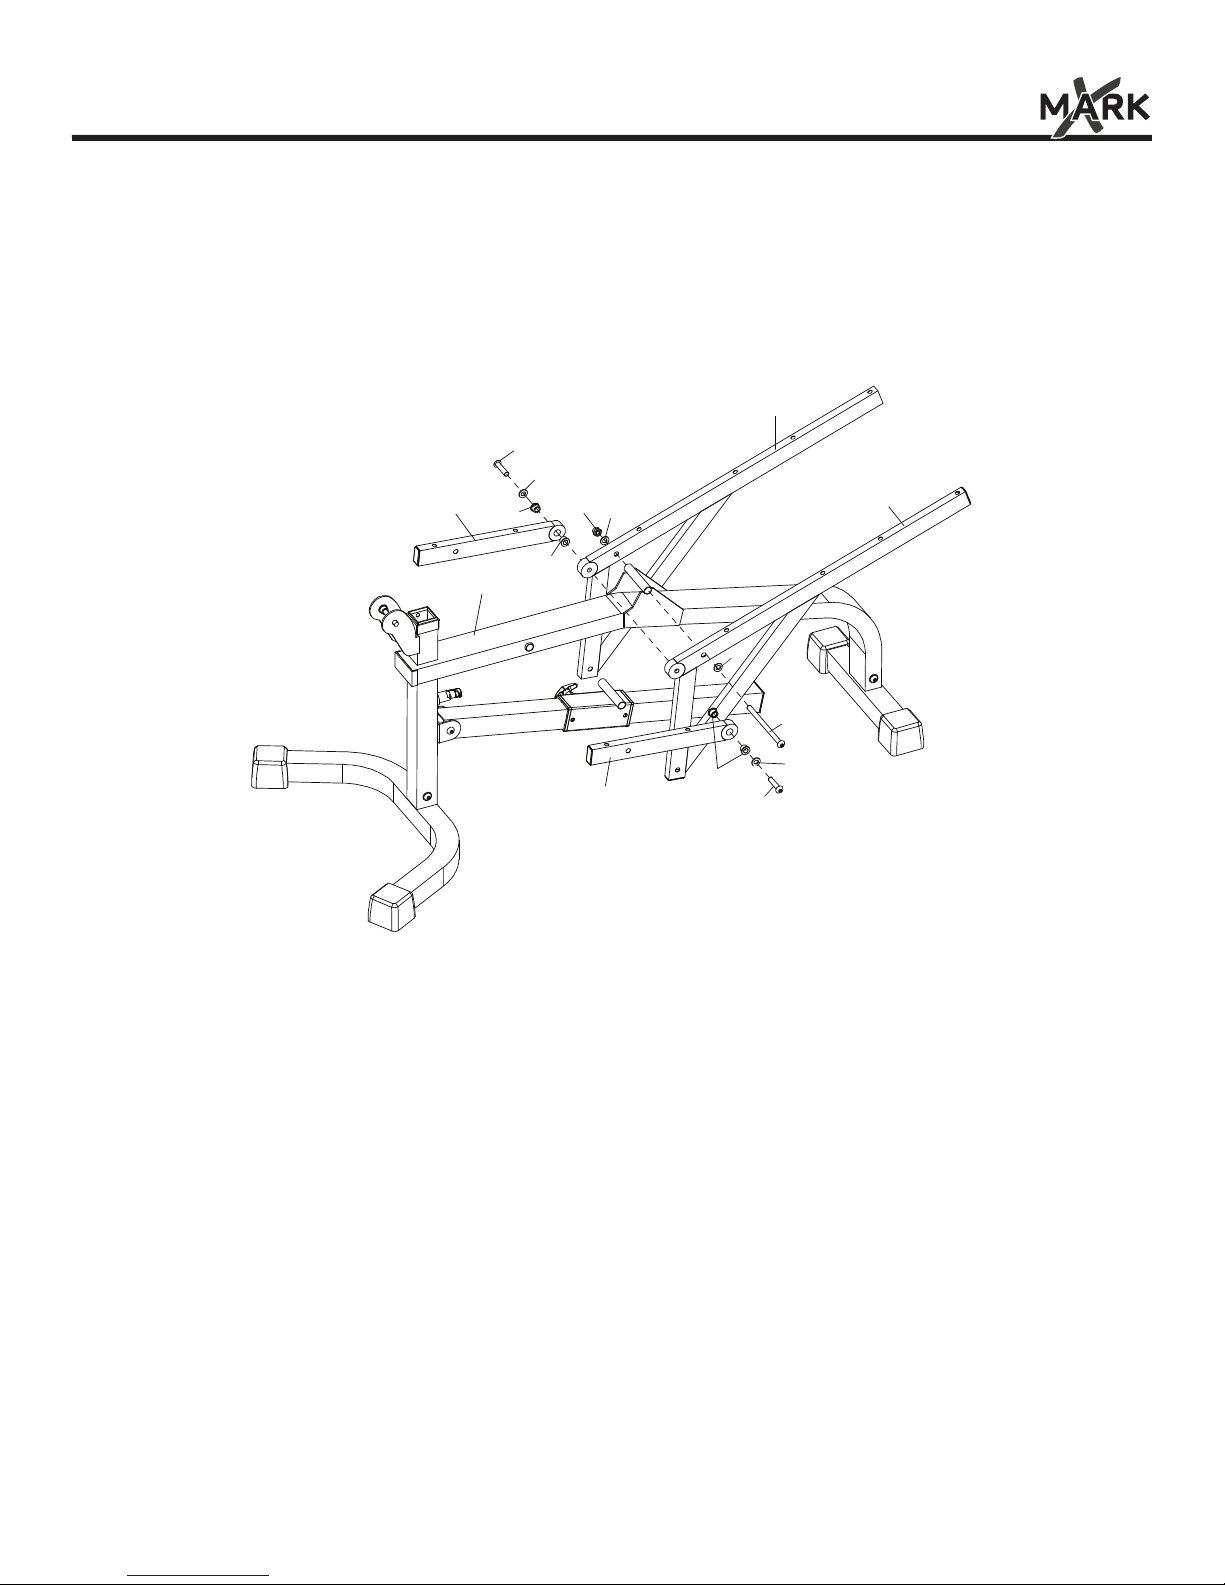
NOTE: Hand tighten bolts and nylon nuts until machine is fully
assembled.
SAFETY PRECAUTIONS
SAFETY INFORMATION WARNING!
Prior to assembly, remove components from the box and verify that all the listed parts
were supplied.
Before using this unit or starting any exercise program, consult your physician.
This is especially important for persons over the age of 35 and/or persons with pre-
existing health problems. XMARK Fitness assumes no responsibility for personal
injury or property damage sustained by or through the use of this product.
It is the owner’s responsibility to ensure that all users of this unit have read the
Owner’s Manual and are familiar with safety information and precautions.
• This unit should only be used on a level surface and is intended for indoor use
only. XMARK Fitness recommends an equipment mat be placed under the unit to
protect the floor or carpet and for easier cleaning.
• Wear comfortable, good-quality walking or running shoes and appropriate cloth-
ing. Do not use this unit with bare feet, sandals, socks or stockings!
• Always examine your unit before using to ensure all parts are in working order.
• Do not leave children unsupervised near or on the unit.
• Service to your unit should only be performed by an authorized service represen-
tative, unless authorized and/or instructed by a XMARK Fitness technician. Failure
to follow these instructions will void the warranty.
Important Safety Information
4

5
NOTE: Hand tighten bolts and locknut until machine is fully assembled.
STEP 1
STEP 2
Assembly
23
23
23
23
10
33
41
920
1
Attach the U-Shaped Front Base (2)
to the front part of the Main Frame (1),
and secure with three M10 washers (39),
three M10X15 Allen Bolts (31).
Insert the Rear Base (3) into the rear
part of the Main Frame (1) with two
M10X15 Allen Bolts (31) and two
M10 Washers (39).
Pull the Pop Pin (20) as far as it will
go and slide Sliding Block (9) onto
Incline Adjustment Tube (10). Push
two Spacers (23) into the Sliding Block
(9).
Push two Spacers (23) into the Incline
Adjustment Tube (10).Then attach Incline
Adjustment Tube (10) to the bracket on
the Main Frame (1). Secure with one M10X75
Allen Bolt (33) and one M10 Lock Nut (41).
Push four Spacers (23) into the Main
Frame (1) as illustrated.
23
23
23
23
2
39 39
31
31
31
33
41
1
3
31
31
39 39

6
NOTE: Hand tighten bolts and lock nuts until machine is fully assembled.
STEP 3
Assembly
6
1
32
39
23
23
41 39
39
7
7
23
32
35
39
6
Push two Spacers (23) into each Seat Supports (6).
Attach one Backrest Support (7) to one Seat Support (6). Align the holes with one M10X45 Allen
Bolt (32) and one M10 Washer (39). Repeat to complete the assembly of the remaining parts
(6) (7).
Attach the two Backrest Supports (7) to the pivot on the Main Frame (1) with one M10X160 Allen
Bolt (35), two M10 Washers (39) and one M10 Lock Nut (41).

7
STEP 4
NOTE: Hand tighten bolts and locknuts until machine is fully assembled.
Assembly
35
39
39
41
910
7
7
Connect the Sliding Block (9) and the Backrest Supports (7) with one M10 x160 Allen
Bolt (35), two M10 Washers (39) and one M10 Lock Nut (41).

8
NOTE: Hand tighten bolts and lock nuts until machine is fully assembled.
Assembly
STEP 5
39
36
39
6
1
41
823
23
Attach the Seat Adjustment Bracket (8)
to the Seat Supports (6) with M10X205 Allen
Bolt (36), two M10 Washers (39) and one
M10 Lock Nut (41).
Do not over tighten the Lock Nut and Bolt.
The Bracket needs to be able to swivel.
Push two Spacers (23) into the Seat Adju-
stment Bracket (8).
STEP 6 14
15
16
67
37
37
37 37
37
37
40 40 40
40 40
40 40
40
40
Attach the Upper Back Pad (15) and
Lower Back Pad (16) to the backrest
Supports (7) using eight Allen Bolts
M6x55 (37) and eight Washers M6 (40).
Attach the Seat Pad (14) to the Seat
Supports (6) using four M6X55 Allen
Bolts (37) and four Washers M6 (40).

9
NOTE: Hand tighten bolts and lock nuts until machine is fully assembled.
Assembly
41
6
43 6
8
Connect the Seat Supports (6) and the Seat Adjustment Bracket (8) with one
M10 x 120 Allen Bolt (34) and one M10 Lock Nut (41).
STEP 7

10
STEP 8
STEP 9
NOTE: Hand tighten bolts and lock nuts until machine is fully assembled.
Assembly
20
17
31
21
Attach the Curl Pad (21) to the Arm Curl
Stand (17) using two M10X15 Allen Bolts
(31).
Insert Arm Curl Stand (17) into the Main
Frame (1) and secure in place using the
Locking Pop Pin (20).
1
23
23
33
41
5
Push two Spacers (23) into Leg Lift Bar (5).
Attach the Leg Lift Bar (5) to the Main Frame
(1) with one M10X75 Allen Bolt (33) and one
M10 Lock Nut (41).

NOTE: Hand tighten bolts and lock nuts until machine is fully assembled.
Assembly
STEP 10
5
42
38
38
38
22
22
22
Attach Arm Curl Handle (4) to Leg Lift Bar (5)
with a Ring Head Lock Pin (26).
Make sure the set screw is on the bottom of
with the 2" Spring Clip (19).
To use olympic weights, secure the Olympic
(13) to the weight tube on the Leg Lift
STEP 11
Insert the Foam Roller Tubes (42)
into the Leg Lift Bar (5). Slide Foam
Rollers (38) onto each end of Foam
Roller Tubes (42) and secure in place
using Foam Roller Caps (22).
5
26
4
19 13
Sleeve
Bar (5) using the set screw (pre-assembled).
the sleeve. Secure the weight plates (not included)
11
Congratulations! You have completed assembly of you XM-4419!

12
Parts List
XM-4419 Parts List
Key NO. Part No. Description QTY
1204056202503 Main Frame 1
2204043401503 U-Shaped Front Base 1
3204043402503 Rear Base 1
4204043418503 Arm Curl Handle 1
5204056101503 Leg Lift Bar 1
6204043405503 Seat Support 2
7204056201503 Backrest Support 2
8204043407503 Seat Adjustment Bracket 1
9204056206503 Sliding Block 1
10 204043415005 Incline Adjustment Tube 1
11 307010000410 Round Plug 25 3
12 307010002303 Handle Grip 2
13 307010000759 Olympic Sleeve 1
14 307040000731 Seat Pad 1
15 307040000732 Upper Back Pad 1
16 307040000733 Lower Back Pad 1
17 204043419503 Arm Curl Stand 1
18 202043411006 Rubber Pad
1
19 306990000080 2" Spring Clip 1
20 802900300002 Locking Pop Pin 2
21 307040000704 Curl Pad 1
22 307010000404 Foam Roller Cap 4
23 306990020001 Spacer 16
24 202032220206 Bumper 25 1
25 307010000714 Square Sleeve 50 1
26 204043408002 Ring Head Lock Pin 1
27 307010000270 Square Plug 50X1.5 3
28 307010000747 Plastic Sleeve 2
29 307010000042 Square End Foot 50 4
30 307010000206 End Cap F20X40 7
31 306010020717 Bolt Allen M10X15 7
32 306010020723 Bolt Allen M10X45 2
33 306010020729 Bolt Allen M10X75 2
34 306010020738 Bolt Allen M10X120 1
35 306010020739 Bolt Allen M10X160 2
36 306010020764 Bolt Allen M10X205 1
37 306010020701 Bolt Allen M6X55 12
38 307010001917 Foam Roller 4
39 306010023108 Washer M10 13
40 306010023106 Washer M6 12
41 306010022504 Lock Nut M10 6
42 204055603503 Foam Roller Tube 2
43 307010000271 Square Plug 50X2 1
44 299056204500 BOLT PACK 1
45 308030000329 MANUAL XM-4419 1

Exploded View
13
22
22
22
22
38
38
38
38
27
42
42
5
19
13 11
24
26
27
4
12
12
30
17
31
21
31
31
31
39
39
39
33
1
41
29
29
2
20
20
9
23
23
10
28 28
23 23 35
3936
40
40 37
37
35
23
32 31
31
39 39
39
623
43
29
29 3
30
30
37
37
37
37
37
37
37
37 40
40
40
40
40
40
40 40
40
7
7
30
30
16
15
14
23 34
30
41
39
23
41 23
23
23 23 23
39
41
3239
39
41
39 25
37 40
37
40
30
27
23
33
23
41
8
11
11
18
6

XMARK Fitness
7501 Trammel Drive
Shreveport, LA 71108
Customer Service: 1-800-719-4605
Table of contents
Other Mark Fitness Home Gym manuals

Mark Fitness
Mark Fitness XM-4418 User manual

Mark Fitness
Mark Fitness XM-7613 User manual

Mark Fitness
Mark Fitness XM-4360 User manual

Mark Fitness
Mark Fitness XM-7631 User manual

Mark Fitness
Mark Fitness XM-4414 User manual

Mark Fitness
Mark Fitness XM-4415 User manual

Mark Fitness
Mark Fitness XM-7629 User manual
Popular Home Gym manuals by other brands

Insportline
Insportline RowAir user manual

Weider
Weider WECCSY24540 user manual

ParaBody
ParaBody 454 Assembly instructions

MARBO-SPORT
MARBO-SPORT MS-W101 Assembly instruction

Hoist Fitness
Hoist Fitness HD1100 owner's manual

Skywalker
Skywalker SJG201 Assembly installation, care maintenance and user instructions manual