Mark2 X-Cross 450 2022 User manual

Models covered: X-Cross 450, X-Cross 520, Scrambler 430, Scrambler 480
X-CROSS & SCRAMBLER
USER MANUAL
Images in this user manual are for illustrative purposes only and subject to change.

2
Product details
Type
¨Scrambler 430 ¨X-Cross 450
¨Scrambler 480 ¨X-Cross 520
Frame number:
Power Pack
¨10.4Ah (375Wh) Promovec Li-ion smart memory power pack
¨12.8Ah (460Wh) Promovec Li-ion smart memory power pack
Serial number:
Register your battery for warranty online at
www.promovec.com/en/warrenty-and-registration (sic)
Purchase date PDI carried out by:
/ /
DD MM YYYY
Please read the manual fully before use.
If safety precautions are not respected then your warranty could be
void.
For your safety and to ensure optimum performance always check
operation of brakes, lights, bell and gears.
Check tyre pressures are correct (see tyre wall for pressure info).
Check all fasteners and release mechanisms before every ride.

Table of contents
Warnings............................................................................................ 4
Product description ..........................................................................5
Classication......................................................................................5
Quick start ..........................................................................................6
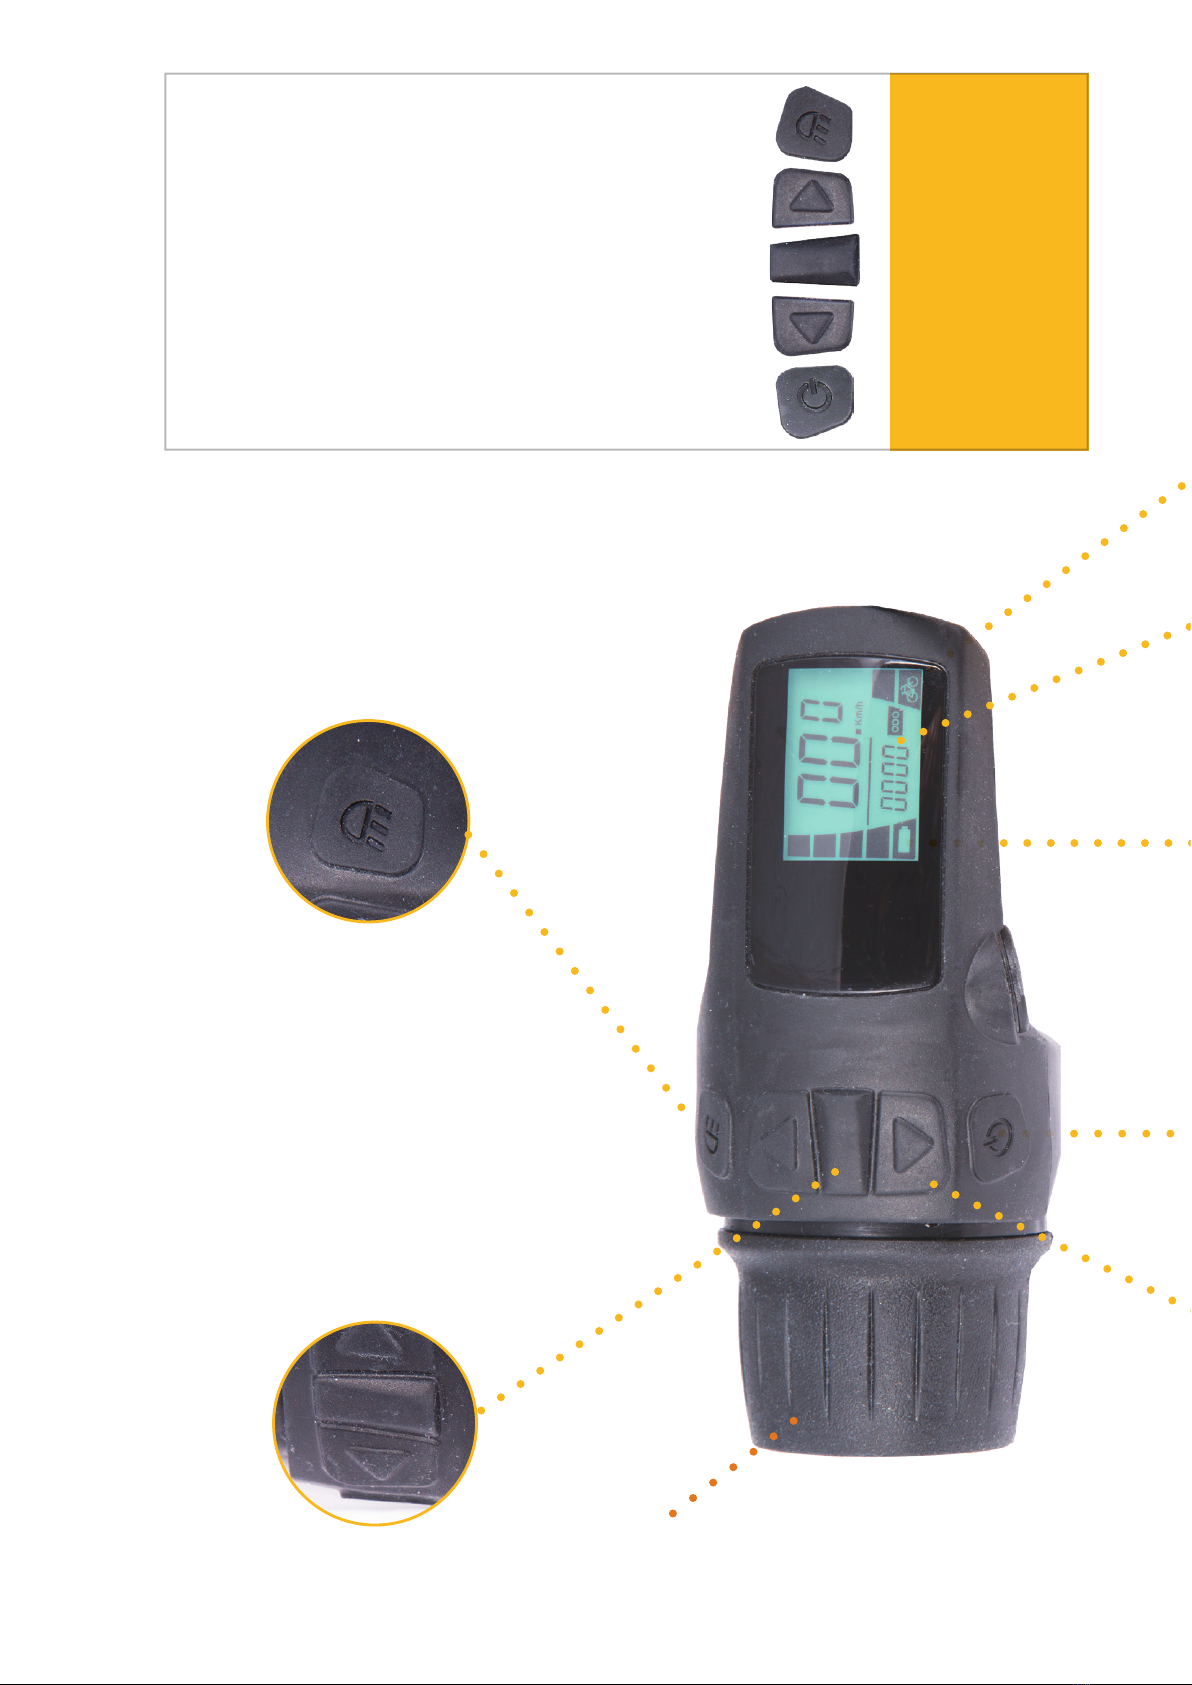
The throttle.........................................................................................7
Display functionality ........................................................................8
Troubleshooting.............................................................................. 10
Wheel size settings.......................................................................... 11
Wheel size ........................................................................................ 12
Optional Centre LCD display functionality ............................... 13
Installing and removing the battery ............................................17
Battery charger/charging options................................................17
Battery capacity and use............................................................... 18
Winter storage................................................................................. 18
Disposing of battery....................................................................... 19
Battery registration ....................................................................... 20
Maintenance ................................................................................... 20
Transportation of e-bike................................................................ 21
Road Traic law .............................................................................. 21
Insurance........................................................................................... 21
Frame number ................................................................................. 21
Battery specications.................................................................... 22
Approvals......................................................................................... 22
Declaration of conformity............................................................ 22
Technical data................................................................................. 23
Notes ................................................................................................ 26
Service record..................................................................................27

4
Important! Always read the safety instructions before use. If the
precautionary measures described are NOT followed, the warranty is void.
• To ensure that the charger and battery are handled in a safe way, and that
users involved understand the danger thereby, charging of the battery
must only be handled by persons aged 8 and up. Persons with reduced
physical, sensory or mental abilities, lack of experience or knowledge must
be supervised or trained in the use of the battery and charger. Do not let
children play with the battery and/or charger. Children must be supervised if
they perform any kind of cleaning and/or maintenance
• DO NOT attempt to recharge non-rechargeable batteries with the battery
charger
• For safety reasons, if charging the battery indoors then the battery should be
recharged in a room with a re alarm installed
• Only charge the battery with the included charger
• Do not dismantle or damage the battery
• Only use the battery included
• Do not throw the battery into a re
• Do not immerse the battery in water or any other liquid
• Never charge the battery at temperatures below 32ºF (0ºC) or above 113ºF
(45ºC)
• Do not heat, short circuit, puncture or otherwise mistreat the battery
• Do NOT change/manipulate the electrical system
• Disposal of batteries, see page 19
• Transportation of e-bike, see page 21
Warnings

5
Product description
The Scrambler and X-Cross are the perfect choice if you want an electric bike
that can be used for varied purposes, as the bike is suitable for riding on
both at and hilly terrain.
The motor is integrated in the rear wheel and the battery is integrated in the
frame. In that way the weight distribution is optimal.
The bike is UKCA marked and produced according to the guidelines in the
standard BS 15194:2017.
Note!
• Use of a bike trailer in combination with the e-bike is not allowed
• Always use original spare parts when replacing electrical components
• Do NOT clean the e-bike with a high-pressure cleaner
• If the electrical system is modied the warranty is void
Class 2 description
Class 2 covers bicycles and Epacs that includes condition 1 as
well as unpaved and gravel roads and trails with moderate
grades. In this set of conditions contact with irregular terrain
and loss of tire contact with the ground may occur. Drops are
intended to be limited to 15cm or less.
Intended average speed range: 15–25km/h.
Intended Drop/Jump height: <15cm.
Intended riding purpose: Leisure and trekking with moderate
eort.

6
ON / OFF-Button
Press and hold the button
until the system turns ON/
OFF. NB! The system will
turn o after
5 minutes
without use.
Quick start
1. Mount the battery (see page 17) and press the ON/OFF button.
2. Start pedalling and the motor will start assisting according to the assist
level selected.
3. Adjust the assist level with the “Up” and “Down” arrows.
4. The assist function will cut o when the user stops pedalling or when the
bike exceeds 24,6 km/h.
See page 8 for a more thorough explanation covering the display and
buttons.
Selecting Assist-level
Arrow up - Arrow down
Note!
If you have the optional large centre LCD tted then the appearance will vary
but the functionality is the same (see page 13 for guidance).

7
The Throttle
When the throttle is twisted towards you then the assist functionality is
bypassed and the “Booster eect“ is activated. Release the throttle and
the system returns to assist mode.
The throttle has several purposes, for example:
• When pushing the bike up a hill, turning the throttle will activate
“walk-assist”. This means the bike will move at 6 km/h until the
throttle is released
• In heavy traic where short bursts of extra power is required e.g., in
situations with overtaking of slower cyclists
• When it is required to reach max speed faster than when using level 4
assist level

8
Display functions
You can manage the display from the left
side of the handlebar. There are 5 function
buttons and a throttle lever.
Light
Arrow up
Menu
Arrow down
On/o
Light ON/OFF
Toggle the light ON/OFF by pressing the
button. Note that the background light
will dim down when the light is “ON”.
Menu function - TRIP - ODO
Press the Menu button to switch
between ODO and TRIP Counter.
TRIP is reset by holding down the
Menu button for 2 seconds.
ODO functions show the total
distance ridden.
Throttle
The throttle is operated by
twisting towards you.

9
Current speed
Here the current speed is
displayed.
Assist-level
The selected assist-level is displayed in
the right side of the display. It defaults to
level 1 when switched on.
Selecting Assist-level
Arrow up - Arrow down
Level 4 - is the highest level
Level 1 - is the lowest level.
Level 0 - (only bottom bar with the
bike icon). The assist function is o;
however, the throttle is still usable.
Battery indicator
Here you can see the status of your
battery. The indicator ashes when the
minimum level is reached. Be aware that
the system may turn o if the battery
level falls below minimum level.
ON/OFF-Button
Press and hold the button until
the system turns ON/OFF. NB! The
system will turn o after 5 minutes
without use.

10
ERROR CODE MEANING SOLUTION
E02Motor error. Check that the connectors are
connected (at the front fork) or
contact your retailer.
E03Controller error. Contact your retailer.
E04Display error. Contact your retailer.
E05Front brake error. Contact your retailer.
E08Low voltage error. Recharge the battery.
E09High voltage error. Contact your retailer.
The error indicator has the following error codes
Troubleshooting
Errors are displayed, with a code and a description in the display info area. If an
error is displayed, then it is a signal about an error in the electrical system. When
an error is displayed it must be remedied before the motor is able to start. Check
the table below for more information covering error codes.

11
Wheel size settings
Setting the wheel size is done by pressing the ”up” and ”down”
simultaneously.
Use the arrow ”up” or ”down” to increase or decrease the wheel size.
The numbers representing the wheel size are modied one by one.
Accept and continue to the next number by pressing the
”menu” button. Repeat until all numbers are correct.
N.B.
Toggle between km/h and mph by
holding the ”down” arrow in for 10
seconds. - if km/h is o then mph is
displayed.
The numbers representing the
wheel circumference are displayed
here. - Measured in cm.
Save the wheel setting by pressing the ”menu”
button until the display returns to normal.

12
The speed display can be adjusted by changing the wheel circumference.
Wheel circumference is found by measuring the wheel from valve to valve.
(Check the table below for reference)
Valve outlet
TO (European Tyre and Rim Technical Organization):
Wheel size
ETRTO TYRE SIZE LENGTH
40-406 20x1.50 1490
47-406 20x7.75 1515
50-406 20x1.95 1565
47-507 24x1.75 1890
50-507 24x2.00 1925
54-507 24x2.125 1965
40-559 26x1.50 2010
47-559 26x1.75 2023
50-559 26x1.95 2050
54-559 26x2.10 2068
35-622 700x35C 2168
38-622 700x38c 2180
40-622 700x40c 2200
42-622 700x42c 2224
44-622 700x44c 2235
45-622 700x45c 2242
47-622 700x47c 2268

13
Display functions
You can manage the display from the left side of the handlebar. There are 5
function buttons and a twist throttle (see next page).
An error indicator is integrated into the display. Read more about error
codes and troubleshooting on page 15.
Press the “menu” button to toggle between “Trip distance”, “Total distance”
or to enter wheel size settings - see page 12 for more information about
wheel sizes.
Battery indicator
Assist- level
Trip length Total distance
Speed
in km/h
When the light
is on the “light”
icon will display
OPTIONAL Centre LCD display

14
Light
Arrow up
Menu
Arrow down
ON/OFF
The Throttle
When the throttle is twisted toward you the assist function is overridden to
activate “Booster eect“. Release the throttle and the system returns to assist
mode.
The throttle has more than one purpose, for example:
• When pushing the bike up a hill, turning the throttle will activate “walk-
assist”. This means the bike will move at 6 km/h until the throttle is released
• In heavy traic where short bursts of extra power is required e.g., in
situations with overtaking of slower cyclists
• When it is required to reach max speed faster than when using level 4 assist
level
Throttle

15
Troubleshooting - Centre
display
If an error code is displayed, then
it is signal about an error in the
electrical system.
The number indicates the type of
error.
FLASHES MEANING SOLUTION
2Motor error. Check that the connectors are
connected (at the front fork) or
contact your retailer.
3Controller error. Contact your retailer.
4Display error. Contact your retailer.
5Front brake error. Contact your retailer.
7Sensor error. Contact your retailer.
8Low voltage error. Recharge the battery.
9High voltage error. Contact your retailer.

16
Note!
Toggle between km/h and mph by
holding the ”down” arrow in for 10
seconds. - if km/h is o then mph is
displayed.
Wheel size settings
Setting the wheel size is done by pressing the ”up” and ”down”
simultaneously.
Use the arrow ”up” or ”down” to increase or decrease the wheel size.
The numbers representing the wheel size are modied one by one.
Accept and continue to the next number by pressing the ”menu” button.
Repeat until all numbers are correct.
See page 12 for wheel size information.
Save the wheel setting by pressing the ”menu” button until the
display returns to normal.
Menu
The numbers representing the
wheel circumference are displayed
here. Measurement in cm.

17
Installing and removing the battery
Support the battery with one hand, then
remove it from the frame by turning the
key left and pushing the battery up and
pulling down. The battery is a snug t, so
if too tight to remove, a sharp tap on the
side of the downtube with the heel of your
free hand will help release it.
Push the battery all the way into the
downtube and lock the battery by turning
the key to the right. You can only remove
the key if the battery is properly mounted
and locked in place.
When the key is turned to the right, press
the battery button that is highlighted on
the photo to release the battery.
Battery charger/Charging
Recharge the battery with the charger according to the manual that is
included with the charger. Recharging of batteries must be done indoors or
under a roof in a dry environment under supervision.
Note! For safety reasons, if charging the battery indoors then the battery
should be recharged in a room with a re alarm installed.

18
Winter storage
If the electric bike is set aside for storage (more than one month), it will
be enough to recharge the battery once a month for 24 hours to keep the
battery in good condition.
The battery should always be fully charged in storage since it cannot stand
fully or partially discharged for a long time.
If the battery is not charged at least once a month the warranty will be void.
Battery capacity and use
Your Mark2 bike uses maintenance-free Li-ION batteries. The battery
delivered with your bike is about 40-60% charged at the factory.
Before using the battery, it must be fully charged with the supplied charger
(Green LED lights).
We recommend that the battery stays connected to the charger for 24 hours
after the green light appears, as it provides a better balance between each
cell in the battery. The optimal charging environment would be at 20°C
(68°F).
Frequent charging of the Li-ION battery can extend the battery life. Be aware
that the capacity of the batteries decreases over time. Several factors, such
as low temperatures, tyre pressure, weather/road conditions, user weight
and own physical eort has an inuence on the range of the battery. As a
user, you therefore have a big inuence on the range.

19
Disposing of battery
Batteries contain substances that can be harmful to
human health and the environment if not handled
properly.
Batteries are marked with the crossed-out rubbish bin
icon. It symbolizes that wasted batteries must not be
disposed of with normal household waste but must
be collected separately.
It is important that you submit your used batteries to the collection
systems established. In this way, you help to ensure that the batteries are
recycled in accordance with the law and will not harm the environment.
All municipalities have established collection systems, where wasted
portable batteries can be collected from households or disposed at
recycling stations and other collection sites. Additional information is
available from your local authority.

20
Maintenance
It is recommended to clean the bike and lubricate moving parts at regular
intervals.
In order to maintain and preserve your electric bike’s condition, we
recommend an inspection two times a year, and at least once a year by a
professional workshop.
Be aware, that wearing parts such as tyre, chain, brake pads are replaced as
needed.
Do NOT use a high-pressure cleaner when cleaning the bike as it may
damage the electrical components.
Battery registration
Register your battery at Promovec.com and obtain a 2-year capacity
guarantee with a third year backed by Mark2. In addition to the prevailing
sale of goods act, 2-year guarantee/warranty provider Promovec A/S oers
a 2-year capacity warranty on all batteries for electric bikes equipped with
Promovec’s electrical system, purchased from Mark2, and used for private
use.
The guarantee covers a guaranteed minimum capacity of 70% in 3 years
from the date of purchase.
To qualify for this 3-year capacity guarantee the battery must be
registered at Promovec.com. Registration must take place within 8 days
from the date of purchase.
This manual suits for next models
6
Table of contents
Other Mark2 Bicycle manuals
Popular Bicycle manuals by other brands

DEMA
DEMA BEAST Operation and maintenance manual

Babyhug
Babyhug BGTB003 user manual

Cannondale
Cannondale FLASH 2010 Owner's manual supplement

Oxygen
Oxygen S-Cross user manual

Kettler
Kettler Traveller E-Silver 7 RT2 Translation of the original operating instructions

Infinity
Infinity Crazyhorse XM3 ST Assembly manual