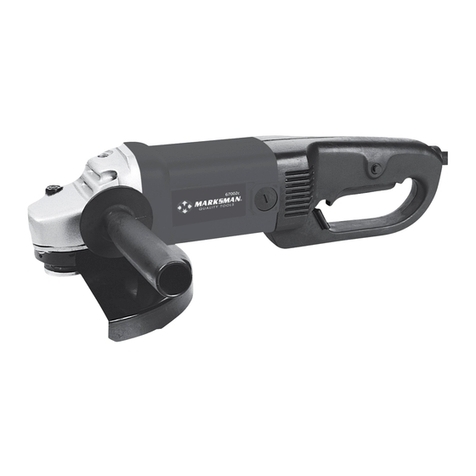
Marksman 67063c User manual

INSTRUCTION MANUAL
Read all the instruction carefully before you use
the appliance and keep it for future use.
600W ANGLE GRINDER
67071c
67063c
230V~50Hz
600W 11000RPM
115MM DISC
3 AMP fuse (max) must be fitted to
plug attached to this cable.

IMPORTANT SAFEGUARDS
Please read these operating instructions before using the tool for the first time and keep them with
the tool at all times.
Overview
General Safety Instructions for Electric Tools
This device is to be exclusively for private use! It is not fit for commercial use!
Warning: when working with electrical devices the following prevention and safety
instructions are to be observed to avoid fires, electric shocks an physical injuries!
For safe working:
• Keep the working area in order’
• Disorder in the working area can give rise to dangers of accidents! Pay attention to the ambient
conditions!
• Do not leave electric tools under the rain!
• Do not use these in humid or wet surroundings! .
• Make sure that there is enough light! Make sure that the working area is visible at a glance!
• Do not use electric tools in areas subject to the risk of res! Protect yourself against electric
shocks!
• Avoid coming into contact with earth parts (e.g. pipes, radiators. stoves, refrigerators) !
• In case of extreme application conditions (e.g. high humidity, presence of metal particles, etc.) the
electrical safety of the device can be improved by connecting an isolation transformer or a fault
current circuit breaker!
Technical Data 67063c - 67071c
Voltage/Frequency: 230V- 50Hz
Input power: 600w
No-load speed: 11000/min-1
Disc size: Ø115mm
1. On And Off Switch
2. Drive Shaft
3. Side Handle
4. Gear Box
5. Housing Handle
6. Protective Cover
7. Lock Button
8. External Flange Spanner
9. External Flange with Thread
10. Internal Flange

• Keep children away!
• Do not let other people touch the tool or the cable!
• Keep other people out of the working area! Make sure that the tool is stored . safely!
• Unused electric tools are to be kept in a dry, secure place, out of the reach of children!
• Do not overload the electric tool! It works better and safer within the indicated capacity range! Use
the right electric tool!
• Do not use weak tools or adapters for heavy jobs. Do not use tools for purposes or jobs for which
these are not intended. For example. hand circular saws are not be used to cut trees or branches!
Always wear suitable working cloths!
• Do not wear baggy cloths or jewellery! Risk of being caught by moving parts!
• When working outside. it is advisable to wear rubber gloves and skid-proof shoes!
• If you have long hair, wear a hairnet! Use protective goggles!
• Always wear a breathing mask during jobs producing dust! Connect the vacuum system
(if available).
• If devices for the connection of vacuum and collection systems are available,” make sure that
these are connected and used correctly!
• Do not tamper with the cable!
• Do not carry the tool by the cable and do not use it to pull the plug out of the socket!
• Protect the cable against heat sources, oil and sharp edges! Secure the tool!
• Use chucking devices or a vise to keep the tool still! The tool can thus be held in place more safely
than by hand and the tool can be used with both hands!
• Avoid unusual body postures! Always stand rmly in place and keep your balance! Always keep
the tool in good order!
• Always keep tools sharp and clean to work correctly and safely!
• Follow the maintenance and tool change instructions!
• Check the plug and cable on a regular basis and have a qualied technician change these
in case of damage!
• Check the extension cable on a regular basis and replace it if damaged!
• Remove the plug out from the socket! After use, before maintenance and when changing
accessories such as saw blades, drills cutters, etc.! Do not leave protruding tool keys!
• Make sure before turning on the tool that the key or setting gauge is removed!
• Avoid the accidental starting of the tool!
• Never carry an electric tool connected to the power mains with your nger on the switch!
• Make sure that the switch is off when connecting to the mains! If using extension cable outdoors:
Use only certied and duly marked extension cables outdoors!
• Always be careful! Pay attention to your work! Proceed carefully. Do not use the tool if you
are not concentrated!
• Check the tool for damages!
• Before using the tool the next time check that the protection devices or slightly damaged parts are
in good working conditions! Check whether the moving parts function correctly, that these are not
jammed or whether any parts are damaged!
• All the parts to be correctly mounted and meet all the requirements for the proper functioning of
the electric tool!
• Damaged protection devices and parts are to be repaired or changed by a qualied technician
provided that the operating instructions do not specify otherwise!

• Damaged switches are to be replaced in a customer service shop! Do not use electric tools that
cannot be switched on or off!
WARNING!
• For your own safety always use only the accessories and attachments specied in the operating
instructions or recommended or specified by the tool manufacturer!
• The use of accessories and attachments other than those specied in the operating instructions
can cause injuries! .
• Always have your tool repaired by certied technicians!
• This tool meets the relevant safety requirements!
• Repairs are to be carried out only by qualied technicians with original spare parts to avoid the
risk of injuries to the user caused by improper repairs!
• Hearing protection: In case of a sound pressure greater than 85.0 dB(A) wear hearing protection to
avoid damage to your hearing!
Special Safety Instructions
• Do not use the machine without the protective cover! Ensure that this is tted correctly!
• Check whether the mounting anges and the disk have been inserted correctly and are not
damaged’
• Ensure that the speed of the machine is high enough for the accessories. Allow a newly mounted
abrasive wheel to run without a load for at least thirty seconds! Please keep the safety instructions
in a safe place!
• Please ensure that the voltage of the mains power supply corresponds to that stated on the type
plate. The tool is equipped with a three pin plug!
• Only use a suitable extension cable when this is absolutely necessary! The use of an unsuitable
extension cable carries with it the danger of fire or an electric shock! If an extension cable has to
be used. ensure that it is correctly wired and in good condition!
• Your machine is double insulated. This means that two completely independent types of insulation
prevent you from coming into contact with live metal parts. This measure represents a high degree
of protection against an electric shock.
• When working with this machine it is advisable to use ear protection!
Before Initial Use
Mounting the Side Handle
During operation, keep one hand on the housing handle (5) and the other on the side handle (3). In
order to mount the side handle, screw it into the screw hole of the gear box (4) .
Correct Fitting of the Protective Device
Ensure that the protective cover (6) is tted correctly and that the xing screws have been tightened!
Before tightening the xing screws, turn the on and off switch (1) to the (0) position and remove the
mains plug!
Grinding and Surface Processing
In order to grind surfaces you should use a coarse abrasive disk with a sunken centre. You can use
abrasive disks with diameter of 125 mm. The maximum thickness is 6 mm. .
Cutting Metal
In order to cut rods, tubes and metal parts you should use a cutting-off wheel. You can use wheels
diameter of 125 mm. The maximum thickness in this case is 3 mm.

Cutting Stone Material
When cutting stone material you should use a at cutting off wheel. You can use wheels with
diameter of 125 mm. Always approach the job at the same angle at which you would like to cut.
Maintain this angle during cutting and do not exert any side pressure on the wheel.
Inserting the Wheels/Disks
Please proceed as follows when inserting the wheel/disk:
1. Before mounting, remove the mains plug from the socket and move the on and off switch (1) to
position(0)! Ensure that the protective device is correctly installed.
2. Place the internal ange (10) on the drive shaft (2). Ensure that it is in contact with the two at
areas.
3. Now place the abrasive disk on the drive shaft (2) and the internal ange (10). Ensure that it is
correctly in place.
4. Now attach the external ange with the thread (9), ensuring that it is facing the right direction
according to the type of disk/wheel used. In the case of abrasive disks, the ange (9) is inserted
with the higher side pointing towards the disk. In the case of cutting off wheels, the ange (9) is
inserted with the at side pointing towards the wheel. .
5. Press and hold the lock button (7) so that the drive shaft cannot turn and then tighten the external
ange (9) with the external ange spanner (8).
Abrasive Disks
• Ensure that the speed to which the machine is set is sufcient for the accessories chosen.
• Use only abrasive disks with a diameter of up to 125 mm!
• Before mounting the disk, remove the mains plug from the socket and push the on and off switch
(1) to position(0)!
1. Place the internal ange (10) on to the drive shaft (2) .
2. Place the abrasive disk on the drive shaft (2) and ensure that it is correctly in place.
3. Attach the external ange with the thread (9) and tighten it as described above with the external
ange spanner (8).
NOTE: Expect a “rain of sparks” when the disk comes into contact with metal.
While grinding, always maintain the correct angle between the disk and 1 working surface of 15º.
This produces ideal results and avoids overloads
Overload
The motor of your right angle grinding machine may be damaged when overloaded. This results
from excessive working pressure over a prolonged period Therefore you should not try to accelerate
your working speed by increasing pressure on your machine. The abrasive disks work more
efciently if only slight pressure is exerted on the grinding machine, thus avoiding a drop in the
grinding speed.
Maintenance
• The protective cover, air slits and motor housing should be kept as free of dirt and dust as
possible.
• Rub off the device with a clean cloth or use compressed air at a low pressure to blowout any dust
or dirt. Excessive amounts of metal dust may result in electricity from the internal components
being conducted on to exposed metal parts!
• Do not subject the grinding machine to any overload! Overloading will lead to a reduction in the
speed and performance and cause the machine to overheat! If this should happen, switch the
grinding machine off and let it cool down for approximately 30 minutes or to room temperature!
NOTE: Turning off the grinding machine while it is being subjected to a load will reduce the working
life of the operating switch!

Cleaning and Care
• Before cleaning the machine I remove the mains plug from the socket and turn the on and off
switch (1) to position (0) !
• For cleaning purposes, only use a slightly damp but not wet cloth!
• Do not use any abrasive additives (petrol, turpentine etc) as these may damage the plastic
housing!
• A mild soap is suitable for cleaning the machine!
• Ensure that no moisture is allowed to get inside the machine I
• After cleaning, wipe the machine with a dry cloth!
SAFETY INSTRUCTIONS
Warning! When using electric tools, basic safety precautions should always be followed to reduce
the risk of re, electric shock and personal injury, including the following. Read all these instructions
before attempting to operate this product and save these instructions.
For safe operation:
01. Keep work area clean - Cluttered areas and benches invite injuries.
02. Consider work area environment - Don’t expose power tools to rain. Don’t use power
tools in damp or wet locations. Keep work area well lit. Don’t use power tools in presence of
ammable liquids or gases.
03. Guard against electric shock - Prevent body contact with earth surfaces (e.g. pipes,
radiators, ranges refrigerators)
04. Keep children away - Do not let visitors contact tool or extension cord. All visitors should
be kept away from work area.
05. Store idle Tools - When not is use, tools should be stored in dry, high, or locked-up place,
out of the reach of children.
06. Don’t force tool - It will do the job better and safer at the rate for which it was intended.
07. Use the right tool - Don’t force small tools or attachments to do the job of heavy duty tool.
Don’t use tools for purposes not intended for example, don’t use circular saw for cutting tree
limbs or logs.
08. Dress properly - Do not wear loose clothing or jewellery. They can be caught in moving
parts. Rubber gloves and nonskid footwear are recommended when working outdoors. Wear
protective hair covering to contain long hair.
09. Use safety glasses - Also use face or dust mask if cutting operation is dusty.
10. Do not abuse the cord - Never Carry tool by cord or yank it to disconnect it from
receptacle, Keep cord from heat, oil and sharp edges.
11. Secure work - Use clamps or a vice to hold work, it’s safer than using your hand and it frees
both hands to operate tool.
12. Do not overreach - Keep proper footing and balance at all times.
13. Maintain tools with care - Keep tools sharp and clean for better and safer performance.
Follow instructions for lubricating and changing accessories. Inspect tool cords periodically
and if damaged, have repaired by authorised service facility. Inspect extension cords
periodically and replace if damaged. Keep handles dry, clean and free from oil and grease.
14. Disconnect tools - When not in use, before servicing, and when changing accessories such
as blades, bits and cutters.
15. Remove adjusting keys and wrenches - Form the habit of checking to see that keys

and adjusting wrenches are removed from tool before turning it on.
16. Avoid unintentional starting - Don’t Carry plugged-in tool with nger on switch. Be sure
switch is off when plugging in.
17. Outdoor use extension cords - When tool is used outdoors, use only extension cords
intended for use outdoors and so marked.
18. Stay alert - Watch what you are doing, Use common sense. Do not operate tool when you
are tired.
19. Check damaged parts - Before further use of the tool, a guard or other part that is
damaged should be carefully checked to determine that it will operate properly and perform its
intended function. Check for alignment of moving parts, binding of moving parts, breakage of
parts, mounting, and any other conditions that may affect its operation.
- A guard or other part that is damaged should be properly repaired or replaced by an
authorised service centre unless otherwise indicated elsewhere in this instruction manual.
Have defective switches replaced by an authorised service centre. Do not use tool if switch
does not turn it on and off.
20. Warning - The use of any other accessory or attachment other than that recommended in this
operating instruction might present a risk of personal injury.
21. Have your tool repaired by an expert - This electric appliance is in accordance with the
relevant safety rules. Only experts may carry out repairing of electric appliances otherwise it
may cause considerable danger for the user.
22. connect the dust extraction device - Wherever there are facilities for tting a dust
extraction system, make sure it is connected and used.
23. Noise level - The noise level of this power tool is measured according to IEC 59 co 11, IEC
704, DIN 45635 Part 21, NFS 31081 (84/537IEWG). Noise level at work area can exceed 85 dB
(A). In that case operators should protect themselves against damage to hearing - wear ear
defenders.
WARNING:
THIS PRODUCT OPERATES AT 230 VOLT AC SINGLE PHASE MAINS VOLTAGE.
READ ALL THE SAFETY INSTRUCTIONS BEFORE USING THE MACHINERY.
OBSERVE ALL THE LOCAL SAFETY REGULATIONS.
This product Is “CE” marked and complies with all the relevant European CE directives for LVD,
EMC and Machinery safety.

CORRECT DISPOSAL OF THIS PRODUCT
This marking indicates that this product should not be disposed with other household
wastes throughout the EU. To prevent possible harm to the environment or human
health from uncontrolled waste disposal, recycle it responsibly to promote the
sustainable reuse of material resources. To return your used device, please use the
return and collection systems or contact the retailer where the product was purchased.
They can take this product for environmental safe recycling.
600W ANGLE GRINDER
67071c67063c
UK plUg REwIRINg
Your appliance operates on 230-240V-50Hz AC Mains and comes tted with a 3-pin
BSI Approved plug, so that it is ready for use by simply plugging into AC Mains.
Should you need to change or ret a plug, proceed as follows:
IMPORTANT:
The wires in the mains lead are coloured in
accordance with the following code:
BLUE : NEUTRAL (N)
Brown or RED : LIVE (L)
As the colours of the wires in the mains lead
of this appliance may not correspond with the
coloured markings identifying the terminals in
you plug, proceed as follows:
The wire which is coloured BLUE must be
connected to the terminal which is marked with
the letter “N” or coloured BLACK.
The wire which is coloured BROWN must be
connected to the terminal which is marked with the letter “L or coloured RED.
Always ensure that the Mains Cord is located into the Plug through the Cord Guard
or Cable Clamp, and that the Cord Guard screws are lightened to clamp the Cord
(outer sheath and inner coloured wires) in position in the Plug. Make sure the Plug
top is also fitted securely.
This appliance must be protected by a 3-amp fuse in a 3-amp type (BS1363) plug.
Should you need to replace the fuse, use only an ASTA approved BS 1362 fuse.
This manual suits for next models
1
Table of contents
Other Marksman Grinder manuals
Popular Grinder manuals by other brands

Parkside
Parkside PWSA 20-Li B3 Translation of the original instructions

Festool
Festool DSG-AG 125 Original operating manual

Hitachi Koki
Hitachi Koki G18SE3 Safety instructions and instruction manual

Metkon
Metkon MOBIPREP Operation & instruction manual

Bosch
Bosch Professional GWS 18V-180 PC Original instructions

Klutch
Klutch 29155 owner's manual